Garden mill with her hands according to the drawing. How to make a decorative mill for giving - ideas and drawings with sizes how to make a soft toy mill with your own hands
The content of the article:
The windmill is a facility on a homeland territory that bears ancient greatness and wisdom, which since ancient times was used for grinding crops, and today it can be an excellent decoration of the site and game room for kids. In addition, the structure can be accommodated under the shopping needs: use as a premises for storing garden inventory, and if desired and as a wind generator for electricity. If you set the goal to build a mill on your site, you will find a lot of useful information in the article.
Features of the construction of windmills
Today on outdoor territory You can see facilities that do not have a functional purpose. These buildings include a windmill, copying ancient buildings.
Standard construction It has the shape of an equilibrium trapezium, with blades that are fixed to one wall. The blades can be fixed or rotating. For convenience, it is made of several parts that are collected in a specified location.
The windmill is simple - it consists of three main parts:
- Housing. It is made by four or pentagonal. Dimensions choose the owner, they are mainly dependent on the designation of the construction. For example, if children play in it, the platform should be massive, and the structure itself is securely fixed so as not to overtake. Often the base is made of concrete.
- Blades. On decorative mills, the shape and configuration of the blades does not matter. If they rotate the mechanisms, they are manufactured by large, according to certain rules.
- Energy Installation. Used only in the case of electricity generation. It is difficult to make it hard, so all parts electrical system Buy. Installed knots into the inner cavity of the structure.
- To disguise places that are not intended for prying eyes, such as sewer hatches.
- Built from lightweight material design can act as a protective cap for engineering structures.
- A durable large structure becomes a playroom for children.
- In the construction of the garden inventory often store.
- Stone mills are combined with a mangal.
- The design is sometimes used to scare the mole. The rotation of the blades creates a vibration that is transmitted through the legs on the ground and scares the animals.
Preparatory work

Before making windmill, draw her sketch on a scale with all the sizes by which you can define the number consumables. In our case, the size of the design nodes will be such: a large base - 1.5-2 m; The height of the construction from the lower base to the roof is 2 m; Roof - 1.2-1.3 m.
For the manufacture of parts, the following materials will be needed:
- Thick plywood or a $ 15-20 cm wide and 2 cm thick - to create the base of the mill;
- Wooden lining - for the case of a housing, you can use a low-quality material;
- Thin rails 20-40 mm - to form a frame;
- Locks-layouts - for the manufacture of blades;
- Corners - for climbing gaps in the joints of parts;
- Nails and screws;
- Olife or varnish - to create a protective layer on sawn timber;
- Long bolt with nuts and washers - for fastening the blade;
- Long studs - to rotate the top.
To extend the service life, cover lumber with special impregnation for wood (Aquatex, Pinotex, Belink, etc.). They reliably protect the tree from atmospheric precipitation, fungus, and pest insects. Apply a liquid into 2 layers after drying the previous one. Before the procedure, make sure the money is safe and accurately secure yourself individual means protection.
To speed up the work, you will need a saw, drill and screwdrivers, electrical plans and grinding machine.
How to make a windmill in the country
Consider the sequence of operations during construction simplest design. It consists of 3 parts - the bottom, medium and top. You can make separately each node, and then transport them to a predetermined place and collect there. Below is a sequence of building assembly.
Instructions for the construction of a decorative windmill

Consider an example of manufacturing a design with rotating blades and the rotating upper part. The structure is intended only for the decoration of the country area, another practical value has no.
Perform operations in such a sequence:
- Determine where the construction will be located. Mill with rotating blades build on open platformwhere there is always windy, which will provide constant rotation of the blades. Perfect option - Lawn with mix bears, against which it looks very good.
- Clean the terrain from vegetation, align the surface. Place under the mill construct - concrete, lay out a stone or sidewalk.
- Make the base of the structure. To do this, cut 2 squares from thick plywood, which will serve as platform sites. In our case, 30x30 and 40x40 cm blanks are used.
- Determine the centers of squares and drill holes through them.
- Collect the framework of the mill. First, cut off the rail 50-60 cm long. Fix it to the center of 30x30 and 40x40 cm sites, screwing the screws through the performed holes. Measure the distance between the upper and lower platforms and the size obtained cut four rakes.
- Secure them in the corners of the workpiece. Middle auxiliary detail remove. Check the correctness of the assembly of the diagonal of the design, which should remain the same. Thus, you will receive a frame base frame, outwardly resembling stool.
- Come to the bottom of the leg to raise it over the soil and protect against wet soil or grass. They are attached to K. inner corners Designs.
- Install the frame vertically and check the location of the playgrounds in the horizontal plane. Repair through the length of the leg length by changing the length.
- So that they do not rot from touching with damp soil, they need to be isolated. Good decision is the use of PVC pipe suitable sizes. Cut from it 4 pieces of 20 cm long. In them, pressed the wooden bars. Fasten the legs to the mill mill.
- In the lower platform, drill holes for ventilation. Through them will also flow water after the rain.
- Make the top of the mill. To do this, cut out of the plywood two triangular blanks 30x30x35 cm. The bottom part fasten up to a wide board, and at the top connect the details of the rails.
- To make the upper part of the roof turning, you will need a pin with a length of 1.5 m with threads along the entire length.
- Increase the frames already performed in the center and at the base of the roof of the hole to the diameter of the stud. Install the rod vertically in them and secure nuts.
- Install the top of the mill on the heel and secure nuts in a position at which the top will rotate on the rod.
- For fastening the blades, you will need 2 identical ball bearings. Perform through holes in the triangular roof walls, the diameter of which is equal to the diameter of the bearings. The axes of the holes should be placed horizontally and passing over the vertical stud in the housing. Install the bearings in these holes, and in them a long pin. Secure them from falling out of walls with nuts with washers big diameterwhich turn on the pin from two sides of the wall.
- Make a blade from the rake layouts or from another material. They can be made from plastic pipe, cutting it along two halves. The form and sizes of these parts are minimum requirements - so that they are more or less rigid. Connect the blades among themselves with small cloves.
- Find the middle of the intersection of the blades and drill a hole in it.
- Install the collected blades on the horizontal pin at the top of the mill and secure nuts on both sides. It is not necessary to clamp fasteners, the blades must deviate and capture the wind.
- To the roof, on the opposite side of the blades, fasten the steering wheel, which will catch the wind. To do this cut out two trapezoids from plywood and connect their boards in the upper and lower part.
- Sweep the steering wheel to the upper rotating part of the mill. If the blades turned out to be severe, it balances them.
- Welcome a frame, roof and steering wheel with wooden trampling. The work consists in cutting off the blanks of the required length and fasten them to the frame of self-draws. Rights in the corners Close the corners.
- With the help of jigsaw cut the door and window openings. It is not necessary to do them, instead you can install decorative windows, Balconies, doors.
- Roof mill cover with decorative tiles.
- Paint the walls in different colors so that the structure pleases the eye. Sometimes images of colors, butterflies, insects are applied to the surface.
- Install the design to the site and secure to the base in any way.
The design is often decorated using the backlight. To do this, around the perimeter of the door and window Operactions Install spotlights. Thus, the problem of illumination of the site is solved.
Features of the construction of a windmill-electric generator

Windmills can be a source of environmentally friendly and free electricity. Such buildings differ from the traditional or decorative presence of the energy installation.
It consists of 3 main elements: the generator, a shaft connecting the blade with the generator, and the inverter - the device that converts d.C. in variable. You can also enter the batteries in the scheme that will be infected with a working mill and give the accumulated on the network in the absence of wind.
All these elements will have to buy. To collect electrical circuit, It is enough to easily understand the electricity.
Mill usually build from wooden boardsMassive structures are made of bricks and stone.
Nodes of similar structures, compared with decorative, have their own characteristics:
- The case must be durable and securely fixed in order not to vibrate.
- The blades are manufactured taking into account the power of the attached equipment. The more effort, the more is longer.
- For a windmill-generator, the accuracy of the manufacture of parts and nodes is of great importance, which will ensure long term operation of acting construction.
When erecting a decorative windmill, everyone can test their strength in design and construction, because the construction does not require special accuracy and it is allowed to be made from healthy materials. In the presence of the necessary experience, the design will benefit - will become a source of free electricity, but you will have to teach mechanical equipment.

Seeing the neighbor a fun twist windmill, we unwittingly think about making a mill with your own hands for the garden, and that she was not worse than a neighbor. From ideas to incarnation the path is short, the main thing is to stock necessary material, decide on the size, and how to build it, we will teach you.
The first steps
Understanding that not every experienced joiner and competent engineer, we decided to spend a trial lesson. Let's build a decorative windmill small sizeLet it be our draft rehearsal before the present representation. Creating a small copy will help you fill your hand and avoid annoying errors in the construction of a large-scale project.

Naturally, we will need real tools and materials. What should you cook?

Instruments
- saw or Lobzik
- screws
- sander
- washers, bolt (calculating the length of the bolt, folding the thickness of the lining on the skate

Materials
for mill hull:
- sheet of plywood, chipboard or wide board
- 4 wooden Bruck Length - 60-70 cm, cross section 3x3 or 5x5
- wooden rails 2 pcs., Length - 60-70 cm, width 3 cm
- any Mill Material Material (Lining, Reiki)

Most often decorative mills for the garden make wooden
Because this natural material best able to fit into any landscape design garden plot
- material for planks of blades (lining, rail)
- wooden corners (length 60-70 cm, side 3 cm)

for roof
- sheet of plywood, chipboard
- 3 rails (the length is measured when collecting the roof, but not less than 50 cm)
- selfless
Prepare initial materials, proceed to drinking parts.


Drawing of "Body" Mills
- From plywood or chipboard drink two bases: the lower 50x50 cm and the upper 40x40 cm.
- We draw the diagonal cross on the grounds and in its center we drill holes.
- With the help of self-tapping screws, racks to the corners of the lower base, retreating from each edge 2-3 cm.

It is best to establish a mill on cement duty or other reliable material that does not conduct moisture from the soil, for example, a decorative stone or paving
- Insert an extra rail to the hole, it will help us in the frame assembly.
- We put on top of the rail top base and fix it on the self-tapping screw.
- We are wearing a frame of clapboard (horizontally), configuring each bar in the width of the side, to which it is attached, too much screaming.

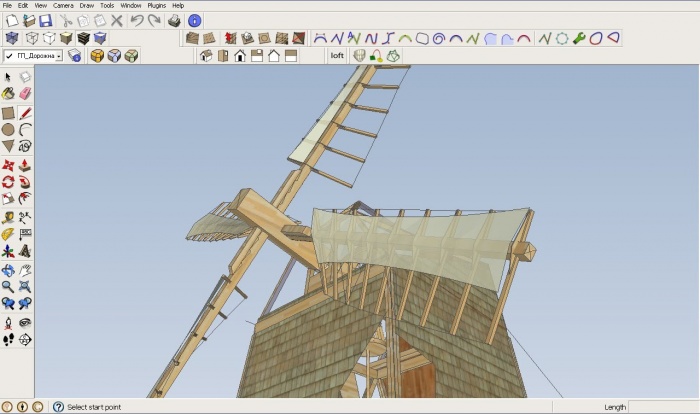
- We proceed to the construction of the roof. We drink two skate from plywood or chipboard (equal triangles). The size of the sides of the triangles choose arbitrarily, but focusing on harmonious combination Its with a frame.

Alya from decorative windmills on your site imitates mini farm
- We connect the skates on the sides and the top to turn out the volume triangle.
- Confirm the roof to the base, screwing the rails with self-draws.
- We do in the front of the roof of the roof hole.
- We collect blades. Two rails lay out the cross, we put through the hole in the center of the cross, the diameter is equal to the opening in the roof.

- We skip the bolt through the hole in the cross and the hole in the roof. Fix it with pucks on both sides and nut.
- We take small nails, harvested racks for the blades, and carefully nail them into all four blades
- We are wearing the sides of the roof with clapboard, vertically or horizontally, as you like more.

- Grind the cover of the mill.
- We close the joints on the ribs of the mill with wooden corners.
Tip! The shape of the blade can be arbitrarily. Traditional figures - a trapezoid or rectangle.

Understanding that even with step by step instructions A person can always have additional questions, we decided to supplement our review with useful advice.

- from the breeds of trees, it is best to take a pine, it is soft and warm, it is good to process and keep a pleasant coniferous flavor for a long time
- to streamline work, make a drawing of the decorative mill and mark on it already performed details

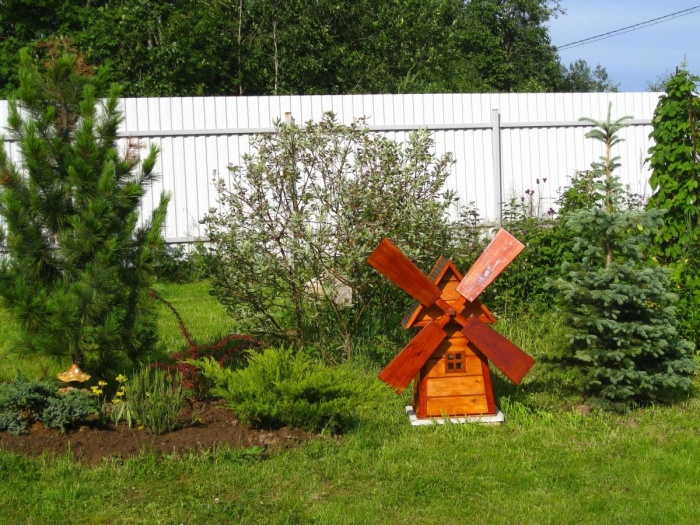
Bright decorative mill Decoration of your country area
- to the mill lived for a long time, treat the wooden parts with a special makeup protected from moisture and wood beetles
- use branded materials to decorate the mill

- do not overload the blades of the mill, correctly calculate their mass so that they do not finish all the construction

- install the base of the mill to the additional podium (cement, stone, paving) to avoid rotting the tree from a long contact with the Earth

Now you know how to make decorative mill do it yourself, but even this small layout can decorate your garden. A little more patience, and your mill will turn into a work of art.

Functions of decorative mill
Desire to equip country plot leads his owners to the most unusual ideas. Times when the cottage was associated with us only with even rows of beds and fruit trees, left irrevocably. Today we use our six hundred and for family recreation, and for friendly parties, and as a creative workshop.

On a modest block of land, the efforts of its owners grow fabulous kingdoms And fantastic landscapes. However, the attributes of rustic life becomes the attributes of rustic life. Painted wells, decorative wooden mills, figurines of dwarves and Leshgo, huge mushrooms And funny animals settled among the beds, creating a special mood.

Some structures of a wooden decorative mill expand their destinations and with light hands The owner turns B. children's house. In large-scale ideas, the mill can be part of the playground, or a shed to store tools. At creative owners, the mill decorative for the garden becomes stylized toilet roomAnd people with engineering skills create existing models of mills.

Naturally, the main function of the decorative mill is a decoration for the garden. However, with her you can hide small elements engineering communicationsBy finding a plot. Hatch septic ventilation tube, Watering crane will be invisible for your guests, and the garden will receive a stylish decorative object. Such mills usually do not require large costsPerformed in small sizes and easily fit into any landscape.
Decorative Mill laid out of a stone for storing garden inventory
From a decorative mill, complemented by side drawers, it turns out a magnificent flower garden. It serves as an excellent addition to artificial water.

The era of agriculture has sunk in the past many centuries ago, but this does not mean that all the events of that time now do not mean anything. For example, today it will be talking about how to make a windmill with their own hands.
Start standing with that why is it, in general, you need? It is unlikely that someone with her help will grind millet in flour. And professional farmers who have for everything for everything are engaged in growing production processes Replies modern machinery. Nevertheless, more and more dachots are wondering how to make a windmill with their own hands?
This excitement is explained quite simple - a windmill that can be easily made with your own hands is a magnificent element of landscape design, which makes a plot of truly unique. Sell \u200b\u200ba garden that has such a raisin is much easier than a plot like two drops of water similar to the neighboring.
In the modern world, uniqueness is valued above all. That is why if you decide to make a windmill with your own hands - this will allow you to transform your garden. In addition, with due diligence and a small excursion to physics, you can use this structure as a source of energy.
Attention ! Windmill can be used as an electric generator.
Windmill on your cottage plot May not only be an element of the landscape that you have done with your own hands, but also the wind energy converter. This will allow to significantly save the family budget.
Additional quality windmills

Before you choose a place to install a windmill, you must consider that this structure you will make your own hands can have several appointments:
- Windmill can hide a number of unsightly places of your site like a sewer hatch.
- Some windmills that can be made with their own hands are performed from lung materials. As a result, it is possible to minimize their dimensions. Therefore, these structures are often used as protective caps for pipe valves and other engineering objects.
- Building can be used as a house for children's games. To do this, you will need to consolidate a little, but there is nothing unreal. The main thing is to make it stable and do not forget about the entrance.
- In the construction of large sizes, made under the mill with their own hands, you can store a varied garden inventory. In fact, it will be a utility room.
- Stone mill can also be used as a brazier.
- This structure with a small modification can be used as scarecrow for moles. It is enough to wear the legs deep into 20 centimeters so that vibrations from the design that will occur when the blades rotate are transmitted to the ground.
As you can see a windmill that you make your own hands, you can find many applications as an element of landscape design.
The role of a windmill in landscape design

The modern world is so diverse that in order for the site to be the best, not enough simple care and smooth beds - it is necessary to stand out. At the same time you need to do everything with the mind. After all, landscape design is a complex science that takes into account the many nuances.
For example, when choosing vegetation, factors are taken into account as:
- shadow,
- humidity,
- combination with other cultures
- necessary irrigation systems, etc.
One of the most trend elements of landscape design on this moment The windmill is considered. The most important advantage of such a structure is that the design can be made with their own hands.
Make a windmill do it yourself
Choose a place and prepare it
Building a windmill is a much more responsible event than it may seem at first glance. It is necessary to take into account many factors to get a truly worthy element of landscape design.
Best for installation fit open space. First, here the blades of the mill will almost always rotate, and secondly, to collect this design It is much easier on the open space, since nothing will interfere with you.
After you select a suitable place for mounting, you will need to remove the site. Remove all embarrassed bushes and hemp. If the grass is too high - cut it with a lawn mower.
Earth before installing the design you need to carefully dissolve. Only after that you can proceed to laying the foundation, more precisely, the platform. To choose right placeYou must clearly represent how your future construction will look like.
Create a plan

As an example, take an elementary structure, which, with due dome, will be able to build every person. It all starts with the creation of a plan:
- Draw a sketch of the layout.
- Through the drawing, you will calculate what dimensions should each detail of the windmill that you want to make with your own hands.
- Choose the optimal material from which the main design elements will be made. The best choice Pine is considered. It has high performance qualities. At the same time, its value is at an acceptable level.
After with the plan and drawing, everything can be started to proceed to the direct assembly process.
Selection of the necessary tools and materials

To create a decent building you need such tools:
- Rule for creating angles.
- Pens, markers, pencils, circulation, markers.
- Construction roulette.
- Drill with a set of different-caliber nozzles.
- Skuropholder or screwdriver. Also for this purpose you can use conventional drill with a special nozzle.
- Hammer, saw, jigsaw.
- Bolts, nails, washers, self-tapping screws, screws. The length of the elements directly depends on how thick boards you will use.
- Sanding paper for grinding elements. You can also use a grinding machine.
With the help of these tools you can make a great windmill with your own hands, which will become an excellent addition to your concept of the country landscape. Also to embody the idea you will need such materials:
- To make a windmill with their own hands most often use Paneur or lining. Wide boards Excellent suitable for the hull.
- To make the walls with your own hands, use bars.
- For the sheat, any material will suit.
- To make the blades, use metal racks or pipes.
- Corners.
- The roof can be made of plywood. As fasteners Use rails.
- In order to secure the paddle screw with their own hands you need a spire and bearing.
After all the materials and tools are collected, you can make a windmill with your own hands.
Marking design
After all the drawings are made, and the desired inventory is assembled, you can proceed directly to the design markup with your hands:
After you make a windmill markup with your own hands - carefully cut down all the elements, pass them away, treat them special compositions And only after that start the final assembly.
Treatment
For the impregnation of the tree it is best to use the following compounds: Pinotext, Aquatex, Belinka.
Important ! Impregnation must be made in 2-3 clips. This ensures protection resistance. At the same time, each layer must have time to dry.
Assembly

After you complete the processing of all parts of the windmill, it will be possible to start its assembly with your own hands. Just follow this instruction, and you can do everything yourself:
- Crerate lateral parts with the help of rails.
- To make the base of the windmill do it yourself, use two squares that have holes in the middle.
- Connect the base and the housing of the windmill with self-masses.
- Skolit two triangles whose bases are 38 cm, and the side 35 and a half.
- On both sides, screw to the triangles of Phaneur.
- The roof must be made of two parts. Each will go to five pre-elements prepared in advance.
- Hardening windmill Make your own hands using wooden plates.
- On the ends of the blades, fasten short rails and screw the circles in the center. Then drill in the middle of the hole and install the hairpins. You also need to do with the end.
- Secure the spire. Whole design with nuts.
At the end, put on the cover on the body that you did with your own hands and secure everything with self-draws.
The detailed process of assembling the windmill device you can see on the video below.
Decoration
After you made a windmill exclusively thanks to your hands, you need to give it an appropriate look. For this you can use varnish. He will give your construct completion.

Attention ! If the elements made of wood are processed not high enough, it is better to use paint.
To give a windmill additional entourage its elements can be painted different colors. You can also add drawings like flowers, butterflies or insects. Each of them is easily done with their own hands, if you use a little imagination.
RESULTS
As you can see, make a windmill for everyone. Main, on initial stages draw the correct markup and pick up a good place. Also, it is also necessary to decide in advance what kind of unique qualities will have a structure.
The times, when to get flour, it was necessary to build a large stone mill, have long been rushed into the fly. Modern devices For grinding grain, it is distinguished by practicality and compactness, and allow me to get flour from different types of grain crops. At home, you can make the mill of two types: manual and electric.
The electrical homemade mill can make flour both rough and medium, and fine grinding. The size of the fraction is set in the settings. Pluses of the homemade mill for grain - the ability to process the most different raw materials: rice, buckwheat, wheat, soybean, rye, corn, oats or millet.
The power of the simplest home device will allow to grind to the foam-shaped state in five minutes of corn bucket, and a similar amount of wheat is in just two minutes.
Required materials and details
Make a mill with your own hands is easy if you have all the materials and tools. Before making a mill, it is recommended to explore the schemes and drawings well. You can find them on the Internet on any thematic forum. The drawings will help to understand the principle of fastening parts, electrical nodes, cutting elements, and avoid many errors in the assembly.

The device mill includes:
- Motor (the motor is suitable from the old washing machine),
- Motor support
- Stanno
- Taking bunker
- Rotor and stator,
- Bulk bunker.
From the materials you also need to have:
- 20 bolts M6,
- Steel corners
- Sheet steel with a thickness of at least 6 mm,
- Tie
- Coupling
- Sheet steel for the manufacture of the cover, a thickness of at least 3 mm,
- 10 screws M6,
- A pair of bearings, number 203.
Manufacturing process
Grain chopper design is very simple. Manufacturing also does not require special efforts, if you buy everything required details. Some craftsmen prefer to make houses not only the device, but also component parts.
In order to collect a completely homemade mill for grain, you need experience on turning machine and drilling equipment.
Rotor assembly
The most important element of the electric mill - the rotor. The process of its manufacture is quite laborious, and before starting work, you need to remember several important points:
- The shaft of the rotor made should be alternating,
- Round steel shaft is done,
- The work process is divided into several stages.
The first stage includes the preparation of metal blanks. The billet should have several identical holes with a radius of 5 cm. The second stage is the erase of the outdoor layer of the workpiece so that in the size of the flow decreased to 10.5 cm. With this size, the working teeth of the future rotor opens.

Next, the rotor is poisoned to hardening. Hardening occurs in two stages. The first is in the oven at a temperature of eight hundred degrees, the second is in the oil container. It is not recommended to cool the workpiece cold water: Metal will become fragile. Next step - vacation: the rotor heats up to four hundred degrees, and left when room temperature until full cooling.
The rotor is attached to the shaft with two bearings, which increases the strength of the mill. A small remote ring is attached to the shaft between the bearings. They allow bearings to move on the shaft to create a larger tension.
Assembling stator
The stator at home is very difficult to do, so it is recommended to buy already ready element. In the stator make several holes with a thread for covers from the bearings and the stator itself, as well as for the nozzle and box of the boot. For greater accuracy of the mill, the mill needs to be correctly set at the coordinate stator. This is done with several bolts.
Build bed
An important detail of the mill is both the bed. The base is made of thick steel sheet. The stator is attached to the bed with the help of screws that at the same time will hold the nozzle. If a removable nozzle is planned, it must be fixed to the imaging at the base corresponding to the diameter of the part. Removable nozzle is held only by friction force.
It is made of pipe cutting pipe, a diameter of about 3 cm. Pipe may have round cross sectionand square. Next is the box to load from the iron sheet. Iron leaf bends in fit form, and the seams are disappeared. Finished box It is installed on the stator, and is attached to bolts.

Mounting engine
Work mill for grain is carried out by an electric motor. Together with the engine you need to have:
- Capacitor,
- Toggle
- Fuse.
- Motor is installed together with component parts per dielectric plate.
Important moment: the engine shaft must have a coaxial location with crushing rollers, and a coupling is used to transmit the rotational element.
The device is ready for work. It remains only to fall asleep grain into the bunker to download and turn on the device.
Manual mill
The mechanical mill is made with their own hands much easier than an electrical analogue, and its performance is quite high. It consists of two parts - millstones and the core with a handle.
Millstone for mill
For a productive mill it is very important to find a good neck. The subsequent grinding and durability of the crusher depends on the quality of the stones. Usually suitable stones You can find in special workshops, or find on the banks of the river and process yourself. The processing of future millstones is made using the Bulgarian with diamond disk At least 23 cm in diameter. To do the holes in the center of the stones, a powerful drill is needed. The optimal diameter of finished millstones is 22 -24 cm, and the height is 10- 12 cm. You can make a millstone and bigger sizeBut smaller is not desirable. Than more weight Stones - the more qualitative will be grinding in flour.
The manual mill should consist of two millstones and bases. Upper millstone is referred to as the runner, and the bottom - bottom. The runner is usually done easier, since after each work cycle it is raised to extract flour residues. The runner necessarily breathes a hole for receipt to the center of grain. Drill a special drill with a diamond coating better, and in the process, cool the place of drilling with cold water.

The next step in the manufacture of a homemade grain mill - cutting out notes in millstones. They must have a shape of a furrow with a triangular cross section, a width of about 10 mm, depth - at least 2 mm and at least 4 mm in the bottom and the runner, respectively. In the center of the runner, four large grooves the depth of eight and the width of fifteen millimeters are made. Understand the location of notches and holes will be easier if you find ready project or drawings of a milling manual mill.
Production of the isow
Homemade grain mill must have a durable wooden exa. It serves as a support for the lower millstone and center the runner. At the bottom of the wooden island there is a small neckline for flour. Hole can be closed with a cell with a cell desired size - Flour will be signed independently, and will not require additional processing. The runner attacks the clamp from the metal to which the handle is attached.

Mill with her own hands made on this scheme will last for many years, and can grind the most different types and types of grain.
Planning and creating the landscape design of the territory, it is necessary to think through the easiest things. Plants, shrubs and trees are the basis, but it is necessary to pay attention to the decor. You can choose a lot of options: from clay statuettes to crafts from a tree. The last group includes many interesting things, but paying special attention to a small mill. Make a decorative mill for the garden with your own hands, she will be able to add any plot and become his highlight. This article will give instructions for its manufacture.
Preparation
It is not worth eating a high design, as it will be inappropriate. So you will choose your choice on medium height In 1 m. Such a decorative mill will be able to fit into the landscape of a small garden. So that in all details to figure out how to make a mill, you should start from the very beginning, that is, with the selection required tools and material.
List of materials:
- lining Type Block House (30 × 90 × 2000 mm) - 5 pcs.;
- bilateral lining (8 cm) - 6 m;
- self-tapping screw (6-7 cm) - 100 pcs.;
- self-tapping screws (2-2.5 cm) - 100 pcs. (allowed to replace nails);
- rake (4 × 4 cm) - 9 m;
- rake (3 × 3 cm) - 2.6 m;
- plywood for a circle (18 × 36 cm);
- laying (wooden rails 4.5 × 1.5 cm) - 8 m;
- a threader for nut (5-7 cm) - 50 cm;
- bearing ( inner diameter is 5-7 cm) - 2 pcs.;
- antiseptic;
- paintwork material (varnish or paint);
- wooden corner (3 × 3 cm) - 40 cm;
- nut (diameter 5-7 cm) - 5 pcs.;
- washer - 2 pcs.

List of tools:
- roulette;
- manual Pillet (Electrolovka);
- drill;
- feather drill;
- sandpaper;
- flomaster;
- cornel (to create direct corners).
Note! When choosing all lumber to pay attention to the available species of trees. These include pine, which will be perfectly combined with other materials.
Production of details
In order not to confuse when performing all actions, you should adhere to a certain order. The algorithm is simple enough and is the following steps.
Slicing blockhaus

The planned design will consist of the main part. In turn, she is going out of 4 equal trapeats: facade, back and 2 sides. Each element includes 6 segments of the Haus block, which are placed from more to less. So, from the bottom side, each element should be 2 cm more, which will result in the desired form of a trapezium.
Thus, as a result, 4 elements should be released different lengths In step 2 cm from 35 cm to 25 cm. Also from the residue it is necessary to make a square base for the design. For this, cutting elements are performed clearly at right angles in the amount of 4 pcs.
Note! The base size must fully coincide with the element of the smaller length. In this case, 25 cm.
Slicing of other elements

With the help of roulette and pencil, the rails are carefully placed to get bars as a result.
4 × 4 cm rail:
- 54 cm - 8 pcs.;
- 38 cm - 8 pcs.;
- 35.5 cm - 4 pcs.
From the rail 3 × 3 cm:
- 54 cm - 4 pcs.;
- 10 cm - 4 pcs.
The length of the lining for the roof should be equal to 36 cm. A total of 10 identical elements should turn out. To obtain smooth and clear ends, art is used. On paper, an anoscele triangle is drawn, the base is 38 cm and the height - 30 cm. According to the resulting scheme, 5 strips of cladding in 2 copies are cut. As a visual manual, use the drawings below.


In addition, the cutting of layouts for the sail in parameters 4.5 × 1.5 cm is immediately performed. As a result, such segments should be released:
- 91 cm - 1 pc.;
- 45.5 cm - 2 pcs.;
- 19 cm - 20 pcs.;
- 26 cm - 4 pcs.;
- 17 cm - 4 pcs.;
- 8 cm - 4 pcs.
On the plywood circulation, we supply a circle with a diameter of 17 cm, and then cut the jigsaw on the office.
Note! For the drawing you can use any large sheet Paper, such as wallpaper. But it is better if it is a cardboard or watman of a big density.
Processing details

After all the components are completely prepared and decomposed, you should not hurry to start assembling. An important step here is processing and preparation. So, with the help emery paper All elements obtained are sandwiched. Special attention is paid to the places of cut and ends. To exclude the possibility of getting injury, the details should not have a jar.
To protect the future mill from the influence of moisture and sharp temperature differences, it is recommended to process wooden elements Special antiseptics. Many modern means Also will minimize the likelihood of fungus.
Assembling mill

The assembly of the entire design is also broken into three main stages: the assembly of the mill, roofs and windmill. We proceed with the most main part:
- Lay out the segments of the Haus block in the right order From Niza to the top: from 35 cm to 25 cm. To the trapezium obtained on both sides we apply a 4 × 4 cm rails with a length of 54 cm and fix using self-samples (6-7 cm) along the edges. Similar actions are carried out for the remaining three sides. We get ready-made 4 sides.
- Now it is necessary to assemble the box of the mill from the resulting parties, with the help of a 3 × 3 cm rail, 54 cm long. We apply them between the joints and screw themselves with the screws (6-7 cm) at the bottom and at the top.
- There are 4 elements from a 3 × 3 × 3 cm long using a 3 × 3 cm rail between them. We note that the height of the elements of the Haus block is 9 cm, so the rails should perform a little.
- The base is fixed to the bottom of the mill with long screws. Screw them need from the inside to protruding rails.
Note! When executing work on the assembly of the base of the mill, it is necessary to carefully check and lay all the elements in the correct order on the table in order not to confuse them. Otherwise, you will have to redo work.
 Collect the roof is somewhat lighter, since the whole process is divided only into two stages. First, with the help of the previously drawn, the ends from bars of 4 × 4 cm into a triangle were pecked. It is also necessary to make two triangles. It will take 2 bar for them with a length of 38 cm and 4 to 35.5 cm. The ends of the bars must be cut at an angle, fasten with self-drawers, as a result, identical triangles will be obtained. They are connected using bars 38 cm on top and bottom.
The second stage provides for fixing the lining to the prepared frame of self-draws on both sides. For the rope skate, it will take 5 elements with a length of 36 cm. It remains only to fix the decorative horse from the angle of 3 × 3 cm.
Note! For the beauty of the roof, the roof should speak a little ones, so the surplus is not cut.
Build windmill

By its form, the windmill resembles a cross, so the framework must come out with cruciform. For this, the longest rail is taken as the basis - 91 cm. Then the scores are screwed at 45.5 cm. It turns out the necessary form. Next follows a step-by-step process.
- From each end of 4 parts of the frame, a strip of a length of 17 cm is attached so that the result of a swastika form was formed. Now to the added bar, you must parallel to fix 26 cm bar, and close the resulting rectangle of a piece of 8 cm. We are cutting out a frame of 5 plackets 19 cm long with a step of 2 cm, navigating them with small nails. Blades are ready.
- For the axis of rotation in the center of the windmill, the two screws are fixing two circles of plywood. In the center drills through a drill, the diameter of which must fully match the spider. In the end of the roof of the mill at an altitude of 9 cm in the center, the hole is also drilled in accordance with the bearing diameter. Hammer score bearings. Take the spire, put on the washers and fix the locknut (a simple nut) is suitable. We wear 2 nuts from above, then the windmill itself, again the nut.

It remains only to install the roof, which together with a fixed windmill is put on the frame of the mill and fastened from the inside long screws.
Note! To drill a small hole for the bearing in the roof, a feathery drill is used.
Latest strokes

At the final stage, a finished decorative mill is stained with varnish or paint. When the paint layer is driving, you can place a mill in the prepared place of the garden. There should be a lack of direct contact with the Earth.
To do this, you can put it on a large flat stone or prepared concrete site. You can also attach to the carcass of the mill legs made of durable plastic, which are immersed in the ground.
Note! Inside the mill, the air will be well circulated, and therefore the likelihood of the appearance of mold and rotten is reduced.
The mill made independently will look appropriate in any part of the garden. Ideal if there is a beautiful and trimmed lawn nearby, as well as several perennial plants. The decorative mill looks good at any time of the year: among the violent greenery, fallen yellow foliage, as well as slightly patient snow. But if you want it to serve for a long time, it is better to hide it for the winter.
Video
With wheel


 What is a hot water supply of an apartment building
 Water supply of an apartment building
 Calculation of the Load for the foundation Installed Electrical Instruments