How to assemble the rafters of a sloping roof. Sloping roof: the possibilities and the device of an unusual design. Installation of floor beams
To use the entire possible area, give the house originality and significantly reduce heat loss through the roof - these are the tasks that the attic solves. If there is a certain margin of safety at the foundation in this way, you can turn cottage in a two-level. It is also attractive that a mansard roof was built with your own hands, even without the presence of special construction skills. It is important not to be mistaken with the choice of materials and do everything according to the rules.
The windows on the regular floor are located in the walls. There are no or almost no walls in the attic. They are replaced by a roof. Therefore, the windows are made special: they not only have to let light into enough, but also withstand wind and snow loads, which are much greater on the roof than on the walls.
Roof windows
When planning an attic, it is worth considering the recommendations of SNiP. They recommend making the area of windows not less than 10% of the floor area. So if the attic will be divided into several rooms, there should be a window in each.
Of all the methods shown in the photo for arranging roof windows with an attic, an inclined installation is the easiest to implement. In this case, it is necessary to ensure the proper degree of waterproofing of the junction, as well as to use special models with a reinforced frame and reinforced glass - the load on the surface can be significant.
Advantages of a tilted roof window:
- more light, less sharp boundaries of light and shadow;
- the surface of the roof remains flat, its relief is not complicated;
- relatively easy installation.
When planning such a window, it must be remembered that its area increases with an increase in the angle of inclination. At what height it is more convenient to install such a window and how its height increases in centimeters depending on the tilt, look at the photo.

The steeper the slope relative to the floor, the lower the window height should be.
The width of the window frame should be 4-6 cm less than the step between the rafters. Then it can be easily installed without disturbing the structure of the frame. If the window is wider, it is necessary to make a reinforced beam above it, calculate the load.
If you need to have a larger window, it is easier to put two narrow ones side by side. They look no worse than one big one, and there will be fewer problems.

When installing a dormer window, the geometry of the roof becomes more complicated: a valley appears on top and on the sides. Because of this, the rafter system becomes more complex both in planning and in assembly. The complexity of the installation of the roof covering also increases. All valleys are where leaks are most likely to occur. Therefore, everything must be done very carefully here. In regions with big amount it is advisable to install snow holders above such windows: so that during a sharp descent they are not blown away.

Arrangement of a vertical window-dormer in the attic roof
The advantage of such a window: you can stand near it in full growth. But they let in less light, the relief becomes more difficult and the roof becomes more problematic.
A recessed window is usually used if you make an exit to the balcony through it. In other cases, this method of arrangement is not the best option: little light enters, the shadows turn out to be very deep, which is tiring for the eye, the geometry also becomes more complicated, although not to the same extent as in the previous version.
The easiest way is to make a window at the end of the attic. In this case, you do not need a reinforced frame or reinforced glass. It is quite enough just high-quality glasses. It is this option that can most often be seen on summer cottages: This is the most inexpensive option that you can easily do yourself.
Rafter system
At self-construction private houses with an attic usually choose a broken roof. It allows you to get a room of a large area, larger than under the gable.

With an equal width of the base (house), an attic room under a broken roof turns out to be larger than under a conventional gable. The rafter system becomes more complicated, but gable roof with an attic under a sloping roof is still more popular
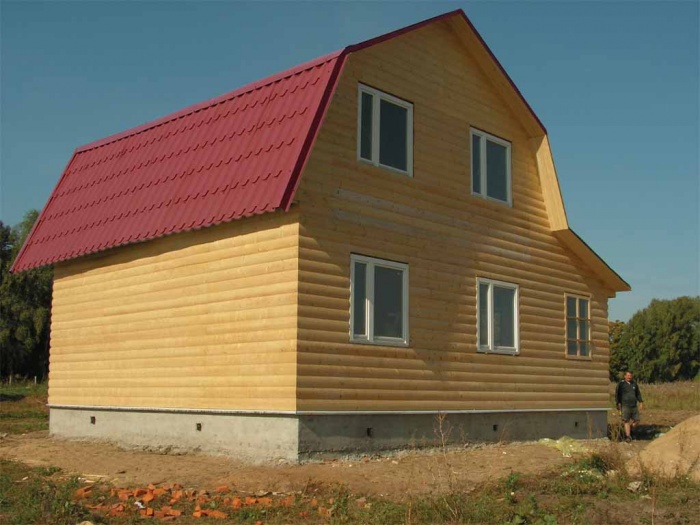
The construction of the sloping mansard roof is such that the overhangs can be lowered quite low, giving the house an interesting look. But the long overhang of the roof serves not only a decorative role. They also cover the upper part of the wall from precipitation and divert the bulk of the water away from the foundation. Although when planning you need to keep in mind that in strong winds they increase windage. Because of this, it is necessary to use more powerful boards and beams. Therefore, the size of the roof overhang is chosen based on several considerations, the main of which is weather conditions.
Tilt angle
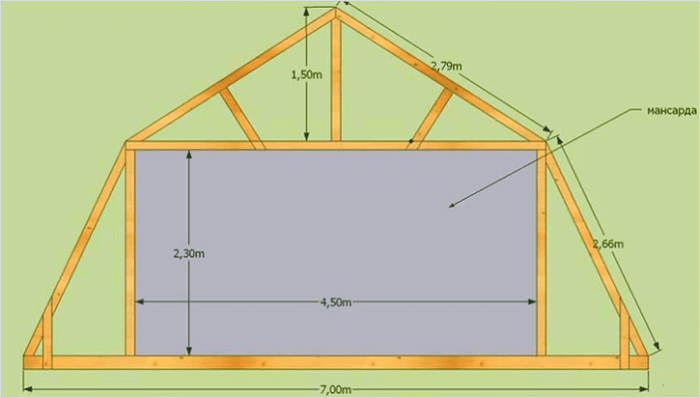
Depends on the roofing material, but most of all - on the region and weather conditions. The classic version is shown in the figure: the lower slopes in relation to the attic floor plane are inclined by 60 °, the upper ones - by 30 °. Based on these data and the parameters of your building, all lengths can be calculated. It is only worth considering that according to SNiP, the ceiling height in the attic cannot be less than 2 m. Then, by definition, it is an attic. A person will feel comfortable if the ceiling is raised to a height of at least 2.2-2.3 m. Based on this, according to the rules of geometry, calculate the required lengths.

In the classic version, the load from precipitation on lateral surfaces may not be counted. Precipitation will be able to stay only on the upper part, the angle of inclination of which is less than 45 °.
In general, the inclination of the side surfaces usually ranges between 45 ° and 80 °. The steeper the slope, the more windage it has, this must be taken into account: in regions with strong winds it is better to make flatter roofs. Then wind loads will be perceived much better.
Types of rafter systems of sloping roofs

The construction of a sloping mansard roof is one of the options for the rafter system (the most common)
To make a broken roof frame with their own hands, they most often use pine lumber, grade - not less than 2. The choice of the section of the timber and boards depends on the size of the roof, the selected roofing (its weight), wind and snow load in the region, the step of installing the rafters. All these parameters are taken into account in the calculation. The technique is prescribed in SNiP 2.08.01-89 and TKP 45-5.05-146-2009.

One of the options for constructing a frame with hanging rafters
Above in the figure will lead a drawing of a frame with hanging rafters. It can be realized only if the base of the upper triangle is no more than 4.5 meters (in this case, this is the width of the attic room). If more, you will have to make layered rafters, which should rest on the load-bearing wall in the middle (the attic will turn out to be divided into two parts by a row of beams).
Another version of the upper part is shown in the photo below (the picture is clickable). In this case side rafters reinforced with struts. They significantly increase the rigidity of the system.
There is a second way to achieve a similar effect - to establish contractions - in the figure, they are only outlined with barely visible lines. The length of the lateral rafter leg is divided by three, and contractions are set in these places. They will be needed if the roofing will have a solid weight.

A variant of the device for the rafter system of a broken roof - with struts that increase the rigidity of the system
For a small building in terms of dimensions, the roof frame can be generally simple: at the top there are two hanging rafter legs, a tightening, floor beams, racks and side rafters (pictured below).

The device of the rafter system of a broken attic roof for a small house
How to calculate a sloping roof
The broken roof attic of a small house (no more than 6-7 meters wide) has been built so many times that, based on experience, we can say which materials are worth using. Many parameters are dependent on other materials. For example, the step of installing the rafters is tied to the parameters of the insulation. In order to have as little waste as possible during insulation, installation was easier, it is necessary that the distance from one rack to another be slightly less than the width of the insulation (by 20-30 mm). So, if you are going to use mineral wool, its width is 60 cm. Then the racks must be installed so that the gap between two adjacent ones is 57-58 cm and no more.
The width of the board for the rafter leg is again determined based on the insulation. For the middle zone of Russia required thickness basalt wool is 200-250 mm. That's not all. In order for the insulation to dry out, a ventilation gap of 20-30 mm is required (without it, condensation will gradually rot the wood and render the mineral wool unusable). In total, it turns out that, at a minimum, the width of the rafter leg should be 230 mm. Board thickness - at least 50 mm. This is in regions with light winds and not very heavy snowfalls. To summarize, for all rafters - ridge and side - a board of 230 * 50 mm is required.
If lumber with such characteristics turns out to be too expensive, it will be possible to make insulation in two directions: part along the rafters, partly, filling the crate, across. You can lay at least 100 mm of basalt wool, therefore you can take standard board 50 * 150 mm and leave 50 mm for the ventilation gap, or order a non-standard 130 * 50 mm. Look what is more profitable in terms of money.
For racks and beams, it is better to take a bar of at least 80 * 80 mm, better - 100 * 100 mm. Especially in areas with difficult weather conditions - with heavy snowfalls or strong winds.
Order a more accurate calculation from specialists. This is a long-term process, which consists of collecting loads from the roofing material, the structural elements themselves, wind and snow loads. After that, according to a certain formula, there is a selection of elements. For more information on how the calculation is carried out, see the next video.
Do-it-yourself mansard roof: installation procedure
The Mauerlat device on mansard roofs is no different from the standard version. If or logs, the upper crown can be used as a Mauerlat. It is only pretreated with an impregnation with high protective properties.
If the wall is made of foam blocks, a reinforced monolithic belt... On brick wall or folded from shell rock, others similar materials, the device of such a belt is optional. Waterproofing is laid on the wall in two layers, and on top - a timber treated with an antiseptic - 150 * 150 mm or a log. It is secured with embedded pins.

When assembling all elements, long nails are used - at least 150 mm in length. In the most critical places, it is better to connect three or more elements with bolts or studs with double-sided threads. It is advisable to reinforce all joints with steel plates or corners.
The first way
The installation of the attic roof rafters is done in two ways. First: they collect the parts on the ground, then they are raised up in finished form. There, the first to expose the extreme structures, which will become gables. They are placed vertically, secured. It is often more convenient to secure them with long bars nailed to the wall (temporary). The following are inserted into the prepared grooves in the Mauerlat (they are made with the required step). assembled structures... They are exposed strictly vertically, carefully fixed. If necessary, install additional temporary spacers that fix them in the desired position. Side beams are installed.
How to build a sloping roof in this way, to collect nodes, see the video below.
Second way
The second method - the construction of a sloping roof is carried out sequentially collecting elements right on the spot. This method is more convenient if the structure is large and when assembled it can only be lifted using special equipment (crane).
First, the floor beams are laid. Racks and puffs are attached to them, temporary spacers are placed to hold them in the vertical direction. Next, the rafter upper and side legs are assembled, puffs and jibs are installed.
During installation, the following sequence of actions is observed: first, the extreme elements are installed and set in the desired position, securely fixed. Use temporary spacers if necessary. A fishing line, rope, lace is pulled between them, which will serve as a guide for the installation of all subsequent elements. This simple move allows you to get perfect geometry (do not forget to check the slope angle, verticality or horizontalness).
On top of the racks, puffs are attached - bars, to which the side rafters are then fixed and on which the tightening of the upper triangle is installed. Tightens are secured with metal corners... Since the beams are long, they sag. This is further eliminated - after the installation of the upper rafter legs - using vertical beams fixed or adjustable height... And temporarily they can be propped up with racks (so as not to pull the entire system).

To make it easier to maintain the desired angle when installing the side rafter legs, templates are made according to which the cuts are made. But since the geometry of DIY buildings is rarely perfect, adjustments may be needed. To check the resulting angle of inclination, another template is knocked down from several boards, which checks the correct installation.
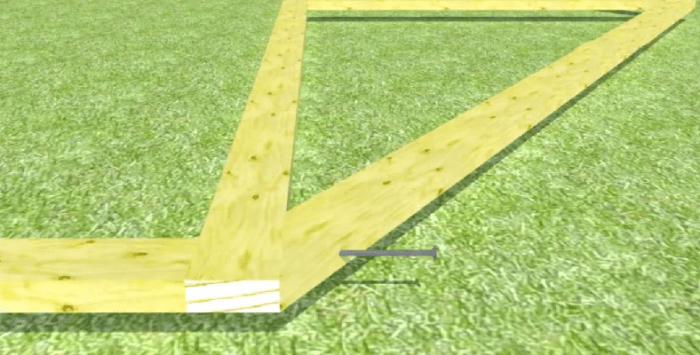
If standard length lumber - 6 meters - is not enough, or they order the required length (expensive) or build up. When building up, two boards at least 0.6 meters in size are nailed to the junction (30 cm on each side of the junction). They are nailed on both sides or bolts are used.

A reliable way to build rafters. The length of the "patch" - not less than 60 cm
After installing the side rafters, it remains to install the upper ones. For them, a template is also made, it is first filed on the ground, and installed at the top.

The top can be made in different ways. Its structure depends on the width of the base. How to do it, see the photo below.

Since the device of a mansard broken roof does not provide for the presence of a ridge, a bar is packed for tightening in the middle, to which the slopes are attached, fixing the triangle in the required position.

Nodes and their drawings
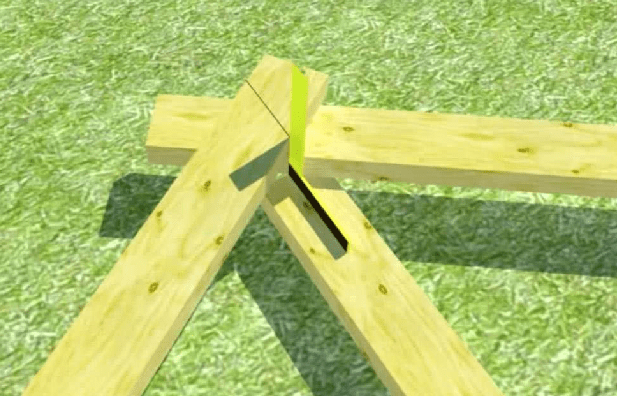
When installing the rafter system, questions may arise about the assembly of nodes - the intersection and connection of several structural elements. In the photo you see drawings of key connections.

The second option is to connect the side layered rafters and the upper triangle. Bolts are used for more reliable fastening.

How to make a do-it-yourself fastening of the upper tegonal and rafter legs on the attic roof
The methods of attaching the rafter legs to the Mauerlat or, as in this case, to the side beam are shown in the figure below. To make it easier to mount a heavy element, a stubborn board (bar) is nailed to the rafters from below, which limits its movement: the board rests against the edge and does not allow it to fall below.

On initial stage construction, when it is far from even before the approval of the project, a potential householder is considering many options of different sizes, number of storeys, planning in search of the most rational option. It has been proven by time, as well as by the experience of thousands of people, that the space in houses with an attic is most fully and effectively used. Due to the residential attic in houses with sloping roofs, the cost of one square meter in them one and a half to two times lower than in similar useful area two-story dwellings.
However, the traditional triangle shape is completely unsuitable for attic equipment. Since its rather steep slopes hide the available space, leaving only a narrow strip with suitable for comfortable life ceiling height.
Therefore, most often the construction of an attic means that the house needs sloping roof... This design is technically more complicated than that of a conventional gable, so it is very important to understand the structure of its rafter system, installation features, if you plan to do it yourself.


Basic structural elements
The sloping roof, resembling a pentagon in shape with an upper point on the ridge, is visually divided into an upper and a lower part. In the upper part, the slope of the slopes is more gentle, it is no more than 20-300, and in the lower part it is steeper, within 50-60 degrees. For its assembly, a mixed rafter system is used, consisting of hanging and layered rafter legs.
To form the necessary geometry of the slopes, to give the structure rigidity, a large number of elements are used, in view of which the sloping roof has an impressive weight. The main constituent parts roofs are rafters, mauerlat, floor beams, and additional - racks, headstock, struts, puffs. They are all made of solid wood. conifers, pretreated with a fire retardant, antiseptic.

- Mauerlat is called a square beam, laid at the base of the roof to distribute its weight evenly over the load-bearing walls, and also protect the rafters from overturning.
- Rafters. The rafter legs, made from smooth, reliable boards, form a slope, converging in the ridge. In a sloping roof, the upper rafters are layered, since they have additional support on the racks. And the lower ones are hanging, because they seem to sag between the floor beams and the tightening. The distance between the rafters is chosen in the range of 60-120 cm, depending on the weight of the roofing material or the width of the insulation.
- Tightening. Also called a transom, a horizontal beam that ties the top rafters to reduce expansion. It also serves as a frame for creating an attic ceiling.
- Racks. Vertical supports, made of timber, transmitting the load from the layered rafters to the load-bearing walls through the tightening. Once covered with plywood, they become the walls of the attic, so the length of the uprights is determined by the desired ceiling height. Although 1.5-1.7 m is enough for arranging a living space, a ceiling of 2-2.5 m is considered the most comfortable, which may well be provided by a broken attic roof.
- Grandma. Vertical suspension that binds the skate to the tightness, compensating for its deflection.
- Braces. Also known as rafter legs, corner supports to prevent sagging of hanging rafters.


Mauerlat installation rules
Before making a sloping roof, you need to building codes lay the Mauerlat. The larger the roof area, the greater its weight, the thicker the timber should be. If for small buildings there is enough material with a section of 100x100 mm, then for houses with a large footage, a bar of 200x200 mm is used.
Before installation, the place of attachment is waterproofed; for this, a roofing material folded in half or several layers of film is laid. The method of mounting the Mauerlat depends on the material from which the house is being built. Most often it is installed on a block concrete screed using metal studs.

So that the strength of the Mauerlat of the sloping roof is not lost, as few holes as possible should be made in it. And the location of the pins should be calculated in such a way that they are not between the rafter legs, and not under them. Otherwise, the holes of the tie-in will be located too close to each other, which can lead to the appearance of cracks, as well as the complete destruction of the Mauerlat.
The sequence of assembling the rafter system
Many instructions on how to make a sloping roof do not describe in too much detail the process of assembling a rafter system, the construction of which is as follows:


Additional thermal insulation
Since the attic room under a sloping roof is used for residential purposes, it is imperative to insulate it. Experts recommend using basalt-based mineral wool in rolls or slabs.
For middle lane In Russia, a layer of insulation equal to 150 mm is enough. You will also need a vapor barrier film, a moisture-proof membrane and a frame on which all this will be attached.

On the inside of the slopes, a counter-crate is being established. For this, a board is used, the width of which is a couple of centimeters wider than the thickness of the insulation, since the insulation should never be tamped.
That is, for the layer mineral wool 150 mm, a 50x200 mm board will do. This gap is also required for air circulation for natural ventilation. The insulation is laid between the beams of the counter-sheathing, and inside it is sewn up with the selected material.
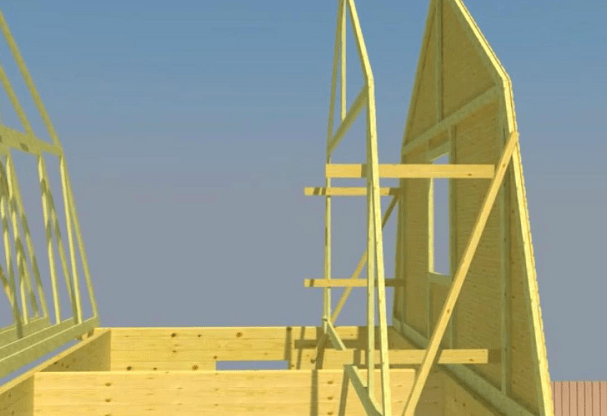
Construction of gables
Pediment - a part of the wall bounded by the roof slopes, and from below by the cornice. At a sloping roof, it has a pentagonal shape. For the construction of the pediment, it is necessary to strengthen the first roof truss, supplement the structure with racks, so that a frame is obtained.
- If windows are located on the pediment, openings are left for them. The rest of the space is sheathed with "inch".
- The gable of a sloping roof can be installed before or after roofing. The first method is good because the slopes will not interfere with the work, and the second because the geometry of the slopes has already been set.
- The gable space also needs insulation, which is most often carried out inside.
- Professional roofers advise using basalt mineral wool or polystyrene-based insulation for thermal insulation of a sloping roof.

The next step will be the installation of cornice boards around the perimeter of the building. The size of the lumber can be 25x150 mm. Then the time comes for the installation of the drainage system, which the sloping roof needs.
It is not difficult to install the structure with your own hands, however, after laying the roofing material, it will be more difficult to do this. If metal gutter clips are used, then they need to be fixed directly to the rafters under the waterproofing, and if plastic - to the frontal board.
Construction of the lathing
The lathing of the sloping roof is a kind of base on which the roof is subsequently laid. It can be solid or lattice depending on the type of material.
- Solid. Perform from sheets moisture resistant plywood, which are laid solid on the rafters. Used for fixing ondulin, shinglas, slate.
- Lattice. It is made of unedged boards, which are laid perpendicular to the rafters. It is used when laying metal tiles, corrugated board.

It is more convenient to do a lathing on a sloping roof, if scaffolding has already been established around the perimeter of the house, they are in any case necessary for the construction of the roof. First, it is fixed on the rafter legs waterproofing film, for this it will come in handy construction stapler... The film is laid with an overlap of 10-15 cm. Then the counter battens and the battens are attached. The length of the boards must exceed the length of the roof to form gable overhang and gable low tide.
Roof decking
The sequence of roofing work on a sloping roof is determined primarily by the material selected. Let's talk about the installation of metal tiles, as they are the most popular in private construction. For laying, you need a powerful screwdriver, a tool suitable for cutting metal, a hammer, a tape measure, a marker, galvanized self-tapping screws with a rubber head. First, the sheets of metal tiles are cut, and then installation, starting with the ridge.
Important! Self-tapping screws should be screwed in at the bottom of the pattern wave. Otherwise, the sheet is deformed, the fastening comes out fragile, which is why the roof will "buzz" in windy weather.

- In addition to the roofing material, the sloping roof must be equipped with other important elements: a ridge board, a snow guard.
- The ridge is installed with an overlap of 10 centimeters on the metal roofing on both slopes.
Snow holders are used to prevent snow from melting, it is a small cornice. They are fixed at a short distance from the end of the slopes on self-tapping screws, taking into account that the snow holders must withstand a heavy load, especially in snowfalls.
A do-it-yourself broken roof will not only save on wages for the brigade of workers, but will give confidence that the processes were carried out correctly, since the construction was carried out in compliance with the technology.
Video instruction
When building a roof for an attic room, it is sometimes impossible to ensure its normal height with the same angle of inclination along the entire slope. In this case, the sloping roof of the house comes to the rescue, the rafter system of which is a little more complicated than that of a conventional gable. Before building such a structure, you need to understand its main elements and nodes.
What is a sloping roof
It is typical for houses with attic arrangement. It has two slopes on both sides. The slope that is closer to the eaves has a greater angle of inclination than the one that is closer to the ridge.
A device of this design is technologically more complicated than that of a conventional one. gable roof, but it allows you to win at the height of the room. Instead of an attic with a sloped ceiling, the owner receives full-fledged rooms. This is achieved by the fact that slopes with a large angle of inclination play the role of a continuation of the vertical walls, and with a smaller one - the ceiling.
A broken roof has two slopes on both sides
The main elements of the system
Before making a sloping roof, you need to understand its basic elements. The structure consists of:
 The main elements of a broken roof
- layered rafter legs, which form a steeper slope (layered rafters are inclined beams resting on two sides, from below - on the Mauerlat, and from above - on the crossbar);
- hanging rafter legs, which form a gentle slope (spacer structure, support occurs only from below, the spacer is perceived by the fight);
- mauerlat - timber, which fits along the inner edge of the outer wall and allows you to evenly distribute the load from the rafters.
- girders (crossbars), in a sloping roof there can be 2 or 3 of them (there are always two, they serve as the upper support for the layered rafters, in some cases they provide for a third run in the ridge, in this case all the inclined beams of the system become layered, there are no hanging rafter legs);
- racks for purlins, which will serve as a frame for the longitudinal walls of the attic (can be installed with a step under the insulation, which will facilitate its installation);
- brace systems, the design allows you to unload the rafters;
- screeds (contractions, tightening), the device of which is provided at the level of the bend of the slope (serves to perceive the thrust from the hanging rafters and as a frame for the attic ceiling);
- pendants (headstock), which is provided for a large length of the scrum and prevents it from sagging.
Choice of materials
To build a reliable attic roof, you need to carefully control the quality of the materials used. For structural elements, it is worth choosing wood of the first or second grade. The quality is also influenced by the time and place of procurement. The best option will be a material with the following characteristics:
 Thanks to resin, conifers are more resistant to decay
- Origin - conifers... Due to the resin content, they are more resistant to decay and destruction. One of the best building materials can be called larch, then pine and spruce occupy their positions.
- The place of growth is the northern regions. The harsher the growing conditions of a tree, the slower it grows. In this case, the growth rings are located as close to each other as possible, increasing strength.
- Cutting time is the end of winter, beginning of spring. Again, completing growth in winter conditions creates a more durable building material.
In addition to high-quality wood, roofing is impossible without antiseptic treatment of all elements.
If necessary, the structure is also treated with fire retardants, which increase the fire resistance.
Work technology
 Frame construction process
- Installing the Mauerlat on the walls. The method of fixing depends on the material of the walls. On brick or concrete beams, it is laid on a previously prepared waterproofing layer. You can use roofing felt (outdated version), roofing felt, linokrom, hydroizol or other bituminous roll materials... Fastening is carried out on anchors pre-installed in the wall. For wooden houses you can consider the option of fastening to staples. On average, the Mauerlat section is taken 100x100 or 150x150 mm.
- Installation of purlins and racks for them. Depending on the constructive solution buildings, drains must be supported either on the floor beams, or on load-bearing walls... Installation on a span of a reinforced concrete floor is not allowed. The device depends on the insulation used: for mineral wool, it is better to put racks with a pitch of 0.58 m, for expanded polystyrene - 0.6 m, for polyurethane foam, the pitch of the racks does not really matter. For the crossbar, the same section is most often used as for the Mauerlat, the rack can be the same cross section as the crossbar (100x100, 150x150 mm).
- Lay the layered rafters. Fastening to the Mauerlat and the transom is made with a cut. For fixing, nails or steel corners with self-tapping screws are used. Additionally, for each or through one rafter leg, attachment to the outer walls is performed. For this, a ruff is laid in the wall. A twist of double wire with a diameter of 3-4 mm is pulled from the inclined beam to the ruff. V wooden house staples can be used instead of twisting and a ruff. The cross-section of the rafters is taken depending on their pitch and the material of the roof covering.
- Install struts. To attach the brace to the leg, nails and a thrust bar are used.
- Installation of trusses. The truss consists of hanging rafters, grappling and suspension. The structure can be assembled directly on the roof or on the ground. The legs are fastened together at the top point with the help of overlays on both sides. The fight can also be double (one board on each side). All fastenings are made with nails, bolts or pins. Studs or bolts are accepted with a diameter of 10 to 14 mm on average.
- Laying a layer of waterproofing.
- Top lathing.
- Insulation installation.
- Vapor barrier and bottom lathing.
- Laying of roofing material.
- Sheathing of the frame of the pediment.
- Ceiling lining and attic finishing.
 Installation of lower and upper rafters
Wood treatment with antiseptics and fire retardants can be carried out both before and after the assembly of the roof structure. It is best to complete this activity immediately after purchasing the material.
 The process of preparing the system for the installation of roofing
Space lighting
The attic device involves two lighting methods:
DIY sloping roof complicates installation roof windows, since most often the role of the walls of the room is played by the racks.
In this case, the space is limited by the uprights and scraps. There is no room for the installation of roof windows. In this case, windows in the gables and dormers are provided. The dormer window of the simplest design is a "birdhouse". Has walls and slopes resting on them.
If you do not plan to sheathe the space along the racks, then you can install skylights. They will give the room a special comfort.
Competent installation of elements will allow you to get reliable protection indoor spaces for a long time.
Sloping roof: rafter system and installation diagram
The structure of a broken roof is not as complicated as it might seem at first glance. We will tell you how to build a sloping roof with your own hands.
Construction of houses

Of particular importance in recent times is given to an increase in the functionality of buildings while maintaining an attractive appearance. A self-made broken roof serves these purposes, which allows you to additionally create living space by organizing an attic room with maximum comfort. A sloping roof is a type of roof that is one of the most difficult to design and build. However, this does not make this type of roofing less popular.
Sloping roof concept
Roofs are called broken because of their shape and the large number of broken lines. At its core, a sloping roof is a type of gable roof that allows you to get a large area of living space on the attic floor. But for many developers, the organization of additional space is not too important, they just like this shape of the roof more than the traditional gable.

Another advantage of the construction of a sloping roof lies in the possibility of obtaining a high ceiling on the attic floor. That is, such a structure can be made higher than an ordinary gable, which often does not withstand the wind load due to too steep tilt angles. Such opportunities are provided by a fracture on the slope: the upper part, which is more vulnerable due to the perception of wind load, has a slight slope, but Bottom part drops sharply down.
Sloping roof device
The most popular is the four-pitched sloping roof, because it is such a structure that ideally combines the low complexity of the construction of rafter systems and the most efficient use of living space. With a similar approach with minimum investment money, you can additionally get full rooms that are completely suitable for living at any time.

The device of a sloping roof implies the presence of sufficiently large rafter structures, but since it is customary to use a modular installation method during its construction, it is possible to assemble the entire system without the use of complex lifting equipment. The uprights and rafters are cut at a certain angle at the fracture of the slopes. For fastening the nodes of the entire system, plywood "kerchiefs" are used, which have a thickness of no more than 2 centimeters.
Similar design hipped roof great for houses with relatively small dimensions, where it will not be possible to make a sloping roof complex shape... And for large buildings, they usually create a slightly different rafter system.
Types of sloping roofs
There are several types of sloping roofs, depending on the number of slopes: single-slope, double-slope, three- and four-slope. As a rule, the comfort of living in the house, as well as the reliability of the building, depends on this parameter.
The sloping roof includes 2 sloping slopes. A pitched roof is a kind of inclined plane fixed to the walls different heights... This solution is the most common, because it involves the creation of a fairly simple rafter system.
The gable roof consists of 2 slopes directed in diametrically opposite directions. This type of attic organization is also very popular. And all because this type of roof is very high quality in use. Vaulted roofs are typical for rectangular residential buildings.

The sloping sloping roof at the end has 1 vertical wall, and the second end is made with such breaks in the profile as the side slopes of the roof have. This structure is less weight due to the absence of one main wall. In addition, a three-pitched roof is equipped when the attic roof is mated with the roof of another part of the residential building.
The hipped roof has broken profiles along all 4 wall slopes. This is the most difficult version of sloped roofs from a technical point of view. But they have the lightest weight.
However, if it is important for the developer, then you can make a heptagon. But projects of sloping roofs with a similar break in the profile are rarely used in practice due to the difficulties that arise in the installation of rafters and the installation of roofing.
Not only houses, but also balconies (loggias) in the apartment can be with a roof, including a panoramic one. It is better to entrust the installation to specialists. Unique glazing balconies with a roof of any complexity.
Sloping roof shape
The shapes of the sloping roof are completely different. Such roofs in most cases have the form of a parabola and are found most often in private rectangular houses. The slopes are trapezoidal along the long sides and triangular along the short ones. Often, drawings of a sloping roof and its rafter system are much more complicated, and diagonal rafters appear in them.
Semi-hip structures are considered a kind of a four-slope broken roof. The half-hip is a kind of end slope, the end of the gable roof is not cut off entirely, but only its lower and upper parts.

The roof at the bottom has a trapezoidal shape, and at the top it is a triangle. TO hipped roofs include such varieties as conical, domed and pyramidal structures. Often such sloping roofs are installed for buildings of a round and polygonal shape.
Construction of a sloping roof
For all the complexity of a sloping roof, the structure can be built with your own hands. Having decided on the dimensions of the product and the layout of the sloping roof, you can proceed to its construction. Attic structures have many features that set them apart from other roofs. If installed incorrectly, the roof may leak, have poor ventilation, and accumulate on top rainwater, ice and snow.
Material selection
The rafter structure for a sloping roof is recommended to be made of wooden materials, which helps to significantly lighten the supporting structure. In this case, the use reinforced concrete structures and metal profiles not desirable.
To form a rafter structure, a wooden beam is required, which is characterized by optimal humidity. For construction, coniferous wood is predominantly used, as an inexpensive and softest material. To form the lathing, you need an edged board.

The lighter the weight of the roof, the ultimately more reliable the entire sloping roof will be. Such materials include metal tiles, soft roofs, galvanized iron and reed sheets. The connection of rafter structures is made using metal brackets and brackets fixed with self-tapping screws.
Calculation of dimensions
Before building a sloping roof, a fairly accurate calculation should be made. The slightest errors in the distribution of loads can provoke a poor-quality creation of a supporting structure, which will not withstand the entire weight of the roof and rafter legs. To make the calculation correctly, you need to have at hand: a roof construction project, a calculator and a tape measure.
Accurately measure all the dimensions of the sloped roof and transfer them to the sketch. It is better to break the roof of such a plan into several different geometric shapes- trapezoids, rectangles and triangles. Next, measure the area of each figure, and by summing them, you will find out the total area of the attic roof.
In order not to encounter a shortage of roofing material during the construction process, you need to make its detailed calculations. It will also help you save money without overpaying for excess material. You already know the total roof area, so you can easily calculate how much it will take to build sheets of roofing material. When calculating, you need to take into account all the subtleties of the roof frame and the presence of eaves with ridge.
Wood protection
Before making a sloping roof and forming rafters, it is recommended to protect the wood from excessive moisture and take care of preventing processes that support combustion. To do this, it is necessary to treat all structures before starting installation with antiseptics and fire-fighting compounds.

In the arsenal protective equipment today there are many compounds that prevent decay of wooden structures. The compositions are applied in several layers using a wide brush so that they penetrate deeply into the wood. When working with such active substances, it is worth protecting hands and respiratory organs with a mask and special gloves.
Location of floor beams
Before you start placing floor beams, you should definitely watch a video about a broken roof with your own hands. Then install the Mauerlat and floor beams. Select the cross section of the floor beams 100 by 200 millimeters. Along the two lines of the rack, set the extreme beams from the timber strictly vertically, then pull the laces and install the intermediate ones.

A distance of no more than 3 meters is allowed between them. All racks are usually fixed with temporary struts. The height of the racks is chosen 10 centimeters more than the planned height of the ceilings in the rooms.
I would like to note that when they do new roof on an old house, often when looking from above at the laid out floor beams, a strict rectangle is not obtained. In order to facilitate the work, it is necessary to put the racks in such a way that a rectangle will necessarily turn out of them.
Side wall frame
Place the girders from the board on top of the uprights and install the remaining uprights. The resulting structures will serve as the future frame of the attic side walls. Install and attach the braces on the purlins. Under each of them, in the middle of the span, it is customary to put a temporary support so that when installing the rafters of the upper slopes, you can safely walk along the puffs and not be afraid that they will break.

After installing all the ties, secure them on top with a board, and the structure will become more rigid as a result. Following the instructions on how to build a sloping roof correctly, it is worth installing side rafters and plugs for insulation, after which you can start installing the rafters of the upper slopes.
Installation of upper slopes
First you need to make a rafter template. Take the desired piece of board and fasten it temporarily to the extreme transom in a vertical position. One of the top corners of the board must exactly coincide with the geometric center of the sloping roof. Make 2 rafters according to the template and install them, securing them with a brace.
Next, you need to put all the other rafters. If you are interested in how to build a sloping roof according to traditional version, then remember that it is enough to install 4 struts on the roof - 2 each different directions... Temporarily fasten the remaining pairs with an inch board until the crate is created. According to the picture, pendants are sewn on, which prevent the puffs from sagging when you remove the temporary supports.

After that, you need to install the frame of the pediment and sheathe it, make cornices, lathing, pediment ebb and overhangs. Next comes the line of roofing work. After connecting all structural elements, they must be additionally processed to prevent the harmful effects of moisture.
Waterproofing and roof insulation
For creation in the attic space comfortable atmosphere and reduce energy costs for heating the room, it is worth taking care of the waterproofing of the roof. It is preferable to use the special " roofing cake", Which allows you to create optimum humidity... You can find out how it looks by watching the video about the sloping roof.

First, install a special underlay or waterproofing film on the crate. On top of it, lay any insulation - bulk, roll or in mats. Lay a layer of roofing roofing on it, which must be attached to the crate with dowels. Then the second row of crate is located.
Roofing
After the sloping roof is done, and construction works for insulation and waterproofing of the roof are over, it is time to choose a roofing material. Regardless of the fact that the roof of a sloping roof has several angles of inclination in its structure, it is customary to install the roofing material using conventional technology.

The lathing system is placed on special counter-battens, allowing natural ventilation of the roof. When organizing the lathing, you need to monitor the strictest observance of the geometric dimensions in order to facilitate the installation of the roofing material, which should be carried out in accordance with the requirements of SNiP and the technology recommended by the manufacturers.
It is not advisable to cover such roofs with copper tiles or iron, because in the summer it becomes very stuffy and hot in the room, despite the presence a large number windows. After installing the roof, you can start installing the gutters.
Roof drains
When constructing a sloping roof, drainage is absolutely necessary. Their purpose lies in the diversion of water that flows from the roof, from the foundation and walls of the building. The life of a house without drainage will become extremely short. Sloped roof drainage can be made of plastic, non-ferrous metals or galvanized steel. Some manufacturers cover such drainage with special polymer coatings that increase the resistance of the material to corrosion.
Today, you can also find plastic drainage systems on sale, which differ low level cost, low weight, low noise level under wind load, different options colors and designs. Modern plastic systems for water drainage are resistant to temperature changes.
Of course, in the photo of broken roofs, drainages made of non-ferrous metals - copper, aluminum or titanium - look more attractive. In addition, they are characterized by high level corrosion resistance. But their cost is too high for the average developer.
Installation of roof windows
Without natural light, the attic will not become a full-fledged living room. It is necessary to install roof windows that have special frames, which are subject to rather stringent requirements. Since it is customary to install such structures in the roof, their device should imply excellent waterproofing, because heavy loads from precipitation fall on them.
Skylights are usually made of PVC or wood. Double-glazed windows for such structures should be energy-efficient, they are covered with a special film that can protect them from damage and dirt. The mechanism for opening windows should also be convenient, because they are rather difficult to clean.

Attic glazing is characterized by its own characteristics. The area of the window with vertical illumination should be 1/8 of the roof area. This ratio with built-in windows reaches 1/10. Windows can be installed in one or several rows, they can be combined.
An important point in the installation of roof windows is the embedding of slopes - they protrude slightly above the surface of the sloping roof. It is advisable to install special spacer bars, which should be located between the vapor barrier film and drywall. This will prevent condensation and create the required air flow. The vapor barrier film itself should be installed along the entire contour of the attic and window; it should not have unnecessary holes and cracks.
Thus, the construction of a sloped roof is a rather complex technological operation, and if you do not have the appropriate skills, you should entrust this work to specialists. But if you are determined, our recommendations and instructions that illuminate the issue of how to make a sloping roof correctly will help you implement the project yourself and allow you to build a beautiful sloping roof with minimal investment.
How to make a sloping roof with your own hands, Construction portal
Construction of houses Recently, particular importance has been attached to increasing the functionality of buildings while maintaining an attractive appearance. These goals are served by the
How to build a sloping roof yourself?
Using the attic instead of a full-fledged second floor makes it possible to rationally use the available space and significantly expand the living area. There are many options for attics; the most popular of these is the sloping roof, which is not only aesthetically pleasing but also financially beneficial. If you wish, you can build such an attic with your own hands.

What parts does a broken attic consist of?
The first stage of roof construction is design and calculation; regardless of whether the project is ordered from a special organization or it is planned to make a design drawing on your own, first of all it is necessary to figure out which main parts the broken attic consists of.

In essence, a sloping roof is a residential attic, well insulated and protected from moisture and noise to make it comfortable to live in. Therefore, in design, it differs slightly from an ordinary gable roof.
- vertical racks;
- tightening - horizontal beams;
- rafters - stiffeners, which are the skeleton of the entire structure;
- struts - diagonal beams supporting the rafters;
- Mauerlat - wooden beams with special fasteners that connect the structure to the walls of the house;
- ridge run- aggregate top elements rafter system;
- headstock - fastenings that ensure the rigidity of the hanging rafters;
- contractions - horizontal struts that remove part of the load from the rafters;
- lathing - a frame for fastening roofing material and insulation;
- roof - can be made of ceramic tiles, different types slate, profiled sheet and many other materials;
- heat, hydro and sound insulation.
Thus, the whole structure consists of a set right-angled triangles; they are connected to each other by wooden beams. All the elements described are easy to find on the drawing of a broken attic.

Sloping roof specifications
The following requirements are imposed on sloped roofs:
- the height of the attic walls must exceed 2.2 m;
- good ventilation must be provided so that moisture does not condense under the roof;
- roofing material should be lightweight;
- the design must provide for measures against the effect of additional load on the rafter system - that is, the roof elements must withstand not only their own weight, but also, for example, snow;
- the attic loses heat faster than the lower floors, so special attention must be paid to thermal insulation;
- to provide fire safety all wooden beams and lathing elements should be treated with fire retardants.
Varieties of rafter systems
The device of a sloping roof is very simple - its slope breaks down into the lower and upper parts, each of which is set at its own angle. Most often they are mounted at an angle of 60–70 °, and 15–30 °, respectively.
Based on the design features of the attic, such types of attic sloping roofs can be distinguished.
- Two types of rafters are used: hanging and layered. The attic floor beams are installed slightly short of the edges of the walls of the lower floor. The lower slope is made of layered rafters, which are attached to the walls of the house with a Mauerlat. The frame of the attic walls is made from the racks. These triangles are set along the walls and tied by contractions. From above, they are joined by triangles of hanging rafters, resting on a puff.
- To increase the area of the room, the lower edges of the rafters can be taken out of the house. In this case, they will not be attached to the Mauerlat, but to the overlap, which, in turn, is held on outer walls ah at home with a Mauerlat. The rafters are necessarily supported by struts. The racks go deep into the floor beams by no more than a third of their thickness.
- This rafter system of a sloping roof differs in that the upper triangles are made of layered, not hanging rafters. In this case, the tightenings are supports for the upper triangle struts.

Sloped roof calculation
Before starting work, there are two calculations to be done:
- determining the amount of required building materials;
- calculation of the bearing capacity of the structure.
Determining how much material is needed is very simple due to the simple geometry of the sloping roof. It is not so easy to deal with the bearing capacity. To calculate it, you must take into account:
- roof weight;
- the approximate mass of snow;
- the mass of the crate;
- a lot of steam, hydro and thermal insulation materials;
- roof dimensions;
- installation angles of the slopes;
- the step of installing the elements of the rafter system and roof sheathing;
- additional load: the mass of people and equipment, windows, ventilation, etc.
Based on these data and with the help of special programs, a calculation of the bearing capacity is made. Depending on which load bearing capacity required, the cross-sectional area used in construction is selected timber... If something does not suit you, the project can be corrected by changing the rafter system, choosing a different roofing material, placing the rafters less frequently.
In most programs, the construction of a sloping roof can be visualized - the 3D model will immediately show how the changes will affect the appearance of the attic.

What materials do you need to prepare?
After the development of the project, it will be clear which timber with what section should be used, which roofing material is better to choose, what kind of roof lathing should be. You will have to purchase a wide variety of lumber: timber for the formation of the Mauerlat, edged boards for the rafter system, boards for the sheathing. They need to be chosen correctly in order for the design to be durable and reliable.
Tips for choosing lumber:
- conifers are best suited for the construction of an attic - pine, spruce - they are strong and tough enough to withstand the entire load;
- the wood must be well dried - its moisture content should not exceed 20%;
- the material must be free of knots, cracks, traces of biological damage and other defects.
Before installation, all wooden elements of a sloping roof are treated with fire retardants and antiseptic agents, as well as impregnations against decay. This treatment should be repeated periodically so that the supporting elements of the structure do not have to be replaced.
In addition to the main material, you need to stock up on metal fasteners to connect the rafters to the Mauerlat and to each other, insulating and roofing materials.
Roof installation

Mauerlat installation
The construction of a sloping roof begins with the installation of a Mauerlat, to which the ends of the rafters will be attached. The nuances of this stage differ depending on the material from which the lower floor is built - if its walls are stone, you need to punch holes for anchors in them in advance and install fasteners. The distance between the anchors should not exceed 2 m.

It is laid on the surface of the wall waterproofing material... Then the timber is marked out, holes are drilled at the points of installation of the fasteners. The Mauerlat is put on the anchor and is tightly attracted by the nuts.
Installation of floor beams
- first, the extreme beams are placed from the ends of the building;
- strings are pulled between them to indicate the plane;
- intermediate beams are installed.
Installation of racks
The racks must be placed strictly vertically. The principle of operation is the same as in the case of floor beams - first, the extreme posts are mounted, then the intermediate ones in the same plane. The step between the structural elements should not exceed 2 m. The racks are fixed with temporary struts. The height of the beams is 10 cm higher than the planned height of the ceilings.
Runs from edged boards are installed between the racks. As a result, you should get a ready-made frame for the inner walls of the attic.
Installation of puffs
The crossbeams are not connected to the uprights, but to the girders using metal roof corners. If the width of the room is large, it is worth installing temporary spacers under each tightening so that when walking on them during the construction of the upper slopes, the beams do not break and do not bend.
Installation of rafters
The lower rafters are mounted first. They are put in the following order:
- mounting points on the Mauerlat are outlined - the step between them should be 1–1.2 m;
- on the rafter legs, attachment points are cut out according to a template;
- first, the extreme rafters are attached, then, as before, along the twine - intermediate;
- struts are installed in accordance with the drawing.
The upper rafters are placed in the same way - according to the template. They are attached to the puffs and interconnected; a longitudinal connection with a ridge beam is required only if the length of the attic exceeds 10 m. Otherwise, braces can be dispensed with, with which the structure of the broken attic roof will be quite rigid.

The last stages of work are the sheathing of the gables and the fastening of the sheathing for the roof. Window openings should be left in the gables (at least 1/8 of the total area of the outer walls of the attic).
Insulation of the structure
On the finished frame, all that remains is to lay the roofing cake. Its first layer is a vapor barrier, which prevents moisture from penetrating into the insulation. Heat-insulating material is laid on the vapor barrier membrane - it is recommended to use stone basalt slabs. They are laid in several layers with a shift of the joints, which will protect against the occurrence of cold bridges. The size of the slabs should be several cm larger than the pitch between the counter-lattice beams. So that the insulation does not sag and does not lose its performance characteristics, its density must be at least 35 kg / m 3.

From above, the insulation is covered with a waterproof membrane that allows steam to pass through, but does not allow liquid moisture to penetrate into the room. A roof is laid on top of the waterproofing layer - the features of its installation depend on the selected material.
After installing the roof, only the finishing touches will remain - installation of drainage, decorative trim... Inside finishing material also attaches to the battens above the thermal insulation. The sloping roof is built. As you can see, it is quite possible to do this with your own hands - only the design and calculation will probably have to be entrusted to professionals.
DIY broken roof: rafter system, photo
The first stage of construction of a sloping roof is design and calculation ... In essence, a sloping roof is a residential attic, well insulated and protected from ...
If you want to build a house with an attic, you need to consider the roof structure. For this case, an ordinary gable roof will not suit you, since you cannot make the interior rooms spacious and with high ceilings. Making a sloping roof with your own hands is quite difficult, but quite realistic. The most popular and most profitable is the sloping gable roof. In the article, we will consider the technology of its construction.
Contents of the article on how to make a broken roof with your own hands, drawings, video
Step 1 - Sloping roof design and preparation of materials
The design calculation of a sloping roof should be entrusted only to professional specialists. Entrust people who are not only theoretically savvy, but also have experience with such roofs to make a project of a mansard sloping roof. If you decide to do the installation of a broken roof with your own hands, starting from the drawings and ending with the laying of roofing materials, consider the ready-made drawings. At the end of the article, we will present several ready-made projects of sloping roofs and drawings of specialists.
Types of sloping roofs:

- upper sloping;
- lower, steeper.
How to make a sloping roof with your own hands? To get started, prepare the materials and familiarize yourself with the device of rafter systems of other structures, for example, a shed roof or a hipped roof. To prevent the entire rafter system from rotting, all wooden roofing materials are processed with special compounds.
Step 2 - waterproofing a sloping roof

Before installing the Mauerlat, it is imperative to carry out waterproofing work, especially at the installation sites. Waterproofing work is carried out using roofing material, film or other material similar in structure. When laying the film, you need to make sure that it sags a little. It is much better if you play it safe and add several layers of this film (roofing material). This will provide double waterproofing, which is important when installing a sloping roof.
Step 3 - Installing the Mauerlat

To make a sloping roof with your own hands, you need to correctly install the Mauerlat, because these are the supports on which the entire structure rests. Installation of the Mauerlat is done using block concrete pouring. After that, it is necessary to connect the Mauerlat beam to the wall with pins.
To increase the strength of the Mauerlat, we make as few holes as possible. When calculating the distance between the pins, you need to make sure that they fall between the rafter beams. Then in the Mauerlat bar there will be fewer inserts located close to each other.
Holes are drilled according to the size of the studs, after which washers are placed under them and screwed in with nuts. If you are just building a house, pre-install the studs in the masonry, and then drill holes in the Mauerlat bar.
Step 4 - DIY sloping roof rafter system
The frame (vertical system) of a sloping roof
The main stage in the construction of a sloping roof with your own hands is the device of the rafter system. The sloping roof frame is usually made of wood. Beams must be cemented at the lowest level of the structure. For this, it is good to use heavy beams with a large cross-section - at least 250 mm.
For a vertical system, light beams with a small cross-section, no more than 50 mm, are more suitable. The rafter system is supported by load-bearing walls. You can watch the video and get acquainted with the technology of constructing the rafter system of a sloping roof in the article How to build a roof of a house with your own hands.
Assembling farms
Having installed the vertical system, we proceed to the assembly of the trusses. It is very difficult to assemble a polyline mansard roof do it yourself at the top of the system, so there is a reason to assemble ready-made farms on the ground, and then lift them up and strengthen. This will make your work easier. To do this, when installing a sloping roof, we take the necessary measurements, connect the bars, mark the cutouts for installation and arrange the necessary fasteners.
After collecting the first two trusses, they need to be identified along the edges and fixed. Pull the level at the top point along the ridge. From this level you will be installing other farms. When all the trusses are delivered, they must be connected together to give the system rigidity and stability. This can be done using crossbars, they will later serve as the base of the attic ceiling.
Step 5 - Insulation and vapor barrier of a sloping roof

Why insulate the roof?
With this design, you can also use non-residential premises as utility rooms or to check the condition of the rafter system of a sloping roof and provide natural ventilation. Suppose you have additional room- attic. If you make thermal insulation of the roof of the attic, then at any time of the year you can use this room for living.
Insulating a sloping roof is an important job. The comfort and coziness of both the attic room and the whole house depends on the quality of the work.
Vapor barrier of a sloping roof
A vapor barrier is needed to protect the house from moisture. If this is not done, moisture enters the house, moisturizes the insulation, which leads to the formation of mold and mildew on the walls.
Step 6 - completing the roof battens

The installation of a sloping roof is completed with a lathing device. For roofing, a well-executed roof batten is an essential element of the rafter and support system.
Roof lathing options:
- roof lathing for;
- roof lathing for corrugated board;
- roof lathing for slate and installation of slate.
In some cases, the lathing is made solid, consisting of boards laid close to each other, which are fixed to the rafters.
For any kind of roofing, instead of planks, sheet material can be used. OSB sheets are moisture resistant, form a perfect monochromatic flat surface, durable and reliable.
You can also use the more popular method:
- at first, transverse bars are laid on the rafters, which run parallel to the ridge of the roof;
- boards or bars are attached to them, directed from the ridge to the edge of the roof.
After installing the window openings and completing the lathing, you can start laying the roofing material of your choice.
Broken roofs - projects, drawings
Below are the projects and drawings of the sloped roof. Carefully consider the drawings and projects, they will help you do the installation of a broken roof with your own hands quickly and efficiently.
For a country house or summer cottage garden plot the most commonly used two-storey building architecture with living quarters under the roof. Most suitable for furnishing attic floor there will be a roof of the polyline diagram.
The four-slope version resists the winds better, is lighter and just prettier than the huge ones. gable schemes... The structure received this name because of the characteristic appearance of the roof slope, which has, as it were, a "break" formed by two planes.

Cute design
The decision to make a sloping roof of a house is made at the stage of designing and thinking about the structure of the building. The larger the building box, the more questions need to be resolved before building a sloping roof with your own hands. There are many factors that affect the cost and complexity of construction. There are several ways to make a sloping roof of a house:
- Build an attic frame on the roof, install layered rafters, and only then proceed to the roof ridge and hanging rafters... In this way, roofs are assembled in large brick houses with long floor beams and increased weight of the roof structure;
- Assemble the sloping roof in the classical way, but to install and level the stacks, use a system of steel corners and profiles as a temporary assembly frame. In some cases, a steel frame is used if they intend to build a terrace or balcony in the attic;
- The gables of the future roof and rafter assemblies are knocked down on the ground, lifted onto the roof, leveled and installed on a prepared base of a bar or Mauerlat. This option is very good if you need to build a sloping roof for a small house.
For your information! In any of the methods, very thorough knowledge and experience of joinery work with a bar of a large cross-section will be required.
Before choosing a method for making a sloping roof, you need to understand that in the first two options, you can make a sloping roof for a house with the hands of a team of at least three trained people. The amount of work and adjustments is large, so you should not count on aligning and building a sloping roof with your own hands.
Another thing is if a broken roof version is supposed to be built for a small house or log house, in this case it is really possible to make a broken roof with your own hands, I will act step by step and take a photo.
Build a simple sloping roof with your own hands
Before starting work, it is necessary to complete a small list of operations and a sketch of a broken roof made on paper. The sequence of operations and the work plan made will help you think through the procedure and purchase the required amount of lumber.
Any construction must begin with a project and an estimate. Consider a project of a sloping roof for a house made of timber, with a box size of 6x6 m. A broken roof version is simpler and easier to build using three main types of lumber - large bar 150x50 - 8 pieces, as well as a 100x50 board and softwood lining. A hundred boards will need at least 30 pieces of a standard six-meter length, the consumption for the lining must be specified based on the details of the project.
Procedure for building a sloping roof
We stand a sloping roof in the following sequence:
- We mark and cut out the base for the rafter assembly from the timber, cut out and knock down the frame from the hundredth board under the walls and ceiling of the attic. Next, we mark and cut out from the board - weave rafters for the left and right parts of the roof. We knock down all the elements into a rafter blank;
- For a sloping roof, we need at least 7 pieces of such assemblies, so we cut out all seven blanks and assemble them on a specially prepared site, treat them with an antiseptic and dry them thoroughly;
- We lift two frontal rafter assemblies to the roof, sew up their surface with clapboard and install on the front and back wall at home. After alignment, we fix it on the Mauerlat or the upper beam of the walls;
- It is necessary to install the remaining rafter assemblies, align and build at the same distance from each other, attach the frame to the wooden base of the walls;
- We fill the sheathing of the flooring, lay the vapor barrier, insulation, waterproofing and lay the roof covering.
Trimming the board and the edges of the stuffed lining is best done with an electric manual circular saw... To work with a bar, you will need a gasoline or electric saw, construction squares, levels, tape measures, a drill, a certain amount of 200 nails, screws and nails for stuffing the lining.

Cut out and knock down the rafter assembly
At the initial stage, we need to assemble the base of the rafter assembly from a bar. A standard six-meter long beam must be increased by at least 70 cm, otherwise it will be impossible to make pedestals and overhangs of a broken roof on a sloping roof. For splicing, cut out two additional pieces of timber. We install one in the end, the second we put on top of the spliced sections and fasten with hidden screws or pins.

Due to the splicing, we use a spare 8th beam, the remaining seven beams will be used to make the base of each assembly. The length of all beams should be the same up to millimeters, otherwise it will be difficult to build a broken frame.
Advice! Instead of nails, use 8mm studs with nuts and washers to mount and connect the elements of the rafter assembly.
To build a rafter blank for a sloping roof frame, based on the size of the future attic room, we cut out two vertical racks and a ceiling beam from the weave board. We mark the base beam in the middle and fasten the previously cut out elements of the walls and ceiling with nails and screws. Everything corner joints without fail reinforced with metal L-shaped plates on self-tapping screws.
In the next step, we need to cut and knock down the rafters themselves. Center first ceiling beams we attach a vertical support for the ridge of the roof. It is important to set it perpendicular to the ceiling beam with maximum precision.
Next, you need to select two six-meter boards - weaving and lay them as indicated in the diagram. We align their position on the support corners of the attic frame and fix it with a clamp. On the ridge support, the ends of the rafter boards are laid on top of each other and washed down on both beams of the contact line. Then we saw down the top of the vertical rack and fasten all three elements with a clamp. The longer the boards, the more difficult it is to build a blank.
After that, we saw off the rafter board so that the cut surface of the rafter beam rests on the upper edge of the ceiling beam, and fasten it with self-tapping screws or nails reinforced with a steel plate. After securing the second side, we knock down or twist the ridge connection of the rafters with self-tapping screws. At the junction, it is advisable to install an additional plate made of metal or wood.

In a similar way, we set the position of the second lower part of the rafter along the edge of the vertical rack and the end of the lower beam from the bar. We saw down the joints and fasten them with nails and overlays.
In more detail about the details and manufacturing technology of the rafter assembly, how to build rafters, you can see on the sensible video

We install and assemble the structure of a sloping roof
Each of the rafter assemblies will weigh at least 30kg, so the installation procedure will require at least one, and preferably two, assistants. We lift the assemblies to the roof through the side wall. One worker lifts and guides the structure from below, the other two at the top of the building carefully lift the rafter assembly and place it on the ceiling joists.
The installation begins with the front assemblies, the first to be lifted is the one that is heavier and requires large amounts of revision. Both facade assemblies are sewn up with clapboard, after which the protruding ends of the boards are cut along the edge of the rafters with a circular or chainsaw.

Do not use installed and assembled rafters to lift other parts. The best option would be to build a ramp of boards with support on the wall and drag the weight onto the roof by dragging along them. If you have lifting equipment at your disposal, then more rational decision will build and sew up façade assemblies on site and raise finished structure to the roof with a crane or winch.
Before installation, it is necessary to mark and build a center line on the façade and ceiling. To do this, you can pull on a cord or use a laser pointer. Every roof structure before installation and fastening, we align along the plumb line and the center line. After aligning the first facade assembly, it must be fixed with nails to the outer row of the wall timber, while installing slab spacers.
After the front, ordinary rafters are placed. The horizontal distance between the rafter legs is no more than 85 cm. If the staircase for climbing to the attic is supposed to be built indoors, then ordinary rafters must be installed from the place where the staircase exits to the second floor.
Further, the knocked down rafters must be leveled and built along a plumb line and a central line, the lower beam is grabbed on the walls with a couple of two hundredth nails and the upper parts of the rafter assembly with the facade beams are spliced with boards. At this stage, it is necessary to use the longest boards, moreover, to sew them to rafter assemblies better with self-tapping screws.
Once again, the correctness of the position of the structure is checked, and the constructed frame is fixed to the walls, hammering five nails into the beam at each point of support on the wall.
To continue further work, it is necessary to build a "belt" of the stiffness of a sloping roof, for this we sew up the ceiling with clapboard on the overhangs, fill the lower parts of the roof slopes with a crate to a height of about a meter. This is enough to work with the upper parts of the structure.

Next, you need to build a ridge girder and strengthen the junction of two inclined rafters in each assembly. This is done by punching the ridge and breaking line of the flooring on each side of the roof with two boards. To increase the rigidity of the ridge of a broken structure, the joining points of the upper ends of the rafters can be reinforced with a bar, thereby building the upper bearing belt.
Conclusion
 What is the dream of an office based on a dream book Office based on a dream book of the sorceress Medea
 Characteristics of the Capricorn man by zodiac sign - an avid pragmatist
 Strong biofield in humans, signs