Roof on a wooden truss system. How to install roof rafters. Video: making and installing hanging rafters with your own hands
The rafter system is the foundation of any roof. The complexity or availability of the rafter structure depends on the type of roof chosen. Today we will talk about the simplest option - a rafter system for a gable roof. Experienced specialists tell about the structure of the roof frame, the features and functions of its elements, and how the gable roof rafter system is carried out with their own hands.
Gable roof: types and advantages
Recall that a gable roof is a type of roof consisting of two planes (slopes) connected at an angle of a certain degree. It can be simple (symmetrical or asymmetric) and complex - broken.
The rationality of choosing a roof from two slopes is determined by its following advantages:
- Efficiency and ease of construction, in comparison with other roofing structures.
- Ease and availability of service at any time of the year.
- Reliability and durability against wind, snowfall, hail and other natural influences.
- The possibility of arranging the attic.
- Better quality hydro and thermal insulation.

The required theoretical minimum for the construction of a rafter system
The pitched roof structure is made of metal or wooden beams. Metal is a more “problematic” material. It makes the entire roofing system heavier, cools and heats up quickly, is more difficult to install and requires the use of professional welding equipment. Based on this, wood is mainly used in the construction of private houses (especially with your own hands).
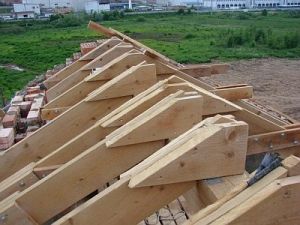
There are two main options for performing a rafter system for a gable roof - a hanging type device (each rafter leg has two support points) and a layered method (the rafters are connected at the bottom with a tightening, forming a triangular truss, a load-bearing beam is installed in the middle). An elevated structure is necessary if there is a distance of more than 10 meters between the load-bearing walls. Look at the image:

What is their rafter system? Let's imagine a 3D projection. The skeleton of the roof consists of a mauerlat (rafter base), rafter legs, a ridge, racks, girders, a bed, puffs, struts and lathing. Mauerlat, lying and tightening are the lower parts of the system on which the entire future roof is being erected. Check out the illustration below first and then look at each element separately:

Mauerlat is the basis of all foundations
Mauerlat is a solid wood (mainly coniferous) timber with a section of 10-15 cm. These are the optimal dimensions for the required strength and durability of the entire roofing structure. The beam is laid on the load-bearing walls of the house to redistribute the spacer load on them.
There are two ways to install the rafter base bars - with the transfer of the load to the walls and without the transfer of gravity. The choice of the mounting option for the Mauerlat should depend on the severity of the roofing system, the coating, the thickness of the load-bearing walls and the perimeter of the roof.

With the latter option, the Mauerlat is placed in a pocket, closer to the inner edge of the wall, and is attached to wooden corks with staples (each cork corresponds to the size of the brick and is part of the top row of brickwork).
The load-bearing bars are mounted on the load-bearing walls from above using anchors. Craftsmen advise putting a rigid frame on a concrete base in the form of a belt in the wall. High-quality waterproofing must be installed under the Mauerlat.
Details can be found in the video:
Lezhen - basic load balancer
Lezhen performs functions similar to the Mauerlat, and has the same dimensions. Beams are laid on internal load-bearing walls in order to evenly distribute the loads from the uprights and struts.
See the illustration for a master class on the installation of beds:

Rafter legs - ribs of the roof skeleton
Rafters can be called the main component of the roof frame. This element cannot be omitted or replaced with another part. The legs of the rafters are wooden beams, the cross-sectional size of which can vary from 5 to 15 cm. The rafters rest on the Mauerlat and are connected with a ridge.
The process of installing rafters can be seen in this video:
The horse is a small nuance with a big meaning
The final element of the joint of the two slopes is called the ridge of the roof. This is a rib located vertically at the highest point of the roof. At the junction of the rafters, a ridge girder is mounted. After that, the roof ridge is installed on it. This element holds the rafters together, performs a ventilation function and makes the roof aesthetically pleasing.
Racks - receivers of main loads
Racks are powerful beams that take part of the load of the rafter structure. They are installed vertically, usually in the center of the truss. If the project provides for an attic, then the racks are placed on both sides, closer to the roof slopes. When the attic is divided into two rooms, the racks are placed both in the center and on the sides.
Purlins - support for rafters
The ridge and side girders serve as a reinforcement of the rigidity of the truss trusses. The greater the load on the system (snowy winters, heavy roofing, large roof area, etc.), the more purlins must be installed on the roof slopes.
Tightening - truss connector
This part of the structure performs the function of fixing the rafters at the base. Thus, a truss triangle is formed - a truss. Tightens may not be installed on stack-type systems.
Braces - the strength of the structure
The struts serve as a support for the uprights and strengthen all structural elements. Experts recommend installing struts at an angle of 450. This increases the strength of the system and protects it from deformation under the influence of snow and wind.
The lathing is the basis for the roofing cake
Lathing - horizontal wooden slats with a cross section of 40-50 mm, located on the slopes perpendicular to the rafters. The main purpose of the lathing is to fix the roofing material. The frequency and thickness of the battens depend on its type. In addition, the lathing helps to move materials during the roofing and serves as an additional element of structural strength.
Overhang elements - finishing points
The edge of the roofing system is called the overhang. This is the protrusion of the rafter system above the wall by about 40 cm. The overhang box consists of the following elements: filly (connection rails with rafters), frontal and cornice boards. The purpose of the overhang is to protect the walls from getting wet during rains and melting snow.
Step-by-step installation guide for the gable roof truss system
To begin with, we suggest that you familiarize yourself with the illustration that we have prepared for you:

And now we will consider the three main stages of the process of constructing the truss system of a simple gable roof:
Stage 1: Calculations and project preparation
Work should begin with the preparation of a roof project. It will contain all sizes, shapes and types of fasteners for structural elements. To create a quality project, you need to make the following calculations:
- Calculation of permanent and variable loads on the rafter system. Permanent loads include the weight of the roof and finishing materials (the attic is also taken into account additionally). Variable loads are the force of wind, rain, snow, etc. The maximum load can be considered the main load up to 50 kg per square meter of the roof, and variable - up to 300 kg (taking into account possible snow blockages).
- Accounting for seismic activity, storm winds and the peculiarities of the location of the house. For example, if the house is surrounded by other buildings, then the load on the roof is significantly reduced.
- The choice of the angle of inclination of the gable roof. When calculating the angle of inclination, the following factors are taken into account: the higher the angle, the more materials will go to the roof (and money, respectively); the slope depends on the roofing material - the softer the roof, the smaller the slope angle (for example, for soft tiles, an angle of 5-200 is chosen, and if you use slate or ondulin, you must choose a slope of 20-450).
- Calculation of the step and length of the rafters. The length of the step between the trusses varies from 60 to 100 cm. The heavier the roof covering, the more often the rafters need to be distributed. To calculate the length of the rafter, we use the Pythagorean theorem, taking the rafter leg for the hypotenuse of the triangle. The first side will be considered half the width of the house, and the second - the selected roof height. Then add another 60-70 cm of stock to the hypotenuse we found.


When all the calculations are done, you need to make a drawing of parts, connections and the entire project as a whole.
Stage 2: Acquisition and preparation of the necessary materials and tools
For work, you need to purchase lumber, according to calculations, bolts, corners, anchors and other connecting parts, and prepare the appropriate tools (drills, levels, meters, jigsaw, etc.). Wood for load-bearing beams and rafters must be solid and of high quality - knots and wormholes are unacceptable.
Antiseptic, anti-corrosive and fire-fighting wood processing is a must at this stage. You can start working with the material one day after processing.
Stage 3: Installation of the roof truss structure
It is better to mount the roof frame in dry, not windy weather, so as not to face additional difficulties during work. At this stage, we will dwell in more detail and consider the step-by-step instructions for installing the rafter system.
Installing the rafter system: a step-by-step guide
Step 1. Laying the Mauerlat and the bed. The bed may not exist if there are no more load-bearing walls inside the house. Before laying the Mauerlat on the walls, it is necessary to lay a waterproofing material, for example, roofing material. We measure the tape of the required width, cut it off and lay the waterproofing on the edge of the wall (where the frame will be installed).
We mark the beams of the desired section and length, cut them off and begin to form the base frame. Mauerlat should be located on the outer edge of the wall (if a hanging structure is planned) or in a special niche on the wall in front of the threshold (if the roofing system is layered). The beds for the racks are laid on the internal load-bearing partitions. The Mauerlat is attached to the wall and wooden corks with staples, studs and anchors.
And we suggest that you familiarize yourself with the illustration that we have prepared for you:

When laying the frame along the entire length of the wall, we may be faced with the need for joining the base beam. They should be performed by cutting the bars at an angle of strictly 90 degrees. We carry out fastening with high-quality bolts.
How to avoid damaging bricks or blocks when lifting roofboards?
Select the edge of the wall through which it is most convenient to feed the beams for the roof frame. Protect this edge with a wooden square. Two trims of a roughing board about a meter long are suitable, which need to be knocked together at a right angle. Slide a square to the outside edge of the work wall. Now you can lift the boards without fear of damaging walls or window sills.
Step 2. Installation of rafters. The first step is to install the extreme rafters. In order to keep the rafters straight, we install the racks in the center. We attach the racks to the Mauerlat using an iron angle and self-tapping screws. This temporary piece is removed after all the rafters have been installed. We fasten the extreme rafters with crossbars and install the ridge girder. Fastening type - metal corner, screws and pins.
The illustration shows the process of installing the rafter legs and attaching the rafters to the purlin:

And here's how to attach the rafters to the Mauerlat:

Between the extreme trusses, it is imperative to pull a construction thread, along which we will level all the rafters of the ramp.
Now we mount all the rafter elements according to a pre-marked scheme. We join the rafters over the ridge run.
For more information on the process of installing rafters, see this video:
A system of special racks will help to strengthen the rafter legs. Wooden blocks of boards of the same thickness as the rafters are attached to the Mauerlat. The bars should be fixed with a step equal to the selected distance between the rafter legs along the markings. The length of each board is approximately 40 cm. These racks will transfer the load to the Mauerlat and load-bearing floors. The bars must be fixed to the base with steel corners. Now the rafter legs need to be installed so that one side of each is adjacent to the rack. Then, on the other side of each rafter, we attach the same rack and grab all three parts with 12 mm studs.
After installing all the legs, the racks are trimmed flush with the rafter bevel from the street side. An empty corner is formed from the inside between the posts, which must be closed with a wooden triangle (you can use trimming from bevels).
All rafter legs should be additionally reinforced with crossbars, uprights, struts and reinforced with metal plates. The complete process of strengthening the rafters can be seen in the video:
Step 3. Waterproofing and lathing. On the finished rafter ribs, you need to lay a high-quality waterproofing vapor-permeable material under the crate. The entry of the insulating sheet (sheet to sheet) is made 15 cm. A counter lathing of wooden slats is stuffed onto the waterproofing along the rafter edges. A crate of the same slats is installed on top perpendicular to the rafter legs.
When installing the frame, it is necessary to take into account the presence of a chimney and the mandatory ventilation of the ridge. The distance between the battens is on average 300 mm. This scheme is suitable for all types of solid roofing. When choosing a soft roofing material, the lathing is made solid from sheets of moisture-resistant plywood.
The rafter system is ready. Now it is the turn of the installation of roofing material, internal insulation of the roof and the arrangement of the attic (if such is provided for by the project).
So, it's time to answer the main question of our topic: is it worth it to do it all with your own hands? Do not trust someone who tells you that it is easy and simple. But if you have golden hands and a great desire to make a high-quality roof "for yourself", then go ahead! We wish you good luck!
The rafter system is the roof frame, which is the base for the decking of the roof coverings.
The rafter system is designed to withstand the load of the roof, taking into account natural loads: winds, snow, rain.
The roof option is approved at the design stage.
The purpose of the roof includes several functions: warmth in the house, protection of the room from natural phenomena, therefore the rafter system must be given special attention.
You can read how to calculate the rafter system.
It is customary to classify rafter systems so that the task of choosing a future roof option is easier to solve:
- Single slope... The most simple ones. More suitable for utility rooms, baths, small private houses, gazebos... Provides for an inclined position of the structure at a slight angle (no more than 25 °);
- Gable. Used for small houses and summer cottages... They look like a triangle, in which the rafter boards are connected by a beam and are at a certain angle;
- Gable broken lines... They have two slopes with a fracture, due to which it is possible to increase the area of the attic;
- Three-slope (half-hip). Have two trapezoidal slopes, which are connected by one end triangular slope (hip);
- Four-slope (hip). Used for residential buildings, require significant labor costs. They have two end triangular slopes and two trapezoidal ones;
- Hip-roof. Used for square-shaped buildings. They consist of four triangular slopes, the upper corner of which is connected in the center of the roof;
- Multi-pliers. Consist of trapezoidal or other slopes of different shapes, connected to each other.
The most suitable designs for - and broken gable. There are others, but they are less common and not as practical as the ones listed above.
Roof structures are also classified into:
- Hanging. With this type of roof frame due to the absence of load-bearing walls in the room;
- Forced. Rafter installation option, providing support on a load-bearing internal wall or support in a building.
The calculation of the material for the roof frame when designing a building is based on the intended configuration and load. Do-it-yourself rafters are not difficult to do, it is important to get down to business wisely.

Roof systems of the layered and hanging type
Calculation of the load on the rafters
To correctly calculate the load on the rafters, it is necessary to take into account many factors that can affect the severity of the structure.
Important metrics to consider:
- Constant load: includes the mass of the roofing cake, covering material;
- The load is temporary: constant and maximum amount of snow, rain, intensity of wind gusts, and in areas with high seismic activity - the action of storm winds, tornadoes, hurricanes.
In addition, one should bear in mind the mass and strength of the rafter legs, and also pay attention to the fastening of the rafters of the gable roof and the installation option.

Truss systems diagram
The distance between the rafters of the gable roof and the thickness of the rafter
 The pitch of the gable roof rafters is the empty space between the rafters. The functionality of the roof depends on the correct calculation of the step. Typically, the step is about a meter.
For a more accurate calculation of the distance between the rafter boards, there is a certain calculation scheme:
- Determine the length of the slope.
- The length of the ramp is divided by the distance between the rafters.
- To determine the number of rafter boards, add one to the resulting value and round up towards a larger value. This is how they determine how many boards are needed per slope.
- The length of the slope is divided by the number of boards, the distance between the rafters is obtained.
This calculation is not always final.
Additionally, you should take into account the load of the roofing (its weight), the thickness of the rafters, as well as the dimensions of the rafters for a gable roof.
The thickness of the rafter board largely depends on the covering material:
- . Boards are used with a section of 5x20 cm at a step from 60 to 90 cm with a sheathing flooring with a section of 4x5 cm;
- . Rafter boards - 5x15 cm, step - from 60 cm to 95 cm;
- . The section of the board is 6x18 cm or 5x15 cm, the distance between the bars is from 80 cm to 130 cm;
- . The rafter section is 5x15 cm, 5x10 cm with a step from 60 cm to 90 cm;
- . The cross-section of the timber is the same as for the corrugated board at a step of 60-80 cm.
All indicators should be taken into account and the thickness of the rafters should be accurately calculated so that there is no excessive load on the foundation.
Incorrect calculation of the length of the rafters of a gable roof, as well as incorrect calculation of the step indicators, can lead to sagging of the roof.
Installing the rafters of a gable roof with your own hands requires taking into account the weight of the rafter board and all additional fasteners of the structure.

What the rafter system consists of
Rafter structure - a complex system and installing a gable roof rafter system is not an easy task. Rafter system consists not only of rafter boards, but also of other additional elements:
- Mauerlat. An element that distributes all the load evenly to the supports;
- Run. The boards that fasten the legs of the rafters: at the top - the ridge, on the side - the side run;
- Puffs. A connecting beam that prevents the rafter legs from diverging;
- Braces, racks. Bars that fix the stability of the rafters, resting on the bed;
- . A lattice of bars, which is applied perpendicular to the rafters. Transfers the load of the covering material to the rafter frame;
- . Connecting beam, which serves as a union of the roof slopes;
- Filly. If the length of the rafter legs is insufficient, they are mounted to form an overhang;
- Roof overhang. It extends beyond the bottom line of the slope to prevent precipitation from entering the walls.
The rafter system implies rafters, braces, braces and racks located in the same plane. They are positioned in such a way that the main load of the roof structure falls vertically on the external load-bearing walls. Therefore, the manufacture of gable roof rafters is a very important process.

What does the gable roof rafter system consist of?
Installation of a rafter system with layered rafters
The layered rafter system is used when the span does not exceed 6.5 meters.
If there are supporting structures inside the building, it is possible to install additional racks.
The main support of the rafter legs is the Mauerlat.
Mauerlat installation
Before installing the Mauerlat, you must install the armpole. It consists of a formwork in which the reinforcement is laid and poured with concrete. At the base, when the concrete has not yet hardened, studs are installed, to which the Mauerlat is then attached.
Mauerlat is a beam that is laid on a support (load-bearing wall) and is the base of the rafter frame. A layer of waterproofing material is pre-laid. If the length of the timber is not enough for the length of the wall, then it is increased.
- Check the equality of the diagonals. A discrepancy of a few centimeters can lead to re-equipment of the frame;
- Fix the corners of the Mauerlat;
- Attach the Mauerlat with pins or wire. The studs are tightened in two steps, having previously drilled holes for them.
The stability of the roofing structure depends on how firmly the Mauerlat will be installed.
Therefore, it is necessary to take seriously the fastening of the Mauerlat to the bearing support.

Mauerlat installation
Sill
After the Mauerlat has dried (after 5 days), mark the installation of the bed on the Mauerlat bar: its axis should be with the same indent on each side of the Mauerlat bar. The bed is attached to a two-layer waterproofing layer with anchor bolts. To the wall from the inside, the bed should be fastened with wire twists or staples. Next, markings are made for installing the rafters.

Installation of the rafter system of a gable roof
The anchor points of the layered rafters are the walls and posts inside the frame. The rafters are mounted with hinged attachment points. When using sliders for fastening, a slight lowering of the roof frame is ensured in the first years of the roof's service.
This installation method is necessary to prevent distortions., as in the early years the building subsides a little.
The rafter beams should be fastened either by installing them in the prepared grooves and reinforced with fasteners, or by attaching the board overlays.

Installation of rafters
Ridge knot
The rafters are connected end-to-end, cutting off the edge of the bar so that the angle when joining opposite beams corresponds to the angle of the slope. The rafters are hammered under the ridge with nails. An option is possible in which the beams are connected with bolts, a nail or a hairpin, that is, with an overlap.
If necessary (if provided by the project), a cut is made in the rafter beams to fasten the ridge beam (run).

Ridge knot
Racks
The uprights are attached with a short span - in the center, on the sides and in the center - with a wider roof base. Fastening is done vertically from the ridge to the inner wall.

Run
Girder - connecting beam for securing the rafter legs. Bolts or brackets to the rack.

Installing filly
The final stage in the installation of the layered system is the installation of fillies with a short length of rafter legs for the overhang. To install the visor, it is necessary to install additionally small rafter boards.


Installation of a rafter system with layered rafters
Diy gable roof rafter system: installation with hanging rafters
Rafter system equipped with hanging rafters, is a triangular design, where the sides are the rafters, and the base is a tightening connected to the lower heels of the rafters.
Installation of a hanging type rafter frame can do without installing a Mauerlat: a board that is fixed to a two-layer waterproofing can replace it.
If the structure has a large span, then struts, headstock, crossbars are attached to it.
There are no racks in the hanging system.
Puffs
The brace is the longest beam of the roof frame. To prevent it from sagging, it is necessary to fasten the headstock - boards that are attached to the top of the structure on one side, and to the tightening on the other. Fastened with bolts or wood strips. Threaded clamps can be used to adjust the slack.

The device of the rafter system
Installation of brace beams
The headstock can be supplemented by strut beams, forming a rhombus, where two struts are the lower sides, and the rafter boards are the upper ones, the upper corner is the ridge. Thus, the struts rest against the headstock, distributing the load.

Strut beams
Rafters
Hanging rafters are mounted like a layered one. When installing attics, the tie is installed closer to the ridge, providing more space under the ceiling. In this case, the tightening is secured by a bolt-in slot.
ATTENTION!
When installing a hanging system, a prerequisite for installation is the accuracy of calculations and the strength of the rafters and tightening.
The presence of errors leads to a displacement of the axes of the elements of the system, which provides a skew of the structure.
This photo will tell you how to install rafters for a gable roof:

Installation of rafters

Hanging rafters
How to strengthen the rafters of a gable roof
 It is necessary to strengthen the rafters of a gable roof when the calculation of the load is performed incorrectly or defects in the frame are found.
Strengthening can be done with:
- Beams, which are installed in order to transfer the load to them;
- Installation of struts with an inclined mount with an emphasis on the bed;
- Overlapping double-sided slats;
- Increasing the cross-section of the rafter beam in the place of supports on the brace by imposing planking from boards with nails or bolts;
- A wall of boards which are attached to the rafters in places of expected snow accumulation to increase the bearing capacity of the rafters.
You can resort to strengthening the Mauerlat bar and the base of the rafter bar. Due to the increased humidity and reduced ventilation, these parts of the frame are more susceptible to rotting, therefore, when arranging the roof special attention must be paid
21.02.2017 1 CommentThe rafter system of a gable roof is a simple design, available for a do-it-yourself device even for a novice developer. You just need to make preliminary calculations, familiarize yourself with the details and stages of roofing, calculate the materials needed for installation. When calculating, it should be taken into account that the bearing capacity of a gable roof depends on the effect of loads on it from wind, snow, and the weight of materials.
In order to make the process of building a gable roof rafter system as easy as possible for you, below are detailed step-by-step instructions for installing a rafter system with your own hands.
In contact with
classmates
Requirements for building materials
 For the device of the rafter system, the best option would be to use sawn timber from coniferous wood - pine, spruce or larch, I - III grade.
The material for the rafters is taken at least grade II, the Mauerlat is made of boards or timber of the II grade, for the racks and girders, the material of the II grade is taken, the lathing is made of lumber of the II-III grade, it depends on the roof. Crossbars, tightenings are made of Grade I material. On linings, linings, you can use grade III material.
Note! The lumber must be dry with a moisture content of no more than 20%. Before installation, it should be treated with fire retardants and antiseptics against fungal diseases.
 You need to store lumber under a canopy, providing protection from the sun and moisture. Level the storage area, shift the lumber with spacers for ventilation.
For installation, you will need fasteners: ties, plates, studs, bolts with washers and nuts, self-tapping screws with EPDM gaskets, 2.8 mm thick, mounting tape, galvanized brackets.
Brackets are used when attaching the Mauerlat, fasten them with nails or self-tapping screws.
KR corners are used to attach the rafters to the Mauerlat, prevent the rafters from moving.
All fasteners must be made of high quality material and protected against corrosion.
Tools for the construction of the rafter system
 To install the gable roof rafter system, you will need the following set of tools:
- tape measures of various lengths 5, 10, 20 meters;
- markers, pencils;
- cord for stretching;
- hammers, various purposes, nail puller;
- scissors for cutting;
- roofing knife;
- putty knife;
- Scotch;
- hacksaws, electric saw, electric drill with various drills and attachments;
- screwdriver with nozzles;
- markings, horizontal and vertical levels;
- slats, rulers;
- mounting foam;
- safety strap and rope - for safe work.
All tools on the roof should be kept in a tool bag for safety reasons.
Types of rafter systems for a gable roof
Sent rafters
They are supported by a Mauerlat and racks installed on the inner wall, with an equal pitch to the rafters. To give rigidity with spans of 6 m, braces are additionally installed.

Diagram of layered rafters of a gable roof
Hanging rafters
If the building is small in width, you can arrange a rafter system when the rafters rest on the Mauerlat or walls, without intermediate supports. The maximum span is 9 meters. Sometimes such roofs can be arranged without a Mauerlat. The rafters are installed on the wall, using spacers, on the rafters in this version, a bending moment acts.
To unload, wooden or metal plates are placed. They securely reinforce the corner. For hanging rafters of a larger span, a headstock and struts are installed. For hanging systems, the rafter is arranged with a larger section, and the lumber is chosen at least I II grade.

Diagram of hanging rafters of a gable roof
Calculation of the rafter system
 It is possible to determine the cross-section of a gable roof beam required in the rafter system by collecting all the loads acting on it: the weight of the coating, lathing, snow, wind pressure, precipitation.
Constant loads can be determined by the weight of 1 m 2 of roofing, lathing. It is important that the weight per 1 m 2 of the roof is in the range of 40-45 kg.
Variable snow and wind loads are calculated according to the tabular values of the SNiP normative documents, depending on the height of the building, the temperature zone. The load from the snow is equal to its weight multiplied by a factor depending on the slope of the slope. All these calculations are carried out in the project.
And if there is no project, and the roof is being erected on a small building? You need to look at the construction of a house in the neighborhood, which is being carried out according to a project, the roof area is the same as your building. The gable roof rafter system will serve as a model.
Sizes of timber for rafters
At the top point, a ridge is laid, which connects the rafters. The height of the ridge depends on the slope of the roof. The slope is influenced by the choice of coating material. The minimum dimensions are:
- for tile roofs, slate 22 gr .;
- for metal tiles - 14 g.;
- ondulin - 6 gr.;
- corrugated board - 12 gr.
The optimal angle is 35-45 degrees. slope, provides a quick discharge of water and snow. In regions with strong winds, the roofs are made flat and then the angle of inclination is within 20-45 degrees.
You can determine the height by the formula: H = 1 / 2Lpr * tgA. Where A is the angle of inclination, L is the width of the building.
The task is simplified when using a ready-made table. The coefficient depends on the width of the building and the angle of inclination. Factor multiplied by 1⁄2 the width of the building.
The rafters are made from pine or spruce bars, with a section of 50 × 100 mm, 50 * 150 mm.
The size of the rafters depends on the pitch. The step of the rafters is smaller, a larger number is installed, the section will decrease. The distance between the rafters at a gable roof is in the range from 600 mm to 1800 mm, it all depends on the structure of the roof and the materials used for its construction.
|
Length rafters, mm |
Distance between rafters, mm | The size of the cross-section of the rafter beam, mm |
| up to 3000 | 1200 | 80 × 100 |
| up to 3000 | 1800 | 90 × 100 |
| up to 4000 | 1000 | 80 × 160 |
| up to 4000 | 1400 | 80 × 180 |
| up to 4000 | 1800 | 90 × 180 |
| up to 6000 | 1000 | 80 × 200 |
| up to 6000 | 1400 | 100 × 200 |
The roof does not end at the level of the walls, it is extended outward by 500 mm. The rafter leg can protrude, or a board or block is built up. In this case, moisture does not fall on the wall, the foundation is not poured.
Step-by-step installation of the gable roof truss system
The gable roof rafter system consists of the following elements:
- Mauerlat.
- Beds.
- Racks.
- Rafters.
- Braces.
- Puffs.
- Lathing.

Mauerlat installation

Mauerlat fasteners to a monolithic reinforced concrete belt
Mauerlat distributes evenly the load on the walls of the building, its installation can be done in several ways:
- to be attached to the wall through a reinforced concrete belt with studs;
- studs are inserted into the masonry;
- a simple and common method for simple roofs, wire rod fastening.
For him, take a bar with a section of 100 × 100 mm, 150 × 150 mm or 200 × 200 mm. Which section to choose depends on the size of the roof and its coverage. The Mauerlat is joined along the length, for this, make a wash down of 100 mm, 500 mm long, fold the bars and fasten with pins.
In the corners, the Mauerlat is tied with cuts into the floor of the timber, fastened with staples or bolts. At wooden buildings, this is the Mauerlat, the last crown. On brick walls, make a monolithic reinforced concrete belt with a section of 400 × 300 mm. Along the waist, place pins with a thread of 12 mm in diameter, after 120 mm, for fastening.
Drill holes with a diameter of 12 mm in the Mauerlat, lay them so that the pins go into the holes. Tighten with nuts from above. First, we put two layers of roofing felt or roofing felt under the bar. On the outside of the wall, lay the Mauerlat with a brick. Lay the Mauerlat on a horizontal and vertical base. It is necessary to check the level of the horizontal surface. Check the diagonals. Align with shims if necessary.
Installation instructions for beds, racks, rafters, struts and puffs
The device of the rafter system of a gable roof with your own hands is performed in the following order:
- Install the bed, with the rafters sent.
- Mark the step of installing the rafter legs.
- Prepare to fit the rack.
- Install them, if necessary, unfasten with spacers.
- Lay the purlin. Check geometry. Install the hardware.
- Try on the first rafter leg, mark the trim points.
- Make a marking of points and install the rafters at the beginning and end of the roof, pull a cord between them in order to align the rest of the elements along it.
- Having installed the rafter leg, we first attach it to the Mauerlat, then to the ridge run, to each other.
- Wire every other leg to the Mauerlat.
Fastening the rafters to the Mauerlat is done using cuts, persistent corners and a hemming support bar. Reinforce with nails or staples.

Methods for attaching the rafters to the Mauerlat
Place the support legs on the planks or pads and linings. Lezhen is a beam of 50 × 100 mm or 50 × 150 mm, laid on the middle wall along a roofing felt gasket. Lay brick posts under the lining, 2 bricks high.
The rafter legs are connected to each other on a skate. Consider the common joints of the rafter system:
- They make cuts at one leg and washed down at the other. Insert one leg into the cut with the other and fasten it with a bolt.
- Install lining, wood or metal.
- With the help of cuttings in the girder, they are fixed with nails or bolts.

Methods for connecting rafters on a ridge
For the stability of the roof to wind loads, puffs, struts and girders are installed. Tightening is a bar of 100 × 150 mm, purlins and struts are made of a bar of 50 × 150 mm or 100 × 150 mm.
With the installation of contractions, the reliability of the rafter structure increases. The cross-sections of the timber are the same with the rafters. Attached to the legs with bolts or nails. The device of struts adds rigidity to the structure. They are installed tightly to the surface of the rafter.
The lumber has a standard length of 6 m. The rafters can be longer. Then you need to dock them. There are several ways to connect:
- Fasten by placing the bars on both sides at the junction, connect them with nails in a checkerboard pattern.
- Overlap, one part of the rafter to the other, at a distance of 1 meter, fasten with nails in a variable order.
- Cut obliquely, cut out part of the rafter legs, connect them, fastening them with bolts.
Sheathing device
 A crate is arranged along the roof rafters. It serves to distribute the load from the roofing material, snow onto the rafters. Plays the role of an air gap between the roof and the rafter system.
The design of the lathing depends on the adopted roofing material:
- under the soft tiles, the sheathing should be made solid, an anti-condensation film is laid on the rafters, the counter rail is pressed down on top, the sheathing is nailed onto it, then OSB boards and a lining carpet, we put the tiles on the top.
- under the roof of the corrugated board, the crate should be sparse. The step of the lathing depends on the brand of corrugated board, its thickness and the angle of inclination of the roof.
- the crate for standard slate should be made with a step of 500 mm from a bar of 75 × 75 mm or 50 × 50, as well as boards from 30 × 100 mm. The design features of the roof should be taken into account when making the final choice of a suitable option.
The lumber from which the crate is made is pine of the first or second grade. It is advisable to take the width no more than 14 cm.When the width is more, the boards can warp and damage the roofing flooring. The length of the nails should be three times the thickness of the sheathing. Lay the boards along the ridge. Install the first board with a greater thickness to the height of the roof covering.
Arrange a continuous crate along the roof slope.
With the first layer, lay a board along the ridge at a distance of 500-1000 mm from the next one, and so on. Lay the lathing along the rafters with the second layer. Arrange the joint between the boards only on the rafters in a run. The nail should be sunk completely with the head into the pulp of the wood.
Eaves overhangs
They are installed to protect from atmospheric precipitation, play an aesthetic role. Eaves overhangs are arranged tightly without cracks. The final stage of roofing.

Diagram of the device of the eaves overhang of a gable roof
Gable
The gable roof has two gables. They have the shape of a triangle, with the apex at the ridge and the sides coincide with the roof slopes. The gables support the rafters and enclose the attic space. Protect from wind and precipitation, give stability to the roof.
In wooden buildings, the pediment is made frame. In brick buildings, frame or brick. The gables are made of brick or aerated block, erected before the roofing device. They require very precise execution.
The frame gables are inserted into the finished opening when the rafter system is already assembled.
The frame is made from bars or boards. The frame elements are connected on thorns or in the floor of a tree, all fastened with nails. Sheathed by nailing boards, lining or siding, maintaining the color scheme in the decoration of the facade of the building. For the device of a window opening, an additional frame is made for it according to the size of the window. If the attic is insulated, then the pediment also needs to be insulated. The insulation is laid in the middle of the frame. Mineral wool insulation with low flammability is used. From the outside, the frame is upholstered with a hydro-windproof film or a windproof membrane, from the inside, a vapor-proof film or a vapor-proof membrane is nailed under the finishing material.
In contact with
To install a gable roof yourself, you only need average skills in performing carpentry work and understanding the technology of its manufacture. All this is easy to figure out. It is also necessary to involve an intelligent assistant in the process, because many operations cannot be performed by one person. Therefore, many, without a doubt, take up this work and successfully cope with it.
DIY gable roof device
The construction of a country house is associated with considerable costs. Therefore, many people are looking for options to reduce the cost of this process through the use of modern materials and technologies. Currently, frame buildings with gable roofs have become very popular. This is largely due to the fact that even a person with minimal knowledge of the construction business with appropriate preliminary preparation is capable of performing such a structure.
The gable roof is formed by triangular trusses, interconnected by a longitudinal upper beam (ridge girder) and lathing
However, building a roof is a crucial moment that requires serious consideration. You need to calculate:
- correct angle of inclination;
- the length of the rafters;
- the distance between them;
- ways of connecting various parts to each other.
Without experience in the production of such work, you should not undertake complex structures, but you can easily build a small house with a simple gable roof with your own hands.
Design features of gable roofs
Such a roof consists of two inclined planes located at a certain angle. Gables are arranged along the end walls, which are a vertical continuation of the walls. In shape, they are isosceles or arbitrary triangles if the slopes are arranged at different angles to the horizontal. In the case of a gable sloping roof, the gables are trapezoidal.
When constructing a roof, a rafter system is created, which is a supporting element of the roofing pie. The rafter system can be made in the form of hanging rafters if there are no capital partitions inside the building box. If they are available, a floor frame is arranged when the span rests on three or more points.
 Depending on the configuration of the building, a gable roof can be erected according to different schemes
 How to make a gable roof yourself
Depending on the design of the rafter system, its main elements may be different, but the main details are present in all options:
- Rafters are the main supporting element of the structure, on which roofing material is mounted through the crate.
- A ridge girder - also called a backbone, unites all rafter legs into a single whole, evenly distributes the load on the Mauerlat.
- Rack - used in floor structures as an additional support on the internal capital partition.
- Lezhen - a horizontal bar on which the racks rest, serves to evenly distribute the loads on the Mauerlat.
- Mauerlat - a support bar between the walls and the upper structure of the building, intended for fastening the rafters.
- Sheathing - flooring from a board 25 millimeters thick for fixing the topcoat of the roof.
 Regardless of the type of rafter system, there are always several basic elements in it.
 Roof design
In the process of designing a rafter system, it is necessary to optimally place all elements of the frame in order to ensure an even load of the roof over its entire area. The main types of load are:
- Snowy - occurs under the influence of a layer of snow lingering on the roof. At high rates for the construction region, the angle of inclination of the roof is increased so that the snow falls off as it accumulates.
- Wind - associated with the force of the wind. It is higher in open ventilated places. A means of counteracting wind loads is to reduce the angle of inclination of the roof.
Thus, it is necessary to find the optimal combination of these indicators with the simultaneous impact of wind and snow. The unit load data for the construction region can be found on the Internet.
Gable roofs with simplicity of design give the house an elegant and festive look.
Photo gallery: projects of houses with gable roofs
The gable roof allows you to arrange a small attic room on the second floor The angle of inclination of the gable roof is selected based on the intensity of winds and the average snow load in the construction area Despite the simplicity of the design, the gable roof can be the central element of the overall design of the building Angles of inclination of the roof slopes do not have to be the same
Calculation of the parameters of a gable roof
Determination of the main characteristics of the roof is necessary already at the stage of foundation design to calculate the effect of the total weight of the building on the supporting base.
Area calculation
With a symmetrical gable roof, it is enough to determine the area of one slope and double the result.
The height of the roof depends on the selected slope angle. Usually it is in the range of 30-45 degrees. In the first case, the height will be half the distance from the projection of the ridge to the Mauerlat axis. Using the Pythagorean theorem and performing calculations, we find that the length of the slope for a 10x9 m structure will be 5.05 meters. The area of the ramp is defined as 5.05 x 10 = 50.5 square meters. And the total roof area will be 50.5 x 2 = 101 m 2.
In cases where a gable roof has a non-equilibrium roof, that is, the axis of the ridge is offset from the axis of the building, the area of each slope is calculated separately using the same technique and the results are summed up.
However, this calculation does not take into account the area of the roof overhangs. Usually they are 0.5-0.6 meters. For one slope, the overhang area will be 0.5 x 5.05 x 2 + 0.5 x 10 = 4.1 + 5 = 9.1 m 2.
The total roof area will be 101 + 9.1 x 2 = 119.2 m 2.
 Most of the rafter calculations are done according to the Pythagorean theorem, reducing the structure to a set of rigid figures - triangles
 Calculation of the cross-section of the rafters
The size of the rafter section depends on several factors:
- the magnitude of the load on them;
- the type of materials used for rafters: logs, beams - homogeneous or glued;
- rafter leg length;
- wood species;
- the distance between the axes of the rafter legs.
All these parameters have long been calculated, and to determine the cross-section of the rafter legs, you can use the data below.
Table: cross-section size of rafters
With an increase in the step of installing the rafters, the load on each of them increases, which leads to the need to increase the section.
Common sizes of the main parts of the rafter system:

Determination of the angle of inclination
The angle of inclination of the roof slope is determined by the requirements of its topcoat:

One of the reasons for the decrease in the angle of inclination is the desire to make the attic or attic space as large as possible. This intention is also the reason for the installation of a sloping roof.
Calculation of the distance between the rafters
This parameter depends on the type of topcoat, or rather, its weight. For the heaviest material, the distance should be as small as 80 centimeters. In the case of using a soft roof with a low weight, the distance can be increased up to 150 centimeters. The calculation of the number of rafters and transfers is done in this way:
- The length of the building (10 meters) must be divided by the distance between the rafters, presumably 120 centimeters: 1000/120 = 8.3 (pieces). Add 1 to the result obtained, it turns out 9.3.
- Since the number of rafters cannot be fractional, the result is rounded to the nearest integer - 9.
- The distance between the rafters is finally set: 1000/9 = 111 centimeters.
At this distance, all the rafters will be equidistant, and the load from the roof will be evenly distributed.
The length of the rafters is calculated according to the Pythagorean theorem, as already shown above.
Installing a gable roof with your own hands
The installation of the truss system begins with the installation of the Mauerlat.
Mounting the carrier on the wall
Mauerlat is made of high-strength wood - oak, larch, etc. In the absence of such materials, pine can be used.
The beam is of a standard length - 4 or 6 meters. Therefore, the connection of several parts along the length is inevitable. It is made with a cut of the connected ends of the "half-tree", for example, for a bar with a section of 150x150 millimeters, a sample of 75x150 with a length of 300 mm is made. The ends are overlapped. Fastening is done with two or four screws M12 or M14 with the installation of large diameter washers. By the same principle, the bars are connected at the corners. The finished structure is a regular rectangle that is installed on the upper plane of the wall along the perimeter.
 Two beams are spliced by sampling wood on each of them. Then they are bolted together
 The Mauerlat installation technology provides for its placement strictly along the axis of the wall or with an offset to either side. In this case, you cannot place the support bar closer than 5 centimeters from the edge. To increase the service life, the Mauerlat should be installed with waterproofing on the wall surface. Most often, roofing material is used for this.
Methods for attaching the Mauerlat to the wall
- Installation on anchor bolts. Ideal for monolithic walls. The threaded rods are embedded in the wall when it is cast.
- Wood dowels. They are driven into the drilled hole. With this fixation, additional metal fasteners are used.
- Forged staples. They are used with pre-installed wood embedded parts.
- Hairpin or fittings. The pins are walled up in the process of laying the wall and are removed through the support bar along the drilled holes. The diameter of the fasteners should be 12-14 millimeters, the protrusion above the surface of the timber - 10-14 centimeters.
- Steel wire. A plait of two or four wire strands is installed when laying the wall 2-3 rows before its end. The Mauerlat is tightened using a crowbar. It is often used as an additional attachment to a support bar.
- When installing a reinforcing belt, fastening on studs or anchor bolts is also used.
The mounting locations should be approximately halfway between the rafter legs.
Video: installing a Mauerlat on an armopoyas
Photo gallery: ways of attaching the Mauerlat on the wall
The studs are walled into the wall during pouring, then the Mauerlat is put on them and fixed with bolts The wire is also installed at the stage of laying the wall The Mauerlat can be fastened with wire ties passed through the holes in the timber Wooden plugs are inserted into the gaps between the wall blocks, in which they are then reinforced staples
Types of truss systems and their installation
The choice of truss structure is determined by the building configuration. If there are no internal capital partitions, a hanging rafter system is constructed.
In the presence of capital partitions, it is necessary to use a flat installation scheme.
Manufacturing of rafter pairs
This is the name of a pair of rafter legs connected to an arch with the installation of a spacer element in the form of a tightening for a hinged system or a crossbar for a floor system.
Installation of rafter pairs is carried out in three ways:
- The assembly is done at the top after installing the translations. They are used for flooring made of planks nailed down.
- The formation of rafter pairs is carried out on the ground in the immediate vicinity of the house. Only workpieces are assembled, which are a rigid triangular structure. The lifting of products is carried out when the rafter pairs are ready for the entire system. For this, it is possible to use lifting devices in the form of a manual or drive winch, which presents certain inconveniences and additional costs. On the other hand, assembly on the ground is much easier and more accurate.
- The assembly of the roof directly at the installation site is carried out in detail.
In any case, the rafter legs are mounted according to the template, which is the first truss. For higher assembly accuracy, it is advisable to fix the parts of the next pair to the previous one with clamps.
 When assembling truss systems on the ground, all structures are made according to a template, which is the first manufactured truss. This makes the editing more accurate.
 Procedure for installing the rafter system
Prefabricated roof elements are installed in the following sequence:

Fastening parts of the rafter system
For a reliable connection of the elements of the roof frame, various auxiliary elements are used, made of galvanized steel with a thickness of up to 1.5 millimeters.
 The use of additional fasteners ensures a strong assembly of the rafter system
 When assembling with the use of additional connectors, labor productivity increases and the strength characteristics of the structure increase.
To connect the elements of the roof of wooden buildings, special fasteners are used. So, the upper joint of the rafters is often connected using a hinge. This is due to the frequent movements of the building, including seasonal ones.
 The articulated connection avoids high stresses at the junction of the rafters during seasonal movements of the frame
 For the same purpose, sliding mounts are used on houses made of this material.
 Reliable sliding connection of the rafters with the Mauerlat relieves this unit from stresses during deformations of the structure
 Video: quick manufacture of rafters
Before installing the lathing, the roof is insulated. For this:
- The inner crate is stuffed from the side of the attic or attic.
- The vapor barrier film is stretched.
- Insulation is laid.
- A waterproof film or membrane with one-sided permeability is applied.
Thus, in addition to insulation, a ventilation system for the roof space is created. It starts working after installing the cover.
 It is more convenient to lay a layer of insulation from the outside on an inner lathing with a vapor barrier coating
 Under certain conditions, roof insulation can be done from the inside, it is not so convenient, but you can work safely in any weather conditions. In this case, the formation of the roofing cake is carried out in the reverse order. Each layer of insulation must be strengthened in the openings between the rafters as the flooring progresses.
Creating a wireframe pediment
Before proceeding with the design of the pediment, you need to arrange the crate and lay the finishing roofing.
When forming the lathing, the type of future roofing is taken into account. It is made from edged boards 25 millimeters thick. The crate is:
- Solid - boards are packed at a distance of 2-4 centimeters from one another. It is used when using tiles or soft roofs.
- Sparse - the distance between the boards is 15-25 centimeters. Such a crate is arranged under metal tiles, corrugated board, slate and other similar materials.
- Rare - the distance between the boards is from 0.6 to 1.2 meters. It is used when the length of the covering sheets is equal to the length of the slope with the overhang. Such coverage is made only to order.
The lathing should be brought out beyond the gable rafters for the overhang.
 On the frontal trusses, a frame is mounted for attaching the front finishing material
 Installation of roofing
Before laying the lathing, the roof is insulated and a moisture-proof layer is laid. Further:
- The roof covering is laid. The installation sequence is from bottom to top in order. The straightness of the first row is controlled by the tensioned cord.
- The roofing sheets are fastened with self-tapping screws using shock-absorbing pads.
When installing the finishing roofing, you cannot save on fasteners, the protective layer must be strong, capable of withstanding wind and snow loads.
 Sheets of metal tiles are laid from bottom to top, starting from the corner of the roof
 Installation of gables
The lathing of the frame gables is made based on the characteristics of the material intended for the front finishing. For this, the following products can be used:

After installing the lathing, it is necessary to lay a moisture protection from a polyethylene film with a thickness of 200 microns. It can be secured with construction brackets. This work is done outside. The film can be used to sheathe the outer surface with the selected finishing material.
Gables need to be insulated with roll or tile heaters. The thickness of the protective layer should be at least 10 cm, and for areas with a cold climate - at least 15 cm. An inner moisture-protective film layer is stretched over the insulation.
On top of it, a crate is stuffed for front finishing, for which bars 50x50 millimeters in size are used. The entire building is finished at the same time, after the roof is insulated.
In the process of facing the pediment, windows are installed, if they are provided for by the project, and in some cases, doors.
 The pediment of a wooden house with a gable roof is most often finished with clapboard
 Design of overhangs
Roof overhangs, both pediment and eaves, in addition to a purely decorative function, are intended to protect walls and foundations from water or snow. Their sizes are usually 50-60 centimeters. Overhangs are made with various materials:
- planed board, installed end-to-end or overlapped;
- grooved lining;
- block house lining;
- sheet plastic;
- profiled or smooth sheet metal;
- finished products made of metal or plastic - spotlights.
There are several ways to install overhangs:

Ventilation holes must be made along the filing. They can be of any size, but large ones must be covered with a fine mesh of any material. This avoids the penetration of birds and harmful insects into the under-roof space. Soffits are sold with ready-made ventilation grilles.
Ventilation is arranged only on eaves; it is not needed for pediment ledges.
 When decorating with soffits, ventilation holes do not need to be drilled - they are already made at the factory
 Video: DIY gable roof device
With the modern abundance of building materials and their quality, you can install a gable roof yourself. The cost savings in this case will be quite significant. But it can turn into losses if you do not carefully think over every step of your construction. I wish you success!
The most important and difficult stage is the installation of the rafter system. The operation of the roof is associated with constant and periodic loads in the form of snow or gusts of wind.
To figure out how to make a rafter system with your own hands, you need to decide on its components. The rafter frame is used for any type of roof, it differs in the level of complexity during installation. Shed and gable roofs are considered simple structures. Hip or hip roofs provide a reliable roof, but are difficult to calculate and install rafters.
There are many factors to consider when choosing the size of the frame material. The cross-section of the rafters and the supporting base must withstand the weight of the roof, climatic loads, the weight of the devices installed on the roof (if any).
Main elements
For the frame of a gable roof, the following elements are required:
- Mauerlat is a timber of significant size 150 × 150 mm or 200 × 200 mm, which is laid and fixed along the perimeter of the walls. It connects the rafter system and the building structure into a common structure, distributes the load on the walls.
- The ridge is the highest point of the roof at which the rafter legs are connected. The longitudinal beam helps to support the structure, provides stability under wind loads.
- Rafters - made of a board with a section of 70 × 150 mm, they bear the entire load. Rafter legs are created from the boards, which are attached in increments of at least 60 cm.
- Lezhen - a bar parallel to the ridge. Its dimensions are equal to the Mauerlat. The bed is a support for racks and other elements.
- Puffs - crossbars made of boards connecting the rafter leg.
- Racks - bars installed vertically, they are installed to support the ridge run.
- Overhangs are parts of the rafters that protrude beyond the boundary of the walls. They allow you to divert rainfall from the house.
- Braces - serve to strengthen the rafters, allow you to create durable structures.
- Sheathing - boards required for tying rafters and laying roofing material.
- Filly - when the length of the rafters is not enough for the overhang, additional filly boards are filled.
Varieties of rafter systems

For the device of the gable roof frame, several types of rafter systems are used.
Forced - the choice of such a design implies the presence of a support in the form of a wall in the center of the building. They have three fulcrum points and only bend stress. The upper part of the rafter leg rests on the girder, and the lower part on the Mauerlat. This system allows for thinner lumber, lower costs and lighter construction.
Hanging - rafter legs rest only on the walls, therefore they are under great stress. To give strength, they are connected by tightening. Such rafters are usually assembled at the bottom and fed directly for installation.
Complex roof shapes require non-standard solutions; combinations of hanging and layered rafters are used for them.
When installing a hipped roof, the frame is based on diagonal rafters connecting the ridge girder and the corners of the building. They are supported by the rafters - short rafters, which, together with ordinary side rafters, form the basis of the roof slope.
Material preparation

The service life of the truss structure depends on the quality of the lumber and its processing. For structural elements, it is necessary to select dry wood with a moisture level below 22%. It should be smooth and free from knots. Before installation, all parts are treated with two layers of antiseptic and an anti-combustion agent. When processing, it is worth using a brush, not a spray, then the composition is better absorbed. When choosing lumber, coniferous wood is preferred.
Fastening

The durability of the structure will ensure the competent installation of the rafter system with your own hands. To connect the rafters, various types of fastening are used: staples, nails, shaped steel parts - corners and plates, which are screwed with self-tapping screws.
Rafters section

The dimensions of the timber used for the rafters are influenced by:
- span size;
- the impact of climatic features;
- the angle of the slope and the step of attaching the rafter legs.
The permanent load is calculated from the total weight of the roofing material, insulation and waterproofing. With an increase in the distance between the rafters, a larger cross-section material is required. The coefficient of wind and snow load must be included when calculating the cross section. Common rafter sizes are 50 × 150 mm and 60 × 200 mm.
Rafter length

The base of a symmetrical gable roof is an isosceles triangle. Knowing the height of the ridge, you can calculate the length of the rafter using the Pythagorean theorem. In this case, it is the hypotenuse, and half of the queen's width and the height of the roof are legs.
Installation of rafters

The first stage in the installation of a rafter system for any type of roof is the installation and fastening of the Mauerlat. Waterproofing in the form of roofing material must be laid under it. This timber requires drilling holes along the length, into which the studs embedded in the masonry are inserted and tightened with a nut.

Having created the basis for the frame, a template is made according to which all the rafter legs for the hanging system are assembled on the ground. To create a sample, take two thin boards equal in length to the rafters and fasten them with a nail at the ends. This blank is set to the width of the purlin, and the resulting angle is fixed by pieces of the board.
A second template is used to mark the assembly cuts at the top and bottom of the rafters. It is based on plywood. When collecting your legs, you need to strictly follow the template so that you do not have to redo the structure. The upper part of the rafters is connected with a wooden or metal plate.
If the assembled trusses are heavy, you will have to use lifting equipment or devices.
The first pair of rafters is installed on opposite gables. It is fixed with temporary struts and set in level. A cord is stretched between the legs, as a guideline for the installation of the remaining trusses. The structure is connected with crossbars, struts and supports.
With a small span, the rafters are not fastened with a ridge run. A roof with a width of more than five meters requires reinforcement of the structure with a ridge beam. This beam is attached both under the rafters and above them. The connection takes place with a cut and plates. With a long rafter length, support posts are installed to prevent sagging.

The completion of the installation of the rafter system will be the fastening of the sheathing.
To know how to properly perform the rafter structure, you can watch a video describing the stages of work.
Video
 How to install ski bindings
 Daria Domracheva and Ole Einar Bjoerndalen got married
 Ski Pole Walking: Dangerous or Beneficial?