Install ski mounts. How to install ski bindings. Some Precautions - Instructions
Ski bindings are the most important elements of an athlete's equipment, on which his safety will depend. It is very important to install them correctly. This can be done either with your own hands or in the workshop. This article provides information on the main types, provides instructions on how to remove the bindings from the skis, how to put the bindings on the skis yourself.
By design and purpose, there are 4 types:
- Soft.
- Hard.
- Semi-rigid.
- Mountain.
Soft (simple) is a loop made of leather or fabric, into which a leg is placed in ordinary shoes - a boot or felt boot. Sometimes, for a more secure fit, an additional strap is used that wraps around the heel. Such loops are usually put on skis for a child or on hunting skis.
Semi-rigid consists of metal cheeks, a sling that holds the boot on top and a strap that wraps around the heel. Previously, they were part of the winter outfit of military personnel. Nowadays, they are often installed on children's models.
Semi-rigid ones are of three types: cable, spring, with swinging cheeks. The third type is the most convenient. Unlike the first two, they do not spoil the shoes, they are reliable, they are easy to fasten and unbutton. Well suited for long hiking trips. They do not require special shoes, while the shoes are fixed much more rigidly than simple ones.
The most popular are the hard ones. There are three systems of this type:
- Nordic Norm 75 (NN 75).
- Salomon Nordic System (SNS).
- New Nordic Norm (NNN).
Nordic 75 is a welt system with a spring-loaded shackle and a locking mechanism. The shoe has 3 or 4 holes on the sole, with which it is installed on the protruding rods. Then the edging of the boot is pressed with a metal arch. The NN 75 is usually mounted on wooden cross-country skis.
Since this construction does not fix the heel at all, it cannot be used for skating.
NNN and SNS are the most common designs for plastic running and roller skis. They come in a variety of models and modifications designed to suit all levels - from amateurs to world-class athletes. Installing the SNS and NNN ski bindings on your own does not take much time. The difference between these types lies in the number of longitudinal guides for fixing the boot.
Both systems can be of three types:
- Mechanical.
- "Machine".
- "Semi-automatic".
New Nordic Norm was developed by Roteffella. With the front brace moved back, this design is more suitable for skating.
The device is a plate with a double profile that holds the sole. Fixation is carried out using a transverse rod. The boot rests against a rubber stop. The stiffness of the stop determines the rigidity of the entire structure. The stops are painted in different colors (white, green, black, red), which determine the degree of rigidity.
There are several NNN upgrades. One of them is NIS (Nordic Integrated System). It is characterized by ease of installation and the ability to slide the boot along the longitudinal axis.
Salomon Nordic System was developed by Salomon. This device has only one rail. In the front part there is a rubber stop, the rigidity of which can also vary. There are two main types:
- SNS Profil
This type is versatile. It can be used for both ridge and classic moves. - SNS Pilot
Usually used for skating.
Alpine skiing differs from other types in that they completely fix the shoes, and are also able to unfasten when an athlete falls.
There are 4 main types:
- Alpain.
Suitable for skiing on prepared tracks. - Framed.
The front is connected to the rear by a frame. Allows you to fully secure the foot on the descent and unfasten the heel for climbing uphill. - Pin.
The boot is fixed by means of 4 pins - pins. - Telemark.
Frame and pins are suitable both for skiing on prepared tracks and for freeriding.
Installation instructions
The following tools and materials will be needed for installation: a marker, a screwdriver, drills, a ruler, glue, an awl.
The center of gravity
Installation of all structures begins with the determination of the balance line. The front edge of the shoe should be on it. Sometimes the center of gravity is already marked by the manufacturer, but it is better to determine it yourself. To find it, you need to put the ski on a narrow object and move it until it reaches a balanced position. The balance line should be noted. This line will be the axis of the bracket for NNN and SNS devices. For NN 75 it will determine where the screws are to be installed.
Markup
The marking can be done using a special jig, and if it is not available, using a paper template.
It is imperative to check the correctness of the markings by measuring the distance between the marks. In NNN systems, the fasteners are located closer to the front end of the balance line, and in SNS systems directly on the line.
Drilling holes
It is recommended to follow the instructions included with the kit to determine the required hole diameter and depth. For SNS and NNN systems, holes are usually drilled 10 mm. Remove dust from the finished holes, then fill them with glue. This will provide a more secure fit for the screws.
Assembly
After that, the device should be applied to the marked holes, and begin to tighten the screws evenly. Care must be taken not to displace it relative to the longitudinal axis. For NN 75, it is recommended to check the alignment accuracy before screwing. You can go out on the track after 12 hours, when the glue dries up.
If old hardware needs to be installed on new hardware, it should be easy to remove. Disassembly should start from the back. First you need to carefully remove the plug from the screw and unscrew it. Then remove the bar, unscrew the two bolts under it. The last bolt is also under the plug.
How to install a ski mount on alpine skis?
Installing bindings on such skis is practically the same as installing on cross-country skis. This work is done in a few simple steps.
The center of gravity is found first as described above. Then you need to lay the fasteners so that its front edge exactly matches the balance line, place the boot in the clip and align it. After that, you should carefully mark the holes with a pencil or an awl, drill them. Then attach the front with screws. The back is set to the middle position and the holes are marked. Holes are drilled, the back is fixed with screws. Installation ends with customization.
Recently, some models have been released with pre-installed platforms, on which it is easy to install latches without fixing with self-tapping screws. This makes it possible to reinstall under a different shoe size, as well as the possibility of displacement along the longitudinal axis.
The choice of bindings depends on the style of skiing, as well as on the level of preparation of the skier. It is recommended to buy products from trusted well-known companies such as Salomon, Fisher, Atomic. The products of these manufacturers are distinguished by their reliability and high quality.
Today there are 2 popular types of mounts, these are SNS and NNN. The difference between SNS and NNN is in the number of protrusions for fixing the boot. SNS has one central, and NNN has 2 small ones at the edges.
Valso skis and TISA bindings of the NNN type are available.
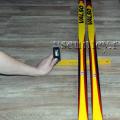
The first thing we do when installing bindings is to find the center of gravity of each ski. I did it with a corner.

The skis must be in balance by drawing a line of center of gravity on each ski.

We press the edges of the skis to a flat surface.  And we draw the center line between the centers of gravity on each ski.


I do this so that the bindings are symmetrical. This line should go where the ski boot meets the binding.
We attach the mount focusing on the line.

We put points in the holes for self-tapping screws. We measure their symmetry about the edges.

We drill holes with a small drill. The drill diameter should be smaller than the bolt diameter.

Pour glue into the holes made.

We attach the mount.

We tighten the bolts.

Here's what happened.

The heel pads must be fitted to the size of the boot. The thrust bearing in this mount has 2 fixation points, since it is not a continuation of the mount, but goes as a separate element. In other mounts, the thrust bearing is pushed out of the mount to the required length and screwed onto one self-tapping screw.
We measure and drill 2 holes. In one we insert the pin of the thrust bearing, and in the second we twist the self-tapping screw. Thus, it is fixed.

Installation and adjustment of ski bindings is often performed by specialists who know how to do it correctly. But, if you wish, you can prepare yourself. To do this, it is necessary to approach the process with full responsibility, without violating safety rules.
For self-installation of mounts, preliminary preparation is required. Necessary:
1. Take into account the parameters of the skier for whom the equipment must be prepared;
2. Stock up on the necessary tools:
- the skis themselves, bindings for them, as well as skiing shoes;
- roulette;
- screwdriver;
- screwdriver;
- pencil or marker;
- drill;
- screws.
Stages and types of installation
The bindings are the lever through which the leg transmits the command to the ski. Their second function is to provide safety for the legs. In situations where there is a high probability of injury, the bindings free the leg from the ski.
- By their design, the fasteners are a front head and a back heel. Each of these parts allows you to adjust the actuation forces;
- The actuation force should be understood as the indicator of the maximum load. Once it is reached, the fastener engages and opens, freeing the leg. The scale on the mounts helps to set this indicator;
- The higher the scale division, the more load is required for triggering;
- The presence of brakes on the mounts does not allow the skis to roll far if they are unfastened;
- Manufacturers often sell skis with rails on them. This allows both fasteners to be moved and adjusted.

There are two types of fasteners installation:
- Using drilling;
- Using already built-in special rails or platforms.
Let's talk about each method in more detail.
Using drilling
Installing fasteners using drills is when fasteners are mounted on screws. The advantages of this type are:
- Possibility to choose any inventory to your liking;
- Installation without gaps and backlash. Thanks to this, ski control is as accurate as possible.
Cons of this type of installation:
- Availability of tools for installation;
- Experience and skills in this type of work;
- Inability to use skis if the difference in boot length exceeds 2 cm.
Important: When reinstalling fasteners using drills, the number of screw holes in the ski increases. This is bad for the durability of the inventory. Reinstallation in this way is not desirable.

The installation process itself consists of several stages:
- The first step is to determine the center of gravity of the ski. For this, you can install it on a small hill and find the point at which it balances. Mark this place with a marker;
- All mechanisms on sale are accompanied by instructions. If it is not there, then it should be noted that for classic skis, the top point of the foot should be at the mark found earlier. If skis are skis, then 8-15 mm closer to the nose;
- The location of the pin (top point) is in the place where the hinge is attached;
- Then the fastener is displaced so that it is on the longitudinal axis of symmetry of the ski;
- Now you can drill the front of the fastener onto the center screw. If there are guides, then you need to center with them.
If not, then a boot is inserted into the installed element and is also installed in the center. This will help determine the correct heel position. Now the boot can be removed and the necessary holes can be made for the remaining fasteners;
- When using a rigid mount, the heel of the boot should cover the heel by 10-15 mm. For system bindings (with rails), an installation is required in which the boot is completely on the rail.
Using already built-in special rails or platforms
Installing mounts using built-in rails or platforms greatly simplifies the entire process and has the following advantages:
- The most simple installation and adjustment of ski mounts, without the help of specialists and without using a tool;
- Possibility of self-adjustment of ski mounts for boots of a different size or manufacturer;
- The ability to shift the center of the boot.

The disadvantages include:
- The choice of mount is limited (as it is already integrated);
- All such mounts give a small gap over time, which affects the accuracy of ski control;
- The increase in the weight of the sports equipment in general. This is a hindrance in the execution of some elements, especially for experienced skiers.
Fixing customization rules
After mounting the fasteners, they need to be adjusted. This is done for comfort and safety. Competent adjustment of the ski mounts allows you to:
- Take into account the parameters of the skier: weight, foot size;
- Hold and maneuver confidently while riding;
- Take into account the load that falls on the legs and ensure their safety.
If the skis were purchased with bindings installed on them, then the seller himself often makes the adjustment. Some manufacturers do not allow self-adjustment. This is a prerequisite for the warranty on their products.
Under adjusting the correct positioning of the front head and rear heel for the skier should be understood. It is important to consider:
- The rider's experience and skills, as well as his physical condition;
- Driving style (calm or aggressive);
- Condition and complexity of the ski track.
The parameters of the skier and the corresponding actuation force on the scale on the bindings:
| Weight, kg | Height / cm | Boot sole size / mm | |||||
| 255 and less | 250-270 | 271-290 | 291-310 | 311-330 | 331 and more | ||
| 10-13 | 0,75 | 0,75 | |||||
| 14-17 | 1 | 1 | 0,75 | ||||
| 18-21 | 1,5 | 1,25 | 1 | ||||
| 22-25 | 1,75 | 1,5 | 1,5 | 1,25 | |||
| 26-30 | 2,25 | 2 | 1,75 | 1,5 | 1,5 | ||
| 31-35 | 2,75 | 2,5 | 2,25 | 2 | 1,75 | 1,75 | |
| 36-41 | 3,5 | 3 | 2,75 | 2,5 | 2,25 | 2 | |
| 42-48 | 148 and less | 3,5 | 3 | 3 | 2,75 | 2,5 | |
| 49-57 | 149-157 | 4,5 | 4 | 3,5 | 3,5 | 3 | |
| 58-66 | 158-166 | 5,5 | 5 | 4,5 | 4 | 3,5 | |
| 67-78 | 167-178 | 6,5 | 6 | 5,5 | 5 | 4,5 | |
| 79-94 | 179-194 | 7,5 | 7 | 6,5 | 6 | 5,5 | |
| 95 and more | 195 and more | 8,5 | 8 | 7 | 6,5 | ||
| 10 | 9,5 | 8,5 | 8 | ||||
| 11,5 | 11 | 10 | 9,5 | ||||
In this table, you need to find your indicators. When they are on different lines, you must select the one that is located above.
Then the required column is determined according to the corresponding sole length. The cell at the junction will determine the appropriate actuation force rating. This method is suitable for beginners or skiers with a careful riding style.
- If the skier feels confident and has certain skills, then the indicator from the line below should be used.
- In the case when aggressive driving on difficult tracks is practiced, the indicator 2 lines lower will be correct.
When working with fasteners, some points should be taken into account:
- You shouldn't tweak the bindings too much. This increases the likelihood of injury;
- Setting too loose will also prevent you from enjoying the ride. The skis will jump off at any, even harmless, fall. It is inconvenient even for a beginner, especially for a professional;
- Please note that the length of the sole of the boot may vary depending on the manufacturer. This means skiers with the same foot size may not necessarily be able to use the same skis with an adjusted binding.
We also offer you to watch a video on how to mount ski bindings at home without using special tools and devices:
Also interesting
In order for skiing to be enjoyable, it is worth considering not only the choice of winter equipment, but also such a fact as the installation. They are the connecting device between boots and work equipment. Their quality plays an important role in this sport.
Fasteners are performed on the skis themselves or on a separate platform. Some manufacturers can install and make holes on it themselves. Then you will have to purchase a specific manufacturer. Any fastening device can be installed on a flat, without recesses platform.
Attention! Among the variety of winter equipment, ordinary cross-country skis are considered the most popular.
Cross-country ski mounts
There are three fastening systems:
- Nordic (welted) is an obsolete variety that is gradually being phased out. Differs in low cost;
- NNN (with rails) have one line;
- SNS (with groove) has two lanes for connection.
The last two systems are divided into the following types:
- automatic fixture clicks on its own;
- mechanical fastening with hands;
- classic - have a soft elastic band;
- the ridge elastic is made of a stiff material, or there is another anchor point for the shoe.
Ski bindings
There are such options:
- installations that are fastened manually. They differ in a fairly high price;
- machine;
- semiautomatic device.
The last two types can jam after water gets into and then freezes in them. Sometimes it is difficult to open them if the inventory is not firmly supported (in deep snow).
Bindings for tourist skis
There are such varieties:
- soft - they are not suitable for tourism;
- tough presence of special boots;
- semi-rigid - reliable and comfortable.
Children's skis have the simplest fasteners, which consist of several thick fabric strips that fix the leg, and they can be ridden even in felt boots.
What does the mount consist of?
The ski bindings are located in two separate pieces and a toe plate that reduces friction on the ski boot. The front section ensures lateral release, while the back grip provides top release. The sizes of both links are equal in all varieties. Modern fasteners are made of very durable materials (titanium, steel, plastic). The main elements are:
- heel and head of attachment;
Running varieties consist of the following elements:
- NNN - differs by a plate attached to sports equipment, which has two share guides that fix the boot from lateral displacement. On the sole of the shoe there is a pair of longitudinal grooves for fastening guides. A transverse snap-in bar is integrated in the front of the boot.
- SNS provides for fixing the shoe with one lobe guide. The front part of the shoe is secured with a rubber stop.
Touring ski bindings contain pins and a bow that grips the shoe welt.
How not to make a mistake when choosing
Properly chosen fasteners fit the ski shoes well, but can come loose instantly at a critical moment. For example, during a sudden fall during a sharp turn. Under huge loads, the installation should hold the leg in one position, and not immediately unfasten.
Finding the right lashing system should start with choosing your boots. Having purchased shoes of the right size, which meets all the necessary characteristics, you should choose exactly this pair of shoes and the available skis.
Installation procedure
To figure out how to properly install the selected ones, you should start by studying the instructions immediately after purchasing them. It is necessary to strictly adhere to the prescribed points, which provide for the specifics of assembling ski fasteners, taking into account its variety.
Determination of the center of gravity
The definition of this parameter will be needed for normal movement so that the ski does not have an "advantage" on one side or the other. Finding the center of gravity is easy enough. Here, the inventory must be installed on the edge of a perpendicularly located ruler and moved along its surface until the ski is balanced like a scale, and stops horizontally on the floor. In this case, the stationery will indicate the correct position, and this coordinate must be marked with a marker. In modern sports equipment, the center of gravity axis corresponds to the fastening line of the boot bracket. Therefore, the front area should be attached to the ski and its correct location should be highlighted in a different color.
Markup
The next step is to mark the holes. A good option would be to use a jig, with which you can find the exact location of the fasteners. If this item is not found, then a template made from paper is used. It can be found on the internet, but it is mostly included in the mounting kit. In the absence of a paper pattern, the ski is marked with an awl, applying the mounted fasteners so that the coordinate of the center of gravity converges with the shoe fixation line. Place marks with a marker through the holes in the fasteners.
Drilling holes
At the beginning of drilling the recesses, it is advisable to match the gap between the holes located on the fasteners with the interval between the marks set during the marking process. As a rule, the instructions say how to screw the screws deeply, and how long the drill should be used. If there is no tool suitable for the length, then you can use any drill, having previously wrapped it at the top with electrical tape, leaving the required millimeters protruding. Then, using a drill at low speed, drill holes in the markings.
Assembly
The final stage is as follows:
- To ensure reliable fixation and elimination of cracks that occurred during the drilling of cracks, the holes made should be cleaned of dust and filled with an adhesive (supplied in or PVA).
- On the holes obtained, you need to impose fasteners and thoroughly fasten the screws. Tighten them a little at first to make sure they are level, and then all the way down to make sure they are secure.
- Leave the skis to dry (10-12 hours).
You can store ready-made skis at home on a balcony or wall by installing a special stand using brackets.
How to remove ski bindings
You need to start removing the fasteners (for example SNS) from the back of the unit. Using a screwdriver, carefully unscrew the plug, remove the screws with a screwdriver, and then remove the strips. To remove the screw under the front cover, press the catch with a large screwdriver and lift it up. After removing the cover, remove the last bolts and the fasteners can be easily removed.
Installation on skis is a doable process yourself. To do this, you will need to study the attached instructions, have the necessary tools available and, most importantly, be sure that everything will work out.
If you or your family members decide to spend your holiday with benefit, then skiing is perfect. Such exercises develop not only muscles, but also joints, endurance, raise immunity and have a beneficial effect on blood vessels. In stores, you can buy skis immediately with bindings in the kit, but people with experience advise you to install them yourself, especially since you may need experience in installing them in the future. You can always replace the fasteners if you prefer a different type or if they break. In this article, you will learn more about the types of fasteners and how to replace them.
Types of ski bindings
Based on your skiing style and tasks, you need to choose one of three types of ski bindings:
- The most modern ski bindings are called system bindings. You should not delve into their work, you just have to know that you do not have to fiddle with buckles, elastic bands and staples with them. Their installation is quite simple and does not take much time.
- The second type is called “hard” or “75 millimeters”. Many could see this type of attachment at school, if skis were in physical education lessons. The bottom line is that the boot is attached to the skis with a special clip - a clip. It firmly holds the toe of the boot, and the brace itself, in turn, is the fastener. It is now believed that a rigid system is a relic of the past. Indeed, many of us will confirm this by remembering the ever-untwisted staples and the slip of the boot.
- The third type of fastening is "semi-rigid". These are all kinds of elastic bands, ties, flagella to which your boot is tied. It is relevant for children's skis, since the baby's foot grows very quickly, and it is difficult to buy suitable boots for them. If you decide to teach a child to ride, then the rubber band system will be just right.
When you have purchased the mounts that suit you, you can proceed with the installation.
What tools are needed to install ski mounts
First of all, you must have a tool such as a jig. This tool can be different and its cost has a large amplitude, however, without it, it will be very difficult to find the right balance on skis. With it, you will find the exact locations for drilling and installing fasteners.
- You need a conductor.
- A marker that can then be washed off with water.
- Drill.
- Electric drill.
Depending on the type of fastening, you may need drills 35 mm or 60 mm, in advance, check this point in the instructions or in the store.

The process of installing ski mounts
For starters, you need to learn a little trick on how to find the exact balance on your skis. You just need to take one of them in your hands and put it on some thin or sharp object, and then gently move the ski until its end and back are aligned and the ski begins to balance. Mark this place with a marker. The principle is similar to how a person tries to keep a pen on his finger, which constantly falls in one direction or the other.
- Now place the skis on the floor, making the balance mark.
- Attach a jig to one ski. Carefully line up the balance lines on the jig and on the ski.
- Take a drill with an appropriate drill bit and make a hole for the mountings using the guide.
- Screw on the fasteners.
- Repeat with the second ski.
If you still do not have a conductor, then you can navigate by this value: the hinge of the ski mount should be at the same time in the place of balance and at the end of the big toe. So you can roughly find a place for your bindings.
More experienced runners know that sometimes the bindings can be shifted slightly forward, then such skis will already be called "skate" skis. Experiment with styles and you will find a way that works best for you.


 How to install ski bindings
 Daria Domracheva and Ole Einar Bjoerndalen got married
 Ski Pole Walking: Dangerous or Beneficial?