How to launch old walls of red bricks. Plaster brick walls. How to plaster brick walls right
The decoration of the room begins with the alignment of the walls. For this, a dry method is used (with the help of drywall), wet (plaster mix), or combined (piece materials). But the most efficient and reliable is wet alignment. Although it is the most time consuming, but allows you to align all the irregularities and create a durable coating.
In this article, we will look at how to choose plaster for brick walls, prepare the surface and perform a roughing finish.
How to plaster brick walls right
Wet rough finish is designed to eliminate expressed irregularities, improving the operational properties of partitions and overlaps. The technology of plastering brick wall does not depend on the type of finishing material and includes a number of works that need to be performed in a specific sequence.
Important: The black shutter of the brick wall is carried out on a fully dried brickwork, otherwise the surface will give a shrinkage, forming cracks, chips.Preparation of the foundation
Regardless of whether the plastering of the brick masonry inside is performed inside, or outside the building, it is pre-clean the surface, to make it on it - it will improve the clutch of the material with the walls.
Preparation of the foundation
The surface after cleaning should be handled by primer, put lighthouses that will achieve the same thickness of plaster throughout the area. Guides can be made of metal products, or brusons.
For your information: Lighthouses must be exhibited strictly in terms of level, without Zavalin and slopes.
An example of the installation of Mayakov
The slope of beacons corrected the level. The verticality of their installation can be checked by applying a rule for several lighthouses immediately.

Lightness installation checks
Watching brick surface technology
The solution is applied in three layers. The first is a spray - a mixture by small portions splashes onto a brickwork, completely covering its entire surface.
Tip: In order to further strengthen the solution on the wall and prevent its deformation, the rough finish will be performed on the grid. It is attached to the brass at the first layer of plaster before installing beacons.
Performing wall spray from red brick
Next should apply the base layer. It is aligned and rubbed at the end. The last layer is concerned, from pure cement. It is rubbed by a grater, the lighthouses take out and produce sealing all the grooves. The thickness of the layer of plaster on brick should be at least 10 mm.

The concerning layer is designed to create a protective crust on the surface
The stucco technology of the brick facade is slightly different from the inner draft finish. In addition to the primer, it will take the batch of seams, and sometimes the use of reinforcement, which is needed for better clutch with a smooth brick surface with trim.
On a note: Stucco for exterior works on bricks should have an increased weather resistance.More vividly about how the plaster of brick walls is performed with their own hands - video:
Choosing a rough finishing mixture
What plaster is better for brick walls? Wet rough finish of surfaces can be performed by the following mixtures:
- lime;
- cement-sand;
- gypsum.
If the building is built of brick, the best option will be plastering brick walls by cement-sandy solution. This is a simple and economical way to implement the draft finish.

The advantage of a sandy cement mixture is that it allows you to make an aligning layer of a total thickness of up to 7 cm
Silicate brick white, consisting of lime, cement-lime plaster is more suitable. The solution is applied with a layer of at least 20 mm, since this building material has low moisture resistance.
Inject to any technology better with the theory. New mixtures and processes multiplied by fantasy masters, spawned confused, to understand which is difficult even to understand. It is necessary to understand, because both among the fantasies you can find interesting ideas.
Theory usually serves SNiP. But in lowering plaster works of specific and useful information on technology - five, six lines.
Therefore, it is better to understand the basics of German construction norms (DIN) according to the book Gracenik A. and Holzapfel V. "The deductible construction of multi-storey houses." What is the interesting book?
The two-volume member was compiled by a professor and engineer by the builder, based on examining houses built in Germany in 1965-1971. All information relates to a brickwork (90% of houses in Germany.) Each recommendation has a reference to the construction of DIN.
The book was translated in 1985. Part of the technologies are outdated, but the basis has been preserved. Their experience is interesting in that 20 years earlier began to apply, the fact that we are now called "new technologies". It was time to study mistakes and make changes to the norm.
It is necessary that the information is not perceived as "Shiza" (opinion) of a separate person.
- First property. The base and primer layer.


Rules:
- On brickwork, at the time of plastering, there should be no dust.
- The masonry is made of one material. With different materials, fill the grid on the joint.
- Before applying plaster, dry brickwork must be moistened, and soaked in water is to dry.


Rule:
- Plaster must be carried out in layers. The first layer is spray.
- Sprint is performed by a liquid solution and the strongest is the strongest of the layers.
- Sprinkle preferably prepare on coarse sand.

Under the words the primer layer, the authors imply spray, and not (as many people think) - acrylic primer. Primer, on the contrary, interferes. After drying it, a water-repellent film is formed on a brick wall. So we ourselves create artificially "bad suction base".
Is it possible to prick a brick before applying plaster?
When the ground is applied to the wall immediately in front of the plaster or add to the solution - there is no harm. But if the water-repellent film has already been formed, then the ordinary cement-sandy solution (without additives) will be kept weakly.

As the solution is clinging (if you throw it as usual) on the primed surface, it is clear in the roller:
This video confuses sense. The firm "Solo" offers to use a plaster mix with mineral additives. This is another technology and for their case all the actions are correct. Stucco with additives can not be thrown onto the wall as a regular CPS - it will stick on the tool. And the CPS (without lime or modifying additives) cannot be smeared on the wall as a mixture.
Ground the wall of red brick, and then apply glue or plaster mixes as the primer layer - you can. Just why complicate and express the process:
2.Fore property. Plaster layers and solving solutions.


Rule:
- Each subsequent layer of stucco stucco should be weaker (or equal) to the previous one. That is, in each following the spray layer, the share of cement should decrease.
The statement is that too durable solution gives cracks, and between the layers it is necessary to take breaks for a durability controversial. Practice shows that cracks in spray do not harm, but on the contrary help when the second layer is applied on the same day.
3.There properties. Participation of plaster in moisture exchange.


Under this rule, plastered walls, 30 cm thick and less:

Rule:
- Outdoor plaster should not prevent moisture movement from the room to the street.
- The thickness of the walls on which the outer plaster is performed (or tiled cladding) must be at least 300 mm.
This conclusion is also fair and to the facing of the outer walls with a stoneward on an excavated surface. Moisture accumulates under the layer of plaster with tiles and in winter shoots. Most often on the base, where it is likely to freeze and disrupt the waterproofing of the top of the foundation.
This is not always the case. If the wall is thick and well distributes moisture, and there is no high humidity inside the room (or walls inside with vinyl wallpapers, or tiled), there will be no damage on the facade:

4. The hard property. Mutual effects of plaster and cement mortar.


Rule:
- Lighthouses installed using gypsum should be deleted after plastering.
- Gypsum plaster must be isolated (ground or waterproofing) from glue, upon subsequent cladding tiles.
About this technology of WEBER-VETONIT:
5.Furnished property. Salts as a factor of damage.
Salts are present everywhere - in water, which knead the solution, in cement, in the sand (especially sea). Water soluble salts in the wall are constantly moving using steam and water from the room outward.
The main danger of salinization - brick is stronger than moisture, and when crystallizing salts - increases the volume. The pressure of salt crystals does not withstand any plaster.
The strength of the compound with the base in cement plaster lies between 10 H / mm2 - 20 H / mm2 the crystallization pressure of NaCl (depending on temperature) is 55 N / mm2.
- Sixth property. Stucco on the grid.

We are talking about the impossibility of fixing the grid similar to that:

Fastening plaster grid on the fence.
Over time, the entire layer of plaster will begin to "bone" and hold on three wires.
For comparison, the second version of the mesh and its fasteners:

Masonry mesh as a basis for stucco.
Cement plaster walls from silicate brick.

Speaking about spray on a silicate brick composition 1: 3, the Germans mean cement brand 500. If you use cement M400, and a semi-annual freshness, then this ratio is shifted closer to 1: 2.5.
The best option of the contact layer (spray) for walls of silicate brick is the tile glue through the dirty surface. If the plaster is made as a basis for ceramic tiles, then this is a mandatory rule.
Stucco on the red brick ready-made mixtures.
The finished cement mixture can be used to shock the walls (mainly bathrooms) can be different. This mixture contains cement, quartz sand and polymer modifying additives. It can be a screed for the floor M150 with a plasticizer and water-retaining additives.
About additives can be said in different ways: "A mixture of cements with mineral fillers and modifying polymeric additives" or "with polymer modifiers", "plastic does not give shrinkage cracks, high adhesion to the base."
According to its external qualities (adhesion like a gypsum plaster), such a mixture differs from the CPS - cement-sand mixture.
On the packaging of the usual CPS, it is descended - "At the heart of Portland cement and fractionated sand." But it is finally understood that in front of you - an ordinary CPS or a plaster mixture, you can only prepare a solution from it.

Because of the difference in properties, misunderstanding often arises, why is this happening :

From an ordinary CPS, you can cook the plaster mix that is not worse than the factory. For this on the bucket of the solution add a bucket of any tiled glue. The more expensive the glue - the more additives in it, the less you can add.
This is as one of the possible outputs in the case indicated above (the plaster on the comb from glue). The second way is to apply the CPS on the fresh layer of glue, observing the thickness, against the foaming.
Mixtures often have a M100 and higher brand. Red brick is found M50, M75, M 100 and above. He was the case to inside the room, a strong layer of plaster broke into a layer of weak brick. On the street, this happens constantly. Therefore, when plausing brick walls in a bathroom, cement mortar, this rule can be neglected.
Sooner or later, almost all housing owners are faced with repair work. Most often have to finish brick walls. At this way today, to hide all the irregularities of the walls of the walls is plaster.
There are several ways of plaster:
- with the help of the rules. In this embodiment, the use of lighthouses. The method is suitable for walls having a small curvature;
- pre-established beacons. It is advisable to apply for walls having large irregularities.
- finishing. With the help of such plaster, the plane is aligned and prepared it under the finish finish (painting, pasting of wallpaper, etc.);
- decorative. This type of plaster serves for decorative design of certain parts of the wall and is divided depending on the application of application on: structural, textured and mineral.
Preparation of solution
To twist the wall, you should prepare a literate solution. For a brick surface, you can use the following types of solutions:
- cement. Materials for its manufacture are sand and cement. It is allowed to apply this type of solution in rooms with high humidity;
- lime. This species can be used to shock the brick walls both inside and outside;
- gypsum-lime. The solution is allowed to apply on the inside of brick walls. Gypsum - increases the strength of the plastered surface.
Tools and materials
Basic tools and materials used for wall shockting: 
- construction Kelma (trowel);
- putty knife;
- rule;
- brush. Used to wet the surface;
- rule or roulette. Used to measure the layer of plaster;
- lighthouses;
- a container for the solution;
- half-sash;
- falcon (wooden board with handle. Used to apply a solution on the wall);
- metal brush;
- level;
- the components of the solution are cement, sand, plaster, lime and water.
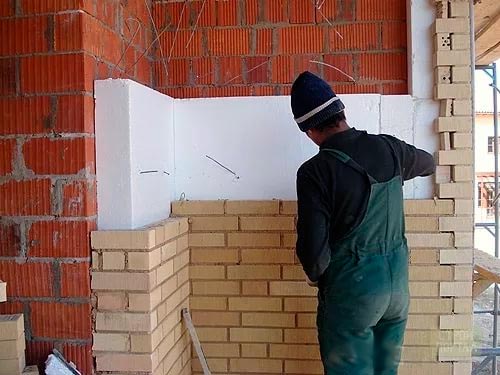
How to plaster brick wall: Step by step instructions
Preparatory work
If the laying is fresh, it does not require labor-intensive preparatory work. It will be enough to install the guides or secure the grid.
If we are talking about the old wall, you will need to hold a number of activities for its preparation, namely:
- Prepare a tool and necessary material.
- Clear from the old finish, dust and dirt.
- Clean the seams. For these purposes the iron brush is suitable.
- Using the putty to close all cracks.
- Covered by primer.
- In front of the shuttering, moisten with water with water. This will be able to reduce the risk of cracks.
- Installation of Mayakov
In order to achieve the most smooth surface of the walls correctly set lighthouses. With their help, you can control the thickness of the layer on the entire wall of the wall.
Lighthouses can be:
- wooden;
- metal.
Rules of installation of lighthouses:
- Set the first lighthouse at a distance of 0.3 m from the corner.
- The following beacons are installed on the wall after 100-150 cm.
- Every lighthouse should be aligned vertically. For these purposes, use the level.
- Lighthouses are fixed to the wall with a concrete mix.
You can start the walls in 5 hours.
Spray
Work on the spray should be started from the bottom of the wall, gradually climbing the ceiling. Works lead to the left. To do this, a layer of solution of liquid consistency with a large content of binding components with a thickness of 4-5 mm is applied to the brick wall. As a result, a solid grip with an uneven surface will be provided. With the help of a trowel, throw a small amount of this solution on the wall. After three minutes, the layer of plaster must be aligned with the help of the rule. After the mixture solidifies you can move to the next step.
Priming
The next step of plastering is a soil. For this stage, it is necessary to prepare a more thick mixture. For one approach, with a spatula, a layer of 10 mm thick is applied. Next produce surface alignment. To get a thicker layer, this operation should be performed in 2 clips.
Cover
Covering - the final stage in plastering as a result of which should be smooth  plane. The shuttering process is as follows:
- Prepare a solution. To do this, all its components carefully prepare. Sand must necessarily sift.
- Wash the wall with water.
- With the help of a trowel, a thin layer of the solution on the wall is applied.
- Clear surface.
If you need to apply a layer of a plaster mixture with a thickness of 50 mm, then work should be carried out within two days. On the first day, apply the initial layer on which notes are applied. You can make them using a spatula. Shells are necessary in order to ensure the surface adhesion with the following layer. The next day, the walls are applied to the walls and throw the final layer.
- In order to form the right corners, you need to use the level and plumb. At the final end, the corner rules should be applied (internal and external). In order for the surface to be as smooth as possible, the instrument in the process of operation must be regularly wateted with water.
- After the end of work on plastering surfaces, it is necessary to dismantle lighthouses. If this is not done, over time they will start rust and spoil the finish. Removal is carried out before the solution will finally freeze. There are grooves that need to be smeared with a solution.
- If the walls are built from ceramic bricks, then to fly to them, it is necessary to pre-conduct work on primer and reinforcing the grid.
If you need to launch a large area of \u200b\u200bthe walls, then the entire surface is better to break down and work gradually.
Make plaster brick walls are not hard. The main thing is not to hurry and clearly follow the technologies for doing plastering.

To align the brick walls inside the room and outside the plastering is often used. Cement-sand plaster is perfectly kept on a brickwork and creates a strong surface, and the perfect plane under the finishing finish can be prepared by plaster mixtures. In this article we will analyze what to plastering the brick and how to do it properly.
Stucco or facing brick?
 The type of finish of the facade must be selected at the stage of laying the foundation. After all, facing brick significantly increases the load, so its weight will be necessary to take into account.
In addition, this brick will require a separate support, as well as the bandage with carriages, and make it better simultaneously with the construction of the walls. Cancel the foundation later and foster the base is not the best solution.
Of course, the brick facing serves a very long time, it will not be necessary to update it throughout the entire operation time of the building. However, the partial replacement of the facade when choosing a poor-quality facing brick is unreal - in this case you will have to completely delete it and replace the new one.
Also note that on the construction standards, the decoration brick is allowed only in low-rise construction. For high-rise houses, it is not used. Old houses are facing them if the walls need to give additional rigidity. In this case, the foundation is needed or its complete replacement.
 Cons There are and when finishing with plaster. It will have to periodically smear the cracks and update painting. Although shrinkage cracks may appear not only in plaster, but also in brick.
Stucco finish will cost cheaper. It does not require the strengthening of the foundation and support, and the cost of cement-sandy solution is significantly lower. Further repair of plastered walls is simple - both small, and large defects are corrected easily. In addition, plastering is not a complex process, which is under the power of novice masters.
Than you can fly
For the draft brick walls, cement-sand composition is most often used. His advantages are: durability, moisture resistance, low price, simplicity of self-preparation.
For external work on brick, only cement-based solutions are used. For work inside the house, you can take both cement and.
Gypsum solutions
Plaster based plaster is more plastic, better applied and less prone shrinkage. Coatings are obtained smooth due to smaller particle size and require less finish finish (sometimes you can do without putty). Work with them is easy. They are a bit more expensive than ordinary cement (by 10-15%, if you do not take into account mixtures with improving additives).
But the gypsum plasters are well absorbed moisture and lose strength, so it is allowed to use them in rooms with normal humidity. For bathrooms, shower, baths and pools are not used without additional waterproofing or facing in a tile.
Giving cement gypsum plaster and in strength.
Cement-based mixtures
 The quality of the coating naturally depends on the type of mixture used. Cement M150-200 is used for the manufacture of cement-sand mixtures for internal work. More durable formulations are made on the basis of cement M300 and higher.
The sand of a large fraction is used as a filler for roughing plaster. Smaller sand is applied in leveling finishings. Use solutions with its addition to create the main roughing is not recommended - too large layer can crack.
The amount of sand introduced into the mixture depends on the cement brand. In the finished cement-sandy mixture, additives are often contained to give a solution of certain properties: plasticity, frost resistance, improved adhesion with the surface, etc.
Adding to a solution of plaster allows not only to improve its plasticity, but also increase the adhesion and thermal insulation properties of plaster. It is also able to absorb excess moisture, improving the microclimate in the premises. With its lack of plaster, on the contrary, gives moisture. That is, the walls placed by the gypsum composition are able to "breathe" due to good vapor permeability.
Ready mixes for alignment
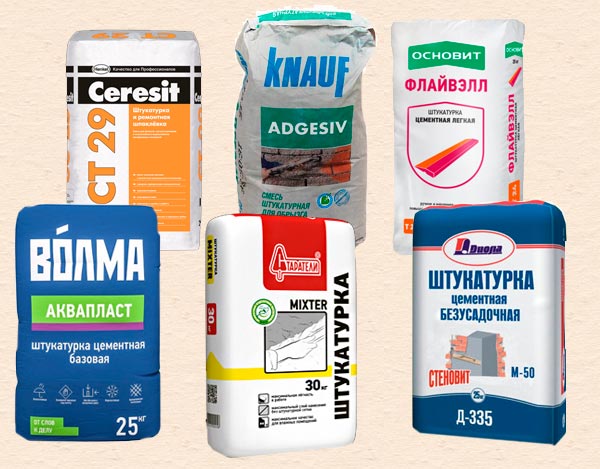
For a large amount of work, it will be cheaper to prepare the plaster on their own by purchasing the necessary materials. But it is necessary to be confident as the resulting solution. If the recipe you have not yet been tested, it is easier to stop your choice on ready-made dry mixes, abundant on the construction market.
Let us give a few examples of popular grades of cement-sand and gypsum mixtures:
- Ceresit ST29: based on cement with microfiber, has good hygroscopicity and resistance to temperature fluctuations;
- KNAUF (adhesive): cement with lime for draft works using a solution spray;
- KNAUF (UNTERPUTC) for the draft wet rooms;
- Flevell T-24 is found: based on a light filler cement, economical, can be used on any surfaces, including brick, has high heat and sound insulation;
- Studyers: highlastic cement-sand or universal cement-sand with the addition of materials increasing its frost resistance;
- Students (Mixter): based on cement and plaster for interior decoration;
- Hercules (cement-sand): very durable and moisture-resistant composition with good adhesion;
- Hercules (lime-cement): used only for finishing inside the house;
- VOLMA (AQUAPLAST): with lightweight filler, can be used both for facades and internal works:
- Unisa (Silin Facade): with special additives that increase the frost resistance;
- Unice for internal works and wet premises.
Preparation and primer of walls
Preparation of brick walls under the plaster lies in cleaning from old finishing materials, as well as dust and dirt. Cracks are expanding, they are sampled by a plaster grid, and then they are shuffled with a solid cement solution. Align you need too large potholes.

To increase adhesion (clutch), a brick wall must be primed before applying plaster. Primers are several types:
- compositions like "concrete asset", "concrete contact" with the addition of cementing additives and quartz sand; used for smooth concrete surfaces; After applying the surface becomes more rough;
- for hygroscopic materials (cellular concrete and bricks) it is better to use deep penetration primer, such as Ceresit CT17, GLIMS -PrimeGrount, Rushan soil, etc.;
- universal: It is allowed to apply to different types of surfaces, including brick walls.
It is possible to primine with a brush or roller. But faster, high quality and more efficient will be with a sprayer. How can this be done, shown in the video:
Watching brick masonry
An important question is when you can plaster walls after masonry? This affects a few moments. If the brick house is new, then he will still give a shrinkage, the foundation must pass at least one cycle of frost-defrost. Therefore, the external walls are better to leave without finishing until spring.
The masonry solution is grabbed for the clock, and the full strength is gaining at about a week. Accordingly, the inner walls of ceramic or silicate brick can be attached through the same time. With high-quality masonry shrinkage almost no. Many masters start a decoration for 2-3 days after the construction of the wall. This is due to the fact that the surface should be wet and not pull the water from the solution so that the cracks do not go.
For a better clutch of plaster and wall seams of brickwork, it is cleaned about 1-1.5 cm. The laying of the inlet is done in the same time at the construction stage, if plastering was planned in advance.

Stripping sews
Works must be carried out at a temperature of 5-30 ° C.
- Dry mixes are bred by water. Dosage and exposure time must accurately comply with the recommendations of manufacturers.
- Since the mortar based on cement or plaster mixture is captured quickly, it is not worth it too much. Focus on the consumption specified by the manufacturer, it is about 15 kg / m2 for the cement mixture and 10 kg / m2 for plaster with a layer of 10 mm.
- After complete drying of the primer layer for alignment of the surface, plaster beacons are placed in the form of metal profiles, fixed with a small amount of putty. Lighthouses are aligned horizontally and vertically with the help of a building level while putty did not grab.

- The solution can be applied manually or by a mechanized manner. In the latter case, special compositions are used for these purposes (the manufacturer indicates a package that the mixture can be applied with a machine manner).
- When plastering with their own hands, the solution is thrown onto the wall with a special bucket or spatula. The application of the layer with a thickness of over 50 mm is undesirable - it can crack, if necessary, you can add a new layer after complete solidification of the first. With a smooth masonry, the thickness of the plaster on the brick will be 1-2 cm.
- Then until the solution grabbed it stretching it with the rule (a construction tool in the form of a long metal strip) along the lighthouses. Start the wall from the bottom and raise the rule up, moving slightly from the side to the side.

- If the mixture did not fill in all the space between the beacons, and the pits remained, then the spatula is added to these places, and it is again aligned with the rule.
- For the final alignment of the walls make grout of the resulting surface. Using a grater with a sandpaper or a grid, remove all irregularities, joints of the layers, grooves. The grout of cement-sand plaster can be carried out without waiting for its complete drying, otherwise it will take more effort.
- Before finishing the room with wallpaper, painting or decorative plaster, the aligned wall must be projected and sharpened (plaster or cement putty).
The putty differs from the plaster with a smaller particle size, so it creates a perfectly smooth surface. But it is not always necessary, for example, when cladding the walls, tile or apply texture plaster is not necessarily. More details
Necessary materials and tools
For plastering the wall you will need the following tools:
- mortar for plaster (material with which you will work);
- master OK;
- drill with a special nozzle or construction mixer (for the preparation of the solution);
- rule (as long as possible);
- spatula (different sizes);
- grater (for stripping plaster);
- construction level (for more practical alignment);
- metal lighthouses (for even application);
- scraper (to remove worn coating).
Instructions for plastering brick wall
Briefly describe what will be discussed. How to launch a brick wall? For a start, as in all construction work, I will prepare a working surface, prepare a solution, bought in advance in a construction store, then put the material on the basis. The final stage will be putting plastering the working wall. So, proceed.

Surface preparation
It is good when the new walls in the new brick building are standing, and waiting for your outfit. But it happens that you have to remove the old material, since for more than 25 years it does not serve and has already been covered with cracks and numerous flaws. If you apply a new coating on the old, I'm afraid that you have all the pieces of slices. Therefore, I advise you to remove the old basis. But before you begin to cover the entire surface with a hammer, perhaps not everything so nevertheless and pieces of plaster do not fail, then you should not remove all the coating. It is possible that only one wall needs to be treated.

To begin with, we have a well process the work material with hot water over the entire surface. It is necessary in order to be softened, and when working it was as few dust as possible. Use the respirator while working and well ventilate the room to avoid heavy consequences. During work, repeat this procedure several times, as water has a drying property. Then take a big hammer and try to break through the wall. The whole product that was badly fixed will disappear immediately. The remaining pieces, starting on top of the ceiling, pry the spatula, driving it at an angle.

If the base was fixed tightly, then the perforator can be used. Bulgarian with a disk for concrete works can be cutting the surface into small sectors, just as gently cut through the angle.
Carefully clean the seams in the brick, since I took it to do, so do the conscience. Carefully review that after removal there is no small pieces, they are not for you. After removing the product, it is desirable to moisten the entire brick water.
New stone surfaces are easy enough to clean from dirt and dust, and for more complex and mass contamination, you can use a steel brush. You also need to remove unwanted cement protrusions between bricks.
For silicate brick, the situation is a little different. Since silicate brick, in contrast to ceramic brick, has a smoother surface. Before installing lighthouses, fasten the entire length of the wall, reinforced with the grid. It will be able to fix the plaster and help to avoid cracks when the plaster is drying.

I take an anti-corrosion coating with a size of 20 × 20mm cells. To secure a dowel, distributing them all over the wall in a checkerboard order. Dowel I have 30 × 40mm apart from each other. I start installing the reinforced mesh below up. It is enough elastic and easy to work. You can hang a knitted thread over the mesh on a dowel to hang up with additional beacons.
Install lighthouses
After cleaning for a clearer and smooth work, you will need lighthouses. Which will help to twist exactly and with the same thickness throughout the surface volume. To do this, you will need metal lighthouses and the construction level. Usually the lighthouse looks like a T-shaped small profile made of galvanized steel. The whole work performed by you work depends on the right placeacination.
Having retreated 15cm from the angle of the wall, apply a cement mortar with an outline, then press it with a vertical beacon. Follow the procedure in the opposite side of the working surface. Then climbing upwards along the angle, throw the solution and clamp the lighthouse to control the smooth level of the level installed. Thread (you can use the fishing line it is more durable) between two lighthouses is sufficient from above and below the wall. The thread can be fixed on the oaks that set between two bricks so as not to damage the surface of the brick.
Watch that the thread would be stretched exactly due to the construction level and did not hurt anything.

Preparation of solution
In a construction store you can buy a ready-made cement-sand mix, but it will be more expensive. Since you need a large amount of mixture this is not economical. You can make yourself prepare a cement-sand mix from a dry analog, which will be cheaper and does not take much time.

In order to prepare a solution you need: water, sand and cement (M400 or M500 brands). The mixture can be prepared in any metal container that is not needed in everyday life. For cement M400, we use the proportions of 1kg cement for 3-5 kg \u200b\u200bsand, and for cement M500, we use the proportions of 1 kg cement by 4-7kg sand. With a drill with a special nozzle or construction mixer, we thoroughly mix, slowly adding water. The amount of water is determined independently, you must have a thick solution, in the form of sour cream.
If you bought a ready-made mixture that you want to dilute with water. That package from the manufacturer already shows the cooking technology. Basically, you gain the specified amount of water in bucket and portions add a mixture into it, just mixing thoroughly.
The main rule is a row mixture input, and not vice versa, otherwise the solution will take lumps. During use, try to mix as much as possible, so that the plaster is neither frozen, add water.
Application of plaster on the layers
And so I will start the most important issue: "How to launch a brick wall?". When all the preparation is over and installed lighthouses, a mixture can be prepared to work to work that you can view on video. I usually nano plaster with three layers, as they are called: spray, soil and covers.
- Spray. The first base is spray, the thickness of which should be approximately 4cm. I apply a solution of sour cream-like grooves and smooth smooth over the entire surface. This layer helps to align all flaws and roughness based on, as well as serves as an excellent clutch. Start the smoothing of the solution, you need from below gradually climbing up "shaky-shaped" movements. After that, leave the layer to not complete drying.
- Priming. This layer is applied, without waiting for the complete drying of the previous layer, it is enough that the spray hardened. You can check the level of drying by clicking on the stucco with your finger. The solution should not turn. Soil The basic step of plastering on which a flat surface is installed. The tough plaster is applied as the same method as the previous layer. It is desirable to distribute in several layers, but not less than two. I try to reveal this layer to achieve the most smooth surface.
- Narying. The final step of plastering is to achieve a finally smooth work surface. The soft layer of the sour cream-like solution is applied with a thickness of no more than 2mm and carefully smoothed. The main rule is to avoid falling into a solution of large particles of sand. Therefore, I try to sift the sand before cooking a solution. After all, it is not enough that when smoothed, there are not necessary divorces, but during the grout appear dents. The poet is better to carefully approach the preparation of the solution for this layer. If immediately after applying the layer, I need to start painting without shtpocking, I do not add sand into the plaster.

Grouting plastered wall
The most beloved my work is grouting. After all, it is not enough that she is painstaking, so also very dusty, but without her anywhere. This technology is to begin after finally drying plaster. Press the finger to it if there is no recess, then you can start. For this I use a clutter board. Put the pre-respirator and open all the windows, it will be hot. Start the grout, it gradually rising upwards, circular movements to achieve perfectly smooth surface. I try to gave the surface and placing the surface during the grout. There is still a way of grouting into overclocking, that is, the straight movements of the hand you drag up and down and right-left.

All the work is over, you can now sigh and start finishing work. I tried to maximize the material, how to plaster a brick wall. For a more visual view you can view the video. Do not be afraid, proceed and you will succeed!
Video "Plaster brick wall with your own hands"
For more detailed work when plastering, you can view the video.
 Why you can not give icons
 Is it possible to give icons as a gift: Signs, the opinion of the Church
 A year ago left her husband, and now I do not know what to do