Alignment of walls
Smooth walls are a rather rare construction phenomenon. This sin even modern developers - buying an apartment in a new building, you have to eliminate small flaws. As for the buildings commissioned 20, or even 50 years ago, the walls there before decorative finish require serious training. Alignment of walls is a rather long and painstaking work, however, the advice of experienced masters will help to cope with this task even a newcomer.
Many people, rapid repairs, skip work related to surface preparation. Explain this solution in many ways: Some wish to save money, others - time, third and consider this stage in the insignificant.
Wall alignment becomes a guarantee of high-quality and beautiful decorative finish.
The drawing on the wallpaper does not swim, the tile is securely attached and creates aesthetic view in the room. The cost of draft works is quite accessible, especially if you spend them on your own.
Better to level the walls
How to level the walls in the apartment? To answer this question, you should conduct a thorough examination of the surfaces and identify the amount and size of irregularities. For this, the following tools will be required:
- nails;
- a hammer;
- a plumb or a level of 2-2.5 m long;
- threads.
One of the upper corners are driven by a nail, while the hat should perform from the wall for 2-3 mm. This mark will be the first lighthouse. A thread is tied to the nail, at the other end of which some cargo is attached (nuts nuts). The length of the thread should be such that the nut is barely reaching the floor. The absence of oscillations of the nut in a suspended state indicates that the thread formed a straight angle with the floor surface. It is here in the lower corner (next to the nut) a second nail ridge. Hand nail and thread after that should be located on the same line.
The same principle of operation is used when driving nails in opposite angles of walls and partitions. For the detection and measurement of irregularities, long threads cross will stretch. From the top corner, the thread is pulled to the bottom corner of the opposite wall and vice versa.
Such a guide from crossed threads will allow you to see all the flaws of the surface. If deviations are 10-15 mm, then you can do with plaster and putty. When irregularities are more, it is better to choose technology using drywall. How to align the wall with your own hands in one way or another? About this a little later.
2 ways to level the walls: plaster or trim
The main methods of alignment exist 2. This is use:
- plasterboard;
- dry plaster mix.
It is necessary to make a choice in favor of this or that technology, taking into account the status of the walls and the selected decorative coating.
Wizards on the interior of the premises are recommended to use drywall sheets for further putty, painting walls and shook wallpaper. For tiled masonry, the alignment of plasterboard does not fit, which is explained by the smoothness of the surface preventing the clutch.
How to align the walls for ceramic tiles? This uses shocking technology. This method is considered universal, as suitable for decorative finishing by any materials.
There is another way to make a wall in the house perfectly smooth - apply putty, but it suits only in some cases when the walls of the wall are completely minor, and it is necessary to achieve an ideally smooth surface.
Alignment of walls with plaster
The process of plastering the surface is quite long and complicated, so before aligning the walls with your own hands, it is worth asking for the cost of the work of specialists. It is possible that the price will be acceptable and much easier and faster will book this service.
Before you prefer this technology aligning the surface from the inside, it is necessary to weigh its pros and cons. Among the advantages should be called the following features.
- A small layer of plaster allows you to achieve a minimum decrease in the size of the room. Due to this, it is suitable for use in close spaces.
- Plaster is ideal for premises with any level of humidity and temperature mode.
- Any finishing material is well attached to the aligned surface.
- Suitable for both in common and for point alignment of individual small sites.
However, plastering technology has several drawbacks.
- Ineffective with large irregularities. For alignment of walls in the apartment, a thick layer of plaster will be required, which will increase the cost and labor costs (faster and cheaper to use drywall).
- To fulfill such work, skills will be required, so the newcomer will have to work in the process.
- Long drying (no less than a week).
Surface preparation
Before you start working on alignment, the surface must be properly prepared. The quality of the work performed and the service life of the plaster layer depends.
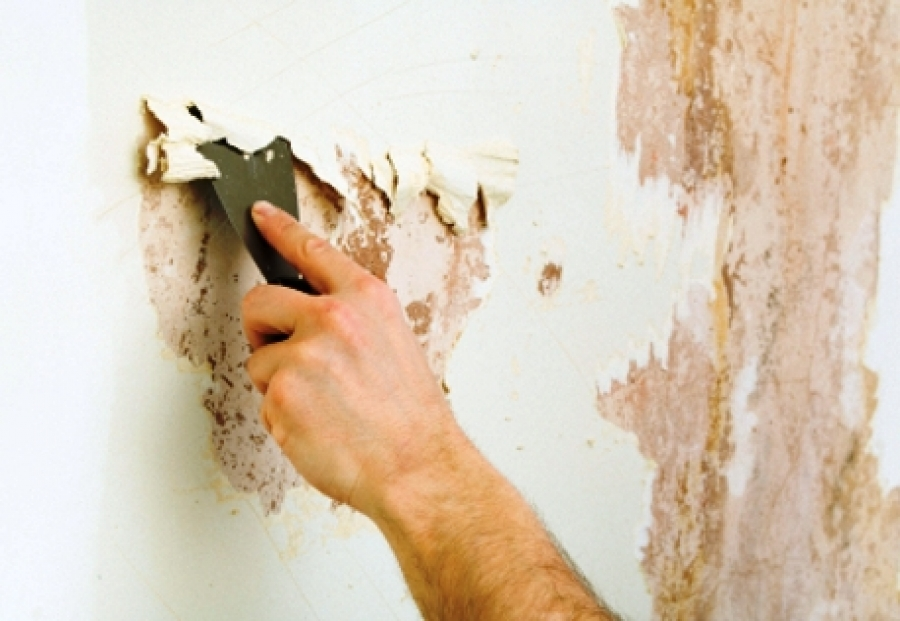
How to align the walls that already have an old layer of plaster? First of all, it should be removed everything that chips and penetrates. It is most convenient to do it with a spatula. If the wall is in the form of durable and there are no potholes and cracks, you should carefully catch it up. In those places where the sound hears the gloover, probably there are detachments of the plastering layer. Now it is still well held, however, the fresh layer of material can cause a detachment and partial collapse. For this reason, it is desirable to get rid of the old plaster layer at all, clearing the wall to the ground.
If there are cracks on the surface, they should be squealing. Large potholes close apart separately, since the plasters have limitations on the thickness of the layer.
The old layer of paint is also not the best basis for applying plaster - in this case, the surface will be too smooth. A special primer or applying the wall of the wall of the walls of the wall will help correct the position. Their quantity must be about 100 pieces per quarter. meter. Perfederator or Bulgarian will help to cope with such work. In the absence of power tools, the old method will come to the aid - applying notes with an ax.
The next stage is the applying of primer. It increases adhesiveness and makes a layer of plaster durable.
Which we use mixtures for alignment of walls
Selecting the material for alignment of the walls, it is worth paying attention to its value. Too cheap building material speaks about saving on production technology. Such mixtures can quickly flaps, "flow" and deliver many other inconveniences.
Differences of dry mixes lies in their composition. They can be:
- plaster - able to maintain a good microclimate indoors, so ideal for living room, bedroom, children's and other residential rooms;
- cement - more suitable for rooms with high humidity (bath, kitchen).
Requires attention and such an indicator as the maximum permissible thickness of the layer. It is indicated on the packaging.
Wall plasters: Step-by-step instructions
Before losing the walls, you need to prepare the necessary tools:
- master OK;
- grater;
- half-sash;
- rule;
- falcon;
- level;
- ladle;
- wide brush;
- metal lighthouse;
- differential or other container for the preparation of the solution.
Align the walls in the apartment can be 2 methods:
- with the help of lighthouses;
- with the help of the rule.
And the other option has advantages and disadvantages.
Plaster for beacons
Work is carried out in stages. How to align the walls in all the rules?
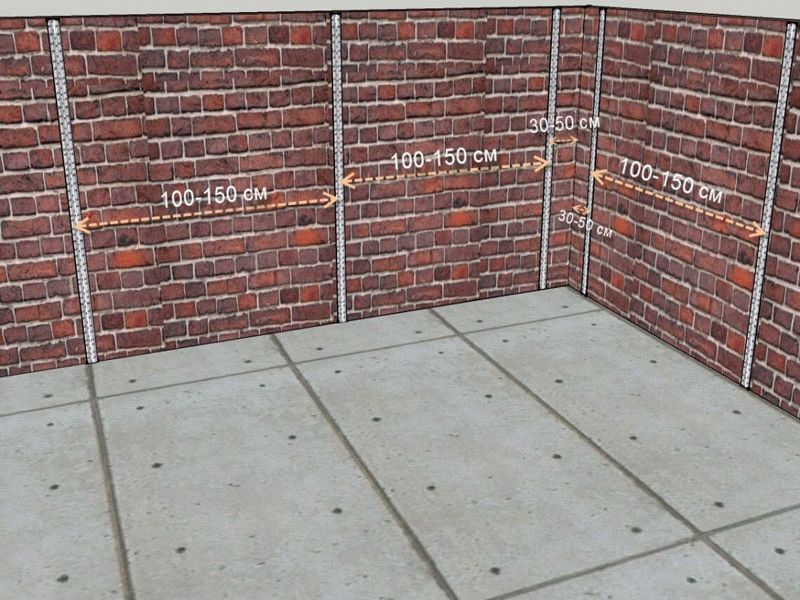
- Installing beacons. T-shaped profiles are used as lighthouses (they can be replaced by rails). The distance between the rails is equal to the length of the rules - its side parties should rely on the nearest profiles. To the surface of the walls, they are fixed with the help of sketched mortar "pisels". While the solution did not have time to grab, all profiles need to be aligned in terms of level. As a result, all rails should be in the same plane. The extreme profiles are fixed not at the corner of the room itself, and at a distance of 30 cm.
- Preparation of the mixture. The solution is prepared, relying on the instructions and manufacturer's recommendations. A large amount of solution to breed at a time should not be - it is pretty quickly freezing (especially with the gypsum composition).
- Apply plaster. The solution is attacked between two lighthouses with a spatula (by volume the solution should perform a little over the rates). The rule leads upwards, carefully distributing the mixture over the entire niche. At the same time, the rule should be restored by the edges on the rail. Thus fill the entire space between profiles.
- Removing profiles. After the solution serves, the rails are pulled out, and the holes from them are filled with a solution and smoothed as a grater.
Leveling rule
In this case, the work is done not on the entire wall, but only on its problem areas. During operation, the rule, it is pressed against the wall and distribute the solution until the gaps will be forgotten between the rule and the wall. Even if the alignment made by "on the eye" gives a small bias, it is almost no noticeable. At the same time there are savings and time, and forces.

How to align the walls with plasterboard
Such technology equalizing the walls involves the use of plasterboard sheets. This method was widespread thanks to several advantages.
- Even big irregularities and surface flaws are eliminated.
- It is possible to apply indoors with walls from any material: wood, concrete, brick, gas blocks.
Plasterboard allows to enhance heat and sound insulation indoor performance.
However, this technology does not exclude inconvenience.
- The volume of the room is noticeably reduced.
- In rooms with high humidity, plasterboard plates are deformed.
- After mounting the plates, additional finishing is required (this is reinforcing seams, shpocking, primer walls).
At the same time, plasterboard allows you to quickly and without any particular difficulties to level the walls with your own hands without attracting masters in two ways:
- frame;
- on glue.
Frame method for fastening drywall
This option is chosen in cases where:
- strong wall curves;
- need additional noise insulation and insulation of the room.
All work can be divided into steps.
- Preparation. In this case, to level the wall requires minimal preparation - remove the wallpaper and peeling layer of plaster.
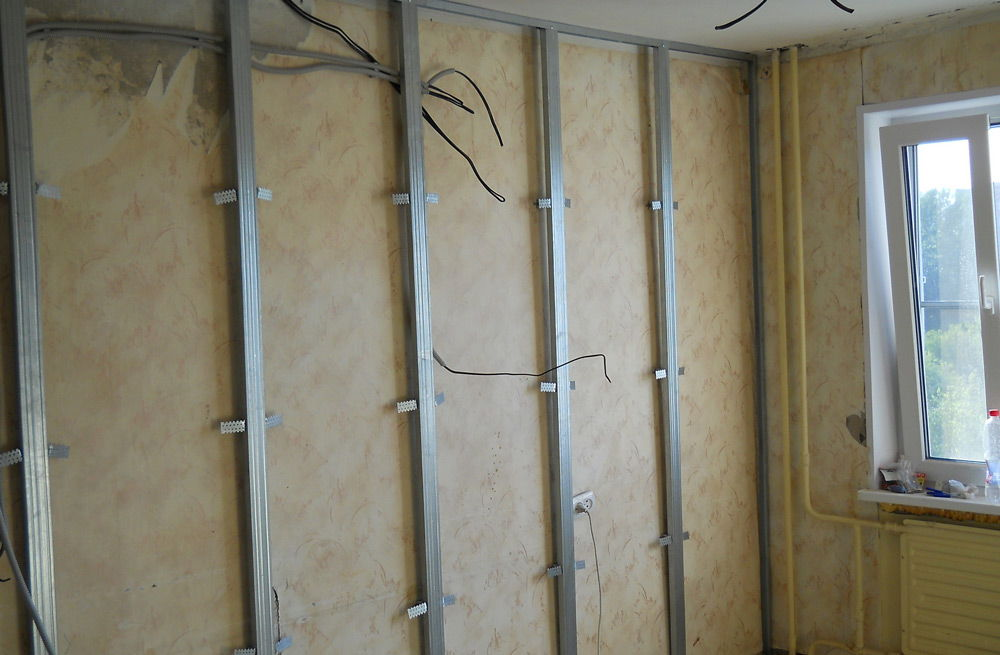
- Marking. First, the line of the exterior edge of the future wall is applied to the ceiling, after which these marks are transferred to the floor using the plumbs. They are needed to attach vertical racks (fasteners are made at a distance of 60 cm).
- Preparation of guides. The guides glue the damper tape and attach them to a dowel-nail to the floor and ceiling. The mounting step is 40 cm. The suspensions are also attached to the wall using a dowel-nail.
- Installation of racks. The height of the racks should be about 1-2 cm less than the total height from the floor to the ceiling. They are installed in guides and fasten with self-draws. The correct installation of each rack is checked by the level, after which they are fixed on direct suspensions. Horizontal jumpers are installed to give the rigging frame (especially in those places where horizontal shelves of plasterboard sheets are located).
- Installation of plasterboard. Sheets are cut into separate pieces with the necessary dimensions, drill holes for the outlets and switches. Using the plane, 4-degree chamdes are preparing (in places of connection). The fastening of sheets to the frame is carried out using self-tapping screws at a distance of about 30 cm. At the end of this stage, a finishing finish should be completed.
Plasterboard on glue
When aligning the walls, you can use this way if irregularities are relatively small. Progress.
- Preparation of the surface. The old layer of decorative coating is removed, eliminate all details of the material. Antiseptic primer is applied to the walls.
- Installation. After cutting the sheets of plasterboard, the glue is not applied to the entire surface of the sheet, but on its side sides. For greater strength, there are several "pisels" of glue in the center. Pressing a piece of drywall to the wall, you should check its position using the level and carefully press for 2-3 minutes. After that, the finish alignment of the walls.
Repair is always a long and expensive enterprise. How to align the walls? The main thing is to follow the advice and recommendations of the finishing specialists. With their help, even a beginner will cope with such a case.
 Alignment of walls
 Green curtains for calm in the house
 Curtains on the doorway