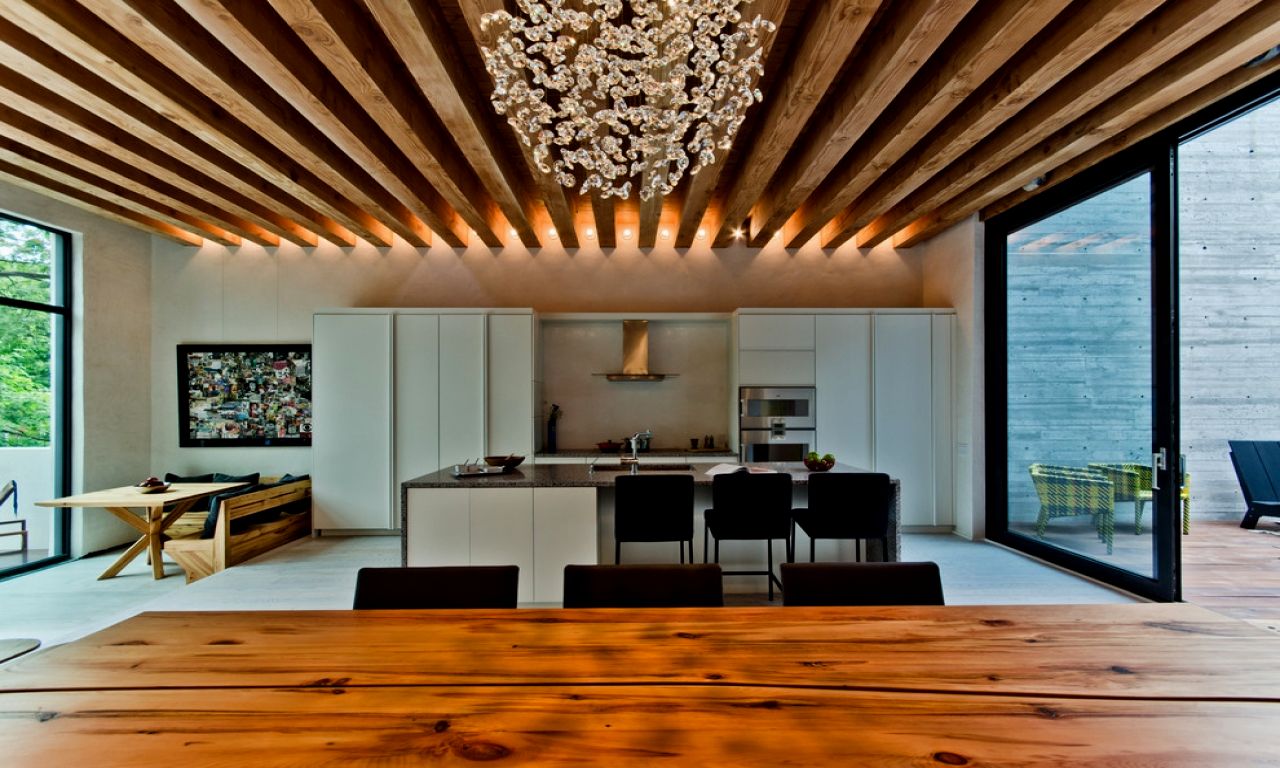
The ceiling finish in a wooden house: plaster, plasterboard, wood, lining, veneered panels, array and embossed shaft designs. Selection of material for the ceiling in a wooden house Wooden ceiling in a private house with your own hands
The ceiling of the tree house is usually manufactured in two main ways: by beam bearings (beams and boards between them) or a solid routing method (from logs). The options for its decoration will differ, and to the ceiling of the logs will have to do the crate, and in the first case, the supporting structures will be rafted and beams. The main task of the ceiling decorator will be the desire to make the ceiling more aesthetic, reliable, without hurting the unique properties of breathable wood bases.

Ceiling in a wooden house - simple and complex solutions
If the basis of your ceiling allows you to warm up the ceiling in the attic high quality, polish and coat with varnish from the inside, it will be the most optimal solution to its finishing. But very often in the construction process does not pay attention to the quality of ceiling boards and beams, so you have to resort to decorative coatings.
In search of the ideal solution, many stop on the laminate "under the tree": In this case, the ceiling will look perfectly "wooden" and beautiful, especially if you build point lights into it. The main concern for the owner of the premises will only be the prevention of moisture penetration under the framework, to which such not very loving dampness is attached as laminate. And if the house is not satisfied, the design can give cracks in the places of bonding panels. But usually the ceilings are decorated in a couple of years after the construction of a wooden house.

Wood ceiling finishes options
Just if home owner it is decided to finish the ceiling panels,now let it be a panel of a wooden array of valuable trees. Panels consisting of frieze, plinth and directly panel itself are made according to individual parameters, they remain only correctly mounted. This is not the cheapest way to design the room, but it is worth it! This ceiling can also be embedded, so if you live in a two-three-story house, do not place above the room with such a beautiful and expensive ceiling of sanitary nodes. Natural wood after severe wet can crackue when drying. Per panels require special careand the string only intended for these purposes compositions.

Decorative functions have robes structures, In which rakes of different formats and structures mounted between beams can be used to not make the surface of the ceiling monotonous and boring. Each rail must be covered with antibacterial and refractory impregnation. But the rush ceiling or ceiling of the clap has a number of advantages compared to the panel decor:
- The ecological component of the design is preserved.
- The possibility of selection of color and textures, taking into account the individual characteristics of the room, its stylistics, furniture.
- This material is not afraid of moisture.
- It is easily cleaned even without the use of detergents.
- The possibility of mounting communications inside the design. When lined with laminate, communication components are also hiding behind the slats, but if the ceiling and walls have irregularities, wires and other hidden components can be seen.

Beams, multi-layered and other ceiling decor elements in a wooden house
When covering the panels of the rolling ceiling, fox beams made of polyurethane can be used. The finish made in contrast significantly increases the aesthetic component of the interior.
When installing lining, Reques on the ceiling, made by the beam binder, can be melted with carvings, burning and painting on wood. If the rails are monotonous, you can always find a way to decorate (or paint!) Some fragments, and the beam decorated with the patterns generally look great.
Opportunity not to save on top And the space makes it available to such design ceiling, as a few levels or make hinged ceilings. They can be done not on the whole space, leaving opportunities for combinations with wood.
Talking about the panels, we did not mention the veneered panels from MDF, Excellent imitating any type of wood. With proper waterproofing, if we are talking about a single-storey building and above the ceiling - the roof, such panels will not be bored, and with their help you can perform interesting decorative solutions.
When finishing the living room in combination with any varieties of the ceiling decor, stained glass windows can be used - from custom-made designer to manufactured using self-adhesive film. Their internal illumination will add luxury.

Ceiling in a wooden house - old proven methods
One of the most standard solutions is a plasterboard ceiling. This material has the pros and cons. The advantages include its ability to breathe and disguise communications, to minuses - the need for putty and painting, as well as a tendency to deformities. For the prevention of the latter, plasterboard should be mounted on a metal frame. And he follows the question of whether the material will withstand your metal design?
The plaster until recently was considered the only right solution, but if the owner of the house does not know how to plaster, he will have to hire a master. The slightest flaws are perfectly noticeable on the ceiling. A set of dranco seta is stamped before applying the solution.
Another simple and economical method is a plywood coating with one polished side. This type of work is impossible to carry out alone, assistant required. If the plywood is high quality, it will be enough to cover with varnish, picking up the racks for masking joints. If its surface is not aesthetic, it will have to put out and paint.
And, of course, it should be remembered that before starting work for any of the selected types of ceiling decoration, the base should be thoroughly impregnated with antiseptic impregnations, and to use primer before painting.

Ceiling in a wooden house - Photo


After the completion of external work during the construction of a country house, you need to start a complex but necessary process - interior decoration. Usually, the internal design begins with the question than to separate the ceiling in a private house. The proposed stating will help determine the choice of finishing material.
Finishing options
There are many decent materials for finishing the ceiling in a private house. These are traditional and modern materials that meet the most demanding taste.
The main options for finishing the ceiling in a private house:
- whitewash;
- staining;
- plinths from plaster with stucco;
- decorative plaster with plinths;
- suspended structures;
- wood tank;
- stretch canvas;
- designs made of plasterboard sheets;
- wallpaper.
An important role in choosing the type of ceilings in a private house plays the need to align the draft coating. So, if you mount a suspension structure, then it is not necessary to align the draft surface. Communications and wiring will close the suspended construction.
Any of the options for finishing the ceiling of a private house has its advantages and cons. What kind of registration method choose depends on the height of the ceilings, interior style, budget, taste and preferences.
Consider some more materials from which the ceilings in a private house do.
Painting
One of the easiest ways to design the ceiling space. A classic version will be the surface of the surface with white. But, such registration is hardly suitable for the bedroom or living room.
Color paint should be taken into account. So, dark tones visually reduce the height of the room. But painting with light paint, on the contrary, will make the room spacious.
If still a desire to use dark tones appeared, then they are recommended to be combined with pastel colors on the walls. Decorative coloring compositions with different effects can be used.
Plaster, gypsum or polystyrene foam
Easily mounted on the surface of the plate of polystyrene foam, or plaster panels and plinths with stucco. Such a coating is usually white, but after installing the panel you can paint with any shade.

A good solution will be the design of the Country House ceilings with decorative plaster, which can be smooth, texture, with imitation of marble or patterned panels. But, decorative decorative plaster requires special skills.
Suspended structures and stretching
Because of the peculiar design of the private houses, it is necessary to think than to close the wiring, ventilation and various elements of communication. For this purpose, suspended plasterboard design is suitable. Lighting devices can be built to the surface. These are LED ribbons or point lights. 
The correctly selected suspension design makes it possible to visually increase the space, use various design solutions.
You can combine suspended structures with stretched canvases.
Wallpaper
On the surface you can stick decorative wallpapers in the form of strips. You can stick the wallpaper of the same color in the bedroom above your head. And for the rest of the ceiling, you choose the material of another color solution.
To enclose the surface with wallpaper, pre-align the working surface. The coating should be smooth. Photo wallpaper is suitable for children.

We can add decorative stickers that imitate the tagged starry sky, or beautiful plants.
Nuances when making a country house ceilings
Choosing, from which to make a ceiling in a private house, you need to take into account the features of the device of the draft surface of suburban structures.
To see the ceiling in a private house from the inside, you must perform the following additional works for the draft coating:
- mount thermal insulation;
- lay hydro and vaporizolation layers;
- it is necessary to take care of insulation, and find high-quality material. For insulation, mineral wool, crumples, sawdust and other materials are used.
After installing the necessary layers on the floors, proceed to the interior decoration.
What ceilings are better?
Sometimes it is difficult to decide and decide which ceilings it is better to do in a private house. After all, competently decorated ceiling space should be not only beautiful, but warm and practical, with a long service life.
The problem of ceiling decoration exists where the premises are not heated in winter. If in such a private house, separate the ceilings with wood or plasterboard, then in the cheese and unheated indoor the coating will soon become unsuitable and starts to collapse. Therefore, if the house is used only in summer, it is best to close the ceiling in a private house with a suspended construction. The panels of plastic and PVC are fitted, beam suspended structures.

It is necessary to pick up such a facing coating that the temperature differences can withstand. You can sew the ceiling of the private house with a tensionable blade from vinyl film. Such a coating is not deformed at minus temperatures and withstand the impact of heat.
If the country house is heated to the cold, and they live there all year round, then the best finish for the tree. Wooden ceiling coating, with proper surface leaving, serves a long time. In addition, such a finish is safe, eco-friendly and durable.
You can see the ceiling of the private house with plasterboard. Such a coating allows you to hide almost any defects of the base surface. After mounting plasterboard sheets, you can perform an additional finish. The surface can be painted, stick wallpaper, or re-organize plaster.
Finishing low ceiling
Not always, the ceilings of the country house are characterized by a large height. In many private buildings, the height of the ceilings is small. To visually increase the height, you need to seriously approach the question than to separate the low ceiling in a private house.
- when the ceiling surface is cleaned, only light tones;
- you can use a glossy coating if the tension canvas is mounted;
- mounting in the coating lamps, it is better to abandon bulky lighting with a hanging fastening. Such lamps visually reduce the area of \u200b\u200bthe room and take the already a small height of the ceilings;
- in the bedroom, for a visual increase in the height of the room, you can make a coating that differs in color from the entire ceiling.

Furniture is played for premises with low ceilings. So, if the ceiling finishes are correct, but the furniture is high and massive, which will not increase the height of the effect.
How to separate a wooden ceiling?
To decide on the choice of finishing materials for the ceiling of a private house from a tree, you need to consider the features of the ceiling ceiling device:
- the overlap of the wooden house is lightweight, and made with the help of beams;
- there is a space between the beams that is filled with insulating material. Insulated space closes with decoration;
- the house from the tree gives shrinkage, which affects the ceiling coating.
Separate a wooden ceiling in a private house best of all wood materials. Natural material combines with any style of a country house, will maintain the optimal level of temperature and humidity.
Important: When choosing a tree for finishing the ceilings, it is necessary to periodically process the coating with special means that protect against moisture.
If you mount the wooden ceiling for the bathroom and in the kitchen, that is, the probability of the appearance of mold fungus. In rooms with high humidity it is better to abandon the design of the ceilings with wood. For bathrooms of a wooden house, a stretch coating is suitable.
Wood coating
Wood wall tank is considered the most common type of cladding, thanks to the following properties:
- good noise insulating and insulating properties;
- the ability to close the ceiling defects;
- no surface preparation is required;
- long service life, if you properly care for the ceiling. It is necessary to periodically soak the material with a special composition;
- quick installation;
- suitable for any design solutions.

By cons of the lining refers to the possibility of deformation with sharp temperature differences and ignorability.
Usually it is used for ceilings with pine, linden and oak, larch.
Plasterboard finish
The trim from plasterboard for the ceiling of a wooden house has such advantages as:
- it uses well to air, excluding the appearance of condensate on the surface;
- ability to hide defects, and close wiring with communications.

The minuses of plasterboard coverage include the impossibility of fastening directly to the wooden ceiling. It is necessary to pre-mount the framework. After installation, you will need to perform additional work. The surface is putty and painted. You can take the surface with wallpaper.
Conclusion
Choosing the material and the method of fastening the ceiling for a private house, you need to take into account the height of the room, the presence of irregularities and surface defects. An important role is played by lighting, which also affects the visual increase or decrease in the height of the room.
When choosing a ceiling finish, you need to adhere to moderation in the color decision. The upper part of the room should be combined with the shared style of a country house. The ceilings should be a real inland decoration of a private house.
New trends in the design of the ceilings in a private house


Video on the topic
The covering of the ceiling surface in a wooden house - the task is not easy, because you need not only to align the base, but also get a practical, beautiful and durable coating. Before we see the ceiling in a wooden house, you need to familiarize yourself with the characteristics and features of the use of suitable finishing materials. We will not only tell you how to seize the wooden ceiling in a private house, but also describe in detail the technology of manufacturing the ceiling surface with the simulation of a bar.
To know exactly, the better to adhere the ceiling in a private house, you need to decide on the purpose of the room and the requirements for its finish. It is also worth considering the features of the processes of the processes in the room, the temperature and humidity regime, the seasonality of living in the house, the features of its heating, as well as the base material.
Important! Since in private overlap homes most often wooden, natural air circulation is important behind the ceiling end. This will be a reliable protection against condensate accumulation and the appearance of mold, which causes damage to finishing and carrying overlap structures.
Ceiling surface sheat
The coiling of the ceiling indoor can be the most different depending on the dimensions of the product and the wood breed from which the rail is made. Cheaper will cost elements from coniferous rocks. The most expensive, beautiful and high-quality planks are made of expensive rocks from wood. The width of the RECEX ranges from 12 to 30 cm.
The choice of wood breed, thickness and deck density is directly related to the purpose of the room. If it is decided to strip the ceiling in a room with wet processes, it is better to choose products from larch and other breeds resistant to high humidity. To arrange the ceiling in a steam room, sauna or bath, lamellas from coniferous rocks do not apply, therefore, with their heating on the surface, resin protrudes.
Tip! The cutting ceiling in a residential room is better made from rails made of Elm wood, poplar or aspen. Such products are characterized by beauty, durability and acceptable price. You can also use a combination of rails from different breeds.
More often use rail-house types. The outer surface accurately imitates the rounded timber, and due to the locking compound, the monolithic surface without seams and slots is obtained. Such products undergo special processing in the factory conditions. They are impregnated with antiseptics and antipirens, after which the wood is reliably protected from fire and damage by microorganisms.
Important! Rakes are mounted on the carrier frame from a wooden bar, so the height of the room will slightly decrease.
Clapboard
Solving, the better to see the ceiling in a wooden house, many owners prefer lining.

This finish has many advantages:
- Wooden lining reduces heat thermal loss and protects against external noise.
- Different ways to finish with clapboard are ideally suited to a wooden house and harmoniously combined with the material of the walls.
- If the framework of the installation is used, then you can hide the base defects, pave heat-insulating materials and engineering communications, set the built-in lighting.
- To install such a finish, you do not need to prepare and level the base.
- The lining can be treated with impregnations to increase service life, tint, dye and open varnish in order to improve the appearance.
By cons use of this material include the following:
- the product is easy to focus and maintains burning, but this deficiency can be smoothed by using flames;
- the boards need additional processing by antiseptics in order to protect against damage to rot and mold;
- due to the drops of moisture and temperature, the product is deformed.
Tip! Ceiling lining with clapboard looks much more interesting if the sections with decoration from this material alternate with ceiling beams. You can also decorate the surface of the painting or artificially creating boards.
Alpharey finish
Not only finishing materials for the ceiling can be applied to decorate the ceiling surface in a wooden house, but also other methods for decorating, for example, painting. Such a decor is also called alfrey finish. To work, you will need only high-quality paints and brushes. Even in the absence of drawing skills, the ceiling surface can be decorated with ornament or patterns using pre-prepared stencils.

At the same time, it is not necessary to paint the entire ceiling. You can decorate the pattern of separate sections of the ceiling surface or protruding beams. The main condition - the basis should be smooth and even. The painting is suitable for the chipboard, plywood and wooden panels.
Finishing with plasterboard sheets
Plasterboard is very popular. It is used to align the wall and ceiling surface in homes from different materials. Moreover, using gypsum plates, you can create not only single-level ceilings, but also complex multi-level designs with backlit, built-in luminaires and curvilinear surfaces.

The benefits of using drywall can be attributed to the following:
- GLC does not interfere with the natural circulation of air. Due to the good vapor permeability of the material, the base under trim is reliably protected from condensate condensate and mold formation.
- Since the gypsum plates are mounted on the framework technology, such a finish has all the advantages of suspended ceilings (it hides the base defects and does not require its careful preparation, the insulation is paved behind the submissions, the insulation is placed in the ceiling, the embedded lamps are installed).
- Material is easy to mount with your own hands.
- Moisture-resistant GLC is suitable for installation indoor with high humidity.
Important! Glue plasterboard sheets directly on the wooden ceiling will not work, we will have to build a carrier frame from a bar or steel profiles.
But it is worth remembering that in violation of the installation technology, the Ceiling surface can be deformed. In addition, the heating of plasterboard needs an finishing finish. Before facing the surface is thoroughly prepared (sweat, grind and ground).
Ceiling from bar
The ceiling surface of the real wooden bars is a rarity, because the material is quite expensive and heavy, so the ceiling will significantly load the overlap and walls of the house. Most often used wood imitation.
The following materials are used to simulate a surface of a bar:
- wooden panels with a puzzle system of fixation and chamfer;
- pVC panels imitating a wooden surface;
- foam beams.
Varieties of ceilings from timber
The ceiling in a wooden house from a bar may be the following types:
- Flooring from a traditional wooden bar. Typically, the material of the light shade is used and the surface is deaf. Such a coating can be made from panels or boards that accurately imitate the profiled timber. You can also use a raw board with a width of 150 mm.
- Coverage of timber with visible ceiling beams. In this case, the spaces or boards are sewn between the beams slightly above their lower face. Color design usually use contrasting combinations - dark beams on the background of a light surface from a bar. This finish is suitable for different interior styles.
- The ceiling cutter from the timber allows you to accurately imitate the caissional ceiling. Instead of a traditional timber, you can use imitation beams with a coating under wood. Ceiling cartoons, moldings and stucco are used to decorate the caisson ceiling. Permissible both monophonic and contrasting color solutions of the ceiling surface.
Any ceiling of timber can be made with their own hands. The sequence of assembling such a design we will look at the example of the manufacture of surface with visible beams of overlapping.
Tools and necessary materials
To work, you will need materials and tools:
- bounded boards;
- wooden bars with a cross section of 50x50 mm;
- self-tapping screws or kleimers;
- drill;
- screwdriver;
- a hammer;
- nails;
- saw or another tool for cutting boards and bars;
- building level;
- roulette;
- a chisel to remove the chamfer from the board;
- line;
- pencil;
- ladder.
Montage sequence

Works in this order:
- All wooden elements are treated with antipirens to protect against fire and antiseptics to prevent the appearance of rot and mold.
- To the beams of overlapping, you need to attach the cranial bars to which we will sow our ceiling, imitating the timing. To do this, decide on the distance to which the beams will perform above the overall ceiling surface.
- After that, on the side faces of the beams, draw the longitudinal lines at the desired distance, retreating from the bottom face.
- Upon this line, screw the cranial bars screws.
- Next, cut the boards on the width of the beam. From the top ends of each board, remove the chamfer using the chisels.
- Boards screw themselves with screws to cranial bars, setting them ends between the beams. Instead of screws for hidden attachment of boards, you can use kleimers. Each board is mounted in spike. In its grooves insert the tooth of Kleimer, after which the fastener is screwed with a screw to the cranial bar. Another version of the hidden fastening is to score a nail into the lower shelf of the groove. This method is bad because the probability of cracking the material increases.
- After that, the following element is similarly mounted. Moreover, its spike is started in the groove of the previous board.
- Thus, the entire space between the beams is sewn.
After installing the boards, the finish finish start. The surface can be painted in contrasting colors - dark beams, and light boards. You can also simply open the entire surface to be lacquered or to impregnate it with a toning composition.
Wooden houses on country sites are very popular today. The arrangement of such buildings includes a plurality of stages. One of the most important is the ceiling finish, which significantly prolongs its service life and improves the interior of the room.
In this article we will consider the most common options for finishing the ceiling in a wooden house.
Materials and their features
First of all, the finishing materials for the ceiling in a wooden house should be harmonized with the surrounding environment inside the building, including wooden walls.
Plaster

Nowadays, there are many special mixtures that will help make the ceiling smooth, smooth and light.
But if they are pretty pretty, you do not suit you, then you can contact the method that our ancestors have used repeatedly:
- Relieve a relief mesh from the three-graduatest rails.
- Fix it with nails to the ceiling surface.
Tip: Instead of the RECEK, you can use the ready-made kapron frame network.
It will significantly reduce the amount and facilitates the necessary work.

- We divor the asbestos plaster with water in the percentage ratio marked on the package.
- We apply two layers of the solution, giving driving the previous one.
Plasterboard

The fact is that it is very compliant in wet as clay, and when it works, it takes a solid solid shape. What is ideal for creating various unusual designs.

Also, plasterboard are inherent in the following qualities:
- Long service life. Compliance with the correct installation technology guarantees more than a dozen years of service.
- Ease of service. Just tying fading places.
Lining

The decoration of the ceilings in a wooden house with a lining perfectly harmonizes with the walls of the building.
In addition, it still has a solid list of advantages:
- Available cost. You can always choose the less expensive breed of trees with a limited budget.
- Environmental purity due to natural origin.
- Low thermal conductivity that allows you to maintain heat inside the house.
Tip: Installation of the lining perfectly allows additional laying under its surface of the insulation material.
So you can further increase the heat-saving properties of the construction.
- High sound insulation. It will help to burn out from the noise of rain.
- Long service life.

Tip: Use for fixing products of kleimers will allow fully hidden fasteners.

Veneered panels

These are very interesting materials for finishing the ceiling in a wooden house. The technology of manufacturing such panels is that a thin layer from 0.5 mm to 3 mm of expensive wood is glued to the board from a cheap wood. So we get the same lining with all the merits inherent in her, just looking much richer.
Array

This is what is trying to imitate veneer. Real expensive trees. But copying appearance, the veneered panel will never be able to compare with the quality of the array.
The instruction of its installation is similar to clap, but the characteristics, of course, differ:
- Very high strength.
- Long service life calculated by decades.
- Solid aesthetic appearance.
- High price.
Plywood

The ceiling finish in a wooden house plywood is more economical and simple option than using tieboards. The wooded plate is made of high-quality veneer, which allows it to fit well into the woody environment and at the same time remain cheap.
Mounting work with it is faster thanks to large sizes and easy weight, but it requires an assistant.
Stretch ceiling

This striking innovation is remarkably coming to the house from any material, but in the case of the log cabin there is an additional nuance. Suspended ceiling due to its elasticity is not afraid of the inevitable shrinkage of the building. Therefore, it can be installed immediately after the construction of the construction.
Pros:
- Beautiful appearance.
- A wide range of colors.

- Unique moisture resistance. If suddenly the roof of your home leaks, it will stretch, copying all the water, and will wait for the service personnel to pump the liquid.

The main advantage of your own house built on the country site is the ability to independently choose materials for walls and coatings, create a layout at your discretion and variable design.
And a considerable number of people, possessing an almost limitless choice, prefer wooden houses. Why? First, recently, country housing from a bar or a log cabin received a "second breathing" and again became relevant and fashionable. Secondly, a tree as a material in itself has many advantages, the main of which is an attractive appearance and environmental purity. But, in addition to the material for the walls, the owner of the new cottage must choose than and how the ceiling will be finished.

Ceiling trim requirements
First of all, you need to understand what requirements are presented to the ceiling in a wooden house and what you expect it (ceiling) to see. The requirements are not so much, it is impossible to call them complex and difficulty. Read them.

Preparation of the ceiling
Before starting the ceiling finishes, its surface must be prepared. First, the draft surface of the ceiling by an antiseptic needed to protect the design from rotting, the appearance of fungi and mold is performed. The treated tree will serve much longer.
Important! If the antiseptic was applied during the construction of the house, then this stage can be skipped.

Prices for antipiren
antipiren

Antipirens - impregnations to impart refractory properties
The final stage of preparation is the installation of the heat-insulating layer. As it is clear from the title, the task of thermal insulation is to minimize the leakage of the air heated to room temperature from the house through the ceiling and the roof. The effectiveness of thermal insulation largely depends on the material selected.


Each of the thermal insulators has its advantages, disadvantages and features, but this is the topic of a separate article. The table below is an attempt to briefly consider thermal insulation materials and their properties.
Table. Comparative characteristics of warming materials for the ceiling.
| Name | Density, kg / m3 | Thermal conductivity, W / (MK) | Benefits | disadvantages |
|---|---|---|---|---|
| Mineral wool | 75-200, depends on the scope of material | 0,03-0,12 | At high temperatures only melts, simplicity of installation | The tendency to absorb moisture |
| Styrofoam | 45-150 | 0,041 | Good thermal insulation characteristics, low cost | It burns and in combustion highlights harmful substances, rodents can start |
| Ekwata. | 45-75 | 0,038 | At high temperatures only melting, environmentally safe, good thermal insulation characteristics | Equipment requires special equipment |
| Ceramzit | 800-1200 | 0,18 | It does not burn, environmentally safe, very simple installation process | Large weight, thermal insulation characteristics worse than other materials |
| Sawdust | 200-450 | 0,08 | The cheapest material | They burn, can get rodents, unstable to rotting and forming fungi |
Prices for mineral wool
mineral wool
Important! Note that the lower the thermal conductivity coefficient (expressed in watts divided into multiplied meters and Kelvin or W / (MK), if briefly), the better the thermal insulation qualities of a material.

For greater understanding of the last stage of the preparation of the ceiling to decoration, we consider the phased process of thermal insulation using mineral wool rolls.
- To begin with, it is necessary to align and clean the surface of the draft ceiling.

- A waterproofing film is stacked on the purified surface. The joints between the individual sheets are performed by the pectoris and are close to adhesive ribbon from the waterproofing material.
- The ceiling is nailed, serving a frame for future insulation. It is manufactured either from a wooden bar or from a metal profile. The distance between the elements of the crates should be 1-2 centimeters less than the width of the mineral wool roll - so reliable "grip" of thermal insulation material with a frame.

- Rolls of mineral wool are stacked between wooden beams or steel profile. The minimum layer thickness is 50 millimeters. If several layers of minvati are stacked - the joints of the first layer rolls overlap as follows.

- The insulation layer and the doomle are closed with a vapor insulating film.


Prices for vapor insulation film
parosolation film
Attention! If the drying of the thermal insulation is made of a wooden bar - do not forget to treat it with antiseptic additives.
Only at the end of these works can be processed to the ceiling decoration in a wooden house.

Alternative - Outdoor ceiling insulation
Most often for a wooden private house, lining is used as a finishing material for the ceiling. It is planed boards, on one side of which there is a spool (also called the protrusion or ridge) and the groove. When installing, the board is inserted into the pole in the groove of the previous one - so the elements are attached to each other.


Types of lining differ along the length and width of the boards, according to the material from which they are made, in color and texture. There is even a lining, stylized under a log cabin. This is the main advantage - a rich assortment, from which you can always choose something suitable for the interior.

But the advantages of the lining on it do not end.
- High sound insulation indicators - in the room where the ceiling is covered with clapboard, walking and talking on the floor above will not be heard, especially with the insulating layer.
- Durability - antiseptics treated with antiseptics, varnish or other coatings, the lining is capable of listening to a lot of years without the need to replace.
- The lining is perfectly combined with wooden walls.
- Parry permeability - due to the fact that the lining "breathes", the excess moisture and condensate will not accumulate between it and the rough ceiling, which can reduce the life of the ceiling and reduce the effectiveness of the thermal insulation layer.

It should be understood that for all rooms, such a finish is not suitable - in very large rooms, the lining seems very monotonous, boring. But there is an elegant way to solve this problem - the use of decorations from several colors. Thus, the space of the room can be divided into several zones, which is especially relevant for the living room or a common hall. You can also diversify the ceiling using threads, painting or patterns made on the clap before the start of installation. Often, the material is artificially aged on the outside, thereby creating the atmosphere of the old and honorable mansion in the room.
Important! There is a subspecies of lining, called Eurovantia. These are finishing boards, manufactured in accordance with the DIN 68-126 standard. In most cases, it is distinguished by a higher quality surface, the execution of grooves and tongs.

Consider how the molding on the ceiling occurs.
Step 1. The height from the floor is measured to the draft ceiling in all corners of the room. The angle with the smallest height is selected, it is measured from it down 50 mm.
Step 2. Using a laser level or a marking thread from the point selected at the previous stage, the frame location line is performed. Thus, it is achieved as a smooth ceiling as possible relative to the floor.

Step 3. A framework is created using a wooden small cross section. The lines of the crates are fitted perpendicular to the location of the future finish. The interval between them is from 40 cm to half a meter, a distance of 10-15 cm should be observed between the wall and the bar. Before installation, the framework elements are processed by an antiseptic and antipiren.


Step 4. If the boards of the lining are not painted or not covered with varnish, then appropriate coatings are applied.

Step 5. The lining is cut into the width of the room, but at the same time between it and the walls there should be a gap of 10-20 mm wide on each side so that when expanding the material under the influence of moisture, bloating and deformation did not occur.


Using when cutting boards guide - metal square
Step 6. The first board is attached to the frame using kleimers, carnations or screws. Molding methods are shown on one of the drawings below.


Step 7. The next board is installed, the pin is inserted into the groove of the previous one. The lining should be carefully customized to each other, it is permissible to use rubber inquiry.

Step 8. The previous step is repeated sequentially for all slats.
Prices for lining

Step 9. The last bar must be trimmed if necessary. In most cases, it is fastened to the frame of the carcass, scored "by oblique".
Step 10. Compensation gaps between the clap and walls are closed with the help of ceiling plinth.

Wooden veneer
Alternative clap can be veneered panels - slats with locks for mounting and mounting, covered with the outer side with a veneer (thin wooden sheet thick in several millimeters). Typically, valuable wood varieties are used for this material. The slight thickness of the veneer allows you to make an attractive and richly looking trim for the ceiling, while quite cheap.


The technology of installing veneered panels does not have large differences from the molding methods of the wallboard: placed the ceiling, the first panel is created using nails or self-tapping screws, the following elements of the finish are mounted with the previous grooves type.


Plywood
In everyday life of plywood is perceived as cheap and not the most attractive material for the ceiling finish. But there are such grants of plywood, which are not inferior by their aesthetics with lining or veneered panels, therefore consider the installation methods of this material still costs.

The main advantages of plywood are low price and resistance to moisture effects (if the sheets have passed the appropriate treatment and covered with the outer side of the laminate). Stacking technology is as follows.

Step 1. Placed the ceiling and a frame of a wooden bar is created. More This stage is already described in. It is worth only to mention that the distance between the elements of the crate should be several centimeters less than the width of the sheet so that the Paneur can be selected directly to the frame.


Step 2. The whole sheet of plywood is applied to the crate so that the edges are in the middle of the bar performing the role of the frame. With the help of screws or plywood nails, first fixed in the corners, then throughout the perimeter in 20-25 cm increments.
Prices for plywood sheets

Step 3. The remaining sheets are sequentially stacked in the same way.

Step 4. The process of laying trunks on the edges near the walls is completed.

Step 5. The joints between the sheets are rushed with decorative lining - or.

Important! Remember that the area of \u200b\u200bthe individual sheet plywood is large, because the laying should be made with the attraction of assistants.
Natural tree
Flooded planed boards from valuable wood varieties is perfectly combined with most interiors. To create an atmosphere of a village house, adding "naturalness", the finish is complemented by a surface flooring from a porch or climb - boards, and a partial stream.


Board laying technology repeats the method of creating a tail ceiling in a bath or shed - first at the construction stage, beams from a large cross section beams are mounted. Then the boards are taken from below, fastened with the help of self-tapping and carefully fitted to each other with minimal gaps. Both the boards and the ceiling frame before the start of installation are processed by protective compositions, and after installing the ceiling is covered with various types of varnish.


Another addition to finishing the ceiling made of natural wood - ceiling beams. But it should be thought about it in advance, since cutouts in the wall are performed at the construction stage. The beams are processed by the compositions that protect wood from rotting are covered with varnish and sometimes artificially aged.
Tip! If you do not want to make cuts in the wall and install heavy beams, but you want to see them under the ceiling, you can use false beams that are made of wood or plastic and hollow inside. They are significantly easier and work with them easier than with a solid bar.

Video - Ceiling Ceiling Tree
Plasterboard
Gypsum Carton is a "puff pie", where the outside of thick cardboard sheets, and inside - solid composition based on plaster with the addition of various fillers and additives. This is a very comfortable finish material, so with it you can make multi-level ceilings suitable for spacious rooms. In addition, in the Hispocarter, it is convenient to install spotlights that are capable of emphasizing the features of your interior and highlight important areas indoors.
Prices for plasterboard
plasterboard

Installation of the ceiling of plasterboard in a wooden house occurs as follows:
- A frame of metal profiles of type UD- and CD is stacked on the insulating layer crate. The frame elements should be perpendicular to the wooden crate. It is desirable to leave a compensation clearance of 10-15 millimeters between the wall and the metal profile, so that during the shrinkage and other movements of the ceiling overlap did not occur drywall.

- With the help of self-tapping and screwdriver, plasterboard sheets are fixed on a steel profile.
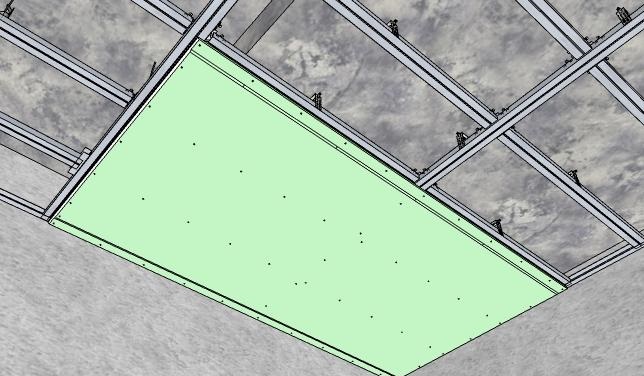
We produce bumping ceiling. Krepim sheet as in the figure, retreating 2 mm from the walls


Between sheets the same technological clearance 2 mm

Following this principle, install the rest of the sheets
- Shakes between sheets should be sharpened. About how it is done is written in detail.


- The drywall finish is performed. It may be embossed plaster, paint, ceiling plates or wallpapers.

Tip! If you plan to install point luminaires, then pre-locate the locations of their future location, mount the wiring there until starting the hitch laying, make cutouts under the lighting devices.
Video - a ceiling of plasterboard with their own hands
Stretch ceiling
Stretch ceiling - Polymeric fabric or polyvinyl chloride cloth, fixed with a frame of plastic or aluminum profile. A similar type of finishes is particularly well suited for only the erected houses from the log cabin, where the shrinkage of overlaps will be observed during the next couple of years, which makes it impossible to paint or shuffling.

In addition, the stretch ceiling can be made multi-level, combining it with plasterboard sheets. But this ceiling has a disadvantage - the height of the room is significantly reduced.

Remember that the ceiling finish will be beautiful and durable only when its installation technologies have been carefully observed. We hope that this article will help you choose the most suitable way.
Video - Installation of a single-level stretch ceiling
 How to return the love of her husband to his wife - Tips of the psychologist
 Why you can not give icons