Do-it-yourself sliding wardrobe in the hallway: description of work from project to assembly. Do-it-yourself hallway - practicality and individuality Do-it-yourself hallway wardrobe
Most of the pieces of furniture are quite simple in their structure, which is quite reasonable. Cabinetmakers go back several centuries for their craft, but the production of furniture on a mass scale began relatively recently. Until that moment, each owner of the house made tables, chairs, beds, wardrobes on his own.
You can do it now with your own hands. Moreover, modern instruments and the materials make this process much easier.
The furniture in the hallway does not belong either to the front door or to the universal one; it only requires spaciousness, compactness and a neat appearance. There is a minimum of decorations. Well, to be honest, decorating furniture is a simple and pleasant business.
- Chipboard - the best way for self-made cabinet or hanger. The material is easily cut, processed, is lightweight and does not require reinforced fasteners or accessories. In addition, chipboard is very affordable.
- Plywood - with almost the same lightness, it is distinguished by its high density and strength. At home, you can make not only curved elements from plywood, but also with a cut pattern.
- MDF is slightly inferior to plywood in strength. The undoubted plus of the material is the possibility of various processing. MDF can be painted, stained, toned and so on.
- Fiberboard is a material for the back walls of cabinets, cabinets, chests of drawers and so on.
- Glass or mirror - assembling a cabinet sash from glass or a mirror is not so much overwhelming task... But, firstly, you will have to purchase and cut the profile yourself, and, secondly, the glass is heavy, you will need at least one assistant.
- If a decision is made to make a hallway from an array, then it is purchased furniture board in the appropriate amount.
- Wooden bar - any frame structure is assembled from a bar.
- Edged boards - pine is most often used, as it is the most affordable wood.
TO additional materials includes drywall - for arranging built-in niches, and furniture edge- required element.
Depending on the type of furniture for the hallway, you will need different kinds fittings:
- guides for drawers and rails for a sliding system, if constructed;
- door hinges, locks and handles, if it is supposed to equip a chest of drawers or;
- hooks for clothes - this attribute is required.
The quantity and quality of fasteners is also selected depending on what exactly is being collected:
- nails, screws, screws;
- furniture confirmations and dowels - when assembling furniture, you cannot do without wooden fasteners;
- metal and plastic furniture corners;
- stubs.
The set of tools is quite standard: a screwdriver, a drill, a jigsaw or a wood saw, a key for confirms, a mallet. If fastening with glue is made, and this is quite allowed, then a clamp is definitely needed. To check vertical and horizontal, you need a square and a building level.
Photo of DIY furniture for a small hallway (after renovation)
How to make a hallway with your own hands
The most critical stages of self-production include taking measurements. If there is an oversight here, the rest of the work will go to waste.
The model of the wardrobe, hallway or chest of drawers is carefully calculated. Can be used finished drawing if the dimensions are suitable for the hallway. If not, and your own experience in drawing is too small, it is better to contact a specialist and get finished project for the required dimensions.
Chipboard, MDF and plywood cutting and edging are available in most stores where this material is sold. This service is relatively inexpensive and will save you a lot of time and effort.
Do-it-yourself photo of a built-in wardrobe in the hallway

Closet
Making it with your own hands is both easier and more difficult at the same time. Easier, because some details do not need to be calculated and cut out. It is more difficult, since the cabinet is "tied" to a niche, which means that the project must take into account the features of the walls and floor.
The level of "embeddedness" can be different. Ideally, this is a niche that is equipped with shelves and a bar with hangers, and a sliding system. Moreover, in this case, the doors are mounted as an interior door - to the wall and to the floor. But much more often, a built-in is meant a wardrobe that occupies the corner of a room. In this case, one sidewall and rear wall, and often the floor and ceiling, are missing.
- The basis of such a product is a wooden frame. For the case described above, two frames are required - front and side, which are assembled on screws or nails. On the frames, in places where shelves and partitions are supposed to be installed, transverse slats are fixed.
- On the walls, floor and ceiling, mark the installation site of the frame, drill holes for fastening. On the frame structure it is desirable to mark the places of fixation.
- First, the front frame is fixed to the wall and ceiling with dowels. The verticality is checked by level. Then set the side.
- Inside the resulting niche, they are mounted to the walls wooden slats under the shelves. The shelves are cut from plywood or chipboard. The details are not fixed, but simply laid on the slats. If desired, fix with carnations.
- Sidewall can be sheathed ordinary drywall, and then paste over or paint to taste, or sew up laminated chipboard... Rounded shelves can be installed here. They are attached to wooden frame, therefore, the strength of the skin is not critical. But if a hanger bar is installed in this compartment, then the sidewall is sheathed with chipboard or plywood, since drywall will not withstand such a load.
- The last to install sliding doors... The upper rails are mounted on the ceiling, and the lower ones on the floor. At this point, it is very important to respect the dimensions. For reliability, a model of the door is used: any part with a height of the sash, the same sheet of drywall is inserted into the upper bus and, after checking the verticality, mark the place where the lower guide is attached on the floor. In this case, it is really better to measure 7 times.
- The sash is inserted into the upper tire under some pressure - the upper rollers allow this, and then into the lower one. Position door leaf adjusted with adjusting screws. The sash should move smoothly and freely.
The described variant has small size and a fairly simple device - only two compartments. If the area of the hallway allows, you can make a much more spacious structure, but in this case it is recommended to assemble the frame from chipboard, not bars, and tie the parts with a common floor or ceiling. The latter method is easier to implement. This design allows you to install not only shelves and a bar, but drawers, lifts for clothes, and so on.
In this case, the assembly is carried out on dowels - parts with each other, and confirmations - shelves. Holes for them are drilled in advance, and then the cabinet is assembled as a designer. The work requires not so much skill as accuracy and patience: a lot of holes are drilled, and each corner fixture must be kept in a clamp for at least a day.
The following video will tell you how to make a built-in wardrobe in the hallway yourself:
Ordinary hallway
The standard version of the furniture in the hallway is in the form of a shelf or a stand with hooks, if there is a place for it. The main element here is, of course, the hanger.
The most popular and easy-to-use version is wall-mounted. This is a shield - one-piece or consisting of vertical slats, which is fixed to the wall. A must-have is a shelf for hats. Such a stand is being built from plywood, chipboard or edged boards- optional.
- At the first stage, the dimensions of the product are determined and the amount of material is calculated.
- The material is prepared for work: the boards are cleaned and sanded sandpaper or a grinder. Chipboard is cut to size and trimmed. The undoubted advantage of chipboard or plywood here is the ability to give vertical elements a different shape, sometimes very intricate.
- The boards are opened with varnish. If the original color does not suit, then first treat it with an appropriate stain.
- The vertical elements according to the scheme are fixed to the crossbars with self-tapping screws. The shelf for hats is fixed on the confirmations: for them, holes are pre-drilled in the boards and at the end of the shelf.
- Attach the selected coat hooks. It is advisable to place them in two rows: the upper ones for clothes, the lower ones for bags and keys, or, if there are children in the house, for children's clothes.
It is more than simple to make such a model original. To do this, boards or chipboard elements are given an unusual shape, for example: they cut the slats in the form of a picket fence and fix different shapes hooks. No less original is the hanger, where the base is irregular shape a piece of wood, like a cut of a trunk, and hooks - varnished fragments of branches with knots.
In this video, you will learn how to assemble a wardrobe with your own hands:
And this video will help you with the assembly radius cabinet for the corridor:
Corner option
It is no more difficult to make with hooks than a simple wall one. But for the stability of such a structure, it is usually assembled from a solid material - chipboard, plywood, and not boards.
The classic model is a module of two parts, connected at right angles, with a top and bottom rounded shelf. Rectangular shape undesirable, since the angle visually needs to be softened. And it is inconvenient to use such a shelf.
- Manufacturing also begins with a drawing, where the dimensions are indicated and the places where the shelves are attached are marked. The latter are installed on confirmations.
- Chipboard is cut with a jigsaw or a hacksaw for wood and must be trimmed.
- On the front surface of one panel and at the end of the other, holes are drilled for dowels. At the same stage, holes are drilled for confirms.
- The dowels are greased with glue and the sidewalls are assembled. After drying, the shelves are fixed on the confirmations.
- Set hooks for clothes and bags at a convenient height.
If there is not enough space in the hallway, you can fix it on such a hanger by simply gluing it to one of the sidewalls.
Corner wardrobe in the hallway with your own hands

Drawings and photos
Photos different options hallways can be found in countless numbers. Unfortunately, about nothing but appearance models, you cannot judge by them. Drawings are much more informative.
If you decide to use a ready-made drawing, then, firstly, you need to make sure that the dimensions indicated in it are suitable for the hallway. Secondly, on working scheme not only general parameters are indicated, but also the distance between the parts, taking into account their thickness. If the material used in the manufacture differs in size, this difference must be taken into account.
The best version of the drawing is a diagram with a dimensional table, where the parameters of each part are indicated separately, and the attachment points are also marked.
Do-it-yourself photo drawings of hallways
 Chipboard
  Compact coupe
 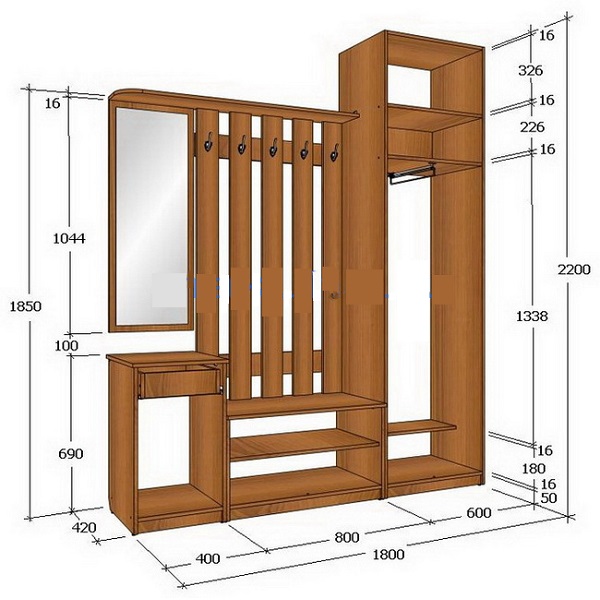 With mirror
It is quite possible to replace a large dressing room in the house. spacious wardrobe Built-in interior items make the design more interesting and the room functional and practical. It is quite possible to make the corridor as thoughtful as possible if you create it according to all the rules of design art. Namely, initially it is worth deciding what are the built-in models of sliding wardrobes, as well as how they differ from each other.
In general, the built-in structure does not have a bottom, floor or walls, since the sides of the room are used for them. Thus, you can significantly save room space, which is required in almost every corridor.
Particularly popular cabinet models are corner cabinets, which have many subspecies:
- The cabinet in the shape of the letter "L" consists of two products that are installed next to each other, forming an L-shape.
- Triangular cabinets, as a rule, are voluminous, and not only shelves are hidden behind the facade, but also an internal space in which you can change clothes or put items.
- There is also a trapezoidal wardrobe, in which shelves are located not only behind the facade, but also outside it, on the sides.
 The built-in wardrobe is perfect for arranging a small hallway
Recessed structures can be easily installed indoors, for example, during construction plasterboard wall or they can fill a niche, if there is one in the corridor.
Installing a wardrobe in a niche is considered the most suitable option, since the niche not only takes up additional space in the room, but also spoils the entire interior.
By installing the original facade, you can hide the shelves and make the room visually wider, more beautiful and more modern.
Choosing built-in wardrobes in the hallway: photo and design
There are many myths about wardrobes.
 The advantages of the wardrobe are that it is functional and roomy.
In fact, sliding wardrobes are an excellent option for any room, including the hallway. Why? Inside they are as spacious as possible, outside they are compact, fashionable and stylish. As for the cost, it depends solely on the preferences of the customers, because, basically, they are made to order, namely, on how the internal filling will be designed, what the facade will be, as well as the dimensions of the product, material and the like.
Custom-made wardrobes allow you to create such a unique piece of furniture that will delight you with functionality, practicality and, most importantly, quality.
Modern furniture factories offer the manufacture of durable and durable structures, capable of serving for years and not losing their proper appearance.
Mirrored built-in wardrobe in the hallway: photos and examples
Many people prefer to install a mirrored wardrobe. It is perfect for a small hallway.
 In order to visually expand the space in the room, designers recommend choosing a stylish wardrobe with mirrored doors
However, there are certain nuances as to how the piece of furniture will be installed, and what benefits it will bring:
- If the hallway is narrow and long, then the placement of the cabinet should be done along a narrow wall, which will visually increase the width.
- If the hall is square, then the wardrobe and, in particular, the mirrored facade should occupy one of the walls so that the room is wider and longer.
- In the corridor with a niche, you need to use this space for a wardrobe, and decorate the door with a mirror. So you can hide this space from prying eyes, and transform the room to a comfortable state.
- If there are many doors in the corridor, then the room should have a narrow wardrobe model.
Some use wardrobes with a mirrored facade as a partition if the corridor is large and you need to zone it into a place for changing clothes and storing wardrobe items.
Advantages and disadvantages of a wardrobe-compartment built into the corridor
Built-in wardrobes have a mass positive sides... In particular, this is the fact that they can be installed in Khrushchev-type apartments, because most of the country's population lives in such housing.
 Many people prefer to choose compact wardrobes for decorating the hallway, because they take up little free space in the room.
Among the advantages, it is possible to note the presence of the possibility:
- Place the structure in any convenient place, including in a niche;
- Use free space efficiently;
- Hide the unevenness of the walls and some communications.
There are practically no drawbacks to such cabinets. The product is completely thought out by the buyer, which means that there is an opportunity even at the design stage to exclude unpleasant moments, for example, inconvenient handles or shelves that do not slide out. The only drawback is that the structure cannot be moved or transported. It is installed monolithically in one place.
There are some rules to follow when installing.
 When choosing a wardrobe, it is imperative to take into account its practicality, spaciousness and the presence of various shelves for things
To install an excellent wardrobe that meets all the necessary requirements, follow the rules:
- A wardrobe for a corridor must necessarily include a place for shoes, umbrellas, hats, as well as for various little things and accessories.
- There are specific guidelines for the door. First of all, they must be made sliding, and at least one of the doors must have a mirror. If you do not plan to create a mirrored facade, then one mirror can be placed on one middle door.
- When choosing the color of the product, you should start from your own preferences, as well as from the style of decoration of the room, from the wishes of the household, as well as from whether the room is small or large, because if the corridor is small in size, then you need to choose light colors, since they are visually expand the space.
- There must be lighting in the wardrobe. Thus, you can simplify the task of finding the desired item. Also, the backlight can be used as a night light and to create additional comfort in the room.
- As for the dimensions, the height depends on the height of the room, but the width and depth depend on the wishes of the owner of the house.
Experts believe that the ideal depth of the wardrobe will be 50 cm.
Built-in wardrobes can be made by hand, but it will take a lot of effort, time, and you need to think over every step.
 You can make a wardrobe for the hallway yourself, the main thing is to think over its design and filling in advance
- Design required;
- It is necessary to calculate the consumption of materials, fasteners, as well as profiles and guides.
You need to have minimal skills in creating furniture, because a wardrobe is far from a simple structure.
The sliding wardrobe must be durable, stable and of the highest quality. Only in this case it will be possible to use it without worry, and also not to be afraid that the shelf or rack will collapse. Due to the fact that sliding mechanism and the doors themselves weigh a lot, the racks in the cabinet must be made of solid wood and metal profiles.
Clutter in the house can set the teeth on edge for anyone, since scattered things are extremely annoying to household members. There is not always a place to store property, so many owners solve this problem by installing a wardrobe. A comfortable place for its placement is an entrance hall and a bedroom. We offer you to find out how to make a wardrobe in the hallway with your own hands, and so that the process of creating this piece of furniture is more understandable, explanatory photos are attached to it.
It is widely used in houses a sliding wardrobe located in the wall, as it has an excellent ability to hold a sufficient number of things. It takes no a large number of square meters and allows residents to move freely around the house. This cabinet performs useful role in indoor space, and it will not be difficult to make it.
The most common types of sliding wardrobes can be viewed in the photo. For convenience, many owners place this structure built into a niche in the hallway. The main advantage of this building is the minimum cost, since the walls and the bottom with a cover are already there, and they do not need to be built. The compartment fills in the empty space that has not been used until now.
A great way to install a wardrobe in the hallway is to place it across the entire width of a blank wall. This is optimal solution, since a wardrobe built into the wall in this way will increase the visual volume of the hallway if you decorate its doors. If the house is small, then this place can be used as a dressing room, while the size of the living space will not decrease.
A sliding wardrobe is often used in zoning. one-room apartments... Similar buildings are common in penthouses, since there is no interior doors... This option is the most expensive of the rest.
The most common type of cabinet is a separate building that can be made in a corner or placed closer to the wall. Such cabinets are created with doors that open both sides to make the content as accessible as possible. On the Internet, you can find many photos of cabinets and their location in the interior.

 Sliding wardrobe
Materials (edit)
To make a wardrobe, you must first of all choose suitable material, on which the progress of the construction as a whole depends. To find the right material, you need to consider its characteristics. Materials applicable in the assembly of the wardrobe:
- wood is traditional material from which furniture is made. It is great for ordinary wardrobes, but it is not profitable to use it for a compartment. This material will warp, because a cabinet built into the wall absorbs moisture more than what is in the room;
- drywall is a good finishing material with many possibilities. Since he is finishing material, it cannot be used in the manufacture of a wardrobe. This is impossible due to the fact that drywall is a structure that must be firmly attached to something, and cannot be part of a supporting structure;
- Fiberboard, chipboard is what you need to make a wardrobe. The process of making it from these materials is extremely inexpensive and simple, and does not require high costs... These materials have the characteristics of wood, but unlike it, they are resistant to moisture penetration. Experts recommend using chipboard, medium and high density fiberboard.
Many companies publish catalogs with photos of all materials. Having made your choice, you can proceed directly to the design of the cabinet.
Cabinet design
When drawing up a project, the division of the cabinet into zones is carried out by means of partitions, which are measured along the width of the doors. It is generally accepted that the main place of filling a compartment is the wardrobe area, which includes rails with hangers and shelves for clothes and shoes. The rest of the space belongs to the utility block.
Designing can be carried out according to photo samples, as well as prepared by yourself.
 Designing a sliding wardrobe using a special program
  An approximate diagram of a sliding wardrobe
 To make a wardrobe, you need a certain amount of details:
- one wall for the side (since the wall and floor will replace the rest);
- internal partitions, the number of which is adjusted to the number of doors;
- in order for the cabinet to look full, it is necessary to make narrow strips of wood, which will give noble appearance constructions;
- other details should equip the shelves. The mezzanine is made for those things that are not often used. The remaining space is filled with shelves at the discretion of the owner;
- if the tenant wants to do stretch ceiling in the hallway after assembling the cabinet, it is necessary to develop a plan so that it does not interfere with this. A homemade U-shaped box will help to prevent the occurrence of such situations. It will serve as the base for the top rail of the doors. The box will need to be screwed to the ceiling;
- during the design and drawing up of the drawing, it will be necessary to measure the size of all cabinet parts for the order, in advance determining the place where the edge will be applied to them. The places that are visible are covered PVC edge a layer of 2 mm, and the others with a thickness of 0.4 mm. Parts that will come into contact with others do not need to be covered with PVC edging;
- the most annoying problem that can appear is the indirect walls. In this situation, you should not make hasty decisions and file sawn chipboard with a jigsaw, as chips may form on the surface. In households, it is almost impossible to do this without damage, because this requires a circular saw;
- if after sawing the sheet the place of the sawing opens, then it should be closed. You can glue an overhead U-profile, as well as a melanin edge;
- the part from the inside, you can simply paint the walls.
You can find many photos with examples of arranging a wardrobe.
 Inner drawer materials
  Shelf material
For sliding systems, it is necessary to retreat from the inner part of the door 9-10 cm so as not to damage the cabinet structure. The exception is the Versailles system, which allows the possibility of its installation close to the upper rail. But in order to protect the cabinet from undesirable consequences, it is advisable to retreat 1 cm.
Cabinet assembly
The assembly of the cabinet should begin with the installation of load-bearing walls around the perimeter, edging the opening with strips of laminated chipboard boards. Then you should attach the frame to the ceiling, floor and walls using dowels. The angle helps to connect the pieces together.
 Installing the frame of the sliding wardrobe
  Installing the base of the wardrobe
 The best method for fixing parts is the use of Euro screws, which are used in furniture assembly. But before using them, first you need to make a hole for them, which is impossible to make exactly without any special devices. For this, there is a specially created drill for confirmation, which can be adjusted to the drilling depth.
If fastening with furniture bolts, it is recommended to use furniture dowels for added strength and greater retention. They are screwed in with a hexagon.

Shelf attachment
Fastening can be done in several ways. With the help of the corners, the shelves are fastened quite usually and not aesthetically, therefore it is used in exceptional cases, when other methods are completely inappropriate.
By means of confirmations, the shelves are securely attached to the cabinet walls, which guarantees the transfer of various heavy loads... But Euro screws are used especially in places where no one will see them, as their appearance deteriorates because of the hats.
The eccentric allows the shelves to be securely attached to the wall. But in order to attach them, you will have to work hard. In addition, the screw cap becomes noticeable from below. In the photo, you can clearly see how these or those fastening options look.
 Shelf attachment option
  Fastening the shelf to the furniture corner
 The most suitable option for attaching shelves is shelf supports, which are fittings, providing the part with stability. When using this type of fastening, they are completely invisible from both sides.
 Attaching the clothes bar
  Assembling the box
 Door assembly
The main procedure for assembling sliding wardrobes is sliding doors. During the installation, it is undesirable to save on supporting material, since if it is of poor quality or it turns out to be insufficient, then problems with the doors falling out and falling out cannot be avoided. Laguna, Versailles and Aristo have established themselves as the most reliable and high-quality companies manufacturing sliding systems... Their cost is very reasonable.
A sliding wardrobe is often equipped with two, less often three doors, consisting of a canvas framed from aluminum profiles from all sides into the frame. For a tight connection in any position, a special profile is used, which allows the frame to not be uniform (an example can be seen in the photo). By standard measurements, the thickness of the chipboard sheet is 10 mm.
With the help of a silicone seal, a mirror or design glass 4 mm thick can be inserted into such a profile. It is important to know that when using glass or a mirror for a door, it is necessary to purchase them with a special protective film, which, with the help of elastic properties, does not allow the fragments to scatter to the sides with a strong impact. You can assemble the doors with your own hands or order them ready-made.

Installation of doors in the structure
It is necessary to hammer the horizontal profiles with a rubber hammer. Then you should fill in the vertical handles fastened with self-tapping screws, the dimensions of which are 5 * 30 or 6 * 35 mm. The top and bottom rollers must be installed before the final screed can be made. In order for the fasteners to be invisible, the holes for the screws should be made in two different diameters... The first is 9 mm (inside the profile), the second is 5 mm (under the screw foot).
Profiles located vertically and horizontally differ. The vertical ones should have 3 holes that need to be drilled one at a time in the top and bottom of the assembly, as well as in the place where the lower rollers are attached. Then the profiles need to be sawed off to the required dimensions and fastened with self-tapping screws. A door stopper is installed in the bottom rail.

Before installing the door, it must be brought into the far channel of the upper door guide, and then inserted into the lower channel. The second doors are required to be installed in the same way. So that there are no gaps between the doors, you need to stick the buffer tape.

Making a wardrobe in the hallway with your own hands is not difficult. It only takes desire, perseverance and finished materials... After completing the assembly, you can take a photo and show this creation to your friends.
A corridor or hallway is the face of any home. The attitude of guests to the owner of the apartment largely depends on how well everything is arranged here. Very important element the interior in this place is a wardrobe. It takes up most of the space and is used to store various things. It can be not only shoes, but also clothes. There may be a mirror in front of which ladies love to show off.
The owners themselves can make a wardrobe in the hallway. This is not as difficult as it might seem at first glance. The wardrobe in the hallway should be multifunctional. Here it is worth thinking about choosing the appropriate design and the availability of certain devices. How to make a wardrobe in the hallway yourself, and will be discussed further.
Tools and materials
Of course, first you should take care of finding all the tools and materials most necessary for the work. Something that is needed may already be present in a person's house, but he will have to acquire something. In any case, the cost of work will be several times lower than the purchased version of this product. So, for work you will need the following tools and materials:

- wooden base for the mirror;
- mirror;
- wooden dowels;
- self-tapping screws;
- screwdriver;
- overlays;
- adhesive tape.
This is quite enough to make a wardrobe in the hallway with your own hands.
Preparing the mirror itself
To begin with, you should start preparing the mirror for installation on a cabinet. By itself, it will not hold, so it must be properly secured to wooden base... In this case, the wood should be the same color as the chipboard that will be used to create the main structure. Basically, the modern market allows you to choose any colors and shades of wood, so no one should have any problems here.
Now it's worth talking about the wooden base itself. It is a board that is wide enough. It should be wide enough so that the mirror is attached to it as tightly as possible. Previously, the very surface of the base must be carefully processed. For this, you can use all available tools.

The most important thing is that there are no protrusions or defects on the board. After that you need to use duct tape for fixing the mirror to the base. In this case it comes about double-sided tape. Today it is available in a wide variety of widths and lengths, so the desired option can be selected without any problems.
After that, the tape must be fixed to the base. Moreover, it is applied not in a continuous layer, but after a certain distance. You can, for example, take 10 cm as a basis.
After that, you can already go directly to the mirror mount. This is done very simply. You just need to lean it against the base, and then push hard. As a result, the two surfaces will connect to each other. In this case, it is very important that the mirror is immediately installed in a given position so that there are no problems with its alignment further. It will be extremely difficult to do this, since the adhesive tape will reliably connect the two surfaces to each other.
Cabinet installation: features
Now you can proceed directly to the installation of the hallway cabinet. Of course, before starting work, you should take care of the design drawing. You can do this work yourself, but it is better to try to search for a sketch on the Internet. Maybe there is something really worthwhile here. After that, you need to prepare the chipboard for installation. Initially, only a standard sheet of this material lies in front of a person. He will have to create the most real art with his help.

To begin with, it is worth marking up all the main structural elements on a sheet. This is done using measuring tool and simple pencil, all walls, lid and shelves are drawn on the sheet. Then they need to be cut. A grinder is perfect for this. All work will be done extremely quickly.
However, this tool does not always do everything well. Burrs can remain, which then lead to delamination of the material. It is better to use here electric jigsaw... With its help, all parts are prepared for further installation.
On the side walls, it is imperative to first mark the places where the shelves will be installed. They are also made of chipboard. At the same time, it is very important to maintain the evenness of the geometry and lines so that all elements are fastened exactly. Then you can assemble the cabinet. This is done very simply:
- First, all the main structural elements are assembled. This means that you need to connect the walls and the bottom and top covers. For this, PVA glue is used. Additionally, all elements are attached to each other using self-tapping screws. This fastener works great in this case. However, don't forget about aesthetics. After screwing in, it is worth putting on pads on the self-tapping screws. They will give the structure a more beautiful look.
- Then you need to start attaching the mirror to the cabinet. This must be done using self-tapping screws, which are screwed into the base attached to the mirror earlier. They should also be covered with special overlays. After that, you can already start assembling the shelves. They are attached with wooden dowels. This will not affect the beauty of the entire structure in any way.
The cabinet is now almost complete. However, it is too early to exploit it. First you need to cover its entire surface with a protective layer of a special substance that will prevent the destruction of the hallway cabinet. Now you can wait a few hours until the composition is completely absorbed into the chipboard structure. The wall is screwed on at the back. In most cases, it can be thin. Here, too, we are talking about chipboard. Its thickness is limited to 3-5 mm.
You can fix the back wall using small nails or self-tapping screws.
The most important thing is that it is firmly and securely held in its place.
Now we can state the fact that the hallway wardrobe is completely ready for use. He will serve long years reliable assistant. Do not forget about its decoration. To do this, you can use a wide variety of decor elements that the modern market offers. It can be wood inserts or pretty hangers. This will once again emphasize the beauty of the cabinet. The entrance hall with his appearance will begin to shine with new colors. She will simply become much more beautiful. At the same time, you will be able to save a lot of money on buying a new copy.
An obligatory attribute of any hallway is a comfortable, functional wardrobe.
If you have experience in performing carpentry work, a piece of furniture can be made by hand.
This will help you save money and create a wardrobe that will decorate your interior.
Plus, the hallway is the first room your guests notice. And your masterpiece can become its main decoration!
Before developing a cabinet project, it is necessary to clearly determine what items it is intended for, and how many things will be stored. The dimensions of the room are also taken into account.
Kinds
 The main purpose of the wardrobe in the hallway is to store shoes and clothes, hats and even household appliances... There are the following types of wardrobes:
- freestanding... Spacious and massive, fully equipped: there are walls, ceilings, floors, doors. The design is easy to disassemble and carry;
- corner... Suitable for small rectangular and square rooms. The back wall can be designed for various shelves;
- embedded... They have internal partitions, side doors and walls, shelves. There are no rear walls and ceilings.
For one person or a small family, a single-door wardrobe is enough. The number of sections is two. Internal filling should provide shelves for shoes or shoe boxes, drawers for hats and small wardrobe items, stands for hats and umbrellas. Requires Hanger Bars and Hooks for casual wear, and a mirror is required.
When creating a schema need to take into account:
- the width of the shelves is about 80-90 cm. If the room is very small, you can make narrow shelves from 40 cm;
- the crossbar for hangers must be placed across the cabinet;
- the height of the closet for top clothes is not less than 140 cm;
- should have decorative shelves for little things.
V large hallways have two-door or three-door wardrobes. It is convenient to store in them not only seasonal shoes, hats and accessories, but also linens, towels, magazines. The width of the shelves is variable - from 40 cm and more. The height between them is from 250 to 350 mm.
Important! How more depth shelves, the greater the distance between them and vice versa.
Scheme and drawing

During the drawing up of the diagram, it is necessary to take measurements of the details and draw everything on paper.
reference. Defined rules no charting. It is advisable to make a cabinet project according to ready-made drawings, which are easy to find on the Internet. Or you can draw a sketch of the future product yourself, having carefully thought out all the details.
The material will be cut according to the drawings.
Sequence of circuit development:
- Determine the dimensions of the cabinet, taking into account the location. Standard length material for the walls is usually 277 cm (based on the size of the ceiling of the apartment).
- Sketch out general form products.
- Divide the interior into vertical and horizontal sections.
- Decide in which compartments to install boxes.
- Determine the dimensions of the doors of the sections that will be closed (if any), the location of the mezzanines.
It is necessary to outline the ends for gluing the furniture edging tape, select the fittings. Put all dimensions on the drawing. To facilitate the task, you can use the free computer program for design - for example, SweetHome 3D.
According to the selected dimensions, you need to prepare 6 important details hulls:
- top and bottom strips;
- back walls (2 pieces);
- side walls (not required when it comes to a built-in wardrobe).
As side panels, back wall, the bottom and the lid of the cabinet apartment walls and floor can be used... This will help save on materials.
Important! If the walls are made of plasterboard, this solution is not acceptable.

What to make to be cheap and beautiful?
The construction market offers a wide range of materials with which it is possible to implement any design solution... It is not necessary to make a cabinet from solid wood. It is expensive and difficult to handle. Better to buy materials that are practical, inexpensive and easy to work with.
Laminated particle board – the best option for making a piece of furniture with your own hands.
Chipboard advantages:
- affordable cost;
- strength and reliability;
- environmental friendliness;
- ease of processing.
 Wood boards lightweight, so they do not need fittings or reinforced fasteners. A wide selection of textures will allow you to implement any design ideas.
Plywood sheets durable, lightweight and stable in shape. The material is several times cheaper than wood.
MDF panels are analogous to chipboard, and are inferior to them in terms of fiber pattern and quality. Such furniture is less expensive. On sale there are MDF with imitation of precious woods.
Advantages:
- easy processing;
- fire resistance;
- moisture resistance (material does not swell);
- ample opportunities for creating furniture.
Fiberboard have excellent performance indicators. For the manufacture of load-bearing structures cabinets are suitable for medium or high density fiberboard.
 The front of the sliding wardrobe can be made from wood, glass or chipboard, MDF sheets. Laminated panels with a mirror or regular surface, with tinted auto film are suitable.
When choosing a material, financial capabilities are taken into account. If the budget allows, you can make a wardrobe from natural wood. The most durable is mahogany... Alternative options are beech, Karelian birch.
You need to purchase the necessary accessories:
- end hangers;
- Euro screws with caps;
- handles for doors and drawers;
- guides for boxes.
The number and type will depend on the number of sections, drawers in the closet.
Important... The fittings must be High Quality to prevent the doors from jamming.
Tools
Before performing work, it is advisable to prepare everything in advance necessary tools and inventory. Namely:
- tape measure or ruler;
- pencil or marker;
- glue;
- edging tape;
- ratchet wrench;
- screwdriver or drill;
- pliers.
If you plan to cut the blanks for the cabinet at home, you will need an electric jigsaw.
Step-by-step instruction
Blanks
 Sawing of parts is carried out according to ready-made drawings. If you have experience, you can deal with this on your own. But after cutting the material with a jigsaw, chips may form.
Expedient turn to professionals for cutting blanks. The sheets will be cut nicely and accurately, and there will be no chipping at the edges.
After cutting the parts, they are trimmed with PVC furniture tape. The edge is glued with an iron heated to a certain temperature.
Assembly Description
Pre-markings for fasteners are carried out with maximum accuracy.
Important! The holes for the fastening elements should be located strictly in the middle of the thickness of the end of the workpiece, since the confirmations are screwed into the end.
Install the bottom and walls of the cabinet according to the scheme:
- They check the dimensional accuracy, put the walls and bottom in place.
- Holes are made to fix the base and partition in the center.
- Secure the plinth and central partition. Confirmates are screwed into the bottom of the side walls. To protect them from moisture from the part that rests on the floor, a waterproof profile is used.
- The upper shelves are mounted to stiffen the frame. For reinforcement, a back wall is installed.
Important! A screwdriver will not work to secure the cover. The fasteners are baited by hand using pliers. Tighten additionally with a ratchet or hex key.
 Go to the installation of side shelves. They are secured with four confirmations (2 on each side).
If the side shelf is flush with inner shelf or upside down, confirmations cannot be used.
They are fastened with dowels - wooden cylinders. They are inserted into pre-prepared grooves in the wall and pushed into the same holes in the shelf.
Door assembly begins with the installation of the tailgate. The level is checked whether the cabinet is precisely aligned. The upper level is fixed by placing 2 supports and a running lower profile on it. To assemble the rear door, you will need a set of accessories:
- rear door running roller with and without trunnions;
- 2 rear door corners;
- 8 screws 4x25;
- 10 screws 4x16;
- 6 screws;
- sealant.
 If the insertion of glass or mirrors is envisaged, the segments of the seal are installed along the length of the dividing profile. When installing parts made of chipboard, a seal is not needed.
When assembling the door, the inserts are placed on the foam plastic with the front side so as not to damage. The glass or mirror is installed in the horizontal dividing profile. When installing two glasses, the seal is placed on both sides.
The combined door is assembled using dividing profiles. At the joints with the glass, a seal is needed. Basic door profile fastened on both sides of the door. If it is made of chipboard, use 4x25 screws. TO connecting profile fixed with screws using a screwdriver.
Important! One profile is fixed in a horizontal position. The second is along the vertical position of the door.
The profile handle is installed on both sides, directing the bend to the front side, controlling the tightness of the joints. If necessary, tap with a mallet and align the mates along the entire length. Rear door restrictive sealing corner, running roller without trunnion is mounted on the side of the profile handle.
The rear door is hung on the running profile and goes to the front. Prepare the same set of fittings as for the rear door. The assembly of the front door of the cabinet is carried out in the above sequence.
At the final stage, hangers and baskets are installed on the side walls. Check the doors to work. They must open and close without extraneous sounds and easily.
Photo with design options and ideas
If you need to decide on the possible design of the final result, we advise you to take a closer look at the following photos:


Useful video
All stages of the process can be seen in the following video:
Conclusion
Thus, making a wardrobe in the hallway with your own hands is a responsible and painstaking work, which is performed in stages. Select a product design; determine the content; make measurements, draw up a diagram and a drawing; buy materials; make blanks of parts and assemble the cabinet.
In contact with
 How to make a boiler with your own hands from improvised means?
 How to make a crossbow: throwing an office battle!
 What to do if neighbors steal electricity What to do if electricity is stolen from a house