Homemade powerful boiler. How to make a boiler with your own hands from improvised means? How does a water boiler work
The adult generation and students probably know the idea of assembling a homemade boiler from two blades and a pair of matches. Such homemade products were very often used at construction sites, or in the army, hostels in the absence of a normal boiler or stove. However, in addition to this method, there are several more options for making an electric boiler from available tools. If you are interested in this topic, we suggest that you familiarize yourself with the simplest instructions explaining how to make a do-it-yourself boiler at home. To make the information more understandable for you, we have additionally prepared illustrative photo examples and manufacturing diagrams.
We use the heating element from the kettle
The safest option is to use a heating element from an electric kettle, such a part is often sold cheaply on the market. If you have an electric kettle lying around that is leaking (either the button does not work), or it simply has an unpresentable appearance, and you don’t want to repair it, we recommend removing the heating element from the design and making a simple boiler based on it.
In addition to the heating element, you will need a two-core wire with a plug, which you can also take from a kettle or any other household appliance located at home. It is advisable to take a wire with a cross section of at least 0.75 mm2 in order to avoid heating it. To attach the wire to the heating element, you can use a soldering iron or, even better, as shown in the photo below. In the second case, the manufacturing process will take literally 5 minutes, because all you need to do is strip the wires and tighten the clamping screws on the blocks.
Before using a homemade device, we recommend that you check it - ring it with a multimeter. This should be done without voltage. Switch the multimeter to resistance measurement mode. First, ring the heating element itself, then connect the wires to it and re-measure the resistance.


If everything is in order, you can try using a homemade boiler from the heating element of the kettle. The device should look something like this:

Remember that it is highly not recommended to immerse the terminals and bare parts of the wire in water, this can lead to their rapid destruction. When using the device, do not touch the heating element and water under any circumstances, as they may carry life-threatening mains voltage. All manipulations with the device can be performed only when it is completely disconnected from the network.
Classic homemade blades
Immediately, we draw your attention to the fact that an electric boilers made of blades are very dangerous. They need to be used with extreme caution. It is strictly forbidden to heat water in a metal container or salty liquids or solutions with such a device. Otherwise, electric shock or injury may result. bare wires in the water. One more thing - it is recommended to use this homemade product only for heating water for bathing, for brewing tea it is better to make a boiler according to the previous instructions, since during the operation of the device a small amount of metal salts from which the blade is made gets into the water.
So, step by step with photo examples, we will consider the process of assembling the device. First of all, we prepare a two-core cable with a plug. If the ready-made is not at hand, use a two-wire one, screwing a collapsible electrical plug on one side. It is advisable to take a wire with a cross section of at least 0.75 mm2. to avoid heating it up.

After that, we clean the veins and screw them to the blades, trying to do this as tightly and reliably as possible, as shown in the photo below:


We tie the whole structure with threads, make sure that the connection is correct, after which you can check. Perform the first start-up with the utmost care.


Typically, water in a three-liter glass jar heats up in a few minutes.

You can clearly see the manufacturing technology in the video below:
By the way, according to a similar scheme, you can make a boiler with your own hands from bolts, clerical knife blades, spoons, nails, or even metal plates. The principle of operation and the wiring diagram will be similar. The main thing is to ensure that there is no contact between the two blades (or whatever you have), otherwise a short circuit will occur.
That's all that I wanted to tell you about how to make a boiler with your own hands at home. Nevertheless, we strongly recommend using only factory products, or even better - an electric kettle, which will be an order of magnitude safer. We have provided these step-by-step instructions for informational purposes, and these methods can be applied in practice only in extreme situations when there is no alternative.
Heating water has not required any tricks for a long time, thanks to the excess of heating equipment in the form of electric kettles, boilers, coffee machines and other devices. But there are situations when they are not at hand, but you need to boil or heat the water right now. In this case, you can assemble a boiler with your own hands from suitable improvised means.
Safety precautions.
The methods outlined in the article will for someone become nostalgia for the student years or military service. But it should be clearly understood that such self-made devices pose a potential threat both in terms of electric shock and in terms of fire and explosion hazards. Therefore, their actual use should be minimized as much as possible, and replaced with factory devices during constant operation. Next, we will consider the simplest options that even a novice electrician can assemble without any skills or knowledge.
Razor Blade Boiler
This option has already become a classic for people who lived during the period of domestic shortages. Over the years, a lot of variations of such heating devices have appeared and a decent experience in their implementation, therefore, we will consider such a model in more detail. Blades are not the only option for boiler electrodes, but they are used most often and this is due to several important reasons:
- High quality steel - during electrolysis, an electric current flows in the water column, formed by metal electrons released from the electrodes. Due to the resistance of the liquid, not all particles pass from one electrode to another, but precipitate in the form of a metal, significantly changing the taste of water. Razor blades are made of fairly high quality, so the percentage of sediment from such a boiler will be minimal.
- The optimal ratio of geometric and physical parameters - despite the fact that no one invented blades as an electrode for a boiler, they provide a relatively high rate of liquid heating.
- Mass distribution - can be found in almost every home, garage or workshop, which is why they are constantly at hand.
Boiler blade materials
Before manufacturing, you need to acquire the following elements:
- The blades themselves - for the high-quality operation of the boiler, the firm and condition of the cutting surfaces does not matter, you can even take blunt blades. It is important that they are of the same design, it is better if you take them from the same package.
- A dielectric to insulate one blade in a boiler from another - you can use any items you have (plastic lids, plugs). If nothing comes to mind, it is best to use regular matches to isolate from each other.
- Material for fixing electrodes in a boiler - threads are most often used. You should definitely not glue it together, and even more so, you should not resort to wire and other metal products - they will immediately short-circuit the blades.
- Power cord with plug - Any option with stranded copper wires that can be conveniently screwed around the blade will do.
This is a minimal set, if you wish, you can complicate the design by using crocodiles to connect the wires to the blades or by installing a plastic bar as a base.
Manufacturing procedure
To get a boiler from the blades, it is advisable to have such tools at hand: pliers, a knife or side cutters, electrical tape. The manufacturing process is as follows:
The homemade water heater is ready, it should be noted that the distance between the blades determines both the parameter of the power consumed from the network and the heating rate. Therefore, you will get the fastest heating at a distance of 2-3 mm (for the thickness of a match), at a distance of 2-3 cm, the heating time will increase proportionally.
 Rice. 5: perpendicular placement of blades on matches
 But the amount of electricity consumed to boil water, say, in a half-liter jar, will be the same for both cases.
Do not forget that all home-made boilers that pass an electric current through a heated liquid must not be immersed in metal containers, they will be at potential and may shock. Only dishes made of dielectric material will do - glass, polymer and others.
 Rice. 6: the blade boiler in action
 From the heating element of the teapot
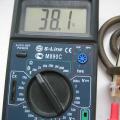
Also, a boiler can be assembled from an unnecessary electric kettle, provided that the heating element is in good working order. In this case, you don't need to come up with anything superfluous - you need the heating element itself and a cord with a plug. First, check the integrity of both parts from the electrical device using a multimeter.
 Rice. 7: check if it works with a multimeter
 Ring the cord and heating element, if they are in good working order, then they can be safely used to make a boiler.
To connect the terminals of the heating element, it is more convenient to use terminal clamps, but if these are not at hand, you can also use a regular soldering iron.
To make a boiler, follow this sequence of actions:

 Rice. 9: finished boiler from heating elements
 The boiler is ready, it can be used both for heating industrial water and for boiling drinking water. In terms of its operating parameters, it is no different from a classic kettle or boiler, therefore it can be used in metal containers. Due to the fact that the factory heating element is used in the heating device, you get a rather powerful boiler.
Of nails
For such a boiler, you will need 6 nails 8 cm long, a wooden strip about 2 cm thick, which can be installed on the edge of a non-conductive container, a ready-made power cord or a pair of wires with a plug. To work, you need pliers and a drill with a drill of the same diameter as the nails.
The principle of creating a boiler is as follows:

The boiler is ready, pour water into a glass jar or plastic bowl, place a bar on top so that the sharp edges of the nails are submerged in the water. Plug in the boiler and wait until it boils. Never try to check the water heating temperature with your finger or hand, as you will get an electric shock when the boiler is on.
From spoons
For such a boiler, you will need two metal spoons, a two or three wire cable, a plug, a glass jar, and two clothespins. The boiler manufacturing process consists of the following stages:

The boiler is ready - just pour water into the jar and plug into the outlet. Note that it is unsafe to move the jar with the device turned on, so first unplug the boiler from the mains.
 Rice. 14: ready-made spoon boiler
 Boiler 12 Volt
A popular device for many car owners that allows you to heat water away from civilization, using power from a car battery. The most difficult is the selection of a heating element, which is calculated by the formula: P = U 2 / R
where P is the power of the boiler;
U is the nominal supply voltage;
R is the resistance of the circuit.
For example, with a circuit resistance of 1 Ohm, the power of a boiler powered by a 12V source will be 144W. Accordingly, the heating time of the glass will be about 10 - 15 minutes.
Ceramic resistors or nichrome thread wound on textolite can act as a heating element. Connect them to the two terminals of the battery and the boiler is ready. The main condition is that the heating container must be made of a dielectric material.
 Rice. 15: 12V heating element
 Video ideas
Earlier, in every house of the Soviet Severyanin, there was such a homemade boiler.
With the help of it, it was possible to quickly heat a bucket of water for drinking livestock, poultry, or to melt imported frozen drinking water for people, which was usually stored in 200 liters. iron barrel.
The design of the boiler turned out to be very simple, reliable and easily repeatable, all the parts (at that time) were easily accessible, every store always had a large selection of nichrome spirals for stoves, air heaters, and blown PN2 fuses (for the case) were plentiful in every production.
I propose to repeat this design and make a "Turbo" boiler with the maximum possible power for this size of the case.
Step 1. For manufacturing we need.
Materials and tools:
Nichrome spiral or wire (preferably d = 0.7-1 mm).
Production fuse PN2 or its ceramic body.
Self-tapping screws for wood, 20 mm long - 8 pcs.
Wire with a plug (cross-section not less than 4 mm2).
Spiral winding device (see sample).
Knife, screwdriver.
Step 2. Calculation of the power parameters of the spiral.
For all calculations, we need these formulas:
1. Determination of the current strength I = P / U
2. Resistance of the spiral R = U / I
3. The length of the required wire R = ρ l / S
4. Wire cross-section S = π d² / 4 or S = 0.8 d²
First you need to decide what kind of nichrome spiral or wire you can get, if any, then your possibilities are simply endless.
The thicker the diameter (section) of the wire, the more powerful the heater and the boiler will turn out.
We measure the diameter of nichrome and look at the table below.

In the line with the resulting diameter, the last column indicates the value of the maximum current for this spiral.

* When using the heater in liquid, this value can be further increased by 1.2 - 1.5 times.
I found a wire d = 1 mm. (S = 0.8mm2), look in the table, it turns out that for 1000C Current = 19.2A.
We apply the coefficient * for liquid (water) 1.4, the maximum should not be taken.
(1)
It turns out: I = 19.2A * 1.4 = 26.88A. maximum current for the future boiler = 26.9A.
Let's see what it will be in kW.: P = I * U = 26.88A * 220v = 5913.6W. = 5.9kW.
This is how a powerful boiler should turn out, about 6 kW.
(2)
We calculate the required resistance for the wire: R = U / I = 220v / 26.88A = 8.18ohm.
(3)
Now we calculate the required length of wire for winding into a spiral: l = R S / ρ = 8.18 Ohm * 0.8 / 1.11 = 5.89 m.
ρ - we take from the table below.
All the necessary data have been obtained, you can bite off 6 meters of nichrome wire and wind the spiral on a special device (step 1).
Step 3. Making a boiler.
We take PN2 fuse for 100A and more.

They are used in these and similar shields.

Having unscrewed eight self-tapping screws and completely disassemble the fuse, you will get such a ceramic case for our boiler.

Take the other eight, longer screws and screw them into place, about 5 mm should remain under-tightened.


We push the end of the spiral inside and turn the end around one self-tapping screw.

We do the same, with a snake, a little with a stretch, around all the screws, at the last we finish the spiral. If everything does not fit, there is an extra one left, bite off, if it is short, then evenly stretch the entire spiral.

We connect a wire with a plug to the starting points of the spiral, be sure to use a wire of large cross-section, 4 mm2 is the minimum that will noticeably warm up.


The boiler is ready.
Step 4. Testing.
Some TB before testing.
ATTENTION!
You can connect this device only to an outlet, wiring and automatic machines that are designed for a current of 30A or more! (for a less powerful heating element, the restrictions are reduced)
When switched on, touching the heated container and water is strictly prohibited!
Do not leave unattended, use out of reach of children!
We hang the boiler in a container with heated water so that it does not touch the walls and does not lie on the bottom.

We turn on 220 volts into the network and check the readings of the resulting power with the device, it turned out to be 26-27A, which corresponds to the calculated one.

Such a boiler is capable of boiling a bucket of water in 8-9 minutes, and 200 liters. barrel in about 3 -3.5 hours.
Heading: Dacha, garden, vegetable garden, Electricity. Tags:. Add
The modern assortment of household appliances has practically erased the word "boiler" from our vocabulary. For office (and sometimes home) use, there are all kinds of coffee makers and electric kettles. What if you find yourself in a hotel, a service hostel, and finally in a garage (in autumn or winter)? You can take this useful device with you.
However, most often at the right moment there is no electrical appliance at hand for heating water, but you want to drink some tea. Remembering the students, a simple (albeit a bit dangerous) technology comes to mind: a double-blade boiler.
Attention!
The information in this article is for informational purposes only. Nowadays there is no longer the concept of "scarcity" and inexpensive boilers, as well as kettles and other similar household appliances are sold everywhere. Do not use these methods in practice, get a boiler in the store and use it!
Elementary knowledge of the school physics course, and more often - the adoption of the experience of the "older" generations, allow you to boil a glass of water in 1 minute, literally using the materials at hand.
How it works
An electric current flows between points of different potentials. Of course, the medium must be conductive. Water is far from being a dielectric, the resistance is quite low (unless, of course, it is a distillate). If you immerse two electrodes with a sufficient potential difference in a glass of water, the current will be very high. So much so that the heating temperature will make the water boil. For comparison, a similar current flows through the filament of an incandescent lamp. The metal is white-hot.
Why doesn't a glass of water explode? The resulting vapor bubbles are kind of dielectrics that protect the system from short circuits. We will not go into the calculations of voltage and current, let us turn to practice.
How to make a homemade device for boiling water
Why exactly blades, and not, say, spoons, nails, and other metal objects? The optimal ratio of consumer characteristics.

- Firstly, this method is more than a dozen years old, and in "those days" almost the entire male population was shaved with a safe blade. The material was always at hand. So - traditions ...
- Second, the surface area of the resulting electrodes matched wonderfully to balance performance. Not too high load on the electrical wiring, at the same time the water boiled pretty quickly.
- Finally, the material. The blades are made from fairly high quality steel. They serve for a long time and practically do not pollute the water.
Let us dwell on the last point in more detail. There is such a thing as electrolysis. When an electric current occurs between the electrodes in a liquid medium, particles of the material move along with the electrons. A significant part remains in the water, not reaching the opposite electrode. Naturally, this does not make the water tastier, and if you have a homemade boiler made of nails, it is not drinkable at all. So blades (especially of high quality) are the ideal donor for the heater.
Manufacturing technology
We need the following materials:
- Power cable with a plug (preferably with a cross-section of at least 0.75).
- Two safety blades. The sharpness of the edge does not matter, usually blunt ones were used. It is best if both electrodes are the same (for even wear). In the case of blades - one firm, preferably from one package.
- Dielectric for installation between the blades. Matches were usually used. It is impossible to simply lower the electrodes in a freely suspended state. They can touch (moving while boiling) and a short circuit will occur.
- Thread for fixing structural elements. As practice has shown, this is the safest way of fastening. You cannot use glue, the rest of the fasteners simply do not fit.
Assembling a homemade boiler from blades
We attach the stripped wires to both blades. The use of solder is pointless, so we make a strong twist. It is desirable to keep the exposed part of the wire as short as possible. Remember electrolysis.
Next, you need to fix the canvases at a short distance from each other. From 2–3 mm to 1–2 cm. The boiling speed depends on this, and, as an inverse relationship, the power consumption. The farther the blades are from each other, the more economical the device is. Accordingly, the longer the water is boiled.
Information:
In this case, economy is a colloquial concept. It takes the same amount of energy to heat a certain volume of water to a certain temperature, regardless of the distance between the blades.
This means that a low-power boiler simply will not give a large load on the network, but the meter will wind the same value of electricity consumption.
There are two ways to assemble a boiler with your own hands. Install a match dielectric strip, and tie the structure with threads.

This is the most common design: a powerful boiler, heats water quickly. Power requires a good outlet and reliable wiring. This connection is reliable, the appliance is designed for repeated use.
The second option is easier to assemble and does not require threads. However, this is more of a one-off scheme - the "fixing" is unreliable. But you can assemble such a boiler in a maximum of 5 minutes.

Advantages: no risk of short circuit, lower power consumption. In this case, the water heats up longer.
Blade options may sometimes not work because the amperage and power will be too low. Boiling will have to wait up to an hour.
Such "heating devices" are called student, or prison: according to the main places of use. Having certain skills, with the help of such a boiler, you can cook dumplings (of course, in a glass jar, a metal pan will arrange a short circuit). And boiling water for tea is a piece of cake.
Alternative options
Another donor for contacts is heels for army boots and ankle boots.

They are assembled in the same way as from blades: threads, matches. Performance and power are similar. Since the metal is of relatively high quality, water boiled with their help can be drunk.
Fasteners can be used as a garage alternative. Two bolts are screwed into a piece of plastic, the issue of connecting wires is solved reliably and elegantly: the nuts are simply tightened. "Electrodes" are located at a distance of 5 cm.

The efficiency of this design is very high: a liter can boils in less than a minute.
The only problem is hygiene. Finding stainless steel bolts is quite difficult, and galvanized models quickly lose their coating, again due to electrolysis. Therefore, this option is more suitable for technical heating of water than for food purposes.
Use of "semi-finished products"
If you have a heating element from an electric kettle or boiler, it is enough to attach the power wires to it, and the "factory boiler" is ready. But this design does not apply to the question of "how to make a boiler with your own hands", since the main element is manufactured industrially. However, DIYers often use spare parts from damaged electrical appliances.

When assembling such a boiler, soldering must not be used. Only terminal connection of the supply wire.
Homemade 12 volt boiler
Despite the fact that there are various options for electric kettles and water heaters on sale for use in a car, making a 12 volt boiler yourself is not so easy. It is impossible to independently create a heating element, except perhaps to use ceramic resistors SEV.

In addition, with a boiler power of 300 W, an amperage of 25 amperes is required. Too much for a battery. Nevertheless, the resistance of a resistor for such a boiler can be calculated using the formula:

where P is the required power in watts and R is the resistance in ohms. For example, if a power of 300 W is required, then a 0.5 ohm resistor is required. If this cannot be found, then it is possible to connect two 1 Ohm resistors in parallel. Recall that with a parallel connection, the resistance is divided by the number, and with a series connection, it is multiplied.
The main problem is that it will not be possible to obtain high-quality drinking water, since the water will come into contact with an electrical product.
Related Videos
In life, sometimes unforeseen circumstances arise. One of these is the lack of hot water, for example, during repair work, when there is no gas, without which the water cannot be boiled. And here, in spite of the fact, the electric kettle has broken down, and there is no boiler in the house at all. Then we begin to think about how we can make a boiler with our own hands at home. It turns out that making such a heating device is not difficult at all, the main thing is to find the necessary materials in your apartment.
A homemade boiler or a primitive 12 volt heater can be made from improvised means.
For this we need:
- Insulated piece of two-core wire.
- The blade that is used for the razor in the amount of 2 pieces. You can also use a paint knife blade. If there are none in your apartment, even two metal spoons will do.
- A saucepan or water jar.
- Two matches or wood chips.
- Threads.
Option 1... A wire must be tied to the ends of the blades. The blades must not be allowed to touch each other. To do this, we install spacers made of matches or wood chips on both sides between them. Then you should wind the blades with a thread. The wires should also not touch. A homemade 12-volt boiler remains to be lowered into a container of water, plugged into a power outlet and wait until it boils.

Option 2... When using a metal container to boil water, one wire can be connected to a saucepan, and a blade, spoon, or other existing metal object can be tied to the other end. It is important to ensure that the latter does not touch the walls of the metal container. It turns out a 12 volt boiler.

A do-it-yourself boiler made with a power of 12 volts copes with boiling a small amount of water quite quickly.
It is important to observe safety engineering when using this heater:
- Before you are going to use a homemade boiler, you must carefully check all the structural connections for strength.
- In no case should you put your hands in water while heating the liquid (you may get an electric shock).
- Do not leave the heating device switched on unattended.
- Don't risk boiling salt water. Otherwise, you will provoke an explosion, as a result of which most of the water will splash out of the container.
- Do not use this design for more than a month. Also, think about the quality of the water you are going to use. Due to the ingress of metals into it, the water becomes of poor quality.
Boiler from teng from a broken electric kettle
In this case, a broken electric kettle, more precisely, its ten, will become useful, unless, of course, it burned out. First, remove the heating element from the kettle.

Then you need to produce cleaning the contacts of the heating element... To the contacts of the latter, using a soldering iron, we solder a two-wire wire with a plug, which can be removed from the same broken kettle. The output of this boiler is equal to that of your broken kettle.

Before using a homemade device that is not connected to the network, you should diagnose it. If the resistance is zero, the electrical connections should be checked.
We figured out how to make a boiler from improvised means at home at home. It is better to resort to such water heaters in extreme cases. Don't risk your life and the lives of your loved ones. Use only factory-supplied water heaters.
 How to make a boiler with your own hands from improvised means?
 How to make a crossbow: throwing an office battle!
 What to do if neighbors steal electricity What to do if electricity is stolen from a house