Homemade table for a mill of wood. Milling table for manual milling hand. Features of self-made design
Having received garden plotI started joinery. After 10-15 years, the collection of the power tool, numbering 27 items, has accumulated in the workshop. A special place in it is occupied by a hand milling machine, which makes it possible to make a lover to do from wood professional subjects Good quality. With it, it is possible to quickly and carefully profile edges and perform connections. However, soon it is uncomfortable to work with a milling machine as a hand tool.
For the first time I felt the need to have a milling machine when I did wooden lattice For a bath: It was necessary to make 40 oval cross sections. I had to build the simplest milling table. I installed the chipboard of chipboard with a hole in the middle, attached to a 10-mm sheet of plywood an old milling machine and secured it on the chipboard - the milling table is ready. It turned out to work with him conveniently, but soon I wanted the best.
Having passed the top ten sites of self-delices, I realized that you can make a very good milling machine, besides budget variant. Began with the project development.
The main dimensions of the machine identified two products available: a metal bed, selected in the landfill, and the hand milling mill sparky x 205se with a power of 2050 W.
Milling table for milling hand: drawings

Classic Milling Machine Made Based manual milling, It consists of six main elements: beds 1, table tops 2, mounting plate 3, manual milling mill 4, elevator 5, allowing you to adjust the departure of the cutter, and the longitudinal stop 6.
Table milling table

To install a manual milling mill, an assembly plate is used on the worktop. The fastening of the milling mill to the removable plate has two advantages over the mount directly to the bottom side of the table covers. First, the plate saves 6-10 mm depth of milling compared with the milling of a milling mill to a lid with a thickness of 20 mm and more. Secondly, the plate makes it easy to remove the mill to replace the tool.

For the manufacture of mounting plate (Fig. 2) I used a 10-mm sheet of lavsan textolite. The location of the fasteners with the soles of the millingrer was transferred to paper, and from paper - on the plate. In the center of the plate made a hole D61 mm and in it, the folded fold for the installation of replacement liners for a specific milling mill.


Cut out the tabletop in size. Stated according to the drawings required holes, grooves and opening under mounting panel. Cut out the discovery with the help of an electric bike.
Prepared guide bars for copying cutters. The height of the bars should be such that the copying mill with the upper bearing during the folding of the fold was in constant contact with them.
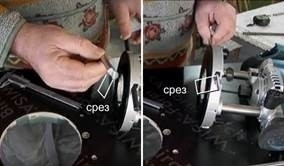
I installed the mounting plate on the worktop, the clamps secured two long bar and attached two shorts to them with a stapler (photo 7). To ensure a guaranteed gap between the folded and the mounting plate, we used thin gaskets with a thickness of 0.2 mm on each side.
For reliability, short guide bars attached to long with small carnels.

Removed the plate and gaskets. I installed a copy mill with the upper bearing in the milling mill. Looking by the sole of the milling of the guides of the bars, set the depth of milling 2 mm in the tabletop. Made a few shallow passages, increasing the cutoff departure until a depth of 0.5 mm is more than the thickness of the mounting plate.
Removed copying bars. I cleaned the edge of the fold with the help of skins.
Using the mounting plate as a pattern, drilled the fastening holes in the corners. FROM back side Countertops installed in fixing holes mortise furniture nuts.
Evilized with a 19-mm milling mills three grooves for aluminum guides, which secured in the grooves by self-draws. Tabletop milling machine ready.
Milling Table Elevator
The following node of the milling machine, which deserves special attention - the mechanism of supplying the cutter into the cutting zone, or elevator. The cost of a professional elevator sold in stores reaches 50-60 thousand rubles. This is high-precision I. comfortable mechanismBut for the goals of lovers, he is, of course, is excessive.
When developing own design Elevator I put myself a goal to use the maximum number of purchased parts. The easiest way to solve the problem of the progressive movement of the spindle of the milling is using a pair of screw / nut: when rotating the screw fixed from the axial movements, the screw the screw is moving.

The elevator design is shown on figure 4.. As a moving element, I used a 200 mm bolt M16. For the support applied the M16 long nut, which was welded to the steel plate. The bolt is driven by rotation with the helm attached to it through a welded support washer.
- Device
- An example of the design of the FS.
- Stanina
- Table top
- Workstop
- Rings
- Mill
- Fasteners fasteners
- Direction guide
- Stubborn planks
- Nozzle
- Longitudinal mobile emphasis
- Additional clamps
- Rotary FS.
The owner of a private house has a lot to repair, improve their household conditions. Milling table will be an excellent solution in the manufacture of various parts and tools from wood, as it provides accuracy and good quality Processing billets.
The table is the main base of the machine. The working body of the equipment is a cutter, a detail with several cutting blades. With its help in wooden blanks make of various types Grooves, canals, windows (vertical recesses), oval profile, and much more. Milling - mechanical restoration Billets with a multi-season tool. The cutter, in addition to the rotational movement, performs translational displacements. Stannu with worktop for processing wooden products Called the milling table (FS).
Device
The correct setting of the milling plate depends on the flawless structures of the bed. The face is located on the bed. It is attached to the bottom to the milling plate, which moves along the vertical axis. The billet is fixed in the transverse direction by a special device - parallel focusing for the milling table.
The principle of operation of the FS can be compared with how Circular saws works. On the rotating blade organ installed in a stationary position, it is coming to process wood material.
An example of the design of the FS.
For the manufacture of FS, the following materials will be needed:
- small pieces of chipboard or plywood;
- various hardware;
- metal corner;
- steel plate;
- aluminum profile;
- elevator (jack);
- carriage;
- plastic fittings.
The drawing shows the dimensions of parts that can be adjusted in each case of individual design of the FS. This homemade table for the manual milling is an example of the most primitive design of the FS. Homemade FS designs can be made from other materials. It all depends on the possibilities and qualifications of the one who took for such work.
Independent manufacture of FS.
Consider the features of the structure of the parts of the FS:
Stanina
The reference part of the machine can be made of wooden bar Or welded from a metal profile. The desired drawing of the bed is presented below.
Under the FS, you can use an ordinary workbench. But it is necessary to know that strong vibrations will arise when working the power unit. If the workbench is not sufficient enough, then the special support structure should be made. The main load is transmitted from the working platform down on the support of the machine. Therefore, the bed must have a big weight.
Table top
Working area is a tabletop. It is better to make it from a textolite with a thickness of 20-30 mm. Why choose textolit? This is explained by the fact that the entire processing process of blanks is associated with the sliding of parts on the working surface of the table. Textolite differs from other materials a great degree of wear resistance and low friction coefficient. The countertop made from such a material will not harm the whole surface of the workpiece and will serve for many years.

As a working platform, a steel plate with a thickness of 6 mm and more can be used instead of textolite.
Workstop
The plate for the milling is made of textolite or from metal sheet. The plate make a hole inserted metal rings. Rings with different diameter are inserted into each other. Ring inserts are on the same level with the surface of the table top.
Rings
What are the rings for? They provide a tight entry of the cutter into the body of the workpiece. Different size Rings correspond to different diameters cutting elements.
Mill
Since the milling mill is attached to the bottom of the table top, the design of the FS creates free space at thenime. Installation and maintenance power plant It should not be difficult because of the cramped conditions at the bottom of the machine.
Universal power unit, driven by milling, is called a mill. It can be done using any suitable electric motor. But this is a person with extensive experience in such a field of activity. The best option will purchase a finished hand mill.
Hand mill - multifunctional unit. Power tools perform a variety of operations. It is used mainly to process wooden blanks.

However, keep the instrument in the hands and at the same time try to fix the wooden part is very difficult. This will not bring the desired result. In order for the manufacture of parts to occur with high accuracy, the milling mill is fixed on a special table.
The sole of the freresser has holes with threaded cutting. The holes serve to attach the tool screws to the plate built into the FS worktop.
Fasteners fasteners
Countertops and plates in milling tables must be located strictly in one horizontal plane. The fastening screws on the plate are twisted in the hidden holes. Nothing should perform or add on the work surface of the FS.
In the absence of mounting holes in the milling case, they are cut independently. For mounting the plate in the table top make a sample of the material from below. If the workplace is made of steel sheet, then the metal plate is equipped with special fasteners.
Elevator
On professional machines to move the milling mill vertically, a special device is installed - an elevator.

With a certain skill, you can adapt a jack as an elevator or another lever lifting mechanism. The best option will be the acquisition of the finished elevator in the trading network. The main thing in the design of the lifting mechanism is to ensure reliable fixation of the unit at a particular height. The conical location of the cutting elements of the cutter allows at a certain height of the protrusion above the working surface of the FS to adjust the depth and width of the production of the workpiece.
Direction guide
Rake guide is made from a duralum profile. You can use duralumin tracks as a guide rail, used in furniture to move sliding cabinet shutters. Under the rails make a sample with a manual milling. The guide track must be placed parallel to the opposite stubborn wall.
Stubborn planks
In the ends of the countertops on both sides, the duralumin tracks are installed, along which the frame design moves with stubborn straps. In parallel, the track in the face is fixed by a ruler. The ruler can be made of ribbon of conventional roulette.
Stubborn strips act as a side support for blanks. They are located on both sides of the milling head. To protect the eyes of the operator from chips, the gap between the straps is closed with transparent plastic.

Nozzle
FROM outside Stubborn slats over the milling head mounted suction nozzle. It during the operation of the machine is connected to the vacuum cleaner. Thanks to this, wood dust and chips are effectively removed from the working area.
Longitudinal mobile emphasis
The lower part of the mobile stop is inserted into the guide track. The stand is fluently moving along the FS. With its vertical wall, the device rests on the base of the workpiece. Pressing the stop, the machine operator during milling moves the part along the table.
Additional clamps
Locks are made of plastic. They hold the workpiece from the involuntary displacement of the part in the vertical and horizontal plane. Clamps are attached on a special rack.

Rotary FS.
Rotary table for milling machine is quite complicated technical device. The rotary FS allows you to set the angle of inclination of the workpiece. This occurs due to the ability of the working surface of the table to move in different directions. On machines equipped with CNC, it is possible to manufacture parts with a round and spiral configuration.
FS S. manual control Perform various roundings, allow you to process curvilinear surfaces of parts. The most common diameter of FS is from 300 to 600 mm. Rotary mechanism Moves the working surface of the table both in the horizontal plane and in the transverse and longitudinal and vertically horizontal planes.
The horizontal vertical rotating platform ensures the processing of high quality billets. The vertically horizontal workstation makes it possible to perform circular processing of parts and form screw channels on the surface of the products.
Rotary tables are used to handle steel parts and billets from other metals.
Make a swivel machine with their own hands can only highly qualify specialists. The machine of such a design is beneficial to have when implementing business activities. For one-time work, contain a rotary FS in its economy is economically unprofitable.
Below is the video demonstrating simple schema FS buildings. Collect such equipment is quite accessible to a person having experience in a joinery.
Compliance with safety
The milling table is equipped with an electric tool. During the operation of the machine should be observed the following conditions Safety:
- If the FS Stanna is made of metal, then you need to ground the support of the table top.
- It is important to install the machine in a well ventilated and illuminated room.
- In the case of the manufacture of FS made of wooden parts, the milling case itself grounds.
Anyone who is seriously engaged in treating wood, knows how important the presence of a good mill. However, it is not necessary to give the transcendant amounts for this tool for this tool - it is quite possible to make it yourself. About how to do it, and it will be discussed in this article.
A high-quality milling table significantly improves the efficiency of working with a manual milling. However, their purchase can fly to a penny, because it will be much easier to make such a table independently, using special drawings for this. This will make it possible to dispose of means and, moreover, the process does not take too much time. There are several types of milling tables: stationary, adaptive and portable. This article will talk about inpatient version, because it is most complicated. And, it means, having learned to do it, the remaining types of millions can be made without difficulty.
Choice of drawings and materials
Before you begin at any work, you should decide which result must be obtained. The easiest way to make a milling table based on the usual workbench, but it's better to do separate design. And if for this purpose still takes normal table, it must be very strong and stable. It is important to choose correctly and dimensions: so, the optimal height is approximately 90-100 cm. An even more successful way out will be the table with adjustable height, After all, it will allow you to adjust the milling machine for the needs of the Master. General form The elements of the milling table can be seen below.

As for the materials, there are also subtleties here too. Often, the covers for such a table are made of MDF stove. In general, it is justified: they are inexpensive, lungs and convenient to use. Popular material is also phenolic plastic - it is more durable and durable than MDF. But even more expensive - about 20%. You can make a metal sheet countertop. It is important that one - the surface must be absolutely smooth, since the workpieces should easily move along the surface of the table, without clinging and not clinging. The thickness of the lid should not exceed 35 mm.
Of the tools for work, you will need:
- Electric drill.
- Chisel.
- Sander. In principle, grinding can be made manually with the help of sandwich, but it will take much more time.
- Plane.
- Screwdriver.
- Lobzik.
As can be seen, both materials and tools for the manufacture of the milling table are not so difficult to get. But it is extremely important that everything is high quality, because the durability and reliability of the product directly depends on this.
Stages of table manufacturing
When all preparatory work Completed, you can proceed directly to the manufacture of the product. Everything is performed in several stages. They will be listed below.

There are some nuances associated with the execution of each of the items. However, everyone who has experience with wood products will be able to make the milling table. It is only important to take carefully to the task.
How to make a milling mill + (video)
Most people prefer to buy ready-made tools, but some of them can be made with their own hands. Belongs to such and manual milling mill. Of course, it is not about assembling from scratch - it takes a lot of time. But the mill can be made of another, simpler and cheap tool. For example, from a drill. You can also make this tool from the Bulgarian or Perforator. It is optimal to take the device with a capacity of 600 to 1000 W (this may be "Fiolent" or something in such a spirit). The whole design will consist of a motor (that is, directly drill) and the framework in which it will be fixed. On how exactly the process will occur, it will be discussed below.
The process of manufacturing the mill
The first thing is made by the frame, in which the drill will need to be installed. It is cut from the chipboard, then a special iron clamp is installed on top for additional fixation. Parts of the design are bonded by self-drawing. A milling cutter is clamped into the cartridge. To ensure that the design is sufficiently stable, the frame is attached to the tabletop using self-samples. Of course, even when, it would seem, a good fixation, the drill can be shown in the frame, which will lead to the fact that wooden details, treated on such a mill, will look inactively. A good exit will be the placement of the swivel lever on the side, and not from above - the motor in this case will be less loosen when working.

Of course, there are certain deficiencies in such a decision. For example, such homemade device Not suitable for long work: when permanent use It will quickly fail. And due to low power with such a tool, it is difficult to process wood solid rocks. But the milling drill will cost inexpensively, it is easy to use, and even a beginner will be able to assemble it. Therefore, this design is used quite often.
In conclusion, it is worth noting that you should not be afraid to make tools for woodwork yourself: expensive factory equipment will undoubtedly be in something better, but sometimes accessibility and low price plays a much more role. In particular, if we are talking about products where it is not necessary to stick high precision. It is ideal for the assembled independently product for those who are just learning to work on a tree, but sometimes it can help more experienced masters.
In the household of private householding, a milling machine is always useful. Equipment is indispensable in the manufacture of various wooden products - from window Rams to different small crafts. Milling Machine It is a reference table and the mill itself. If the owner already has a hand mill, you can make a milling table with your own hands.
The table is the main base of the machine. Cutters - its working bodies. With these parts, with the processing of blanks from wood, many operations perform. On the machine in the wood make longitudinal grooves, Channels, vertical recesses, oval sites and more. The table is necessary to accurately place the cutters - both in the horizontal and vertical direction.
Construction of milling table
The machine desktop must meet the following requirements:
- The standard height of the working surface ranges from 800 to 900 mm. The height of the table can be different - at the request of the master of the workshop.
- The surface of the table should ensure the unobstructed gliding of the wooden billet.
- The mill must be equipped with an elevator that will easily move the mill vertically.
- IN work zone You need to install suction chips and dust.
- The mounting plate should provide reliable fastening Mill. The thickness of the plate should allow the cutting organ maximize the cutting organ.
- The clamping items should be such that the employee's hands cannot accidentally get under the mill.
- The machine must be stable, and at the same time allow you to easily move the machine to the right place.
Making beds and countertops
Under the conditions of the home workshop, inexpensive subsidized materials are often used to manufacture the support part of the machine. To do this, take pieces of MDF, construction plywood, metal corner, hardware (bolts, screws, washers and nuts) and so on.
Stanina
The support structure for the machine is made from a wooden bar or a welded metal. Some masters fit under the face old table or workbench. The most important thing in the device is a resistance. During the operation of the mill, various loads of vibration character may occur.
If a old furniture Overlated, it is worth installing an additional fastener. To do this, use a metal corner, which is attached in doubtful nodes of the design through drilled holes Scorouses.
Samoa reliable design There will be a steel corner of 40 × 40 mm. For this you need welding machine And the experience of handling it.
Table top
The organization of the desktop can be "high" in the video of the work of milling machines published on the Internet. In the manufacture of countertops, it is necessary to follow the requirements that ensure the easy movement of the wooden billet and cutting organ cutter, as well as the reliable fixation of the part being processed relative to the cutter.
Machine assembly option with your own hands
On both side end, the tables are installed aluminum profile of the T-shaped section for fastening and free movement of the parallel stop in the form of a plank. Plank on the sides is equipped with aluminum fasteners, which are part of the grooves of the side profiles.
The bar make a rectangular cutout under the cut of the cutter. The guide profile is fixed on the details, which move vertical and angular clamps. Prints fix the passage of wooden billet through the milling zone.
A parallel groove is cut in the tabletop - to move the slider of the corner stop. On one of the supports under the countertop, the switches are installed with the button emergency stop Mill.
The working platform is often made from MDF and construction plywood. The surface of such material is rapidly wears. More reliable table top - Made from textolite. The textolite surface has a high wear resistance and a low coefficient of friction.
An ideal option for a table top can be a steel sheet or an aluminum alloy plane. So, the playground should have technological grooves and holes, make it yourself such a detail will be quite difficult, and sometimes it is impossible. The output can be found in the use of the details of the old equipment.
Plate for milling
In the center of the countertop cut out the opening to install the working plate. The plate is better made of the same textolite. In the plate make a round hole. Under the hole make round inserts. Combining inserts, pick the passage hole in diameter for the desired cutter.
Ring inserts, like the stove itself, must be in the same level with the entire surface of the desktop. Rings provide tight entry of the cutter into the working area.

Mill
The power plant in its functionality acts as an ordinary drill. The cartridge of the milling is clamping the axis of the cutter and tells it the rotational movement. The unit is attached to the bottom to the work plate. When designing the table, it is necessary to take into account the save space to place the device under the tabletop.
As a milling mill, adapts the compact motor. Make homemade power tools experienced Master. In some cases use electric drill. To get rid of such a problem, get ready-made hand mill. In the trading network, buyers offer a wide range manual power tools of this type.
The hand milling mill of different manufacturers has about the same set of options and dimensions. The tool is mainly designed to handle wooden blanks.
The milling machine allows an employee to control the processing process with two hands, and when working with a hand tool, hands are engaged with the holding of the aggregate itself. Favorable hand milling in the homemade machine design.
Mounting plate
The polymer sole of the milling is removed and cut the mounting plate on its involution. The mounting plate is made of metal sheet, no more than 6 mm thick. In the workplace, the mounting holes are drilled along the fastening screws of the milling plate through the mounting plate.
The holes make on the side of the working surface with sweating so that the screws do not protrude above the plane of the table.
Elevator
Elevator - a device for moving something vertically. In this case, this concerns the milling unit. The hand mill is equipped with an elevator. The problem of installing the elevator becomes relevant when used as a power installation of self-made devices.
You can purchase a ready-made elevator of factory manufacture. Many options for the manufacture of homemade lifting devices are published on the Internet. The main task of the lift is the solution to accurate fixation of the cutter vertical. The protrusion of the cone cutting surface of the cutter determines the depth and width of the wood sample in the workpiece.
One of the most popular embodiments of the self-made elevator is the movement moving on a vertical metal rod with thread.

Scheme of homemade lift mill
Under the table, the shelf is installed, into which the rod is inserted with a flanged nut. The flywheel is installed above the rod. Rotating it, achieve necessary height Cutters above the surface of the desktop.
Rotary milling table
The rotary model of the machine is complex design, ensuring the slope of the wooden billet relative to the mill. Thanks to this feature of the machine, wooden blanks make complex form. At home, such tables are almost impossible to collect.

Safety when working on a homemade machine
For safe work Milling Machine, follows several safety regulations:
- Metal bed must be mandatory grounded.
- The machine is installed in a dry ventilated room.
- If the machine is made entirely of wood, the milling case itself grounds.
Conclusion
The milling table, made by their own hands save the master of the master of the workshop. The homemade design takes into account all the individual needs of the machine owner, the more profitable differs from the already ready-made options.
One of the main assistants of the Master's joinery is a milling mill for wood processing. This hand tool is indispensable when in a wooden billet need:
- cut the groove;
- make a groove;
- perform a spike connection;
- process edges, etc.
However, when performing some carpentry work, it is not always convenient to apply this tool due to the fact that it is necessary to simultaneously hold the processed part and wrame the mill. Therefore, many masters go to the tricks, manufacturing the milling table for a manual milling mill. Using a table, which is a reliable addition to the milling tool, can be obtained as a result wooden elements In terms of quality and accuracy, no inferior to carpentry products made in professional furniture workshops on milling machines.
The homemade table for a manual milling is significantly improving the productivity of the tool and facilitates work on the processing of wooden products. Making such equipment is easy, besides, in contrast to the standard milling table, produced by various manufacturers, this table will have dimensions, design and options selected directly by its manufacturing master.
To perform any engineering works, and the manufacture of equipment is precisely such and it is necessary to make a sketch of the future machine. It needs to designate your project vision indicating real sizes. Based on the sketch, you can easily choose the materials for the manufacture of the future design, their number, to determine the construction budget and store the tool necessary to process the machine parts.
Option 1. Instructions for manufacturing table for manual milling
Material Material Materials
For the construction of the milling table, you need:
- 4 square bruck;
- pruning chipboard and plywood, the dimensions of which are determined when building a drawing of the table;
- hardware (nuts, bolts, selflessness, loops, etc.);
- jack;
- metallic profile;
- sixmillimeter steel plate;
- aluminum guides;
- movable carriage-focus (sewing guide);
- manual frezer.
Drawing of the homemade milling table (option 1)

In any case, before starting to do any such table, the drawing must be performed with the designation of all sizes and the determination of the location of the working elements relative to each other.
Step-by-step assembly
Consider in detail every step on the manufacture and fastening of each element of the self-made milling table.

1st step. For the manufacture of the stationary base for the table, bars and trimming of the chipboard are required, from which the leg supports twist are additionally reinforcing the rigidity using horizontal connective panels from plywood. In the right side part, cut the hole under the start button, which will be connected to the manual pulverer.

2nd step. Tabletop tables perform from chipboard. We make it lifting together with the mill, for which we install the loops and make an additional basis of the support from 15-thymillimeter plywood.


3rd step. In order to smoothly move the processed workpiece along the table, for example, to cut into it the grooves, the moving carriage is applied. In the table top, cut out the groove under the guides of the movable stop and install a metal profile into it. As a carriage, you can use the guide from the old saw.

4th step. The longitudinal focus is also carried out from the chipboard and make it moving to regulate around the cutter cutters. To ensure mobility, cut into the upper part of the stop perpendicular grooves and fasteners stop to the tabletop by retainers. In the middle, cut out a small groove for sucking chips and other milling waste.

5th step. Of thin plywood Mastery box with a hole for connecting a vacuum cleaner hose, which will remove dust and chips formed during milling process. Krepim the box behind perpendicular stop.

6th step. We take a sixmillimeter steel plate and screw it up to the tabletop in a closure with a surface. In the process of fastening, follow the edges to do not oppose the table top, otherwise the workpieces will be cling to them. A manual milling mill will be mounted on the bottom.

7th step. We attach a milling mill for an aluminum sole to the bottom of the plate with bolts, but do not forget to pre-drill in the sole of the bolts. Fastening hand tool The removable plate, and not directly to the table, ensures the savings of milling depths and makes it easy to replace the mill.

8th step. Construct the elevator of the mill. To do this, use a car jack, which allows you to change the height of the cutter with maximum accuracy.


9th step. We remove the handles from the milling mill and instead we are screwing aluminum guides that connect with the jack mechanism.

Design and video of self-made milling table for manual milling
Before proceeding to the manufacture of the milling table, it is necessary to define it accurately constructive features. This article provides instructions according to which a simple milling table is manufactured. Other first assembly option Details Look at the video below.
Check the reliability of fixing all the elements - and the milling table is ready!
We offer to your taste for a few more models milling machines on the tree made by your own hands.
Option 2. Another milling table and other assembly features
We offer the design of the table for a milling room with a detailed analysis of its nodes.
Materials and tools.
In order to make a table under a hand milling hand, materials will be required:
- metal corner or tube (for frame);
- aluminum guide;
- axis for fastening the milling
- putty, primer and paint for metal;
- self-tapping screw; Furniture bolts 6 x 60 mm;
- adjusting hexagon bolts with nuts - 4 pcs. ;
- plywood Finnish moisture resistant laminated, 18 mm thick (you can take another material);
- boards or trimming plywood (for the manufacture of parallel stop).
The following tools are also needed:
- welding machine (for metal carcass tables);
- drill and drill;
- screwdriver;
- electrolovik;
- mill;
- spatula, brushes, rags.
Main drawings


Constructive features of the milling table
Under the milling machine you can adjust the existing workbench. But it is more expedient to eliminate the effect of strong vibration when working cutters, produce a separate design that ensures the stability of the table.
The main loads during the operation of the equipment are transmitted to the base. Therefore, the bed must be reliable and stable. Under the face, the fixed base is understood on which the mill is located. It perceives all loads and is a construct in the form of a table with a fixed lid. It is possible to make it from a metal pipe, a corner, chapellera, wood, chipboard.


It is necessary to take into account that the fastening of the mill itself is carried out to the tabletop below, it means that there is no empty space.

The milling mill is attached to the table through a high-strength and rigid plate for execution. mounting work. It is preferable to make metal, a textolite or a circular board.

On the sole of the milling room is provided for mounting the installation holes with thread. In case of absence threaded holes, cutting performed yourself. If the task is impossible, fasten the milling device using special presses.

Works start with the sample milling and the thickness of the mounting plate. To simplify on mounting plate Straight angles need to round up with a file. The recess in the table lid provides the location of the plate at one level with the worktop.

The center of the plate make a hole for the output tool, drill the holes for fastening the plate on the table. The next step is to drill holes to attach the milling device, consider that the fasteners should be sweeping.


How to make a working surface and base

Making the base of the future milling table begins with a frame. For the convenience of performing the work, the table cover must perform in the front part 100-200 mm. Special attention in the design of the framework of the beds, select the height of the work surface installation. This size is defining for the convenience of work behind the machine. According to ergonomic requirements, it should be 850-900 mm depending on human growth. For convenient operation of the future milling machine, you can install altitude controllers at the bottom of the support. This will allow, if necessary, change the size of the table height, in the event of irregularities, the floor will help to put the tabletop in terms of the level.
As a working surface for the future, the machine is useful kitchen table top Soviet times. Most often it is made of 36 mm List chipboard covered with plastic. Wood-chip material will reduce vibrations arising in the process of milling, and the plastic coating will provide excellent movement over the surface of the workpiece. With absence old table top Apply plates MDF. or LDSP, with a thickness of at least 16 mm.

Choose a place for the future milling machine in your workshop, dimensions depend on the size and type of future design. It can be an aggregate machine located on the side of the circular saw, desktop versionAnd maybe a separate stationary machine.
In the event that the use of the milling machine is not regular, coming down to one-time work from time to time, it is enough to make a small compact table.
Making milling machine for yourself. It is a design that fits on standard Table. It will take for work plate chipboard, Two boards. On a sheet of chipboard in parallel, fasten two boards. Attach one of them to the tabletop bolts, it will serve for the direction and as an emphasis. Secondly use as a restrictive stop. In the table lid, cut the opening for the placement of the mill. Mill Attach the table cover using clamps. Milling machine in compact design is ready.
If you have a lot of free place in your workshop, then make a full-fledged stationary milling machine. It will be more convenient to work on it than on the desktop version.
Option 3. Cheap homemade table for milling
Sketch ready. Materials purchased. The tool laid down in its place in the workshop is waiting for the moment to serve its owner. The Master is also serious and is not going to grab everything at once. He will decompose everything on the shelves and will do everything in stages.
Step number 1.


Start from making a frame of a future machine. You can apply the following method of making bed. Profile pipe 25 × 25 With the help of "Bulgarian", cut in size, then weld the blanks intended for the frame on which the work surface will be located. Weld on one side the pipe at which it will later move parallel emphasis. To the frame welded 4 supports.
To fix the table cover, the perimeter frame is moving the corner, then it will sit in the recess.
Take advantage of the second way of making framework. It implies additional supports for the work surface. In the middle of the table weld limiters for milling equipment. The size between them should correspond to a convenient fastening of the milling mill.
For the stability of the design, connect the lower supports with jumpers at a height of 200 mm from the floor.
Step number 2.
Color the resulting design. Why prepare the surface: Clean metal pipes And degrease the solvent, after which it is proper. If there is a need for putty surfaces, perform a special putty mixture and impose soil. After complete drying, color PF-115 enamel.
Step number 3.

Work surface cut down internal size Frames, install it tightly into corners. After that, drill in the upper frame of the opening under the mounting of the table covers. Make the tabletop itself, drill and securely connect with the bed with furniture bolts. Dimensions of the table 850 × 600 × 900.
Step number 4.


Return from the edge of 200-250 mm and cut the T-shaped guide along the length of the working surface.
Step number 5.
Cut half milling axes. This will give the opportunity almost twice to increase the distance from the sole to the guide axis, which in turn will expand the range of the tool capabilities.
Stage 6.
Remove the sole from the milling equipment, in the middle of the working surface of the table, mark the holes for its fastening and drill them. In the middle of the table covers, drill a hole under the device. On both sides of it, drill holes for fastening the presses of the milling axes.
Stage 7.
On the bottom of the countertop, make a sample under the sole of the milling device.

On both sides of the drilled throat in the sample, make grooves to install the milling axes. The size of the groove and the axis should coincide.


At the edges of the grooves, the floter drill (picture above) drill holes for adjusting bolts under the hexagon.


Step number 8.
Cut two pieces of pipes in size of a large groove width and drill in them in the center of the opening for non-removable bolts. They will serve as pressed axes of the milling device. Screw the nuts on the bolts.

Step number9.
On both sides of the axes, install bolts and nuts from the hexagon, to adjust the plane of milling equipment.

Step number 10.
Now make a parallel focus. Take a small piece of plywood and shift in it the groove so that he can move along the pipe welded for this. With the help of an electric bike cut three bands identical in size, where its length is equal to the amount of the table length and the width of the guide tube and the four plates for them as ribs.
On the page number 1, make a semicircular hole to remove woodworking waste. It should coincide with the slot in the working surface of the table. In the page number 2, we roll a square hole in the same place.
Lane No. 3 from plywood sawd on equal parts. One attach to the back side of the strip with a square bolt or using guides. Plywood halves should move in opposite sides. By upper edge This strip set the aluminum guide.

Stage №11.
While the plates number 1 and No. 2 among themselves as parties with semi-sides. Two stiffeners fix the edge of the resulting hole and two around the sides at a distance of 70-100 mm from the edge.
Cut the square from plywood in size to the distance between the ribs, cut the hole in it to the diameter of the vacuum cleaner hose. Attach the square to the rigidity ribs.

Step number 12.
Fix the parallel stop by clamps. This is done for the mobility of rearrangement of the stop. If it is intended only for the milling machine, then fix it with brackets with grooves for movement.
Stage №13.
We weld to a metal strip with a thickness of 6 mm bolt. Fit clay from wood with two grooves under the bolts in the amount of two pieces.


Stage №14.
Install the milling equipment: Cut off axis in the side openings of the device, put on them nuts and secure the device with clamps from pipes.

Step number 15.


Turn over the table and with the help of a hexagon, raise the mill.
For the convenience of raising the milling mill, it is advisable to establish an elevator based on the jack.
Option 4. Milling Machine based on Writing Desk

The milling machine on the basis of writing table is considered economical and convenient option solutions. In the list of photos of the drawings, a table is presented, with the specification of parts in size and recommended material.

Dimensions of children and materials


 Why you can not postpone the pregnancy
 Effect from regular use of home recipes
 Features of the structure of the neck