Installation of MDF plates on the wall. Installing MDF panels on the walls: Installation and doom do it yourself. What is the MDF panels on the wall
MDF is one of the most popular finishing materials today. In many ways, this is due to its relatively low cost, but for many consumers, the installation process is much more important. If the finish can be installed with your own hands, it is already a huge plus.
That is why, in this article we decided to talk about how to put on the wall of the MDF panel, and if you even confident one hundred percent, we strongly recommend that you read this material to the end and see the videos posted in this article.
Preparatory work

Any repairs, and including mounting MDF panels to the wall, begins with careful and thoughtful training. It is necessary to take into account the mass of the nuances, and first of all, calculate the number of necessary materials. Fortunately today, it is much easier to do than 10 years ago, it is enough to use the calculator on one of the construction sites on the Internet.
Important! Calculation of materials using an Internet calculator may have an error, to compensate for which by simply adding to the resulting result of 10 percent. Thus, you not only guess accurate quantity with the necessary amount, but also leave the stock in case of marriage in the installation process.
Calculate the number of panels is easy and independently, but only if the room in which the repair is planned has straight walls, without communications and architectural sources. So, everything was bought and delivered, in principle, you can proceed to work, but there is one small trick - before installing the MDF panels on the wall, they need to lie down at room temperature at least a day in the open form, that is, extracted from the package.
This is necessary in order for the material to scroll moisture, and produced all deformations that inevitably occur when changing the temperature regime. In the meantime, our panels get used to the new room, it's time to prepare a tool. It is very important that everything you need is at hand, often in search of a hammer or nail, goes much longer than directly to repair.
To simplify the task with the preparation of the tool, we give a complete list of what may be needed during the installation process.
Set of tools

So:
- Roulette and pencil for marks. This most important tool should always be in the arsenal of a home master, and moreover, be at hand. For all repairs, you will have to take advantage more than once, so it is better if they always lie in your pocket.
- Drawing on a tree, but with a small tooth. If there is an opportunity, this tool can be replaced by an electric bike, but if your repair is not planned in a huge room, then buy it is simply meaningless. The MDF panels and the material for the root, it is easy to cut off manually, and it will not require special physical forces.
- Building level. A simple tool without any repair. In the arsenal of professional builders there are high-tech laser levels, in everyday life of a home master you will be met often. The fact is that the price of this tool can reach 10 thousand rubles or more, so it is simply not profitable to buy it for one repair.
- Thunderstorm neighbors - perforator. Very loud tool, but without it you can hardly be drilled holes in a stone wall. The perforator will also need a boring, and better if it is with a diamond tip.
- Building stapler. If you are still unfamiliar with this tool, then it's time to meet. In many situations, he is able to replace the hammer and nails, and it is much easier to work with it and more convenient. You just apply a gun to the place of attachment, and press the handle, and the metal bracket itself penetrates into the base and fastens materials.
- A hammer. It is said that any repairs can be done only with the help of a hammer and strong sense. So it is or not, we will not say, but what is the fact that the mounting of the MDF panels to the wall does not produce without it, this is a fact.
So, the entire tool is prepared, and you can rest a little before the next step, but for now, we suggest you to see how to mount the MDF panels to the wall of the video, in order to understand what to expect in the future.
Preparation of the foundation

Our panels are still getting used to a new place, and we have time to do the preparation of the walls.
Instructions for fastening panels implies two options:
- Secure the panel directly on the wall. Immediately make a reservation that this option is not suitable for us, and most often it is offered to their unrealistic customers, careless and extremely lazy workers. Over time, such a finish will begin to recruit moisture, and for MDF is faithful death, and sooner or later, you will understand that the repair must be completely redo.
- On the prepared idres. Only in this way you can protect the panels from moisture. The MDF is attached at a distance from the wall, so it serves such a finish much longer. Next, we will describe this particular option, and if once, the workers will try to convince you that the root is not important, just look for other performers, these are clearly trying to inflate you.
The preparation of walls begins with the removal of the old finish, and the more carefully it will be removed, the better the basis. It is unnecessary to leave the wall to the brick itself, it is enough just to remove the old paint or wallpaper (see how it is right and without torment to remove wallpaper from the walls).
It is very easy to do with a plaster spatula, and if in some places the paint does not want to leave his place, just leave it there, it means that it will not be obstructed with your walls, and will not interfere with the new repair.
The next stage is a priming. It is necessary in order to protect the walls, and subsequently the entire finish from the appearance of mold, which is inevitably formed due to the constant condensate accumulation. Primers and impregnations deep penetration, in this case they work as antiseptics, that is, the fungus and molds are not allowed.
Beautiful and smooth walls - the key to spectacular repair. In modern decoration there are a great many species and finishing methods. And MDF panels are one of them. When choosing a finishing material for decorating walls, a question of the cost-effectiveness, ease of installation and ease of operation, always occurs.
Along with the paints, plastic, wallpaper and other materials, the walls of the MDF wall panels are also worthy of attention. About this relatively new method of finishing, I will tell you in this article.
Probably many of you faced the fact that when updating the interior of the apartment I really do not want to mess with a long preparation of walls, cleaning a large number of construction debris, and especially spend a lot of money for repair. When there is no possibility and desire to mess with painting or sticking wallpaper, you can do the walls of the wall. This method allows one inhabit and align and decorate the surface.
The wall is perfectly isolated by many different materials. And it is not only plasterboard or plastic, but also the MDF panels. Working with them is beautiful in terms of speed and relative simplicity of installation. They look much richer plastic, more comfortable in size and are also easily operated in the future.
MDF panel is a plate of pressed wood fibers impregnated with binding materials. From above, such a stove may be no coated, and can be coated with a layer of special film and a thin layer of plastic. This is a very eco-friendly material with all the properties necessary to create structures. The panel can be washed, it is rather durable and safe.
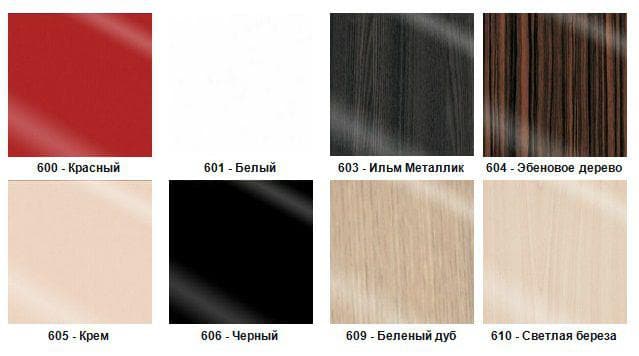
As for the color and appearance, I want to say that today manufacturers offer a fairly wide selection of colors that imitate various types of wood, as well as bright and pastel monochrome options. So the lifting of the walls of MDF panels will easily cope with the solution of any designer solutions. In size and form, the panel may also be different.
It can be square plates from 300 x300 mm to 980x980 mm. There are panels up to 300 mm wide and 3 m in length. Such panels are very similar to the lining and look at the wall and ceiling. If it is necessary to sew a large area at once or use non-standard size, then the sheets will be helped with dimensions mainly 1220 × 2440 mm.
All options mainly have up to 25 mm in thickness. It helps to solve the problem with noise insulation. Therefore, the MDF is clearly worth paying attention when choosing materials for cladding.

The only disadvantage of this material is relatively low moisture resistance. Therefore, they are suitable for finishing not all rooms. The DSP panel is used only in dry rooms, such as an entrance hall, and from the fiberboard in rooms with moderate humidity, for example, the kitchen.
Testing-Instructions Phasedno
How to strover the walls with MDF panels, I will tell you in detail. The process of mounting wall panels is quite simple and does not imply a complex preparation of the wall. They can be attached to the prepared frame, at the same time aligning the wall, or use the glue when the wall does not require additional transformations.

In any case, what method you would not have chosen, you must consider several nuances. Before starting work, the panel must pass some acclimatization. To do this, it is enough to hold it in the repaired room, so that the balance of temperature and humidity between the panel itself and air has been established. MDF comes back to normal, there is some extension.
Before starting installation, the wall, as already mentioned, does not require special training. It is enough to cleanse areas with clearly outgoing old paint or plaster, get rid of cracks.
When installing panels, you must remember their physical properties and leave small gaps at the bottom and at the top. There are several millimeters. It is necessary to take into account the normal expansion of their temperature and humidity in the room. Otherwise, with time the panel may not be stolen.
On frame
When choosing a frame mounting, you will need profiles or wooden slats. When choosing fasteners, you should pay attention to the complexity of the wall itself. You may need to bypass many corners or protrusions.
In this case, it is better to use the mounting profiles (various enough items), since a large variety of their diversity will allow you to make a job as accurately as possible. Particularly in the case of angles. However, if you decide for some reason to do without good items, this is also not trouble. All joints and corners can then be closed using a universal corner.
This applies not only to the frame, but also the adhesive method of installation. So, you need to install two profiles-plinth (they are also called moldings), which are perpendicular to the facing plate. This means that if the panel is mounted vertically, the profiles are horizontally (at the floor and ceiling).

When the horizontal direction of MDF plates, the profiles are installed in a vertical position at the corners of the wall. In the case of fastening the leaf panels of a large area, this question is not so principled. After installing the first profile, using a plumb or construction level, determine the position of the second extreme profile. Next, using the same plumb or level, fasten a few more intermediate profiles at a distance of about 500-600 mm.
If the sharp surface drops do not allow to attach the profile to the level, then the various materials can be put under it. It can be wooden rails, fiberboard, plywood.
Intermediate profiles are necessary to ensure that the future panel does not begged under the press. Therefore, their number is adjustable, based on the area and the levels of the sewable surface and the thickness of the panel itself. The panel is pre-cut into size, taking into account the necessary gaps. If the lifting is made using rush panels having a groove and tail, the J-profile is usually used as a molding, which will start the first panel.

The tail is cut and start in the profile in three sides - side and two end. The side having a groove remains free. It must be attached to the crate or directly to the wall. The next panel is rolling in the tail in the groove, and also fits the side with the groove to the crate. So the set of all panels is carried out.
The last cut around 5 mm at the edges and initially drive into the second molding. After the stop, it is enough to move a little in the opposite direction until it comes to the previous groove. When using other types of panels, they are attached to the joint in the joint.
It is very important to cut the edges evenly to cut the edges to be smooth. Cutting thick panels is better to produce with the use of hacksaw or an electric bike. Carnate panels to the crate can be conventional self-drawing or using special clips and beamers.
The last option is especially progressive and convenient, since in this case the panel will not sleep and is simply fastened to the crate. Also, this method does not prevent the lengthening of the panel under the influence of moisture and temperature, and if necessary, it is easily dismantled. On this, the trim is finished and your wall looks smooth, smooth and beautiful.
On glue
The adhesive method allows you to do without installing the crate. The preparation of the wall remains the same. Even if the wall was painted with oil paint, it is not necessary to delete it. Modern glue mixes penetrate deep enough, and allow you to do without this process.
You can also glue the panels to the crate. This option is relevant in the case when the wall is very uneven and for accessing the required level you have to install additional railings. Glue for MDF is applied over the entire surface of the panel in the form of zigzag strips.
The wall decoration consists of several stages. Installation of MDF on the wall will require the prior choice of the necessary materials. Mounting technology MDF panels on the walls quite simpleif you follow the advice and recommendations. Establish the room under the power to all.
Each person wants to have stylish and comfortable accommodation to emphasize his own individuality and create a unique atmosphere.
Description of the MDF wall panels
Installation of MDF Plates on the walls can be done correctly, quick and cheap, without putty, primer, painting or blending wallpaper. Minimum construction garbage, stylish and practical.
Wall panels are known for more than 10 years in the Russian market. During this period, their popularity does not fall.
The advantages of using MDF panels are:
- a wide selection of sizes and textures, glossy and matte;
- low cost;
- great quality;
- the environmental friendliness of materials from which panels are created;
- optimally suitable dimensions;
- ease of adaptation for premises of any configuration;
- the possibility of fastening to a wooden and metal crate;
- indicators of mechanical, thermal and ultraviolet resistance;
- long service life without losing your initial type;
- resistance to the effects of tobacco smoke;
- ease of cleaning and washing;
- convenience of mounting if you need to fix the MDF panels on the wall. It is possible to repair the room for half a day, without dust, dirt, preliminary work and a large number of special tools.
This building material suitable for dry, and for wet premises. Even in the conditions of exposure to moisture, the furniture from MDF will not cover mold or fungus. Mounting from wood will also be a favorable way to decorate the surface.
There is a large variety of MDF panel design:
- matte;
- glossy;
Effect of large-format ceramic plate
Some tiled panels have a small size. Alternate tiles, different patterns and colors, you can lay out different patterns of any level of complexity.
Visually, this will achieve the effect of a large format ceramic tile.
Thanks to the panels with dimensions of 120 per 80 cm, you can quickly cover the panels. After reviewing the recommendations on whether you can give an excellent appearance of modules.

The difference of wall panels is noted in such indicators as:
- dimensions;
- texture;
- thickness;
- color;
- principles of fastening.
With proper execution of work, you can create an ideal interior. Interior wall decoration with natural materials is now in the trend. However, natural materials are quite expensive, and labor-intensive works with them. Therefore, synthetic materials are widely used.
Due to their high quality, they are difficult to distinguish from natural analogues. The MDF panels repeat the natural wood texture, create a view of a wooden coating.

At the same time, they are perfectly amenable to washing and cleansing. And the installation process is characterized by simplicity and speed of work. It is necessary to cut the panel of the desired length and secure them on the frame.
MDF reacts steadily to moisture. About moisture-proof MDF for walls. There are special corners under the color of the panels, they can change the form. You can build a platband, internal or outer corners. Such material used to give the interior of the finished species. Find out how to install MDF panels on the walls, you can from the recommendations.
If the installation is performed in winter, it is pre-equipped to hold the wall panels for several days indoors so that they restore their dimensions. When choosing panels, it should be borne in mind that than they are already, the longer work will be performed, but there will be less trimming.
It is necessary to determine how smooth walls. If the level shows good data, in which case you will not need to make a wooden crate.
It will be possible to simply glue them to cement using a special glue. In the case when the walls are not even, you will need to perform the crate.
This situation is more common. What materials are for it? The crate is made of softwood wood. Pre-think what kind of doom is. In dry rooms it is better to use a tree, and in a wet - metal profile. By the same parameters you need to select and fasteners.

Self-tapping screw - if a metal profile is used, fastener from the wood screws or brackets, if necessary to work on a wooden crate. In the wall space and crates can place a layer of heat - or sound insulation.

What methods attack the MDF panel to the wall:
- with clamp;
- without crate.
How to fix and install - Installation
Mount the crate to the surface of the rail
Start work is necessary from the corner. Stacking must be done tight. The thin part is drawn towards the corner. The mount is performed by the surface of the rail.
Successfully perform work on the installation of panels from MDF on the wall with their own hands, if you prepare a rail, whose cross section is 20 by 40 mm. They will need to be fixed using self-tapping and screwdriver.
The location of the regions should be perpendicular to the direction of the panels that will be mounted. In order to mount the elements of the crates, stick the interval 40 - 50 cm.

Mounting levels constantly carry out the checks of the fixed racks. If the wall surface is uneven, it is necessary to align the crate with the help of building materials such as:
- plywood;
- bar;
- mounting glue.
For the consolidation of the surface, long screws or dowel - nails are used. This will depend on which materials are made of walls. This process is also constantly monitored by measuring the surface smooth surface using a level.
The bottom of the cutter must be located taking into account the distance of 3 - 5 cm from the floor. This will allow to continue to successfully fix the floor plinth.
At the top of the fence mounted at the ceiling level.
- the crate is fixed in different positions:
- in corners;
- along the window opening.
If the works are manufactured where an increased level of humidity, it is desirable to install the elements of a plastic crate or metal. You can view the video on the topic, how to mount panels from MDF to the surface of the wall. If you use the method of fastening the "groove in the groove", one can easily disassemble the design.
Installation and technology installation of the first panel
To perform installation work on installing MDF panels on the walls, you must start with an angle:
- we apply the first panel;
- we produce check the level;
- fix the panel with self-draws to the raiks all over.
On how MDF attach to the wall, tells thematic videos from the Internet.
How attached to the crate
In order to fix the MDF panels to the walls of the wall, the kleimers are taken - a special type of brackets.
Kleimers are inserted into the cavity of the panel groove and fix the construction stapler.
It is best to use nails. It is necessary to constantly monitor not to damage the edges of the panel.

In order to avoid this, use pliers. Mount the remaining panels. In the grooves of the panel, which is already installed, the crest of the panel, which will be next in the row.
The video on the installation of MDF panels on the wall can be viewed before starting work. Next, it is necessary to fix to the crate and produce work similarly in the required quantity.
The last panel at the wall may not be approached by size. If necessary, you can cut the MDF panel with a logging or saw on a tree.
It will not disclose it, the main thing is to measure the part correctly, which will be cut. So they will be the desired length. Following the recommendations of the instruction, as the MDF to attach to the wall, you can perform such works on your own. Mount the fittings.
In order for the interior of the MDF mounting on the wall to the view of the completed product, it is necessary to establish the MDF accessories. Close the joints can be closed with a folding corner.
Mix glue the surface of the inside and tightly press to the angular panels. After performing finishing works using the MDF panels, the appearance of the walls will be significantly transformed.
How to fix without wooden guides
You can fasten the MDFC wall panels without crate. In this case, the lower part of the panel must be closed between the wall and plywood. The upper part must be inserted into the starting profile. It is screwed to the top panel.
To optionally fix the design, it is necessary to do another hole in the middle to secure the panel. Fastening MDF panels to the wall without rails is performed using wooden chips and screws with hats.
The panel will be perfectly imparting to the wall, and it will be possible to save at least 4 cm space if you install the MDF panel on the walls without crate.
For additional fixation of the panel on the wall, professional mounting foam is used. Under the foam panel will not be collapsed, as the sun's rays do not fall there. Treat the top and bottom of the surfaces. Fastening MDF plates to the wall should be reliable.
The panel is glued, in the middle of one self-tapping, is added in the middle. About how to glue MDF on the wall. This will be quite enough. The strength and durability of the entire design depends on how to fasten the MDF on the wall.
For more information about the installation of MDF panels on the walls, see the video:
How to attach plinth - installation methods
MDF plinth can be attached to the wall in several ways:
- on self-tapping screw;

Select the plinth is necessary in the tone of the main coating. Step-by-step instructions will look like this:
- we note the place of sleep;
- we make cut;
- apply glue;
- click to the wall using effort;
- mount the angular element.
Most often, the plinth in the apartment is suitable for a platband, it gives the design not aesthetic appearance. So that sharp corners do not spin the type of plinth, it is necessary to write the angles by turning them inside.
Molding MDF on the walls in the kitchen with their own hands
You can install attractive with mounting on the wall. Excellent panels with photo printing.
Compared to the aprons from other materials, it can be mounted directly in the kitchen, configuring all the technological dimensions during the installation process.

The panel must be placed if necessary, cut holes for electricity sockets. On a flat surface panel mDF glued with liquid nails.

It gives the room a beautiful view. Installation of apron and additional elements are performed quickly and with the minimum presence of construction debris.
conclusions
Practical and eco-friendly MDF panels are widely demanded in modern construction. They are made by pressing wood dust in vacuum. At the same time, the color of the natural tree of various shades is achieved.
If you know in detail how to mount the MDF panels on the wall, you can drastically change the appearance of any room in the house. Installation of MDF panels on the walls, the price of which will depend on the quality of the selected materials and the volume of necessary work, is more profitable than working with natural materials.
On how to install the MDF panels on the wall, you can learn from the video. This material is so convenient for use that you can perform work quickly and efficiently.
If the apartment has not been repaired in your apartment, and the walls have lost their appearance for many years - the MDF panels will become the best replacement or tile. They are ideal for interior decoration, as they have an attractive appearance and are made of environmentally friendly materials. In addition, the high-quality installation of panels is able to perform any person with basic technical and construction skills. Today we will talk about the features of the furniture of the MDF panels and give step-by-step installation instructions.
What is MDF.
MDF is a panel finishing material obtained from woodworking waste by means of dry hot pressing of fine chips. When heated from the wood, a substance called lignin is distinguished, which performs the role of glue. According to the structure of the MDF, it reminds felt of wood fibers. The main advantage of such panels is high moisture resistance. As a consequence, they are often used to cover walls, floors and ceilings in rooms with high humidity, for example, in the bathroom or in the bathroom. However, due to an attractive species, such a finish is often widely used in the halls and offices. Also perfectly look the surfaces, lined MDF in the corridor and on the loggia. The value of the material compared to the tile is low, while the walls will turn out perfectly smooth.
If you decide to install panels with your own hands, you should first prepare the necessary tools and materials for work.
What will be needed for installation
For high-quality trimming of MDF walls, you will need the following materials and tools:
- Heatel (mineral wool, foam, foam or extruded polystyrene foam). Each type will look at a little later.
- MDF panels. There are many models that differ in thickness, color and structure, so the choice is yours.
- Reiki or galvanized profiles for installation of the root. Width and thickness - 40 and 20 mm, respectively. Length is selected depending on the size of the wall.
- Self-tapping screws are needed for fasteners of panels to the doom.
- Kleimers are special items necessary to attach panels to each other and the doom. It is often available with panels.
- The plumb is a nut or any other small metal object attached to the fishing line or thread.
- Building level.
- Yardstick.
- Pencil or marker.
- Plane.
- Metal corner (plumbing carbon). It will be needed for cutting pieces of panels for slopes.
- Electric jigsaw is used for the sawing MDF. You can also use the metal knife or a disk saw. The latter, due to compactness, is very convenient to use. It you can cut both a tree and metal - just changing complete circles.
- Perforator with a drill along concrete.
- Screwdriver, drill or screwdriver with a nozzle under the self-tapping screw.
Toolkit in the photo
Preparation of walls
Preparation of walls before installing the root
Before starting facing work, you need to make sure that the room is suitable for installing panels. If the walls are visible on the walls. Strong swelling of wallpaper, drywall, or disposal of plaster, then you should first clean them from old finishing materials. Also, do not forget about the plinths and decorative corners (if any) used to hide the joints of the walls and the ceiling.
Useful advice: It is advisable to shoot an old finish completely, that is, to the capital wall. So you will save on fasteners and identify hidden surface damage.
When the walls are cleaned, you can go directly to the installation of the doom under the MDF panel, but first let's find out what kind of varieties exist.
Types of dohes
The most popular technologies for installing wall panels from MDF today are considered:
- Wooden doom. This design is easy, and it does not require a large number of mounting elements. However, a wooden lamb needs a preliminary impregnation with a special tool in order to prevent the appearance of fungus, rot, as well as mold. If the room has increased moisture, then it is not worth using a wooden doom in this case.
- Galvanized profiles. Often, metal structures are used as a drywall under drywall, although they are quite suitable for cladding walls MDF panels. But for the formation of the frame on the floor, galvanized profiles are not suitable, due to low strength. As for the ceiling, the design of a light metal is suitable here, and not from the bar.
Installation
The installation of lattice structures made of metal and wood has several differences. For example, when using galvanized profiles, their mount should be performed only by means of powerful and long screws. The use of dowel-nails in this case does not make sense - the chain is lost between the profile and the fastener itself.
The most important point on which the strength of planting fasteners and the entire structure depends is fixing the body of self-drawing or a dowel-nail (with a wooden cut) at least 35 mm in the wall. For example, if the rack thickness or profile is 20 mm, and the MDF panel is 10 mm, the depth of the groove under the landing socket and, accordingly, the fastener should be about 65 mm, and better more. The diameter of fasteners is selected from 4 to 6 mm, depending on the density of the wall. The stronger it is, the smaller the diameter of the self-press should be. All fastening elements are equipped with a special jack. When drilling a groove, the diameter needs to be compared with the body diameter of the planting socket, and not his cap, otherwise the safety margin will be insufficient.
Installation of wooden design
Installation of wooden dohes
We start from the installation of vertical racks. Reiki set in every corner pairwise - so that they formed a straight corner, as well as on the edges of the door and window openings throughout the height of the room. To make the racks accepted exactly a vertical position using a plumb. Now in order:
- We apply a rail to the wall and outline it on any side with a pencil or marker.
- We perform holes for fasteners by means of a perforator with a drill along concrete. For the strength of the design, the drilling step must be in the range from 0.4 to 0.5 m.
- We drive into the openings of the nest under fastening and make the mark of their location on the rack itself.
- Drill in the rail of holes with a diameter of slightly less fasteners.
- We set the racks in place using self-tapping screws or dowel-nails.
- In the same way, install horizontal bars. Step remains the same. Do not forget to execute slopes.
- At the end elements of the ledge at the joints of the design, we remove with the plane.
Mounting metal base
The order of work on the installation of the design of galvanized profiles is completely similar to the above. At first, the racks are placed at the corners of the room and in the places of openings to apply markup on the walls. After the holes are performed under fastening and installing vertical profiles. UD profiles are used as racks. In the marked places in accordance with increments of 0.4-0.5 m in them, horizontal profiles of type CD are inserted. After transverse strips are attached to the racks and wall. Between themselves, elements of the metal structure are connected using conventional self-tales. As mentioned earlier, it should be fixed to the wall to the wall only with powerful fasteners (dowel-nails do not fit).
Useful Tip: For cutting metal profiles, it is recommended to use a grinder or a manual disk saw with an appropriate nozzle. Effectiveness of the electrolovka, even with a mill for metal, much less.
About thermal insulation
Installation of insulation
Installing the root is complete, but before moving to the installation of MDF panels, walls should be insulated. This will allow good to save on the heating of the room, and will also increase its thermal insulation. In addition, insulation additionally prevent the occurrence of mold, fungus and moisture in the voids of the root. Cells in the doomle are recommended to fill out one of the following insulation:
- This is a relatively new multi-layered insulating material, which consists of polyethylene foam and polished foil with a reflection coefficient of 97%. It fireproof, environmentally friendly, has good noise insulation and low vapor permeability.
- Mineral wool. The material has gained great popularity due to high thermal insulating and moisture-resistant indicators.
- Styrofoam. Air is the best thermal insulator, and this material consists of 98%. All this thanks to polystyrene granules, which are formed in a foam in the production process. Material features high indicators of moisture and countertilence.
- Extruded polystyrene foam. This type of foam is obtained by saving with extrusion. The sealer stands notice, but it justifies its price completely. The material has excellent thermal insulation, as well as a high coefficient for compression. Therefore, it is often used for floating floors.
Installation of this thermal insulation material is very simple:
- From the heater roll, according to the sizes of the cells (pitch), sheets are cut.
- After that, they are attached to the wall by means of a construction foam or silicone glue.
- The resulting protrusions of the mounting foam are removed using a stationery knife.
After insulation of the walls, we turn to the most interesting - technology of wall cladding panels.
Installation of MDF panels
Installing panels
Stacking the product should be started from the corner. The installation order is as follows:
- We apply the panel to the corner and check whether it fits tightly to the shap. After estimating the level of surface with the help level.
- If everything is fine, on the side of the corner at the entire height of the design, fasten the panel with self-draws to the doom.
- Subsequent strips are connected using swipes that are inserted into the panel grooves. These staples are desirable to fix nails to the doom.
- In the groove of the first corner panel, we simply simply rush the comb. It is necessary to control their adjustment density. In the case of the detection of the slots, it should be trimmed a bit of the crest of one panel with a knife and again try to put it in place.
- Fresh the MDF bar to the pendant with the help of self-tapping screws throughout the height of the design.
- Next, the installation process is repeated.
- The last panel is needed until you stop pressing the penultimate and fix the self-stairs at the free edge.
IMPORTANT: If the last plank does not fit in the remaining space, then you can still neatly shorten the width with the help of an electric bike.
Finishing of slopes
This procedure is performed similar to the installation of panels. Everything else, when finishing the slopes, there are two options for decorating. The first is the installation of the panel along, the second is across. If the slope is small and its width does not exceed 1.8 width of the finishing panel - the transverse trim is performed. With broad slopes, you can resort to any of the ways.
Useful information: A great view have slopes, embroidered across, with alternating dark and light tones.
The finished finish type gives fittings, thanks to which you can hide the angular joints between the panels. The lack of folding angles are well closed. From the inside, they need to be applied and tightly press the product to the trim in the corner. To hide joints with floor and ceiling, you can use the plinth.
Video instructions for working with wall panels
As you can see, there is nothing difficult in installing MDF panels, and this work can be done without the help of a building master. We hope that our article will help you make a high-quality finish of the premises, which will not only be warming up your home, but also serves many years.
Methods for fixing MDF to the wall and ceiling, which glue is applicable for mounting panels. Fastening to a metal crate, and how to make a wooden frame.
MDF panel How to mount a wall
MDF panels are attractive to their appearance. A wide selection allows them to apply in various premises to create a unique interior. They have many positive parties, minimum drawbacks. However, after making a decision, the question arises the question: "MDF panel How to mount a wall"? Facing methods are described below.
What is MDF panels for interior decoration: advantages and disadvantages
Material is made of fibreboard. The supply of high temperature and the use of resins perform pressing wood chips. This technology allows not to apply glue, which includes poisonous substances. Therefore, the panels are environmentally friendly facing material.
MDF produce three species:
- Laminate - repeats the pattern of wood, marble and other materials.
- Veneer - produce from chips of valuable wood wood.
- Laccated panels.
 Features of the material:
- Simplicity of fixation to the surface. Fixation is carried out on the frame base and for glue.
- Additional protection against noise and extraneous sounds.
- There is an option for alignment and insulation of the surface with an attractive appearance.
- Hiding communications and wires.
- Simple care.
Negative facing sides:
- when hanging items on the lined walls it is necessary to use the Fisher-Anchor;
- many types of material do not endure the constant impact of moisture;
- the material is on.
Despite the negative sides, with the help of panels create beautiful design rooms, loggias and corridors.
MDF panel: Molding Methods for the Wall
 There are 2 methods to attach cladding on the rough surface. Each of them has its own characteristics.
Fixation on the frame base. Facing is fixed on a metal or wooden crate. To do this, it is not necessary to carry out a thorough alignment of the walls, but it is required to make markup and prepare the material.
Fastening panels for glue. For this, the adhesive solution must respond to a number of requirements corresponding to this work. Otherwise, the panel will disappear.
Facing fasten on:
- glue solution;
- liquid Nails;
- mounting foam.
Positive aspects of this method:
- Installation time. On a flat surface, cladding is faster than creating a frame base and after fixing the material.
- For fastening, do not need self-tapping screws.
Disadvantages:
- The panel is not fixed on the curve. It is necessary to make the wall smooth.
- If 1 element is damaged, then you need to change the entire surface.
- It is impossible to insulate the wall and hide communications there.
Knowing installation features There is accuracy in choosing fastening of the facing.

Installation to the wall on a wooden crate
 Wooden frame constructs in a dry room. For this use treated wood.
Advantages:
- installation is easier than metal frame;
- for the frame base, the rails are needed;
- tree is an environmentally friendly material.
Disadvantages:
- not mounted in wet rooms;
- do not use untreated bars;
- the tree is subject to small rodents and bugs.
Despite these minuses, well-processed and dried wood serves a long time not deformed.
Case with a metal profile
 Metal crate makes using profiles. They are used to create a frame base in wet premises, because the profile is covered with anti-corrosion material.
The advantages of metal structures:
- no need to level the surface to create a frame;
- under the metal design, all communications hide;
- move the wall insulation;
- if the panel is spoiled, it is possible to replace it without dismantling the entire surface.
Disadvantages of a galvanized profile design:
- The area of \u200b\u200bthe room is reduced.
- If you need to hang out the object, an anchor can be used to withstand the load.
To create a profile crate, you need to make additional costs.
Fastening on the wall without crate and frame glue
 The panels are attached to the adhesive base only when the surface does not have deviations from the level and there are no significant defects.
Advantages of planting cladding for glue:
- Installation time. The minimum time spent on the facing installation.
- No additional costs for fastening elements.
- The space of the room, the corridor is not reduced.
Negative sides:
- there is no way to hide communications. For wiring you need to stick the wall;
- there is no possibility of laying the insulation of waterproofing;
- this method does not apply in the bathrooms due to dampness;
- in case of damage to one panel, it is necessary to dismantle the entire surface.
To select the panel attachment method, it is necessary to calculate everything and take into account external factors, such as humidity, temperature differences.
Sequence of works of the MDF panels do it yourself
 For the selected method of creating a flat surface with a frame, it is necessary to carry out a number of works in such a sequence:
- Measures and calculation to acquire the required amount of material.
- Treatment of wood in case the frame will be from bars.
- Processing the surface of the primer. In some cases, putty.
- Marking on the draft surface for mounting a smooth and durable frame.
- Installation of crates.
- Fastening panels.
Sequence of work in the adhesive method:
- Conducting the surface assessment to evenness.
- Protecting a rough base.
- Marking for the first panel.
- Cutting material for the desired length.
- Applying glue.
- Facing fixation.
- Fastening corners and planks.
Proper work will be a guarantee of a long service of a beautiful appearance.
Fastening without shabby screws: instructions for work
 Panels without crates are fixed with self-draws only to the wall of the tree. If the surface from another material does not need to be risked, because due to the movement of the soil and the skills of the building, the screws will weaken over time. The panels are overwhelmed and lose their appearance.
How to install wall MDF panels in the kitchen: Fastening without Retails
Adhesive method. In this case, the surface should be smooth, dry, clean. The rough base is ground, make marking for the first panel. The material is cut into the desired length. The glue is applied with a toothed spatula. Printing panels need to be used. Equality is mainly checked in the corners. After installation, the surface is wiped with a moist microfiber from dust and glue residues.
What is better to fix: glue or liquid nails?
Each material used has its pros and cons.
Installation foam, top, expands. In this case, the surface of the facing can bent. But, it will brush the rough base and the panel for a long time. In case of damage to the material, there will be a time dismantling time. It is used in wet rooms and with sharp drops of temperature.
 Universal glue - use the appearance that fastens a draft base (concrete, brick) and wooden elements.
Liquid nails - means suitable for gluing wooden elements with other bases. It has many positive sides:
- there is an opportunity to use in wet premises;
- fast setting with a surface;
- long service life;
- blind strength.
The negative side is its considerable amount with large areas.
How to glue to the concrete wall: mount
The glue must have the following set of properties:
- Working with a tree.
- Warranty of the quality of gluing concrete and wood.
- Quickly stick.
- Resistance to moisture.
- Stability to alkalis.
Types of glue for mounting cladding:
- Compound. Universal material - "Titan", "moment".
- Special series - "Liquid nails", "macroflex".
- Mounting foam.
 The glue is applied by a small dotted line on the MDF surface, the time specified by the manufacturer will wait (if necessary) and applied to the surface.
Errors in working with "liquid nails" - no need to overeat time before fixing. The grip will decrease. Further, if the tool will not be wiped on the surface of the panel on time - the appearance is spoiled.
Errors work with foam. You need to use a building gun.
Facing on metal frame structures
Fixation of MDF to a metal frame is made using clamps. They are fixed to the profile with small self-draws. When buying a set, you need to pay attention to the package. If in the package is not self-tapping screw and nails (on a wooden frame), then "clouds" are acquired separately.
Metal Frame System Set
 The frame base is not different from the drywall crate. For this, the surface is ground, make marking.
The first fasten the guide profiles. All check the level. NPs are fixed by a dowel-nail. As well as they fasten the suspensions for the racking profile.
The fastening step is 60 cm. If used for rigidity transverse - their fastening step is the same. Locks for panels are fixed on the rack profile.
Lightness
These are the main planks in the crate. They are fixed in markup. After determining the uniform plane on the wall in the corners on the ceiling and the floor, NP is fixed with a dowel-nail. Fixation should be mirror. For even the threads stretch and lower the plumb. Laser level also apply.
Fox fasteners
 Molding MDF is made from the corner of the crate. It takes place in this order:
- Measure and cut off the first panel.
- In it (for need), a hole for lighting devices are cut.
- The panel attached to the angle, on the one hand, is fixed with self-drawing. With another clips.
- Subsequent panels are fixed using locks and clamps.
- Ceiling and floor plinths are fixed with glue.
- The last step is the fixation of the finish corner. It closes the self-tapping screws in the corners. Fix them with glue.
After the work done, the entire surface is wiping with a wet rag.
How to trim on a wooden crate
Wooden doom is easier than metal. The MDF is fixed using tipped locks. To do this, use small "shoe" carnations.
How to attach the rails
Wooden rails are attached to the base of the markup. To do this, you use a dowel-nail - a concrete, brick base, or self-tapping screws - a wooden base.
What distance between the slats should be
 After fixing the main guides, retreating from the floor and from the ceiling 40-60 cm, the horizontal (vertical direction of panels) or vertical rails are fixed. Step between them is 40-60 cm. Each mount will check the level on evenness.
Installation of sheets
MDF is fixed from the corner. The first panel is fixed with self-draws to a wooden frame of the frame. Subsequent sheets are connected by clammers. The panels must be smoothly and tightly fit into the frame. If there are braids of wooden rails, they are cut by a planer or a knife.
How best to mount MDF sheets on the ceiling
 The ceiling of MDF is called suspended. Because the best way is considered to be fixed on the frame basis.
The crate is created from wood and metal profile. It does not have differences from creating a standard crate. Railing step 40-60 cm.
Finishing of the surface of the surface
After fixing the facing, you need to glue corners and separation rails. Their fixation is carried out with liquid nails.
It is necessary to be attentive so that the glue does not hit the front of the material. The appearance will be sought.
If the mixture got into the panel, it is immediately wiped with a damp cloth.
Care
 The panels are not detergent with acids containing acids. Also do not apply powders.
It is necessary to apply once a month a tool for general cleaning. Once a week, the surface is wiped with a soft microfiber, moistened in room temperature without chemistry.
You can not use steam. When the jet direction from the panel steam generator will immediately lose their original appearance and deform.
The fixation of the panels is carried out on the frame basis - which is more durable and on the glue - indoors without vapors and sudden temperature drops. Caring for the surface does not require expensive tools and efforts.
Useful video
 Why you can not give icons
 Is it possible to give icons as a gift: Signs, the opinion of the Church
 A year ago left her husband, and now I do not know what to do