How to make a chimney in a private house with your own hands: design options and their implementation. Brick chimney in a private house with your own hands Pipe for a home stove
"Smoker" is a part of the furnace, on which both the efficiency of operation and the overall efficiency of the furnace, as well as the safety of its use, largely depend.
Choosing a stove is a complex process that requires a certain level of knowledge. In this material, we will tell you how to approach this issue correctly and make the right decision.
Purpose and design features
The chimney performs the function of removing the combustion products of wood (or any other fuel) during the heating of the fireplace. In addition to smoke, ash, soot and soot are emitted through the hole.
A properly made chimney provides maximum effective work oven and safety of its operation.
The issue of arranging a fireplace should be taken as seriously as possible, because the slightest flaws in its mechanism can significantly reduce the efficiency of the stove and accelerate its wear.
This is a poor smoke removal, and as a result - smoke in the room in which the stove is located, excessive settling of soot on the walls of the smoker (which means creating a blockage), and similar troubles.
When it comes to the fact that without a normal pipe the fireplace will not fully realize its potential, it is a question of the fact that it is the smoker that provides the thrust to the fireplace.
This is due to the following reason: the temperature of the combustion products leaving the chimney is very high (sometimes reaching a hundred degrees), which creates natural draft due to the pressure difference between hot and cold air.
The pulling force directly depends on the height and diameter of the furnace, as well as on the thickness of its walls: it should not be too thick or too thin.
It is necessary that the smoke does not have time to cool down during the journey through the chimney - in this case, the draft will weaken, and vice versa.
Types and differences
Structurally, there are three main categories. Let's consider each separately.
Indigenous
Not the most popular option, as it takes up a lot of free space in the room. The indigenous smoker is brick device, which has its own foundation and is installed next to the oven.
The application will be appropriate in buildings where several fireplaces are located in one place.
In this case, their smoke channels can be led out to one smoker, or in houses built from wood, where it is impossible to make a smoke channel inside the load-bearing wall.
Wall
These are chimneys that are built into the load-bearing wall of the room, near which the fireplace is located.
Their use is justified in brick houses, since they have a significant advantage (such mechanisms do not take up the free space of the building).
However, their arrangement is a rather difficult process that requires design and implementation even at the stage of building a house.
Mounted
This is perhaps the most popular, due to its simplicity, option. A wall-mounted chimney is, in fact, an extension of the chimney of the fireplace itself.
For such chimneys, it is required to use stove insulation, but they are extremely lightweight in their implementation, and do not require serious material costs.

In addition to the design features of the chimneys, smoke pipes can now be performed with different materials, each of which has its own advantages and disadvantages.
The main types of materials used in the manufacture of smoke pipes (chimneys):
- made of ferrous metal: along with the cheapest materials, which, due to its cheapness, is widespread, although they are not particularly durable and environmentally friendly.
- brick - this is perhaps one of the most popular types of chimneys. It is reliable, durable, but rather difficult to implement, and should only be performed by a competent stove-maker: since a lot of factors affect whether a brick chimney will effectively perform its functions - from the degree of brick hardening to the ideal precision of the construction.
- made of stainless steel: fairly simple, but at the same time reliable and effective mechanisms. Stainless steel perfectly removes smoke and soot, since its surface is as smooth as possible. It is heat-resistant and not afraid of water. The most the best option is galvanized.
- Ceramic: gaining more and more popularity lately. This is already complicated modular system, which is manufactured in industrial conditions, and in a complete set, ready for installation, sold in stores.
Nuances of choice
The type of chimney or chimneys to be used is determined in each individual case depending on the structural characteristics of the building, the type and financial capabilities of the owner.
The chimney pipe for the fireplace should be easy to install, and meet all safety standards, because it is through an incorrect chimney design or installation errors that most fires happen.
First of all, it is necessary to determine the diameter.
There is one simple rule that must be strictly adhered to: the diameter should not be less than the diameter of the chimney of the fireplace itself, since the height directly affects the thrust force, it is necessary to approach its calculation with great responsibility.
The optimal distance is considered to be at least 50 centimeters from the top to the place where it comes out of the roof, if it is located on a flat roof.

If the roof has a strong slope, and the smoker is brought out at a distance of less than 1.5 meters from the parapet or ridge, then it should rise 50 cm above its level.
If the chimney is located in the interval of 1.5-3 meters from the ridge to the parapet, its mouth should be at the level of the upper point of the roof. This is necessary so that the roof does not impede the free extraction of smoke by air currents.
In this case, the total height of the structure, from the exit to its upper point, must be at least 5 meters.
Installation nuances
We will talk about the installation of a nozzle tube with a spark arrester, since it is this option in ordinary houses occurs most often.
Installing a device for a home from a stainless steel (a metal tube for a stove, as already mentioned, is very popular), it is enough uncomplicated process, which can be done by anyone with their own hands.
Unlike root pipes, and even more so wall pipes, they must be installed by specialists.
When installing a top-mounted pipe, you must be guided by the following principles:
- A back-up pipe for a stove for a home should be at least a two-section structure, because the lower part of the metal structure, due to the heat from the firebox, can "burn out", and over time it will be necessary to replace it.
- It is very important to pay attention to such a moment as pipe insulation in the ceiling. In the place where the device passes through the roof, it is necessary to install a layer of fireproof insulation, the presence of which minimizes the risk of fire due to the hot surface touching other surfaces. For this reason, the passage of the furnace through the ceiling must be insulated in mandatory.
Thermal insulation for devices or otherwise thermal insulation of a stainless steel or metal chimney is a matter of high urgency.

Due to the thin wall, these products may not provide the necessary thermal insulation properties, which will lead to condensation of moisture on its wall, and further deterioration of traction and destruction of the tube itself.
The best option for warming a house is Izovol basalt wool, which is used to wrap pipes for ovens. It is a non-combustible material that has sufficient flexibility and frost resistance, and at the same time it is environmentally friendly.
Along the perimeter, pipes for furnaces are wrapped with basalt wool, which are reinforced with wire (where the spark arrester is located).
This operation is repeated until the entire structure is insulated, preferably up to the upper section on which the spark arrester is located.
Installation goes through the following steps:
- The first knee is put on the air duct.
- The second knee is put on the first.
- A refractory spacer is made. Correct cutting on the ceiling is made of two layers: 1 - stainless steel sheet, 2 - galvanized box, and all this is fixed with a clamping strap.
- The third knee is first inserted into the attic, through a hole in the ceiling, and then connected to the second section (where the spark arrester is).
- A deflector for a smoker and a spark arrester is put on its upper part. This part of the structure serves to enhance traction. Basically, when industrial production the deflector on it is connected into one structure.
- The pipe on the roof can also end with a head (although sometimes there is a spark arrestor there), which will protect it from the rain.
The nuances of editing (video)
Approximate prices
Prices for chimneys (as well as for insulation for them) depend on their size and material. In addition, of course, there is a variation in the price level from manufacturer to manufacturer, but we can talk about the following amounts:
- the price of a heater pipe for a stove with a diameter of 200 mm is about $ 18 per 1 m;
- the price of insulation for devices made of stainless steel with one circuit, 0.5 mm thick and 200 mm in diameter - from 10 to 13 dollars per meter;
- the price of a spark arrester is from $ 10.
You can buy a metal stove pipe at any major building materials store.
The price of brick pipes depends on the cost building material and the work of a stove-maker. So, a brick pipe for metal oven will cost you about $ 25-30 per linear meter.
Of course, a modern house with a stove is an anachronism. The zealous owner sets himself a complex economical system heating. However, what could be better than sitting in front of the fireplace on a cold evening or taking a steam bath in a Russian bath? But a fireplace and a good stove in a Russian bath cannot do without chimneys, chimneys. This equipment will also be useful in the construction of stationary barbecues and barbecues. The device of chimneys and chimneys is quite simple, but has some nuances.
It is possible to divide the chimney chimneys into several large groups, depending on the material of their manufacture. So they can be made using brickwork, from metal pipes different types, as well as from multilayer materials.
Besides stove flues may differ in the way they are installed:
- Wall chimneys are mounted directly in the thickness of the building walls, external or internal. At the same time, stoves and fireplaces can also be mounted directly in the walls of buildings.
- Suspended chimneys are installed on the outer walls of buildings.
- There are also indigenous chimneys. Such structures are mounted separately, next to the oven.
SNiP requirements for chimneys and chimneys
The existing SNiPs impose certain requirements on the chimneys under construction:
- They must effectively remove the combustion products.
- They must have sufficient height above the roof ridge.
- Their internal cross-section must be large enough to completely remove the smoke.
- The pipes must be resistant to high temperatures.
- They must be strong and the top of the chimney must be able to withstand gusts of wind.
Let's start with the height of the chimney. Sufficient chimney height ensures good traction and effectively removes combustion products, preventing the room from smoke and maintaining draft. However, excessive pipe heights can lead to condensation and reduced draft.
The diameter of the chimney or its internal section is calculated based on the dimensions of the firebox. It increases with the volume of the furnace space, in proportion to it. An insufficient chimney cross-section leads to smoke, but an excessive diameter will, on the contrary, lead to a decrease in draft.
What should the chimney be made of, what materials are prohibited to use?
The main requirement for the material for the manufacture of chimney chimneys is heat resistance. The minimum fire safety threshold of the chimney material is defined at the level of 30 minutes and 1000 degrees. In continuous operation, the pipe material must withstand a temperature of 500 degrees without damage, since the temperature of the combustion products rarely drops below 300 degrees.
The stock of 200 degrees is due to the fact that the soot accumulating in the pipes tends to ignite spontaneously.
Strict requirements are also imposed on thermal conductivity. The temperature of the outer layer of chimney pipes should not exceed 90 degrees, and at the points of interface with flammable structures - not higher than 65 degrees.
It should be especially noted that combustion materials are aggressive chemical composition and the material from which the chimney pipes are made must effectively withstand an adverse chemical environment. In addition, the part of the pipe extending outside the premises is exposed to climatic conditions and must not collapse due to temperature extremes.
The traditional material for the manufacture of chimneys is refractory bricks. It almost ideally meets all the requirements for chimney materials. However, the construction of brick chimney chimneys requires certain skills.
In addition, the brick must be individually selected for each heating device. So in furnaces, the temperature of the combustion products is usually kept at 250 degrees, but in fireplaces, under conditions of direct fire, it can reach 400 degrees. So the walls brick pipe for a fireplace, it is recommended to be made of fireclay bricks, laying a wall thickness of more than 15 centimeters with seams of 5 mm. This significantly increases the cost of manufacturing chimney pipes for fireplaces, as well as the requirements for strength characteristics foundations under the fireplace.
Chimneys and chimneys made of asbestos cement
Asbestos-cement pipes are relatively cheap, but also reliable material for the manufacture of chimney pipes. They can be used for the construction of chimneys in stationary barbecues, light buildings, baths. When installing such pipes, special attention should be paid to the areas of interface with flammable materials, since an asbestos-cement pipe can crack during service.
Chimneys made of stainless steel
As a rule, stove chimneys made of stainless steel can be used in the construction of heating systems with gas boilers... Such a pipe is very hot from the passage of combustion products and therefore must be reliably equipped. In addition, it is necessary to pay special attention to the quality of the pipe from which the chimney is made. Thin stainless steel, especially in poor-quality pipes, can crack, which can easily cause a fire.
Also, the disadvantage of this model of pipes is the strong formation of condensation on their surface.
Pipes and flues made of multilayer composite materials
New models of pipes, also called "sandwich pipes" have appeared on the market relatively recently, but have already proven themselves well. Multilayer pipes are manufactured in an industrial environment, usually in the form of meter sections; during installation, the chimneys just need to be connected. Such a pipe is reliable in terms of strength, it is highly resistant to high temperatures and aggressive chemical environment.
Typically, a sandwich pipe has three layers. The inner surface is made from of stainless steel, the upper one is made of galvanized. An insulating material is placed between them.
Such a pipe is lightweight and quite undemanding for installation. It does not put a lot of stress on the oven. As a disadvantage, the high cost of such structures and the relatively low service life can be noted. However, the time of failure-free operation of a sandwich pipe depends on the specific manufacturer. During operation, such a pipe undergoes thermal deformations, which can violate its integrity.
Multilayer pipes can be of a different composition. So the inner part can be made of refractory clay, and between it and the upper shell of lightweight concrete basalt wool can be placed. This configuration of multilayer pipes significantly increases their service life. In addition, various decorative coatings can be glued to the outer part of such a pipe.
Modular chimneys
Modern industry offers ready-made construction kits for self installation chimney chimneys. All components are manufactured in industrial plants and then easily assembled on site.
How to equip the passage of the chimney through the roof?
1 - chimney, 2 - rafter leg, 3 - fireproof thermal insulation material, 4 - bearing beam
Usually the installation of chimney chimneys is carried out during the construction of a building or structure, simultaneously with the installation of a furnace or heating system.
With this approach, you can easily fit mutual arrangement rafters under the chimney and create the necessary gaps between the wood materials and the chimney. They must leave at least 15 centimeters and are laid with a fireproof material, such as basalt wool.
When building a stove or fireplace, when calculating them with a foundation, the weight of the chimney must also be taken into account.
The upper part of the pipe can be supplied with protective device, preventing the spread of sparks on the one hand, and on the other hand, rain falling into the pipe.
Brick masonry chimney - instructional video
The installation of a stove or fireplace involves the arrangement of a smoke extraction system. In this matter, it is not enough to choose correct pipes for the chimney, it is also necessary to observe the mass of construction and fire regulations... Otherwise exploitation heating equipment will be ineffective and unsafe.
Errors made during the installation of the chimney not only reduce the efficiency of the furnace, but can also lead to tragedy. In our material, we will talk about how to avoid the most common mistakes during installation. In addition, we will tell you how to choose the right chimney pipes.
The main and only purpose of the chimney is to remove exhaust gases from the heating boiler into the atmosphere outside the building where the stove, boiler or fireplace is installed. Moreover, from her correct installation the efficiency of the heat generating equipment directly depends.
You can put a boiler in the house with excellent efficiency, but make mistakes when. The result is excessive fuel consumption and the lack of comfortable air temperatures in the rooms. The chimney must have the correct cross-section, location, configuration and height.
Image gallery
During normal operation of the chimney, the horizontal wind flow, flowing around the section of the chimney above the roof, turns up. As a result, a rarefied air is formed above it, which literally "sucks" smoke from the outlet. However, this process can be hindered by the ridge of the pitched roof and even tall tree in close proximity to the house.
Standards for the construction of a smoke evacuation system
Building codes prescribe the chimney to be done as follows:
- Its length from the grate to the top point should be from 5 meters (an exception is possible only for buildings without attics and only in conditions of stable forced draft).
- The optimal height, taking into account all possible bends, is considered to be 5–6 m.
- The distance from the metal chimney to structures made of combustible building materials should be from a meter.
- The horizontal outlet immediately behind the boiler must not exceed 1 m.
- When passing roofing, walls and ceilings inside the house, the channel should be equipped with non-combustible materials.
- To connect the metal elements of the pipe, the sealant should be used exclusively heat-resistant with an operating temperature of 1000 ° C.
- Above flat roof the chimney must rise at least 50 cm.
- If a non-brick chimney is constructed above the roof level by 1.5 meters or more, then it must be reinforced with stretch marks and brackets.
Any slopes and horizontal sections inevitably reduce the draft in the chimney pipe. If it is not possible to make it straight, then bends and displacements are best performed from several inclined segments at a total angle of up to 45 degrees.
In addition to observing purely building rules that guarantee high efficiency the work of the chimney and the stove, it is also necessary to take care of fire safety, for which special indents and screens are made
When arranging ventilation and chimney shafts in parallel in one structure above the roof, they should never be covered with a common cap. The outlet from the stove must necessarily rise above the ventilation pipe, otherwise the draft will decrease, and the smoke will begin to suck back into the house. The same applies to separate, but located nearby hoods and chimneys.
Chimney material selection
Chimney laying in a private residential building can be done in several ways:
- With a passage through the attic floor and roof.
- With the conclusion for external walls and exclusively inside the building.
- With a passage only through the roof, bypassing the floors.
- Supported directly on the boiler or stove, or wall-mounted.
- With an offset of the vertical centerline and in a strictly straight design.
The choice of the final configuration depends on the layout living rooms, the location of the heating unit, as well as the individual features of the construction and architecture of the cottage. In each case, it is recommended to select your own version of the chimney.
It remains only to figure out - which pipe to choose for the chimney, what material for this fit better Total.
You can make a chimney from:
- bricks;
- iron or asbestos pipes;
- ceramics;
- concrete;
- heat resistant glass.
It can be either round, square or rectangular in cross-section. Moreover, it is the first of them that is the most optimal. Of all materials at self-assembly only heat-resistant glass can cause problems. Its installation will require a special device supporting structure, competently and with a guarantee that only a specialist can collect.
Option # 1 - traditional brick
Fired brick chimneys have been made for centuries. These are traditional and well-studied constructions for the removal of flue gases by professional stove-makers. But they have to be done simultaneously with the construction of the dwelling; for heavy brickwork, it is necessary to fill in a separate foundation.

The brick for the chimney of gas equipment should be taken exceptionally corpulent and well-burnt, the porous analogue is capable of passing gas dangerous to humans
Among the advantages of a brick pipe are high fire safety, attractive appearance, study of the design and additional heat transfer from the masonry. And among the disadvantages are the high cost of work, the large weight and the need for a foundation, as well as the strong roughness of the walls.
In general, brickwork is a reliable and effective option for organizing a chimney. And the existing disadvantages can be easily bypassed by the banal installation of stainless steel pipes inside the shaft. The steel liner will prevent clogging with soot and will take on some of the heat load, thereby protecting the brick and extending its service life.
Brick chimney ducts are mainly constructed using solid fuels. They are arranged with attachments, i.e. installed on the ceiling of the stove, indigenous in the form of a separately built vertical outlet, and wall - located inside the load-bearing wall.
When using a metal liner with a circular cross-section inserted inside a brick chimney, it can serve as a chimney for gas heating and cooking units.
Image gallery
The foundation under the brick chimney must be extremely reliable, otherwise the pipe can lead to the side with its subsequent partial or complete destruction. And if smoke evacuation is done for gas boiler, then the brick is better to exclude. It is rapidly degraded by the alkaline environment generated by the combustion of natural gas.
But if you need the most durable and safe system removal of stove fumes, ceramics is the undisputed leader here. It is expensive, but it will last for decades. The main thing when installing all options is to comply with construction and fire safety rules.
Having decided to install (or fold) the stove in your home, you need to immediately carefully think over several main points, because the pipe for the stove must be safe and fully cope with the tasks assigned to it: remove the combustion products of the fuel used from the stove and generate traction.
Type of pipes
It would be desirable to take care of this problem even at the stage of creating a house project. But if the idea to install a furnace in any structure came to your mind later, you will have to make changes to the structures already erected. In this case, the chimney must:
- be straight;
- do not go too close to combustible structures;
- be made of non-combustible material.
All chimneys are usually divided into several types:
- mounted - they rely on the oven itself,
- wall - they are built into the walls of the house,
- indigenous - have their own separate foundation.
Pipe material

There are four non-combustible options to choose from which the pipe for the furnace will be created - brick, metal (steel), concrete or modules with ceramic cores.
Most often, until now, the owners of furnaces prefer to arrange packed pipes made of bricks, which, in turn, consist of the following elements:
- the neck is the part of the pipe between the furnace body and the groove in the thickness of the ceiling;
- cutting - pipe thickening in the body of the floor;
- a riser is a pipe located in the space of the attic;
- cutting at the roof (also called "otter");
- pipe head.

For the pipe, you will have to use only a special high-quality brick designed for laying heating structures. The solution on which it will fit must also be heat-resistant and plastic.
Note! If the pipe for the stove is laid out only of bricks, then soon you will face the problem of the need for frequent cleaning. The fact is that inside a brick pipe will have many irregularities on which soot will stick. This can be avoided by making a double pipe for the oven - by inserting a pipe made of a different material ("sleeve") inside the brick pipe.
The size

The cross-sectional size of the chimney flue depends on two factors:
- on the type of oven,
- from the heat transfer of the furnace.
For example, for a pipe with a heat transfer of up to 3000 kcal / hour, it is necessary to make a pipe with a cross section of ½ by ½ brick; and for a pipe with heat transfer from 3000 to 4500 kcal / hour - ½ per ¾ brick.
Brick masonry

If you put a brick oven yourself, then you will definitely have diagrams (orders) in your hands. These diagrams usually contain information about the chimney. You will only have to make cuts in the right place, which prevent the heating of the combustible elements located in the immediate vicinity of the pipe, thereby excluding the occurrence of a fire for this reason.
Modular version of the chimney

Note! The convenience of ready-made modules is that you do not have to spend too much time on the construction of such a pipe. Besides ready-made modules already immediately have a safe wall thickness, so you just have to make (or foresee in advance) holes in the ceiling and roof for the pipe.
The modules are installed as follows:
- Purchase a special dry mix for bonding modules recommended by the module manufacturers.
- Dissolve 1 bucket of solution from the mixture and water, exactly observing the proportions that you find on the package (stir the solution to a homogeneous consistency using the "mixer" attachment on the drill).
- Cut the asbestos-cement spacer to fit the module.
- Lay it on your existing stove in the place where the chimney will be.
- On top of it, apply the first layer of the solution.
- Install the first module. Check its verticality with a building level.
- Lay a layer of mortar again and install the next module.
- Repeat all operations until the pipe extends beyond the roof to the required height.
- Insulate the junction of the pipe to roofing material and install a structure on top of the pipe to protect it from rainwater.

Note! You can use ready-made modules if you have purchased a factory-made stove or fireplace, since it is impossible to lay out a brick pipe with support on the stove (fireplace), because its weight is not provided for by the design and can lead to the destruction of the stove.
Metal pipe

Another pipe option is metal structure made of heat-resistant steel, which leaves the furnace, passes through the wall and rises above the level of the roof already outside the house. In this case, the place requiring special attention is the passage of the pipe through the wall and its good insulation.
You should not make such a pipe yourself - it is better to buy it ready-made together with fasteners (clamps), thanks to which you will achieve its complete tightness.
Video
We offer you to watch a video instruction on the construction of a multi-channel chimney for a gas boiler:
The efficiency and safety of a heating device that generates heat by burning one or another fuel largely depends on the parameters and condition of the chimney. Today, many companies are engaged in the production of insulated steel models, but not all users are ready to put up with their high cost and relatively short service life. Often, homeowners decide to build a chimney along traditional technology, that is, made of brick, do it yourself. To do this, you need to adhere to some rules and know which materials are best to use.
Strengths and weaknesses of a brick chimney
Brick chimneys can be used at any facility, be it a boiler room or private house... With the advent of prefabricated steel sandwiches, they have become less in demand, but are still widely used. This is due to their following advantages:
- a brick chimney is cheaper than a "sandwich";
- lasts longer: about 30 years;
- is an important architectural element and is ideally combined visually with some types of roofing, for example, tiles.
But there are plenty of disadvantages to this design:
- In terms of complexity and duration, the construction of such a chimney is inferior to the installation of a "sandwich", and special transport will be required to deliver the materials.
- The brick chimney has a significant weight, so it has to be provided with a reliable base.
- Across has rectangular shape although the most suitable is a circular cross-section. Eddies form in the corners, preventing the normal outflow of gases and thus impairing traction.
- The inner surface of a brick chimney, even when finished with plaster, remains rough, as a result of which it becomes covered with soot faster.
Unlike stainless steel, bricks are quickly destroyed by acid condensation. The latter is formed if the temperature of the flue gases during their movement through the pipe manages to drop below 90 degrees. Therefore, when connecting to a brick chimney a modern economical boiler with low-temperature exhaust or a stove operated in the smoldering mode (heat generators of the brands "Professor Butakov", Bullerjan, Breneran), it is necessary to carry out its sleeve, that is, install a stainless steel pipe inside.
Elements of a brick chimney
The chimney design is very simple.
The flue duct is protected from above by a cone-shaped piece - an umbrella or a cap (1), which prevents precipitation, dust and small debris from getting inside. Top element pipe - head (2) - is wider than its main part. Thanks to this, it is possible to reduce the amount of moisture that gets into the lower area during rain - the neck (3).
There is another widening above the roof - an otter (5). Thanks to it, atmospheric moisture does not enter the gap between the chimney and the roofing (6). On an otter with cement mortar a slope (4) is formed, along which water that has fallen onto the pipe runs off. To prevent the rafters (7) and lathing (8) from igniting from contact with the hot surface of the chimney, they are wrapped in heat-insulating material.
The section of the chimney that crosses the attic is called the riser (9). At the bottom of it, just at the level attic floor, there is one more broadening - fluff (10).
Note! All three widening - head, otter and fluff - are made only by thickening the wall, while the channel cross-section always remains constant. An otter with fluff, as well as other elements of the chimney, installed at the intersection of the roof or floors, are called cutting.
The thick walls of the fluff protect the wooden floor elements (11) from excessive heat, which could cause them to catch fire.
The chimney can be made without fluff. Then, in the area of the ceiling passage around the pipe, a steel box is mounted, which is subsequently filled with a bulk heat insulator - expanded clay, sand or vermiculite. The thickness of this layer should be 100–150 mm. But experienced users do not recommend using this cutting option: the insulating aggregate is poured through the cracks.
The fluff is additionally lined with an effective non-combustible heat insulator (12). Previously, asbestos was used everywhere in this capacity, but after revealing its carcinogenic properties, they try not to use this material. A harmless but more expensive alternative is basalt cardboard.
The lowest section of the chimney is also called the neck (14). It has a latch (13) by means of which the draft can be adjusted.
Depending on the method of construction, the chimney may be one of the following types:
- Nasadny. The furnace itself acts as the basis for this design. To withstand the impressive weight of the chimney, its walls must be two bricks thick.
- Root. Such a chimney stands on separate foundation and is not part of any heat generating installation. The flue pipe of the furnace or boiler is connected to it by means of a horizontal tunnel - a crossover sleeve.
- Wall. Chimneys of this type are ducts in load-bearing walls... In order to save heat, they usually use interior walls, on both sides of which there are heated rooms.
In a vertical brick chimney, draft is generated naturally, that is, due to convection. A prerequisite for the formation of an upward flow, the temperature difference between the ambient air and the exhaust gases is used: the greater it is, the stronger the thrust is formed in the pipe. Therefore, for the normal functioning of the chimney, it is very important to take care of its insulation.
Calculation of basic parameters
At the design stage, it is necessary to determine the height of the chimney and the dimensions cross section smoke duct. The task of the calculation is to ensure the optimal traction force. It must be sufficient for the required amount air and all combustion products were removed in full, and at the same time not too large so that the hot gases had time to give off their heat.
Height
The height of the chimney must be selected taking into account the following requirements:
- The minimum height difference between the grate and the top of the canopy is 5 m.
- If the roof is covered with flammable material, for example bituminous shingles, the chimney head must rise above it by at least 1.5 m.
- For roofs with non-combustible coating minimum distance to the top is 0.5 m.
The ridge of a pitched roof or a parapet of a flat in windy weather should not create a support over the chimney. To do this, you need to adhere to the following rules:
- if the pipe is located closer than 1.5 m in relation to the ridge or parapet, then it must rise above this element by at least 0.5 m;
- at a distance of 1.5 to 3 m from the ridge or parapet, the pipe head can be at the same height as this element;
- at a distance of more than 3 m, the top of the head can be placed below the ridge, at a height drawn through it, an inclined line with an angle of 10 degrees with respect to the horizontal.
If there is a higher building near the house, then the chimney should be erected 0.5 m above its roof.
Section dimensions
If a stove or boiler will be connected to the chimney, then the cross-sectional dimensions should be determined depending on the power of the heat generator:
- up to 3.5 kW: the channel is made in the size of half a brick - 140x140 mm;
- from 3.5 to 5.2 kW: 140x200 mm;
- from 5.2 to 7 kW: 200x270 mm;
- over 7 kW: in two bricks - 270x270 mm.
The power of prefabricated heat generators is indicated in the passport. If the stove or boiler is homemade, this parameter has to be determined independently. The calculation is carried out according to the formula:
W = VT * 0.63 * * 0.8 * E / t,
- W is the power of the heat generator, kW;
- Vт - volume of the furnace, m 3;
- 0.63 - average load factor of the furnace;
- 0.8 - averaged coefficient showing what part of the fuel burns in full;
- E is the calorific value of the fuel, kW * h / m 3;
- T is the burning time of one fuel load, h.
Usually T = 1 hour is taken - in about this time, a portion of the fuel burns during normal combustion.
The calorific value E depends on the type of wood and its moisture content. Average values are:
- for poplar: with a moisture content of 12% E - 1856 kW * h / cu. m, with a humidity of 25 and 50% - respectively 1448 and 636 kW * h / m 3;
- for spruce: with a moisture content of 12, 25 and 50%, respectively, 2088, 1629 and 715 kW * h / m 3;
- for pine: respectively, 2413, 1882 and 826 kW * h / m 3;
- for birch: respectively, 3016, 2352 and 1033 kW * h / m 3;
- for oak: respectively, 3758, 2932 and 1287 kW * h / m 3.
For fireplaces, the calculation is somewhat different. Here, the cross-sectional area of the chimney depends on the dimensions of the furnace window: F = k * A.
- F is the cross-sectional area of the flue duct, cm 2;
- K - coefficient of proportionality, depending on the height of the chimney and the shape of its cross-section;
- A is the area of the furnace window, cm 2.
The coefficient K is equal to the following values:
- with a chimney height of 5 m: for round section- 0.112, for square - 0.124, for rectangular - 0.132;
- 6 m: 0.105, 0.116, 0.123;
- 7 m: 0.1, 0.11, 0.117;
- 8 m: 0.095, 0.105, 0.112;
- 9 m: 0.091, 0.101, 0.106;
- 10 m: 0.087, 0.097, 0.102;
- 11 m: 0.089, 0.094, 0.098.
For intermediate values of the height, the coefficient K can be determined according to a special schedule.
They tend to make the real dimensions of the smoke exhaust channel close to the calculated ones. But they are selected taking into account standard sizes bricks, blocks or cylindrical parts.
Materials and tools
A brick chimney is operated in conditions of significant temperature changes, therefore, it should be erected from the highest quality bricks. Compliance with this rule will also determine how safe the structure will be: if the brick does not crack, then poisonous gases and sparks that can cause a fire will not get into the room.
Brick types
The pipe is erected from solid ceramic bricks with refractory properties of grades from M150 to M200. Depending on the quality, this material is divided into three grades.
First grade
When making such bricks, the temperature and holding time during firing are ideally matched to the type of clay. You can recognize it by the following features:
- the blocks are bright red, yellowish tint is possible;
- the body of the brick does not have pores and inclusions visible to the eye;
- all faces are even and smooth, there are no crumbling areas on the edges;
- tapping with a light hammer or other metal object gives a clear and clear sound.
Second grade
Such a brick is unfired. Here are the signs that are characteristic of him:
- the blocks are pale orange, weakly saturated;
- numerous pores are visible on the surface;
- the sound when tapped is dull and short;
- on the edges and edges there may be defects in the form of scoring and crumbling areas.
For bricks of the 2nd grade, low heat capacity, frost resistance and density are characteristic.
Third grade
- the blocks have a deep dark red color, there are almost brown ones;
- when tapped, they give a too sonorous sound;
- edges and edges contain defects in the form of chips and scuffs;
- the structure is porous.
Such a brick is not frost-resistant, does not hold heat and is too fragile.
The chimney should be built of first grade bricks. Second-rate should not be used at all, and third-rate can be used to make foundations for free-standing pipes.
What solution is needed
The requirements for the quality of the mortar are as high as for the brick. Under any temperature, weather and mechanical influences, it must ensure the tightness of the masonry throughout its entire service life. Since individual sections of the chimney work in different conditions, then different solutions are used when laying it.
If the pipe being erected is a root pipe, then its first two rows (zone No. 3), located under the floor, should be laid on a cement-sand mortar (for 1 part of cement, 3-4 parts of sand). To make the mixture more plastic, 0.5 parts of lime can be added to it.
The upstream sections of the chimney, up to and including fluff, have an internal temperature of 355 to 400 degrees, therefore, a clay-sand mortar is used for their construction. If the fluff ends at the ceiling (zone No. 8), and the cut is made of bulk material (zone No. 9), then the use of this mixture extends to the rows in the cut.
The riser, otter and chimney neck (zone no. 10), which do not get very hot, but are subject to wind loads, should be laid using lime mortar... The same composition can be used for the construction of the head (zone No. 11), but the usual cement-sand mixture is also suitable for this area.
The clay for the solution should be taken medium-fat. It should not have a strong odor, as this is a sign of the presence of organic impurities that cause cracks in the solution.
The absence of organic matter is also desirable for sand. This requirement is met by mountain sand, as well as its cheaper replacement from crushed brick. The latter can be ceramic and fireclay. Since the chimney is built from ceramic bricks, the same sand should be used.
In addition to these materials, you will need special purchased items - a cleaning door, a latch and a hood. The gaps between the brickwork and the metal products mounted in it are sealed with asbestos cord or basalt cardboard.
Instruments
The most common tools will be used:
- Master OK;
- hammer pick;
- plumb line.
You can't do without a building level.
Preparatory work
If a root chimney is being built, then construction works you should start with the construction of a reinforced concrete foundation. Its minimum height is 30 cm, while the sole must be located below the freezing depth of the soil. The foundation of the chimney should not have a rigid connection with the foundation of the building, since both objects give different shrinkage.
Some masters soak the brick before starting work. This makes sense, since when dry, the blocks will actively absorb water from the solution and the masonry will be fragile. But it must be borne in mind that the brickwork from the soaked brick dries for a long time, so choose a technique in accordance with the season and weather conditions - the brick should dry out before the first frost.
The sand must be thoroughly cleaned of impurities by sifting through a sieve with a mesh of 1x1 mm, and then rinsed. It is better to wipe the clay through a sieve after soaking. The lime used must be slaked.
Solutions are prepared according to the following recipe:
- Clay-sandy: mix sand, fireclay and ordinary clay in a ratio of 4: 1: 1.
- Lime: sand, lime and cement of the M400 brand are combined in a ratio of 2.5: 1: 0.5.
- Cement-sand: mix sand and cement of the M400 brand in a ratio of 3: 1 or 4: 1.
The clay is soaked for 12-14 hours, stirring from time to time and adding, if necessary, water. Then sand is added to it. The above recipe is designed for clay of medium fat content, but it is advisable to check this parameter in advance in the following way:
- Take 5 small portions of clay of the same mass.
- Sand is added to 4 portions in the amount of 10, 25, 75 and 100% of the clay volume, and one is left in pure form... For known to be oily clay, the amount of sand in portions is 50, 100, 150 and 200%. Each of the test pieces should be mixed until homogeneous, and then, by gradually adding water, turn into a solution with the consistency of a thick dough. A properly prepared mixture should not stick to your hands.
- From each portion, make several balls with a diameter of 4–5 cm and the same number of plates with a thickness of 2 to 3 cm.
- Then they are dried for 10-12 days in a room with a constant room temperature and without drafts.
Determine the result, considering that a solution that satisfies two requirements is suitable for work:
- products made from it did not crack after drying (this happens with high fat content);
- balls dropped from a height of 1 m do not crumble (this would indicate insufficient fat content).
The solution that has passed the test is prepared in a sufficient volume (2-3 buckets are required for 100 bricks), while so much water is added so that the mixture easily slides off the trowel.
How to lay out a chimney with your own hands: step by step instructions
If the materials and tools are prepared, construction work can begin:
- About two rows before the ceiling, they begin to spread the fluff. If there are several channels in the chimney, then the bricks that block them must be partially recessed in one of the outer walls.
- The first two rows are laid out especially carefully. They set the tone for the entire structure, so they should be perfectly even and strictly horizontal. If a packing pipe is placed, then it is erected from the first rows on a clay-sand mortar, which is applied in a layer 8–9 mm thick, and when the block is installed in place, it is compressed to a thickness of 6–7 mm.
- Following the order, the chimney neck is erected. The seams must be tied up so that the masonry does not crack into separate layers.
- From the inside, the seams are rubbed with a solution (so that the inner surface of the chimney is as smooth as possible).
- The duration of the fluff is determined taking into account the expected settlement of the structures:
With each row, the wall thickness in the fluff is increased by 30–35 mm. For this, plates of different thicknesses are cut from brick. So, for example, in the 1st row of fluff, in addition to whole blocks, the number of which has increased from 5 to 6, longitudinal and transverse halves (2 pieces each) and several quarters are used. Chopped bricks it must be laid so that the rough cut looks into the masonry, and not into the flue duct. The row of fluff, which will be flush with the overlap, must be isolated from wooden elements strips of asbestos or basalt cardboard. Then they return to the original dimensions of the chimney - this will be the first row of the riser. At this stage, using a plumb line, you need to determine the projection of the chimney onto the roof and make a hole in it for it. In waterproofing and vapor barrier films do not make a hole, but a cruciform incision. After that, the resulting petals are folded in such a way that the functionality of this element is not impaired. A riser is laid out row by row, trying to make it absolutely vertical (controlled by a plumb line).
Otter formation
The riser ends side by side, protruding halfway above the bottom edge of the roof opening. Those that are on the level wooden rafters and battens, it is necessary to insulate with asbestos or basalt strips.
The otter begins next. Like the fluff, it gradually expands, but unevenly, and taking into account the different heights of the edges of the hole in the roof. Further, the dimensions of the chimney return to their original values - the neck of the furnace begins.
The last stage is the device of the head from two rows. The first row is made with a broadening of 30–40 mm in all directions. The second row - according to the usual scheme, while on the ledge of the lower row it is laid out using concrete mortar inclined surface.
An umbrella is attached to the ledge of the head. The clearance between its bottom and the top of the head should be 150-200 mm.
If the roofing material is combustible and a solid fuel heat generator is connected to the chimney, a spark arrester (metal mesh) must be installed on the head.
The gap between the pipe and the roof must be sealed.
The otter's "steps" are smoothed out with a solution so that an inclined surface is formed, after which the entire outer part of the chimney must be treated with a waterproofing compound.
Insulation of a brick chimney
Most cheap way chimney insulation - coating its surface with a solution based on lime and slag. First, a reinforcing mesh is attached to the chimney, then a solution is applied layer by layer, making the mixture thicker each time. The number of layers is from 3 to 5. As a result, the coating has a thickness of 40 mm.
After the plaster dries, cracks may appear on it, which must be covered up. Next, the chimney is whitewashed with a solution of chalk or lime.
A more expensive but more effective insulation option is associated with the use of basalt wool with a density of 30-50 kg / m 3. Since the walls of the chimney are flat, it is most advisable to use this insulation in the form of hard plates, rather than soft panels (mats).
To install basalt wool on the chimney, you need to fix the metal profile frame with dowels. The insulation fits into the frame, after which it can be fixed with a stretched nylon cord or screwed to brickwork special disc dowels with a large-diameter head (to prevent the material from being pushed through).
A vapor-impermeable film is laid on top of the basalt wool (this heat insulator absorbs water well), and then plastered with an ordinary cement-sand mortar on a reinforcing mesh or sheathed with tin (galvanized).
Installing the sleeve
The stacking of the chimney is carried out in the following sequence:
- In the connection area of the boiler or stove, the chimney masonry is dismantled to a height sufficient for the installation of the longest part of the steel liner. This is usually a condensate trap.
- All elements of the liner (liner) are sequentially installed, starting from the topmost one. As the installation progresses, the parts to be installed move upward, freeing up space for subsequent ones. Each element has hooks that can be hooked with a rope passed through the upper hole.
- After installing the liner, the space between it and the walls of the chimney is filled with a non-combustible heat insulator.
At the end, the opening in the chimney is again covered with bricks.
Chimney cleaning
A layer of soot settling inside the chimney not only reduces its cross section, but also increases the likelihood of a fire, since it can ignite. Sometimes it is even specially burned out, but this method of cleaning is very dangerous. It is more correct to remove soot by a combination of two methods:
- Mechanical implies the use of brushes and scrapers on long stackable holders, as well as weights on a strong cord, which are passed into the chimney from above.
- Chemical: in the firebox, along with ordinary fuel, a special agent is burned, for example, "Log chimney sweep" (sold in hardware stores). It contains many substances - coal wax, ammonium sulfate, zinc chloride, etc. The gas released during the combustion of this agent forms a coating on the walls of the chimney that prevents soot from sticking to them later.
The second method is used as a prophylactic one.
Video: laying a brick pipe
At first sight, chimney seems to be an extremely simple construction. However, at every stage of its construction - from the choice of materials to the installation of thermal insulation - a balanced and deliberate approach is required. By following the recommendations of experts, you can build a solid and safe structure that will last for many years.
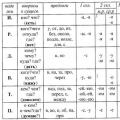 Spelling the suffixes of different parts of speech
 Higher professional education
 Rebus in Russian