How to make a mill with your own hands. Decorative garden mill with their own hands: Step-by-step instructions, photos of drawings and master classes how to make a decorative mill yourself
Garden mill with their own hands is a certain country attribute. This decor element is not functional and is intended to emphasize the design of the garden plot. Increasingly, people come to vacation home Or in the country area is not in order to engage in vegetable garden or planting vegetables and fruits, but in order to relax from the city bustle, relax in the circle of relatives and prepare a delicious kebab.
The mill will help to give the garden of its own unique atmosphere.
To rest the most comfortable, owners country houses They try to create such an atmosphere that "will delight the look" and will allow you to relax. Today, the ponds with fishes, unusual cargo margins, are very common in the garden. beautiful flowerbeds, Russian baths.
Decorative mills do it yourself - no exception. They give the interior of the yard a special atmosphere, and it is not difficult to do this mill, having the most ordinary materials and tools. Yes, and the special skills and skills of the carpenter will not need.
Materials and tools for the manufacture of a wooden mill

- fat plywood;
- wooden bars
- wood tank;
- reiki;
- several wooden corners;
- self-tapping screws and small carnations;
- morilka, paint, waterproofing primer;
- long bolts, washers;
- eclectic jigsaw;
- screwdriver;
- sandpaper or grinding machine;
- roulette, level;
- PVC pipe;
- metal rods;
- stainless sheets.
Wooden mill platform
Starting work on the manufacture of a decorative garden mill, all wooden surfaces should be made as smooth as possible. To do this, you can use either sandpaper or grinding machine.
The bulk of the mill is a platform. The construction should be as strong as possible and strong, since it will have to withstand the entire design. It is from this part of the decorative mill that depends on its service life. The facilities platform is a wooden square shape frame. Size - 600 mm * 600 mm. So that it turns out to be durable, the boards will need a width of 150-200 mm and a thickness of 20 mm. The ideal option is to use a facing board, in the commoner it is called "lining". It does not matter where the decorative mill will be installed - on the ground or on a concreted area. It is necessary to take care of the ventilation of the platform to avoid contact of the wooden surface with moisture (for example, after it is raining). Therefore, the foundation is better to install on the legs.

For this you can use PVC pipe. They have good insulating properties, so the tree will be reliably protected from moisture. The pipe should be cut into 4 parts of about 200 mm high. Then make four bars from the tree. It is necessary to pay attention to the diameter of the pipe: it should coincide with the diameter of wooden bars. Pipes wear on bars - these are ready-made legs.
Then it is necessary to make the basis of the decorative mill. From the boards, a frame of the mill is formed, which closes on top too wooden boards, firmly adjacent to each other.
The legs are attached to each inner corner Fundamentals of the future mill with the help of self-tapping screws. How correctly the legs of the decorative garden mill are installed, can be checked using a level. As a result, it turns out the basis that has a form of torere.
To garden mill served for a long time, you need to external surface Basics Drill 15-20 holes with a diameter of 3-5 mm. It will be a kind of ventilation system that will warn from rotting wooden surfaces.
Frame and roof of a wooden decorative mill
To do decorative mill, you will need 4-meter wooden barsFrom which you need to form a frame that resembles a truncated pyramid. This design is bonded with self-draws and then trimmed with wooden boards from four sides.

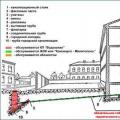
Roofing options for the mill: a - roof made of dusts, b - roof of thick plywood.
You can pre-make a small window, shutters, doors, or even balconies on the trim. Such decorative design It will look individually and beautiful. Its base should be 400 mm in size per 400 mm, the vertex is 250 mm by 250 mm. The finished pyramid will be attached to the finished base with bolts and nuts or self-drawing.
For the manufacture of the roof of the decorative garden mill, 2 of the equilibrium triangle will be needed (300 * 300 * 350 mm). They must connect with wooden boards (3 pcs.) And bars (600 mm). As an additional fastener for the mill, it is necessary to connect the base and roof. To do this, the vertical axis is suitable, clicked in 2 bearing. Thanks to this supplement, the roof can be rotated in different directions.
You can diversify the appearance of the mill, if its surfaces are clogged with iron (for example, a roof) or stick thin sweatshops on it. Then she will look like a real.
Sound for mill
For the wind, it will take a rod of metal. In this case, you can use the hairpin (length - 1500 mm, diameter - 14 mm). The vertical axis with threads across the entire length is attached from above and bottom with nuts with washers. It is necessary that the roof of the design turns to the other side, where the wind blows. The horizontal axis must be attached the same as the previous one. As a horizontal axis, it is possible to use a metal strain (length - 400 mm). The horizontal axis must be arranged above the center of vertical. The axis passes through 2 boards with bearings. It will pour the roof and is installed parallel to the base. Bearings are mounted in the central part of the board using tie bolts.
The resulting design will act as the basis for the blades. So that the homemade mill is as close as possible to the present, it is necessary to build the steering wheel, with which the direction of air flow will be captured. You can make the steering wheel from a wooden trapezium. It is attached using self-tapping screws on the opposite side of the propeller.
It should be borne in mind that sail should be heavy. To do this, it can be clogged plastic material or metal.
Another important detail is the turntable. Wings should not be too massive (if they are too heavy, the wind simply will not be able to twist them). To make them, you will need 2 boards (length - 1500 mm, width - 50 mm, thickness - 20 mm). Since the wings will not be hollow, it is necessary to cut before installing the groove. They will enter each other in cross-shift.
The wings of the finished garden mill will be spinning as well as a children's turntable. It is for this reason that they need to be done with this calculation so that the power of air flows put pressure on them. The finished turntable is attached to the horizontal axis, so that the turntable and the steering wheel balanced each other.

In principle, all the work on the installation of a wooden garden mill can be considered complete. It remains only to decorate the structure.
No matter whether the mill will rotate or not, its decor is very important, because it performs not only the functions of the wind capture, but also creates a certain interior on cottage plot. You can use a wood veil or paint, add different elements - for example, to issue interior Mill or put the original dolls next to it. It all depends on the desire and fantasy of a person.
It looks very nice, especially in the evening, a decorative garden mill, inside which there are lanterns. Set the mills is better near plantings - shrubs or trees.
Separately, it is necessary to say about the waterproofing of the wooden surfaces of the structure. In order for the mill to serve for a long time, all the wooden surfaces need to be treated with primer and only then paint. In this case, moisture will be excluded on the surface of the mill, as a result, the tree will not rot, even if it rains and snow will fall on it.
A garden wooden mill can act only in the role of decorative decoration, it can be functional. The easiest mills for the garden, even small in size, can hide the hatch septic, pipe valves. Large designs in some cases are able to hide even street toilets from curious eyes.
Sometimes some owners combine decor with useful features. For example, decorative mills can be not only the subject of the interior, but also to perform in the role of arbor with mangals. Water Mill It looks no less beautiful for the garden.
In some cases, you can combine a pleasant with useful and make not only a decorative mill, but also functional to be used according to your direct appointment. Then you can make flour, and enjoy the beautifully built mill with your own hands.
It should be noted that such a mill made by their own hands can not only please the owners of the house and their guests, but also attract various intruders. Therefore, you need to immediately think about the construction impossible to bear it.
For this leg, it can be concreted either to make a separate metal axis, which will be concreted, and the whole design will be held on it.
Times when on country plot It was possible to see only a flat range of beds and a blank lawn long passed. More and more people began to use the cottage as a family recreation. The decorative mill can easily taste the mood of the whole outdoor territory. This article will tell what kind of varieties can be built in your garden and how to harmoniously enter the construction into the surrounding space.
Rustic charm of the garden
Once the mill was a real working giant. With the help of energy from the rotating blades of Molly flour, the tree was treated and swung water. Today, majestic structures have lost their significance, however, people still have an idea of \u200b\u200bthis element of the landscape as something attractive and majestic.
Below it will be about a miniature copy of the real mill, which will serve decorative decoration Pricework. It will create a sense of style and harmony, and will also cause pleasant associative images of the atmosphere of the last century. The mill will give the plot of rustic charm and comfort, which is so lacking a city inhabitant.
Varieties:
- wooden;
- stone;
- with a waterfall.
It can also be wind or water.
Standard windmill has a form of an equifiable trapezium. One of the walls are attached blades that, if desired, can rotate. This will make a constructions more interesting and reliable. The whole design can be divided into four elements:
- foundation and base;
- housing;
- roof;
- wings-blade.
Additionally, it is possible to build a hole on the roof, which allows the mill to rotate in the wind, however, it is not necessary.
Where to accommodate and with what to combine
The mill can be the center of the composition of the subsidence. Support a predetermined theme well in the same style performed under ancient or decorative haystack. Supplement painting Wooden animal figures, shrubs and flower bed.
The design can be placed anywhere. It will be equally harmoniously in the garden among trees, overgrown with high grass and outdoor space next to the terrace surrounded by flower. The main rule - the material of manufacture and finishing should fit into common style Buildings on the site.
The mill with a waterfall is ideal for the recreation area. Place it better on the shore of the pond or stream. This will allow warm summer evenings to enjoy the peaceful splash of water.
Determining size and functional purpose
The design can be not only a decoration of the garden, but also a functional structure. In the form of a decorative mill, you can check out:
- cellar or shed for storing tools;
- country toilet or shower;
- dog booth;
- multi-level flowerbed;
- children's house for games;
- gazebo;
- summer kitchen.
The last two options will suit only for large sites, otherwise the structure will look at cumbersome.
Decorative building will help hide engineering Communication, for example, a pipe for watering or hatch from the septica.
The size of the future mill depends on the alleged needs, it will be whether it will carry any functional purpose or will only be the decor and the capabilities of the site allotted under construction. Too big design in a small territory will look ridiculous. The height of the mill serving the decorative decoration of the garden, the average is 1-1.5 meters.
The millet propeller can be rotating or not. In the first case, you need to make a wheel with blades moving and minimize friction strength, then it will be twisted even from a small breeze.
Construction of stone mill
The indisputable plus of the stone mill is its durability. With minimal care, it will simply flash on the plot of not one dozen years. The minuses include the complexity of moving, as well as dismantling, so it should be treated for the construction.
Construction begins with the project. Deciding with the size and appearance of the future facilities, it is necessary to draw a plan. This will allow calculating required amount Materials.
Materials:
- brick or its broken fragments for the base;
- cement and sand;
- natural stone or tile for facing;
- sheet iron or wooden rails for the manufacture of blades;
- threaded hairpin;
Nails, bolts, nuts, selflessness of different sizes.
Instruments:
- mixer and bucket for mixing the solution;
- putty knife;
- master OK;
- roulette;
- level;
- if the blades are made of wood, then you will need a saw, hacksaw or an electrolovka.
Foundation
The stone mill will need a foundation, only this can be guaranteed that the construction does not swim together with the soil in the spring or during the rain.
The depth of the bookmark depends on the total size. For a small mill height of 1-1.5 m, a hole 40 was digging 40 cm, a depth of about 30 cm, the armature is laid inside and is poured with cement-sandy solution. The foundation should dry for several days, after which it is possible to continue construction.
One part of the cement and three parts of the sand takes for the preparation of the solution.
Construction of a house
Inside the finished house will not be empty, so it is necessary to prepare the basis. It is more convenient to use a brick or its fragments. It is necessary to fold the masonry necessary form. The size and proportions can be any, but it is better to make a mill in the form of a trapezoid or cone. For a ligament, the same cement-sandy solution is used. The design must be smooth, therefore, during the construction, the level is used.
In the process of laying bricks, a threaded stud for further fastening the blades is lit into the base. A plate is welded in advance to it or a large nut is screwed, which it clings to brickwork.
In the same stage, other technical openings are provided at the base of the mill, because when the solution hardens, it will not be possible to change the design. Of course, you can try to drill the masonry, but in this case the split of the entire foundation will not be excluded.
The roof shape depends on the shape of the house. For a cylindrical base in the form of a tower, a traditional roof is suitable in the form of a cone, the coating of which is made from facing material, And for a rectangle, an ordinary duplex roof.
Than decorated
Can decorate the mill you can natural or artificial stone. It is best for a tile, made in the form of small bricks. The construction lined with such material will look like a reduced copy of the real old mill.
It is necessary to lay the outer layer on moisture-proof glue, avoiding emptiness. The better the work will be made, the less moisture will penetrate inside, and the mill will retain a good appearance longer.
Production of propeller
Rotating under the influence of the wind blade is the most recognizable mill detail, however, when making a decorative version, they can be fixed.
There are several ways to collect a propeller.
First option:
- Two circles are cut from plywood with a diameter of 15-25 cm, and a hole for the heel is made in the center of the drill.
- Separately from the rails are gather blades. In order for the wind to twist the propeller and rotate the millstone, in the real mill they are slightly at an angle, which allows you to capture air flows.
- Both parts are processed by an antiseptic and covered with paint.
- The blades are on the same distance from each other are clamped between two circles of plywood with glue or bolts.
- The finished propeller is put on the hairpin, the nut is tightened on both sides.
Second option:
- Two long rails, with the help of glue, the cross is connected to the cross.
- In the center of the intersection there is a hole for the stud.
- Each edge is nailed raters in the form of a blade.
- The finished propeller is put on the heel and fastened with nuts.
If you wish, the blades can be cut from sheet metal. In this case, sharp edges need to be processed, and the parts are welded with each other. The decorative stone mill with a metal propeller looks more harmonious, but iron must be painted to avoid the appearance of rust.
Manufacturing wooden design
The wooden mill will not be so durable, like a stone, however, it looks a product completely differently and creates a different mood. Someone will seem to collect the design of the tree much easier, but it is not quite so. No carpenter skills do not do.
Wood products are poorly transferred high humiditySo for the winter the mill must be put into the room. This will help avoid rotting and darkening of the array.
Make a wooden mill can be from the remnants of building material or buy everything you need in the store. Any trimming of a wood array and lumber are suitable.
It is easier to work with a pine - it has a soft plastic structure, besides, this is the most inexpensive and affordable tree in the store.
Materials:
- wooden bar;
- moisture-proof plywood;
- tree for finishing;
- rake for blades;
- roofing material
- nails, bolts, screws of different sizes;
- threaded hairpin;
- varnish for wood or olife.
Instruments:
- drill or screwdriver;
- sander;
- sandpaper;
- a hammer;
- brush;
- roulette.
Foundation - is it necessary?
Small Wooden Mill Bearing decorative functionThe foundation does not need. The mobility of the design will allow you to rearrange it into any part of the garden.
In the case when the sustainability of the future building is questionable, four legs are used as a foundation, which on the one hand are attached to the bottom of the support platform, and on the other stroke into the ground.
If planned thorough building With domestic room or children's playground inside, then without foundation it is not necessary. This will prevent the mill turning. In this case, the foundation of the shallow embedding around the perimeter of future walls is done.
Support platform
The support platform will give a raven stability. The square is collected from the bar. For rigidity, you can additionally combine the opposite corners of the cross on the cross.
If desired, the area of \u200b\u200bthe reference platform may be greater than the base of the mill. It will save the design from falling with strong wind and can serve as an additional platform for placing decor, such as a wooden fence.
Manufacture of housing
The easiest housing for the mill is a box in the form of a trapezoid. To the support platform, with the help of self-tapping screws, four bars of the same length vertically join. From above, the edges are additionally connected by the bar horizontally. When assembly, it is important to observe symmetry.
The edges of the resulting design are trimmed with wood. You can use almost any material. Judging well, block house or imitation of timber.
Roof arrangement and blades assembly
The roof can be both double and fette. The second option is better to use for large structures, and a slim roof is perfect for a small.
From the bar they have two ends in the form of a triangle. Once large mills for grinding flour were covered with the most real roofing tiled from the burned clay. The same material can be a decorative analogue that was used for the base, cutting color proflist, or a modern tile, made under the antiquity. Under the roofing material, the scat from plywood is preliminarized.
The joke of the ribs on the roof should close the horse. It can be purchased or assembled independently. Without a skate, the roof will look unfinished, and rain fall inside the design.
The finished roof dresses on the mill housing and is fixed from the inside long self-drawing.
The propeller is assembled in the same way as for a stone mill. A stilette is installed in one of the bases of the base, only in the case of a stone, it was lit into the masonry, and here it is fixed with nuts. Similar to the previous variant of the blades are put on the other side of the studs and are fixed.
Decorative finish
The wooden mill has a lot of options decorative finish. Next to her looks good flowers and greens. As an option to turn the construction into a flower garden. To do this, its foundation must contain a box for the Earth, where velvets, phlox, petunias or any other annual garden plants are planted in the spring.
The finished mill must be impregnated with a protective solution and paint, or to cover with oil or varnish. If you walk around the wood by the veil, then you can emphasize the structures of the tree. Each additional layer will make the surface of the mill darker.
Decorative Mill with Waterfall
The murmur of water and rustling of spinning blades in the evening garden creates indescribable sensations of comfort and calm. A decorative water mill with a waterfall will become an excellent addition to the design of the garden plot.
The principle of operation of the water mill
If in the windmill in order to move the blade from the place is used by the strength of the wind, then the stream of the river corresponds to the water. The heart of such a mill - the wheel installed on the shore of the reservoir under the chute, through which water flows.
Ideal for installation - flowing water. Running natural water will create a constant torque. If on garden plot There is no river or stream, and the mill really wants to recreate the stream stream can be artificially.
Possible options:
- Install the mill wheel under the gutter gutter. In this case, it will spin during the rain.
- To create a stream, use elevation on the relief. In the highest point of the site, the place of water collection is created, which will be supplied to the blade of the wheel.
- Run water in a circle with a pump. Artificial elevation is created, for example, from the stones compacted land. Inside the hose is laid along which water will be supplied.
Today in stores there are installations that can produce energy from the force of rotation of the wheel. A small wooden mill will be able to provide electricity to the operation of its own pump and LED backlight.
Materials and tools
Necessary materials:
- wooden bar, rail, plywood;
- threaded hairpin;
- nails, self-tapping screws, bolts with nuts of different sizes;
- trumpet for gutter;
- moisture-resistant glue;
- protective impregnation, varnish or olife.
number essential materials Determined by the dimensions of the future building.
The wheel of the mill has a constant contact with water, so all the wooden elements must be soaked with a protective solution, and the use of metal unpainted elements minimize.
To create a water mill, you will need a standard tool kit:
- saw, hacksaw or electrolybiz;
- drill or screwdriver;
- a hammer:
- roulette;
- level.
Step-by-step instruction
House
Water mill house can be made of arbitrary shape and from any material or absent at all. Construction of construction Standard: platform, home base and roof.
It is better to build a building in the same order as in the case of a windmill. First, the platform is collected or, if necessary, the foundation is laid. This stage is better not to neglect, not enough fixed design can carry the flow of water.
On the finished platform set the base of the house. The 18th century water mill looked like a conventional rectangle with the roof, windows and a door. The base can be collected from the bar and separate the boards, or fold out of stone or tiles.
The frame of the roof is going from the bar and plywood. There is a roofing material, after which all the details of the house are collected together and fasten with the help of self-tapping and glue.
A stilette is installed in one of the walls of the house. It should be carefully fixed.
Wheel
The finished wheel of the water mill can serve: Wire bay, bicycle wheel connected by ring plastic trumpet with attached blades and other binding items having the axis of rotation.
Independently the water mill wheel can be made of moisture-resistant plywood or tree. The design is two disks, between which, with the same interval, blades are fixed. The center drills a hole through which the wheel dresses on the heel. When water falls into pockets between the blades, the whole design will rotate.
The axis can be fixed in two ways:
- on one support from the house - in this case, the wheel should well hold on;
- on two supports on both sides - the wheel is attached between them.
The intensity of rotation of the wheel depends on the flow strength, which means its size, and the design. Fast stream in combination with a small diameter will give high speed Rotation. It is good if the mill serves as a source of energy, and not a decorative element. For a measured calm rotation, you will need to increase or drain the wheel.
An important stage of construction of a water mill is a tree processing. It should be carefully sanded every detail emery paper and coat protective impregnation In several layers. Over time, the coating will be washed off, so the procedure must be repeated every few years.
Installation
After all the details are ready, you need to install the mill so that it worked. The house is placed as the reservoir coast, and the wheel under the jet. Water supply is carried out on the upper blades through the chute. You can make it can be cut in half the pipe of a suitable diameter. If everything is done correctly, the wheel will start spinning.
Decoration
A simple wooden wheel on the shore of the reservoir looks boring, so the main object for the decor will be a house attached to him. There is fantasy where it is roaring - carved windows with shutters, doors, colored platbands. Separate element The decoration of the water mill can be a roof covered with reed, cane or straw.
The natural landscape naturalness will support wild flowers and shrubs, as well as stones, chaotically laid out around. A coniferous culture will be perfectly fitted next to the mill: Thuja, juniper, low-spirited spruce and dwarf pine. The reservoir also represents the field for activity - the fern and floating on the surface of the leaves of the pita will create a sense of primacy.
Another idea for decorating a water mill - neon lights. Mount the lighting can be both outside and under water. The transfusing light of small light bulbs will not give the mill to get lost at dusk. Mysteriousness will give glowing at night Melnik's house.
Japanese style
The main components are water, stones and plants. Nothing should not be, because style is based on elegance and minimalism. IN japanese garden With a water mill, nothing should distract from contemplating the natural element.
The mill will complement the stone castle and a bench from the same material. The reservoir coast or its bottom can be postponed with white pebbles and a seven, and to land a Japanese maple and a low-spirited Sakura. Plants S. bright colors It will violate the deliberate rigor, but the use of bamboo tubes will have to be very useful.
Country
The option is suitable for those who have the whole area reminds cozy house in the village. Water mill with wooden wheel and straw roof Perfectly fitted among wooden benches, log bridge and well. The atmosphere will emphasize the most ordinary reed.
Russian style
Registration in this style has similar features from Country, however, it seeks to all familiar Sharm of the Russian village. The Mill House should look like a classic wooden hut, assembled from a rough bar, and the windows are closed on carved shutters. On the roof you can place the traditional fluger in the form of a rooster. The atmosphere will add details: a ceramic Melnik's Ceramic Figure, posted on a wicker fence of clay pots, peering from the corner of yellow sunflower and a bed with daisies. Sewing other ideas for decoration can be in Russian folk fairy tales.
Dutch style
This style causes a lot of interest in landscaped designers, because it so goodly combines bright juicy paints and provincial charm. The water mill may be in the center of the composition, for this, the house must be performed in the traditional Dutch-style Fakhverk, which is supported by the frame of which is located outside the building. One more feature - Parter's lawn. Let the tulips, crocuses and hyacinths surround from all sides, and the live fence is closed around.
Conclusion
Decorative mill on panstone It looks original and interesting. The design can be of any size and arbitrary shape, made of wood, stone, tile residues or other materials. It will harmoniously fit into any corner of the garden. Construction will not require accurate calculations and will give an excellent opportunity to show design abilities.
Many owners of country houses have become more and more attention to decorating their sites. Walking along the streets rural settlements, you can see a lot various elements landscape designUnless, of course, the territory is not fenced with a deaf fence. This is right - coming to the rest of the city, I want to relax in a cozy place and enjoy the silence and peace surrounded by original decorative items.
Most of the crafts are done with their own hands - information about this can be found on the pages of the magazines or in the limitless expanses of the Internet. Therefore, they are obtained by such original and original.
In our country, there are also many interesting things that we did ourselves. it artificial pond, alpine Gorka, small bridge, flower stand, transformer bench. For a complete set, there was not enough decorative mill. Searching for information on the network, we decided to fill this gap and build a mill with your own hands. What did it happen, you will learn by reading this article.
Mill do it yourself
Let's start working from the construction of the foundation of the future design. From the bar of 10 cm with a size of 10 cm with a resolution of 2 pieces of 50 and 30 cm in size, connect them to the square in the square.

For weighting design, cut two more segments from the same bar, equal diagonals Square, choose the middle of the middle, connect with each other and insert the base inside, consolidating all the screws.

Now we take a timing of 5 to 5 cm and take two more squares, with 40 and 25 cm sides.

From the same bar sculpt 4 segments of 130 cm long.

Of these two squares and bars, we will make the frame of the mill. We will leave a large square below, screw the timber to it in the corners, and we install a smaller square and firmly connect the design with the help of screws.

For the manufacture of the upper part of the mill from a bar with a size of 5 to 5 cm. Attach the segment and make a so-called house, a width and a height of 30 cm. We are screwed to it by the bars, connecting them at an angle of 45 degrees on which the roof will be kept.

In order for the base the base of the IOC and not rot, we treat it with the waste machine oil, and the insulating material will be reappeated from the bottom. Connect three elements with long screws with long screws: base, middle part and house - Mill Frame is ready.

To decorate the mill in one side wall insert a homemade frame for the window, 12 sm 12 cm, cutting into it the grooves in it.

You can start the framework of the frame. First, incented boards, we generalize the base of the mill, cutting them in size.

Walls we will wash with pine clap. It is inexpensive, natural and convenient in work finishing material. Since our frame is made in the form of a cone, narrowing up, you have to measure each piece and cut it on individual sizes. Swelling the lining to Brusa with small carnations, leaving the opening under the window.

Now we will make the manufacture of the mechanism to rotate the blades. We will need a piece of boards with a thickness of 2 cm, a size of 10 per 25 cm, an iron rod with a diameter of 2 cm, a length of 40 cm and two bearing No. 303.

To create a mechanism, you need help tookary. Fortunately, in our town there is such a specialist. We treated him a blank and he made a shaft, on which a 10 cm long thread is cut from one edge so that the nuts can be turned.
From the other edge, retreating for a distance of 5 and 20 cm, 2 bearings are pressed. As a result, it turned out that the shaft is freely rotated on the bearings.

We will make a shaft to the board, we will make labels with a pencil and the chisel to choose excess wood to a depth of 1 cm. There should be a notch in which bearings will fall.

Bill the shaft with short screws with the help of aluminum tape, align it in the center of the mill and screw the board inside the house so that the carving is sticking out for 10 cm.

Now you can hide the house and its roof with the clapboard. If we installed the land on the framework parallel to the ground, then the house we share vertically so that it does not merge with the walls. In the lining, born in the center of the house, we drill a hole for the shaft. Check that the shaft is easy to rotate and did not touch the bar.

You can start making the blades of the mill. To do this, dreamed two cuts from a 5-minute 5 cm bar with a length of 50 cm. Cream with their sandpaper, we will determine the middle and note from the central point of 2.5 cm in each direction.

Circular saw will make cuts along the lines of a depth of 2.5 cm. Will chose too much.

Connect two timber to each other, screw them to each other by self-draws, in the center we drill a hole equal to the shaft diameter. We made a cross for the blades of the mill with their own hands.

We put it on the shaft, replenish the nuts and check how it will rotate, slightly promoting it. Cross should not touch the walls of the house.

In order for the blades to rotate from the wind, you need to make it so that they are not parallel to the frame, but at a small angle to it. To do this, we will analyze the crossbar and on each part of it we draw 2 lines at an angle of 20 degrees. We will remove the excess plancock or a grinder, with a plate of sandpaper installed on it.

Next, take a bar in size 5 by 3 cm, cutting 4 pieces of 60 cm, emit them and screw themselves with self-proofs to the cross.

For the manufacture of the blades themselves, 16 boards with a thickness of 2 cm, 10 cm wide, length 30, 37, 44 and 50 cm, 4 pieces. Testers are carefully thrown by sandpaper.

Now we will boil them with self-reserves to the cross at an equal distance from each other.

We put on the cross on the shaft, fasten it with nuts and check. During rotation, the blades should not touch the mill. If still somewhere touches, we note this place and eliminate the cause.

So that the shakes of the lining with each other were not noticeable, in the corners of the walls and the house, we need a wooden corner, cutting off its desired length. At the same time at the bottom with the electric lobby arched inlet for a cat living on the site. We put the floor of the foam in advance to the floor, so that she was warm.

The blades of the mill will paint the color of the oak, which we stayed after the construction of the arbor.

In the same color painting the frame of the mill.

While the lacquer will dry, make the platform to which we will put our construction. First you dig a shallow pit in the form of a square.

Sand in it in it and wisely sink.

As a cover, we used old tiles with a thickness of 3 cm. We will lay it on the sand, circling the tile rubber Cyansa. The surface horizontal is monitored using a construction level.

Waiting for paint drying, make wooden lining on a nut in the center of the Cross. We measure the distance between the bars, cut the desired piece from the board and serve it in it with the help of a metal crown deepening.

We process the cover with emery paper, painting, smearing the wood glue and glue in the center of the Cross.

IN window hole Instead of glass, we inserted a piece of the mirror, cutting off with its usual glass cutter with their own hands and fix the strokes.

Since the mill turned out pretty heavy, together with the assistant, we move it to the place of installation.

We placed it in the corner of the site, next to the wooden. The mill was harmoniously fitted in, applying to the color and material of the manufacture of our canopy and the furniture in it.

The cat also liked the place cooked her. Sometimes she comes there and watches what is happening on the plot or sleeps.

With the strong wind, the mill blades rotate, glad us well done and surprising our guests with the original building. If I liked the article, share it in social networks.
Video
No, fighting windmills Not included in our plans: Don Quixote can rest on laurels alone. Our goal is to build. We have to find out what a decorative mill for the garden can be built with their own hands.
Not only beauty
It is clear that the mill will not perform its own direct function - grind grain. Obviously, the main purpose of its construction is.
However, there are a number of ways to combine pleasant with useful: a decorative structure can perform a number of additional functions.
- The mill will hide the sewer hatch or septic ventilation.
- It can serve as miniature storage garden tool or children's toys.
By the way: Children will surely please this structure in their gaming area. In adults there will be only one serious problem: you have to explain the functions and the prototype function for a long time.
- The structure can be a kind of decorative lamppost: the lamp mounted on the top will turn your night garden in the likeness of the mysterious Narnia near the exit of a kind of swing cabinet.
- Finally, the mill can accommodate the latent lighting control panel or gate.

Materials and solutions
So, proceed. Since the tastes do not argue, we will not go through the projects and drawings of the decorative mill for the garden with their own hands; Instead, focus on technical solutions.
When construction we use natural materials - Wood and some products of its processing. And because of the simplicity of their processing, and because in this case the mill will look closer to the original.
What should be our building?
- It is strong enough to withstand the gusts of the wind and the activity of younger family members.
- Protected from rotting and ultraviolet. As you know, on sunlight The tree darkens on the cut; Fermentation processes are launched precisely by the ultraviolet part of the spectrum of sunlight.

- Securely waterproof from the soil. If you put a wooden structure directly to the ground, after some time you will beton, without withsting constant moisturizing and insect attacks, even the most resistant wood.
- Finally, the drawings of the mill drawings for the garden do not have to contain too wide front projection. Or, more simply, the sail of the structure should not be too big; Moreover, this refers to both the tower and to the blades. Do not forget that we are building after all the imitation.
Platform
It should be durable and most massive: the lower the center of gravity, the more stable structure.
What can be done from?
- From stitched into the shield of the chubbed chamber of chamber drying. The shield will be fastened with walls built on it; Additionally, the tongue compounds can be sampled with casein glue or conventional silicone sealant.

- From plywood thickness of 15 - 18 millimeters. The platform carved from it is grinning with rounding edges.
Not all types of plywood are equally useful for our purposes. In a wide sale, you can find primarily FC and FSF, which are distinguished by the mixer layers used to glue.
In the first case, carbamide resins are used, which ensures the harmlessness of the material together with very modest resistance to moisturizing. In the second - pretty toxic phenol formaldehyde resins that make, however, the Faneru is very waterproof.
Tip: Since our garden mill is built on the street, and there will also be to stand after the end of construction, it is worth staying on FSF plywood.

In addition, you can find the Faneru of several varieties.
| Variety | Short description |
| E (Elite) | Defects are not allowed. Only changes in the wood structure are allowed. |
| 1 | The length of victim and / or cracks is not more than 20 mm. |
| 2 | Permissible cracks long no more than 200 mm, insertion and leakage of glue with with total area up to 2% of the entire sheet. |
| 3 | In addition to the above defects, wormworms are allowed with a diameter of up to 6 mm with a total of no more than 10 per 1 m2. The total number of defects on the sheet is not more than 9. |
| 4 | In addition to the listed, there may be fallen swings and worms with a diameter of up to 40 mm. 5 mm edges defects are allowed. |

Since the upcoming volume of purchases is small, the price of the material will not play a special role in choosing. Obviously, 1 - 2 varieties will be more preferred. However, they often simply cannot be found on sale: high-quality plywood is rarely in great demand.
What to do in this case?
- Defects are put on the acrylic putty on the tree.
- After drying, the putty is polished.
- Instead of varnish, it is covered by any water and weatherproof enamel.
Legs
Platform, as we remember, it is unwanted to put directly on the ground: waterproofing is needed. A simple and elegant way to perform it is to fasten below either plastic furniture legs, or, in their absence, four - five short plastic sewer pipe diameter 50 mm.
In the latter case, the method of fastening pipes will be quite specific.
- We screw to the base of the mill plastic plugs of the corresponding diameter.
- We put on them the sockets of the right length.

Walls
Here are several solutions.
Log
It is constructed from a circular diameter of 30-50 mm. In this role can perform, for example, cuttings shovel. Compounds - "in the paw"; For fastening, any carpenter is used or again silicone sealant.
By the way: the log house can be additionally fixed with anticipation of a round pencil. They are inserted into the knocked holes for glue.

Frame structure
The frame is assembled from a dry fir or pine bar on galvanized corners and is trimmed with sliced \u200b\u200bbamboo wallpaper. Corners are closed narrow wooden corner. Such a scheme of the garden mill is good because it will be bludging; When it gets inside the water, it will quickly evaporate.

Plywood walls
Vertical walls can also be collected from thick plywood.
In this case, the framework is not needed: with a thickness of 15 mm, the plywood walls are joined.
- In 7 millimeters from the edge of the plafferous part, the holes are drilled with a diameter of 4 mm. Drill is kept strictly at right angles to the plane.
- The holes are sprinkled with an 8-mm drill.
- The part is applied to the end of the adjacent part, after which she is captured right through the holes with a 3-millimeter drill.
- The compound is assembled on a self-drawing with a length of 45 - 51 mm and a diameter of 4 mm.
ATTENTION: The given instruction is relevant to connect at right angles. If a garden decorative mill with their own hands is built five-stranded or six-willed, the details will have to cut with oblique ends with the help of a jigsaw or disc saw With swinging skiing. For the connection in this case, only glue is used.

Cap
There are also several solutions here too:
- Two- or fourth roof on the frame of the bar, made all the same bamboo wallpaper. In this case, at the base, it is worth providing holes for water drainage: In the rain, our mill will inevitably assemble some of its number.
- Lodge from thick plywood, joining.
Wings
They can be static or rotating. In any case, as we have said, high sailboat is undesirable: the wings of the mill are harvested from thin (no more than 1.5 cm) on adhesive connections.
How to organize rotation?
- The sovereign crossed is placed on the SCOS, so that the glued rails form blades with an angle of attack at 15-30 degrees to the rotation plane.

- As an axis, you can use the entire old low-power electric motor (for example, from the fan). The axis is inserted into the windweight drilled in the crossbar; The stator of the motor in any way is fixed in the cutting of the front mill of the mill.
- Wings are carefully balanced. The slightest imbalance will lead to the fact that a heavier wing will come out of the lower position only with strong winds.
Protection against moisture
What can be protected wood structure From water?
- Aquatex - impregnation-antiseptic with a hydrophobic effect and ultraviolet filter - will save the appearance natural wood At least 6 to 8 years.
- Yacht varnish is also exceptionally racks to the action of water and the sun.
- Extremely waterproof tree can make an impregnation of ordinary oil. It is advisable to preheat it in a water bath: then the wood is impregnated deeper.

Olife - Time Vainted Tool for Wood Protection.
Conclusion
Of course, B. small material We are described only a small part possible solutions ().
As always. Additional thematic information reader will find in the video in this article. Successes!


IN lately When placing the landscape design of garden and country sites, not only plants are increasingly used, but also all kinds of decor elements. In particular, decorative mills are very popular, which are the colorful decoration of any landscape. In this article we will look at what is the decorative mill for the garden and how to do it yourself.
Types of decorative mills
Usually, decorative crafts - Garden mills are not only an ornament, but also perform a practical function.
Moreover, according to the functional purpose, they can be divided into two types:
- Masking protruding elements, for example, pipe valves, hatches of septics, columns, etc. As a rule, such products have small sizes - 0.5-1 meter in height.
- Masking surplus buildings, for example, toilet, cabinet or even rest. Similar structures have impressive sizes.
Of course, the decorative garden mill may not perform any functions, but simply decorating the site. This approach will allow you to establish a design in the most favorable place in terms of the design of the site.
Tip! If there is a decorative water in the garden, the water mill will be watched on its shore.

Manufacture
As a rule, decorative mills are made of wood or various wood materials. There are a lot of making options for such a craft. Below we consider one of the most simple and fast ways Production of a small decorative or country area.
Materials
So, for the manufacture of the product, the following materials will be needed:
Tip! For making crafts can be used construction materialremaining from repair or building a house. In this case, the price of the product will be minimal.
In addition, you will need consumables - Self-tapping screw and wood lacquer.

Drawing
Before proceeding with the work, you need to draw a drawing of the decorative mill for the garden, depicting all the details indicating the size.
Product design is extremely simple:
- The basis is the square or a rectangle from the chipboard.
- In the corners, four racks of the same length are attached to the base.
- The top base from the chipboard is mounted on top to the racks, which should have the same shape as the bottom, but slightly smaller sizes.
- Two triangles from chipboard are attached to the top of the resulting trapezium, which form the base of the bantal roof.
- After that, the frame is triggered and the blades are attached to it.
Tip! By this principle, not only the mill can be made, but also decorative houses for garden.
The dimensions of such a design can be any, depending on your wishes.

Assembly
The manual for the manufacture of such a mill looks like this:
- First of all, you should make two foundations, cutting them with a log cabin of a chipboard. As mentioned above, the sizes must be different, for example, the bottom item can be made of 40x40 cm in size, and the upper - 30x30 cm.
- Next you need to collect the framework. For this, first of all, the bars of the desired length should be prepared. Since the frame design is a trapezium, on the ends of the bar need to perform sections at a certain angle so that the base is fully adjacent to the ends of the supports.
- Then, at the corners of the base, you need to drill holes under the screws and set the supports.

- Similarly, the top base is attached to the supports, as a result of which the trapezoid frame is obtained.
- The next step is the manufacture of top mill. For this you need to cut two equilateral triangles from chipboard. Dimensions can be chosen at its discretion, but the side of the triangles must be more sides of the upper base of the trapezium.
You can connect triangles using rails or bars. As a result, the upper part of the mill will turn out.
- The next step is the cutting frame of the frame. IN this process There is nothing complicated - it is necessary to simply cut off with your own hands the panel of the desired length and attach them to the frame with the help of self-tapping screws.
- After completing the finish, you can cut the jigsaw improvised window and the door.

In the photo - sheathed with clapped design
- After that, you need to attach the upper part of the product with the help of screws.
- Before sowing the roof of the lining, you need to install the axis for the blades. Make it very simple - in one of the triangles it is necessary to drill a hole and consolidate a long bolt in it.
- After that, you can shelter the outer part of the design and fasten the corners that will hide all defects in the places of the shakes of the lining.
- The last step is the manufacture of blades. Their appearance can be the most different, depending on your imagination. The easiest way to make a blade of two rivers, for this in the place of their intersection you need to drill a hole and put on the parts on the axis, fixing the nuts.
At the edges of the regions, it is possible to perform crossbars so that the blades have acquired the completed view.
- After that, the design needs to be lacquered.
On this process of manufacturing a decorative mill is haweded.

Installation mill
Wooden mills for the garden fit perfectly into the rustic and some other landscape styles. However, even if the garden is decorated in a similar way, when installing the mill, some nuances should be taken into account.
The best option is its location on the lawn with high grass or somewhere in the corner. In this case, you can not take into account the fineness of the combination of the composition elements. However, if all the elements of the decor are placed alone, the impression will arise that they are not interrelated among themselves.
You can also make a craft near the arbor, but in this case the designs should be combined with a stylist. For example, the gazebo can be covered with the same clapboard as a mill.

It will harmoniously look nearby Mill Mill Rustic Telep or Abandoned Wooden Wheel. If you make decorative houses and mill mills in one style, then problems with the placement of the composition will be less.
In general, the most important thing is that any of the elements of the landscape caused an imbalance.
Output
Make an independent mill for the garden is absolutely not difficult, even if you do not have special skills in the joinery. The main thing is to correctly perform the markup of all the details and prevent errors in the process of work. The result will be a product that can be the central decoration of the entire garden landscape.
From the video in this article you can get some additional information on this topic.
 What is a hot water supply of an apartment building
 Water supply of an apartment building
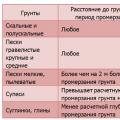 Calculation of the Load for the foundation Installed Electrical Instruments