Wooden mold with beveled edges. What is rubber kiyanka relatives Rubber Cyan
Kiyanka. "Beatushka". It would seem that it could be easier. Pen with a blank, kalket. AN no, kinds of Cyan are many. The most successful form is "grenade". Knocks in any end, not that hammer. And invented people of the queen not ababa as, but with the goals:
Make the work of the carver comfortable and pleasant
Eliminate professional diseases of cutters associated with shock load on brush and wrist
Increase service life and Cyanka and chisels
For example, a beater can be wooden and beautiful:
But after a few months of work, all this beauty turns about such a washcloth:

There are still Cyans, dressed in bronze - to blow to be more powerful:

Good kiyanka! Wonderful! But do you need to show, what do the chisel sticks turn? Only chisels, reinforced metal rings able to withstand the blows of such a sledge truck ...
Or, too, it seemed to be a good solution - a rubber head.

But .. it hurts greatly bounces from the chisel's handle when you hit ...
Mikhail Ilyaev works by Cyonyan Stepan Erzya made from Cabracho, the hardest tree Argentina:

Mikhail told a funny case. One harmful neighbor, the old woman, began to complain about him "where necessary" for a permanent knock on the balcony. Mikhail was upset, began to search for compromises. Here is one of them. The rubber dye from crutches went to the thing, put on a tension on the handle and the slobbier became more muted:

Next was still detective! As Ilyaev says, he seemed like God heard: that malicious neighbor went down the ravis of his house, and a deaf intelligent old woman was settled in her place, with which Mikhail was suited. These are such wonders ...
Perfect solution
In the preparation of the article used forum discussion:
http://forum.woodtools.ru/index.php/topic.317.0.html
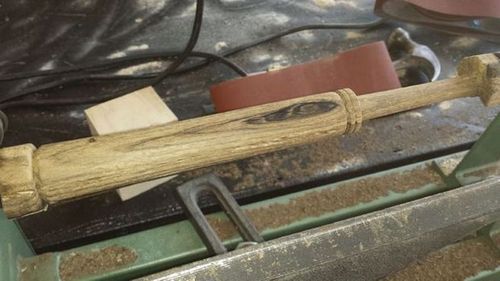
Actually, the product is an idle mile from Vladimir Zhukov. Collected from personally selected wood. Oak and plums (cherry). The whole process in the photo. I needed a heavy mile with a short handle.
First, the billet under the head of the Cyanka gluits. Between the details laid plates of sea oak (veneer). Bonding was performed at the time of the "carpentry".
After drying the glue and giving the grinders more rectangular shapeThe forster cutter is selected through hole connecting with each other. 
I obey them to oval shape and fall asleep lead fraction. It can be clear below that another flat item is pasted (the cavity will close exactly the same) 
The ends also curse the plugs. The shape of the blank is attached to the rudely - the plane, and then brought on the grinder. 
The handle is exactly the same sandwich (in a hand held by hand) at the junction site with the "head" it has a rectangular cross section. For the crushing, you should make two cuts, they end with holes for protection from splitting. 
The handle is putting on the glue, it is crushed and, after the final gluing, it is completely polished, this time already hands. 
Finishing - Oil Coating Aquatex Balsam Colorless 
Understand the real men's rattle! Her weight was 827 gr. When strikes, it does not bounce off when they hit and with small dimensions has a lot of weight.

Feels like working - it is approximately as palm on asphalt clapping or raw clay.

In general, the thing turned out not only functional and comfortable, but also stylish. 
Wooden mall (or joinery hammer) with beveled edges is very often used to bother the chisels and chisels. However, this is not the only scope of application of this tool. Kiyanka is also used when assembling furniture and in the process of processing or fitting parts and products made of soft materials.
To make your own hands a wooden queen with beveled edges, you will need to be covered with wood fruit trees (for example, apple tree, pear or cherry). The handle can be made of a cedar or walnut.
It is advisable to use wood light and dark shades to get an interesting and original color contrast. First of all we dissolve circular sawSo that in the end it turned out two of the same sidewall.

The main stages of work
From the dark wood board, you need to cut off two small billets, which are carrying at an angle of 5-6 degrees. After that, glue all the billets together. From below and on top we use the bars of a light shade, and inside the "insertion" of the wood of a dark shade.

In the middle, you need to leave the opening of the square shape under the handle. After gluing, the ends should be trimmed under a small angle, so that there are bevelled edges. Then the surface of the workpiece must be seized, and the edge to pass by a manual milling.

Buying the chisels, do not forget to pay attention to the acquisition of such a product as a rubber cynica. This tool causes the least damage to the chisels themselves, although there are certain disadvantages. Let's deal with what exactly the ideal version of the Cyanka exist.
Rubber pins - and convenient, and safe!
Even such a simple tool, like a molding, has many different incarnations, of which the most popular are wooden and rubber products different shapes. The main purpose of the Cyanka is the "engine" of the chisels in the process of cutting parts. This happens as follows: In one hand, the wizard holds the chisel, attaching it to the point of the desired cut, and in the other hand holds a Cyanka, which he hits the end of the chisel's handle, giving it the power necessary for the shy. The ease of material makes it possible to avoid strong injuries of the hands and shits the tool itself.
Over the form, there are two types of xyiyanka - turning, draped from a solid piece of wood a beater resembling a bow or a small bit, and a hammer, which in shape resembles a sledgehammer, but is performed entirely of wood. The advantage of the first - in its convenience, after all, what point the beater does not hit, it will be correctly, which significantly reduces the load on the brush. The hammer molk allows you to apply stronger, concentrated strikes, however, it should be very confident to keep the tool in hand and follow the position of the head in relation to the chisel.
Therefore, the first are still more popular, although it will not work out this tool without a special workbench.
Disadvantages of materials - imperfect pyenki!
The beasts have a significant drawback - since they are performed from the workpiece with longitudinal fibers, with intensive use, the working part of such an image of such a time is reminded by the most real washcloth, from what kind of wood it would be done! The hammer sledgehammes have such problems less, however, as already noted, its form is far from ideal. Taking the basis of these two forms, manufacturers offer to our attention advanced, in their opinion, tools. For example, the "casing" from bronze is put on the accurate image.
To some extent it turns out really durable instrumentHowever, these are the chisels themselves! After several goals, the exhausted appearance will already have them, and not in the Cyan. Under such a tool you need to buy special, reinforced chisels, which is not always affordable. In this case, it would seem, the perfect version will be a rubber cusion! Of course, it is not all made of rubber - most often, it is a rather thick layer of material or rubber inserts At the edges of the hammer. Indeed, the blows are obtained very gentle to the tools, but it is still inconvenient to work - the rubber has a sprinkler property.
It turns out that there is no ideal inquiry? After all, you need to combine the quality incompatible in our case:
- convenience;
- durability;
- lack of depreciation when hit;
- optimal weight.
Manufacturers have not yet suggested perfect optionAnd here the masters themselves learned to do it!
The perfect cynica with your own hands is not a tree, not rubber ...
Leather! We forgot about it! On the one hand, the material is sufficiently heavy, on the other hand, does not spring, and with the third - very durable. What options to create a queen? If you have previously purchased a turning tool, then at least you can wind up several layers working areaTo protect the Cyan from further damage. So that the skin does not fly, it is necessary to secure it reliably - glue into the start of winding one edge joinery glue to wood, and in the process of the winding, lubricate the skin itself.
In addition, if the dimensions of the material allow you to intercept from the base of the bits protruding the edges with a worm clamp or in the extreme case, make a winding from a strong twine. From above the protruding edges you can nail to the end of the Cyanniki with small carnations or simply cut - if you are well glued with layers, then this option will last long enough. However, it is much better to make a queen completely out of the skin, except for the handles. This option will be almost eternal! To do this, you will need a lot of skin, you can search for the market from the sellers of trimming, which they will gladly give if not for nothing, then cheap. You still need glue, a large washer, a drill and a fairly large bolt.
How to make a queen with your own hands - a step-by-step scheme
Step 1: Cooking the handle
It is best to take a solid wood for the handle, for example, oak or beech. Birch or walnut is also suitable. If it is possible to sharpen it on turning machine, then do it for the result convenient for hand round in cross section of the form. In addition, so you can make a ledge in the middle handle so that the layers of the skin were emphasis. If there is no lathe, then you can hide several layers of rope.
Step 2: Cooking Skin
You need to chop out a lot of round segments of the same size. To begin with, make one layout and take it on it on a piece of material the desired number - depending on the size of the working part itself it will be necessary from 50 to 70 such circles. In addition, the role of skin thickness plays - than it is more, the less layers will need.
Step 3: We ride layers
Do in each layer hole so that you can drive the skin on the handle. Each layer we connect with the subsequent, we try to press the layers to each other as close as possible. When all layers are risen and lubricated with glue, clamp the tool in vice or clamps to completely dry the glue.
Step 4: Krepim Puck
So that in the future, leather layers could not be able to fly, from the top end of the handle you need to secure a large washer - metal or wooden. To do this, we drill a hole in the handle itself, we apply the puck and screw the bolt tightly. Of course try to pick up optimal size For your handle, so that it does not crack.
That's all! The skin will not fly into small sins in the process of work, the blows are actually visited in this material and do not create so much noise as when working ordinary wooden tool. Of course, it makes sense to mess with such a tool when you constantly work with the chisels and have already changed more than a dozen of the ciyayan, but the usual wooden hammer molt-iron is quite suitable for infrequent use!
How to make a tree from a tree - easier than a simple!
To do this, you do not even need a drawing of a drawing - everything is very simple! Find three sufficiently large maple trim or birch of the same thickness. It is not recommended to take more solid wood species, except for the handle, as they split from constant shocks. All trimming down to the same thickness - 2-3 cm. Take one of the bars, attach a handle to it and circle its contour. Then he cut the ribbon bar or so that the two piece of chunks fit tightly to the handle. It is important that the handle and these two trimming have the same thickness, equal to the thickness of two wide bars brings.
We glue all the bars and the handle with joinery glue, clamping the clamps and leave at least 12 hours. When everything goes, mark the rounded profile of the brisk and sideways and doinched unnecessary. How should I walk out emery paper And cover the wood of Olifa. You will have two days in the manufacture of such a tool, of which only a few hours will be devoted directly.
Hammer - tool in the farm needed. But besides the usual, metal knob, it may take a hammer with a rubber head. It is used for different needsBut, frankly, he is pretty hard. Alternative to him can be wooden hammer. - The instrument in the economy is necessary. But besides the usual, metal knob, you may need a hammer with a rubber head
Necessary materials:
1) Wooden Poles
2) Grinding machine
3) tape saw
4) lathe
5) Metal pin
6) varnish, impregnation for wood
Instructions for manufacture
Step number 1: Choose suitable wood
Choosing a wooden floor, which will subsequently become a hammer, pay attention to the hardness of the selected breed. The tree should not be unnecessarily soft and pliable, otherwise the hammer will come into disrepair very quickly, but also too hard wood is not suitable, because it will be difficult to saw it even with the help of a woodworking machine.

Step number 2: Wooden knob
The blank for the embolly will have a cubic shape. Dimensions are determined arbitrarily: as soon as you consider that the workpiece meets your expectations, round the sharp corners on the machine, polish the head of the hammer and stop working on it, go to the drinking handle.


Step No. 3: Drink Handle
For the handle, maple wood will fit well. Proceed it with ribbon sawAnd then bring to mind on the lathe. Since all sizes are arbitrary, then focus only on your own sensations. As soon as it seems to you that the handle comfortably falls into the hand, put it aside and drill the hole of the corresponding diameter.


Step No. 4: Final Barcode
Wear your head on the handle so that the handle has passed the knobs through and thoring a bit. In order to secure the design, use a small metal pin.
The hammer can be covered with impregnation for wood, varnish or wax, to give him a beautiful view.
 How to return the love of her husband to his wife - Tips of the psychologist
 Why you can not give icons