How to make ventilation in the cellar. How to make ventilation in the cellar: we make natural and artificial circulation. Natural ventilation is the right device
For a cellar or basement, it doesn't matter in country house or garage, the presence of a complete and effective ventilation just as important as proper waterproofing or correct location entrance and exit to the premises. Otherwise, you will have to regularly suffer with the entrance hatch and valves on the ventilation openings, each time with your own hands to set the optimal position of the grate in order to prevent condensation and temperature jumps in the cellar.
Which type of ventilation is more efficient
There are certain differences in the organization of ventilation and air exchange in the basement and in the cellar. This is due to the fact that when ventilating the cellar, a number of factors are required to ensure high quality food storage:
- Strictly defined temperature range, and different products require a little different conditions storage, even in the same cellar atmosphere;
- The humidity or concentration of water vapor in different places of the cellar should also be different, with normal level ventilation;
- The composition of the atmosphere in the cellar should be optimal for storing vegetables, even if it is not quite optimal for comfortable breathing.
Attention! Ventilation should not excessively increase the ventilation of the basement.
The duct system is more like a large-scale preservative tool.
Thus, proper ventilation in the cellar is designed to provide a microclimate in the room.
Features of the organization and device of ventilation in the cellar
There are certain differences between the storage conditions of home preservation in airtight glass jars and storage of vegetables and fruits. Most often, all winter supplies are stored in one cellar under almost the same ventilation conditions, and this is wrong. For jars of jam and salads, the driest and coldest atmosphere is enough. For fruits and vegetables it is necessary to control moisture, oxygen and carbon dioxide content. The minimum depth of the cellar is not less than 150 mm, the value largely depends on the level of occurrence groundwater and the amount of soil freezing.

For central Russia, this is quite enough for the existing temperature difference to be sufficient for ventilation. Problems with the work of the natural inflow can arise in the summer, in the hottest months the temperature in the basement can rise to 12-15 o C, which leads to a stop of ventilation and even a change in the direction of air in the duct pipes of the cellar.
Cellar ventilation in hot weather is no less important than during storage of vegetables and fruits. It is in summer and autumn that the bulk of microflora and bacteria accumulate in the cellars, causing damage and rotting of fruits, only proper ventilation stops such processes. In addition, if the cellar is located in an unfavorable geological zone, radon gas can accumulate in it, which eats well into the smallest pores and cavities; powerful ventilation of the cellar is needed to remove it.
During this period, the cellar room is freed from all reserves, carried out sanitization walls and ceilings with lime and disinfecting mixtures, intensively dried from residues of condensate and moisture, creating drafts with a maximum air pressure in the ventilation. In this case, the ventilation must work on full power- all hatches and valves open, entrance doors closed with one steel mesh.
How to properly arrange ventilation in the cellar
For the arrangement of supply and exhaust ventilation, you can use the effect of natural draft in the pipe during temperature changes or use various kinds of blowers with a bypass valve system. Most often, you have to do the ventilation in the cellar yourself, so you usually want to make the structure as simple and reliable as possible. But for a large room, the amount of air flowing into the ventilation may not be enough, in which case condensation will fall on the ceiling in the form of a thin wet film. We'll have to install a forced type of ventilation with fan blowing of air.
Correct ventilation of the cellar creates an atmosphere that does not meet the standards adopted for living quarters. The amount of carbon dioxide in such an air environment is several times higher, oxygen is less by 2-3% of the sanitary standards. This inhibits the development of pathogenic flora and creates favorable conditions for the respiration of root crops and fruits. It is not recommended to stay in such an atmosphere for more than 15-20 minutes. All basic work in the cellar must be performed before the products are stored, or forced intensive air blowing must be organized for one hour before starting work.
Pros and cons of natural cellar ventilation
The natural flow of air into the cellar room can be quite simply provided with the help of one or more pipes installed according to a certain pattern. How successful will simple construction ventilation, depends, first of all, on the accuracy of their positioning, the diameter of the air ducts.

The ventilation principle of operation is based on the effect of traction - lifting more than warm air in the lower temperature air duct.
The rules for building ventilation in the cellar should contain several simple conditions:
- For successful work natural ventilation requires a temperature difference in the cellar and outside of at least 7-10 o C or a wind speed of at least 1.5 m / s. That is, most effectively the cellar will be blown out during windy weather or after the “outboard” temperature has dropped to at least -7 o C. This may be the period from October to November, until this moment, from September to mid-October, in the cellar intensively moisture and respiration products of crops accumulate, which are practically not removed from the atmosphere of the cellar;
- The cut of the "exhaust" pipe is raised at least one and a half meters above the roof of a building or cellar. Ideally, the difference in height above the outside air intake and the highest discharge point should be at least three meters. The colder the basement, the worse it is ventilated, the more condensation will fall on the walls and objects;
- The outlet pipe should ideally be made without additional "pockets" and "elbows". The ventilation performance in the cellar depends on its ability to lift and disperse the air in an even and smooth channel.
Advice! After 3 meters of exhaust duct height, each additional meter increases productivity by 10%.

The point of intake of "hot" air in the natural ventilation of the cellar is made in the form of a single pipe, the window itself is located in the highest place of the room. Often, air enters the channel not through the end hole, but through the side windows in the pipe walls. At the end of the duct, you can do it yourself with a collector for condensate, rain and ice and snow melting products.
Advice! Try to make free space around the windows of the ventilation pipes, later this will come in handy when you have to clean the air ducts from dirt and debris with your own hands.

At the upper end, various weather vane rotary pipes are sometimes installed, designed to turn the outlet downwind, which, according to the manufacturers, should increase traction and protect the channel from rain and snow. It would be much more useful to install with your own hands a device for scaring away birds and mice, who managed to climb into a warm ventilation pipe in the cold and clog it. Getting a dead bird or animal with your own hands is not always as simple and easy as it might seem.

What is most important in the structure of the natural way of ventilation of the basement:
- The supply of cold air in the volume of the cellar is always removed from the outlet channels to the maximum distance, the outlet window for cold air is lowered to the floor itself. This zone is the most tolerant of low temperatures and water condensation of vegetables. In this part of the basement, carrots, cabbage, poorly potatoes and beets are well stored;
- It is very important to choose and make your own hands the location of the pipe for the intake of outside air. The optimal point is at a height of 40-50 cm, the direction and orientation of the entrance do not matter. The so-called straightening devices, designed to improve the air intake process, often become clogged with dirt and become unnecessary resistance in the path of the air flow. Coarse-mesh steel mesh is an obligatory attribute of the entrance hole.
The main advantage of natural ventilation is its simplicity and reliability. The effectiveness of her work is a controversial thing. One thing is known in practice - such a device is suitable for ventilation in the cellar under the house, due to the large storage room, high "exhaust" pipe and good ceiling and wall insulation. Another plus is that it is easy to do it yourself.
How to make forced ventilation of the cellar with your own hands
Unlike natural ventilation methods, making forced ventilation in a cellar with your own hands is much more difficult, but only because in most cases you have to redo and modernize an existing one.
We assemble the air duct system with our own hands
In fact, forced ventilation is no different from natural ventilation. The main difference will be the installation of special air intake ducts in the ceiling area of the basement. The point of the idea is that warm air is taken not at a specific corner or point on the ceiling, but in five to six places, evenly distributed in the upper part of the basement.

Such air ducts can be easily made with your own hands from plastic sewer pipe... For 10 cubic cellars, a pipe of 50-70 mm will be enough, for 20 cubic rooms, plastic with a diameter of 100 mm will be required. Such a network of air ducts is made with a "donut" along the perimeter of the ceiling; windows with removable covers are made at the points of air intake in the pipes. They are easy to remove and install with your own hands, thereby adjusting the most optimal air intake scheme. Both branches ventilation ducts are connected to the intake manifold of an axial or centrifugal fan.
The air collected through the channels is discharged by the fan into the exhaust pipe. In some schemes, the ventilation system is equipped with a special bypass valve. With its help, the artificial air circulation system can operate in the natural ventilation mode.
Features of ventilation with forced air circulation
This type of ventilation is able to provide a precisely metered amount of outside air. And this is the main advantage of the possibilities of such a ventilation scheme. For example, in the summer, after the walls have been whitewashed with lime, forced ventilation of the cellar with warm air will dry the room ten times faster than if the fight against moisture occurred naturally.
In winter, thanks to the correct regulation of the warm air intake points and the fan performance, it is possible to correctly distribute the movement of cold outside air throughout the cellar volume and thereby protect thermophilic crops from freezing.
Advice! A good way to control an electric fan is with a programmable motor power switch.
In this way, you can get a low temperature in the cellar even in September, if you set the timer for turning on the fan for the cold night hours.
Conclusion
The forced ventilation method of the cellar has one significant drawback - the fan electric motor requires a round-the-clock connection to an electricity source, which is not always safe. Sometimes homemade cellars simply do not have the ability to get power, so they have to be content with only a natural ventilation scheme.
- It is dark inside - there are no windows, the light comes from a light bulb and only when you need to take something.
- Low temperature is required for long-term storage of things and food, otherwise "love is gone, tomatoes wilted." Literally.
- Constant air circulation, inflow of fresh air and removal of stagnant air.
- Humidity is about 90% - not a lot and not a little. Enough to maintain freshness without rotting or drying out.
If the building does not meet the listed requirements, you should think about the need for high-quality ventilation. To create such an air cycle, 2 types of ventilation are used - passive and mechanical.
For small spaces
When laying the foundation in the basement part, air vents are left above the cellar. They are covered with iron bars so that pets, pests and debris (leaves, branches, waste paper) will not get inside. With the onset of frost, a dense fabric is placed on top of the grate for insulation and pressed down with an iron sheet. With the right design, the cellar will maintain the temperature that is permissible for storing food even in winter. 
This is the simplest way of arranging, but it does not provide sufficient ventilation, and precipitation (snow, rain) in any case will fall into the vents and accumulate.
If it is not possible to make two separate vents, you can halve one. The first part with a wind catcher directs fresh air into the room, the second is slightly covered from parallel blowing and will serve as an exhaust hood.
Passive (natural) ventilation
Cellars large sizes it will no longer be possible to ventilate qualitatively with niches alone - air circulation is necessary here. But you can pretty quickly and without high costs make ventilation in the cellar with your own hands, and a full-fledged blowing system will allow you to store any things in the future without the danger of damage.
A significant disadvantage of natural ventilation is its dependence on weather conditions. In the complete absence of wind, the air flow is extremely weak, therefore it can be considered an intermediate solution and a "frame" for a mechanical one.
First you need to decide on the diameter of the pipes, calculate the volume of the chamber and required amount air for normal circulation, after which a cellar ventilation scheme is drawn up. The formula is quite simple: 1 cm of pipe diameter is 13 sq. Cm. section. For 1 square meter of cellar, you need 26 square cm of section. That is, with a cellar of 10 sq.m. diameter is calculated as follows: 10 square meters (area) * 26 (required section per meter): 13 (section per 1 cm of diameter). 
Simply put, the area is multiplied by 2 - the diameter of the pipe is obtained. If the duct rectangular- we take the calculation of 1 sq.m. room area = 26 sq. duct area (in this case, an area of 230 sq. cm = 10x23 cm duct). The ventilation of the cellar in the garage is done according to the same principle, but taking into account the design features - it cannot always be brought out directly.
Since the garage is used mainly for storing products that are more resistant to temperature and moisture, there is less dependence on ventilation, but the car still needs air circulation to prevent the accumulation of condensation.
After that, the required length is measured, and you can start installation work.
Installation of exhaust and supply
The air duct through the ceiling in the corner of the cellar is brought out to the roof, always above the level of the building, otherwise the draft will be unstable and depend on the direction of the wind. A flap for adjustment is attached below, and a mesh (from birds and debris) and a "fungus" from rain are placed on top. You cannot put it back to back, otherwise the air will not flow freely, but too high a "mushroom" is useless by default, since rain and snow rarely fall vertically, and the wind will blow them into the pipe. If there is already a ceiling above the cellar ( concrete wall, slabs, bricks) - instead of one large passage, you can make several smaller ones, but equal in total area / diameter. Correct ventilation of the cellar in winter will keep the food from icing up and allow the pipes to “split”.
The inflow is located diametrically to the hood - in the opposite corner at a distance of at least 0.5 m from the floor. The size of the supply channel can be made slightly larger than the hood for reliability and better air supply. Similar to the hood, it is displayed on the roof and is also equipped with a mesh and rain protection. It is important that the supply pipe is at least 0.5 m lower than the exhaust, otherwise the system will close and air will not flow due to the same pressure in both channels. 
After installation, you need to check the traction.
No sensors - just bring a burning lighter to the exhaust port for 5-10 seconds. If the flame burns evenly and is "drawn" into the channel, everything is in order. If it goes out, it means that the air does not enter or is not removed. In this case, the flame is brought to each channel in turn for testing. Near the inflow, it should tremble from the flow of the wind, if it burns perfectly evenly - the pipe is either clogged or incorrectly installed. Change the height, increase the diameter - this should solve the problem.
Forced (mechanical) ventilation
Unlike passive, mechanical ventilation basement in a private house does not depend on the weather, wind strength / direction and other details. Moreover, the already existing passive ventilation will serve as the basis for creating forced circulation... Actually, the basic design principles do not differ - both pipes are located diametrically, both are brought up, both are protected from debris and precipitation. Forced ventilation is equipped in two ways.
- With fans
An electric fan is mounted on the hood, which blows air out of the room. As a result, a small vacuum is formed inside, which itself will draw in the outside air. An alternative is an intake fan for better air injection, but the load on it will be slightly increased if the exhaust is not wide enough. Ideally, you should put variable speed fans on both channels and set them to the same speed. 
Since the humidity in the basements is higher than under normal conditions, it is better to use low voltage fans and additionally insulate the wires and contacts and consult with professionals in advance on how to make ventilation in the basement with your own hands.
- Non-mechanical
An alternative is deflectors. They are placed on the hood instead of the hood and thin out the air in the pipe, creating increased draft. Another option is turbines. The force of the wind rotates the shaft, it transfers the force to the fan, which improves the outflow of air. Both options do not require electricity, but when installing them, you need to regulate the traction. 
There is only one disadvantage of deflectors and turbines - they are also dependent on the wind and in its absence will not bring much benefit. it is better to strengthen the hood with a fan in such cases.
Do-it-yourself video of the cellar ventilation will help to understand all the details better - visual perception is much more effective than any text.
The cellar must have racks and shelves for storing food, preparations, fresh vegetables and fruits, and equipped with a ventilation system. A uniform indoor temperature regime will ensure the safety of products until the next harvest. Proper ventilation of the cellar allows you to maintain an optimal mode for storing vegetables in it.
This will relieve him of the dampness of the room and high humidity,. Using the basic rules for the design of ventilation systems, it will be possible to dry without the help of specialists.
There are several options for how to properly ventilate the cellar: you can use ready-made air conditioning devices and just install them, or you can make an air duct with your own hands.
The second option is suitable for household use cellars, the first - for the arrangement of large industrial storage facilities.
Before you make ventilation in the cellar, you should choose the most suitable version of the system. They are natural and compulsory.
ventilation - scheme 1
The main differences between the systems:
- the forced method provides for the installation of a mechanism - a stationary fan. Such a simple, at first glance, method is suitable for large volumes. The fan for the cellar is placed on the exhaust air duct;
- for natural ventilation, a fan is also used, but not stationary, but temporarily - the device is installed for several days to quickly dry the storage.
Features of the arrangement of ventilation:
- the supply pipe is laid through part of the foundation;
- the supply pipe must be flat;
- part of the chimney must be insulated to prevent condensation.
When choosing a specific type of ventilation system, the frequency of use and the mode of maintaining temperature should be taken into account.
Important! For effective ventilation of any other room, air ducts must have a high throughput... To avoid a shortage of air mass, it is very important to choose the right pipe diameter for the cellar ventilation device.
Natural air exchange system
Ventilation of an underground room with two pipes for supply and exhaust purposes is the simplest and effective method make a natural air exchange system.
Suitable material for duct equipment is asbestos or PVC pipes. For pipes made of galvanized steel, the correct diameter works correctly - for 1 m2, 25 cm2 is required, calculated from the total size.

Opposite corners are usually used for pipe placement. This reduces the likelihood of stagnant humid air forming.
Exhaust system structure
Exhaust pipe - used to purify air masses inside the room. Suitable place for installation - in one of the corners of the cellar. It is important to consider that Bottom part The duct should be installed at the very top of the room. In the room, the ventilation duct must be vertical. In places of withdrawal, there should be a protrusion above the ridge part by about 50 cm or more.
To reduce the condensate masses that will form inside the pipe, it is required to insulate the duct. The insulation procedure does not take much time and does not require special skills. For work, you will need one pipe of a slightly larger diameter and mineral wool or other insulation. One pipe is placed inside the second, and the hollow space is filled with insulation.
Installation methods:
- A simple scheme for ventilation of the cellar - through the through method: the pipe passes through the floor, rises along the corner of the wall and is removed through the ceiling and roof;
- More difficult - through the wall, when the lower part of the chimney is horizontal and rises up already at the surface. This scheme is also suitable for.
The inlet pipe provides the cellar with fresh air. Usually the pipe is installed in the corner opposite the duct exhaust type... The height of the open end of the pipe from the floor level is 40-50 cm. Further, it passes through the sections of overlap and also rises 25-30 centimeters from the floor.

ventilation in the cellar scheme 3
The supply air duct should be installed in such a way that its lower cut does not reach the floor level by about 45-50 cm. Approximately the same distance should be between the upper cut and the ground level.
It is important to take into account that the upper cut must be covered with a protective grill. This will help protect food supplies from rodents, mice, rats, and other intruders. Metal mesh can be used.
Air moves through the ventilation ducts due to the difference in the specific gravity of warm and cold air masses.
If the temperature difference is too dramatic, drafts will form inside the room.
In another case, on the contrary, the air will stagnate. To regulate the movement of air masses, gate valves are used. They are installed on both pipes - both exhaust and supply.
Benefits of natural ventilation:
- low cost - do-it-yourself ventilation of the cellar does not require significant financial costs;
- energy saving;
- the possibility of self-assembly;
- there is no need for constant monitoring, usually only required in winter time with a sharp cold snap;
- compatibility with other ventilation systems, or air conditioning systems that can be installed in the house, if necessary, you can additionally install forced ventilation for the cellar.
At the end of the installation, it is very important to check the functionality of the system. To check if it works correctly ventilation system a regular piece of paper will do and should be attached to the ventilation hole.
It is very simple to check: if the leaf vibrates under the air currents, then the ventilation in the cellar is installed correctly with your own hands. In the same way, the operability of the duct system in a cellar with one pipe is checked.
Forced air exchange system
Forced ventilation implies the device of a stationary, constant fan - optimal solution for arranging a large cellar. It can also be used for natural ventilation of the cellar, but not permanently, but temporarily. The fan is installed on the chimney.
The ventilation of the cellar located in a residential building has some peculiarities - the air duct for the inflow of air masses is laid only through the above-ground part of the foundation. If there is already a basement, then the supply air duct also passes through it. The pipe must be flat, with minimum amount bends and corners. You should also pay attention to the length, it should not be very long. The outer section of the exhaust system must be insulated.
Exhaust ventilation of the cellar is usually located inside load-bearing wall summer cottages or houses. If the ventilation of the cellar under the house is installed after construction, then special recesses are made in the wall or a passage along the wall.
If the cellar is small, then the temperature and humidity conditions can provide ventilation even with one supply and exhaust pipe. Forced ventilation of the cellar in winter, when installed negative temperatures, can be turned off, since there is no urgent need for additional ventilation of the room.
Ventilation system diagram
If the cellar is already closed, holes are punched in the walls in opposite corners for the installation of air ducts with a step of 26 cm2 per 1 m2 of area.
The exhaust duct is lowered inward through the hole so that the lower end is under the ceiling itself, the distance of the indent is no more than 10-15 cm. The upper part of the hood is taken out into the air through an opening through the roof to a height of 15-25 cm.
The supply air duct is routed into another opening. There should be a distance of at least 20-25 cm from the floor. All cracks are carefully sealed with cement mortar.
The calculation of the ventilation of the cellar is done as follows: the amount of air that has passed in 1 hour, the volume of the room must be multiplied by the recommended frequency of air exchange.
Formula for calculating duct area: F = air flow: (air velocity x 3600)
Cellar ventilation in a private house or in the country performs 2 important functions at once:
- provides suitable conditions for storing food for a long time;
- helps to maintain a comfortable temperature in the house above the cellar.
Incorrect ventilation of the cellar in the house negatively affects comfort and coziness. In this case, dampness and musty, the air easily penetrates into the living quarters. Sanitary standards are violated, which leads to the risk of developing various diseases among the inhabitants of the premises.
Important! Remember that even a tightly closed lid, door or cellar flap will not replace the ventilation system that no living space can do without.
Preparing the cellar for storing food
In the warm season, as well as in those periods when the laying of food for storage is being prepared, you should open everything, doors, windows, do not forget about the dampers on the pipes. This is done to further dry the cellar and establish the same temperature inside.
If the room is heavily saturated with moisture, in order to quickly dry the air, all wood is removed from it, which are separately dried under the sun. If necessary, the cellar can be ventilated with fans for 3-5 days before preparing food.
Simple tip: moisture is removed by placing a bucket of quicklime in the cellar. A popular way to improve draft is with the help of a candle; it should be placed in front of the chimney.
The use of electric heaters is also an effective way. Fans that are installed in the middle of the cellar are also suitable. After fan drying is finished, the walls and ceiling will need to be applied in layers. This should result in a waterproof surface.
In cases where the hood works normally, the ventilation scheme in the cellar provides for the usual ventilation not only inside the cellar, but also the entire living space as a whole.
Ventilation in the cellar plays a very important role, because in the absence of a regular flow of air in the room for storing fresh food, dampness will appear. It is quite simple to equip an extractor hood in the basement. And this can be done not only at one of the stages of construction, but also in an already finished room.
What is the principle of the ventilation system?
Before you make ventilation in the cellar, study how it works. It is based on the laws of physics, on which they rely when creating a scheme for arranging ventilation. According to it, to create ventilation, 2 holes must be provided in. Fresh air seeps into one of them into the basement. Through the second hole, air together with vapors leaves the cellar to the street. The scheme is quite simple, however, for greater efficiency, pipes must be drawn to the holes. In addition, the position of the air supply and exhaust pipes, as well as their level above the soil surface, greatly affects the operation of the system.
Ventilation pipes should be located directly in the basement walls. Also, residents often install an extractor hood in the garage cellar. In the latter case, the pipes must pass through the room and be discharged above the roof of the building. Very important factor when creating a diagram, the height of the installation of pipes from the cellar to the street is considered. If calculated incorrectly, the cellar hood will suck in too much cold air, which will negatively affect the shelf life of fresh vegetables. Experts also advise against making too small holes for the piping, as this will not allow the fumes to be completely removed, which will lead to the loss of products.
There are a lot of opinions and advice on how to make a hood in a cellar. Let's explore the most helpful advice concerning the creation of a circuit and directly the air circulation system itself for basement... Many experts advise to provide a ventilation system even during the construction of the basement. At this time, holes can be left in the walls of the room, into which pipes will be installed in the future. In order not to choose a suitable place for laying channels later, we advise you to include the exhaust system in the original basement project.

The pipes used to circulate the air must be of the same size. If the room is different high humidity, the exhaust pipe can be taken with a diameter slightly larger than that of the supply. One of the main rules is not to do the opposite, otherwise it will entail air retention in the room. Another useful advice- do not place both pipes side by side. In such a situation, the basement will not be fully ventilated. It is best to place the ducts in opposite corners so that the air can pass through the entire room. The hood must be installed under the basement ceiling. This is due to the fact that the hot exhaust air will rapidly go upstairs. This position of the pipe will contribute to uninterrupted air purification without the slightest stagnation under the ceiling.
The chimney should rise 1.5 m above the ridge. This will provide sufficient air draft.
For the arrangement of the exhaust system, plastic pipes are most often used. Cellar ventilation in the garage should be equipped with pipes with a minimum of turns and bends. It is best to keep the channels perfectly flat and straight. In addition, each of the channels must have the same diameter along its entire length. Before you make ventilation in the basement, put special dampers on the pipes. Their presence is especially important in winter, when it is necessary to independently regulate the air supply and outflow. With vertical pipe heads, they will need to be protected from rain and snow. This can be done by a decorative metal overlay in the form of an umbrella.
Exhaust system types - natural or forced?
Also, before you make ventilation in the basement, decide on the type of system. It can be natural or forced. You can choose the most suitable option taking into account the layout and volume of the basement. The first type of hood is based on a small difference in temperature and pressure inside and outside the room. The ventilation efficiency is strongly influenced by the location of the pipes. The air intake hole should be about 30 cm above the floor and the exhaust hole should be 20 cm below the ceiling. You cannot leave the latter below, otherwise the ceiling will begin to damp very quickly. Such a system will not be enough for arranging large basements, which consist of several rooms.

Ventilation of the second type also consists of pipes, but special fans must be installed in them, forcing the air to circulate in the room. The most simple system includes installation of the fan only in the exhaust duct. In this case, a vacuum is artificially created in the room, which helps to quickly draw in air through the inflow hole. The fan power must be selected taking into account the area of the cellar. Homeowners often do things a little differently. They put fans on both channels. This is especially true for basements with several small rooms.
Ventilation installation - detailed algorithm
Almost every inexperienced person wonders how to do it right in the cellar. To do this, you need to act according to a specific algorithm:
- 1. If the ventilation system is installed after the basement has been built, then a hole must be made in its ceiling for air circulation.
- 2. After that, a pipe intended for extraction is lowered through the hole.
- 3. Fix the pipe under the ceiling surface no more than 15-20 cm below it.
- 4. Outside, the pipe should be raised 1.5 meters above the ground or above the roof.
- 5. In the corner of the ceiling opposite, you also need to make a hole and extend a pipe into it for air flow. Place it at least 20 cm above the floor.
- 6. Outside, the supply pipe should not be too high. If it passes through the ceiling, then its upper part should be no higher than 25 cm above the surface.
- 7. If the inflow pipe is led out through the wall, then it will need to be fitted with a deflector or grate.
- 8. If the installation of ventilation is carried out inside a residential building with a stove or fireplace, then the exhaust pipe rises near the chimney. This will promote more active air extraction from the basement due to the temperature difference.
- 9. At the end of the installation it is necessary to install the regulating dampers on the pipes. They will make it possible to let the right amount of air into the room.
After installing the system, you will need to check it for traction. To make sure that the air pressure at the inlet is normal, a paper sheet is applied to the supply pipe. If it begins to tremble, it means that air is actively entering the room. The second method is to set fire to the paper in the bucket inside the basement. By the direction of the smoke, it will be possible to determine where and how fast the air is moving.
What needs to be done to maintain the indoor climate
Having considered how to properly make ventilation, we suggest that you figure out further measures for the care of the room. To maintain a comfortable microclimate in the basement, you need to perform certain procedures from time to time. So, to help reduce the humidity in the room, ventilate it regularly. In the summer, be sure to open the doors and hatches of the room, as well as the dampers on the pipes, once a week. The hot wind that gets inside will dry the floor, walls and ceiling of the basement well.
Often, owners are faced with situations where they need to quickly increase the humidity in the room. To do this, you need to spray it with water from a conventional spray bottle. You can also install a container with wet sand or sawdust in the basement. If you need to dry out the basement, then first of all you need to take out all the shelves and other furniture from it. All racks must be dried naturally in straight lines sunbeams... Open the hatches and door wide and turn on the fan. In this state, the room should stand for at least 3 days. After that, proceed directly to drying the basement.

To get rid of moisture in the room, bring in and leave several boxes of quicklime or coarse salt in the room. These substances absorb moisture very quickly. In addition, they effectively disinfect the surfaces of the room and the air in it. More old method is to use a candle. Install and secure it next to the exhaust vent. Light a candle and wait a couple of days. The flame generates better draft, which allows more recycled raw air to escape.
Another way to dry quickly and efficiently is with a broiler. It is easy to do it yourself using a regular metal bucket. First, make a few holes in the container, then fill it with birch wood. Next, light the logs and let them burn for at least 12 hours. During this time, the room will dry out quickly, after which you can store your products in it without fear of losing them.
Cellar treatment to protect against moisture is an important procedure for the freshness of food
On one drying out of the room, the measures for caring for the cellar do not end there. To extend the period of storage of the cellar without moisture, the surface of the floor and walls must be covered with waterproofing compounds. If the walls in the room are made of concrete, apply deep penetration impregnation. It needs to be applied in several layers, each of which will seep into the slabs and close the holes and cracks in them.

Sometimes the dried cellar is covered with roofing material. It is considered a good insulator, but the walls and floor must be perfectly flat to use it. To do this, first, mastic is applied to the surface, which must be heated, and then the insulator itself is placed on top.
Environmentally friendly safe material clay is used for waterproofing. It must be very oily, otherwise there will be no benefit from using it. Before applying the material, the basement floor must be laid out with stones, on top of which clay mixed with sand is poured. The layer should be about 10–12 cm. After application, the clay should be tamped between the stones, after which a layer of coarse sand should be poured on top. It will also need to be tamped. The only drawback of this method is the long-term drying of the floor. On average, this takes about 30-40 days.
Drying out the basement with household appliances - fan or heater?
You can also use household heaters and fans to remove excess moisture in your food storage room. In the first case, "wind-blown" and convector models of heaters are suitable. To dry wall and floor surfaces, install a heater in the center of the room. This way, the appliance will distribute heat evenly, and none of the corners will remain damp. Remember that this drying method is time-consuming. In addition, you will have to spend a lot on paying for electricity.
Often, basement owners use powerful steam generators. Due to its radiation, the storage room dries out very quickly. As a result, you will spend a little less, because drying will take less time. Due to the effectiveness of this method, it is often used even in basements that have survived floods.
To get rid of moisture using a fan, the device must be placed in the center of the room and turned on. Complete drying in this way will take at least 4 days. Often, an ordinary old potbelly stove helps the owners of the cellars. In such cases, the stove outlet pipe is led out to the basement hood. It will take at least 5 days to heat the potbelly stove until the basement surfaces are completely dry. If there is no exhaust hole in the cellar, then this method will not work.
A construction such as a cellar is often set up in the country, under a house or outbuilding. The cellar is used for storing fresh food and preserving, and for it effective work the correct microclimate must be created in it. An important element its provision is an extractor hood in the cellar: how to make ventilation correctly - you can learn from numerous instructions and thematic videos. Ventilation can be natural or forced.
There are several options for providing the microclimate in the storage using ventilation. Air circulation can occur naturally, or maybe with the help of special fans. In addition, the ventilation system can be equipped with additional devices that will increase the efficiency of its functioning.

The main element of any ventilation system is pipes. There are usually two of them:
- Exhaust pipe - through it, air leaves the room. It is mounted in the upper corner of the basement, and it should protrude about 0.5 m above the ridge.Condensation can accumulate in the chimney, so it must be additionally insulated with mineral wool or other materials.
- Supply pipe - serves for the supply fresh air in storage, mounted in the corner opposite to the chimney. The opening of the supply pipe should be located approximately 40-60 cm from the cellar floor, and its outer end should be significantly raised above ground level.
In addition to pipes, when arranging the air ventilation system, dampers, fans, deflectors, as well as special climatic equipment, if necessary, are used.
Natural ventilation
The most in a simple way secure in the basement optimal temperature and the flow of fresh air is the installation of natural ventilation.

When arranging proper ventilation cellar, you will naturally receive the following benefits:
- Low construction cost. When installing natural ventilation, you only spend money on building materials, which are not so much needed for it.
- The possibility of installing the system not only during the construction of the basement, but also after its completion.
- Ease of installation. It is not necessary to create a system of natural air circulation in an underground storage a large number time and effort.
The disadvantages of such a ventilation system in the cellar include the fact that with its help it will not be possible to clearly regulate the temperature regime. In addition, if the outside temperature is the same as in the basement, then air circulation simply will not occur.
Useful advice! If the products in the storage need a certain temperature regime, then it is better to use a forced ventilation system. It will allow you to accurately regulate the microclimate in the basement.

Installation of a natural ventilation system
In order for the air in the basement to circulate naturally, you need two pipes. The pipe material may vary, depending on Lately PVC pipes are often used - they are inexpensive, lightweight and durable. Also ventilation pipes can be metal, plastic and even reinforced concrete. The cross-section of pipes is selected depending on the storage volume. For example, the optimal cross-section of a ventilation pipe in a basement with an area of 6-8 m² is 120x120 mm.
If you are going to make a hood in a cellar with one pipe, then its cross section should be larger. For example, for the same basement of 6-8 m², it starts from 150 mm. The use of only one pipe is possible in cases with small storage facilities. With this design option, two channels are located in one pipe at once - supply and exhaust. Each of them is equipped with its own damper, with the help of which the intensity of the inflow and outflow of air is regulated.
When installing a natural hood in a cellar with your own hands, you need to take into account a number of nuances:
- the higher the chimney opening is, the more efficiency air circulation in the system;
- external pipe exits must be covered with special visors, otherwise rainwater or snow will fall into them;

- the fewer bends and bends the pipes have, the better ventilation will be carried out;
- both pipes must be of the same diameter.
Natural ventilation for small storage rooms is a simple and effective option for a cellar hood. How do you make the same efficient system for large storage? In this case, forced air injection is indispensable.
Installation of forced ventilation of the cellar with two pipes and one
As a rule, a forced air circulation system is installed in two cases. The first of them is the presence of a large storage area of over 40 m². The second option is a basement, which is not used for storing food, but as a gym, playroom or other similar room.
In both cases, the installation of a forced-type ventilation system will not only ensure the flow of air and maintain the set temperature, but also allow you to get rid of excess moisture and dampness. The last point is very important if sports or other expensive equipment is installed in the basement.

Automatic type
Unlike natural, the system forced ventilation in the cellar is characterized by the following advantages:
- Air circulation does not depend on the temperature difference in the basement and outside.
- Not only cooling is possible, but also air heating in the room, as well as its filtration.
- With the help of special devices, you can easily adjust the intensity of air circulation.
The disadvantages of this option include the need for regular maintenance, more complex than natural system installation, as well as the high cost of components. In addition, the functioning of the forced system depends on the availability of power supply, which means that you will have to install additional wiring. And if there is a power outage, the system will stop functioning altogether.
Options for arranging a forced ventilation system
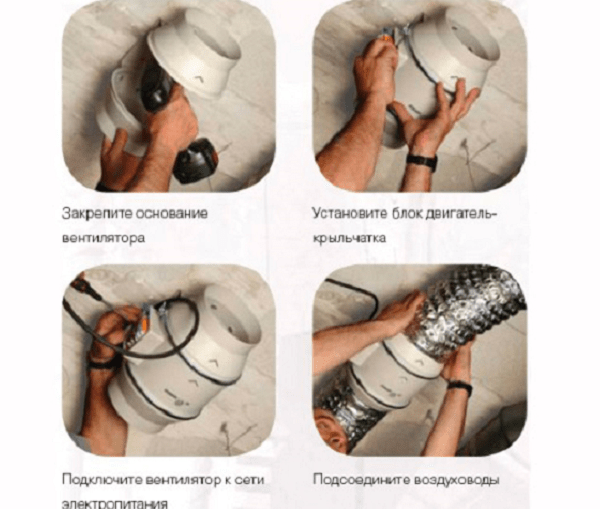
There are several types of forced air circulation systems in underground storage. The first of these involves the use of electric fans.
Useful advice! If you decide to use fans, then be sure to take care of their protection from moisture and other adverse influences that affect equipment underground.

There can be two or one fans in the arrangement of forced ventilation in the cellar. One fan is mounted on the chimney on the side of the storage, and the air must be blown out with its help. Dual fans are an option for large rooms... In this case, the second is placed in the supply pipe and serves to force air into the storage.
The fans can operate in several modes, so you can control the air inflow and outflow, and maintain the required temperature in the basement. Power can be supplied from the main power supply if the basement is located under residential building or garage, as well as from a separate power generator.
If you are installing forced ventilation in the cellar under the house, then it will be easier to provide power supply to the fans than in a separate underground storage. In the latter case, the wiring and equipment must be additionally insulated from moisture.
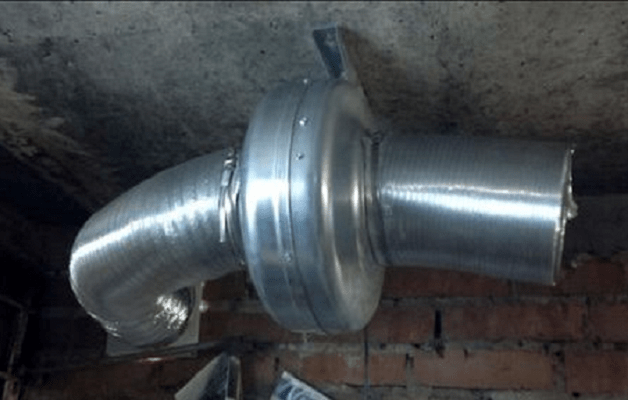
The second version of the forced system involves the use of wind energy instead of electricity. To do this, a special device is mounted on the exhaust pipe - a deflector, which catches air flows and transfers energy to the fans. It is worth dwelling on the deflector in more detail.

Deflector for ventilation in the cellar: how to make a device with your own hands
The principle of operation of the deflector is that the air currents, cutting through the diffuser, create an increased draft in the ventilation pipe, due to which air circulation is carried out. The use of deflectors allows you to save on electricity, as well as increase the efficiency of the forced ventilation system. In addition, such a design can be successfully used in a natural-type system.
There are several types of deflectors. Let's consider the most popular ones.
ASTATO- a deflector that can be powered by an electric motor or from the wind. The design of the device implies the presence of a special sensor that automatically turns off the mechanical traction when there is sufficient wind force. This version of the device is beneficial to use in cases where the wind strength is not always sufficient to ensure normal air circulation. The electric motor in such models is quite economical, so you don't have to worry about excessive energy consumption.
- rotates exclusively due to the force of the wind, good because it can adjust to any direction air currents... The disadvantages include the fact that the bearings included in the structure need regular lubrication and periodic replacement. In addition, if you use such a deflector in the ventilation circuit of the cellar, then please note that when low temperatures its mechanism may freeze.

Static deflector- a relatively new model, which is characterized by the presence of an ejection fan. At a relatively high cost, it has such advantages as a reduced noise level during operation, high efficiency, removal of moisture from the system.
Rotary turbine- installs in an area with stable strong wind, therefore, this design is not very popular.
In addition, there are spherical and H-shaped deflectors, Grigorovich deflectors and other options. The choice of model depends on the characteristics of the ventilation system and the area in which the basement is located.
Useful advice! The Grigorovich deflector is considered the easiest to manufacture, therefore, if you are installing a conventional supply and exhaust ventilation system, it is best to use it.

Making a deflector with your own hands
This device is most often made of galvanized or stainless steel sheets, as well as plastic. Plastic Models cheaper than their steel counterparts and more attractive in appearance, but lacks durability. In addition, plastic deflectors are very sensitive to high temperatures, so you should not install them if the ventilation system combines the functions of a chimney.
Before proceeding directly to the manufacture of the deflector, it is necessary to calculate its parameters. The deflector height is calculated using the formula: H = 1.7xD, in which D is the diameter of the ventilation pipe. The hood width is 1.8 times the diameter and the diffuser width is 1.3 times the diameter.
Blueprints ventilation deflector do it yourself on cardboard or thick paper, after which metal or plastic parts are cut out on them. To work you will need the following tools and materials:
- paper or cardboard for drawings;
- metal scissors for cutting parts;
- sheet of metal or plastic;
- marker or construction pencil;
- drill with drills of various diameters.

- The contours of the product are transferred from the drawing to the sheet of metal. This includes sweeps of the hood, outer cylinder, struts, and diffuser.
- With the help of metal scissors, these parts are cut out.
- The parts are connected to each other using a rivet gun.
- The finished deflector is installed on the pipe head and secured with clamps.
When installing ventilation in the cellar, the installation of the deflector is a very crucial moment. It is best to install the device with two people, since work is usually carried out at a height. First, the lower cylinder of the structure is fixed at the outlet of the ventilation pipe. This is done using clamps or special bolts with dowels. After that, a diffuser is attached to the cylinder, on top of which a protective cap is installed. It is recommended to additionally treat the joints of parts with bolts with a special anti-corrosion compound.
The deflector occupies a very important place in the drawing of the hood in the cellar, therefore, special attention must be paid to its assembly and installation.

How to properly ventilate a cellar with high humidity, draining the cellar
There are situations when a storage facility is being built in an area characterized by a high level of groundwater or a climate with high humidity. A high moisture content in the air can negatively affect the condition of the food stored in the cellar.
In addition, with a single-pipe cellar ventilation system, moisture often condenses on its walls, and freezes in the cold season. Thus, it can freeze in several layers and completely clog air vent... To prevent this from happening, it is necessary to equip a forced ventilation system with a reinforced hood.
With the help of forced extraction, humidity can be significantly reduced in any type. How to make even enough dry large room? To do this, it is necessary to use not only the ventilation system, but also pre-dry the cellar. To do this, you need to take out all the products from it with your own hands before arranging the ventilation in the cellar, and then carry out the drying work.

There are several ways to drain the cellar:
- With the help of an iron stove or brazier - a brazier or a bucket of coals is lowered into the basement, the fire is maintained until the room is dry enough. Before starting this drying in the cellar, you must open the door and other openings. It is best to start the fire with sawdust or wood chips, and if necessary, the operation can be repeated several times.
- Using a candle - the candle is installed under the hood in the cellar. The correct use of this method implies a small size of the cellar, otherwise it will not be effective enough. Drying a basement with a candle is easier than using a brazier, but takes longer. As a rule, this takes several days, during which the candles will have to be changed regularly.
- Using a special - a good option for large storage areas, allows you to quickly get rid of humidity in the room. A dehumidifier can be used in addition to the usual supply and exhaust ventilation system if moisture often accumulates in the cellar.
You need to choose the appropriate option for draining the basement depending on its size, as well as the time and opportunity you have. Installation effective system ventilation will allow you to do this less often, but even the highest-quality ventilation will not be able to completely eliminate the need to dry out a wet cellar, if its waterproofing was not performed during the construction of the room.

Controlling the microclimate in the basement using a ventilation system
There are several options for how to make the cellar colder. different types... You can initially dig a hole in deeper, you can pay more attention to thermal insulation, or you can use special microclimate control systems. According to the type of temperature control, there are two options for ventilation systems:
- Automatic - works in offline... In such a system, there are special sensors that monitor the temperature in the cellar and turn off and turn on the fans when it needs to be lowered or raised. The main elements of such a system are different variants temperature controllers for the cellar, which you can buy in specialized stores.
- Mechanical - works with the direct participation of a person who monitors the level of temperature and humidity in the storage. In such a system, the intensity of the fans, as well as the position of the dampers on the supply and exhaust pipes, are manually adjusted.
Useful advice! When choosing the type of ventilation system, be guided by how accurately it will be necessary to maintain the temperature. If the tolerances are greater than two degrees, then a mechanical system will do. Otherwise, it is better to give preference to automatic microclimate control.

Materials for the manufacture of ventilation systems
Diy ventilation schemes in the cellar involve the use of various types of pipes. Today, the most popular of them are asbestos cement and low pressure polyethylene.
Asbestos-cement ventilation pipes look like slate, therefore they are also called slate. They are characterized high level strength and reliability as well as durability and corrosion resistance. They are sold in long lengths, so the ventilation system can be made from whole pipe pieces. Polyethylene pipes, most likely, you will have to weld together, this will require special tools and skills.
Less commonly, metal pipes are used for the air circulation system. They are quite cheap and easy to install, but the metal is susceptible to corrosion and rots quickly enough in the ground. To prevent this from happening, metal pipes can be covered with a layer of anti-corrosion enamel before burying them in the ground or additionally protected from moisture with waterproofing materials... Moreover, on metal surface moisture condenses more strongly than on plastic, so it is better to use them in combination with compulsory system ventilation in the cellar. How to make the correct hood from metal pipes? This is best done for storage under an apartment building or garage.

When using any material, the openings of the exhaust and supply pipes must be protected from moisture and debris. To do this, a special cap and grill are installed on them, which can be made of any materials.
Fan types for forced ventilation system
In order for the air to circulate properly in the cellar, several different types of fans can be used. According to the principle of operation and location, they are divided into and axial.
Duct fan characterized by an average level of performance and can be installed anywhere in the ventilation pipe. It also uses a little electricity, so this is a good option for saving money. The most effective are considered duct fans amplitude type.
Axial fans installed near exhaust or supply openings. They are more demanding in terms of electricity, but they also provide a more powerful air flow. Complete with a fan, a special valve is installed on the outlet pipe of the system, which prevents cold air from entering the room.

Hood in the cellar: how to make ventilation correctly, assembling the system and checking its performance
After you have decided on the type of air circulation system, selected the type of pipes and fans, made or purchased a deflector, dampers and other components, you can start installing the hood. This is done in the following order:
- If you install a ventilation system after the storage is built, a hole is drilled in the ceiling for a ventilation pipe.
- An exhaust pipe is installed in the hole under the ceiling. On the street, its end should be raised above the surface by at least 15 cm.
- A hole is drilled in the wall opposite to the exhaust hole near the floor. It should be located not lower than 2 cm, but also not higher than 5 cm.
- A supply pipe is mounted in the hole. From the outside of the cellar, its opening should be too high, since there must be a pressure difference between the supply and exhaust openings to create natural draft. This is more relevant for the natural air circulation system, but it also makes sense for the forced one.
- The end of the supply pipe on the street is closed with a deflector or a special protective grill.
- Inside the cellar, special dampers are installed on the pipe, the gap adjustment of which will allow you to adjust the intensity of air circulation in the system.
After the system is mounted, it is necessary to check the efficiency of the hood in the cellar. How to do this correctly using the means at hand? To do this, you can bring a sheet of paper to the opening of the supply pipe. If it wobbles, then the system is working properly. Another option is to check with lighted paper or other source of smoke. The smoke should quickly dissipate and be drawn out of the basement.

Regardless of which type of air circulation system for the basement you choose, a number of general points should be taken into account during installation:
- it is best to lay the ventilation system at the stage of construction of the storage facility. In this case, it is necessary to leave special channels in the walls, into which ventilation pipes will subsequently be installed. This will save you not only time and effort, but also financial resources. The ventilation scheme should be immediately included in the basement project;
- how to make the ventilation of the cellar in a private house uniform? To do this, it is worth using the supply and exhaust pipes of the same diameter. If the basement is characterized by high air humidity, then the diameter of the chimney may be slightly larger. Remember that the supply pipe should in no case be larger than the exhaust pipe, as this will trap air inside the storage, which can lead not only to spoilage of food, but also to increased gas content in the room. The last moment is dangerous for human health;
- the supply and exhaust pipes must not be placed next to each other. This will lead to poor performance of the entire system. It is best if the holes are located on opposite walls of the basement;
- if the cellar is located under an outbuilding, then the entrance hatch or door can play the role of a chimney;

- as ventilation ducts you can use plastic pipes for sewerage. They are characterized by a suitable diameter and are relatively inexpensive;
- the part of the exhaust pipe, which is located outside the cellar, must be properly insulated. Otherwise, condensation may form on its inner surface during the cold season, which, when frozen, can clog the exhaust hole.
Useful advice! It is possible to insulate pipes so that condensation does not form on them, not only in the part where they come to the surface, but also along the entire length.
There are many options for how to make your own ventilation in the cellar. of various types... You can use one or two pipes for this, arrange air circulation in a natural or forced way, install fans, deflectors, temperature control systems and climate sensors.
The shelf life of food directly depends on the efficiency of the ventilation system, as well as health, if it comes about a gym or other frequently visited area. It is best to lay the exhaust scheme directly into the storage plan, so you will spend less time installing it and will be able to use the basement immediately after its construction.
 Invisible calories: why alcohol gains weight Calorie content of alcoholic beverages in 100 g
 Olives: useful properties
 How many calories in buckwheat Kcal of buckwheat porridge on water