How to make a kitchen table with your own hands. How to make a country table Make a kitchen table yourself
Not in everyday life big table fully meets the needs of a family of 3-4 people. Such a table is successfully used both as a kitchen and as a dining table. The situation changes dramatically when guests arrive. Many people have a desire to make a sliding table with their own hands.
Any table is not a very simple design, which must withstand significant loads and frequent movements around the apartment. Despite certain difficulties, anyone who is familiar with carpentry can make a sliding table with their own hands. Sliding structures and folding tables a bunch of. You just need to realistically evaluate which of them you can do yourself.
Step-by-step instruction: design basics
Any table consists of a tabletop, legs and fasteners. Sliding (folding) structures additionally contain removable or movable tabletop inserts and a sliding mechanism. The shape of the tabletop can be round (when extended - oval) or square (rectangular).

The main requirements for the design are the strength of the table top and the reliability of fixing the legs, which should allow it to withstand loads (including shock) and be stable when used while cooking or at dinner. In addition, the surface should be comfortable and practical.
The dimensions of the table are determined mainly by the dimensions of the room and the number of guests who can sit down at the same time. The height of the dining table is usually 73 cm. Dimensions in the extended state can be calculated based on the condition that optimal distance per person at the table - 60-70 cm.
Back to index
Choice of base materials
If you decide to make a table with your own hands, you should decide on the material for the main elements. The aesthetic impression of the design of the table is mainly provided by the tabletop. In addition, moisture, fat and other active substances used during cooking can get on it; may be affected by increased temperature from hot dishes; significant mechanical loads can be applied. Wooden countertops are quite reliable, environmentally friendly, practical and aesthetic, but at the same time expensive and difficult to manufacture.
Pine, oak and walnut wood has found the greatest use as countertops. When using wood, it should be well dried and treated with moisture-proof compounds. If applied to the surface natural wood, then it must be periodically polished, as well as varnished or waxed.

A simple, cheap, but fairly reliable countertop is obtained from a laminated chipboard with a thickness of at least 20 mm. The ends of the plates are rounded and covered with a protective material, such as silicone or PVC film. Such plates can be additionally covered with plastic. A big disadvantage of this material is swelling when moisture gets into the thickness of the material. In other respects, this material is quite capable of competing with wood.
Table legs can be made independently, or you can buy ready-made ones. The most common option is the legs of wooden block. The minimum dimensions of the bar are 40x40 mm. For large tables, use a beam bigger size. So, for a table with a length (in the extended state) of about 2 m, a bar with a section of 85x85 mm is recommended. The legs can be square, round or carved, depending on the desire and ability of the manufacturer.
In addition to wooden legs, metal ones are used. For example, you can purchase ready-made metal legs in the form of a pipe with a diameter of 70-90 mm. You can independently make steel or aluminum legs from pipes and various profiles.
Back to index
Extendable table design
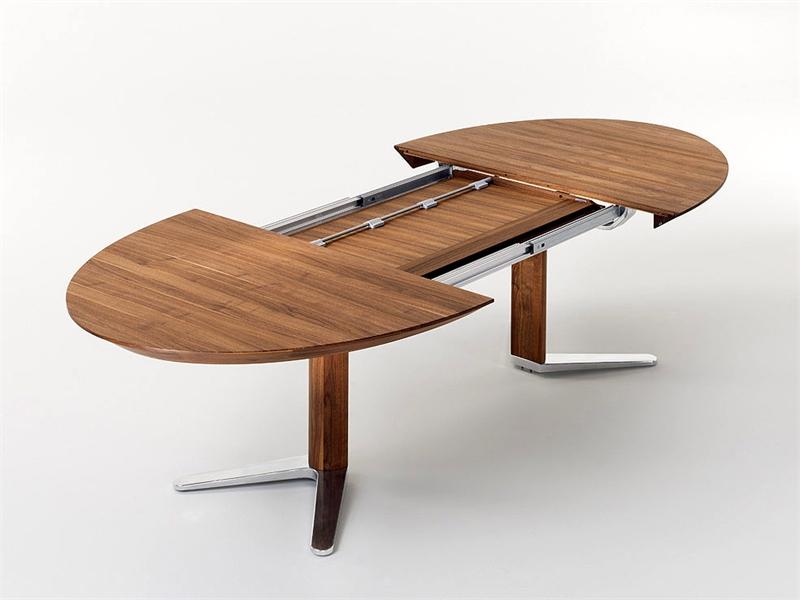
One of the simplest designs extendable table based on the increase in size due to the spreading of the surface and laying additional elements. The main tabletop consists of two parts that are not fastened to the legs and have the ability to move longitudinally in opposite directions from each other.

The sliding structure consists of the following main parts: base; the main tabletop, consisting of two identical parts; full roll-out guides; additional panels. The base is made in the form of a frame that connects the legs to each other with the help of jumpers (collets), and the top panel, which resembles a tabletop in appearance, but is fixed on the legs.
Each of the parts of the main tabletop consists of the surface itself and three sidewalls fixed on it. The extension mechanism is recommended to be made from standard full rollout guides for drawers. It is necessary to purchase two sets of rails with a length of at least 30 cm. Additional elements of the tabletop are made similar to the main surface and have a length equal to the width of the tabletop, and their width is determined by the extension length. The number of elements can be from 1 to 3 at the discretion of the manufacturer.
The principle of operation of the design is very simple: both parts of the main tabletop are mixed in the guides, fixed on the base of the table, until they stop. In this case, the tabletop slides on the surface of the base. Additional elements are installed in the resulting space between the two parts, which, together with the main parts, create the appearance of a solid tabletop.
Back to index
Making the base

The main function of the table base is reliable connection legs of the table between each other and providing support for the installation of the tabletop. The binding of wooden legs into a single frame is carried out using wooden jumpers - collets. Collets are made of plywood or board 10-12 cm wide and 18-20 mm thick. The length of the collets is determined by the selected table size when not extended.
To fix the collets in the upper part of the legs, grooves are made on two adjacent sides with a size corresponding to the cross section of the collet, up to 20 mm deep. The ends of the collets are fixed in the grooves. The junction is glued and reinforced with screws. To strengthen the connection of the legs in heavy tables, it is recommended to additionally install wooden scarves at the joints.
A sheet of plywood 10-12 mm thick is fixed on top of the frame. The size of the sheet is determined by the dimensions of the frame. The sheet is fixed with screws. In its final form, the base is a table with a rough top. The top plywood sheet is not a mandatory element, since the structure will work without it.
Back to index
Making the main countertop
First, cutting and cutting out two parts of the table top of the selected sizes. If necessary, the surface is lined and the ends are sealed. On the inner end (which is combined with the end of the second part) of each of the parts of the tabletop, two holes are drilled for the dowels of removable elements to enter them. Hole diameter 8-10 mm.

A U-shaped box is made from sidewalls, which is a strip of chipboard or a board 100-120 mm wide and 18-20 mm thick. The length of the sidewalls corresponds to the dimensions of the table base, measured by the legs. The corners of the box are reinforced with an aluminum corner on the inside.
On the inside of the side parts of the body, narrow (reverse) parts of the guides are fixed so that the box can move at a height of about 2 mm above plywood sheet the base of the table (or the surface of the collets in the absence of a sheet).
A tabletop is installed on top of the box so that the cut of the tabletop coincides with the free ends of the box. With the help of aluminum corners, the tabletop and the box are interconnected.
The dining table is important element kitchen interior. The design and dimensions of the kitchen table should allow the whole family to sit behind it, but at the same time not interfere with free movement. Available for sale big choice kitchen tables of various shapes, from domestic and foreign manufacturers. But if you have a little carpentry skills, then it might make sense to make a table with your own hands, with your own design that will fit perfectly into general interior kitchens.
In our article we will tell you: how to make kitchen tables different models what tools and materials to use for this. Also at the end of the article, you can find unusual models of kitchen tables.
Tools
Despite the variety of table models and production methods, the set of tools used for the manufacture, with minor exceptions, remains the same:
- Electric jigsaw.
- Hacksaw.
- Drill.
- Screwdriver.
- Set of drills.
- Screwdriver Set.
- Electric planer.
- Electric planer.
- Sander.
- A set of hexagons (in cases of using confirmations).
- Iron or building hair dryer (for edging the ends with tape).
- Yardstick.
- Pencil.
- Ruler.

Depending on the complexity of the table design, additional tools are included in the set.
Materials for manufacturing
The following materials can be used to make a kitchen table:
- Chipboard - Chipboard.
- LDSP - Laminated chipboard.
- Glued board.
- Regular cutting board.
- Wooden bar.
Often in the production of kitchen tables, a combination of two or more of the above materials is used. 
accessories
Accessories for the kitchen table includes the following elements of fixtures and decor:
- Furniture corners.
- Confirmations.
- Eccentric bolts.
- Folding table hinges.
- Rollers for sliding tables.
- Corner leg mounts.
- Table legs made of chipboard.
- Plastic profile for table top.
- Cross-cut adhesive tape.
- Decorative caps.

Certain table models may include additional fittings that are not included in the list.
Table options and how to make them
Simple kitchen table made of chipboard
markup
On the purchased sheets of chipboard, mark the parts of the table:
- First of all, mark up the tabletop, since it is the largest element of the table. The tabletop is made in the form of a rectangle with rounded corners.
- In the second step, draw two side posts that will serve as the legs of the table. Racks are usually made in the form of a chess rook, with a round cutout at the bottom. But you can show your imagination and make racks of a different shape, the main thing is to observe two conditions: the racks must be stable and not crawl out from under the countertop.
- In conclusion, mark the upper and lower crossbars connecting the racks to each other and increasing the stability of the table, the strength of the tabletop. Please note that the lower crossbar is made 1.5-2 times wider than the upper one. The shape of the lower crossbar can be either flat or wavy.
When marking, consider the fact that the table stands should be located 15-20 centimeters from the edge of the tabletop. 
Cutting out table pieces
- Place the chipboard sheet on the table.
- Cut out the table top using a jigsaw. When cutting, do not forget to place an unnecessary piece of plywood under the cut line, this will help to avoid chips on the back of the cut.
- Cut out the rest of the table. Avoid sagging the sheet, this can lead to clipping of the jigsaw blade, as well as to breakage of the part being cut.
- Finish the edges of the cut pieces sandpaper or vibratory grinder.

Trimming the edges of parts with tape and profile
- Slide the plastic profile over the edge of the tabletop.
- Having reached the place of the corner bend, heat up the profile building hair dryer and rotate the profile.
- For a more secure installation plastic profile on the countertop, additional universal glue can be used.
At the second stage, it will be necessary to trim the racks and crossbeams of the table with a special tape:
- Clean the ends of the parts from dust and grease.
- Pressing the tape with a hot iron, glue it to the end of the part.
- Cut off the excess with a knife, equalizing the width of the tape with the width of the end. Smooth out the unevenness with sandpaper, being careful not to scratch the tape and part.
- Stick the tape on the ends of the remaining parts.

Please note that gluing the trimming tape is required only in visible places on the table parts.
Table assembly
- With the help of confirmations, connect the racks from the floor with the upper and lower crossbars. The location of the top rail should allow it to support the countertop and prevent it from sagging. The lower crossbar is attached above the round cutouts of the racks 20-25 centimeters from the floor.
- Having made the base of the table, install the tabletop on it, fixing it to the furniture corners from the inside.
- Place the plastic feet on the bottom of the table legs.
- Close the heads of confirmations with decorative caps.
A simple chipboard kitchen table is ready! 
You can also see how to make a table from chipboard in the video:
Kitchen table "book"
The book table consists of the following parts:
- The base of the racks and crossbars.
- Narrow main tabletop.
- Pair of movable legs.
- Two opening side tables.
- Piano and ordinary loops.
- fasteners.
It is possible to make a table of this design from chipboard, or from glued and edged timber. Also, metal parts are used to make the base.
Let's look at the process of making a table from glued laminated timber.

Production of countertops and racks
In order to make a countertop from bars glued together, you need to have at least two racks with clamps on which you will form the countertops. Racks and tabletops for a table made of glued laminated timber are made in the following way:
- Take a few bars with a section of 50x30 millimeters and lay them out on racks with clamps. Place the bars in such a way that the annual rings on adjacent bars look in different sides, this will avoid distortion of the part during subsequent operation.
- Form a shield from the bars, slightly larger than the future countertop.
- Lubricate the ends of the bars with PVA glue.
- Clamp the shield with clamps. Avoid very strong compression, otherwise the shield will buckle.
- Leave the glued bars for a day for the glue to dry completely.
- After a day, remove the shield from the clamps and treat the surface for thicknesser or with an electric planer.
- Cut the shield to the desired dimensions and finish the edges with a planer or hand mill.
- Thus, you need to make two table stands, two crossbars, one narrow and two wide side tabletops.
 Bars clamped with clamps
 Making retractable legs
Retractable legs for the "book" table are made in the form of frames, where the lower crossbar is located 15-20 centimeters from the floor. To make a frame, you will need four bars with a section of 50x25 millimeters. The connection of the bars can be made using long screws, spikes and glue or confirmations.
Assembling the book table
- Assemble the table base by joining the uprights and crossbars.
- Attach a narrow tabletop to the base.
- Attach the retractable legs to the table legs with the help of hinges.
- Attach the side ones to the narrow tabletop by attaching them to the piano canopies.
- Install the foot pads on the racks.
- Check the operation of all moving parts of the table by unfolding it completely.
 Table-book
 Lacquering the table
To emphasize the beauty of the tree, cover the finished table with a transparent varnish, if desired, pre-treat its surface with a stain. To get the effect of polishing, you will need to apply several layers of varnish. 
How to make a "book" table, see the video:
Extendable kitchen table
The sliding table has the function of increasing the surface of the tabletop by installing additional elements. This type of table is popular in small apartments where the area of \u200b\u200bthe dwelling does not allow you to install an ordinary large table.
A sliding table is made from the following parts:
- Two main tables.
- Additional collapsible tabletop.
- Bases with a pallet.
- Four legs.
- Corner mounts for legs.
- Rollers for countertops.
- Fixing table top hooks.
- Fixing pins.
It is best to make a sliding table from a combination of chipboard and bars.
 Extendable table fittings
 Countertop manufacturing
- From a sheet of chipboard, cut out two identical-sized countertops that will form the main surface of the table.
- Cut out the extra countertop. The width of the additional tabletop should not exceed one third of total area table, otherwise the table in the extended position will not be stable.
- Apply edging tape to the edges of the countertops.

Making the base of the sliding table
The base for the extendable table is made of four narrow crossbars, connected by corner mounts for the legs and a tray. To lighten the overall weight of the table, instead of chipboard, plywood 5 mm thick can be used for the pallet. Also, instead of a pallet, manufacturers often use metal or wooden crossbars, which reinforce the structure and serve as a place to store the middle countertop.
Making table legs
The legs for the sliding table are made from four bars with a section of approximately 50x50 millimeters, slightly beveled towards the bottom. A hole is made at the top of each leg for a mounting screw. The hole must be on the inside. Do not forget to treat the legs with a planer and sandpaper.
Extendable table assembly
- Install the sliding tabletops on the base by attaching them to the roller mounts.
- Extend the tabletops and install the removable tabletop. For a good fixation of the additional tabletop on the base, install spikes on it, which will connect all parts of the table to each other.
- To prevent the tabletops from moving apart when the table is assembled, install hook locks on them.
- Attach the legs to the base.
- Lacquer or paint the pallet and legs.

Instructions for assembling the sliding table are also in the video:
Folding wall table
If you have a very small kitchen and there is no way to put a regular kitchen table, then making a folding wall table can be the solution to the problem. Its advantage is that when folded, it occupies only 15-20 centimeters of kitchen space, and when disassembled, two or three people can easily dine behind it.
The folding table consists of three parts:
- Countertops.
- T-shaped wall mount.
- triangular folding stand
You can make a table from plywood, bars, hinges and screws.
 Parts of a wall table
 Making a wall table
- Cut out the tabletop with a plywood jigsaw.
- From bars with a section of 100x20 millimeters, make a wall mount in the shape of the letter T. The upper mounting bar should correspond to the width of the table top, and the lower height of the triangular stand.
- Make a triangular stand that will be attached to the hinges and hold the tabletop in the open position.
- Install the wall mount with dowel screws.
- Attach the tabletop to top bar mounts. For connection, use hinges or piano canopies.
- Install the triangular stand.
- Check the operation of all parts of the table by disassembling and reassembling it several times.
- Cover the table with varnish or paint.
If you have a tabletop but don't want to handcraft your folding table parts, purchase folding brackets from the store. Bracket models are specially designed for wall mounting and are very inexpensive from 170 to 700 rubles.
 Wall bracket for table
 You can see another version of the kitchen table in the video:
Design and shapes of kitchen tables
To help you with the choice of a kitchen table, we present you photos of the original models:

- Kitchen table from a glued board in a rustic style.

- Table "tansformer" on one leg of complex design.

- Extendable table with a pattern on the tops.
- Glued board table with rounded tops, high-tech style.

- Round table with original legs.

- Massive wooden kitchen table.

- Original table made of glued laminated timber.

- A beautiful table made of boards of a very simple design.

- with internal electric lighting.
Now that you know everything about making tables, it will not be difficult for you to make your own table for the kitchen!
The role of the kitchen table in everyday life is difficult to overestimate. It is considered the main attribute in the kitchen, and not without reason - after all, it is at the table that the whole family most often gathers, noting various events occurring in life.
Speaking of kitchen tables, the dining table most often comes to mind. However, kitchen tables are used not only for a feast and differ in their functions. So, the bar table perfectly divides the space into zones. It can be used as a dining room for a small number of people, usually 2-3 people. It is especially relevant when you need to save space. The sink table serves as the basis for embedding the sink.


Thinking about purchasing a kitchen table, you can consider the possibility of making it yourself. This option, firstly, will save some money. Secondly, surprise guests with the original shape of the product, unusual design or decoration method. Thirdly, to master the skills of carpentry. And, of course, enjoy the work done and the final result.


Convinced of the need to make a kitchen table on your own, you need to determine for yourself a number important parameters. Namely, decide what form it will be, choose a design option, calculate the dimensions of the product and the size of individual parts, and decide on the material for their manufacture.
You will learn how to make a table with your own hands in the video:
Kinds
Tables differ in execution options: classic, folding, transformer, corner, folding or hanging, retractable. At will and need, the table can be with a cabinet or with drawers. The choice of execution option depends primarily on the size of the kitchen and the semantic load.


For small kitchens, most likely, the folding option or folding, bar, corner will be the ideal solution. Corner tables also can be folding or folding.


Transforming tables solve the problem when you need a 2 in 1 solution, which greatly expands the possibilities of its use. So, with a slight movement of the hand graceful coffee table can easily be turned into a full dining table.

Extendable table well saves space and is built, as a rule, in kitchen sets.
With the help of a bar table, you can divide the room into zones of both a small area and a large one.


materials
The materials from which the table can be made are striking in their diversity and require a clear idea of themselves.
For this purpose, arrays of various tree species, such as oak, coniferous trees. If a beginner is going to be involved in production, then pine is perfect, as it is much easier to process. Solid wood furniture is considered "capricious" and requires special treatment. It can burn out under the influence of direct sun rays, absorb odors, it is badly affected by changes in humidity and temperature. The positive aspects of this material are environmental friendliness, durability. Solid wood furniture looks very elegant and expensive.

- Chipboard- a material that is quite common and very often used for the manufacture of furniture. Produced from dry wood chips and resin by pressing. Among the minuses, one can single out environmental insecurity. Plus - relatively inexpensive cost.
- MDF is considered a more environmentally friendly material compared to chipboard, but is also more expensive. It is obtained by mixing wood shavings with carbide resins modified with melamine and pressing them. Minus - it is highly flammable, while even rapidly incandescent objects, not to mention open flames, pose a potential risk of ignition.
- An alternative to chipboard and MDF can be furniture board . It has a relatively inexpensive cost. It is a durable and environmentally friendly material. It consists of glued bars, pulled together by a press.


- Metal can also be used to make a table. Most often used for this purpose stainless steel. The cost of such material is quite high, and a cold surface will require the use of tablecloths or napkins. However, the sparkling appearance of such an attribute is sure to attract everyone's attention.

Dimensions and shape
The most common form is rectangular. Rectangular table convenient in that it can hold enough a large number of a person, while requiring less usable area than a round one. It can be easily pushed against the wall. But due to sharp corners, both rectangular and square options are considered the most dangerous.


Round- applies for usable area 1.5-2 times the area required for a rectangular table, designed for the same number of people. It is believed that the round table is stronger than other forms to create a feeling of comfort in the room.

photos
oval tables, as well as rectangular ones with rounded corners, combine the advantages of rectangular and oval shapes. oval tables considered the most elegant and aristocratic.

Dimensions can vary from large to compact. If necessary, the design of the compact table can be provided in such a way that it can be increased. So, for example, a folding table occupies a small space when folded; when unfolded, it can accommodate a fairly large number of people.


An important point is the calculation of dimensions. When it comes to a standard kitchen, from 6 to 8 square meters, drawings and diagrams will show a standard solution with a height of 750 mm, length and width from 800 * 500 mm to 1200 * 600 mm, respectively.
For a correct calculation, it is necessary to multiply the number of persons by 60 (perimeter per person). But, as for the width, the width from 800 to 1200 mm is optimal here. Because narrow tables are difficult to serve, and wide ones are not very comfortable to sit at. For round table you need to measure the circumference according to the formula - diameter * 3.14 (pi number).

photos
Step-by-step instruction
- If you intend to make this kitchen attribute yourself, you must definitely make a drawing.
- To make a table from solid wood, you will need the following tools: a planer, grinder or Sander, electric jigsaw, a circular saw, drill (with a 6-8 mm drill), screwdriver, sandpaper, self-tapping screws (30-35 mm), wood glue, dowels, clamps, pencil, tape measure, gloves and goggles.
- It is necessary to buy supports (legs) for the table, which can be different - from ordinary rectangular to curly ones.
- For a countertop 80 cm wide, you will need four boards 120 centimeters long. They must be dry.
- For smoothness, the countertop must be sanded well. Joints must be processed in such a way as to achieve full contact with each other.
- To avoid deformation of the countertop from excessive moisture, you need to lay the boards with a pattern towards each other. To connect the boards you will need dowels.
- At the ends of the boards that will be connected, make holes with an 8 cm drill. The distance of the holes from each other should be 10-15 cm. Then these places must be sanded and greased with glue on the end, holes and dowels. Drive the dowels into the holes and thus connect the table top. Excess adhesive must be removed.
- Using screws and glue, it is necessary to connect the transverse and longitudinal boards with legs. We make two holes in the longitudinal boards on top, they will be useful for attaching the tabletop. Wait 12 hours. Install table top.
Cover the finished product with varnish, paint or stain. When using a stain, you need to take into account some nuances - choose the right thinner (if you don’t have enough experience, you need to use a slow thinner), the surface to be treated should be evenly sanded, it is important to properly adjust the gun (the torch should be oval and the applied layer should overlap the already applied half).

Traditionally for making wooden furniture dowels are used. Such a connection is not visible and has a low cost.
For tables made of wood, it is appropriate to use wooden dowels, as they dry out at the same time in this case. For chipboard is better use plastic, since chipboard practically does not shrink.
But it can be difficult for inexperienced craftsmen to achieve the most accurate calculation when planning holes for dowels. Therefore, euroscrews or confirmations are an alternative to them. Of course, this increases the cost of the product somewhat, but facilitates manufacturing.


Kitchen table from laminated chipboard with metal legs can be quite a budget solution.
- A chipboard sheet can currently be easily bought in the right size, or cut it yourself. The most common, plastic top coating makes the countertop sufficiently resistant to abrasion.
- For work you will need: an edge for end processing, screeds, connecting and end strips, designed to protect the joints and ends of the countertop from moisture, dirt, and grease. In addition, they make the look more aesthetic. To make such a table, you also need to purchase legs.
- On a chipboard sheet, mark the desired radius of curvature. Next cut the table top given form jigsaw. To prevent chipping of the plastic surface, it is better to work with a saw with reversible teeth. Using a router, make a groove and fill the edging.
- Be sure to lay the sealant in both the edging and the top edge of the countertop. Remove excess sealant. There is a special solvent designed to clean surfaces from similar materials. Using self-tapping screws, install the holders and put the legs on them.
It should be noted that such a table can be made quite easily and quickly.

The following method allows not only to collect modern model wooden table without colossal costs, but also to remake the old countertop.
- This will require unnecessary boards of the same size, carpentry glue and three clamps.
- Boards must be laid out on work surface so that the middle of the board to be laid is at the junction of the two previous ones.
- Using wood glue and clamps, you need to fasten the boards together. Then align the edges and sand the surface. Sand the edges and cuts.
- If the table is made entirely, then for the manufacture of the legs you will need two boards and a corner that will connect them together, as well as wood glue.
- First we glue them with glue, then we strengthen them with a corner.
- Along the perimeter, from the inside, where the legs are connected to the tabletop, we attach a bezel.
- Fasten the table top, legs and rim with a corner.
- Coat the surface with varnish.
- To make or restore a table, you can also use wooden pallets.
- To do this, we make the base of the countertop and attach the supports. For strength, you can come to the legs with wooden spacers.
- It is better to install wheels, as the countertop will be quite mobile.
- Fit a piece of plywood under right size and attach a bezel around the perimeter.
- We lay a piece of plywood on the base.

To decorate the tabletop, you can use chipped ceramic tiles or a mirror. We glue them to the countertop, fill the voids with grout for joints. At the finishing stage, everything can be painted or varnished. This method can also be used to restore damaged or old countertops.

photos
There are many more ways interesting options decorating tabletops. One of which is dyeing through tulle. The result of this decoration is a beautiful lace pattern.
Whatever the size of the kitchen, be it a small cell in a small family or a huge spacious kitchen in country house, in any case, a table is an obligatory piece of furniture in it. Despite the abundance modern materials and the possibility of choosing designer tables made of metal, glass, plastic and stone, wooden products continue to be invariably popular. A wooden kitchen table creates an atmosphere of comfort and harmony in the house, somehow you don’t even want to quarrel behind it, the mood becomes calm and balanced. You can buy such a table in any furniture store, the range of finished products is large and varied. But also a wooden table can be ordered in a carpentry workshop according to an individual sketch. Of course, both of these options will cost a pretty penny, so many people prefer to make a wooden kitchen table with their own hands. Thus, you can save up to 70% of the cost of a finished similar product in the store. True, to perform carpentry work, you will need special tools and carpenter skills, but this depends on the material chosen and the complexity of the table design.
Wooden dining table - optimal dimensions
The size of the table for the kitchen directly depends on the area of \u200b\u200bthe kitchen and the place where the table is planned to be installed. It is believed that a person feels comfortable if his personal zone is at least 70 cm, i.e. there is no one around him within a radius of 35 cm. Based on this, a square table 90x90 or 100x100 cm will be quite enough for a family of 4 people, if the room allows you to move the table away from the wall so that everyone sits on their own side. If the dimensions of the kitchen do not allow you to move the table, then you can install a rectangular table 120x75 or 120x80 cm. In this case, two people will sit at the long side of the table, and two people from the short sides.

In a large room spacious kitchen or in the dining room - you can safely put a large wooden dining table, the length of the tabletop of such a table is 160 cm. Usually the dimensions of large tables are 160x90 cm or 180x90 cm. There is enough space along the long side of the table to freely accommodate two people, and two people behind the ends will feel just kings. And that's on normal days. If an event is planned with many guests, then 10-15 people can safely fit at such a table.
But how to accommodate guests to residents of apartments with small kitchens? In such cases, a sliding dining table and a transforming table come to the rescue. Sliding tables are equipped with additional inserts for the tabletop, the width of which is usually 40 - 50 cm. There can be from one to three such inserts, they are all located in the middle of the table or hidden under the tabletop cover in a special niche if the table is in the assembled state. When unfolded, the length of the extendable table can reach 230 - 280 cm. This is enough to invite guests to a wedding. When folded, the length of such a table is from 120 to 180 cm.
The height of the dining table is usually 70 cm, but a lot depends on the height and build of the residents, sometimes kitchen tables are made 60 - 65 or 75 - 80 cm high.
When choosing the dimensions for the dining table, be guided by the space allotted for it. After all family members sit down for him, there should be enough free space around for the hostess to move, so that she does not create inconvenience to those sitting and vice versa.
Wood for the kitchen table
The choice of material for the kitchen table is a responsible task, from right choice depends not only on the durability of the table top and its resistance to mechanical deformations, but also on the final cost of the table as a whole. Solid wood kitchen tables are considered the most durable, environmentally friendly, aesthetic and are the most expensive. To make a solid wood table yourself, you will need the skills of a carpenter and carpenter, as well as a woodworking tool and a workshop for work.
The density of wood for a kitchen table is of great importance. There may be marks and scratches on the surface of softwood, although it all depends on the accuracy of the owners. And hard rocks can be difficult to handle for a beginner. Masters distinguish three categories of wood by density: soft, hard and the hardest.
Softwoods include: pine, cedar, fir, spruce, poplar, aspen, linden, alder, juniper, willow and chestnut.
Hardwoods include: oak, beech, elm, ash, larch, birch, apple and rowan.
To the hardest: white locust, yew, iron birch, dogwood.
Any wood is suitable for a dining kitchen table, even pine, which is considered the softest, but its surface must be varnished in several layers. The walnut table will be strong and heavy, and its surface is exceptionally durable, as even in the process of making openwork carving there are no chips on the walnut.
Oak wood for the kitchen table - perfect option. In addition to being strong, hard and durable, it is also easy to work and varnish, does not warp, split or warp, and is resistant to decay, which is extremely important for a wet kitchen.
Larch wood is considered healing, but taking into account the fact that the surface of the table must be covered protective equipment, she will not have the opportunity to release therapeutic phytoncides into the atmosphere. Linden wood is suitable for the manufacture of turned elements, plastic and durable, but it is affected by pests, and therefore also requires staining.
The most common types of wood that are used to make kitchen dining tables are pine, oak, walnut and wenge. Remember that you need to buy only well-dried material, with a moisture content of not more than 10%, otherwise the tree may warp, and this is fatal for the table.
In addition to solid wood, kitchen tables are made of laminated chipboard (laminated chipboard) with a thickness of 18 to 22 mm, as well as plywood and MDF. The ends of these materials are closed with a special PVC or melamine tape. These materials can hardly be called environmentally friendly and, of course, they are inferior in strength and durability to solid wood, but ease of processing and low price seduces many. Laminated chipboard surface no need to additionally cover with anything, it already has a finished look. And plywood is used only for strapping or embedded parts, so it is not visible.
To make a table from solid wood or prefer a chipboard that is easy to process depends on the preferences of the owner and his carpentry and financial capabilities. After all, a kitchen table made of chipboard will cost much less.
Types and configuration of kitchen wooden tables
After you have decided on the size of the table and the material of manufacture, you can proceed to the choice of shape and configuration. A variety of design solutions for tables is able to satisfy any requests and choose a table model that the best way will fit into the interior of the house and complement its sophistication.
Legs for kitchen wooden table
The number of legs for a dining kitchen table, their shape and size directly depend on the shape and size of the table, as well as on the material of manufacture. For example, it will not work to make a table completely from chipboard on 4 legs, which are attached to the corners of the tabletop, since the chipboard material has insufficient thickness and strength. But if in such a model the tabletop is made of chipboard, and the legs are made of wooden beams, then you get a completely strong and durable product.

The legs for the kitchen dining table can be made independently according to the sketch, or you can buy ready-made ones in the store furniture fittings. Self-manufacturing legs is a time-consuming task, the complexity of which depends on the configuration of the legs. That is why many people prefer to buy finished goods. In the furniture fittings store you can buy metal legs for the kitchen table, which are hollow pipes with a diameter of 70 - 90 mm, but you can also pick up wooden carved legs that look like balusters for a wooden staircase.
The dining kitchen table can be supported by one or more legs. It depends on the weight of the tabletop, the shape and configuration of the table. How different dining tables look like with different numbers, shapes and sizes of legs, you can see on the photos showing the wooden dining tables below.
To set the dining table on one massive leg, it is necessary to perform a high-quality cross-shaped strapping.

Also the table can be about two massive legs separated by a certain distance. Usually such tables have a rectangular or oval shape. Tables on two legs are convenient because the people sitting at it do not beat their feet on the legs of the table. At the bottom, these two legs expand to increase the area of support, and are also connected at the bottom by a jumper board or reinforcement board.


Dining tables with four legs- the most common category and the easiest to perform, since complex calculations for strength and stability are not needed. It is enough to choose the legs of the correct size and install them on correct distance from the edges of the table. The shape of the tabletop of such tables can be round, oval, square and rectangular.


The shape of the legs for the kitchen table can be very diverse. Remember that the aesthetic appeal of the legs is even more important than the beauty of the tabletop, as it will be hidden by the tablecloth, while the table legs will be visible to all guests.
Countertops for the kitchen table
The tabletop of the kitchen table can be made of solid wood (furniture board, which is a board glued together), as well as chipboard or glass. Naturally, massive tables look more refined and resemble a work of art, while chipboard tables are just an ordinary, unremarkable dining table. The end of the chipboard must be edged, so the cut must be perfect. Cutting chipboard at home, and even so that the cut is even, is quite difficult. Especially if the cut is semicircular. Therefore, sawing chipboard on the machine is better to order. Trimming chipboard is better all with PVC tape 2 mm thick or more or with melamine tape. The first option is preferable, since the edges are smooth, even and rounded. If you paste over the end of the laminated chipboard with melamine tape, then the edges will be sharp, they may cause puffs on clothes, cuts on the skin, and the melamine tape is short-lived and does not withstand frequent water procedures.
Important! The thickness of the countertop should be more than 25 mm, preferably 28 - 35 mm. If a laminated chipboard with a thickness of only 18 mm is used, then from below it is imperative to make reinforcement in the form of a false plywood tabletop.
The shapes of the tops of wooden tables are not as diverse as the shapes of the legs.


Round tables for the kitchen - an option for an amateur. The main problem is that, oddly enough, such a table requires more space. You can’t put him in a corner, and even if you move him up to the wall, it’s all the same that people need free space around him to sit down. A round wooden dining table will look great in a dining room or big kitchen, living room, where he will stand in the middle of the room. In a small kitchen, a round table is not appropriate. Unless, if only one or two people live in the house, and the table is small - no more than 90 cm in diameter. Round tables allow you to experiment with support. For example, use only one leg or three legs, but for greater stability, four legs are still used, installed at a distance of 10 - 15 cm from the edge of the tabletop. It is not possible to use two support legs in tables with a round top - this design unstable.

Oval kitchen tables can have various sizes: from small tables for oversized kitchens to huge tables that occupy the center of the dining room.

A small oval wooden kitchen table is designed for compact kitchens, it can be installed in a soft corner set, as shown in the photo. But the most common are still large tables and medium-sized tables, as they fit in average domestic apartments and at the same time many guests can be accommodated behind them. If there is nowhere to put a large table - the area of \u200b\u200bthe living room and kitchen does not allow, then an oval sliding wooden dining table comes to the rescue.

Such a table usually has a tabletop divided in half, the halves of which can be moved, and additional inserts can be installed in the middle part of such a table. By the way, the shape of such a table in the folded state can be round, and the table acquires an oval shape only in the unfolded position.
Sliding wooden kitchen tables
It is worth highlighting in a separate category sliding tables for a large number of guests. They can have different shapes: round, oval and rectangular. The most common are still rectangular and oval models. It is easier to make a rectangular sliding wooden dining table on your own than an oval one, since there is no need to round the corners with a carpentry tool.
Sliding mechanisms for such tables can also be different. The old Soviet tables were not equipped with roller guides or full rollout guides, and the table had to be pushed apart with effort, as the wood rubbed against the wood. Especially if the table for a long time stood in a folded state, sometimes it was extremely difficult to move wooden surfaces stuck to each other. Modern sliding tables have a special roll-out mechanism, which greatly facilitates work, and also prevents damage to wooden parts and surfaces. Metal guides for the sliding table can be purchased at the hardware store.
Sliding wooden kitchen tables: photo examples.


Additional wooden inserts-sections, which are installed in the middle of the table, can be stored under the tabletop when the table is folded. The easiest way is to make special fasteners for them into which they will be inserted.

In modern sliding dining tables, the insert consists of two halves connected by hinges, folded in half and hidden under the table top using a special mechanism. To do this, under the main tabletop, an additional false tabletop with a hole in the middle must be required.


Tables on wooden legs, but with a glass top, are suitable for rooms in a style close to high-tech or minimalism. Sometimes a glass top is installed on top of wooden frame or wooden table top with holes. In any case, the product is futuristic. The tabletop is usually made of tempered glass, it is not only impact resistant, but also much stronger than wood and the surface is quite difficult to scratch. The legs are attached to the glass top with special fasteners. Such a table can be easily made on your own if you order glass cutting in an organization specializing in this.
![]()
![]()
![]()
![]()
![]()
Transforming tables are a separate category of tables, which, when folded, are a small compact bedside table. If you put it near the wall, then it will take no more than 50 - 60 cm. When unfolded, such a table can accommodate from 10 to 15 people. Hinged tabletop covers are attached with hinges. The most common form of transformer tables is rectangular, but round tables are also found.
DIY wooden dining table

To make a wooden table with your own hands, you need to have a workshop, since there will be a lot of dust, and it makes no sense to litter in an apartment or house. First you need to draw a sketch of the future table with the exact dimensions. Then sawing wooden elements can be ordered at the sawmill, if it is not possible to produce it yourself. Consider the manufacture of the simplest wooden dining table.
We will need the following materials and tools:
- Hacksaw;
- Electric jigsaw;
- Drill;
- Milling machine;
- Plane;
- Paint brush;
- bolts;
- Sandpaper and grinder;
- Wooden boards 22 mm thick;
- Furniture shield.

The first step is to cut out all the elements according to the sketch. The legs in our case will have a simple straight shape with cutouts that are easy to make with a jigsaw, and then clean with a grinder and chamfer.
The legs of the kitchen table according to the drawing consist of two horizontal elements (supports) with which the table rests on the floor surface, and two vertical elements (rack legs). They are connected to each other by a simple bolted connection (bolts 8 mm). The bolts are fastened through and on the reverse side are locked with a nut. The assembly starts from the bottom, first one vertical leg-rack is attached to the supports, then the same is done with the second leg. Then, a longitudinal connection is inserted into a special groove between the vertical legs-racks - a jumper board. It is fixed by the second vertical elements of the legs-supports.
The next step is the installation of the countertop. We put the finished furniture board and in the place where it is planned to mount the vertical elements of the legs, we install horizontal transverse stiffeners. These elements have a length equal to the width of the countertop. Then a flanging of wooden bars is installed on top. The technology for attaching the flanging to the tabletop and horizontal transverse stiffeners is easier to understand by watching the video at the end of the article. The strapping / flanging beam is fastened through the straps of the stiffeners with two self-tapping screws.
First, the bars are attached to the long sides of the tabletop, then perpendicular bars are attached to them with screws, located along the narrow side of the table. As a result, a free space remains between the tabletop and the flanging bars, which does not look very aesthetically pleasing. To close it, a decorative wooden plank is used. To fix it to the bars, dowels are used. Holes for dowels are made in the bars and planks. Then wooden cylinders, which are called dowels, pins or dowels, are inserted into the holes of the strapping bars, having previously lubricated the hole with glue. Then it is put on protruding dowels decorative strip. The tabletop is ready.
It remains only to screw the legs of the table to the tabletop. For this, the same bolts are used as for attaching the vertical leg-racks to the horizontal supports. Holes for them are best done in advance.
Design this table it turned out to be collapsible, after a feast it can be taken apart by screws and hidden in a pantry or behind a closet. More clearly, the sequence and technology for making a wooden table with your own hands can be viewed in the video instruction below.
A feature of the layout of most apartments of a typical development of the 20th century: small area premises, especially the kitchen (even if the apartment is multi-room). Under such conditions, the ideal solution to avoid excessive clutter of furniture in an already cramped space is to increase the functionality of the main pieces of furniture. If in the living room it can be a sofa, extending if necessary to seat a certain number of guests, then in the kitchen this item is a table. For big family living in an apartment with a conventional layout, a sliding dining table is an indispensable attribute of the interior: in its normal state, it takes up quite a bit of space - and when extended, it can fit a large number of eaters behind its tabletop.
Benefits of a sliding table if you made it yourself
Nowadays (with the choice of various materials and furniture fittings offered by specialized stores), it is much more profitable to make an extendable table yourself: the cost of the table comes out cheaper, and the design, including individual sizes, everyone can choose for himself. Agree - it's nice if your kitchen has a table that exists in a single copy!
The design of wooden sliding tables has been known for a long time. If earlier all the details were made of wood, and only a high-class carpenter could make a good sliding table, today even a beginner can make such furniture thanks to commercially available mechanisms made of durable metal.
Possessing the simplest skills in working with elementary tools: an electric drill, a jigsaw, a screwdriver, you can easily make a table of the shape and size you need. To do this, we suggest you use a few simple examples of sliding tables.
General principles the manufacture of such tables is the same for any do-it-yourself products:
- Determining the dimensions of the future product;
- Drawing up a design drawing (or making changes to an existing drawing);
- Acquisition of basic and finishing materials, fasteners and accessories;
- Cutting of structural elements, intermediate surface finishing of parts;
- Assembly of the structure;
- Finishing.
Moreover, the first and last points of the algorithm are individual for each case, and it makes no sense to describe them in detail. Detailed Instructions for the rest of the steps are given in the proposed descriptions.
Option 1. We make a sliding table - a "minute" of the simplest design
The table is named "Minute" because it takes a minimum of time to make it.
The table has a height of 735 mm, tabletop: minimum size- 1200x800 mm, maximum - 1670x800 mm.
We will need:
- Chipboard sheets 25 mm thick: 600x800 mm - 2 pcs., 470x800 mm - 1 pc.;
- Full extension telescopic guides, 500 mm long - 2 pcs. (fig.1);

- Leg for a kitchen table with a flange (710mm) - 4 pcs.;
- Aluminum corner with a rib 50mm - 2 meters;
- Lock-latch type "frog" - 4 pcs. (fig.2);

- M4 screws 10 mm long and nuts for them (it is imperative that the nuts are with a stopper) - 16 pcs.
Production of the main element - the sliding mechanism of the table
- Cut the corner into 4 parts, sharpen the sharp corners of the side faces, as shown in Fig. 3;

- Separate the telescopic guides into two parts - a narrow bar and a wide canvas, attach each of the parts to the corners to get the design shown in Fig. 4;

- Repeat the process with the two remaining corners and the second "telescope".
Table assembly
- Fold both parts of the tabletop together;
- Install the corners on the reverse side of the countertop (Fig. 5);

- Install the latch locks on the sliding parts (Fig. 6, a);
- Extend the tabletop, opening the locks, and insert the removable part;
- On the insert of the tabletop, install the parts of the latch locks in such a way that all parts of the tabletop can be firmly fixed (Fig. 6, b);

- We fasten the legs to the tabletop - the table is ready!
As you can see, making a sliding table of the simplest design is easy and does not take much time.
Some inconvenience of this design is in the removable part of the table top: this table does not provide a place to store it, so it is put away in the closet until the next “influx” of guests.
The next option will help you make a sliding round table, free from this inconvenience.
Option 2. Making a round sliding table with a folding insert
You will need:
- Chipboard 25 mm thick
- For countertops - 850x850 mm - 1 sheet; for the insert - 850x 370 mm;
- For a false tabletop - 600x600 mm - 1 sheet;
- For the underframe: slats 100x575mm - 4 pieces and 2 slats 120x600mm (chipboard, 18mm).
- Legs - bars 60x60x710 mm;
- Telescopic guides 250 mm - 4 pcs, swivel mounts (Fig. 7) - 2 pcs. and hidden end hinges (180 degrees) -3 pcs., as well as stops for the folded insert;

- Furniture corners, confirmations, self-tapping screws, wooden dowels.
Making round table elements:
- Cutting out the tabletop. There are several ways to make a perfectly round countertop. The first of them is to make a pattern from an ordinary drawing paper by drawing a circle with a large compass, or with the help of a simple device (Fig. 8a), and then start cutting along its contour.
We propose to do something a little simpler: to assemble a sawing "compass" from a jigsaw or an angled circular saw (depending on what you have) - you can use it repeatedly.
For such a "circle" you will need actually cutting tool, tape measure, drill, 3-4 self-tapping screws and a meter rail made of plywood. The width of the rail is equal to the length of the sole of the tool (see Figure 8c, this is how the whole structure looks like).

The solution of such a compass can be changed in the range from 20 cm to 1 meter (respectively, the diameter of the sawn tabletop can be from 40 cm to 2 meters). Using it is very simple, the saw cut is clean, and the circle is perfectly even: at a distance of 425 mm from cutting blade(disk or saw blade) we drill a hole, with the help of a self-tapping screw we attach the structure to the material to be cut - the compass is ready, it remains only to evenly push the tool forward, and it will move along the desired path.
Important! It is better not to cut the countertop from the front side - a trace from the self-tapping screw in the center will spoil the appearance.
The tool must be driven slowly and without jerks, otherwise you can get uneven chips on the chipboard surface (if a saw is used, it is better to gradually increase the depth of cut).
- Divide the table in half. To divide it into two identical parts, you need to draw a straight line through the center of the circle (diameter), and then carefully saw the countertop along this mark.
- We glue the end tape on all sections. It must be said that it is of two types - melamine (made of paper with special coating) and more expensive (but also higher quality) ABS plastic edging.
Melamine edging tape is produced with a layer of hot-melt adhesive already applied to it (glued with a conventional iron).
However, in order to achieve more quality coverage, before gluing the tape, it is advisable to putty and sand the sections - and only after that start gluing the tape.
The tape is superimposed on the end of the laminated chipboard, pressed against the sole of the iron and so kept for some time (so that the glue melts under the influence of temperature). Then, having removed the iron, it is advisable to press the tape with your hand (after putting on it a fabric folded in several layers of cotton). Cut off excess tape with a sharp spatula or knife - while trying not to damage the cut corners!
The ABS edge is more durable, however, it is not glued so simply. For edging with ABS tape, glue is needed (as a rule, manufacturers recommend the most suitable one). Moreover: when removing excess glue that has protruded beyond the edge of the tape, the solvent can damage the laminated chipboard surface - special care and practice are needed here.
- The part intended for the insert is cut into 2 parts 425x370mm, all ends are also glued with tape. We connect the parts of the insert with hidden loops like a book.
- In the false tabletop, exactly in the middle, we cut out a hole 430x4400 mm - we paste over the end parts of the hole with the same tape (Fig. 9).

The assembly of the table takes place in stages:
1st stage: underframe with a false tabletop (scheme 1);

2nd stage: assembly of the sliding table structure (scheme 2);

 Diseases transmitted through the blood of a sick person to a healthy person What infections are transmitted through the blood
 What you don't know about okroshka Where and when did you come up with okroshka
 Colostomy closure - reconstructive coloplasty