Drawings of a table with a metal frame at the dacha. We make a picnic table with our own hands: step by step instructions. How to make a round or rectangular wooden table. Original table ideas for giving
We continue to equip the summer cottage. Today we'll talk about how and what to fill the dining area or recreation area. It is difficult to imagine a cozy gazebo or shade canopy without a table and comfy benches or chairs.
Today, garden furniture manufacturers offer a huge variety of tables: large and small, wooden, wrought iron, wicker or plastic.
Of course, you can buy a finished product, but many people prefer to make garden furniture with their own hands.
How and from what material to make a table, how to decorate a tabletop will be discussed in this article.
Outdoor table for giving made of wood
Undoubtedly, wood is the most malleable and environmentally friendly material. A wooden table can be made round, square, rectangular or irregular, it all depends on the size of the gazebo or the number of seats. You can use a regular stump as a tabletop leg.

The shape and appearance of the table largely depend on the style of your country house and exterior. A log cabin can be supplemented with furniture made from logs and planks. The main tool for processing parts is a sander, since the surfaces of the table top and benches should be smooth, without chipping.


The tabletop can be made from slats or narrow boards by stringing them on metal rods, or by connecting them using short slats.

A table made of wooden cuts looks interesting, especially if there is one on the site.


There are several ways to make such a table:
- connect the cuts together with staples or tongue-and-groove joints, forming a flat surface;
- fix the cuts on any base (in this case, the parts must be of the same thickness to form a flat surface). The product must be sanded and varnished. If desired, the gaps between the cuts are filled with epoxy resin, after which dries, the surface is sanded again and covered with a protective compound.
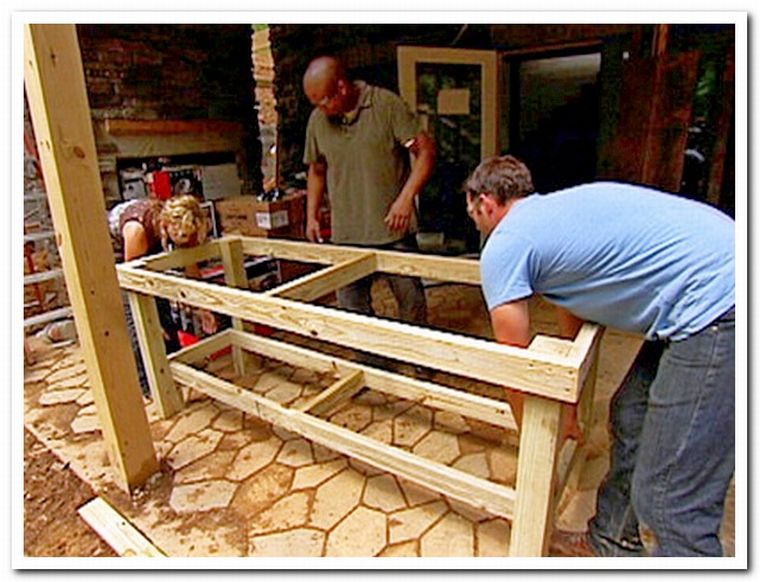
A garden table made of wood with benches, made in a single structure, looks great both in the gazebo and in the open area.


It is not difficult to make it. Use the diagram below to make your own drawing and calculate materials.

When drawing up a drawing, consider some generally accepted standards:
- bench seat height from ground level - 400-500 mm;
- seat width - 300-400 mm;
- table top height from floor level - 700-750 mm;
- tabletop width - 580-900 mm.
The length of the table and benches is individual. The figure shows an example of making a table with benches located on two long sides of the table top. Similarly, you can make a structure with benches on four sides.
And here is a variant of a small round table with stationary stool benches for four seats. It is easy to move it to the right place at the moment: to an open area, under a canopy or into a house.

If desired, you can purchase or make your own folding garden furniture, which can be easily installed in any part of the garden or in the house.

Such furniture will last longer, as it will not be constantly exposed to atmospheric precipitation. The weight of such products is small, they can be easily and quickly transferred to a permanent storage place in a house or shed, where they will not take up much space.
In order for the product to serve for a long time, all wooden elements must be treated with an antiseptic and varnished, waxed or painted. Use wood stain or special pigment impregnation to give the wood the desired color.


Garden table made of scrap material
Earlier we have already talked about the furniture made. A stylish table made of pallets is cheap and looks organically on the backyard. The design, complemented by furniture wheels, is also mobile.

Ordinary stumps decorated with mosaics look very original and can serve as a small table or stools in a recreation area. For mosaic decor, various tiles left over from repairs, chopped into small fragments and laid on tile glue or cement mortar, are suitable.

The originality of this composition lies in the creative approach of the owners. The most common stumps turn into a work of art.

An old, worn out table can also be decorated with mosaics and thereby renew the tabletop. Old paint must be removed from the legs, sanded and painted again. Such a garden table will serve the owners for a long time and will gather the family around it for lunch and tea.

A wooden reel for winding a cable can also serve as a table, it is enough to process it and decorate it a little, or just paint it in the desired color. The table will be easy to move if the wheels are attached at the bottom.


Many have inherited things, as they say: it's a pity to throw it away, and nowhere to put it. Try to be smart and use them when arranging a summer cottage. As legs for the table, you can use the base of an old sewing machine, metal headboards and much more. By the way, you can simply buy a countertop and install it on top of a metal structure.

Those with weaving skills can make vine garden furniture with their own hands. If you are not capable of such feats, but are very fond of wicker products, then you should go to the store. Manufacturers offer tables and chairs made of wicker, rattan or artificial fibers for every taste and budget.

Metal garden furniture
If you are "friends" with metal, have a welding machine, then you can make garden furniture from this material. Such furniture, as a rule, is delicate and original. In order for the product to serve for a long time, the metal must be protected from corrosion before its operation. One of the simplest ways to protect metal surfaces is a primer, which is applied to the product before finishing painting.

Forged furniture for a summer residence is an excellent solution for respectable home owners. Such can only be made by blacksmith forging masters with the appropriate equipment and the presence of a forge.

Forged products go well with many materials: wood, glass, marble. If you wish, you can purchase a forged blank for the table, and fill it yourself.
Stone table
Recently, small architectural forms made of stone are gaining popularity. Including on sale you can find tables and benches made of marble or granite. Such products are expensive.

But this is not the only solution. You can independently make a stone base of a table and benches, for example, from quarry, limestone, brick or blocks, fitting them into the overall look of the garden, combining them with other stone buildings.
As you can see, there are quite a few options for arranging a recreation area on a personal plot: from cheap, practically worthless, to expensive. A table made with love will definitely gather wonderful people around it, and joint gatherings will deliver pleasant moments.
The table - an integral attribute of every home - can be made of different materials, have a simple and intricate shape and carry different functions, but it is absolutely impossible to do without it at all. Not everyone understands why they need to make a table with their own hands, if such an ordinary item is easy to buy at any furniture store. Indeed, not everyone dares to make furniture with their own hands.
But that daredevil who deliberately gets down to business will certainly enjoy the process and the excellent result of his labors. Some come to this, wanting to save money, especially if something unpretentious is required. Others, obeying a creative impulse, want to have a unique piece of furniture in their home that will enhance their mood and self-esteem. In addition, a do-it-yourself table always has ideal proportions and matches the interior style of your particular home.

Product shape and design
A wooden table is an environmentally friendly, aesthetic and durable product that will successfully fit into both an apartment and a summer cottage. Moreover, there are options for special garden tables. It can be light, portable, or solid and massive, have different models and shapes:
- Angular;
- Oval;
- "Book";
- Folding;
- Sliding;
- Transformer.

Transformers is perhaps the most interesting category of tables. When folded, they are very compact and look like a small bedside table. If you put it against the wall, then it will take no more than half a meter. A table of this shape is indispensable in a limited space, when it is not possible to hold a large dining table for a dozen people. Hinged worktop covers are attached with a hinge system. Transformers are usually rectangular, but there are also round models.

Before getting started, decide what configuration and size you need. Below are general guidelines from professionals:
- A hand-made table must correspond to the room for which it is created, both in size and style;
- When creating a street version, it is important to think in advance how many people will use it at one time;
- A folding table is a great option for hospitable hosts. Such a product will be used assembled for family dinners and will become a godsend during the reception of guests;
- For a comfortable feast, the place at the table reserved for each guest should be at least 70 cm;
- The child's model should be designed according to the age and height of the child.


Manufacturing will cost some work and time, but the result will please. After all, a handmade product will be inexpensive and fully consistent with your ideas and desires. If you wish, you can make a whole set of furniture, but this will require special skills and dexterity.
Before proceeding with the manufacture of the table, you should carefully read the drawing so as not to translate the materials in vain.

Tables can be divided into the following structural types:
- Solid wood;
- Prefabricated (from terraced, grooved, unedged boards);
- Glued;
- Made in the form of a "shield" of lamellas.


Solid wood furniture is elite and has a rather high cost. The rest of the options are simpler and can be used both in pure form and in combination. Glued tabletops made of boards of different types of wood, made with epoxy - this is an adhesive based on resin, look very nice. Natural wood patterns and different textures create an incredible effect. Products made using this technology, very strong and resistant to deformation.

Material selection
The most popular material for tables and other garden furniture is wood. This is easily explained, because wood has a number of significant advantages over other materials, for example, metal or concrete. The tree has such advantages as:
- Ease of processing;
- High aesthetics;
- Resistance to different climatic conditions;
- High amortization;
- The possibility of restoration;
- Ample opportunities in the field of processing and painting;
- Safety for human health;
- Low cost of certain categories of wood;
- The beauty of natural patterns.

Natural wood is a material with a beautiful natural texture, rather inexpensive, environmentally friendly and durable. It is resistant to moisture when specially treated, pliable for carpentry tools, and therefore excellent for making household furniture and utensils.
The appearance of the finished product and its characteristics will depend on the type of material and its preparation, so it is worth starting with the selection of wood. Each type of wood has its own hardness. The most popular tree species can be identified:
- Spruce, pine and cedar are softwoods. Easy-to-process material, but prone to deformation, drying out and cracking;


- Oak, beech, larch and birch are hardwoods. Beautiful and noble types of wood. Moisture resistant and durable. Processing oak and other hardwood products will require electrical tools;


- Superhard materials - yew, hornbeam and acacia - possessing an extremely dense internal structure, are highly durable materials. Requires professional industrial processing.


To make a wooden table, you need an edged board or timber. A table made of croaker will have a brutal look and will perfectly fit into a hunting-style country house. A wide slab can serve as a material for an entire countertop. Another material for creating a countertop is a trunk cut. First, a trunk of the required diameter is selected, then an even cut is made and varnished. With this technology, a large amount of waste is generated.


The durability of the product depends not only on the processing of wood, but also on the choice of wood species. Hard rocks are not always a good choice. In conditions of temperature drop and high humidity, the tree swells and crumbles. The best option for outdoor or country countertops is elastic wood. Characteristics such as hardness and resilience provide resistance to deformation. Spruce, aspen, larch and linden can boast of such properties.

Before starting carpentry work, the tree must be sanded and treated with an antiseptic, and at the end you will need to be varnished. In addition, the stain will give the product a finished look.
Instrument preparation
If you were inspired by new ideas and decided to make a wooden table with your own hands, you will need to prepare the following tools for work:
- Thicknesser;
- Saw;
- Jigsaw;
- Hacksaw;
- Jointer;
- Milling cutter;
- Screwdriver;
- Drill;
- Grinding device;
- Clamps;
- Pencil,
- Roulette,
- Square.

In order for the work to argue, consider the shape and size of the product, prepare drawings. The size of the product will depend on the area allotted for it, and the average height is 70 cm. Here is a list of materials required for the work:
- Antiseptic;
- Sandpaper of varying grain size;
- Boards;
- Bar or slab;
- Paint and stain;
- Glue.

For a standard family of four, a square-shaped table with a side width of one meter is suitable. Size 120 by 90 cm will accommodate both hosts and guests.
Drawing construction
The drawing is a diagram that clearly tells about the sequence of actions, following which the expected result is guaranteed. If a unique design is conceived, then you will have to work on the diagram and drawings yourself. To do this, you can use a computer program, then print the received documents in order to have a clear guide.

Manufacturing of parts
The step-by-step process of making wood countertops can be described as follows:
- Select the required amount of materials. For a standard width, you will need 6-7 boards 3 cm thick. Only perfectly flat boards processed with a jointer are suitable. Knots are not a hindrance.
- Subject the tree to antiseptic treatment and dry thoroughly.
- Lay out the boards in the form of an even rectangle. Align the joints.
- Attach a block on both sides and cut evenly.


- Screw the timber to the boards. On the back of the countertop, in the center of the boards on each side, drill a bolt hole 2/3 through the block. Make the recess wider on the bar so that the head of the bolt sinks.
- Round off the corners.
- Attach the board diagonally from the bottom with self-tapping screws greased with glue.
- Sand the surface first with coarse sandpaper, then softer.
- Cover the product with stain and varnish. The table can be painted if desired.


Homemade solid wood worktop
Tables made of such material have an even and uniform structure, do not have joints or crevices. Another argument in favor of this technology will be resistance to deformation and cracking. To make a table, you will need 4 boards with smoothly rounded edges, having the following parameters - 1x1.5x0.5 m. The work algorithm is as follows:
- At the ends, at a distance of 10-12 cm, make holes 8-12 mm in size. They are needed for fastening dowels and dowels. The holes in the two side boards are made on one side only.
- Fold boards correctly before glueing.
- Sand the boards, coat with glue.
- Insert the dowels and fasten the boards.
- Align the ends and make sure each board is in the correct position.
- Lay the finished worktop on a flat surface and squeeze firmly with a clamp.
- Leave to dry.

Making a round table
To implement the idea of creating a round table with your own hands, you need to have with the following materials:
- Square timber (width - 100 mm, length 750 mm - 4 pieces;
- Boards 100 x 20 mm, length 750 mm - 2 pcs;
- Boards 250 x 40 mm, length 2000 mm - 4 pcs;
- Boards 100 x 20 mm, length 800 mm - 2 pcs;
- Boards 100 x 20 mm, length 1600 mm - 2 pcs.


Step-by-step instructions for creating a handmade round table:
- Fold four long boards tightly together.
- Draw a circle.
- Cut along the line with a jigsaw.
- Make a rectangular frame and fasten the circle with screws.


- Attach legs to the frame.
- Check stability, and then disassemble.
- Sand the wood with sandpaper. First hard, then soft.
- Cover with stain and varnish.


At first glance, it seems that the most important detail of the table is the table top. However, the legs of the product should not be underestimated either. After all, it is they who decorate the table and give it a certain style. Legs must match the basic style of the model and the required parameters.
The paradox is that the more complicated and pretentious the legs of the table, the less they will last. The most reliable will be simple wooden, stable and lightweight supports. You don't have to make drawings for them. Stages of making table legs:
- Selection of four bars of equal length (85 cm);
- Installation of bars in the corners of the table top;
- Connection on each side with boards or beams: two equal to the length, and two equal to the width;
- This structure is glued to the table and left to dry.

The table does not always have standard four legs, sometimes craftsmen resort to creating a base from a frame and one or two legs. The glue can be replaced with furniture corners, which are fastened with self-tapping screws, or, for reliability, use both options. You can create an unusual fantasy model by evenly attaching the countertop to the ornate and whimsical tree roots. It will be an amazing piece that only you will have.

Assembly features
Holes are drilled in each element of the product, then the parts are bolted together, which makes the product really strong. You can enhance the effect with fixing with good glue. Self-tapping screws are screwed in from the inside at an acute angle in relation to the board. If the finished product wobbles noticeably, use special straps with anchors. This will help make the structure more reliable and stable.

For the legs, wooden blocks are taken, which must be processed with a plane in the shape of a cone. Carved balusters are also excellent for this, which you can either buy or grind yourself on a lathe. Carrying out the structure with his own hands, a person acquires the skills of working with wood, so if it becomes necessary to repair the product, this will not cause difficulties. You will already have all the necessary arsenal of tools. In addition, you will need wood and tools for the restoration of old wooden products.

Treatment
It is not so difficult to get a good and solid result. The main thing is to comply with all the necessary conditions. After carrying out the main work, the time comes for the final, but no less important stage - the processing of the product with varnish. In order to correctly carry out this operation, observe the following rules:
- Sand the edges of the countertop by hand;
- Apply a quality varnish to the entire product. In addition, painting some parts of the table with paint will look very decorative;
- Flaws in the work are well masked with a putty that matches the color.


The most popular option for decorative finishing of a wooden table is to cover its surface with a transparent or colored varnish, which will emphasize the natural wood pattern and provide it with protection from external factors.
In order for a hand-made product to serve for many years, remaining the pride of the owner, it is recommended to follow simple rules:
- Avoid direct contact of the product with the open sun and do not leave it outside in the rain;
- Monitor the cleanliness of the surface;
- Process with polish;
- In winter, keep the table indoors so that the varnish does not suffer.

Before assembly, each wooden part must be treated with antipyrine, which will serve as protection against decay, increase moisture resistance and fire resistance.
Exterior decoration and design
The most enjoyable stage of making furniture with your own hands, of course, is the decorative finish, which each craftsman performs in his own way. In order to get the original model, you need to think over the external design of the product. Cuts of medium-sized trunks, decoratively laid out on the table top, will come to your aid. Woodcarving is also a wonderful decoration. Carved legs and table top will add elegance and lightness to the product.

Many people prefer to design a tabletop under glass. This option is suitable if the table will be located indoors. The hand-painted table is unlikely to go unnoticed by guests. Such a product will add a special flavor to any room.
For those who are not good at drawing, the option of transferring the picture through a stencil is suitable. It is, indeed, extremely simple, but there are some nuances: it is recommended to apply the pattern with acrylic paints, since they, when solidified, form a thin film, so they do not spread.
Allow the previous coat to dry before applying a new coat. You can work with both a brush and a roller.

The frame around the edges of the worktop always looks dignified. Masking tape will help to create a perfectly straight line. Cover the finished drawing with varnish. The simplest and most proven option is playing with the color of the boards. Using paint, stain and sandpaper, you can create the effect of aged wood. Products "for noble antiquity" always look spectacular and expensive.

The decoupage technique is just a godsend for creating a decor for a new wooden table or restoring retro furniture. This method consists in attaching a paper picture to the surface of the product using furniture varnish. The choice of pattern is made to the taste of the owner. These can be images of nature and animals, rhythmic patterns, black and white graphics, and even photos from the family archive. Material can be napkins, newspaper clippings, and vintage postcards.

The new table can be easily refined with mosaic tiles. To date, a wide selection is presented in hardware stores. It is advisable to use one set of tiles so that there are no inconsistencies in height and unnecessary relief is not created, which can damage the pattern and make the table inconvenient to use. In addition to the mosaic, you need to purchase glue and grout. In short, the process of creating a mosaic countertop can be described as follows:
- The surface of the countertop is degreased with alcohol;
- Then it is processed with sandpaper;
- Start at the outer edges;
- Secure the elements;

- Leave to dry for a day;
- Dilute the grout to the desired consistency;
- Thoroughly coat the seams;
- After an hour, remove the rest of the grout;
- Let the garment rest for two days, then wipe it with a cloth and vegetable oil for shine.

A budget option for mosaic decor would be eggshell table decoration... It is necessary to crush the shell into a medium-sized crumb, then lay it out with tweezers on the surface of the countertop previously greased with PVA glue. Try to keep the gaps between the shells as small as possible. If desired, the shell can be dyed.

Countertops with gold leaf decoration... Potal is a thin sheet of metal alloys that imitates gold. This material can be purchased at art stores. The required pattern is applied with special glue on the table surface, after 15 minutes, cover it with a sheet of gold leaf, gently smoothing it out. Then you need to walk on the surface with a soft brush and admire the result.

The luminous table is an excellent design solution, and it is also quite simple to implement. The finished product is equipped with special lighting - small lamps or LED strip are built in, providing a variety of lighting options: from simple to colored.

Modern kitchen sets often do not include such an essential item as a dining table, and if it is included in the basic set, it is usually made according to a standard design from cheap pressed wood. Of course, such products are not famous for their original design and durability. Such tables are usually inexpensive, but it is still better to abandon an unsuccessful purchase in favor of a homemade dining table made of wood, which any beginner in home carpentry can handle.
The physical labor associated with woodwork (sawing, planing) usually gives great pleasure to novice craftsmen, and a successful result will not take long.

It is important that the activity associated with the independent design and assembly of wooden models is a very creative process. Rarely does someone try to completely repeat the model they like from the store. Usually the design of the model is taken as a basis, and the remaining parameters are finalized by the master on his own inspiration. On the veranda or in a country house, utility rooms, it is better to choose transformer designs:
- Folding,
- Hiking;
- Suspended;
- Garden;
- Leveled.

Tables for stationary use are made in the same dimensions:
- Coffee;
- Massage;
- Writing
- For laptop;
- For a bath.
The assembly of such products is very strong, the parts are held together tightly, there are no hinge joints.

Tables for a summer cottage or terrace usually have a standard rectangular or round shape. However, there are craftsmen who manage to make a rustic-style table in the form of a stump, and a bench in the form of a log, which looks very impressive. This ensemble is easily complemented by log-cut stools in the same style. As you can see, making a wooden table yourself is a simple job.
With strict adherence to the instructions, the correct selection of high-quality materials and suitable tools, you are guaranteed to get a durable and beautiful table, which fits perfectly in terms of parameters and style into your interior.
It is such a building on a personal plot or in a garden, where you can relax with the whole family and invite friends.
But the arrangement is not only about giving an aesthetic appearance to the building itself.
It is also important to organize the interior space.
The role of the gazebo in the design of the cottage
The gazebo has a special role in the design of the cottage. In addition to its functional purpose, it should be in harmony not only with the surrounding buildings, but also with the landscape of the site.
It is good if all the facades of the buildings on the personal plot, including the gazebo, are finished with the same material. Gazebos look interesting, the roof of which is an exact copy of the roof of the house.
But even such a room is unthinkable without internal filling, the main element of which is the table.
You can make a good table with your own hands
You do not need to buy a ready-made table for the gazebo, because you can do it yourself.
This option is preferred. As a result, you will get such a piece of furniture that you not only need, but also ideally fits in size and shape.
This does not require extensive experience in construction work and special tools. Simple skills and a small set of tools are enough.
For making a table, wood is the best suited. Its main advantage is its long service life, visual appeal and naturalness.
Such a table will become a worthy element of the overall design of the cottage.
Project and drawing creation
At this stage, you need to create a detailed drawing of the future table.
Self-tapping screws and fasteners made of stainless steel can be used as fasteners. Be sure to use a wood impregnation that will protect the table from rot and mildew.
Development of a 3d drawing of a garden table in AutoCad.
Step by step instructions
You can make a garden table with your own hands by following this master class.
It is necessary to prepare all tools and materials for work in advance. At the preparatory stage, a wooden surface is processed and boards are selected by thickness.
Then four boards measuring 15x70 cm are laid in a row and connected with thin wooden planks. And the end parts are closed on both sides with boards measuring 15x60 cm, which are fixed with special metal plates.
Thus, a flat wooden surface is obtained.

Rectangular top strapping box
To prepare the upper harness, make a box. To do this, you can use boards measuring 10x91 and 10x46 cm. First, you need to make a rectangular base from long boards.
After that, stiffeners are installed on its surface, fixing them with self-tapping screws. It is important to install them at an equal distance.
Supporting structure box
Cooking the lower frame
It consists of 2 parts, made in the form of the letter "P". They are attached to each other using a long wooden plank. U-shaped elements are represented by two legs connected to each other by a bar.
Each support leg is made of four 4x4 cm bars.After both parts are made, they are fastened to each other with a strip, the length of which is 10x99 cm.

To make it more comfortable, turn the countertop over and lay it on the ground. Do the same with the frame.
As fasteners, metal corners and self-tapping screws are suitable, which ensure a reliable connection of structural elements.

We connect the tabletop with the frame
We process surfaces
All wooden surfaces must be carefully treated with a special protective compound.
It will provide reliable protection against moisture and insects.

Impregnation with varnish
Wood table
Wood is the most environmentally friendly and pliable material.
A wooden garden table can be round, square, or rectangular. Irregularly shaped models are also popular.
If you plan to do it yourself, the tabletop can consist of narrow boards or slats.
A table made of wooden cuts also looks good, which can be done in several ways:
- connect the cuts to each other with tongue-and-groove connections or staples, forming a flat surface;
- fix the cuts on some kind of base.
The finished surface is sanded and varnished. The gaps between the boards can be coated with epoxy.
Sand the finished product and cover it with a protective compound.
To give the surface the desired shade, you can use a stain or a special impregnation with pigment. Such a piece of furniture can be placed not only in the gazebo, but also in the open space in the garden.
For more information on how to make a table for a gazebo made of wood, see the video:
As a basis - pallets
Designers actively use wooden pallets to create furniture. This technique allows you to create an original stylistic solution.
Existing ideas can be used to implement the following solutions:
- models on a stand;
- on casters;
- with a lid;
- with glass top.
You don't have to buy a ready-made table. You can make it yourself using pallets.

Such tables themselves are not difficult to manufacture. To do this, you first need to find or buy a pallet. You can find it in one of the major home improvement stores. Then you need to saw off a part that is suitable in size and screw the wheels to it.
You can put an MDF panel or glass on top. They can also be bought at one of the hardware stores. The finished table must be treated with impregnation.
If you want to change its color, use a suitable shade of stain. This completes the manufacture of a table from a pallet.
Such a piece of furniture will organically look not only in a gazebo, but also in the open air on a personal plot. And the design, complemented by wheels, is mobile and inexpensive.
From scrap materials
Many designers use any materials at hand to make a table. Such a piece of furniture allows not only to decorate the internal space of a house or apartment, but also will look organically on a personal plot, in a gazebo or garden.

Ordinary stumps decorated with mosaics look original. Larger stumps can be used in a qualitatively original table. Smaller stumps are suitable for use as unusual stools.
Any tile left over after repair is suitable for decoration. It is split into small pieces, which are attached to the surface with cement mortar or tile glue.
Originality lies in your creativity. Such designs often turn into a real work of art.

Mosaic table top
An old table that has fallen into disrepair can also be decorated with mosaics. This will refresh the countertop. To do this, first remove the old paint from the legs, grind them and cover them with one or two coats of new paint.
Then the countertop is sanded and the mosaic is glued to it. From above, you can apply grout, which will protect the surface from the adverse effects of the external environment.
A wooden bobbin for winding a cable can also be used as a table. To do this, it is enough to process and paint it in a suitable shade. But it can be additionally decorated.
The resulting piece of furniture will become more convenient if you attach wheels to its lower part. In this case, you can easily move it around the site.
Also, many have inherited tables. They are usually not used as they require serious work. With the right approach, they can be used as garden furniture or placed in a gazebo.
If you inherited a forged table, you can simply restore or replace the old tabletop.

Forged furniture for a gazebo
For those who have weaving skills and sufficient perseverance, garden wicker furniture from a vine is suitable. Such furniture can be done independently.
But if you like wickerwork and don't want to make them, go to a large store. Here you can buy tables made of vine or rattan, as well as artificial fibers.
If there is a lot of metal left in your area, and you know how to work with a welding machine, you can make a beautiful table for a garden or a gazebo.
If you have the necessary skills, you will get an openwork and original product that will be one of a kind.
But before starting to use it, do not forget to treat all metal surfaces with a corrosion agent.
If you plan to paint the table, you can cover its surfaces with a special primer and apply a finishing coat of paint. Materials such as wood or glass are most successful as a countertop.
A more interesting approach could be used. Decorate a simple countertop with mosaics or pebbles of the same height. Then cover the surface with glass to match the size of the resulting countertop.

Whatever table you choose for the gazebo or your garden, the main thing is that it is in harmony with the surrounding landscape and the interior of the gazebo. A hand-made thing will delight you for a long time with its uniqueness and originality.
How nice on a fine summer day to sit with family and friends in the garden, have some tea and just to talk about this and that, enjoying the voices of birds, the smell of herbs and clean air.
And so that the gatherings are as much as possible comfortable both for the owners and for guests, in the garden you need a reliable and comfortable table.
What are country tables and what you can use as material for their manufacturing, consider in this article.
In contact with
classmates
Types of garden tables
Options garden there are a lot of tables. It could be a small table for picnic and a large outdoor dining table, table- brazier(he is a fire table) and a gazebo table.

An excellent solution for a summer residence - table-bench. It can be either a stationary table combined with benches into a single structure, or transformer. In the latter case, an ordinary-looking bench with back if necessary, folds out into a table and one or two benches.
![]()
Another version of the transformer is a bench with a folding a table for two

What can you make a table for a summer residence

- Wood
Country tables are mainly made from solid array,, MDF or plywood. Highly spectacularly worktops made of cuts wood.
Wood - aesthetic, strong, malleable material, but less durable than metal, glass and plastic. - Metal
Less popular, but no less beautiful are products made from metal. The disadvantage of the material is that options the decor of the countertop is much less than wood or plastic. - Glass
Tempered glass looks beautiful, enough durable. Yet glass products are not popular as outdoor furniture. In addition, with self-production, problems may arise with cutting material and subsequent fastening glass parts of the table. There are also much fewer glass table decor options. - Plastic
In order for the plastic table to hold shape, it is necessary to use a metal frame. - Scrap materials and unnecessary items
It is easy to build a table from a tree stump, old planks, pallets, logs and remaining unnecessary things. If there is a desire and perseverance, then the table can be woven even from newspaper tubules.

Bench table

Materials and tools
To create a country table with benches, you will need the following materials:
Needed also instruments:
- pencil, ruler, marker;
- hacksaw or an electric saw;
- chisel;
- sander or medium grit;
- brushes for impregnation and varnish;
- manual milling cutter(can be used for additional processing of edges).
Manufacturing steps

Step 2. Sand them by hand or grinding machine.
Step 3. All the top boards that hold benches(4 pcs. For each) and a table (4 pcs.), file at an angle of 45 degrees in the form of trapezoids. To do this, you need to draw rectangle, fold two boards crosswise (from corner to corner), and file them along bottom the long side of the rectangle. No need to file the upper parts!
Next you need turn over boards with uncut sides and do the same so that they take the shape trapezoid. There should be a total of 4 trapezoidal boards for table(2 pieces on one side and 2 pieces on the other) and 4 pieces for each benches(2 pcs for each side of the bench).
Step 4. We put 7 long boards in a row with gap 3-4 mm and fasten them with beams (2 pieces on both sides) using self-tapping screws(80 mm).
Step 5. We put in a row of three boards the same length as the table and hold them together with smaller ones beams. The gap between the boards is 5-10 mm. Self-tapping screws 80 mm.
Step 6. We drive two bench legs on each side between the fastening trapezoidal boards. We fasten self-tapping screws 100 mm.

Step 7. Between the legs fix the board perpendicular to the bench seat. And long boards fasten both benches between each other (2 boards on each side of the bench). It turns out rectangular dining area with benches on the sides.

Step 8. The legs of our table will be crossed. To do this, mark the sampling site, saw off with a hacksaw and knock out half of the board with a chisel so that the second leg fits perfectly into the first. We make both supports and fasten them with countertop(between trapezoidal boards).

Step 9. Supports of the finished table insert between long boards (inside the dining area).
Step 10. All joints strengthening furniture bolts and tighten.
Step 12. 8-12 hours after application the last the impregnation layer can be applied transparent varnish. We took a colorless protective coating in order to emphasize natural the beauty of the tree and focus on naturalness products.

It is possible after impregnation paint a table with ordinary waterproof paint or decorate in other ways (carving, mosaic, painting contrasting paint through a stencil, etc.). After decorating, it is necessary to apply 1-2 layers of transparent varnish.
Note! Instead of ordinary boards on the bench and tabletop, a more aesthetic option would be a board edging, the edges of which are cut strictly 45 degrees.
You can build the same table, but a little lengthen him, putting in the middle one more support and mounts on legs supports and benches. Make a table-bench with another option supports (A-shaped).
You can put or make it right away with canopy:

Stump table

The stump should be dried, without cracks, strong chips, rot and damp wood(especially the middle). Term drying freshly sawn or a freshly uprooted stump - not less 70 days.
When bark the stump will become easy move away from the inner surface, proceed to processing.
Note! The wood materials used to make the countertop must be at least 20 mm thick.
Another version of the table from the stump is a stable, medium-sized stump with roots, to which a table top made of various materials is attached. In this case bark it is not necessary to remove from the stump.

Materials and tools

- countertop;
- level, pencil, ruler or tape measure;
- impregnation and transparent varnish;
- sandpaper medium grain size;
- sander or manual plane;
- hacksaw(saw);
- chisel(chisel);
- screwdriver;
- hammer;
- screws, nails, screws.
Manufacturing steps
Step 1. We release the dried stump from bark using a chisel (chisel). If soft, spoiled, rotten or damp places are found in the stump, they should also be careful. delete.
Step 2. With the help of construction level trim the bottom and top of our hemp so that the table top is located clearly horizontally... Irregularities are removed with plane, hacksaws or saws. All new slices we grind sandpaper and sander. Necessary thoroughly work through all parts of the stump, all folds and bulges.
Note! In hard-to-reach places, it is recommended to walk first with medium-grain sandpaper, and then with fine-grained paper.
Step 3. We make a tabletop. The simplest option would be cut it is made of laminated chipboard or MDF. Simple rectangular or a square shape and a matching shade of varnish for hemp processing will make the table more attractive. You can also make a tabletop from edged boards fastened together. The most common form of such countertops is round.

Highly cute option may be small slice thick tree trunk, glass countertop or countertop of some kind bizarre forms.

Step 4. The worktop can be attach thick long nails or using additional fasteners on its inner side. For this, boards are nailed (sideways) or bars on both sides, boards are attached slightly on the other two sides longer.
Step 5. On the inside of the tabletop, two small boards are stuffed opposite each other so that they fall between mountings on a hemp.
Step 6. The table is processed with a special impregnation 3-5 layers (each layer dries well). After complete drying, it processed transparent or translucent varnish.

Self-production garden tables significantly saves money and time in finding the right table for you.
Do you want to offer photos on a topic for publication?
Please help us make the site better! Leave a message and your contacts in the comments - we will contact you and together we will make the publication better!
The dacha is a pleasant place not only for work, but also for relaxation. In stores, you can find many offers for summer cottages, but a more economical option is to make country tables and chairs yourself.
Country table with your own hands
Making furniture requires a serious approach, certain tools and skill. But you can make a simple and very economical option from wooden pallets.

Necessary materials:
- Sandpaper
- Self-tapping screws
- Pallets
- Wood primer
- Varnishes and paints for wood


The pallets must be sanded (coarse sandpaper can be used for this). Then process with fine-grained sandpaper, in order to facilitate the work, the paper can be fixed on the block. Next, you need to cover the pallets with a primer, paint and varnish if necessary.

If the finished furniture will be outdoors, the workpieces must be varnished. So it will last longer and will last several seasons. Before you start connecting pallets, you need to decide on the type and size, we select a photo of a table for a summer residence on the Internet and make it according to it.


Two or three pallets can be stacked on top of each other and fastened with self-tapping screws. If the table will be used at home, you can attach wheels to it for easy movement.

You can also attach ready-made metal legs to the pallets and thus make a full-fledged dining table. You can also make budget chairs, benches and veranda sofas from pallets. This material is the most affordable, you can buy new pallets, or get previously used ones for free.

Folding country table
Required materials and tools:
- Hacksaw
- Screwdriver
- Roulette
- Hammer
- Drill
- Pencil
- Wooden lath 5 m long
- Wood plate for countertop (board, plywood or OSB)
- Screws and nuts

When using plywood, it turns out to be a completely inexpensive option. If you have tools for woodworking at hand, it is better to use them, so the process will go faster.


To begin with, we cut the blanks according to the following dimensions:
- 4 pieces 70 cm each
- 4 pieces of 45 cm
- The table top measures 45 cm by 65 cm.

In order to properly assemble the folding mechanism, you need to find on the Internet drawings of country folding tables, or step by step photos.


On 70 cm parts, measure 40 cm from the edge and mark with a pencil, then drill the holes. We connect the two legs with each other with a screw, on the other side we tighten the nut, we also do the second pair.

We divide the tabletop into two equal parts of 32.5 cm and cut it. On parts of 45 cm (for a folding mechanism), we retreat 1 cm from the end of the rail and drill holes. The parts for the folding mechanism must be rounded off so that they do not cling to each other.


According to the diagram in the photographs, we collect all the details together and get a folding table. Next, the table must be primed, painted and varnished. When using these sizes, a very compact table is obtained, it will be convenient to take it with you to nature and carry it in a car.

Additional Information
The design of the folding table can be adapted to your size and you can make drawings yourself. To make the table look better, the table top can be smoothly rounded.

Wood primer helps protect wood from insects, so don't neglect using it.

When painting tables and chairs, new brushes must be used, during the process, care must be taken that the paint does not bubble. Usually they are painted in two stages, you can proceed to the finishing stage after the first layer of paint has dried.


Outdoor tables must be varnished so that dampness and mechanical stress do not affect the wood. This should be done in a well-ventilated area; it is better not to take the product outside until it is completely dry.


If the structure is large and it is not possible to bring it into the room, you can varnish it on a covered veranda, where moisture cannot harm.

Varnishes differ in the degree of protection, some protect only from moisture, others will help to avoid minor scratches, they can also be with the addition of paint.

When making tables from wood, it is necessary to observe safety precautions, use cotton gloves for work, be careful when working with tools. If the work takes place on the street, you need to make sure that moisture does not get on extension cords and sockets.


Diy photo of a country table


 Liquid Center Chocolate Fondant - Yummy Milk Chocolate Chocolate Fondant Recipe
 Delicious and healthy cherry jelly
 How to cook lightly salted cucumbers on mineral water - instant recipes with gas