Sheathing of a wooden house with metal siding watch online. Finishing the facade with metal siding: photos of the exteriors of private houses. House cladding with metal siding
All photos from the article
Sheathing wooden houses siding is the easiest way to transform a building without significant costs and overhaul... That is why this solution is so popular among developers and is used so often. Consider what types of material are and how to properly organize the workflow in order to achieve the best result.

Types of products
First of all, we will figure out which siding to choose for cladding wooden house... One of the following options is most commonly used:
| Wooden options | This type of siding is obtained by gluing several wood panels, therefore it is often called glued clapboard. Among the advantages, it should be noted environmental friendliness and attractive appearance, but there are much more disadvantages: high price, short service life, susceptibility to damage by fungus, mold and numerous pests |
| Ceramic panels | This type of product originated in Japan and is a mixture of clay and fiber aggregates that provide reliability. This option has more and more fans every year due to the high reliability of the products and the unpretentiousness of the cladding. |
| Metal siding | If you need very high strength, then the metal will become the best solution, because it is resistant to adverse influences, non-flammable and easy to use. The most important thing is to choose an option with a high-quality polymer coating, it will protect the metal from corrosion |
| Cement panels | For wooden houses, they are rarely used due to their heavy weight and complexity of installation, especially when cutting elements. Nevertheless, it should be noted that this type of product is characterized by high strength and durability and excellent resistance to adverse weather conditions. |
| Vinyl siding | The most popular and widespread option these days for a number of reasons: simple instruction on installation, low weight of panels, their moisture resistance and durability. In addition, the material is well cut and resistant to aggressive chemical attack, you can choose desired color of pretty a large number possible options |
Important!
For finishing the foundation, a special basement siding on a vinyl base, it is distinguished by increased strength indicators and has different options textures imitating brickwork, a natural stone and much more.

Let's find out if it is possible to sheathe wooden house siding without harm to the structure? Everything is simple here: if the technology is followed and correct preparation, then no problems will arise in the future, because the structure is breathable and well ventilated.
Description of the workflow
If you carry out the work with your own hands, then you will have to deal not only with installation, but also with preparatory measures and the acquisition of everything required, so we will begin our consideration with these nuances.
Preparation
First of all, you need to purchase everything you need:
- The main material is calculated as follows - a building plan is taken, the area of all walls is calculated, the openings of wooden windows and doors are subtracted from this figure. It is best to consider not only the total volume, but also to plan the position of the panels, so you can determine in advance where to use the trims and whether it is possible to save money due to the competent layout of the elements.
- It is also necessary to purchase components that are quite diverse - from platbands and near-window panels to initial, finishing, connecting strips and other elements. All these details are calculated in running meters so as not to overpay or purchase extra materials, the photo below shows how the main components look.

- To preserve the wood, the surface should be covered with a waterproofing vapor-permeable membrane, it will significantly extend the service life of the structure by maintaining optimum humidity in the material. A special film is also spread over the insulation, it protects the mineral wool from wind and moisture from the outside, but is vapor-permeable from the inside.

- For the frame you will need either wooden blocks, or a galvanized metal profile. The second option is much more durable, but its cost is much higher, so the choice depends only on your preferences and capabilities.
How to carry out the work
The technology for cladding a wooden house with siding is quite simple, so even those who never carry out such work can cope with it, the sequence of operations is as follows:
- First, the surface is cleaned of contamination and treated with a fire-retardant composition so that the material becomes resistant to fire and does not undergo rotting and pest damage.... If there are areas affected by mold, then you should definitely get rid of them, do not leave the fungus inside.
- Further, the base is closed with a vapor-permeable membrane, this is done before... The easiest way to work is to use construction stapler, it is easy to use and allows you to fix the material much faster than any other method.

- Next, you need to make a strong frame, for this, either a bar with a section of 50x50 or more is used, or a metal profile, usually the height of the crate should be equal to the thickness of the insulation... The most important thing at this stage is to create an even base, so control the position of each element with a building level, you can stretch the cord between the extreme posts to create an additional reference point.
Important!
In order to adjust the position of the frame, it is easiest to use suspensions for fastening, they are pre-screwed to the base along the line of passage of the bar, then they are bent and fix the position of the element exactly as needed.

- Further, between the crate, insulation is laid, it is best to use mineral wool 50 mm or more thick... The step of the frame should be equal to the width of the sheets for thermal insulation, usually this figure is 50-60 cm. If insulation is not required, then this and the next stage do not need to be performed.
- After warming, the surface is closed waterproofing material and a counter-lattice is made on the surface of the frame, a 20 mm thick bar is suitable for this... This is necessary to create ventilation under the exterior cladding and to prevent condensation.
- After carrying out all the above measures, you can proceed to the installation of the siding, first the starting bar is attached and the first sheet is inserted into it, everything is quite simple and quick... The elements are fixed either using galvanized 3x30 nails with an enlarged head, or using self-tapping screws with a press washer measuring 4.2x25 mm or 4.2x19 mm.

The external decoration of the building facade is not only an attractive appearance, but also the protection of the walls from the influence of external factors. As a plating, choose various materials, differing in their characteristics. The most common home decoration option is metal siding. This is a beautiful, reliable and easy-to-install material that is easy to install on your own if you familiarize yourself with the technology of cladding.
Metal siding is universal material, which can be used as external cladding on any building. Sometimes it is used for interior decoration... It is a lightweight panel made of steel, zinc or aluminum. From above, the surface is covered with paint with a protective varnish or a layer of polymer.
As for the dimensions, almost all panels have standard dimensions:
- full width - 211 mm;
- useful width - 188 mm;
- thickness - 5 mm;
- length - 0.5–6 m.
Some products may be 100–300 mm or 500 mm wide. The length recommended by specialists, with which it is convenient to work, is 3 m.
Extensive assortment color solutions and forms of metal siding will help to implement any design ideas... The cladding "under a tree" looks great and, in contrast to natural wood weighs much less without putting additional stress on the home. From a distance, it is difficult to understand that the cladding is made of siding, not wood. Much can be said about the merits of this material. There are several main advantages:
- affordable price compared to any other cladding. The exception is galvanized material, it is more expensive than the rest of the range;
- resistance to any weather factors, not susceptible to attack by bio-pests;
- easy installation and high speed fulfillment renovation works in any season;
- it is used for finishing facades of any geometric shape;
- can be used for arranging a ventilated facade;
- the color of the facade of the house will remain the same even after prolonged exposure sun rays;
- long service life, more than 50 years.
The disadvantages of the material include mechanical instability. If the cladding is hit hard, it will dent. Such a defect is not eliminated and a piece of sheathing will have to be changed. Unlike vinyl siding steel is not subject to fire, therefore it is considered fireproof.
Recommendations for working with metal siding for exterior home decoration
Self-assembly of metal siding is not difficult, but like any construction process requires certain knowledge.
- It is necessary to calculate in advance the amount of material required for finishing. Some manufacturers' websites have online calculators that are convenient for making calculations. If you want to do it yourself, then you need to take measurements of all sections of the facade that will be finished. It is recommended to depict schematically how and where the siding will be located, to indicate the combination of colors, if any. This will make it easier to calculate the amount of finishing.
- In parallel with metal siding, the calculation of fractional elements (slopes, soffits, platbands, linings, etc.) and related materials is performed.
- It is better to order the cutting of siding into parts according to your measurements from specialists. At home, cutting is performed with a jigsaw or a reciprocating saw.
- All finishing elements are mounted taking into account a thermal gap of 1 mm between the metal and the screw head. This is necessary so that the parts do not deform during thermal expansion.
- Front installation work it is necessary to carefully study the instructions for working with the selected material.
- Purchased metal siding, prior to installation, is stored horizontally on a flat surface away from the street.
Necessary tools and complete set of coating
After all necessary calculations, you can think of the tools you will need for installation work. Depending on the method of fixing the cladding, you will need:
- metal scissors for trimming siding sheets;
- puncher, if you need to make additional holes for fasteners;
- a screwdriver for attaching the cladding to self-tapping screws;
- punch - a special tool for cutting metal by bending it up or down;
- rivet gun, if the outer corners are fastened to these elements;
- hammer for nailing;
- building level, preferably laser;
- tape measure with a fabric base so as not to scratch the siding coating;
- plumb line;
- square.
Do not forget about protective equipment: glasses and gloves. It is also recommended to purchase a can of paint in a color matching the facing coating. It is possible that the coating will be damaged during the installation process, and the resulting defect can be eliminated with paint. Do not use a sander to clean the edges and corners of cut sheet metal siding, because this can damage the paint and cause corrosion.
The exterior decoration of the house is not limited only to metal siding panels. The package includes many other elements that help to create a single structure on the facade of the building. Additional elements include:
- cornice strips - for the design of the joints of panels, window and doorways;
- external and internal corners - for external corners and internal docking corners;
- window strips - for slopes on windows and doors;
- starting strip - lower guide support for subsequent strips;
- finishing strip - for the top panel;
- soffits - for the design of overhangs and cornices;
- connecting strips - for the design of the connecting strips;
- J-strip - for decoration of windows and doorways.

It is advisable to buy all accessories and additional elements from one manufacturer so that there is no discrepancy in shades and joining of parts to each other.
Metal siding technology
Facing the facade of a private house with metal siding with insulation takes place in several stages, each of which is important in its own way.
Preparatory work
If the cutting of the material was not carried out in advance, then the cutting must be done independently. The protective film is first removed from the cladding. If this is not done, then under the influence of the sun's rays it will stick so that it will be very problematic to tear it off.
Next, the wall is prepared, cleaned of irregularities, if old finish interferes, it is removed. All existing cracks are embroidered, primed and puttyed. For defects more than 15 cm, it is necessary to carry out reinforcement. All elements are dismantled: downpipes, antennas, etc.
The base requires special attention. The foundation must be without problem areas... Plinth and walls are processed bituminous mastic to provide waterproofing. Wooden houses are impregnated with fire retardants. On them, if necessary, a vapor barrier is attached.
The next step is to carry out the markup so that the vertical guides lie flat, without distortions. A pencil and a laser level are used for marking. The distance between the posts is usually 50 cm. You can also mark out the fasteners. Vertically, beacons are installed every 70-80 cm, horizontally - every 50 cm.
Erection of the lathing
The lathing is important element for the installation of metal siding. Basically, for its arrangement they use standard materials: wood or metallic profile... Construction process timber frame as follows.
- A bar with a section of 50x40 or 50x50 is treated with an antiseptic and fire retardant.
- Markings are made on the wall in 50 cm increments for fixing the beams.
- When the wooden blanks are dry, holes are drilled on them for fasteners every 20-30 cm. The projection of all holes is transferred to the marking and holes for the dowels are drilled with a puncher.
- The bars are set according to the markings and pre-fixed. After that, a substrate is laid between the planks and the wall, and when they level out, they are finally fixed.
- The gap between the timber and the wall is filled polyurethane foam to exclude "cold bridges" after the arrangement of the insulation.
The lathing made of a metal profile is erected in a similar way. After the marking, the hanging frame elements are attached to the wall. Next, the corner elements are first inserted, the cord is pulled, and the remaining segments are mounted. Make sure that all parts of the frame are clearly level. The quality of the entire cladding as a whole depends on this.
Hydro and thermal insulation of walls
At this stage, insulation plates are laid between the sections of the lathing. It can be mineral wool, polystyrene, polystyrene, etc. The density of the material is selected based on the region of residence. The farther north, the thicker the insulation you need to use. It is fixed with the help of "fungi". When using polystyrene, all gaps are blown out with polyurethane foam.

A film is stretched over the thermal insulation to drain condensate from the wall surface. The elements are overlapped and glued with construction tape.
On the advice of specialists, it is better to build a counter-lattice on top of the waterproofing membrane from wooden beams... This is necessary to improve ventilation of the entire structure.
Installation of starter bar, outer and inner corners
Finishing the facade of the house with metal siding is approaching its final stage. Before laying the strips, set the starting bar, having previously determined its location. The strip is mounted on the bottom lathing strip at a distance of 40 cm from the bottom horizontal line building. The starting element sets the direction for the rest of the metal siding strips, so its horizontal position must be controlled by the building level. The starter bar is attached to the wall with self-tapping screws. If the house is made of wood, then the installation is carried out immediately with fasteners. If the wall is brick, first holes are drilled in it, dowels are inserted into them, and only then the bar is attached to the screws.
External and inner corners are installed strictly vertically. If you deviate even by a few degrees, all subsequent elements will lay down crookedly, which will negatively affect the structure as a whole. For even installation, the corner strip is fixed at the top with two self-tapping screws, but do not tighten them tightly. Further, starting from the bottom, the remaining fasteners are screwed in one by one. Like all screws, on corner elements they are not twisted completely, but 1-2 mm are left for thermal expansion... If it is necessary to lengthen the corner strip, it is increased by overlapping one element with another 2.5 cm.
Panel mounting
When all the guide strips are installed, the installation of the ordinary elements is carried out. The first row is wound around the corner, snaps into place on the starting plate and is fastened with self-tapping screws into the holes on the profile on top of the panel. Make sure that the self-tapping screw is located exactly in the center of the hole and do not tighten it all the way. It is necessary to leave gaps of up to 5 mm between all subsequent strips. Also, cut the horizontal plank to the desired length, but do not wind it completely at the vertical angle, leave about 5-8 mm. After the edge of the bar is wound behind the vertical element, it is lowered until it is aligned with the previous row and checked with a level for horizontalness. According to this scheme, all subsequent facade cladding is performed.
At the end of the laying of the metal siding, a finishing bar is installed. If it is too wide, cut it, then bend it so that it goes over the edge of the previous plank. Along the edge of the siding, notches are made that go into the installed profile, which provide reliable fastening.
Finishing of windows and doors
For cladding window and door openings, a J-profile or special platbands are used. Installation is carried out depending on the depth of the openings. Recessed windows and doors are decorated with platbands similar to the corners. Sometimes the platband is placed together with the slopes.

If the niches are flush with the wall, then for their cladding, the elements intended for this are used - aprons. Their installation begins from the bottom of the window niche. Next, the side parts are mounted. It should be borne in mind that the side elements must be located on top of the lower bar. Top panel should overlap with side parts. A cornice is attached to the lower bar.
Without decorative design windows and doors, a mark is made on the profile, which is located at a distance equal to double the length, width and height of the openings. Cuts are made in the corners, and the profile is bent with the letter P. They are fastened along the perforation in the central part, while departing from the corners by about 15 cm. Next, the J-profile is installed. All openings are made in a similar way.
Metal siding of a house today is one of the most popular ways of finishing the facade. It has an undeniable cost advantage over other facade materials, for example.
When purchasing it for finishing a building, consumers often do not know how to sheathe a house with metal siding with their own hands.
Basic material parameters
Metal siding is facing material made from galvanized iron sheets. These are the lungs steel panels covered with a polymer film of various colors and shades. Used metal siding for house cladding.
Note! The sheets of material are provided with special grooves for joining when stacking the panels vertically on top of each other. Therefore, the screw heads close well from the outside and make the façade aesthetically pleasing.

The material is commercially available in the following sizes:
- The strips have a total width of 211 mm and a useful width of 188 mm.
- The manufacturer offers strips with a length of 0.5-6 meters.
Calculation of the amount of material
Instructions for cladding a house with metal siding include methods for calculating the amount of material, depending on the complexity of the structure:
- Siding has certain geometric dimensions, it can be calculated with an accuracy of 1 m² (see).
- It is more convenient to make a schematic drawing of the house and apply all dimensions (height, width of walls, window, doorways) to it.
- Before sheathing the walls with metal siding, it is necessary to determine the area of the building that is planned to be sheathed with panels.
As a rule, calculations are performed according to the formula:
- S total = S walls - S openings.
- It is good to draw up a diagram showing the exact location of the strips of material on each wall of the house.
Advice. The use of such sketches allows you to perform the calculation more accurately, as well as obtain an installation diagram.
- It is convenient to use it when the house is clad with metal siding with your own hands.
According to the sketch of the house with the location of the panels, you can calculate the number of panels = H / S of one panel (H is the height of the building).
Calculation of the number of components

Exists different variants house cladding with metal siding, with a different number of components:
| Name | Appointment | Interchangeability | Calculation method |
| Start and finish rails. | It is used to fasten the bottom row of panels, and the finishing one is used to complete the mounted surface. | A lock is cut off at the panel, which is installed as a starting strip. The remaining strip is mounted as a final one. | The length of the perimeter of the house (in running meters) is divided by the length of one plank and the quantity in pieces is obtained. |
| Outside and inside corners. | Sheathing metal walls siding provides for their use to decorate the corners of the building. | It is recommended to count the corners one by one (the places of their connection are visible, it is better to avoid this). Basically, the number of corners of the house is multiplied by their height, and the result is divided by the length of the profile. | |
| J-profile. | It is installed as the end of a plane, usually it should cover vertical endings (windows, doors) and diagonal (gables). | Can replace the finish bar. | Calculated in running meters to get the quantity, this value is divided by the length of the profile. |
| H-profile. | Used to connect siding panels. | Wall cladding with metal siding can be performed without joints (the length of the panels is selected according to the width of the wall). | Piece by piece. |
| Window profile. | Installed if door or window openings are recessed deeper than 20 mm. | J - profile, if its width is sufficient. | Piece by piece. |
| Platband. | Used for finishing openings. | The house can be sheathed with metal siding using a J - profile. | Piece by piece. |
Varieties of material
A fairly extensive range of colors and textures of metal siding is offered on sale:
- There is a material that makes it possible to finish the facade "under a tree" (see), to make an imitation under a rounded beam.
- You can consider various options for cladding houses with metal siding. For example, when finishing, use a material with a protective and decorative coating under a log.
- This siding is characterized by a layer that imitates wood texture and color. Thus, the clad house becomes like a log house.
Note! In this case, it is important that when finishing natural wood it is necessary to additionally strengthen the foundation.
Stylized wood or stone siding (see) with all the fasteners weighs so little that the load of the sheathing itself can be ignored. In addition to weight, this material has a number of other advantages.
Main advantages
Metal siding is characterized by:
- Fast and simple DIY installation technology.
- High strength and practicality (does not fade, does not burn, does not rust).
- Durability (will last at least 50 years).
- Wide operating temperature range (in the range of -50 ° C ... + 50 ° C).
- Many are attracted by the price of the material, but its use has other positive points... For example, it is convenient for them to decorate houses with complex geometry.
- Metal siding is used for. Insulation is laid under the material and additional heat and sound insulation is created.
Facade cladding with metal siding can be performed on newly erected walls, and work can be carried out in any season of the year.
Installation guide

On external walls mount the frame - the base of the future facade. Most often they use a metal profile, sometimes a wooden bar.
So:
- The lathing is vertically level with a step of about 500 mm.
- The metal siding of the house begins with fastening the lower horizontal row of planks and continues with the installation of subsequent rows.
- Metal siding is attached to the crate with self-tapping screws screwed into the center of a special mounting hole.
Advice. It is necessary to leave a gap of about 1 mm between the strip and the fasteners, then the change temperature regime will not deform the material.
The whole process can be roughly divided into stages:
- Surface preparation.
- Marking.
- Installation of brackets.
- Thermal insulation.
- Installation of profiles and other elements.
- Fastening siding.
Step by step guide
The operations must be performed in this order. To avoid any difficulties, it is recommended to watch the video in this article before starting work.
Advice. On preparatory stage everything that can interfere with the cladding process (antennas, sinks, etc.) must be removed from the facade of the building. The old facade finish is removed and any surface defects are corrected.
- Marking is applied along the facade. It is necessary to outline the areas of the surface to be sheathed, taking into account the sequence of work. You also need to indicate the position of the fasteners with the installation of beacons.
- Next, it is necessary to mark the attachment points of the brackets with a step of 0.5 m (horizontally) and 0.8 m (vertically).
Before the house is clad with metal siding, brackets are installed according to the finished markings. For which holes are drilled with a diameter for which dowels or anchor nails will be used.
Working with brackets

The brackets are mounted on an isolon gasket. V different conditions different lengths of brackets and fasteners are used.
With an uneven surface of the house (in terms of level), the brackets are selected as follows:
- When attaching the brackets at the lowest level, they should protrude beyond the limits. For example, there is a significant depression on the surface. Then a bracket is installed, the size of which is 2-3 cm larger.
- Before sheathing the house with metal-plastic, the insulation is tightly butt-welded. When choosing the thickness of the material, the climatic conditions of the area are taken into account. For the installation of the plates, dish-shaped nails are used, which ensure a reliable fixation of the insulation.
They are made of 2 parts:
- Plastic dowel with a wide head.
- Metal rod.
The number of fasteners is taken at 6-7 pcs / m² of insulation, for the protection of which a vapor-permeable membrane is used. It is fixed with an overlap of 10 cm.
Installation of guides

They are fixed to the brackets with 4.8x28 mm self-tapping screws or rivets.
Advice. After that, the finishing plane must be adjusted by changing the length of the brackets within 3 cm (the corresponding instruction is used).
The rest of the structural elements are also installed:
- Drain mountings.
- Guide and slope planks.
- Corner connections.
Let's take a closer look:
- A plinth drain with a guide bar is attached to the vertical profiles with 4.2x16 mm self-tapping screws. The horizontal position of the siding must be checked by the level.
- The metal siding of the house begins with the first row of planks installed to the starting plank. Top edge material is attached to the guide profiles with self-tapping screws.
- Subsequent rows are fixed in a similar way: they are superimposed one on top of the other.
- When working, it is regularly necessary to check the levelness of the planks with a level. Recommendations on how to properly sheathe a house with metal-plastic, pay attention to the fact that you cannot fasten the planks too tightly to the frame.
- With temperature fluctuations, the dimensions of the plates change, which can lead to serious deformation of the entire system.
At the end, it is attached the last row adjacent to the roof, using shaped elements with special strips. You can compare the result with a photo of warm and beautiful facades.
When decorating houses in recent times, metal siding has become very popular. This finishing material is made of stamped galvanized sheets that are coated with polymer. Next, we will take a closer look at the features of this material and the technology by which the house is finished with metal siding.
Features of metal siding
So, using this material is a great way to insulate a building and improve its design. The coating is used when arranging ventilated facade systems... Installation is carried out on a prepared lathing, installed on the walls strictly at the level ().
The advantages of metal siding include the following points:
- The ability to finish the house with your own hands, due to the ease of installation;
- High strength of the coating;
- Durability that reaches 50 years;
- Fire resistance;
- Resistance to temperature extremes;
- Frost resistance;
- Environmental friendliness;
- Resistant to corrosion and microorganisms;
- Low coefficient of expansion;
- It has an attractive appearance, it can imitate wood and other materials.

These advantages are quite enough to make your choice in favor of metal siding, however, you should also familiarize yourself with some of its disadvantages:
- Relatively high price when compared with other types of siding;
- Large weight, which increases the load on the foundation, especially if a large area of the walls is covered with this material.
- Cannot be repaired after mechanical damage such as scratches and deformation.

Installation of metal siding
Decorating a house with metal siding is carried out in several stages:
- Preparatory work.
- Drawing on the surface of the marking.
- Installation of brackets.
- Installation thermal insulation material.
- Installation of profiles, as well as all kinds of shaped and additional elements.
- Installation of the siding itself.
When performing all these operations, this sequence must be strictly observed. Without correct organization process, it is impossible to obtain a high-quality result, in addition, this will avoid unnecessary financial costs.
Note! Personal safety equipment such as gloves and goggles should be used when cladding the façade.
Required tool
For self-assembly metal siding, you will need the following tools:
- Square;
- Roulette;
- Plumb line;
- Hammer;
- Marker;
- Building level;
- Screwdriver;
- Perforator;
- Scissors and a hacksaw.

In the photo - installation of insulation
Preparatory work and marking
First of all, it is necessary to remove all elements from the surface of the facade that may interfere with construction works ().
As a rule, these elements include:
- Plums;
- Antennas;
- Visors;
- All kinds of signs, etc.
In addition, it is necessary to eliminate existing defects, such as peeling plaster, deformed pieces of beams, etc.
After the surface is prepared for further work, you need to apply the markings, which will simplify the work in the future.
In particular, it should be indicated:
- The position of the fasteners;
- Locations of lighthouses;
- Places of installation of the brackets, given that they should be located with a horizontal step of 60 cm and a vertical step of 80 cm.

Thermal insulation
An important stage in the work is the installation of insulation. Plates must be installed end-to-end so that there are no gaps between them. To fix the insulation, you should use dowels with a wide head, which are called "umbrellas".
After finishing the building surface with insulation, it must be protected with a vapor-permeable membrane. It needs to be fixed with an overlap about 10 centimeters wide.
Installing the frame
The installation of the frame is carried out in the following order:
- Work must begin with the installation of the brackets.
- Then guide profiles are installed, which are attached to the brackets with self-tapping screws or rivets.
- After installing the profiles, you should perform a plane correction, which is carried out by changing the length of the brackets.
- Next, you need to install the fasteners for the drain, corner joints, guide strips and other structural elements. In addition, you must remember to install the sloping planks on the windowsill.
Note! The starter strip is attached to the bottom edge of the metal profiles.

Siding installation
Now you can proceed directly to the installation of siding.
Installation instructions are as follows:
- Installation starts with the first row, which is attached to the starter bar.
- The upper edge of the panel is fixed with self-tapping screws to the guide profiles.
- Subsequent rows are assembled on a "one by one" basis. At the same time, in the process of work, it is necessary to check the horizontalness of the installation using a level.
- At the final stage, you need to fix the last row of metal siding, adjacent to the roof, with special strips and shaped elements.
Note! Self-tapping screws must be installed strictly in the center of the hole in the siding. In addition, they do not need to be twisted by one turn, which will allow the material to move freely during thermal expansion. Otherwise, the entire façade system may be deformed.
Among the facade cladding materials of individual residential buildings and small industrial buildings one of the very first places is confidently occupied by metal siding. With all its accessibility and practicality, it makes it possible to create an attractive building interior. To carry out the installation of metal siding is quite within the power of any craftsman.
1. Metal siding as a facing material and its advantages
Metal siding is made in the form of long narrow sheets that are convenient for cladding. It is made of galvanized metal with a thickness of 0.5-0.7 mm and is painted in various colors for decorative purposes. The siding strips have profiled ribs for an attractive appearance and added strength. There are several main types of siding:
- Regular profiled
- Under the log
- Under the timber
Metal siding has convenient system fasteners, facilitating installation and minimizing the difficulties of fastening and, accordingly, damage to the material during installation.
Metal siding is similar in shape and appearance to vinyl siding, but has differences in structure:
- Stamped steel at the base
- Corrosion-resistant special coating on steel
- Priming coat over anti-corrosion coating
- Has outside polymer coating painted in various structures for decoration
You can list whole line advantages of metal siding over other types of cladding, such as
- Facing brick and stone
- Vinyl siding
- Plaster
- Wooden decorative panels(the so-called "lining")
- Plain edged board
Metal siding differs from all these materials:
- Increased durability
- No significant thermal deformation
- Fire resistance to fire
- Resistant to precipitation
- Chemical resistance
- Increased service life
Unlike brick cladding, metal siding is easy to install. Compared to vinyl siding - higher environmental friendliness, as well as lower cost compared to some types of finishes
2. Preparation for the installation of metal siding
For this, the surface area to be clad is determined. Don't skimp on exclusion window openings- part of the material will be spent on finishing. Better to have a little of it than not enough, and you will have to buy it. The panels are usually long, and it can be difficult to bring just one missing panel if you brought the entire volume, for example, to the Gazelle. And the leftovers and scraps will always fit in the household.
When designing the cladding, it is also necessary to accurately calculate the number of additional elements:
- Starting and finishing tapes
- Slopes
- Ebb
- Internal and external corners
- Planks for framing openings
- Connecting profiles
Below we will discuss these elements in more detail.
Some provisions should also be kept in mind:
- Storage of material is carried out in a place closed from precipitation
- Do not place heavy objects on the siding sheets.
- An angle grinder cannot be used for cutting, as it destroys the polymer and protective layer
Here is a list the necessary tool for mounting metal siding:
- Reciprocating saw or jigsaw
- Roulette
- Level
- Ladder
- Metal scissors
- Screwdriver
- Hammer
Fastening of metal siding is done with nails or self-tapping screws.

3. Preparation of facade surfaces
Cladding surfaces may vary - either it is a wall brick house, either folded from logs, or made according to the method frame structure... In each case, the surfaces are very different. Peculiarities brick wall- a solid base, which makes it difficult to attach the cladding. In the case of a log wall, a wavy surface. Frame houses usually sheathed with flat sheets, for example, OSB, simultaneously with flat surface and pliability for fastening.
In any case, it is necessary to create a frame for metal siding. He, firstly, will level the finishing surface, and secondly, it will make it possible to leave the necessary ventilation gaps. In some cases, the frame will allow you to create additional insulation of the facade - if you put insulation between the wall and the metal siding.
In this regard, the structure of the wall surface itself does not play a big role in the finishing cladding. It is only necessary to clean the walls of the facade from dirt, from possible fungal deposits, remove protruding nails, dismantle protruding elements. It is recommended to cover the surface to be treated with an additional layer of fire retardants and antiseptics.
There are two main types of frame used for metal siding:
- From a metal profile
- From a wooden bar
Thus, before installing the metal siding, you need to make the so-called lathing of the facade.

The main rule in creating lathing is that the supporting elements should be perpendicular to the siding strips. If it is installed vertically, the timber is nailed to the wall horizontally, and vice versa.

4. Installation of battens for metal siding
Correct installation of the lathing will ensure its subsequent correct and convenient fastening, therefore, this stage must be approached very responsibly.
In the case of a lathing from a profile on the surface of the wall, markings are first made - it determines the places of attachment of the brackets. They are installed on the line of intersection of the marking. Guide rails are attached to the brackets. The step of installing the slats is about 50-60 cm. The profiles are always attached at the bottom and top of the wall, in the corners and around window and door openings.
The lathing with a tree is carried out by stuffing a bar on the wall (usually 40x60 mm bars are taken), the step, as a rule, is 30-40 cm.
The main rule for creating a lathing is the removal of the metal siding attachment plane. For this, a building level is used, as well as a long rail. The verticality of each beam is set according to the level - and the long rail should adhere without gaps to all the bars of the sheathing.
5. Installation of metal siding panels
Before fixing the panel, you need to remove the protective film from it.
Siding panels have special mounting holes in the shape of an elongated oval. Hole play is needed so that the panels can move freely sideways. This is necessary to take into account the thermal expansion-contraction of the panels. They are not as significant as in vinyl siding panels, but they should also be considered. Fastening panels to wooden crate made with nails or self-tapping screws. When screwing in self-tapping screws and hammering in nails, pay attention to the following:
The head of the nail or self-tapping screw should not press the panel “tightly” (due to thermal expansion). After tightening the screw tightly, unscrew it a little, and the nail is not hammered completely. Can be placed in the attachment point metal plate(for example, a coin) and then remove it. This will not affect the overall strength of the fastening, since the panels are pressed against the wall due to the weight of the subsequent ones, mounted with an overlap.
Nails and self-tapping screws must be introduced strictly perpendicular to the lathing beam, otherwise distortions will occur, subsequently bending a single panel, which will affect the unevenness of the overall cladding plane.
6. The procedure for cladding the facade with metal siding
Consider the installation of metal siding panels on the facade of the building - from the lowest to the highest part, taking into account window and door openings. The work progress should be as follows:
- A plinth ebb is attached to the lathing beam, which is necessary to protect the foundation cladding
- A starting bar is installed above the low tide.
- The starting bar is level with the horizon
- Corner profiles are installed on the sides of the wall
- If the siding panels are shorter than the length of the house, join profiles are installed.
- End strips are mounted near window and door openings
- The metal siding panels themselves are installed. They are fastened from bottom to top with constant monitoring of the horizontal position (be sure to check the level every three rows)
- Near a window or doorway, the panel is cut to length or width
- The framing of the window or door opening is made. First, the ebb is installed, then the slopes and the upper bar
- Top panel attaches to the finish bar

7. Vapor and thermal insulation of metal siding cladding
Often, metal siding cladding is carried out together with additional insulation walls. This is useful not only from the point of view of house insulation, but also for better preservation of the cladding material itself. The fact is that due to possible sharp changes in air temperature by back side the panels inevitably occur periodic moisture condensation. Despite the anti-corrosion film, moisture can gradually destroy it, which will lead to corrosion of the metal from the inside. Creation of hydro and vapor protection of panels will significantly increase their service life in this case.
The thermal insulation material should be fixed directly to the wall of the house. For this, special disc dowels are used. As a heat-insulating material, it can be used as mineral wool and plates of expanded polystyrene (polystyrene), which are laid between the bars or profiles of the sheathing. A vapor barrier film must be installed on top of the insulation, which does not allow the insulation to be dampened. It is mounted even if the insulation is not laid - to protect the wall from moisture condensation. A small ventilation gap must be left between the siding and the vapor barrier. For this, an additional counter-lattice of thin strips is created between the film and the panels, the thickness of which should be about 3-4 cm.

8. Conclusion
Correctly installed metal siding will give your home an attractive appearance and will last long enough. The choice of siding depends on the purpose of the building, on the tastes of the owner and on the general design solution at home. It is quite possible to carry out the installation of metal siding with my own hands if you have skills in construction. It is only necessary to follow all the recommendations and the order of work.
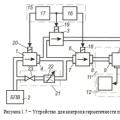 Automation of control of the tightness of the purge valve of the gas manifold of boiler plants
 Useful information about installing air conditioners with your own hands
 Site drainage project: selection of location, slope, depth, drainage system elements