Homemade incubators for eggs. The ideal maternity hospital for chickens, or how to make the incubator with your own hands at home. Incubator with your own hands at home: Temperature mode for birds of different breed
Turn
Guided by the instructions set forth in this article, you can make the incubator with your own hands. It will have the same functionality as the store device, but it will cost you much cheaper. In order to collect the incubator with your own hands at home, you do not need to possess special skills and knowledge, follow our advice and everything will work out.
Where to start, what tools will be needed?
Before starting the assembly, decide on the main material from which the product will be consisting. If you have an old refrigerator, you can take it as a basis. Large pieces of foam plastic are also suitable, no less than 40 centimeters or a simple cardboard box. The determining factor when choosing a material is its thermal insulation capacity.
For heating, it will be necessary to equip the device with a lamp or heating instrument, take care of temperature control. In the incubators, you can adjust the auto-rotation by adding additional mechanisms.
Automatic eating coup in the incubator is needed to save time. It is usually installed on large devices calculated on 200 or more eggs.
All you need for assembly:
- Refrigerator (if you have conceived to assemble an incubator from the old refrigerator), a box or foam.
- Standard incandescent bulbs with a capacity of 25 to 40 W. The number of lamps depends on the size of the incubator, a small device for 100 eggs can be warm up four lamps.
- As an alternative to lamps, you can use electrical lamps.
- Incubator tray made of metal grid or analogs. The grid should keep eggs tight. In the refrigerator can be installed wood trays.
- Thermometer, fan.
- Temperature controller (if you design an automatic incubator). To do this, you can use bimetallic plates, electrocontacts or barometric sensors.
- MotorTector (then from which the coup mechanism consists). If necessary, bearings - 4 pieces, clamps for their screed.
- Sealant for embedding cracks for insulation purposes, screws, various fasteners, metal corners.
- To track the level of humidity use hygrometer.
Attention! Lamps for heating need to be installed at a distance of more than 25 centimeters from eggs.
Decide with the size of the incubator, decide from what you will collect it. Then select all the necessary components from the list given above, and you can start assembling.
How to determine the size?
Incubator sizes need to be planned in advance. This parameter depends on the volume of your production, the number of chickens. The decisive factor in this issue will be the number of eggs that you plan to lay in the device. Also on the size of the incubator affects the type of heating system, the location of the lamps and the material from which the device is made.
For more accurate work, you will need drawings with dimensions that will look approximately like this:
Rice1. Example of drawing
Here is a drawing of a small size incubator (by 45 eggs) 25 cm in width and 40 cm long.
Model dimensions for 100 eggs
Forming the size of the incubator, consider that 2 cm temperatures from the egg should be in the range of 37.3-38.6 degrees Celsius. Usually make a medium-sized device designed for 100 eggs. Cells make about 45 millimeters in diameter and 60-80 millimeters in depth. It is recommended to make a replacement grille so that the sizes can be adjusted for different types of eggs.
Collecting the home incubator with your own hands per 100 eggs, you will get a 60-centimeter device. Weighs the device about 3 kilograms. It can be re-equipped and used to accommodate duck, goose, turkey or quail eggs.
If you collect the house incubator from the old refrigerator, it will take more space and contain more eggs than a foam or cardboard product.
How to calculate the size?
Dimensions for the incubator can be determined using the table below. The table shows the dependence of the length of the width and height from the number of accommodated eggs.
Making an incubator for chicken eggs with her own hands, you must take into account that with the same capacity, the design of foam will be more voluminous than from the cardboard.
Larger models are usually done in several floors using other technologies. Therefore, the calculations are made there otherwise.
How to make an incubator from a refrigerator with an automatic coup of eggs?
The incubator device has many similar features with a refrigerator device. Therefore, from the refrigerator you can easily make an egg incubator. The case of this device is well kept warm. It can accommodate more eggs, each tray for the incubator will lie on a separate rack.
In the role of racks will be the shelves of the refrigerator. Inside there will be optimal humidity thanks to the fluid exchange system located at the bottom of the household appliance. From this chapter you will learn how to make an incubator from the refrigerator, adding the thermostat, the heater and the rotary mechanism.

Figure 2. Scheme of the homemade incubator from the refrigerator
Consumables and their price
Knowing how to make a self-made incubator, you will save 70% of the store value of the device. The easiest incubator from the refrigerator can be collected without investments. But if you want to make it convenient and efficient, you will have to buy several additional items.
- Old refrigerator is usually purchased for free, you can buy on the ad is not more expensive than 1,000 rubles.
- Light bulbs by 220 volts - from 25 rubles per piece.
- The thermostat is from 300 rubles.
- Fan - from 200 rubles.
- Chain with an asterisk or metal rod.
- The drive for the coup of eggs is from 500 to 5,000 rubles. You can get free of charge. Any motor deuctor is suitable, for example, from a car wiper.
Basic requirements for the camera
The homemade incubator from the refrigerator must meet the minimum requirements that will make the removal of chickens possible. At the conclusion of a cub is given about twenty days. During this period, the incubators maintain humidity at 40-60 percent. As soon as the chicks begin to appear on the light, the humidity increases to 80 percent. At the final stage, before selecting chickens, the humidity is returned to the initial level.
Eggs require compliance with the temperature regime. Therefore, your device must be manufactured taking into account this fact. Temperature requirements vary depending on what eggs you place in the tray for the incubator. Pick the mode in accordance with the table below.
Temperature table
Ventilation system
The manufacture of an incubator from the refrigerator assumes the installation of the ventilation system. Ventilation affects temperature and humidity inside the device. Prevents the formation of adverse climate eggs. The average vents should be about 5 m / s.
Home incubator with your own hands from the refrigerator must be equipped with two ventilation holes that are drilled in the case. One of them has below, and the other. Plastic or metal tubes are inserted into the holes, so that the air masses do not interact with a glass gamble, which is under the sheaving of the cooler body. Adjusting the ventilation is carried out by partial or complete overlap of the holes.

Figure 3. Ventilation system
Help: The embryos begin to consume oxygen from the outside on the 6th day of incubation. At the third week, the egg consumes 2 liters of air per day. In recent days, in front of the elimination, each chick consumes 8 liters of oxygen.
Ventilation is two types:
- Permanent is a system involving the creation of a continuous movement of air, with a constant exchange and a smooth distribution of heat.
- Periodic - device, triggered once in 24 hours for active air change in the chamber.
Please note that even the highest quality ventilation does not allow you to completely abandon the coup. Therefore, the mechanism of rotation of eggs in the incubator is needed anyway. The autoturn prevents the adhesion of the nucleus to the shell.
Constant
Permanent ventilation for the refrigerator has the following principle of operation:
- The fan installed inside the chamber drives the air flow into the holes. Due to this, the air comes out. By doing the home incubator with your own hands, you must pay the maximum attention to this point.
- At exit, the air flow is mixed with fresh air, passes through heaters.
- Then the air goes down, it is moisturized due to water tank.
- The incubator device contributes to the heating of the air, which subsequently gives the heat of the eggs.
- After heat transfer, the air returns to the fan.
The device of the incubator with constant ventilation is more complicated than with a periodic system. But this allows you to simultaneously solve three tasks: air humidification, ventilation and heating of eggs.
Periodic
Periodic system. If you make an egg incubator with your own hands, then most likely it will be a manual mechanism. To install automatic power on, you will need an electronic controller. The use of the controller is not always justified, especially if you make the simplest homemade incubator with automatic enemy coup. Venting in such a system is as follows:
- Disable heating.
- Start a fan that produces air replacing and cools the eggs.
- After 30 minutes, the fan is turned off and start the heating system.
The characteristics of the fan are determined depending on how many eggs the camera is calculated. If you make the middle incubator with your own hands with an automatic coup of 100-200 eggs, then you need a fan:
- operating from the network 220 volts;
- diameter from 10 to 45 centimeters;
- with a capacity from 35 to 200 m 3 / hour.
In addition, the incubator device must assume the presence of a filter for the fan. The filter prevents dust, dirt and fluff in the blades of the device.
Refrigerator Incubator Case
This is an important aspect of the topic "How to make an incubator from a refrigerator with your own hands," since the efficiency of its operation will depend on the proper preparation of the device.

Figure 4. Case from the refrigerator
First you need to remove the freezer and other built-in equipment. Then make the holes for ventilation, as described above, in the text of the installation of this system. Install the shelves and trays in the amount that you consider it necessary.
Installation of the heating system
By doing the incubator with your own hands with an automatic coup, you will have to independently organize the heating system. To do this, use 4 incandescent lamps of 25 watts or two bulbs of 40 watts. Lamps in equal amounts are distributed between the bottom and the top of the refrigerator. The lower lamps should not interfere with the water tank setting, designed for moisturizing.
Before making an incubator at home, you need to make the necessary calculations and prepare the toolkit. Do not hurry in the process of work, as this can lead to a planning result.
Selection of thermostat
Many are interested in the question of how to make a home incubator with the optimal temperature regime. To do this, you will need a quality thermostat. There are three types that use poultry farms:
- The electrocontact is a mercury thermometer with an electrode responsible for disconnecting heating when a certain temperature is reached.
- Bimetallic plate - closes the circuit when the desired heating parameter is reached.
- A barometric sensor - closes the chain at an excessive pressure.
Figure 5. Ready thermostat
If you think about how to make an incubator with a convenient control, then install the automatic thermostat. It will significantly increase convenience and save time.
Mechanism of the coup
According to the generally accepted technology, the mechanism of rotation of eggs in the incubator should be opened 2 times a day. Some experts recommend turning the eggs twice as much.
The coup of eggs in the incubator is two types:
- frame;
- inclined.
Framework rotary device for the incubator functions due to the binding of the egg with a special frame that rotates relative to the axis.
The inclined turning device for the incubator involves the periodic slope of the tray with eggs at a certain angle. Due to this, the position of the embryos inside the eggs and their location in relation to the lamps changes.

Figure 6. Turning mechanism
The main principle of the device with automatic rotation is that the engine drives the rod that affects the tray with eggs.
How to make a simple turning mechanism for the refrigerator:
- Install the gearbox inside the refrigerator at the bottom.
- Inside the refrigerator install a wooden frame that will keep trays. Trays must be attached so that they can be tilted by 60 degrees in the direction of the door and also in the opposite direction.
- The gearbox must be firmly fixed.
- The rod is attached to the engine connected to the tray on the other side.
- The engine drives a rod, which, in turn, tilts the tray.
Video
Making a device from the box
Consider the question of how to make an incubator from the box. This option will be the cheapest from the proposed, the manufacturer will take several hours. Cardboard is a fragile material, but at the same time, it is well kept warm and easy to work with it.
There is an excellent opportunity to save - make an incubator personally. It is not so difficult, as it seems at first glance. From the article you will learn about the features of creating an incubator from affordable materials, what are the requirements for this process, and how to choose the balls for bookmark.
Description and types of homemade incubators
Incubators make various sizes according to the number of eggs, which are used when bookmark. Plays the role and place of placement of the device. But even the easiest incubator must be equipped with a thermometer for fixing the microclimate, ventilation, egg trays.
Did you know? The daily chick has the same skills and reflexes as a 3-year-old child.
pros
- Among the advantages of such "nasal", experienced poultry products call:
- savings in power consumption;
- reliability;
- the ability to lay large eggs;
- versatility (equally suitable for any species of birds);
- microclimate suitable for the survival of chicks.
Minuses
- Home Incubator has certain disadvantages:
- when it is created, it is important to take into account the requirements for such devices, otherwise the result will not be achieved;
- the appearance of such a device is often inferior to the purchase;
- if you collect an incubator for the first time, then there is probability to allow an error when assembling it.
For example, before starting the assembly of the device, it is necessary to provide every trifle. Eliminate some disadvantages possible, because it is in the forces of everyone who is going to create an incubator. Then you can not think about purchasing purchased.
Freemaker Requirements
In order for the design to perform the functions entrusted to it effectively, it must comply with the following requirements:
- temperature. Collecting an incubator, remember that it will have to maintain a microclimate at + 37 ° C ... 39 ° C;
- humidity. During the entire period of the Egg stay in the device, this parameter will need to be changed according to the process phase;
- ventilation. The device must have a fan so that the constant air flow contributes to the optimal ratio between heat and humidity.
Important! It is the complex of these three components that provides the same conditions as under the wing of the zeal.
General rules manufacturing
Today, home incubators make from a wide variety of materials and devices (there are examples of similar devices made even from microwave). 
However, their manufacture should always correspond to a number of general rules:
- it is necessary to work only with dry, pure materials;
- making a framework of the frame, make sure that there are no cracks and holes for heat leakage (if necessary, use the sealant);
- at the planning stage, consider where to supply water tank to maintain humidity in the device;
- it is important to remember about heating: there are several lamps of 25 watts for its collateral, one of which should be secured at thenex for uniform heat propagation;
- do not forget to make several holes for output ventilation;
- be sure to place the thermometer and the lighting window with a light bulb (for example, by 12 volts) on the cover to control the situation inside the incubator.
Did you know? U P. eTUKH in a chicken flock of many functions: he calls the chickens to food, protects them from small predators, prevents conflict between birds.
How to make an incubator for chicken eggs
Now in more detail how to make a homemade device for incubation of chickens and other birds.
To assemble the device, you will need diagrams and drawings with dimensions, as well as a set of tools and various materials, from which it is planned to create an incubator.
With automatic coup
If there is no desire to assemble the mechanism for automatic coup (as described in the example above), you can buy an already finished design: it is fixed in any self-made device.

The principle of operation of the automatic turning mechanism is simple and effective. It not only performs the functions of the zeal, but also allows you to save the temperature inside the device, because the lid at the same time opens less frequently. Having similar equipment, you do not have to worry about to have time to turn the eggs in the device in a timely manner.
From the refrigerator
A no less popular option of the improvised incubator is the manufacture of those of non-working refrigerators. To do this, you can use both two-chamber and industrial instruments, because their design provides for careful saving temperature (which is extremely important for the incubator).

In addition to the refrigerator, you will need to create a device:
- cardboard box;
- wooden bars to create a frame;
- incandescent bulbs (from the calculation of 4 pcs. per 100 eggs);
- trays for eggs (wooden, plastic, metal);
- fan;
- thermometer;
- thermostat;
- motor deuctor;
- bearings with clamps;
- the hygrometer (it is intended to measure humidity, so if there is such a function in the thermostat, then you can do without a separate device).
It is necessary to prepare a number of tools for work:
- lobzik;
- pliers;
- celebrate.
Assembling the device from the non-working refrigerator implies several stages:
- First drill holes from above - for light bulbs and ventilation.
- For the same purpose at the bottom of the door of the refrigerator, 3-4 are a diameter of up to 1.5 cm.
- With the help of cardboard, the walls of the device are insulated.
- At the bottom of the construction, a container with liquid is installed to save humidity in the device.
- Fix and connect fan to electricity. The optimal speed of work for it is 5 m / s. Only it is not necessary to direct the flow of air on the trays, and then the eggs can be spoiled.
- In the hole done on top, make the wires for incandescent lamps and secure heaters.
- It is necessary to equip the incubator to thermostat. In such a large device, 3 species are usually used: a bimetallic plate (electricity closes upon reaching a certain level of heating), an electrocontact (it turns off the heating at a given temperature) and a barometric sensor (closes the circuit under excessive pressure).
- Take care of the presence of a mechanism for the rotation of eggs. In nature, the zoom turns over 3-4 times a day, and it means that a special design should also be in the incubator. For it, set the gearbox at the bottom.
- Place the wooden frame for trays from above, so that they move to 60 ° forward and back.
- Reducer with trays join stock.
Video: How to make an incubator for eggs from a refrigerator
From foamflast
Polyfoam (or polystyrene foam) is considered one of the most profitable materials and suitable materials for creating a home incubator. It perfectly holds heat, has a slight weight and easy in work.
Did you know? The chick of chick needs oxygen on the 6th day of incubation.
To make an incubator from an inferno, you will need such materials:
- 2 sheet of foam (foam);
- transparent plastic sheet for windows;
- 4-5 lamps and cartridges to them;
- thermostat;
- glue;
- trays (quantity - depending on the wishes).

Also prepare the tools:
- stationery knife / scissors for cutting fasteners;
- soldering iron;
- corner and ruler.
We proceed to assembling the device:
- The sheet is cut into 4 the same parts, measuring everything with a ruler / square: it will be the side sides of the case.
- Glue them. This is a frame of a future design.
- The sheet should be divided into 2 equal parts, one of which is additionally cut into pieces of 60 cm wide (device cover) and 40 cm (its bottom).
- The bottom layer is glued to the finished frame. Tighten the whole design with a scotch, giving it hardness.
- At the top of cut square 12 x 12 cm. Close it with plastic: it will be a window and ventilation of our incubator.
Important!Some poultry farms mounted a fan in the incubator so that the air is better circulating. Only the flow of air from it should be directed to the lamps, and not the eggs: they dry up.
- From the residues of the foam to carve 2 bars 6 cm in height and 4 cm wide, then glue them to the bottom along the long sides (it will be legs that you place trays for eggs).
- On the 40-centimeter walls to make 3 holes (1-2 cm with a diameter) at the same distance at the level of 1 cm from the bottom.
- So that the material does not lure, it is necessary to cover the edge of the soldering iron.
- Mount the roof. So that it is stronger to keep on the frame, it is necessary to attach to it thin (for example, 2 x 2 cm) bars from foam at a distance of 5 cm from the edge.
- Having finished with the design, it's time to engage in its internal arrangement: to build cartridges for lamps in an arbitrary order (as well as convenient).
- Secure the thermostat for 1 cm above the tray. It is easy to choose it - it is enough to focus on the number of eggs in the planned tab. Today, there are devices capable of controlling devices and on 20 eggs, 30 eggs, 1000 eggs. If possible, it is necessary to choose thermostators, which simultaneously measure temperature and humidity.
- Put trays. Between them and side walls need a gap at least 4-5 cm, otherwise there will be no high-quality ventilation.
Video: Polyfoam incubator with his own hands
Collecting the incubator, you can proceed to the selection of eggs for bookmark. Not all of them are suitable for breeding birds.
Therefore, it is important to know how to choose the appropriate:
- pay attention to the shell: it should be without cracks, dents, tubercles or marble color;
- enlighten the eggs on the lamp and leave those of them who have a clearly visible formed yolk on a transparent background without unnecessary enclosures and spots. When the egg is coup, it should move slightly;
- choose eggs bigger, correct shape.
Important!If you plan to place eggs of various types in one bookmark (chickens, geese, ducks), then use for this trays at different levels. Each bird has its own requirements for timing, temperature, and it is important to adhere to a successful result.
But it is important not only to choose the right selection material, but also prepare them for bookmark:
- store eggs are needed in a cool place no more than 7 days;
- immediately before the bookmark, it is necessary to transfer them to a room at room temperature by 8-12 hours (otherwise it is formed condensate in a warm incubator, and this may lead to the development of mold and death of the embryo);
- the exact recommendations regarding the calculation of chicken eggs in the trays are not: Position them vertically, horizontally. As for larger specimens, they can be put in a pointed end or even under the tilt. Although most experienced poultry farkers argue that when horizontal placement, the egg is better warmed.

After laying eggs, periodically check their quality. Already 6-7 days after the start of the process, it is worth enlightening them through the lamp: the blood vessels in the protein and dark germin should already be seen.
Temperature regime for different types of birds
Temperature is the most important condition for the surgery of eggs. The lack of heat slows down the growth of embryos, and long-term supercooling leads to death. Overheating can also lead to the same consequences. If the embryos survive, then the chicks will be deformed by the parts of the body, organs.
Different species of birds have their own parameters of a suitable microclimate:
- for chickens, it is first worth keeping the level of + 38 ° C- + 39 ° C, with time dropping to + 37.6 ° C;
- ducklings better feel at + 37.8 ° C with a gradual decrease of up to + 37.1 ° C;
- goose eggs require no less than + 38.4 ° C, and closer to the end of incubation you can lower the temperature indicators to + 37.4 ° C;
- for turkey oscillations below: In the first days it is worth it to + 37.6 ° C, gradually reducing the level to + 37.1 ° C;
- quail love the same temperature (+ 37.5 ° C) throughout the incubation process.
Did you know?Chickens are not just like this: they are constantly exchanged information about what is happening around, including their own well-being.
So, make the incubator with your own hands is not so difficult and expensive. But you can create a device, ideally suitable for your conditions in size, the number of eggs for incubation. Before assembly, carefully examine the rules and sanitary standards regarding such devices, otherwise the success of the enterprise will be in doubt.
Make a homemade incubator for quail growing is quite easy. With this task, any person who does not have specialized knowledge and skills in wood processing can cope with this task. If you consider much benefit from meat and eggs of quail, then the solution to the problem of removing the offspring of such a type of birds is very relevant.
The huge use of ceremony eggs for the body is now known to all mankind. That is why the main task of breeding quails can be considered obtaining precisely Yaitz. The main difficulty lies in the fact that the females of the most egg standards are considered fairly mediocre. For this reason, it is necessary to make huge efforts to remove the offspring. In this difficult, the homemade incubator for quails will be able to help.
How to choose an incubator for quail
 Natural Incubation Method Quite often is ineffective for such reasons:
- in the poultry farming, it is hard to find a good zoom;
- the number of eggs that are capable of sit down one chamber is limited.
And also when a person intends to breed quails, he may encounter a rather important problem, because bird chicks have a very high price. In order to save money, it is worth buying quail eggs for incubation. In this case, you will need a good and reliable incubator, because the natural incubation can be held all year.
When a person wants to buy a factory incubator, then it is necessary to take into account some very important moments. The most economical models are polyflast incubators. Such products do not have great strength, but have a rather low price. When a person wants to buy a high-quality and expensive incubator, then you should calculate, after how much time he will be able to recoup. Specialists advise first to buy a cheap model, and when a person will receive good profits, then you can buy a road and high-quality apparatus.
When there is a desire to purchase a device with the function of an automated coup of eggs, it is worth considering that its price is quite large. Such models are used to breed quail in large farms. And also such a device has impressive sizes. That is why when it is possible to purchase an incubator of this kind for domestic use, it will be equipped with a mechanical reversal mechanism, which will need to be carried out with your own hands using a special lever. Quail eggs are able to break or crack such work. As well as the main type of breakage of incubators for quails is the failure of the coup system.
How to make an incubator for quail with your own hands
 When a person decided to make a homemade incubator for quail, then it can be collected from broken refrigerator or ordinary box. However, do not forget about high-quality thermal insulation. There are certain important rules that apply not only to the product, but also to the room. The optimal temperature of the room is obliged to be about 23 degrees Celsius. In the homemade incubator for quails, the temperature should be about 40 degrees Celsius.
To provide high-quality ventilation in the device, then in the lid you need to make several holes. These holes can be closed or open when the need to adjust the humidity and temperature to the optimal indicator will appear.
For assembling an incubator frame These materials can be used:
- plywood sheets;
- sheets of fiberboard or chipboard;
- punching board.
To warm the product well, any kind of rolled insulation or simple foam is perfect. Before starting assembling a self-made incubator for quails, it is worth familiar with all the methods of its manufacture. After that, you can choose the optimal method of assembling the product.
How to make a foam incubator with her own hands
To make a homemade incubator for quailMaterials will need:
- an ordinary incandescent lamp with a capacity of about 40 watts;
- any box;
- styrofoam;
- plywood sheet;
- metal construction grid.
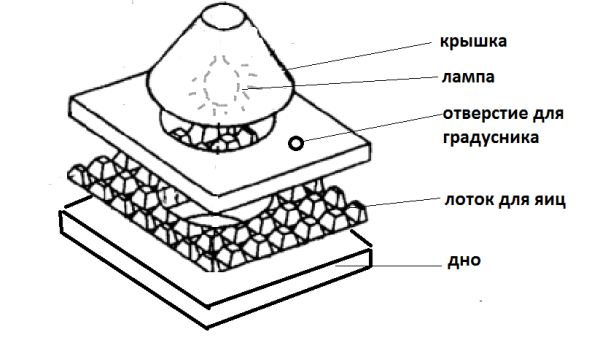
First, the box is squeezed by pieces of plywood. Do not forget about good insulation. To make it, you can apply pieces of foam. In the bottom you need to do several small through holes. Their diameter should be at least 1 centimeter. In the homemade lid it is worth making a special glass window. This will help to monitor the state of eggs and temperature in the product.
In the box under the lid, it is necessary to pave and install the electrical wires with cartridges that are required to be located in the corners of the device. On 10 centimeters above the bottom you need to secure a special tray for eggs on a foam support. Next, you need to pull the iron grille on top of this tray. Now the homemade incubator for quails from foam can be considered ready for use.
How to make a water incubator with your own hands
 A similar design of the home incubator for quails was developed for a very long time, and its popularity is only increasing every year. The heating element is the usual water Capacity. The advantages of such a product can be considered uniform heating of eggs and complete independence from electrical power supply. When electrical energy is turned off, the chicks in the incubator are continued in comfortable conditions. The assembly of such an apparatus is quite laborious work, but the result is worth the time spent.
From trimming of pipes of the same diameter, nozzles are made by a length of about 4 centimeters, which are welded into the metal container so that the inner holes are 1.5 centimeters less than the diameter of the nozzles. The resulting side is necessary to set the plumbing limiter of the lamp.
From the sheet of plex a thickness of 0.6 centimeters, 2 disks are cut. The outer disk should be a diameter of about 10 centimeters, in the size of the internal disk is obliged to correspond to the dimensions of the lamp. Such plumbing details are applied as indicators of starting heating. And also they help control the water heating process. All flasks of incandescent bulbs with a capacity of about 100 watts must be lowered up to cartridges.
From the side of the device you need to install the valve, which is designed to drain the water. For high-quality insulation, which will be able to maintain a high temperature of water to 14 hours, it is necessary to climb the tank made of metal by conventional foam. Further, the iron container is filled with water over the lid, and the product can be used for its intended purpose. For the manufacture of a framework of the device, you can apply the design of wood that is collected from bars.
Incubator from girlfriend with their own hands
 To make a home incubator for quail With your own hands, you need to find a box of foam, a small leaf of aluminum and tin cans. It is also worth buying a few 15 watt light bulbs and a computer cooler.
A high-quality cooler is needed in order to maintain the optimum temperature in the product, regardless of the installation site of the incandescent lamp. Plywood is necessary to fasten the lamps and coolers on it, because the fastening to the foam does not differ in reliability. Special screens are made from tin cans so that the thermal energy from incandescent bulbs is dissipated throughout the product.
The cooler is fixed at a certain angle so that it can be able to carry out all the lamps. In the lid of the box of foam, you need to cut a hole. Next, with high-quality glue, it is necessary to fix a small piece of glass on it. It is necessary for comfortable control over the state of quail eggs. To the homemade home incubator well kept the optimal temperature, it is necessary well insulate it from inside with foil polyethylene. Quail in the incubator need the influx of fresh air. Therefore, you need to make some small holes in the box.
To turn the tray with quail eggs, on the bottom of the foam box, it is necessary to place a special lattice with a small cell size. Absolutely all pointed edges of the tray are scolded with a file. Next, a small piece of metal wire is attached to the lattice, which is necessary to turn the tray with quail eggs. You must not forget to put a small container with water into the incubator, which will maintain the optimal level of humidity.
To adjust the temperature inside the mini-incubator worth applying good digitalj. controller. For comfortable feelings of chicks in the device, it is necessary to constantly maintain the optimal level of air humidity. That is why you need to put a special psychrometer in the incubator.
Before bookmarking into the manufactured apparatus of the first batch of quail eggs, it is necessary to test the conditions in it. It is worth tracing how it warms up and how ventilation is carried out. Eggs are able to spend a small amount of time in cool conditions, but high temperature is dangerous for them. Huge importance for good incubation has an indicator of egg quality.
It is necessary to spend a small amount of time to quail possessed good health and strong physique. Additionally, you can see numerous videos from the network, which show the process of manufacturing various models of home incubators with your own hands.
ATTENTION, only today!
The homemade incubator can be made in several ways from the girlfriend. It will work not worse than the store analogue, but it turns out much more economical. Capacity is chosen based on personal needs, and the tray turning mechanism can be both manual and automatic.
At home, you can collect an incubator from:
- Polystyrene foam
- Tolstoy cardboard,
- Plywood sheets
- Washing machine
- Old refrigerator.
The size of the incubation machine is selected individually, and depend on:
- The required number of eggs for bookmark
- The location of the heating elements.
The average incubator with dimensions: 45 * 30 cm accommodates:
- up to 70 chicken
- up to 55 ducks
- up to 55 turkey,
- up to 40 goose
- up to 200 quail eggs.
Regardless of the material or sizes, each device consists of:
- Covers (with or without window),
- Hull
- Tray and lattice,
- Lamps
- Water containers to maintain humidity,
- Thermometer.
Models with automatic or semi-automatic rotation of the tray are also equipped with a digital timer.
Models with hand turning tray
For the manufacture of simple incubators at home, minimum of materials and tools are required, and you can easily make it in a few hours. Cons - insufficient thermal insulation, fragility and hand-cutting grilles with eggs.
Polyfoam incubation machine
The advantages of this model: lightness and compactness, inexpensive cost and simplicity in the manufacture.
It is possible to make an incubator from foams as follows: the walls are cut out of the sheet of polystyrene foam, a thickness of at least 5 cm. Recommended size sidewall - 50 * 50 cm, end - 50 * 35 cm. Collect the case and correctly distribute the inner space. The walls are bonded by glue, or they can be glued together with a wide scotch. 3-4 vent holes pierce the bottom.

The foam incubator is equipped with a lid with a glazed viewing window. The glass is not necessary to firmly fix: if there is a need to reduce the temperature - it can be moved away. So that the cover is more densely and not loosened the design, you can glue on wooden bars. The thermostat and the thermometer is installed next to the window.
Incubating chicken eggs in a foam incubator occurs under the influence of three incandescent bulbs, with a capacity of 25 W. In this amount it is enough to maintain the required temperature. The bottom of the chamber is installed water tank. The lattice for eggs is assembled from a solid galvanized grid with a cell size of 2.5 * 1.6 mm. Each side of the tray is trimmed with durable marks: if this is not done, the chicks can be injured. To install trays on each other around the perimeter, flights are increasing, a height of at least 10 cm.
Air circulation inside the incubation chamber will be better if to attach the usual fan from the computer.
The foam incubator for chicken eggs can be equipped with an additional heating indicator that are placed under the grills.
Incubation machine from the box
Incubator for chicken eggs from cardboard - economical and simple, and the assembly of such a design does not take much time. Make a device from a regular box from under household appliances. It is not recommended to take a big one - the volume will be difficult to warm up, and use more powerful lamps is dangerous. At a distance of 4-5 cm from the bottom 6-7 vent holes, with a diameter of 3 to 7 mm.
From the inside to the side walls at an altitude of 9-10 cm from the bottom, wooden rails are fixed. Selfly covered with cellophane or oilcloth, and the wooden bars are put on top. A bath with water is placed on the resulting pallet, and on the rail - a regular store tray for eggs. For the receipt of fresh air from above, another 3-4 holes are made in the lid, with a diameter of about 5 mm. Next to them, the thermometer hangs and penetrate one additional hole under the wire from the lamp.
For heating the incubator, the incandescent lamps are used with a power of 25 watts. Air humidity is regulated by opening the lid.

Incubator of plywood
This model differs from previous greater strength and best heat saving characteristics. How to make an incubator:
- From the sheet of plywood, the walls are cut. Larger thermal insulation can be achieved by making them double,
- The dimensions of the device are selected individually,
- The lid is also cut out of plywood, and is made removable,
- To control the process in the lid, a small window is dilated,
- Around the perimeter of the lid - holes for ventilation, with a diameter of no more centimeter,
- From the inside to the walls of the improvised incubator, the rei for installation of trays,
- For air exchange in the floor, 4-5 holes are drilled,
- The heating element for the incubator usually perform incandescent lamps, but for a large volume you can use a tubular electric heater (TEN),
- The minimum distance between lamps or ten and eggs - 25 cm,
- The minimum distance between the trays (if there are several of them) - 15 cm,
- Tray for eggs of frame-type, collected it from a metal grid and cubs with a marlevary grid,
- At the bottom, the capacitances of the same size for water are installed.
- The finished incubator for eggs put in a warm room with good ventilation on a flat surface, and connected to a conventional electrical network.
Automated models
There are several ways to make an incubator with your own hands with an automatic coup of eggs, uninterrupted food and good heat saving.
The incubation apparatus from the refrigerator
How to make an incubator with backup power: the housing of the incubator from the refrigerator is assembled. For this purpose, the inner space is cleaned and washed well with a disinfectant solution. A pair of viewing windows that are glazed from the inner and the outside are cut into the door.

From the inside the camera is divided into two parts. Lower - incubation, equipped with trays. Top - output, a fixed shelf is installed in it. The partition is cut out of the sheet of plywood, and several holes for the air exchange break in it. To circulate air at the bottom of the incubation chamber, a small fan is installed at the bottom of the incubation chamber, and next to it in the side wall is drilled a pair of holes, a diameter of about a centimeter. For air output at the top of the case, similar holes make.
The electrical scheme looks like this:
- The thermostat for the output and incubation chamber,
- Emergency thermostat,
- Voltage stabilizer by 10 V,
- Heater for the incubation compartment,
- Heater for output separation,
- Spare heater connected to a backup power unit,
- Reserve battery for incubator by 12 V,
- Psychrometer,
- Turning mechanism,
- The moisture level regulator inside the output and incubation chamber.

In automatic mode, the operation of the backup power incubator provides a control unit that controls all the main nodes. The specified temperature in the chambers support independent thermostators and heating elements, and electronic thermometers correspond to temperature control. They can be assembled independently, using various ready-made schemes, but if there is little experience with microelectronics - it is better to buy. The heating system is collected from light bulbs with a capacity of 20-25 W, or the heating cord is paved to save electricity around the perimeter.
The automatic mechanism of the enemy coup in the incubator works every two hours, turning the trays by 45 °.
A temporary electronic relay is responsible for the operation of the mechanism, which is assembled from the low-speed engine and gearbox. The output gear shaft must make a complete turn around the axis for 4 hours. Replace a homemade relay with a similar device from the old drum washing machine. The mechanism is driven by a motor from the car wiper. To reduce the turnover, it is complemented by a step-type chain gearbox.
The main axis to which the asterisk of the gearbox is attached, the lower lattice for eggs is installed. Two options are hanging over it, and the distance between them is at least 15 cm. For simultaneous rotation, all trays are connected by a burden.
The incubator scheme for eggs involves the presence of two power sources: universal and uninterrupted. The backup power of the incubator is carried out from the battery or power supply. Power supply power - 120-150 W, and battery for incubator - from 12 V.
To maintain humidity on the bottom of the incubation chamber, a capacity with water and a fan is put.
Automatic incubator
Another option, how to make an incubator with an automatic enemy coup. The case can serve as a frame from a washing machine or an old bees hive.
The incubator device looks like this:
- Housing
- Tray system,
- Heating system
- Fan,
- Grid rotation mechanism.
In order to be inside the target air temperature, it is necessary to insulate the incubator walls. For this purpose they are trimmed by foam. To ensure air exchange on one side of the wall at the bottom, and on the other - at the top we make holes. Diameter is no more centimeter. Holes can be equipped with plugs. The lid cut the viewing window, which is glazed. The glass is not fixed firmly: if it is necessary to reduce the temperature inside the chamber - it is moved.

Trays are collected from a metal grid with a cell pitch of about 2.5 cm, and tighten the mosquito net so that the hatched chicks do not damage the paws. The auto-rotation for the incubator is done like this: the holes are powered in the lattice frame, and they themselves are attached to the axis. All parts of the mechanism are bonded between themselves, and reduction engines are used as a drive, with a capacity of up to 20 W. For a smooth movement of the tray, it is recommended to take a chain in increments of 0.52 mm. A temporary relay is responsible for automating the process.
It remains to establish a system of heating the entire design. The heating element for the incubator of this model is a spiral from old irons. They fasten the spirals to the walls with screeds or brackets so that if necessary, they can be easily replaced.
The minimum distance of the heating element from the tray is 20 cm.
In the incubator for chickens, with their own hands made according to this scheme, the thermometer is necessarily hung, and the water container is placed on the bottom. For better air circulation to the bottom grid, you can attach a fan. A psychrometer must be in the cell. The device measures humidity indicators, and you can buy it in any pet store.
For those who work in the poultry farms or himself is engaged in breeding birds on a large scale, it is known that without such a miracle of technology, as an incubator cannot do. Many people know or heard that this particular apparatus gives a guarantee that all eggs will result in chicks. However, some dreams to do the poultry farming at home or in the country, and are not ready to invest a lot of money in this matter. For such self-taped amateurs today there are many ways to make the incubator with their own hands with minimal costs of forces and means.
Is it worth making an incubator independently or the risk?
Many novice poultry farms are deeply mistaken thinking that the homemade incubator is a rather complicated design, and only a person who has special knowledge and skills can make it. It is absolutely wrong. In order to make an incubator will not need unusual tools or materials, and even more so special knowledge. In addition, you yourself can choose the device size, as well as its functionality. Plus you will save very well, and you will be proud of your creation.
Incubator with your own hands - easier simple
What is necessary in order for sure all the chicks appeared on the light, and none of the egg gone in vain? There are three main conditions: heat, humidity and regular eggs. Accordingly, all this should be clearly calculated and taken into account, before proceeding with the realization of the intended. At any stage of the incubation period, it is absolutely no longer sustained or overheating in the device. An excess or lack of humidity, as well as deviations from the temperature of the temperature regime, should not be, otherwise it threatens the high mortality rate of embryos and chicks.
A box, foam sheets, glass jar, bee hive, plywood and even an old fridge can be taken as the basis for the design, that is, the home incubator can be made from anything. Consider the most popular ways to manufacture such a device with your own hands.
Cardboard box incubator
The easiest way to make an incubator with your own hands is to take a large cardboard box as the basis. Establish assembly:
- In the side or top of the box, a small ventilating hole is cutting through, and on the cover fasten 4 fireproof cartridges for lamps.
- Install the lamps of 25 W (the lamps must be at a distance of 15 cm from the tray).
- The front wall to make a removable or install a door there, which will be good to lay down to the design.
- In the middle of the box (15-18 cm on top and 15-18 cm below), a tray for eggs is installed (to measure the temperature in the incubator next to put the thermometer).
- Under the tray, it is necessary to install a water container (humidity in the incubator is measured by a hygrometer).
- Open the box cover only to turn the eggs that you need to do regularly.

This method of growing chickens is quite suitable for home use, such an incubator will be quite enough. You can make wooden dug. Places such homely tray up to 60 eggs.
It is very important to put the whole design not on the floor, but on a stand from bars, for example. Also, do not forget about the need to constant circulation of air not only inside, but also outside the box. After each use, the incubator should be cleaned and disinfected in obligatory.
Incubator from the old refrigerator
A very good option is the ability to make an incubator from the old refrigerator, so if so is available in your home, do not hurry to throw away. Due to its design, the refrigerator is ideal for the role of the incubator. In this case, there are also several options for the device, consider the easiest way to make the incubator with your own hands from the refrigerator:
- We dismantle the entire inner filling of the refrigerator, including the freezer.
- Top of installing cartridges for 4 lamps, as well as temperature controller and contactor relay.
- On the front door, cut out the viewing window of a small size.
- We equip the lattices to install trays.
- Fresh thermometer, so that it is clearly visible through the window.
There is also a more advanced version of the automatic incubator made from the refrigerator. This design is certainly very convenient, since the eggs in it turn automatically, which significantly reduces the possible losses. This incubator is able to completely replace the industrial, however, in order to make it will have to spend more forces and time. The main control blocks in this device will be: automatic, automatic coup tray and moisture regulator.

In order to be clearer, how to assemble the incubator with your own hands video
Incubators for birds: convenient and profitable
Why make the incubator himself, is it easier to buy ready-made chicks? How to make the incubator we looked above, and now let's see what its advantage is, and whether it is spent the strength and time.
First, the purchase of chicks in the market in the season is costly, since the cost of them grows every year. Therefore, even taking into account constant costs of electricity, chicks will cost cheaper.
Secondly, no one gives you a guarantee that all purchased chicks will survive. Unfortunately, due to non-compliance with the correct conditions during the incubation period, many chicks dying. If the egg incubation itself, this process can be monitored.
Thirdly, with the presence of its own incubator there is an opportunity to get chicks before the generally accepted season.
In addition, a good incubator can become a source of income.
Incubator made with your own hands can be used not only for chicken eggs, there we can lay duck, goose, quail and any other eggs. The main thing is that the poultry should know is that each type of eggs requires its particular incubation period. Forget about such subtleties is not worth it, otherwise it can not work.
Chicken Egg Incubator
In the incubators, various types of poultry are withdrawn, but the largest chicken eggs remained the most popular. It is not difficult to bring chicken chickens at home.
The delay of chicks, subject to all necessary conditions, can sometimes reach 100%. Used industrial or made with their own hands. The latter are very often used, because it's easy enough to make them.
An important condition for successful incubation of chicken eggs, as well as for any other, is ideally selected material. The shelf life of eggs intended for incubation should not be more than 7 days, and even better if these eggs have passed no more than two days before they are tabling in the incubator. The full incubation period of chicken eggs is 21 days. If you adhere to all the necessary conditions (temperature regime, humidity, eggs, and their quality), then after three weeks you can get a healthy and strong chickens.
Interesting on the topic .
 Why you can not give icons
 Is it possible to give icons as a gift: Signs, the opinion of the Church
 A year ago left her husband, and now I do not know what to do