Do-it-yourself installation of an interior door step-by-step instructions. Do-it-yourself installation of an interior door. Removing the old box and door
Do-it-yourself installation of interior doors is done in a strict sequence, every moment, even the most insignificant, turns out to be important. If you allow a minor oversight, this will result in major problems with the further operation of the building. The main condition for installation is a perfectly level position vertically and horizontally.
Only if these parameters are observed, the normal opening and closing of the doors will be ensured. Step-by-step instructions for installing interior doors will help you get the job done. The first thing you need to pay attention to is the installation of the door frame.
Complete set of interior designs
Installation of interior doors is carried out after finishing the ceiling and walls. During the installation phase, a sub-floor is required and finishing coating... The skirting boards are installed after the doors are installed. Complete set of doors:
- Cloth without box and lumber. In this case, everything is purchased separately. Lumber is bought, strips are cut to fit the size of the doorway and the corners are filed. In case of use standard box a cloth of the same size is used. Before buying, it is necessary to carry out all measurements so that you do not have to modify the elements. In this case, installing interior doors with your own hands will be as budgetary as possible.
- Box and canvas. In this case, both elements will fit each other, you just need to buy lumber, make strips and assemble the structure. It may be necessary to install accessories on interior doors. You need to think about this moment in advance.
- Assembled block. All components are assembled and fitted, all that remains is to install the block in the opening, level it and fix it.
If you know how to install an interior door with your own hands, then you can purchase any kit. For beginners, the latter is suitable, since it is the easiest to install. For more experienced craftsmen, the first is best, it is also the most economical. Such structures are not subject to additional adjustment.
Dimensions of door frames
Each country has its own standards, they differ and sometimes significantly. Width of swing doors according to Russian standards:
- 600 mm;
- 700 mm;
- 800 mm;
- 900 mm.
The same standards in some European countries(in Spain, Italy). The French differ by 1 cm (690, 790, 890 mm). The choice of the standard depends on the owner, but it is best to use the Russian ones, since they have a clear advantage - a wider choice.
If you happen to buy non-standard doors, then it will be difficult to change them later. According to GOST, the width of the opening and the door leaf installed in it depends on the room in which the installation is carried out:
- For the kitchen, the height should be 2000 mm, the width should be 700 mm.
- In the bathroom, the height is 1900-2000 mm, the width is at least 600 mm.
- For residential premises, the width of the opening is 600-1200 mm, and the height is 2000 mm.
But these are standards, in reality it happens that you need to adapt to a certain building. Sometimes it is better to give preference to a sliding door. To determine the size of the box and the canvas, you will need to measure the opening. After that, the dimensions of the block are selected. The size should be slightly smaller in order to be able to mount the fasteners and spacers. You need to take these parameters into account before you install the interior door yourself.
At the stage of carrying out measurements, it is necessary to carefully inspect the walls, if necessary, carry out repairs and reinforcement. In this case, the door frame will be able to hold much better in the opening. Particular attention should be paid to the condition of the walls if the installation of heavy doors is planned. Need to attach wooden beam to the wall and plaster it, if possible. This approach will allow you to install interior doors without any particular difficulties in any opening. The thickness of the bar should be 5 cm. After such an improvement, installing the door frame with your own hands will be much easier, and the reliability of the structure will increase.
Everyone can independently install doors from scratch with their own hands if they understand the nuances and design parameters. One important parameter for boxes is depth. According to GOST, the standard is 70-80 mm, but if the wall thickness in the house exceeds this indicator (and this is in most cases), then you need to cheat. Installation of a door frame without a threshold is carried out flush with one wall, but on the condition that the slopes and the opening will not interfere with the opening. The rest of the wall is plastered and finished like the walls in a room. But you can do it with extras: a plank is mounted to match the canvas and platbands. How to assemble platbands, you can find out from the instructions for them.
Assembling door frames
How to put the interior door correctly? The horizontal bar is the headroom, the vertical ones are the jambs (racks). These are the main elements of door frames. If you bought them separately, then you need to put them together. To do this, oilcloth, paper, cardboard are spread on the floor, lay out the planks. All elements are connected.
If the box and the canvas are purchased assembled, then the dimensions will match. In most cases, the installation of an interior door threshold is not required. But you need to double-check so that you do not have to start all the work anew. All elements are stacked on the floor of the box, between them there is a canvas, correct installation interior doors should be done this way.
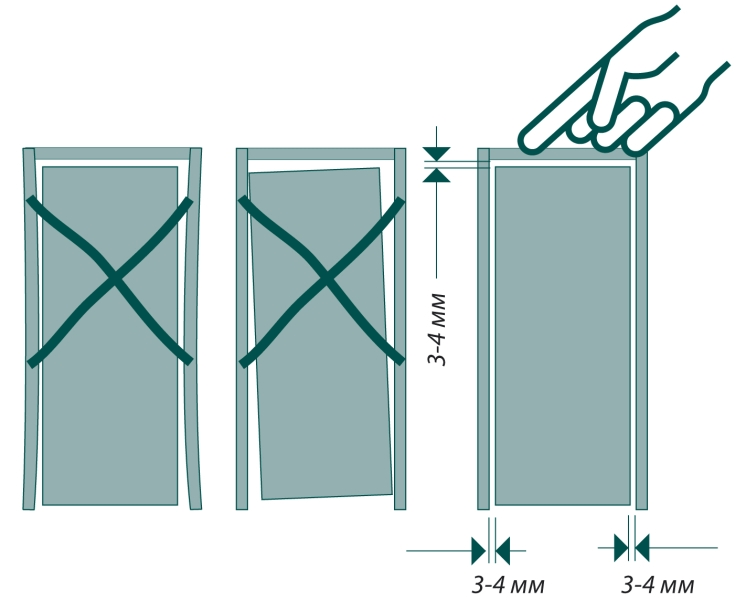
Ideally, there should be the same gap around the entire perimeter of the canvas - about 3-4 mm. With this gap, the doors will open and close normally. Similar requirements for double-leaf interior doors.
A separate story is height adjustment, regardless of whether you are installing doors in an apartment or in a bathhouse. The frames of the box are 12-15 cm larger than the canvas. For correct installation racks abut against lags. But during construction, such an installation is used extremely rarely, therefore door jambs shorten to the required size. Installation of the interior door frame is carried out using self-tapping screws.
But be sure to make a hole with a thin drill before screwing in the fasteners. If the planks are sawn at 45 °, it is necessary to drill holes on the side plank. Then you apply it to horizontal bar and fix it with self-tapping screws. Similarly, do the installation of doors in the bath with your own hands. You just need to pay attention to the material - the wood must withstand high temperatures and humidity.
And how to install the interior door yourself if the edges are sawn in the box at right angles? In this case, the whole work is much easier. But you still need to drill holes, especially if the box is made of MDF. Attach the top to the side bar, align the edges and make two holes.
There is a through in the upper beam, in the side hole in the end. After that, connect the straps, you get a box. During construction, the lower plank is rarely used. Make sure that the assembled box exceeds the dimensions of the blade in length and width by 3-4 mm. Builders prefer a door frame without a threshold, so the racks have to be cut a little. When installing interior doors without a threshold, there are small advantages.
Quite often it happens that the jambs are larger than necessary. Measure the height of the opening, subtract 2 cm (for filling polyurethane foam). This value will be the height of the box. Take measurements from all sides, plot the values on the assembled structure and draw a line along which the cut will be made. The excess part is cut off. The installation of interior doors with an extension is not much different. Differences are only in small things, which appear in several moments.
Hinge selection
Before buying accessories, be sure to decide which type you need - left or right. Stand near the opening in which it is planned to carry out the installation (the canvas should open towards you). This condition is mandatory, try not to confuse the sides. Open up to yourself and see where the movement is going - to the left or to the right. If to the left, then left loops are needed.
If the hinges are right, then the canvas should open to the right. Try not to confuse the hinges, mark the places for their installation. Keep in mind that in some cases it may be necessary to remove the canvas (to take out the furniture), so you need to be sure that this procedure is painless and quick. Installing hinges on a door is a matter that requires special care, since a small deviation can be worth the fact that the canvas turns out to be crooked.
When installing wooden doors, you need to outline the contour of the hinges and remove the layer with a sharp knife. Pay attention to the thickness of the loops. To make it convenient to make a cut, you need to make a vertical cut along the contour. If you make only horizontal, then the excess wood will be difficult to separate. The cut is performed either with a chisel or with a special machine. Do the same with the door leaf. But sometimes a chisel cannot be beautifully decorated with a cutout. If the canopy falls on a knot, it is necessary to make a shift to the side. Installing doors on your own will not cause difficulties, but this work is painstaking. Now you need to consider how the awnings are set.
Inserting loops
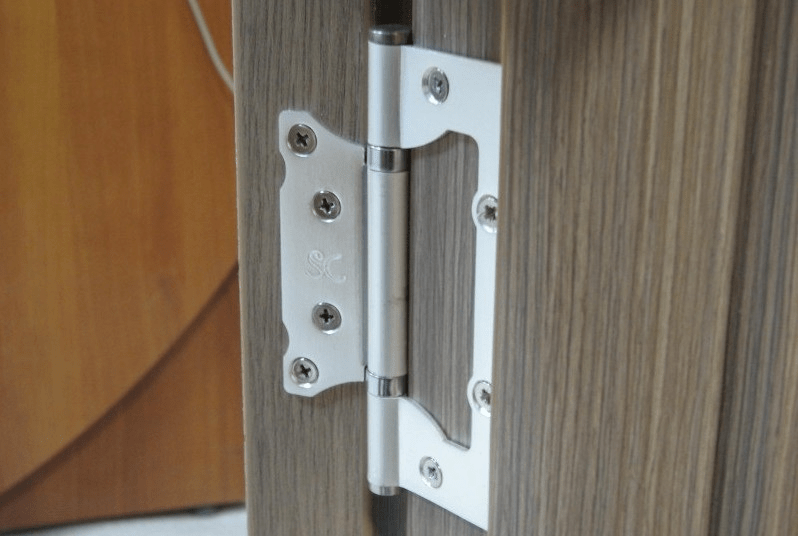
Separately, you need to consider how the installation is performed door hinges... The requirements for them are not very serious, it is enough to maintain a distance of 19 cm from the edges.You need to know how to assemble an interior door with your own hands and what tools are required for this.
To install or dismantle the hinges, you will need the following set of tools:
- Drills with a diameter of 1-4 mm.
- Drill and screwdriver.
- Cutter.
- Awl.
For MDF doors 2 loops are enough, as they are light. For heavy ones, you need to put 3 loops - an additional one in the middle. All hinges, regardless of type and price, consist of 2 parts. One half of them has a pin. An important condition: install in such a way that this pin is pointing up. It will be wrong if it turns out to be directed downward.
It is best to insert hinges and door locks directly on the floor, prior to installation. The fittings are fastened after marking and cutting. Attach a loop, mark the contour and make notches with a chisel. Fasten the fittings first on the jamb, then lay the canvas and mark the position of the second part of the hinge on it.
Installation of interior doors in wooden house simplified due to the fact that fasteners can even be made with nails. All the grooves are made with a router in a matter of minutes, but in the absence of such a tool, chisels can also be used. When closing the hinges, provide a gap of 4 mm. Installation of laminated doors is practically no different from the installation of wooden doors, there are only minor differences.
Final box assembly
In practice, it turns out that the assembly and installation of interior doors is a painstaking business. Racks and lintels have the shape of the letter "P", install the assembled structure in the opening. Using a level, set the entire structure to zero. Achieve maximum horizontal and vertical evenness. Fix the position of the box with spacers and wedges, pierce the level from time to time. Be sure to make sure that the jambs are parallel to each other, blockage in any direction should be avoided. The convenience of using the doors in the future depends on evenness.
After checking all the installation parameters, fix the box in the opening with self-tapping screws or dowel-nails. The distance between adjacent fasteners should be 0.25-0.3 m. There should be about 2-3 fasteners on the lintel, and 7-8 on the jambs. Holes with a diameter of 4 mm must be drilled in the box, since the caps of self-tapping screws are usually 1-2 mm larger. If you installed a timber between the box and the wall, the installation is much easier. In this case, it is easy to make interior doors, since the fasteners are more reliable.
If the walls are made of shell rock, brick or block, then the installation is more difficult - you need to install the dowel-nails. Note that they must be in the bricks, not in the seams. It is not recommended to put doors on seams. With a 4 mm drill, make a hole in the racks, leave a mark on the wall. Having finished marking all the holes, dismantle the box and check if you hit it correctly. To avoid getting caught in the seams, pay attention to open areas masonry, make marks on the planks. Only after making sure of the accuracy, make holes for the dowel-nails. This is exactly how they do the installation of wooden doors with their own hands. Installation of plastic structures is done in a similar way, only it is easier to work with them - all elements are fitted as accurately as possible.
Do-it-yourself doorway installation is done in the same order, so the guide can be used for this case as well. Then you expose the box and make sure that the holes in it coincide with the dowels. Set the position horizontally and vertically, fix it with wedges and spacers, only then fasten the box to the wall. Do not pull too hard, as it can damage the wood or bend the jamb. Since the installation of canopies was made in advance, further installation of the canvas will not cause difficulties.
Installation entrance doors do it yourself will significantly reduce the cost of work.
Foaming gaps
After the final fixation, place cardboard between the jamb and the canvas, you need to set it on the foam. Close the door and install spacers and wedges to prevent the box from arching. Fill the gaps between the wall and the box by 1/3 with foam, as the volume increases during the drying process. If there is too much foam, then it will bend the bars. To dry, it must be left for a day.
Then remove the spacers using sharp knife cut off the excess foam and proceed to further work - the installation of an extension or platbands on the interior doors. A layer of putty can be applied to the foam and covered with decorative elements. Do-it-yourself installation of platbands for interior doors will not cause difficulties even for an inexperienced master who has encountered such a procedure for the first time. Correct installation of doors is the key to a long service life of the product.
Application of fasteners and subtleties of the tie-in
Self-tapping screws are sold together with the door hinges. It is with their help that fastening is made. Before screwing them in, you need to make thin holes in the wood. This will prevent the wood from splitting when screwing in. Fittings can be concealed, their installation is a little more difficult - it is necessary to make deeper mounting holes. The hole is best cut with a milling machine. Decide in advance whether you need to install a set of interior doors, everyone can do it with their own hands.
When screwing in the self-tapping screws, make sure that the hinges do not go to the side, align if necessary. With the correct insertion of the loops, they will be located at the same level. If there is even a slight bulge, you need to deepen to required level hinge pad. Using a ruler, check to see if the canopy is properly planted.
Press the ruler against the hinge and assess the position. If it protrudes strongly, then there will be too much between the door leaf and the frame. big slit... When the doors are correctly positioned, a normal opening angle of 180 ° is ensured. In this case, the maximum load on the hinges should not exceed 50 kg. Next, insert parts of the hinges by lifting the canvas. This will allow you to determine as accurately as possible the point at which both canopies will be combined.
When choosing awnings, it is best to opt for hidden ones. They look much better, and the fixing rules are the same. After installation, be sure to check the smoothness of the movement by interlocking the latch on the jamb and the striker plate. If necessary, move the latch. This is required if extraneous noise occurs when the door is closed. The metal tab should be adjusted a little and the noise will disappear. In general, the installation of hinges on interior doors is quite simple, there should be no difficulties. It is enough to act strictly according to the instructions and use the recommendations.
Advantages and disadvantages of sliding interior doors
Installing sliding doors with your own hands is quite simple and does not require significant costs, and the design is much more attractive than conventional swing doors. In total, there are 2 types of interior door designs:
- Swinging, the installation of which is discussed above, are attached to the box using movable awnings. This is a traditional option, the range of models on the market is very wide, the view is rich, but one drawback is that they take up a lot of space. Installation plastic doors do it yourself will not take much time, but it will be problematic to apply them in a small room: when opening, they need a lot of space.
- Sliding ones are much more convenient, since with their help the space of the room is used more rationally. And the installation of sliding interior doors with your own hands does not take much time if you carefully study the features of the work.
In turn, sliding doors are divided into 2 types:
- Sliding doors built into the wall slide into it and recessed. The design has a mechanism that allows you to move the door parallel to the wall. Rollers are mounted on the canvas, guides are mounted on the opening or on top of it. The rollers move along the guides, the opening is cleared for passage.
- Installing an accordion door with your own hands will also be a good option. Structurally, they are made of plastic or wooden slats. Moving, they fold and open the opening. But one drawback is that cheap products are extremely inconvenient and impractical. Therefore, if the choice fell on such a design, then it is better to purchase an expensive and high-quality product.
Regardless of the design, all sliding doors have the following advantages:
- Non-standard and unusual, very original appearance.
- There are no blind zones, they do not interfere with the arrangement of furniture in the rooms.
- Complete safety, since there is no risk of hitting the corner of the door. But it is worth making sure that children do not stick their fingers between the door and the wall.
- A huge plus - they do not open up drafts.
- Installation of the threshold for the interior door is not required in most cases, only if you need to cover the guide at the bottom, a threshold is set.
But there are also significant disadvantages:
- The prices for the installation of a sliding door from the masters are simply exorbitant. But if you do all the work yourself, you can cut costs. Do-it-yourself installation of interior compartment doors will reduce costs to a minimum and equate them with the cost of installing swing doors.
- Low degree of isolation. We have to install a felt gasket at the end of the door. This is the only way to get rid of the penetration of foreign smells, sounds, light into the room.
- It is rather difficult to look after the pencil case through which the door goes. But if you contrive, you can get the job done with a vacuum cleaner. It is problematic to do this when installing casters that cover the openings.
- Repair of such a structure is quite complicated, therefore, when buying, be sure to take a few rollers in reserve. The installation assumes that items that are rarely found on the market will be used. Sometimes people who have installed such structures start repairs after a few years and do not find spare parts in stores. We have to redo the mechanism.
Sliding door components
The main difference between sliding and swing structures- this is the mechanism of their functioning (rollers or canopies). Sliding interior doors can be equipped with the following mechanisms:
- In-wall, which allow you to remove the door leaf inside the wall. But there is one caveat: the system must be started at the time of the construction of the walls, since it will be necessary to leave voids in them. This will make the wall thicker. Due to this, the area of the room will become slightly smaller, but the walls will be freed.
- External, which can be installed at any time, no wall rebuilding is required. In this design, the canvas moves parallel to the wall. Small flaw: you need to free a small distance from the walls.
Guides are one of the important structural elements, runners along which the door leaf moves on rollers. They are placed on top, bottom, or on both sides. The sale and installation of such items is carried out by stores, but better installation do it yourself. Features of location options:
- Only the top guides are used - the most common method. It is used only if the weight of the door leaf is low. The advantage is that the risk of guide rails breaking is extremely low and the service life is high.
- If only the lower guides are used, there is a high risk of damaging them during operation. It is extremely difficult to achieve the smooth movement of the door without an upper support, and the constant clogging of the runners will make itself felt.
- Combined designs are assembled when using doors with a large mass, or to improve the smoothness of the movement.
Preparation for the installation of sliding doors
Since the most popular type is external structure, it is worth focusing on it. Do-it-yourself door installation implies the presence of the following tools and materials:
- Door leaf, platbands, box.
- Accessories (rollers, guides, locks, handles).
- Bars measuring 50x30 mm for fastening the guides.
- Hardware.
- Level, tape measure, ruler if necessary.
- Drill and screwdriver.
- Hacksaw.
- Chisels.
If the weight of the door exceeds 27 kg, 4 rollers must be used. For lighter structures, 2 will suffice. To avoid wall deformation and damage to wallpaper by handles and locks, use hidden doors cut into the canvas.
At the very beginning, you need to decide on the installation site and the opening side. If you plan to install 2 doors, consider how convenient it will be to use them. If necessary, the old door is removed, a new box is mounted. V living rooms ah, the gap should be kept in the order of 10 mm. If there is no finished floor, then the laminate, and the screed, and leveling are taken into account.
- Measure the width and height of the compartment door. It is advisable to do this at several points (below, in the middle and above). The height of the door should be measured open and closed.
- The timber is being installed. Draw a straight line over the top of the box. From the line to the edge of the box, you need to maintain a distance equal to the width of the guide. The bar is attached to this line. One caveat: the middle of the bar should be located above the right half of the box if the door slides to the right.
- The installation of the upper guide profiles is in progress. The runners are fastened to the timber using hardware. Check how the rollers slide along the runners. If necessary, replace the latter, otherwise the functioning of the doors in the house will be accompanied by inconveniences.
- The lower runners can be installed in several ways. It is possible to remove part of the floor covering, but this is for cases where the installation of a structure with lower rails is required. You can mount the guide directly on the floor, only you have to use such a structure with sills. But builders actively use the installation of doors without a threshold, although they do not allow the guide to collapse. But much more often the rollers are not placed at the bottom, they only use a packet knife. With its help, the door adheres and does not deviate from the direction of travel.
Doors with a threshold are used infrequently, without it it is much easier. The reason is the ability to implement normal work, sliding doors coupes will be able to work without damaging the floor covering. And this allows you to reduce the time required to maintain the structure.
Sliding doors: assembly and maintenance
On the upper end of the web, rollers are hung, and holes are made at the bottom, between which a groove is knocked out. It should be 2 mm wide - slightly larger than that of the knife. The depth is the same as the height of the knife, in the range of 10-18 mm. The part that does not have a groove acts as a limiter. A door inserted into the grooves in the presence of a limiter is difficult to pull out of its limits.
The installation of fittings is the installation of a lock in an interior door, it is not difficult to do this with your own hands. It is enough to have a simple tool - screwdrivers, pliers. After that, 1 of the important points is performed - do-it-yourself installation of handles on interior doors. All work is done carefully so as not to damage appearance, otherwise sliding sliding doors will look unattractive. If there is no experience, then it is better to entrust the work to specialists.
The final setting of the sliding compartment doors is to get into the guides. At the end, rubber stoppers are installed, which will prevent the doors from falling out during operation and will make the stop much softer. This design is much better than butterfly hinges, as it provides greater reliability and convenience.
For beauty, you can use decorative elements - platbands, which are installed on the box and upper runners. How to mount them correctly, you can read on the label. It is not necessary to place cash, since the mechanism itself is already an element of decor. To care for sliding doors necessary:
- Do not allow water to enter the door leaf and mechanism of the sliding door, especially if all elements are made of wood.
- Carefully monitor the cleanliness of the runners, remove dirt in a timely manner. If debris gets on them, then the door will not move well and move apart.
- Try not to jerk the compartment door or slam it, you do not need to apply force, since the rollers wear out more, sometimes "flying out" beyond the limiter is possible. Sliding them back into place can be problematic.
- Check the quality of the fittings, change the rollers in a timely manner.
- Reinstalling door locks should be done as carefully as possible.
It is clear that installing interior doors from MDF with your own hands or an accordion is a drop in the ocean. It is much more difficult to maintain them in good condition, prevent breakdowns and make timely repairs. In general, they are able to serve no less than simple swing structures. Do-it-yourself installation of compartment doors is a guarantee that an element of novelty will be present in your home.
The ability to handle carpentry and measuring tools is already a reason to try to solve such a difficult task as installing interior doors with your own hands. The work is simple, but tricky in its own way. It will take scrupulousness, and even tediousness in marking and adjusting, otherwise it will not work to correctly install the interior door with a box.
Features of installing interior doors
At first glance, nothing complicated, but this is only a superficial impression. It's about not just installing the box and door leaf into the interior opening, but to do it beautifully, without distortions, scratches and sagging hinges. If this is the first experience, then it is best to make a detailed step-by-step instruction for installing interior doors with your own hands before starting work. It's not a shame for beginners. Even experienced craftsmen often make notes with their own hands - what not to forget and what to look for when installing the door frame on a specific interior partition.
During the installation process, you will need to solve two of the most difficult tasks with your own hands:
- Correctly assemble and install the box of interior doors, align and fix it so that the frame does not sag under the weight of the door leaf;
- With your own hands, mark and cut out the mounting grooves on the vertical rack of the box and on the end of the interior door leaf.
It takes an experienced craftsman 2-3 hours to install an interior door, a beginner will need at least a day to completely install the frame and hang the door leaf.
Advice! It is not necessary to stupidly follow the instructions for installing interior doors, which recommend consistently embedding the fittings of the locks, fixing the hinges, and only at the very end solve the problems with hanging the interior doors. The main thing is to install the frame and door leaf with a fresh head with your own hands, and platbands, locks and handles with platbands can be postponed for the next day.
You will have to measure and saw a lot. All cuts are done by hand with a hand hacksaw, therefore, in addition to fresh strength, you will need to stock up on quality tools.
Tools for installing interior doors
A day or two before the start of work, it will be necessary to assemble a working arsenal for working with lumber. It can be collected from friends or rented. Why two days before installation? Because ahead of time, before the start of work, you will need to check the serviceability and operability of each tool with your own hands:
- Building levels - small, 70-100 cm, and large, 150-200 cm, with a working bubble indicator. Usually, they do not pay attention to the state of the camera and the lighthouse, considering them to be serviceable, but at the box office, it happens that there are bent and even broken copies, this is the most important tool in installing interior doors;
- The marking tool is a carpenter's corner with a ruler, a tape measure and a one-meter metal ruler. We check the presence of angle marks at 90 o and 45 o;
- A screwdriver or electric drill with a bit attachment for cross-head screws. We check with our own hands how the cartridge is holding, and the serviceability of the wiring - batteries;
- A cutting tool, you can cut a bar of interior doors with a jigsaw, but it is best to stock up on a pair of hacksaws - carpentry and metal. The first one is used for cutting box parts, the second one is used for thin cutting of platbands.
In addition to the tool, you will need a hammer, clamp, wood chisel, polyurethane foam in a cylinder, adhesive tape and gloves. There is not much dust and waste when installing interior doors, but you still have to periodically clean it up with your own hands so as not to spread it throughout the apartment.
In addition, it will be correct to have a punch with a bayonet in stock, because when installing the interior door frame, problems with the doorway in the wall may occur. Ideally, the gap between the uprights of the box and the ends of the opening should remain 10-20 mm, for normal alignment and foaming of the cracks. In reality, the opening may be uneven, and you will need to knock down some of the concrete or stone with your own hands, with a puncher or a hammer with a chisel.
How to assemble an interior door frame
The best option would be to buy a ready-made door kit, which usually includes:

In this case, the whole process of installing the box of the interior frame is reduced to transferring the second parts of the hinges to the frame parts with your own hands, assembling the loot with self-tapping screws and installing it in the opening.
The entire work will take less than two hours. One of the options for installing interior doors with your own hands in the video

The only drawback of this scheme is that not all manufacturers modern models interior doors release their products in sets designed for do-it-yourself installation. Most often, the customer buys a door leaf, and platbands and frame parts are purchased with the expectation of installing an interior door with a frame on their own.

How to install an interior door with your own hands
First of all, it is necessary to lay out the door leaf on a flat area. Next, the selected pair of beams is laid to the left and right ends of the sash. With a tape measure, we measure the width and the estimated height of the future supporting frame. Then, using a building level and a tape measure, they check the dimensions of the interior passage.
Important! This is done in order to determine whether the platbands will cover the edges of the break in the wall, and how thick the additional elements must be used.

If you "miss" the height or width of the frame, you will have to redo the platbands with your own hands, or, even worse, you will need to raise the interior door in height.
Assembling the frame of the door frame of any size
In order for the installation of the interior door to work without distortions, it is important to choose the right distance between the left and right pillars so that the door leaf enters the frame with a small gap, no more than 2 mm per side. In this case, the door will open freely without wedging in the trap.
The easiest way is to assemble the frame with your own hands using a clamp, a saw and two blanks. Vertical racks, as in the case of preparation, are attached to the ends, leveled and fixed with clamps.

From the side of the upper and lower edges of the web, an allowance equal to the thickness of the bar is left on the blanks. At the same time, a cut line is applied to the left allowance with their own hands at an angle of 45 ° for further joining with the horizontal cross members of the frame. Without disassembling the structure, markings are made for cutting grooves for awnings, a lock and a handle.
If the interior door is too wide or of a complex shape, then usually at this stage the conformity of the frame configuration with the door to the shape of the interior opening is checked. To do this, a couple of nails are hammered onto a wooden plank at a distance from each other equal to the outer width of the frame. The plank must be fixed above the opening, and a pair of construction plumb lines are suspended from the nails. If the gap between the frame and the wall is 10-15 mm, then the calculation is correct.
Installation of hinges on an interior door
After all the checks have been completed, it is necessary to cut out the mounting grooves for the awnings in the canvas using a chisel or a carpenter's knife and hammer. The easiest way is to mill a niche using a hand-held router, but, as practice shows, the work can be done with your own hands and without an expensive power tool.
If this operation is difficult, then for interior doors you can use overhead hinges or models for drilling. For installation, you just need to drill holes for screwing in the fasteners.
We fix the frame in the doorway
- We mark the level of the upper horizontal cross member of the frame with a marker on the step, this will help to perform the correct installation horizontally and vertically;
- Using wedges and a building level with our own hands, we align the frame vertically and horizontally. We fix the position of the frame in the opening with wooden plugs and wedges.

Advice! If the frame and door leaf are lightweight, then the frame can be fixed with mounting perforated petals to the wall of the interior partition.

Next, it is necessary to blow out the space between the frame and the wall with foam, while the installation on the PUF is being carried out, it is necessary to check it again and, if necessary, finally level it vertically using a long building level. On the upper mark we apply a small building level and, if necessary, we tamp the frame to the desired height.

Installing the door leaf
After the loot is firmly fixed with the hardened foam, it is necessary to install the mating parts of the sheds. To do this, initially the door leaf is lifted with wedges so that a gap of 1-2 mm is obtained between the sill and the lower edge.

It remains only to install the sash on the awnings, and you can proceed to the decorative finish of the interior doors.
Installation of platbands on an interior door
Facing the frame with platbands is not particularly difficult. First of all, the vertical planks are installed. The height of the plank is measured according to the mark made earlier, after which the platband is applied to the frame and the cut line is marked at an angle of 45 °.
Advice! It is best to make an undercut with your own hands using a thin hacksaw blade for metal. Previously, adhesive tape is glued to the cutting line. The plank is nailed or glue down.
The installation of the second vertical casing is carried out in a similar way. After the installation of the vertical parts has been completed, you can mark the saw line on the horizontal bar, and in the same way install it on the door frame.
What are the sizes of extensions for interior doors
Additional strips are used as an additional element to increase the width or thickness of the door frame. Most often, the installation of extensions on interior doors is required in a situation where the wall is much thicker than the canvas, and there is a gap between them that needs to be closed.
The width of the additional slats ranges from 10 mm to 200 mm, for interior structures the most common size is 10-20 mm, and often, due to the non-standard profile of the slit, the extensions have to be ordered or cut out by hand from the platbands.

How to install extensions on an interior door
If, after installing the box, an unpleasant fact is revealed that the vertical plane of the frame is recessed into the space of the interior opening relative to the wall surface, then the only way to correct the situation is to use additional strips.

First, it is necessary to determine the size of the extension, for this, the building level is applied to the wall and the distance to the front edge of the box is measured with a ruler. Thin strips are nailed with wallpaper nails, wide extensions are glued to the frame.
Professional tips on how to install interior doors
Among the features of the installation of home doors, the following problem areas can be noted.
Before installing the platbands, you need to make sure that the frame or additional strip is located in the same plane with the surface of the interior wall. Otherwise, even if you make a perfect wash down of the edges with your own hands, a gap will surely appear between the platbands.
The second problem that one has to face is the sagging of the doors when installed incorrectly. To correct the situation, you need to remove the canvas, place washers, or trim the edge and install the door in place.
Conclusion
Do-it-yourself installation of interior doors will require a little practice in installing awnings and accessories, but in general case the work is simple, and with the proper skill, the canvas can be hung in a few hours. The craftsmen claim that with each installation, the quality of do-it-yourself work doubles.
Installation can be done by hand if you know how
Read in the article
How to choose and install an interior door in size and configuration
Manufacturers offer products of various widths and heights, which allows you to choose the right model for any opening. Cloths for swing structures, made in Russia and most of the EU countries, can have a width of 600 mm, increasing in increments of 100 mm. The minimum width of French-made doors is 690 mm. The step of resizing is 100 mm.

When choosing a door leaf, the dimensions of the door frame should be taken into account. If the opening is wrong geometric shape, the minimum width is taken into account. Otherwise, it will need to be expanded, which will significantly complicate the installation work.
Attention! The standard height of interior doors is 2 m.
When choosing a suitable product, you should also focus on the purpose of the room for which they are intended. For living rooms, canvases with a width of 60-120 cm are purchased, for the kitchen - at least 70 cm, for a bathroom or toilet - from 60 cm.

How to independently install an interior door leaf
When starting to install the sash, you should raise it to a small height and put a board underneath. We combine the elements first of the upper and then of the lower loop. When figuring out how to install it yourself, you should pay attention that it is better to do such work together. In this case, it will be possible to perform the installation more efficiently.

A video on how to properly install interior doors on your own will help you understand the nuances of replacing the door leaf.
Do-it-yourself installation of an interior door along with a box - step by step instructions
If you plan to do the installation yourself, step-by-step instruction will help you better understand the process. We offer you to find out the nuances that will help you perform the installation efficiently.

What tools and consumables are needed for work
List of tools, equipment and Supplies will depend on the design features of the installed system, and how the interior doors are planned to be installed. As a rule, you need to prepare:
- drill. If the work is carried out in apartment building, then instead of a drill, it is better to take a perforator;
- drills for wood 3-4 mm and concrete for 4 and 6 mm;
- roulette;
- pencil;
- building level;
- for wood and concrete;
- polyurethane foam.
 The list of tools used may vary.
 The procedure for dismantling the old door and carrying out work to strengthen the doorway
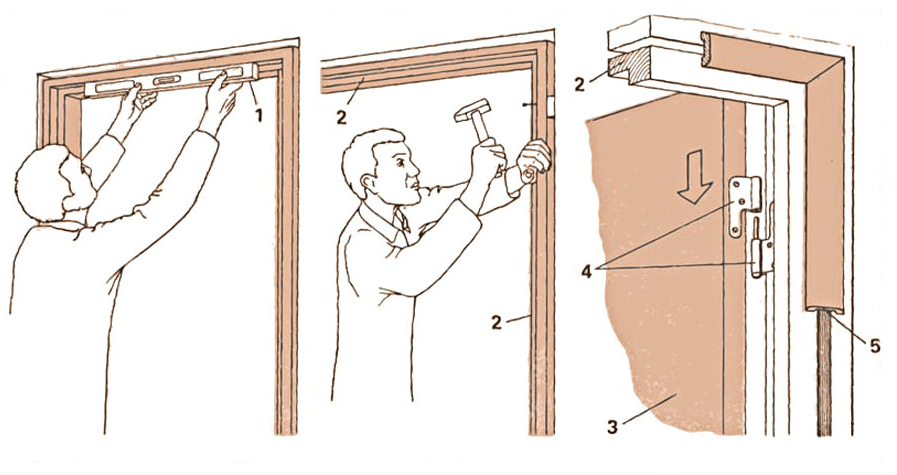
Do-it-yourself installation of interior doors should begin with dismantling the old structure. This should be done very carefully so as not to damage doorway... For this:
- remove the door leaf from the hinges;
- remove the platbands. To do this, insert an ax between the product and the wall and gently squeeze the fasteners;
- dismantle the box, after removing all the fasteners. It is usually located near the lock and in the hinge area. Screws should be unscrewed at low speed;
- we remove the addition.

After dismantling the door, you should carefully inspect the opening. Remains of old material should be completely removed. In the presence of mechanical damage, the geometry of the opening should be restored. You can do this with.

If a heavy interior door is to be installed in an apartment, reinforcement measures may be required doorway including:
- along the entire perimeter of the doorway;
- cutting to the size of channels for the entire surface of the doorway;
- installation in prepared grooves of channels. To fix them in the opening, studs of a suitable diameter are used;
- in the corners individual elements welded together.

How to install a door frame for an interior door
After the opening is fully prepared, we propose to figure out how to install the door frame of the interior door. The procedure will depend on the delivery form for the item. Manufacturers offer a box:
- assembled. In this case, the assembled structure can be immediately mounted in the opening;
- in the form of cut-to-size elements. By connecting them together, the structure is installed in the opening;
- like a curly bar. In this case, the elements are cut off first. the right size, then they are connected to each other and only then the box is mounted.
Let's consider the last installation option in more detail.

Measurement and assembly of the door frame
We measure the parameters of the doorway using a tape measure of sufficient length. When determining the height of the uprights and the length of the cross members, the gaps between the frame and the door leaf should be taken into account. They are selected from the range of 5-10 mm. The gap between the floor and the sash may be larger.

A comment
Head of the team of the repair and construction company "Dom Premium"
Ask a Question« Measurements of the same parameter should be taken at several points. "
| Illustration | Description of action |
 | Cut off the elements, ensuring the formation of the selected corner. Box elements can be positioned at right angles or 45 °. Other more complex options are possible, which should not be resorted to when doing the installation with your own hands. It is better to entrust them to the master. |
 | We carry out the markup of the elements. |
 | Cut off the elements using a fine-toothed tool. |
 | We form the landing grooves and connect the elements together. We check the correctness of the work performed by putting the sash into the assembled box. The same gaps should be obtained on all sides. |
Installation of hinges
We mark the place where the loops will be located. Usually it is 20-25 cm above the bottom edge of the valve and below the top. We remove the layer of material for the width of the hardware. In this case, the attachment will be flush. This can be done using a chisel or a special tool.
Attention! When forming a place for the hinges of an interior door, you should work extremely carefully so as not to damage the decorative layer.

Installation of the frame in the doorway
We install the assembled box in the doorway:
| Illustration | Description of action |
 | We provide the required spatial arrangement using pegs or timber. Auxiliary elements can be fastened to the level before installing the box at the level of future hinges. |
 | We fasten the box using suitable fasteners. The space between the box and the wall can be filled with foam. |
How to install the door leaf of an interior door
Quite a crucial moment for those who learn how to install interior doors. Previously, the counterpart of the hinges should be screwed to the door leaf, or the mounting holes should be marked if it is decided to use non-separable fittings. How to insert an interior door? You just need to put it on the loops. After that, you should make sure that it opens and closes well.
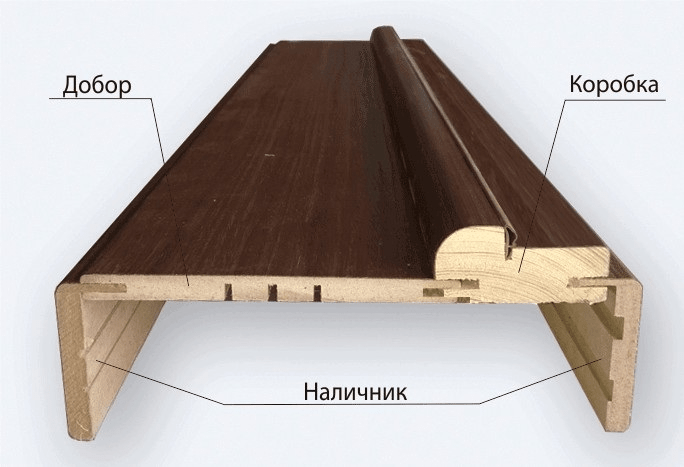
 We attach the hinges to the door leaf Dobras help to beautifully arrange the opening
 The functional capabilities of the structure and aesthetic appeal depend on the quality of installation of interior doors: in any house or office with doorways inspection of the premises begins. Experienced specialists will quickly carry out measurements, suggest the most optimal options, and carry out the installation in accordance with the design features.
It is also important to eliminate gaps by foaming with high-quality sealants, leveling the walls at the initial stage of installation and choosing a suitable model of domestic or foreign production.


Installation features
Installation of door frames is carried out at the final stage of the repair. After gluing the wallpaper, work is carried out to install the door frame in accordance with technical regulations and safety requirements. Installation of a door in a large opening without anchors and additional elements requires professional approach: experts recommend not to carry out this work yourself. Once upon a time, dampers were used as door structures to prevent cold air and moisture from entering the room.
Nowadays, doors serve not only as an entrance and exit area, but also as an effective addition to the interior design that can serve for many decades with proper use.


Knowledge of technology allows you to organize installation at a high technological level.
To install the structure you will need:
- form a block and equip the canvas;
- prepare material for use in conjunction with fittings;
- pick up hinges (with a regular handle or with an automatic latch).


A block is mounted in the opening, on which the canvas is equipped. Experts recommend pre-adjusting the mechanism. Platband trim is a great way to give a structure a stylistic completeness and constructive unity, while it is advisable to use modern materials and Newest technologies... The activities are carried out in a strict sequence: during installation, actions are coordinated in accordance with building codes.
Plastic and metal-plastic installations are realized in a complementary form, prepared for the fastening process. The frame is a collection of wooden blocks of different parameters, door leaves and special parts (strips) for platbands.


Collecting a box is a professional process:
- compliance of the measures taken with the operational requirements;
- use of proven materials and technologies;
- use of a U-base with a threshold.
For this purpose, bars are used (rack, loop bar). A base with a threshold requires the installation of a lower material of a certain thickness, while the assembled block must have a strictly geometric configuration. The craftsmen determine the dimensions of the doors, fix the format of the racks and lintels, taking into account the voids, cut out and design special bars.


Views
The dimensions of the box material must differ from the dimensions of the canvas. Measurements are made with simple tools, most often a ruler. The measurement of the canvas is carried out along the perimeter: you should not count on an external effect, since distortions are observed during the shrinkage process. Deviations play an important role in measurements.
The sequence of work is as follows.
- Parameters are analyzed outside parties loop material;
- The working parameters of the lintel, mock material are measured;
- The condition of surfaces in contact with the planes of the opening is diagnosed;
- Provides space for gaps (within 0.2-0.4 cm).

When installing glass structures, the decor parameters are additionally measured, a pattern is applied using modern methods if provided. Installation of sliding and double door systems is carried out in accordance with technical requirements, fixed in GOST. Roller doors will require additional measures related to the selection of a suitable model, installation of a structure that meets standards and design requirements.
Swing and sliding options are a great option for those who are used to saving space and relying on modern design... Experts will carry out preliminary measurements, select the most effective models and quickly carry out all stages of installation. At the request of the customer, installation of non-standard door structures and classic double-leaf doors is carried out.
Using these models, you can create original design interior, equip any type of premises (office, residential, warehouse). Subject to the installation parameters in an apartment, room or office, you can place dimensional furniture, which always looks fashionable and stylish.


Frames with a threshold acquire slotted holes along the perimeter in the plane of the door block without a threshold. Wizards will calculate points to eliminate vertical posts, provide sufficient parameters for the opening.
When arranging the box, you should pay attention to the following points.
- Correspondence of the size ranges of the "P" configuration;
- The quality of plasterboard materials;
- Competent carrying out washed down the timber.


The miter saw is effective when creating cuts, often used hand hacksaw or self-tapping screws. When installing doors, innovative technologies are used: the method of sawing down vertical racks involves adjusting the parameters of parts and lintels, while observing strict rules, the structure is adjusted at an angle of 45 degrees.
Competently carried out joining of parts gives the installation the necessary external format. The holes must be through, perpendicular to the cut.


Dimensions (edit)
When installing interior blocks, the question often arises of how to calculate swing doors for a niche. With small walls, similar to the parameters of the door frame, Finishing work carried out using platbands. The formed set is installed on the sides of the box. This setting is designed to mask the foamed seam. Wooden or laminated platbands, if they are not processed, are installed using hardware, after which they resort to painting. Platbands may differ in shade from the plank, because contrasting options are always in trend.
The timber door frame is designed in accordance with the requirements in the field of construction using cement-sand plaster... It is not recommended to install a canvas made of wood together with fiberboard boxes: different levels of moisture resistance can lead to deformation and cracking.


Structural blanks for screws in an MDF installation are made on preparatory stage, drilling is performed with a tool with optimal diameter... The size of the internal vertical bar level is calculated as the sum of the dimensions of the canvas (as a rule, 3 * 3 mm), if the structure is with a threshold. The ceiling piece is installed to special devices.
The use of self-tapping screws ensures high efficiency of work. The parameters are determined by indicators such as false and loop materials, the distance is determined as the sum of the parameters used for lateral voids.
The beam is made in accordance with the technical parameters at a right angle, since this is required by the arrangement of the threshold. The block is formed on a straight base (for example, on the floor).
The arrangement of door fittings must be carried out in such a way as to ensure evacuation measures. You can choose from right-hand or left-hand universal door hinges. Devices with a laminated surface are manufactured taking into account the parameters of the hinge. Usually, 20 cm is left as an indent from the top and bottom edges. The zone for installing the hinge to the box structure is determined taking into account the technological voids.


What material is better to put
Door products are represented by a wide range of models. Modern interior doors are made using MDF panels, progressive materials (WPC, eco-veneer, natural wood).
- Fiberboard Is a great option for creating an inexpensive and effective door. The wood frame is covered with laminated fiberboard sheets. These economical structures, easy to install and compact, are popular in the construction market. Experienced specialists will help to increase the resistance of the structure to high temperatures and humidity by using special formulations.
- MDF allows the manufacture of inexpensive and durable door blocks with optimal sound insulation performance.
- Wood it is characterized by high strength and resistance to the influence of aggressive media and mechanical stress. The porous structure of the material ensures the creation optimal microclimate... Such designs are great for author's design, perfectly complement classic interior, while the parameters of the interior doors must correspond to the specifics of the opening.


All-glass doors, metal-plastic structures, steel parts are non-standard products that require an individual project.


Standard door systems are placed in a solid box, the quality of which determines the durability and reliability of the entire structure.
- Fiberboard box is a solid installation that can deform under the influence of mechanical stress.
- Box made of wood, untreated - structures made of profiled timber. They are distinguished by their super strength and reliability. The installation will require the use of additional materials for final finishing activities.
- Box made of laminated materials. This installation does not require final finishing. The defining point is the nature of the lamination. The use of thin paper is not recommended, since in this case, scuffs and cracks may appear, affecting the external parameters of the product.


The doorway can be pre-treated. This determines the specificity of the opening, its parameters, and features of the interior of the room. Processing can be carried out using additional parts and platbands.
What tool is needed
Door installation requires the use of certain knowledge and technology: a vacuum cleaner and a miter saw are considered indispensable attributes of the kit. Experts recommend at the initial stage to think over an action plan: it will be necessary to organize the marking, cutting of hinges, arrangement of door slopes.
Manual equipment and electrical equipment are used at the main stages of work. The question of how to use the router will be answered by experienced craftsmen with many years of experience, under whose guidance all the main activities will be carried out.


With the help of a punch, the working surfaces are leveled and the opening widens. This tool allows you to make special dowel indentations. The drill helps to drill the recesses of the required parameters for the fastener. The start of work is accompanied by a check of the equipment. The tightness of the drill is very important, because the part can fly out during work and damage the working surfaces of the doors.
The screwdriver allows you to securely fix the hardware in the hinges. The jigsaw is used to process complex surfaces that are difficult to cut. The manual electric milling cutter helps to install the locking mechanism and integrate the hinges. The pencil allows you to make special marks in places that require processing. For the same purpose, a marker is used (provided that it does not leave marks on the surfaces).
A three- and five-meter tape or steel ruler, together with a checking square, ensure accurate measurements. Using a vernier caliper, the depth of the cut is measured, which is performed using a chisel.


The slope of the surfaces must be measured using a bubble level with parameters within 50 cm.Using a set of screwdrivers, hinges and awnings are attached, and locks are equipped.
The miter saw is an excellent tool for sawing structural parts - bars and platbands at an angle of 45-90 degrees. Circular Saw helps to format the dimensions of the door leaf. The gun can be charged with a high quality sealant to close gaps.


What is included?
Self-tapping screws allow fixing device elements (mounting strips, hinges, platbands, locking mechanism). The kit also includes liquid and finishing nails and micro-studs, which are fixed with a pneumatic gun. With the help of these devices, the mount becomes ultra-strong and reliable. The mounting micro-stud is a compact hardware element without rivets, which provides a solid surface. You can measure the length and width using a tape measure or a metal ruler.
Interior doors are sold without fittings, which are known in domestic and foreign manufacture.


Experts will help you choose high-quality systems (hinges and locks) that are not subject to mechanical stress and corrosive deformation. By adjusting the hinges with the help of fasteners and a screwdriver while working with slopes, it ensures a high density of adhesion of the canvas to the box, while using special devices that allow you to measure parts, insert structural elements at a high professional level.
The solution tray is made of a special material for an optimal mixing format building mixtures and ease of cleaning after work. The kit includes brushes and rollers for finishing work. The grout kit provides a reference surface view of the door block.


How to install correctly: step by step instructions
Interior designs are installed from scratch using step by step recommendations posted on Internet portals. Experts recommend not to do events yourself if you do not have sufficient knowledge and experience.
Experienced craftsmen will tell you at what stage you should carry out the preparatory activities yourself, and at what stage the structure is being installed.
- Determine the specifics of the means and the quality of consumables for the installation of the structure.
- Outline the installation scheme for the blocks of a double-leaf interior door with extras.
- Carry out constructive measures to install the door frame without self-tapping screws. Hinges are attached to the door block, a cutout is organized in the structure, a strong box is assembled, after which all the elements are assembled. Metal bases must be structurally sound. The planks are fastened using self-tapping screws. U-shaped design- a pledge of competently carried out work.

- Mount the structure in the opening. The box is inserted into the doorway, alignment is performed. The end piece is drilled from both sides.
- Install the door structures on the hinges. Lightweight fiberboard door allows you to carry out events on your own.
- Stamp the seams, thereby eliminating the voids between the wall surface and the box. Complete solidification is carried out within 24 hours at room temperature.
- Carry out finishing work. Determining the type of finish will help create an optimal design.
For a visual demonstration of the installation process, see the following video.
How to install fittings?
Experts do not recommend carrying out installation work on your own door structure, replacement of the castle and the arrangement of thresholds, as these activities require high professionalism. Experienced craftsmen will help you purchase a set of high-strength materials, determine the order of work, install the structure correctly, insert the door frame into the opening. Assemble the structure, ensuring high quality assembly, you can use special tools.
It is necessary to insert fittings using modern technologies and installation methods for preliminary measurements using a tape measure or ruler. High quality hardware is used as fasteners. At the initial stage, a work scheme is formed, a set of necessary tools, insertion of the box into the opening, installation of hidden hinges is provided.


Successful examples and options
Before starting the door installation activities, you must familiarize yourself with good examples and design options. On the websites of companies engaged in licensed activities, samples of doors in a Khrushchev, a modern apartment, an equipped kitchen are presented. At the same time, it is important to pay attention to a high-quality installation, made in accordance with technical requirements: holes are carefully made in the wall, structural parts are inserted at the required angle.


If you have a need installation of interior doors, then do not rush to call an expensive master, because if you wish, this can be done do it yourself. There is little understanding in the construction business, you can use our advice and independently install the interior a door .
Read also:
We install interior doors with our own hands
The process of installing interior doors is quite complicated, so a positive result depends on clear implementation every action.
If you decide to do this kind of work on one's own, then please be patient. You should carefully study all the instructions and tips for installing interior doors with your own hands, and then scrupulously perform all actions.
Observing all the rules that are given below, you and your loved ones will be pleased with the new interior doors.
We install the interior door ourselves. Preparation

First you need align the walls, cover them with putty and plaster. After which the wall in which the door will stand must be well dried otherwise there is a risk of displacement of the door frame.
The floor must also be prepared for flooring. When installing an interior door consider the final height of the future flooring, to correctly calculate the height of the door frame. If you are already replacing existing door, then the latter conditions are not so important.

The next step will be selection and purchase of interior doors, which we will talk about in the next article.
You can purchase both the box and the doors separately, or assembled. The door frame can be made on one's own. it U-shaped design, consisting of a box beam. In essence, these are two racks, as well as a horizontal rail called the headroom.

Note! The best option for a door frame is without a horizontal bar at the bottom (sill). If you do not hide this block, then it will only interfere with walking.
When choosing a bar, make sure that there are no irregularities and black (dead) knots on it.
Important! The thickness of the door frame must be equal to the thickness of the door, otherwise the interior door cannot be installed.

To see the quality result of our work, you need professional tool. However, this is expensive. At the same time, if you do work simple tools, that is, the risk of not maintaining the required accuracy.

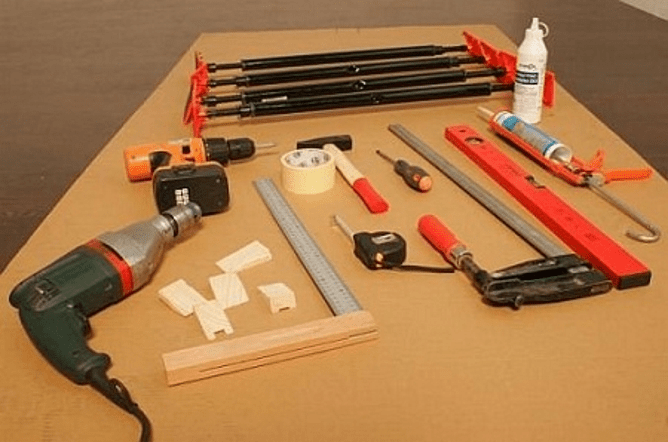
You will need:
- Hacksaw
- Level meter
- Miter box
- Distance measuring tape
- Screwdriwer set
- Hammer
- A set of chisels.
Power tools:
- Electric milling cutter
- Perforator
- Miter saw
- Screwdriver
- Circular.
Consumable material:
- Polyurethane foam
- Nails
- Self-tapping screws
- Wedges
- Bars.
We begin to install the interior door

First you need to decide how the interior door will open... This largely depends on the layout of the house.
For example, in the bathroom, it is recommended to make doors that open outward, because there is little space. And if the door is a transition from a small corridor to a large room, then you can install doors that will open into the room.
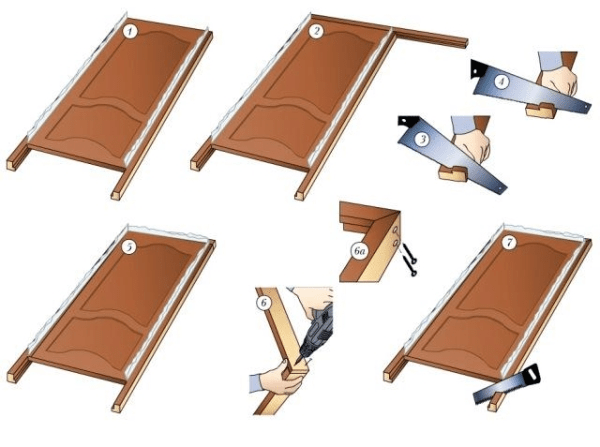
Let's move on to installation of the door frame. This is the most crucial moment and the basis of all work on the installation of interior doors, since the entire success of the work depends on the installation of racks.
1. Miter saw saw off the upper parts of the racks at an angle of 45 °. If you do not have a miter saw, then this operation can be done using a small hacksaw and a miter box.

2. We measure the racks. It is better to measure and mark the required length of the two racks from the inside.
3. Now let's prepare the lintel. Similarly, we measure it from the inside.

4. With a miter saw or a small hacksaw, we saw off the lintel on both sides at an angle of 45 °.
How to install an interior door correctly
Installation of door hinges
Installation of door hinges is also a responsible event. Dimensions must be accurate regarding the door leaf and door frame. It is also necessary to accurately calculate the dimensions of the hinge grooves.
1. On the stand from the inside, you need to retreat 20 cm.A loop will be fixed at this place.
2. The hinge installation distance will be equal to 0.4 cm (the distance from the door leaf to the rack) + directly the recess in which the hinge will be located.

3. We attach the loop in the right place and outline it with a pencil.

4. It is better to make a hinge pad using a router, and if there is none, then this work is done with chisels.

5. Using the same principle, we make a seat for the lower hinge, which should be located at a distance of 20 cm from the lower edge of the door leaf.

6. We make recesses for the hinges both on the rack and on the door.
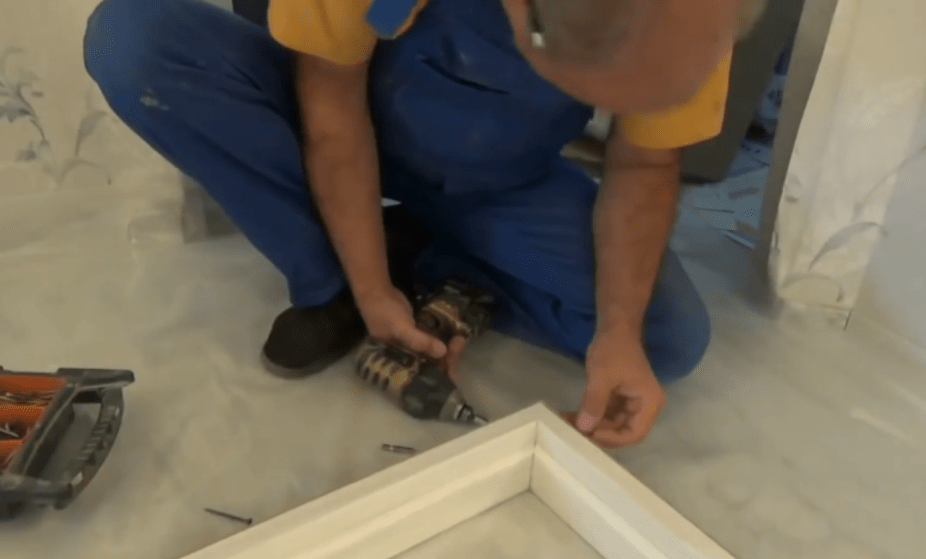
Door frame installation
Door frame installation should proceed as follows:
1. We fasten the racks to the lintel perpendicularly using self-tapping screws. But first you need to make a hole with a drill with a smaller diameter than the diameter of the screws.

Then we screw the self-tapping screws into the holes obtained, otherwise the structure at the screw-in points may burst. It will be enough to screw in only 4 self-tapping screws, 2 per side. The whole procedure must be done on a soft substrate (for example, on cardboard) so as not to scratch the door leaf.
2. We place the resulting box in the wall opening, while fixing it with spacers and wedges.

Do not forget! There must be a 2-3 cm gap between the box and the wall for polyurethane foam.
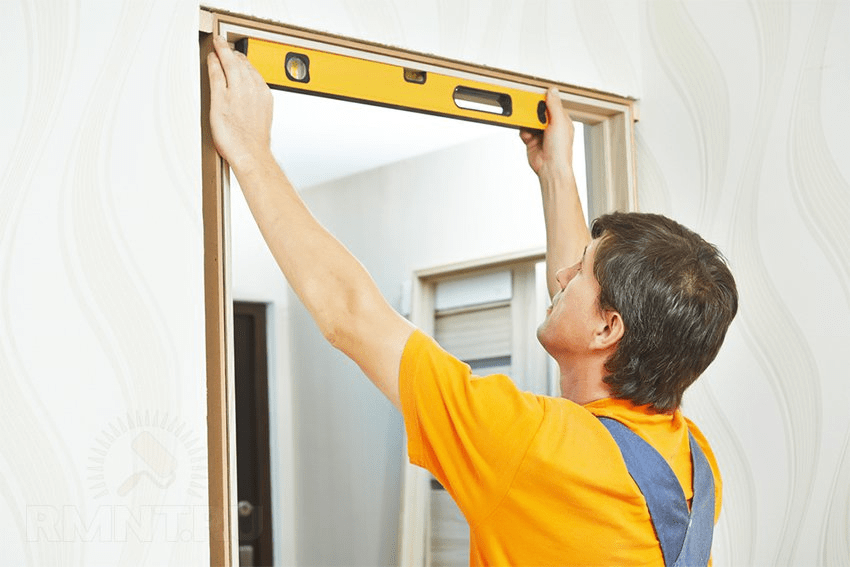
3. Align the door frame horizontally and vertically using a level.

4. Finally, we fix the entire box with self-tapping screws, but before that we drill holes in the box and in the wall.

Before drilling the wall, we apply marks with a drill through our door frame. If the opening is made of brick, then you should hit the solid brick with a self-tapping screw, and not into the cracks between the bricks, otherwise the dowels will not hold well.
5. After the holes are ready, of which you can make 6-8 per side, you can install the dowels.

6. Now we screw the screws (it is better to use wood screws) into the dowels through the door frame. It will be more convenient to screw in the self-tapping screws with an electric drill with an appropriate attachment or a screwdriver. Do not tighten the screws to the limit, as the box may bend. When screwing in, periodically check the level of the position of the structure.
7. Install loops.

Be careful! The hinges must be installed so that the door leaf can be hooked onto the hinges from above.

8. We put the doors, hanging it on the hinges, and check if the door closes and opens correctly. The door should not open or close on its own - this will indicate that the interior door is installed incorrectly. If there are any defects, we eliminate them.
9. Now you need to close the door and insert small spacers of appropriate sizes between the door and the racks (you can use cardboard) so that in the future the foam does not deform the door frame.

10. Finally, we apply foam between the wall and the box. Start filling the vertical seam from the bottom. Do not overdo it, fill in about a third of the total volume of the seams, as the foam grows in size as it dries.

In addition, excessive application of foam leads to its overspending. Also, excess foam can get on the front of the door. The foam should dry for about a day at a temperature of 20 ° C.
11. After the foam has dried, you can remove all spacers.
Installation of platbands
After the door frame is installed, there is still install platbands.
1. To do this, we cut the required length at an angle of 45 °.

Advice! Saw from the outside so that no chips remain when sawing the casing and the groove is "clean".
It is better to saw the strips for the platbands, leaving a margin of a few millimeters to hedge against mistakes.
2. We fix the received platbands with self-tapping screws, nails or glue.

3. If you used nails, then their caps need to be wiped off.
And if these are self-tapping screws, then you can simply put decorative plugs on them. It is enough to screw 6-8 self-tapping screws on each side of the platbands.

There are times when the width of the casing is too large, which is why it cannot be installed against a wall perpendicular to it. Then you just need to reduce the width of the casing by cutting it off. You should have a platband that fits right butt to the wall.
If the platbands do not fit well in the corners, then such angles can be adjusted using sandpaper, but it is better to use a belt sander.

Also consider the case when the walls in the room are not straight, and are located in the shape of a trapezoid. This usually happens in toilets and bathrooms of old "Khrushchev" houses. In such cases, it makes no sense to cut the platbands at an angle of 45 °, because they will not converge. Therefore, you can use our advice and cut the trims as in the photo.


However, such methods of installing platbands can be applied if the thickness of the box matches the thickness of the wall. And if the wall thickness is greater, then the installation is used additional additions.
Installation of add-ons

So, in order to prepare the add-ons and make the installation, you first need to cut rebounds according to your size. It can be done do it yourself from a flat board.
Perfect for damp and thick walls waterproof plywood(BS), which can be additionally pasted over with a decorative film. But it is often easier and cheaper to put ready-made additions from MDF with decorative design.

Consider one more nuance: if the design of the interior door is significantly skewed, then the installation of add-ons is highly discouraged.
Distortions are evidence that the door frame has been installed not right, and if the rebounds are still adjusted to such an incorrect design, then subsequently they will split and warp.
Perhaps, walls in a room with a slight slope. If it comes for minor irregularities (about 5 mm), this can be corrected with a layer of plaster. With a much greater curvature of the walls, there will be no choice - you will have to file the rebounds under the walls.
Foaming

After installing the extensions and before applying the plaster the cracks must be filled with polyurethane foam.
As you know, foam tends to expand during solidification, creating a lot of pressure, and so that the design of interior doors does not lead, use our tips:
- Do not remove the leveling wedges and spacers before the foam is completely dry.
- Apply the foam in 3-4 layers: apply the next layer after the previous one has dried.
- Leave no foam space within 1 cm between the fences and the wall. It is better to plaster this space.
We hope that our advice will bring you benefit and joy from new doors.
How to install an interior door video
 We issue a child's passport
 Easter cake in a bread maker - simple and tasty recipes with a photo step by step, video - How to make dough for Easter in a bread maker: Panasonic, Moulinex, Redmond, Kenwood
 In Chelyuskintsev park, a roller coaster trailer knocked down an administrator to death - Salidarnasts