How to make a spectacular "brick" wall from plaster? Imitation of decorative brickwork made of cardboard design imitation brick masonry
Brickwork itself is an excellent decorative background for both internal and the outer part of the walls of residential and non-residential buildings. However, not always exterior appearance The walls corresponds to the aesthetic needs of the inhabitants. In particular, the walls can be performed at all of the brick, and not all kinds of last look quite effectively.
In such cases, such a finishing reception, as imitation of brickwork, comes to the rescue. How to make imitation brick wall It will be discussed in your own hands in the following article.
How to make a wall under the brick?
Decorative bricks on the wall do it yourself can be done different waysThe simplest of which is the acquisition of decorative tiles under the brick and its laying on the pre-prepared surface of the wall with tiled glue. But the real craftsmen are not looking for, so we consider below whole line Other ways that are more laborious, but will allow you to significantly save when finishing the surface of the walls of your home.
Application of the imitation layer on the wall
In this case, it is assumed to apply the prepared solution to the surface of the wall using special stencils or with preliminary marking working surface.

Important! Before starting work, you should paint the wall in suitable color. It will be visible in the intervals between bricks, therefore, this color must match the color of the seams of brickwork. Usually it is chosen white or gray paint.
- cutting rectangles in plastics or rubber sheet;
- collecting a pattern of thin wooden or plastic plastic rivers.
If the section of the wall planned to finish is similarly relatively small, and you don't want to spend time or money to get a template, you can apply the necessary marking on the wall by means of adhesive tape or painting tape. In this case, the series of bricks are indicated first ( horizontal strips Ribbons or Scotch), and then separate bricks are distinguished by vertical segments.
Important! Since later you will have to remove the tape from the wall, on the edges of the markup it is advisable to leave the free edges of this material so that it is convenient to pry them and separate them from the wall.

The disadvantage of the latter method is the increased requirements for the consistency of the solution and the layer of its application. The solution should not flock down the wall and apply it to a layer of no more than 2-3 millimeters.
After completing all the preparatory work on the manufacture of the stencil or markup, you can safely start kneading the solution. We offer you the choice of the two most popular recipes.
- On a plaster basis. A feature of such a mixture is rapid frozen, for this reason, in the case of working with painting scotch, you will have to introduce the so-called "moderator" into it. This will lead to the fact that the layer decorative coating It will not be fun 20-40 minutes for which you have to have time to complete the work on the skled site. Otherwise, you simply will not be able to remove the tape from the wall.
- A mixture of plaster and tiled glue in proportions 1 x 1. For the preparation of such a mixture, the sand is also needed, with extremely smallest fractions. It will have to be purchased in a specialized organization, since sand from the nearest sandbox or even a career after sieving at home will not comply with the requirements of it.
Production of decorative bricks from plaster or tiled glue
You can try to independently make a tile, imitating bricks. To do this, you need a form that can be purchased in a specialized store, or make it yourself.
Important! The thickness of the "aircraft" brick should be 5-20 millimeters. Thinner elements are not strong enough, and thicker, firstly, unreasonably increase the consumption of the material, and secondly, the area of \u200b\u200bthe room planned to decorate is thus reduced.
A gypsum, tile glue, etc. can be used as a starting material for the manufacture of pseudokiters. It should be dissolved with water to the consistency of thick sour cream and poured into a shape, pre-lubricated with soap solution. Pouring should be immediately aligned using a spatula or an ordinary plastic ruler.

Leave the shape alone until completely drying the solution (approximately half an hour), and then turn it over and carefully remove the resulting bricks.
In principle, you can do without a form. To do this, the mixture should be made more thick and roll it, like the test. Next, cut the resulting "damn" to the rectangles of the same size and spread them for drying. The dried elements can if necessary, can be painted in the desired color.
Regardless of which method, the manufacture of pseudokirpiki, you prefer, glue them on the wall all the same tiled glue. Previously, it is necessary to put the markup of the laying of the tile on the wall, postponing the original starting line at the bottom, from which you start performing laying.
Laying each row, follow the width of the seams. For convenience, you can use matches, toothpicks or "cross" for laying an ordinary tile with a remote one of the ends. For applying tile glue on the wall use toothed spatula.
To make decorative brickwork, the effect of deliberate negligence, you can pass the edges of the side pseudokich.
Foam imitation brick with her hands
There are less than labor methods Imitation brickwork. Of course, the bricks obtained by such methods will be less durable, but visually the result of the work will delight you no less than in cases described above.

In particular, can be used to create pseudociphers foam (for example, ceiling tiles that does not have a pattern). To do this, make a mark between the selected material with a handle or felt-tip pen, and then sell the toothpick the neat lines according to it.
To create a brick texture, apply indiscriminate strokes on the surface of the material to the same toothpick. Such a foam panel can already be glued to the wall, it will only remain paint it into the desired color.
Imitation of wood bricks
Another way to create a brickwork effect can be the use of wooden stations or rectangular pieces of plywood of the appropriate size. To do this, distinguish and cut the selected source material on the items and stick the front side of each of them.
Watch the wall to exercise the calculation of it prepared by the pseudokirpiki and stir them according to it. After drying the adhesive base, it will only remain to cover the decorative decoration of the paint layer.
The main advantage of such a method of imitation is its complete environmental friendliness and quite large durability.
Draw - We will live
The simplest ways to recreate the effect of a brick wall, as it would be ridiculous, it neither sounded, is pasting the surface of the walls with wallpaper with an appropriate pattern or its self-applying.

Of course, realistic this method It is not different, but, nevertheless, he takes place. In addition, this method is the easiest and most fiscal of all that we have been considered in this article.
Brick imitation finish coating
As you already understood from all foregoing, most of the methods for creating a brick effect requires the color of the created surface as the final stage of the style and color design.
In order to simulate the color performance of the red clay (ceramic) brick, you can connect together a red and yellow ocher, adding a slight amount of bleel to their mixture. This composition should treat the decorative surface by the method of tampony, that is, evenly distribute it on the facing with the help of a foam sponge. Next, it is necessary to use liquid brown paint, spraying it on the stained surface with, for example, an old toothbrush.
To get a more spectacular and natural appearance of brickwork, you can use different staining techniques in different places. For example, along with the above-described method, one row (or its segment) of pseudokikitis to be treated with cold hematic, diluted with water, and the other coat the connection was bleached and siena. Each of the compositions apply everything in the same method of vanity.
Brick masonry in modern design
Now you know about the whole complex of ways to make a brickwork imitation with your own hands. Possession of such knowledge and skills will allow you to transform both external and internal look of your home. However, keep in mind that not all of the above materials are applicable to finishing outdoor walls due to the constant impact on them of various factors ambient.
Brick masonry and its imitation found wide applications in a number of style decisions. The most popular from the latter is the so-called Loft style. However, spectacular bricks will make a highlight and indoors decorated in country styles, Rustic, Provence, etc.
Decorative design of the premises is made by a variety of ways. If we consider the cheapest and affordable self-implementing technology, then one of the simplest and cheap is the imitation of brickwork.
This option is applicable to almost any structures, regardless of the material of the walls. How to do it with your own hands, without attracting assistants, and especially experts, we will understand this article.
Step by step algorithm of action
Wall drawing
The easiest way is the long rail. Naturally, with precise observance of distances between horizontals (bricks have the same dimensions). You can focus on the standard. The thickness of the single - 6.5, one-time - 8.8, double - 13.8 (cm).
Applying simulation coating
There are many techniques, so we will be limited to the most common, based on the fact that the work is performed independently.

With the help of adhesive tape (painting scotch)
Before starting work, the wall must be painted in that color that the seams should be. As a rule, gray or white (or something intermediate). The fact is that depending on the components, their relations in the mixture dry solution acquires a different shade. Further indicate horizontal seams (tape sticker). After that, it is easy to highlight individual bricks, imitating the laying with a shift of products in adjacent rows (pieces of scotch are attached vertically).
Feature: Since the tape will have to be removed, there must be free ends sufficient to grab their fingers. After that, the prepared mixture is applied on the wall.
Important: The consistency of the solution should be such that it does not glare along the wall. And the layer should be applied minimum, not more than 2 - 3 mm.
Option number 1 - based on gypsum. But this material is quickly hardening. Therefore, it will be necessary to enter the mixture to enter the so-called "retarder". Its use leads to the fact that the layer of the gypsum solution does not harm for from 20 to 40 minutes. Otherwise, it will not be possible to remove the ribbon to designate the masonry seams.

Option number 2. - Plastering mixture + tile adhesive (1 to 1). In this case, the sand is used in the process of cooking only the smallest fractions. So you will have to specifically acquire, since the usual (from the river or from the career), even well-sized, will not suit.
disadvantages: With a large size of the object of the walls of the wall, the tape takes a mass of time and material itself. Too rapid solution of the solution can lead to the problems of extracting scotch from it to preserve external view drawing.
By stencil
The method is more complicated, as you have to prepare the grid. It is made from a sheet of plastic or rubber, knocking in it rectangles.

In addition, it is advisable to create a template of subtle rivers, undoubted advantages of which are:
- the ability to work with solutions that quickly freeze, because they will have time to "grab" and dry;
- large selection of materials and flexibility in carrying out any complex of work. The form of the design fully repeats the elements already considered;
- the ability to create a template directly on the wall and images of any form;
- naturalness and naturalness of the appearance of the resulting brickwork.
disadvantages: Stencil needs to make or spend money for the purchase of a finished product.

Imitation of a brick wall of foam (ceiling tiles) with their own hands
For falsekirpich, suitable smooth tile from polystyrene foamless. For our purposes, you can use any of its sides. The optimal size of the "stone" is 7/15 cm. If you increase the proportion, the wall will look unnatural. The process of manufacturing "stones" is simple: squeeze them out of ceiling tile.
First we put on expanding the markup with letters on the seams. Next, we pay flat lines, after which we cut the "bricks" with a painting knife. Finished goods We stick with your own hands on the desired part of the wall. As a binder, we use glue for ceramic tile. Here you will not need to fill the seams with the help of plaster. The gaps between the "stones" need to be made very small: 1-1.5 mm. After the end of the work on the sticker bricks need to paint. As a larger layer of paint, we try to apply to the gaps, thereby creating imitation of brickwork.

Imitation of a brick wall with their own hands from plaster (tile glue)
For the manufacture of parts, any tiled glue, which is sold as a dry mixture. It needs to be dissolved with water to the state of very thick sour cream. It is best to use the composition of white. After that, we divide the whole mass into 3 parts, in each of which will add some paint.
It is important that the paint differ in each part by shade.
Mix the mass in each pile like the test. We will have a lot of beautiful divorces. Roll over the "damn" from it and cut the bricks of the same size. Lay them out for drying. So do it until you gain the required number of "stones".
We stick from the wall with the same tile glue. Seams fill in the composition painted in more dark color. At the end, the surface of the wall can be covered with several layers of varnish.

How to paint fake?
To get a more natural shade, two types of ocher should be mixed: light and red. Then add a small amount of Belil to them. In order for the texture of the brickwork, it looks like a real one, to apply the paints, use the reception of the switching.
We take the sponge and begin to apply a pre-cooked mixture on the wall. After that, there will be a liquid paint of the shade "Luggage". It is sprayed on bricks using a conventional toothbrush.

So that the decor looked even more natural, each row stain in a special way.
The second one can give the shade with the help of Mars, diluted with water. For the third - use Siena and Belil. All paints are applied in the same way of vanity. Then continue to alternate shades in the same order. Upon completion of the work, the wall is recommended to cover with varnish in two layers. If there is a desire to get a matte surface, then slightly pass the shallow emery paper.

This type of decoration has several subtleties, because by virtue of its characteristics, he can create a special atmosphere and clogged it.
It is worth remembering that masoning is completely optional in the area of \u200b\u200ball walls, it is enough to be one surface of four, decorated in this way. When planning actions, it is important that you represent a full image own room - And then everything will turn out.
Imitation of a brick wall with your own hands - photo of real objects:

Brick imitation in the interior of the living room

Wall from Falkirpich in the bathroom

Imitation brick wall
do it yourself from cardboard in the bedroom

Accent Wall from Falkyrpich in the Hall

Imitation of aged brick
in the interior of the living room

Falo Flames in the hallway

Brick Loft in the interior of the living room

Brick imitation on a kitchen work wall

Figowy Masonry
In the interior of the living room

Stencil Falkeer in Dining Room

Imitation of a wall of tricolor brick
do it yourself

Interior living room
With Falquer Finish: Fusion Loft with Outdoor

Staircase
gypsum bricks

Imitation of a brick wall in the hallway

Accent wall of falsekirpich in the living room

Factory decorative brick
from tile glue

Imitation brick wall
do it yourself in the bedroom interior

Combination of natural and fake
in the interior of the fireplace hall

White Falkirpich do it yourself
in the interior of the cabinet

Brick imitation from cardboard
on the emphasis wall of the attic

Ceiling tile brick
in the interior of the living room

Large brick
made by stencil

Accent Wall of Falkirpich
in a minimalist hall

Brick imitation do it yourself
in the interior of a private house

Highly...
Very much Falkekrpich in the interior. Obvious bust!

Imitation of brick walls
do it yourself in the interior of the hallway

Painted polyfoam brick
in bathroom

Fake arch of screen brick
In the interior of the living room
How to make a brick wall imitation think many. After all, it is not always possible to make a wall of the brick. For this you need a durable and wide foundation or high-quality bearing walls. After all, brick is quite much weighs. But today there are many options to make imitation of brickwork and not much to increase the weight of the structure.
Today we will tell you what the imitation of the brick wall is made and you can choose the most optimal option. Also you can on the video in this article and photo visual examples And choose the most appropriate design.
If the room has a brick wall, it is enough to remove upper layer Finishes, slightly refine and brickwork is ready. At the same time, it will be really "real" folded by the builders of the wall. It will remain easy to paint and cover with varnish (see how to paint the brick wall: two options for impeccable repair).
- The surface is enough to clean from the finish, take the grinder and the sandpaper and seal. Seams between bricks are embarrassed by a special mixture, it will help to remove visible irregularities and defects.
- In the end finishing work You can cover the surface with wax or special varnish, these materials are perfectly suitable for finishing the natural wall. If you do not want a brilliant surface, it is enough to take a fine-grained emery and stick to the matte state.
You should not forget that, removing the finish, you can rarely detect the perfect brickwork. But there is an output - imitation under natural brick. This is an excellent option that will not require grinding and additional finishes.
What is a brick simulation finish
How to imitate a brick wall in an apartment or on the facade? Is it possible to make masonry imitation itself?
Let's look at a few options that are easy to implement at home, because they will not require special skills and special tools, it will be able to make a simulation with your own hands. Then the ultimate price will not be high
Decorative surface decoration
The use of decorative plaster gives a quick result, and it is not difficult to apply it. The main advantage can be considered that you will not need to carry out painstaking work on the smoothing of the surface, everything will hide under the layer of plaster.

You will have to get the following tools:
- Primer;
- Roller or wide brush;
- Decorative plaster;
- Wide spatula;
- Paint;
- Several rags;
- Small handle or ordinary stick.
Using the batch in the natural masonry, seams are created, we will not need this device for plastering enough handles, stack or hash (sushi wand), in general, of any long item that is easy to spend smooth and shallow seam.
So:
- It is worth starting imitation from the preparation of the plane: Be sure to delete the previous finish, whatever all the holes, clean the wall from dust and boot. The decorative mixture is prepared after drying the soil layer: on the package, the manufacturer specifies the necessary proportions, dial the desired amount of water, fall asleep the powder and add a dye. The latter is not necessary if you want to just paint the wall after applying plaster.
- It is not necessary to knead the entire pack right away, it is enough to divide the composition on certain portions, so that it is in order to process each meter of the wall, before the apparent mass hardens. The perfect solution does not slide from the wall, there should be no clots. Having achieved good consistency - proceed to work. Using trowel and spatula (see Construction Spatula - Types and Differences), decorative mixture Apply to the plane, flatter and remove the surplus of the solution from the wall. No need to try to achieve smoothness, because brick, in itself with roughness and small chips.
- Then proceed to the most important stage - we make the visibility of brickwork. Naturally, their size can be arbitrary, but still it is better that they do not differ too much from ordinary, then the wall will look more realistic. If you are not confident in yourself, feel free to take a ruler, it will help in creating a geometrically verified pattern.
- According to the still empathous mass, the dry stick is drawn lines, therefore, a masonry pattern appears, an excess solution that is allocated due to lines can be easily removed with a rag. Go further to a new site and so until the entire surface is processed. Let it harden the treated part, since further impact will affect the pattern.
- The snap mixture is easy to clean the sandpaper, so you not only remove the excess material, but also adjust the seams, at the end necessarily erase dust. If you want to paint the resulting wall, do not forget to predict, so the paint will stay longer. To make the wall of maximum similarity, you can choose different shades.
- There is one more way: first the wall is covered with a layer of gray plaster and only then levels and smoothed. A dye is added to the solution, the resulting mixture is evenly applied to the wall and the seams are stuck on it. Thanks to the addition of the dye, color plaster remains in the resulting lines, it must be cleaned and end up with imitation under the natural wall of the brick.
I imitate the laying with the help of foam
Also easily decorative brick can be made independently of foam or expanded polystyrene foam.

But before the work, you must get the following tools:
- Large sheets of foam;
- Marker;
- Long line;
- Stationery knife;
- Tile glue;
- Several paint cans (see Paints for foam: what can be used).
During the preparation, it is worth marking the foam sheets: with the help of a long line and marker draw standard bricks 7x15 cm, do not forget to make a seam allowance.
- Then the stationery knife is cutting the placed foam and prepare the plane.
- We remove the decoration layer, smear the holes and scratches, be sure to flatter and do not forget about the soil layer. Glue smears on the prepared wall, then bricks are gradually glued; Do not forget about the gaps, it is enough to leave 2 mm between each brick. After all the elements are fixed, proceed to painting the wall, be sure to fill the seams of paint and do not forget to remove the drums.
- To achieve maximum similarity, you can apply chaotic chips and scratches to the foam, the painted wall will look somewhat lured, but such a similar to the original laying. It is quite simple to achieve a unique texture with the help of canned, tin strips. Also stands some of the bricks to paint another paint. We select the most similar shades and forward.
Textured wallpaper
There are special wallpapers imitating natural masonry. If a couple of years ago, it was normal wallpapers, now modern technologies Allowed to obtain real textured wallpapers, of course, from afar not to distinguish them from brickwork, but it's noticeable near that it is imitation.

Textual wallpapers have several advantages:
- Low cost in comparison with the methods described above;
- High installation speed;
- Light in care - wallpaper can be washed, and dust does not accumulate on the surface.
ATTENTION: If you decide to punish exactly the wallpaper, now there are special options for applying a foamed polymer on paper - such wallpaper is very realistic.
Finished simulation panel
Under these words, it is understood ready plastic optionwhere the surface is identical to the natural masonry.

- It is enough to buy a panel and ordinary wallpaper glue to remake your wall in a few hours. At the same time, they are equally well used in the outer decoration. In order for the glove panel well to keep needed to prepare the wall in advance, do not forget about the primer.
- If the wall is not smooth then you make the alignment of the plane. This can be done by plaster. If it is an inner surface, then it can be done with drywall.
- The second option is beneficial and in the fact that you can immediately make the insulation of the wall.
For the crate, the choice will have to do from two materials. This is a metal and wood.
| The tree is better to apply for finishing internal surfaces. It is quite simple processed and you can easily make transitions even in several levels. |
Installation of wooden crate | In the first case, the metal will be the most optimal for outdoor decoration. A coating is made on the metal, which prevents the occurrence of rust.
|


Stencil embossing
The process passes through the still plastered surface. The finished stencil is taken (usually from rubber or polymers) with the embedded masonry. Here we will look at how to draw brick imitation on the wall.

- The work side must be pouring out with water, you can simply spray from the sprayer. After that, it is necessary to carefully, but tightly press the design to the plane.
- To delay it for a few seconds, then take carelessly, ideally the sutures of the seams will remain on the wall.
Having finished part of the wall, repeat the same operation again. It is extremely important to move the stencil on a new part of the wall, taking into account the lines of imitation masonry already made, otherwise the whistle will turn out.
- The hardened layer of plaster should be further primed, or to cover with wax. After the surface is driving, proceed to painting. Of course, you can do without it, then you should add several color additives in the plaster in advance. If you did, then you need to apply plaster in several layers and do not forget to smooth it out. As a result, it will be very similar to the color of real bricks. Do not forget about the additional color of the seams.
Choosing paint, do not forget that dried, it will become darker!
Figured tiled masonry
This option is notable for the installation method. In fact, you take ready-made ceramics and just glue it on a pre-prepared wall. The process is completely similar to the usual tip cladding, except that it is thicker and in the process of laying leave a wide opening.

- The gap between the tiles must be lifted with any adhesive mixture. As soon as the seam is completely dry, it must be primed or covered with varnish. Due to what, in the process of painting, it will save its color.
- Not necessarily to buy finished tileIf you have a lot of unnecessary bricks and Bulgaria, if you wish, it is easy to cut the tile yourself.
- In principle, you can make tiles and wood, drywall, tiled glue, corrugated cardboard, we will tell you more.
Drawn tile
The process of something resembles the application of an impression by means of a stencil, here we will also need fresh plaster.

- We apply to the plane plaster and smoothing it, thus, it turns out a random relief, which will be like something like a texture of bricks. As soon as the wall dried a little - proceed to work. You need to draw contours of bricks. The easiest all this is done for a ruler, but then it turns out too strictly, it is better to draw contours without any devices, it will turn out to be much natural and chaotic.
- Having finished with the conduction of the contour, you need to take a narrow scraper and clean the plaster, thereby highlighting the contours of the brick. The result is a small recess, it must be cleared with a conventional cloth or brush. This is done in order to remove crumbs of plaster before it becomes.
- The subsequent finish is completely similar to the stencil-described method.
Brick on putty
If there is a prepared wall, boldly choose this option. On the plane you need to apply a light layer of putty with a color additive. And then we do in the previous method, simply draw the laying contour to a slightly frozen surface.

By the way, the relief can be done quickly and simply using construction tape.
You need to act like this:
- Having a dry placard plane, you need to armed markers or marker, place the seams. Consider that each next row should shift in relation to the previous one, otherwise, you will have a prison lattice, but not laying.
- Scattered seam needs to paint and wait until the paint gets up.
- Once the paint is driving, you need to stick the scotch bands along the seams, and then stick to the tight strip of the tape. This is necessary for subsequent easy removal of tape.
- Then we put a light layer of putty, it is not necessary to smooth out, you can leave everything as it is, then it turns out an interesting and original structure.
- As soon as the putty is grabbed, we begin to pull the scotch strips. Because they are glued together, it will be easily removed.
- Now we wait until the wall is completely dry.
- As soon as the plane dries up, you can begin to finish the surface with the method specified above.
Imitation corrugated cardboard
Imitation with the help of this material is the most profitable and easy way to decorate the wall.

The following things will be needed:
- Corrugated cardboard - in principle, it is not necessarily the buyer, it is enough to take everything carton boxes from under shoes, household appliances And so on;
- A couple of packs of paper napkins, be sure to be dense;
- Several PVA cans and wide brushes;
- Adhesive gun, thermoclay;
- A sharp narrow knife (the stationery is suitable);
- Pencil and large ruler;
- Paint, varnish.
Now let's talk about the process itself:
- If there were wallpaper on the wall - necessarily ground the surface, and if the paint - believes and degrease.
- Cut the corrugated cardboard in size for the side plane of the brick, it will take some time.
- We are placing the wall, it will be more convenient to glue our "bricks", but note that the rows should be shifted to make a laying, not a lattice.
- Further smearing the PVA cardboard, but there is a trick, the corrugated cardboard should be dry, glue from the gun is applied there. Due to such a simple combination, you can quickly fix cardboard;
- Now the most difficult stage. We take paper napkins and decorate cardboard bricks by sizing. It is not so difficult, as it seems, you need to apply glue to the surface of the rectangle, and then stick the napkin there, which should be lubricated by glue.
- At the stage of sticking the napkins, it is important to form seams, there will be no special tool here, you can take a pencil, or simply push your finger, so they will be slightly recessed into the wall. It must be done to smooth the sharp edges of the "bricks", thereby achieving the maximum similarity with the real wall.
- At the final stage, when the whole wall dried, begins decorative coloring and varnish. Laco will help protect the imitation from mechanical damage. Drying out, the decorated wall will be as similar to the brick.
ATTENTION: Only tight napkins are used in the work, otherwise they will simply be splashing from glue.
Before sticking to the surface, they are a bit in a palm of the palm, thus get the folds, which will eventually repeat the random texture of the brick. It is better to choose white wipes, otherwise, it may turn out that it will come from the paint.
Nuances and design examples
Choosing a masonry imitation, it is necessary to take into account that it can not only bring a highlight to the interior, but also to fully suppress the rest of the design with its cordiality.
Before the start of work, you need to fully represent how the room will look like with the imitation of the brick wall. Thanks to the wall trimmed under the brickwork, you can make your home original and cozy, and what to choose how to solve only you, because any of the options described above, perfectly imitates natural masonry.
By the way, the technology discussed above can be used to obtain brickwork not only on the walls, many decorate vases, furniture items, thereby adding several more elements to "brick" design.
With the help of imitation you can create unique drawings. They can be pretty original and decorate any room.

It will also be quite acceptable to look and sewing openings, it can be windows or doors.

Also with the help of imitation can be found interesting solutions And more useful.

With such a decorative trim, you can always make and add-ons. Which is not always possible to do on the walls.

Decorative finish Under the brick can look good and be useful when simulating the working part of the kitchen. After all, if you take the panel, then he will not just protect the wall from moisture, but also look good.

Also you can and zonate the room, highlighting the most attractive places in the room.

Imitation of the brick wall with your own hands the case is not a complex, but creative. With a fantasy, you can make just masterpieces and instructions will help you with it.
The surface of the walls trimmed under the brickwork itself, or the masonry itself is in the interior design, the combination of incompatible, that is, the union of strict lines of the brick series and individual patterns of the texture of each masonry square. Such brick imitation for interior decorationwhich is used more often than natural masonry belongs to architectural style loft. Since the natural surface of the brick masonry is rarely used in design due to its rough surface, then many when finishing the inner surfaces of the premises use such a simple reception as the imitation of a brick wall with their own hands.
How to finish a wall under the brick plaster
The surface imitating brickwork does not have to spread to the entire room - it is often enough to separate only one wall or even a small area to give the room of originality and uniqueness. In the interior design, several plastering technologies were developed under the brick: a tile of plaster, a drawing on a fresh layer of plaster, obtaining a drawing with a painted tape, stencil, tile glue.
General drawback of all options - the need big roomSince there is an approximation effect: the closer to the imitation of the brick with their own hands, the rougher and unnatural looks surface. Conversely - when removing the wall, the effect of an absolutely natural brick wall is created. One of general decisions For all finishing options, painting brick rectangles are light, and the seams are dark color. Homemade imitation of the brick wall with their own hands is the reception not only for the walls. In this way, you can decorate the doorways in the apartment, the kitchen work surface (apron) or room corners. 
Preparatory work - The undernder condition so that the decorative brick will be high-quality and beautiful. The second condition is the observance of the thickness of the decorative layer. This is especially true of the plaster - the layer should not be thicker 0.5-1.5 cm. To achieve such thickness, the wall should be aligned, and at deep depressions you can use lighthouses for which the blacknacent plaster is applied. The decorative decoration of walls under brickwork is carried out only after complete drying of this layer. In order for this layer cake to hold on the wall firmly and for a long time, its surface is ground to the compositions of deep penetration. By stucco, the brick wall is done with your own hands in two ways: the seams that imitate the masonry cut through the scraper, or they form a feast of the assistance of painting scotch.
Sews with a scraper
Before making the imitation of a brick wall, prepare tools. First of all, it is a spatula with a width of the blade of 20-30 cm and narrower - with a width of the blade of 4-12 cm. A narrow spatula is applied to the solution on a wide blade, and also work in hard to reach places Walls, for example, in the corners. The application of the solution is carried out by invigs, which correspond to the volume of one serving of the solution - 10-12 liters. The first primer is applied plaster plaster. 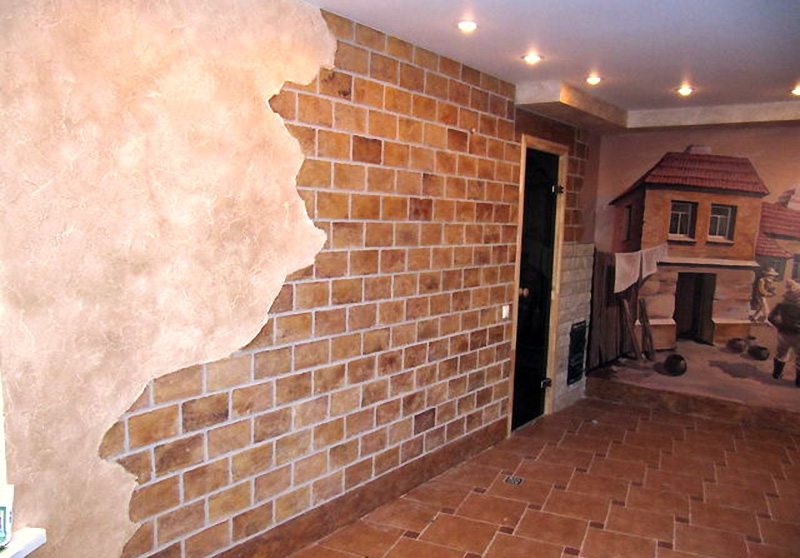
In another wet surface, make the marking of the seams under the brick of the help of the long rule and drawat, which can be replaced by any metal platewhich would provide the width of the seams within 0.5-1.0 cm. The main recommendation is to observe the size of the brick 250 x 65 x 120 mm and drawing of the dressing.
After drawing contours of the seams of the wall under the brick is processed with a scraper. In the role of a scraper can be the usual joinery of the corresponding width, or homemade tools. The scraper remove the solution along the contour of the seam to a depth of 3-6 mm. At the edges of the grooves there will be torn surplus of the solution that it is better to remove the sandpaper after they are completely dried. 
A scraper forming tool for the formation of seams is a steel framework that is used to clean the seams when laying bricks. The difference between the scraper is that with its help, the seams can be made convex or concave. Suts on the plaster first horizontally, then - by short verticals. After complete drying decorative surface And stripping seams with grinding paper, it is necessary to clean the wall from dust with a dry cloth, and then wipe it with a wet sponge.
The last step in this technology: a brick wall with your own hands from plaster should be painted. Painting is carried out in two stages - staining the entire surface and staining of the seams. The whole area of \u200b\u200bthe wall is the easiest to paint with the help of a pulverizer - a layer of paint will fall smoothly and without drills. Also, a good result will give painting roller. Paint brush for a long time, while you need to constantly and high quality stretch paint along the wall so that it does not flow. Painted brush is used mainly only for the allocation of decorative seams. 
Before making a brickwork imitation, it is necessary to choose a gypsum plaster, and the brand "VOLMA" is best for this purpose - the solution does not give a shrinkage from it, it is easy and quickly, it does not require a rough surface plastering. When using plaster plars, other types of solutions cannot be applied - it is possible to bundle mixtures and the imitation intake.
The calculation of the plaster mixture with a thickness of 10 mm will be 8-9 kg per 1 m 2 wall surfaces. Thus, the stucco "" is packaged by paper bags of 5 kg, 15 kg, 25 kg and 30 kg, so it is easy to calculate how many bags need to decorate a certain area. In addition, the gypsum solution is the cheapest of all plaster options - the price difference with plaster or adhesive tiles can be 2-3 times.
Malyary Scotch for seams of brickwork imitation
When using this simple technology, bricks on the wall are drawn by a painting tape, namely: after applying the primer, the contours of the seams are placed with a pencil, and a narrow tape of tape is pasted on them.
The edges of the tape should be in the edges of the plaster, and the gypsum solution itself is applied with a spatula on top of the greasy tape. After alignment and drying the layer, it is necessary to easily pull for the free edges of the tape, which, peeling, will leave a smooth shallow seam. 
Imitation made by scotch - the operation is more complex and long-term than the selection of the seams by a decree or scraper. In addition to painstaking work with scotch, after it is removed, it will be necessary to additionally clean the edges of the brick partitions. Scotch should be removed from the wall very carefully, since it carries the adhesive solution.
Imitation with stencil
Stencil can be made independently, but it is much easier to buy it. Stencils are rubber or plastic, and the solution adhesions badly. Homemade stencil is made of wooden plates.
Advantages of the use of stencil:
- You can work with fast dry solutions;
- When using a stencil selection plastering mixes It grows multiple times, and the stencil itself allows you to use any forms of a picture of brickwork. In addition, the drawing of any form can be created directly on the wall surface, which is more convenient;
- The stencil makes it possible to get the most natural pattern and natural texture of the brickwork surface.

Imitation from foamflast
Another way how to make a brick wall with girlfriend - fake polyfoam bricks. For their independent manufacture Need a smooth polystyrene tile. The drawing in the form of bricks can be performed on any side, observing the size of the natural brick plus 0.5-1 cm on the seams. With increasing or decrease in the size of the form, the overall pattern on the wall will not look like a brickwork.
The figure is made as follows: Polyfoam is placed taking into account the seams by which the shape is cut. For cutting, it is best to use a carpentry cutter. You can make a drawing on one large area of \u200b\u200bthe foam sheet, but you can cut each brick separately, imitating natural products. The billets are pasted on the wall with a plastering gypsum mixture or adhesive solution for ceramic tiles - any synthetic glue does not give the desired thickness of the adhesive layer and dissolves the surface of the foam. The seams between the individual elements of the decor can not be filled with a solution, since their width should not exceed 1-1.5 mm. After sticking the foam, it must be painted in suitable interior color. Several layers of paint can be filled with gaps between brick partitions. 
Imitation of tiled glue
Elements of such tiles are made of tile glue of any brand in a dry form. Dry mixes of light shades should be coated with water to the consistency of sour cream. Further preparation feature is that the solution is divided into three equal parts, each of which is painted by the same paint, but with different color intensity. The liquid roller is added so that the mixture becomes like a consistency in the dough. Such a density gives visually beautiful collequer divorces.
The mass is rolled by a thin layer (0.5-1 cm), and is cut into the form of the same size corresponding to the size of the brick. Details must be dried. The number of such elements is determined by decorating area. That surface bricks are glued with glue of the same composition. The seams between forms are filled with tiled glue, which is in advance to the darker shades. Finishing stage - decor coating with transparent varnish. 
Staining Falkyrpichi
The naturalness of the texture of the brick surface can be obtained by painting it with light and red ocher, mixed in different proportions. To the Okra add Belil. Staining is not made with a brush, but a foam tampon. This reception will make the surface more rough and similar to the brick. 
First, the mixture is applied with a sponge on the wall, then distributed a tampon. Next, it will take work with a liquid color of the "burn bone". Many paints are not needed - it is sprayed along the wall by an ordinary toothbrush or a small brush-flirt. For a more natural type of wall, each row is painted with its shade. This can be achieved not only by the addition of Belil, but also by the addition of Siena or Mars. All rows are stained only with a tampon, with alternating shades. The lacquer layer is the finishing operation on painting, and the matte surface can be grinding in small sandpaper.
From the author: Welcome to our cozy repair and building portal, dear reader. Not so long ago, one comrade turned to me for the Council on the issue than to separate the walls in the hallway. The wall under the brick seemed to him the most optimal decision. So we began to argue about how to make a wall under a brick with their own hands in the apartment.
The first and perhaps the most simple was the following solution: alignment of the walls of plasterboard (GLC), and then - sticking wallpaper whose texture would simulate brickwork. Decision? - Yes, definitely. But at that moment we considered this idea banal, as a friend wanted in his hallway, still a structurally pronounced brick, and not drawn.
We began to go further possible options. I will say honestly, we considered all the ideas, even the most insane. For example, the jokes for the sake of, I suggested to knock down the old plaster from the walls to expose the brickwork, and then cover the wall with a primer and varnish. But to recreate the interior in the style of LOFT in a similar way to our plans was not included, so we decided to leave this idea for another case. And now we will consider the most likely solutions to the issue, one of which you can apply in your apartments if the idea with wallpaper under the brick or the demonstration of real brickwork in your plans is also not included.
Preparation of walls to apply "brick" decor
It goes without saying that everything begins with the preparation of the working surface, because the decor of the walls that are not prepared properly is the hack of clean water. And the preparation of the surface implies first of all - alignment. If you decide to use GLC to align, it is not necessary to use special surface preparation: just mount the frame, and it is fixed on it plasterboard sheets, put off the joints and locations of fixation by self-drawing - and now, can already be applied to the surface of the decor.
But in some cases, GLCs together with the frame "steals" too much useful space by the room. For example, in a small hallway or tiny kitchen, which are often found in the houses of the construction of the Soviet period, - this decision will not be the right one. And the walls in such houses, as a rule, do not differ in particular evenness.

In this case, a suitable solution will be putty or plaster walls in lighthouses. To begin with, we should clean the wall, that is, remove everything that will interfere with further work (for example, pieces of old plaster, which are permanently held). Then we appline a layer of penetrating primer on the wall.
The primer contributes to the best adhesion, that is, the clutch of the working surface and the finishing material applied to it. In addition, it has antiseptic properties, in other words, serves as protection against fungal colonies (more simply, - from mold).
Now, after applying the primer on the wall, is the time to start the finish. Below are two videos.
Important! Plastering walls in new homes should be performed no earlier than the house will give natural shrinkageOtherwise, plaster on the walls can crack. This applies to both multi-storey new buildings and private houses.
Another an important nuancewhich is not necessary to forget - this is the use of reinforcing grid. If you are going to apply decorative plaster or, especially, put a decorative stone, - the surface should be thoroughly strengthened, since these decoration Materials Sufficiently heavy.
About the grid should also make one important digression: the plastic grid is not (!) Suitable for cement-sand plasterSince it is not designed for staying in such an aggressive environment and it will not be sense. It is designed for gypsum plaster mixes, and for cement-sand, you need to choose the grid "more serious".
 Why you can not give icons
 Is it possible to give icons as a gift: Signs, the opinion of the Church
 A year ago left her husband, and now I do not know what to do