How to remove an aluminum heating radiator. How to drain the water from the radiator. When it is necessary
In houses older than 30 years, the replacement of heating batteries becomes simply necessary. When radiators change in apartment houseIt is better not to leave products from cast iron, since in them over time due to corrosive processes are clogged with internal passing holes. The replacement of the radiator is needed to more modern designs, for example, bimetallic or on cast iron, but new. Plumbing Portal will tell how to remove old heaters and replace them with new ones.
So, radiators in old high-rise buildings have long been in a deplorable state, but local serving services are not in a hurry to carry out capital or at least partial repair of the heating system, replacing problem areas. The question arises, who should change the heating batteries in a privatized apartment?
To answer this questions you need to contact legislative Base RF and sort out legal aspects.
The Government of the Russian Federation in August 2006 established (Resolution No. 491) and adopted rules that regulate what is included in the general property in an apartment building. According to the 6th point of this resolution, the general property includes the heating system, located inside the house, including:
- risers;
- armature (regulating and shut-off);
- heating elements (radiators);
- total thermal energy counters;
- other types of equipment, which is part of the heating network.
This means that according to the law, if the batteries were worn out or flowed in them, it should be changed for free to change the equipment that the organization that receives monthly deductions from tenants apartment house At the overhaul of the building and is responsible for the proper maintenance and maintenance of communications.
That is, the replacement and installation of heating radiators should be carried out with HOA or utility, regardless of whether the apartment is privatized or is a municipal property. At the same time, with the tenants of additional circuit boards should not be charged. Repair of products should also be free.
However, managing organizations silent this information from the owners of apartments, forcing them to pay for dismantling, installation, and even the cost of a new heating device. Yes, and wait for actions from utilities or a management organization for a very long time, so many tenants replace the heating batteries in the apartment alone.
What needs to be done before replacing?
The entire replacement process heating equipment You can divide into two stages: the preparatory and second stage - the process of removing and installing heating radiators with their own hands.
From thoroughness of preparation for the replacement of devices, the speed of the process depends on, which is very important because all work is carried out, as a rule, immediately before the new heating season comes, and not in winter.
To speed up this process, Before replacing the heating batteries in the apartment should act on a predetermined plan:
- We take permission to replace the appropriate organization.
- It is better to agree on the overall replacement of equipment with neighbors above and below.
- Remove all the necessary dimensions.
- We buy new heating batteries, fittings, fittings, pipes.
- Forest required materials and tool.
Before blocking the heating battery in the apartment, you need to agree on your actions not to have unpleasant consequences further:
- If you change the batteries to the same type (i.e. cast-iron on cast iron), then you just need to notify the management organization about the upcoming repair work.
- If you change the radiators to another type, including the possibility of changing the configuration and increasing the area of \u200b\u200bheating, the owner of the apartment should turn to a paid specialist for examination for the possibility of installing new heating equipment. The replacement of the battery in your apartment should not negatively reflect on the heat balance of the whole house.
- If you plan not only to change the radiators, but also to transfer them to another place, then the expert's conclusion is also necessary.
If it turns out to reach an agreement with neighbors about the complete replacement of supply pipes, then work will be much easier. If it is not possible to come to an agreement with them, you will have to trim the riser from the floor and under the ceiling, setting the propylene reinforced pipe only in the apartment.
If the neighbors agree, it is necessary to remove and write down all sizes:
- To measure the diameter of the outlet from the bottom of the neighbor's heating from above (No. 1 on the diagram) and the diameter of the inlet into the diagram of the neighbor below (No. 21 in the diagram).
- Measure the length of the pipe for connecting the neighbor from above (№2.4 in the diagram). The amount of distances from exit from the neighbor's radiator from above to the corner 90˚ and from the corner 90˚ to the slab of the overlap.
- Measure the length of the pipe to connect from a neighbor below (№18.20 in the diagram).
- Thunder the length of the pipe in its apartment (the amount of segments is 5,7,9,12,13,15,17). Plus a pipe for the passage of the floor slabs (about 1 meter). The diameter of the pipe take the same as the replaceable radiator was connected.
If it did not work with the neighbors, then all measurements are removed only in their apartment.

Knowing all the necessary sizes, we count how much material you need and buy new heating radiators, pipes, fittings and fittings.
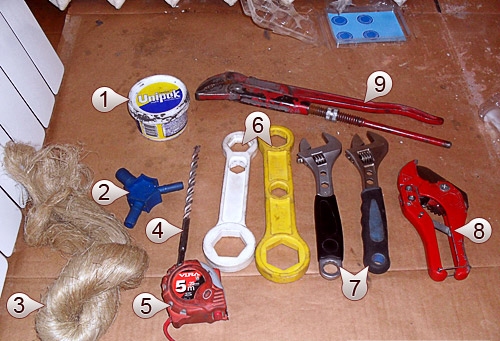
Before changing heating radiators In the apartment, you need to stock the following tools:
- press for fittings;
- level;
- spanners;
- perforator with boots;
- pipe bender;
- a hammer.
Important! In order for the replacement of heating batteries with their own hands turned into flooding of his housing and the apartment of the neighbors from the bottom, do not forget to cover the water.

New heating radiators must be obtained from packaging. The cardboard, in which they were packed, do not throw away, but cut into two parts. One half put under the radiator so as not to scratch it or do not apply any other damage. The second can be used as a protective screen, placing it between the old battery and the wall, it will help keep the wallpaper.
Once all work on the preparation is completed, you can begin to replace the heating batteries.
How to change heating radiators
This process can also be divided into two stages - removal of the old product and installing a new design.
To simplify the task of replacing radiators in the apartment, act according to step by step instructions Site site.
Dismantling equipment
- If installed three-way craneIt must be discovered, and will make sure that there are no water in old batteries. To perform this operation, unscrew the screw and uncheck the checkbox or slightly weaken the rod. If water does not eat from the rod, the screw can be unscrewed further. In the presence of fluid, you can hear the corresponding sounds. Tighten the screw back. In the case when everything is fine, it is necessary to remove the upper part of the three-way crane.
- In the event that when there is a riser on the upper and lower pipes that lead up and down from the radiator, there is extra threads, you will need to cut them off. To do this, unscrew the first nut on the top pipe, in the same way you need to go from the bottom. If some nut is not unscrewed, just cleanse the area with it from paint with a knife or metal brush.
- In the place of removal of the nut, you need to leave exactly so many threads as you need to establish the heating battery without any problems. It must be remembered that threads need to be left smooth so that it is enough to twist fitting. In order to establish a tee on 4-5 revolutions usually grabs 7 thread turns.
- Old radiator must be removed from fasteners. It is necessary to do this most convenient for you by the method: first you need to cut off the pipes, after which, with the help of a tubular key, unscrew the fasteners, or unscrew the mounts and then cut off the pipes.
- To trim the pipes, use the grinder. The place of the cut must be determined in advance (threads of the lower and top pipes). Need to remember to leave 7 turns! Old radiator can be removed, it will no longer need.
- Old attachments remove with a hammer or key.
- Connect the tee with the nipple. In Nippel, you need to spin the ball valve ( shut-off in our design).
- In another removal, tighten the press compound. One tap of the tee must remain in order to screw it into the pipe, part of which we dug. According to the scheme, you need to make two such designs.
- Screw the designs with tees on the threads of the top and bottom tube. Threads in advance must be sealing packles.
- Tighten the fittings of tees.

Replacing the radiator to a new device
- Metal plastic pipe need to cut the cut-jumper desired size. This segment will have to connect free taps of the upper and lower tee. The edges of the plastic tube need to calibrate. A little bent, insert the pipe into the taps. After the pipe is mounted, it must be aligned.
- With the help of a special soldering iron or welding, press the plastic tube.
- Take a set of footers corresponding to the size of the pipe. Suppose ½ inches. Tighten the footballs on the new battery. Compact pacles each thread. Taking advantage of the hexagon, tighten the plug on the radiator. At the top of the battery, use the Maevsky crane.
- Given the number of sections, determine the middle of the sections.
- With roulette, determine the middle of the window niche. The radiator needs to be leaving so that the middle is located in the middle of the window niche. To the extreme places between sections you will need to "wear" fasteners. That is, between the first and last section and the rest. On the wall, make a pencil mark, indicating the location of fasteners.
- Radiator remove to the side. Using the level, perform vertical marking for 4 fasteners for just applied.
- You will need to hang the battery, focusing on the windowsill (if it is new) or in terms of level (if the windowsill disgwed). Measure the distance from the windowsill to the center of the pipe. Suppose, the distance will be equal to 10 cm. 2 parts on which the markup is made under fasteners need to be outlined 10 cm, adding 1.5-2 cm.
- Measure the inter-axis distance of the pipe-jumper appropriate tags apply to 2 areas indicated above.
- Perforator Make holes. In each hole you need to insert a bracket, making sure that it fully comes. If necessary, deepen the holes.
- In each hole, tighten the bracket. Radiators hang on the brackets. You will only stay to connect the upper and lower pipe of the riser and battery. Two metal plastic pipes You need to bend, cut them up to the desired size, calibrate.
- Connect the construction by reloading the extreme taps of tees and screw in them. Connections Pressure. Tighten all nuts.
- Check the plugs and, if necessary, tighten them. Smoothly open the upper and lower cranes, but not to the end. You will hear the noise, just it stops, the cranes can be opened completely.
If you all fulfilled according to the instructions, you can congratulate - a new radiator is successfully installed. You can wait only until it warms up, and starts to warm up your apartment.
Replacing the heating batteries with their own hands in the apartment is not a complicated procedure. The main thing is to consider everything, prepare and neatly do everything. At the same time, it is necessary to obtain permission to carry out work in the relevant organizations. It is better to warn the neighbors. In a private house, changing radiators without any kind of coordination.
Accommodation in the house becomes comfortable when it's warm. In order for the heating of the apartment, no problems cause, it is necessary to set high-quality modern radiators. As a rule, this process takes place at the construction stage. But over time, necessarily the need to replace heating batteries.
The need to replace radiators
Reasons to think that the replacement of batteries in your apartment is inevitable - a lot. Someone has radiators from old age and proceed with small jets of water. The mechanical destruction of the part of the heating system and the battery occurs as a result of the hydroedar, which consists in a sharp increase in pressure in the system.
Other radiators do not give enough warmth, hinting that inside more dirt than the necessary coolant. Education by interior walls Mineral deposits also leads to a decrease in the lumen and a significant deterioration in the passability of the heat carrier of the heating system, which water acts in this case.
Sometimes it happens that the power of the radiator lacks for heating the dwelling. And if residents of a private house can change the level of heat in their home by adjusting gas pressure in the headlet, then living in urban apartments panel houses We are constantly forced to put up with ordinary convectors that do not have enough power for high-quality heating throughout the housing.

But replacement of heating batteries is actual question and for residents of private houses, since today there are many modern technologies to regulate heating in their home and the possibility of saving considerable means on heating when obtaining the maximum coefficient useful action. In addition, when using radiator thermostats, you will have the opportunity to independently choose the desired temperature in the room.
In addition, you should not forget that the time of useful service of old batteries is sometime and expires, and the operation of such batteries is not desirable. Such radiators can be out of order at any time, but they can also cause a serious accident not only in the heating period, but even in the summer. In this case, the price of dismantling and the installation of heating radiators will increase greatly, because there are also the effects of breakdown to eliminate.
Instructions for replacing heating batteries
It is better to study the heating devices in the offseason when the heating system is in a non-working condition. Since in the summer period, the heating is turned off, then the permission to replace the batteries you can take without much difficulty.
1. Selection of heating radiators
Before replacing the heating radiator with your own hands, you need to consider their varieties and parameters. The following types of radiators are distinguished:
- Panel radiators are 2 or 3 panels through which water will pass. Heating of similar radiators is carried out faster than sectional. Connection is the bottom and side. Devices are made of rolled steel.
- The column radiators are two collectors, which are connected with tubular columns. These devices made of aluminum or steel are manufactured.
- Sectional batteries Consist of two or more hollow sections for which the circulation of the coolant occurs. The number of sections is almost unlimited and is determined most often weighing the radiator. That is, the sections can be increasing until it is possible to suspend this battery. Devices of this type of cast iron, aluminum, steel and bimetal - two heterogeneous metals are manufactured.

Will you be replacing heating radiators yourself, or are you going to invite a specialist - in any case, you should choose the highest quality batteries. In this case, you should pay attention to the criteria for selecting radiators:
- Strength. Batteries can be cheaper, with low heat transfer, but they are in obligatory Must be durable. In the passport of any device indicate the working and test pressure. It is necessary to focus on working pressure, leaving about the reserve and in case of force majeure test strength. For the supply of heat carrier to the height of the ninth floor, a pressure of 6 atmospheres is applied, and on the 22nd floor - already 15 atmospheres! Such pressure is withstanding not every radiator, so the devices and aluminum disappear immediately. Aluminum radiators are appropriate in the private sector, because they have high heat transfer. Cast iron heating batteries are suitable only for nine-storey buildings. Cast-iron operating pressure is more than 9 atmospheres. With the like high pressure It is better to put a device from a bimetal or high-quality steel. Radiators made from bimetal, combine high heat transfer and increased strength.
- Corrosion resistance. Corrosion resistance is one more important factor When buying heating radiators. On this scale the most polarities are considered cast iron radiators. Cast iron batteries oppose corrosion is best of all, while aluminum batteries are weak in this regard. Therefore, when choosing aluminum during the fill of water into the heating system, it is recommended to mix anti-corrosion additives to the coolant.
- Heat transfer. The most pressing moment for which radiators actually is installed is an indicator of their heat transfer to heat the room. In the accompanying documents, the battery indicates its power, or may be denoted by the power of one section. To calculate this value, you should remember that 1 m2 traditional room 80 -120 watts of the coolant capacity, depending on the height and thermal insulation of the walls.

2. Preparatory process
If you succeed, you will agree with the neighbors from below and on top of a complete replacement of pipes, as it is considered the best option, because you do not have to cut in your apartment metal pipes. We persuade them to put a new pipe from the exit of the neighbor's battery from the top to the departure to the neighbor's battery below. So you will greatly alleviate the replacement of old heating radiators, and the neighbors will receive a new plot of pipeline in its apartment.
If you are not lucky, you will have to trim the floor and under the ceiling and go to polypropylene reinforced pipes In my apartment. The connection of the batteries is carried out by polypropylene, metal-plastic, metal welding and on the coast. But most often used metalplastic. They are mounted much faster and easier, and they serve much longer than traditional metal pipes.

Before replacing the heating battery with a new radiator, water should be blocked throughout the system. Then use the pump, reload the maximum possible amount of water, and then overlap the water near your radiator. Count how much water can contain in the battery, and stock dishes of the appropriate volume, which you will be substituted in the process of dismantling the old radiator.
Let's start after this to the removal of the necessary measurements:
- Remove the measurements and record the diameter of the outlet of the neighbor's radiator, which lives from above, and the diameter of the radiator inlet in the neighbor's living below.
- Make all the necessary dimensions of the pipeline length, which is needed to connect a neighbor above: Calculate the distance from the exit from the neighbor's radiator above, up to the corner, and the distance from it to the overlap between your apartments.
- Make all the length of the pipe length, which is needed to connect a neighbor below by analogy.
- Calculate the needed pipe length that will be needed in your apartment.
- Find the length of the pipe, which will pass through the floors - approximately 1 meter. At the same time, you should take the pipe of the same diameter that you used to connect old battery.
3. Purchase of consumables
The heating batteries for the house are sold "bare". These should buy such details:
- Three plugs are one deaf and two passing under your diameter. Also, you will need a plug to the "Maevsky" crane for its overtake, so that during the launch of the heating system it was possible to lower the air.
- Gaskets for all stubs.
- Reinforced polypropylene pipes.
- Cranes "American", which are required to complete the radiator and carry out preventive workSince they provide the possibility of its disconnection and removal.
- Polypropylene crane, which is useful for the inclusion of the heating system with closed Cranes "American" and allows the coolant to circulate with a removed radiator.
- The trick of the PPR, which has a diameter of 20 millimeters and a similar thread, is required to connect to neighbors batteries.

4. Preparation of the necessary tool
At this stage you can prepare all tools for work:
- Soldering iron for pipeline soldering (today many shops give this tool to hire);
- Gas and adjustable key;
- Drill and drill on concrete to attach a new bimetallic battery to Wall;
- Bulgarian and metal disk;
- Level;
- Markup pencil;
- Roulette.
If you could not agree with the neighbors, then the larch will also need to cut the pipe on the floor and under the outdoor thread ceiling.
5. Dismantling of the old battery
If you carefully look at the old heating devices, you will see that they are usually connected to the pipeline with the help of the so-called Signs - the finished long threads on which the coupling and locking is screwed, which will serve great place To connect a new battery. To dismantle the old radiator, make the following actions:
- To start twist to the end of the threads of the lock nut on the lower and upper eyeliner.
- After that, army with a plumb or level and determine the places of the cut. Tools put so that at least 1 centimeter of thread remains on the pipe.
- It is very important to use the level, since if you ignore this moment, then the new radiator will not hang exactly. And the connection of radiators of heating to crooked cut pipes is sufficiently problematic.
- Further cut the pipes on the marked places and remove the batteries from the brackets. From the walls, remove the old brackets that hold the battery.
- If the new battery differs from the old size, proceed so. Cut pipes to the desired size, and then welcome or cut the threads on them. If the old pipes are better to apply welding, because the pipe when cutting the thread can burst on the seam.
- If the pipes should be lengthened, then you can use the insert. You can use Ecoplast, having previously done the rotation of the pipe or attacking the missing length.
- Prepare the residues of the thread to further work. Cross the edge of the thread if necessary, fir the grinder, twist the lock nut from the thread to get rid of burrs.
6. Radiator layout
Battery will be based on places marked. When marking the position of the heating battery on the wall, take into account such moments:
- The distance from the floor to the radiator should be 10-15 centimeters. If you post the battery below, it will be a bad air duct through it. And spend wet cleaning It will be inconvenient.
- Due to bad convection, it is not recommended to bring the radiator close to the windowsill. The distance to the battery from the window sill must be at least 15 centimeters.
- It is impossible to press the battery very much to the wall, as the thermal return will deteriorate. Optimal distance It is 3-4 centimeters. The distance to the battery from the wall adjust the depth of turning the brackets.
7. Installation of heating battery
The sequence of installation of heating batteries is one for all types of radiators:
- If you work in the winter, then agree with the operational service to turn off the minimum half a day the heating. It is usually not allowed to carry out such work in the heating period. But if the breakdown happened, or in the apartment critically low temperature And children live, then you can get permission to replace the batteries.
- When the riser is turned off, and is open in the basement drain crane, Start the procedure. Open new battery Futour nuts, and eyeliner tubes - with ball valves.
- Start from the cranes - turn the sealing material correctly on the thread. The main thing is that the connection is reliable, almost all the wizards are used for these purposes. First, it's good to scrum the threads of any paint other than the water-emulsion, then wrap on the carving of the pass. You should wind clockwise, tight and cone, which starts from the edge of the thread. Purchased pass again, scorch abundantly.
- Then screw the crane. It should be twisted so that the threads on the pipeline almost remains. Soak excessive pass paint. After it is completely dried, this connection will not give the flow, and the crane itself will be problematic.
- Each side of the radiator has 2 internal threads To connect the heating battery to the system. In these threads, screw the hoods. On one side of the battery, install the nuts with the left thread, and on the other - the part with the right. In order not to get confused, it is recommended to buy passage nuts that allow you to connect the radiator in any position. Food nuts in most cases are installed on paronit or rubber seals.
- After installing the nuts additional equipment. In places where you will connect the battery to the pipes, install the "American" response parts. On the other hand, put the battery downstairs and at the top of the Maevsky crane.
- Install the battery in this form. Raise it and connect the crane with the American. So you will protect yourself from falling the battery at further work. Under the bottom of the battery is better to put something.
- The battery is hung on the wall using special brackets. To accurately install them, you need to mark the placement of the place to attach brackets. To do this, use the level. Drill holes and set the hooks.
- When all 4 brackets are installed in their place, the radiator can be finally hanging into place, while tightening the blocks of the plug-in with a confront key.

Here is the installation of heating radiators you have completed. Run the heating system by filling the coolant before the coolant and at the same time running the air on the top floor using the crane of Maevsky. Open the feed crane and check the node for the presence of leaks. If you performed work in the summer, it is recommended to close the cranes on the liners before the seasonal start of the heating system.
At first glance, this question is relevant only in the heating season, and in the summer in the water heating system may not be. However, in new buildings, water in the heating system is even in the summer. Still, the hidden laying of pipes and if something is wrong, then it is better to learn about this summer during repair than in winter, when an expensive Spanish tile is already laid on the floor.
Now in high-altitude new buildings, as a rule, a horizontal heating wiring is performed - feed pipe hot water And the returns are laid under the tie (as well as the wiring of electrical wires) and only near the battery itself the pipes come out of the floor. Thus, you have not only ordinary water heating batteries, but also partially warm floors. Very convenient and quite thoughtful. At the same time, no pipes on the walls near the windows, which is mandatory with a vertical wiring and the eye of the eye of almost any housewife. That's just if the pipes in the floor with a marriage or docking are poor-quality, the tie will have to break and troubleshoot (however, this moment of repair does not have a relation to the topic of this article).
In addition, the horizontal heating layout allows you to install heat meters to each apartment that modern prices The energy carriers are very relevant and practically eliminates the quarrels between the riser neighbors due to the heat meter settings during the vertical laying of heating (as a valve is not adjustable - one will be cold, others are hot).
Heat meters are installed in the distribution unit on each floor. And besides the counters there are installed and cranes, allowing you to easily and quickly overlapping hot water and returns (or just cranes, if the spares are not equipped with heat meters).
But the fact is that in multi-storey new buildings, when there are 10-20 apartments on the floor, and most of the apartment owners are still engaged in loud repair, and not a quiet accommodation, access the distribution unit is a problem. While the repairs are not finished and not all tenants settled, there is only one key from a storey distribution unit and is usually located at Plumbing - a representative of the developer.
In principle, bring this plumbing - not a problem. That's just it happens at work not every day, and besides it is very busy, and the working day at the plumbing is relatively short (these are only people trying to finish repairs as soon as possible new apartmentIt seems that shooting or installing heating batteries at 10 pm on Sunday is normal). But in any case, the services of this plumber-key accounting are usually not free (and if you are free, then you do not make sense to read this article, because the plumbing will come and will do everything for free).
In order to remove one battery, plumbing from the developer will take a couple of dollars, and then as much as the connection of each battery. Thus, for removing the installation of batteries in three-bedroom apartment Plumbing from the developer will have to pay $ 15-30. Strying plumbing can take even more, given the possible transportation costs.
In general, plumbers do not like small work - to spend half of the working day on standing in traffic jams, then in 5 minutes to earn $ 10-15 - those who want a little, therefore, and for replacing a paddle gasket in an old cheap mixer and for the cleaning of the siphon and for the installation of a new expensive toilet bowl (and this is at least drilling holes for fastening the bowls to the floor, mounting the toilet to the floor, setting the tank, connecting to the existing water supply system and sewage, adjusting the intake and drain fittings) You have to pay at $ 20-30. Much more interest plumbing is shown to larger orders such as water supply and sewerage in the apartment, when $ 200-500 need to be paid for work. Such work is performed in 1-2 days, so you can stand in traffic jams.
But even if you yourself will shoot and install batteries, or it will make a stranger plumbing, it's all the same for turning off the water and returns on the floor (if the batteries are not equipped with cranes), the plumber will take the same $ 2-3, and then as much as much For the inclusion of water supply.
If it happens in winter, it is necessary to remove and install each battery several times, as the plaster, putty and sticking wallpaper for 2 hours are not made. And to pull the repaired placing with electrical heaters - can get out even more expensive than bringing plumbing every time. As a result, payment for not difficult work on the removal of batteries in a three-room apartment can do at $ 50-100.
Meanwhile, it is possible to save on these relatively small, but all the same unplanned expenditures can be if the cranes are installed on each battery, and they are usually installed with a hidden horizontal wiring. You can make it simple enough and quickly, at any time convenient for you, at least 3 o'clock in the morning, besides almost free, for this you will need a pair of keys, a minute of time, and of course know how to do it.
Almost free because if I just tell you in this article about how it can be done yourself, then some plumbing will lose part of their and so modest income. In particular, this will happen to one of my old familiar plumbing, with whom I often meet to drink a beer mouse and chat for life. However, he speaks mainly, complaining of an unfair device of life and falling income in lately. It was he who told me this story with batteries.
In this regard, I decided to make this information paid. The board is small - 1.5 $ in the local equivalent (100 rubles or 50 hryvnia). As practice shows, pay money for information - people who want a little. Many people think that any information can be obtained for free. And even for information that allows you to save not one hundred, and sometimes a thousand dollars, not everyone is ready to pay $ 10, not to mention larger amounts. Therefore, if for a month I earn a couple of beer mugs for my friend, it will be already good, and it will not notice a possible reduction of customers for 1 person per year.
If you still want to learn how to remove the batteries of heating yourself without the help of plumbing, it is enough to translate the specified amount on my wallet, using the form at the bottom of the page. At the same time, do not forget to specify your e-mail. You will receive a letter with a description of the procedure, including photos and a short video (in order to remove or install the heating battery, one minute is enough when all the necessary tools are at hand).
If you translate money from the phone, on a card or other way that does not allow you to specify your e-mail, you must inform about it in the comments to this article, and specify your e-mail in the appropriate field when adding a comment. I will definitely contact you.
It goes without saying that the replacement of the batteries in an apartment or house cannot do without dismantling old heaters. This complex work It is necessary to do, otherwise the installation of new radiators will not be possible to produce. About how to remove the heating battery, the information is very much, however, first of all, it is worth thinking about the people around you, especially if we are talking about an apartment building. It is impossible to replace radiators with no one with this. To do this, it is necessary to get destruction, as well as coordinate the procedure with utilities.
In addition, replacing heating batteries, more precisely preparatory stage cannot be carried out independently because the overlap central heating Must be made exclusively by specialists of public services. However, not only the levelwall should be aware of the work carried out, other housing offices are not to notify. Mulching can lead to far from the most joyful consequences. An independent shutdown of central heating, information about which will not be in housing offices, will lead to a fine, the payment of which will fall on the shoulders of the violator.
It is important to remember that everything takes time. Therefore, an application for overlapping heating must be applied in advance, otherwise the planned date of replacement of radiators is certainly not coincides with when radiators can be removed. It is no secret that housing offices will not give an instant response to the submitted application, a lot of time will need to consider it. That is why it is better to be restrained and long before changing the offices.
Successful negotiations with neighbors will enable best option work, since their consent will allow full replacement Pipes from the junction of neighbors from below, to the junction of neighbors from above. Such an outcome of the negotiation will save time, as well as the most quick to produce work. However, with a negative outcome of the negotiations, nothing will remain, how to produce pipes directly in the risers. Word to say, dismantling the batteries is an excellent opportunity to change the old pipes on polypropylene analogs. Among their advantages, simplicity of installation and dismantling are allocated, as well as low weight, but high strength.
After all preliminary work was carried out, the services carried out overlapping heating, you can dismantle the old battery. However, this is facing an apartment building. In a private house, things are different and much easier. In this case, it is necessary to carry out overlapping, without notifying anyone, and you can proceed to removing the batteries and the subsequent replacement of them on the Global heating batteries, or which other brands.
Instruments

Be sure to acquire the following materials:
- Dynamometric keys;
- Bypass;
- Bulgarian:
- Adjustable key;
- Gas key;
- Roulette;
- Drill;
- Pencil;
- Soldering iron;
- Level;
- Lever pipe key.
In addition, it will not prevent the presence of a crane of Maevsky, without which no sanitary work can do. It is necessary to have plugs suitable to the sizes of batteries and radiators, as well as to install additional cranes. In a compartment with plugs, it is recommended to stock up immediately and gaskets.
If, in addition to dismantling, it is planned to replace batteries and pipes, then it is necessary to stock up and new pipe segments, it does not prevent and buy bimetallic Rifar heating batteries, or which other analogs. In the same case, it will take the presence of "American" cranes or options simpler. The polypropylene crane is very useful, it will easily achieve the health of heating when the radiator is removed. The CPR endwriter will be needed for work on the space of neighbors. With the unsuccessful scenario, Lerka will also need to communicate with them.

Among other things, the cost of pig-iron batteries is much lower than the analogues, while the heat transfer can these same analogues and envy. Also cast-iron batteries are low hydraulic pressure. Such batteries are very reliable and do not require any specific skills for operation.
The only minus data of the aggregates is extremely not presentable appearance. However, manufacturers today know the felt in the style of radiators and try to give a cast-iron analogue the most attractive appearance, especially since modern technologies Make it allow.
Replacement pig-iron battery It can not do without a lever pipe key, with which the removal of monetary is removed, as well as flanges. If this work does not work possible, you have to act with the help of a pipeline. In this case, circumcision must be made before that nut. The following dismantling steps include:
- Disconnecting the heater from the system;
- Removing the heater with fasteners;
- Disassembly of the heater and cleaning.
Very often, removal is made not only for replacement, but also to clean the radiator. So, cast iron radiators are very difficult to disassemble, but they are simply necessary to clean them from rust so that they work as newly purchased. Before starting to disassemble the battery, you must prepare the tools:
- Blowtorch;
- Tow;
- Pipe key;

- Brush;
- Pads;
- Chisel;
- Bulgarian;
- Nipples;
- A hammer;
- Battery key.
Start disassemble the battery is necessary from heating soldering lamp Corks, after which they can easily be removed. After that, nipple is cut between the sections with the help of a grinder, it becomes possible to disconnect the sections. Next, these nipples are eliminated by the hammer, and the battery is cleaned.
The reverse process is much more complicated - it is no longer unscrewed by the heating battery by a wrench. At first, it is necessary to collect sections and group them, then the sections are connected using the totality of gaskets, silicone and nipples, and the latter are selected relative to the direction of thread - this should be taken into account. Do not forget about the washing of the newly collected radiator.
When the assembly process is completed, it is necessary to fix the removed radiator. This procedure involves either fixing the previously installed brackets, or to new, especially this concerns the case when they were previously poorly installed. In this case, the first holes need to be shuffled and sharpen. New holes are drilled according to the measurements. Again the holes are filled with nipples and brackets.
You can achieve the best seal by fixing all connections using a pacle. Moreover, cast-iron batteries to the pipes are joined by damage. Be sure to trace the plugs to be turned out. This is the algorithm for dismantling the cast-iron battery. For convenience, it is recommended to purchase 300 mm heating batteries.
The need to disassemble the heating batteries may occur in every home. If one of the sections gave flow, then it is required to replace or remove it. Add additional edges when the available room does not warm up to the desired temperature. And if during the heating season in the apartment it becomes hot, you need to remove the extra sections. Such tasks are solved with professionals, but if the financial condition leaves much to be desired, you will have to find out how to disassemble the heating radiator with your own hands. This will save and get useful experience.
Designs of heating radiators
In the event of a breakdown of the heating element, especially during the cold season, it must be immediately repaired or replaced. Is the radiator disassembly, depends on the type of its design. Quite often in apartments establish non-separable types of radiators that are not subject to recovery. In this case, it is better to immediately buy a new battery. But there are collapsible models that can be dismantled to replace the damaged element and set back.
Products are divided into two main types:
- Sectionalbatteries collected from several identical sections securely interconnected. In each of them there is a channel for which water circulates, and the ribs that radiate heat heat the room. Sectional batteries are the most popular, since the cost of such radiators is lower. If a breakdown occurs, it is enough to replace only the damaged section, and if necessary, you can always add or remove the ribs.

- Monolithic productsrepresent one whole design that has no individual sections. By external signs These radiators can resemble sectional counterparts, but the differences between them are obvious. In monolithic devices there are no connecting joints, due to which they are able to withstand greater pressure. From this and the deadlines for the trouble-free operation of these structures are almost twice as much as the sectional. But in case of leakage monolithic device We'll have to change completely. In section products, it will be enough to replace the damaged element.

Preparation for disassembly
At this stage, you need to prepare all the necessary tools and dismantle the battery from the place of attachment. For work, depending on the type and state of the radiator, such tools may be needed:
- radiator (nipple) key;
- adjustable key or set spanic keys from different sizes heads;
- autogen or bulgaria;
- construction Fen;
- hammer, sledgehammer;
- chisel.

The nipple key is an iron rod with a head in the form of a blade at one end, and a hole or curved "ear" on the other. The tool acquired in the store has serifs, the distance between which is equal to the width of the heating radiator sections. They will help you find the locations of the right nipple nuts.

After preparing tools, it is necessary to equip the place to disassemble the radiator. Floor is suitable or durable table. Need to take into account that from the battery will flow dirty waterAnd do not forget to raise a water-winding tissue under it.
To disconnect the radiator from the system and remove it from the mounting location, you must do the following:
- Stop the circulation of water and reset the pressure.
- If the heating battery is hot, you need to wait until it cools, and then disconnect from the system. To do this, unscrew the coupling coupling at the input and output.
- Move the coupling from the radiator on the pipe to remove the device from the brackets.
- Merge the remaining water and put the product to the place of disassembly face up.
- Pull out and immediately rinse the filter so that the pollution is not dried on it.

At the next stage, the radiator is dealt with separate sections.To avoid damage during operation, it is necessary to figure out which way you need to turn the nipple nut. This element is an annular nut with external thread and grooves inside from both sides. At the same time on one nut there is a right and left thread. If you unscrew it, then the adjacent battery sections will be evenly proper, and when twisting, it is tightened.

Typically, manufacturers make markers on the front side of the plugs and hoods that indicate the direction of the thread. The "D" mark indicates the right-sided thread, "S" - left-handed. For accurate definition Directions of movement, it is recommended to take a free nipple nut and try to put it on the threads in the radiator. Deciding which way it turns into, it will become clear where to rotate the key to disconnect the sections.
Important! If the nipple nut is not twisted to the other side, you can easily thread the thread and on it and on the heating battery.

Deciding with the direction of the thread, insert the nipple key into the radiator and move to the desired nut. Make it will help notches on the instrument. When it is in the groove, insert the lever into the hole on the other side. To move the nut from the spot. You will need to make an effort. Call assistant so that he fixes the radiator in one place.

When the nut is moving on half turn, go to the other side to unscrew the second, and perform the same actions. After making sure that both nuts rotate without applying a lot of physical strength, gradually unscrew the one, then the other side, moving on 5-7 mm.

After separation, take metal gaskets that were between sections. If they are in good condition, they can be installed back when assembling, if in bad, then use them as a sample to buy new ones. Silicone gaskets need to be changed.
Disassembly of the cast-iron radiator

Cast iron products are usually standing in apartments for several decades. In this regard, in many cases, it is impossible to disassemble them without damaging. To remove the battery from the place of attachment, unplug the inlet and outlet. If it did not work out, it will have to cut off with a grinder or autogen. After dismantling, the product is washed and stacked on a flat surface.

Per long years Operating joints between sections, nipple nuts and others separate elements Break down to each other. Due to this, the disassembly requires the use of greater physical strength than while working with new heating radiators. If the nut is not unscrewed, use the tool for heating the connections. When the accurate areas will warm up, they will be easier to disconnect.
Tip: For heating, you can use a construction hangeon, autogen or soldering lamp.
If the grooves intended for fixing the key in the combing nuts, the rust drove, disassemble the product will not work. Effective way Remove the damaged section is a mechanical breakdown with a sledgehammer, but in this case there is a big risk to damage the entire design. You can also try to cut the battery in the joints of the joint with a grinder or handcraft for metal.

After separating the damaged section from the whole structure, try to knock out nipple nuts with a hammer and chisel. To work it easier, attract the assistant. Only with your own hands to remove and disassemble the radiator may not work, because cast iron products Very heavy. One section weighs about 7.5 kg. Accordingly, the battery in 10 sections pulls 75 kg.

If you understand how to disassemble the heating radiator with your own hands, it can be done quickly and without any negative consequences. The main thing is to stock required tools and knowledge. In the case of old batteries, problems may arise. But if you're lucky, then remove the necessary sections will work. Otherwise, you will have to buy a new heating element.
 Why you can not give icons
 Is it possible to give icons as a gift: Signs, the opinion of the Church
 A year ago left her husband, and now I do not know what to do