How to independently make a table from a tree - step-by-step instructions, drawings and photos. Dining table with your own hands Durable table with your own hands
Make a table from the girlfriend will be even a novice master. But before collecting a coffee table with your own hands, drawings and schemes are better to view in advance. This will determine the form of future furniture and cut off too complex options.
Drawings and schemes of coffee tables do it yourself

It is comfortable, light and universal. For the rigidity of the frame of the frame, the substole is collected from the legs and the tsargi - a rectangle connecting the legs and supporting the worktop. Otherwise, the legs will touch and the table will lose its stability.

At the same time, the complexity of the assembly increases slightly, but in the coffee table can now be stored books, notebooks or other trinkets.

A feature of such a design is the absence of legs - they are replaced by four sidewalls, to which from the inside the ready-made folding mechanism is attached. A wide board is fixed on a short pair of supports, a double board is fixed, and a double countertop is mounted on high supports, which is in the unfolded version and relies on the prestole.
Table for PVC pipe magazines
The easiest and most economical, but very original version of the coffee table - make it from plastic pipes. Form and height depend only on the enlightened fantasy. It can be a small round table that performs the feature of the bedside table or a full-fledged coffee table with a glass countertop.

To create it, you will need:
- pipes of two diameters - thicker for legs and already for a substold, for example, 16 and 9 mm;
- glue-gun or a tube of a transparent superclay;
- sandpaper medium grain;
- hacksaw for cutting plastic pipes (can be replaced by a saw for wood);
- acrylic paint to hide printed labeling on pipes.
The process itself is simple to disgrace:
- Cylinders of the selected length are cut. Four legs are made from the thick pipe - their length will be equal to the height of the future table (40-50 cm). From a narrow tube, 30 short cylinders are cut, an average of 10-15 cm (depending on the table shape, the number can be changed).
- It is necessary to start collecting the basis from the center - it will not be exactly the latter gaps between the cylinders. The glue is applied to the entire surface of contacting pipes. Little trick - to accurately glue cylinders, liquid superchalter is poured from the end of the pipes so that it is the stack along the entire length of the joint. The adhesive gun is simply processed from the outside - after painting they will be invisible.
- When the desired shape is achieved, the legs are glued - you need to follow the diagonal distance between them to be equal. Otherwise, the table will fall on one of the parties.
- Final stage - Painting. The easiest way to do is an aerosol method, although it is possible and a simple painting brush.
When laying on your table glass countertops, you should choose a tempered glass with a thickness of 10 mm. So that the removable tabletop does not slide on the basis, use silicone shock absorbers for furniture.

If a non-removable tabletop is planned, it is fixed with transparent silicone glue.
Build a wooden coffee table with your own hands
For admirers of classic style there is nothing better than a wooden table. To be needed to stock:
- planed bru 40x40 mm - for legs;
- planed board 50x20 mm - for the Tsargi;
- the finished tabletop from the furniture shield 800x400 mm (but the MDF or Plywood is suitable);
- putty for wood - rub holes from the screws;
- sandpaper or grinding nozzle on a drill - treat a tree;
- varnish or paint - for the finishing of the table.
From the tools you will need a screwdriver (or screwdriver), saw on wood and drill. After cutting the bar on the legs, and the boards - on the king, the assembly of the table begins:
- The first is going to the podstole. For the convenience and simplicity of assembly, everything is done upside down. The sidewalls are attached to the legs with self-draws through pre-drilled holes. But it is possible and metal corners, if aesthetics is not so important.


Wooden tables are made not only of planed wood. If there are minimal skills to work with a tree, you can create original furniture even from firewood. For example, picking up a wooden chubban and a pair of in-shaped thick branches in height, having worked a slightly grinding nozzle and covering everything with a varnish, a great massive coffee table will be obtained.

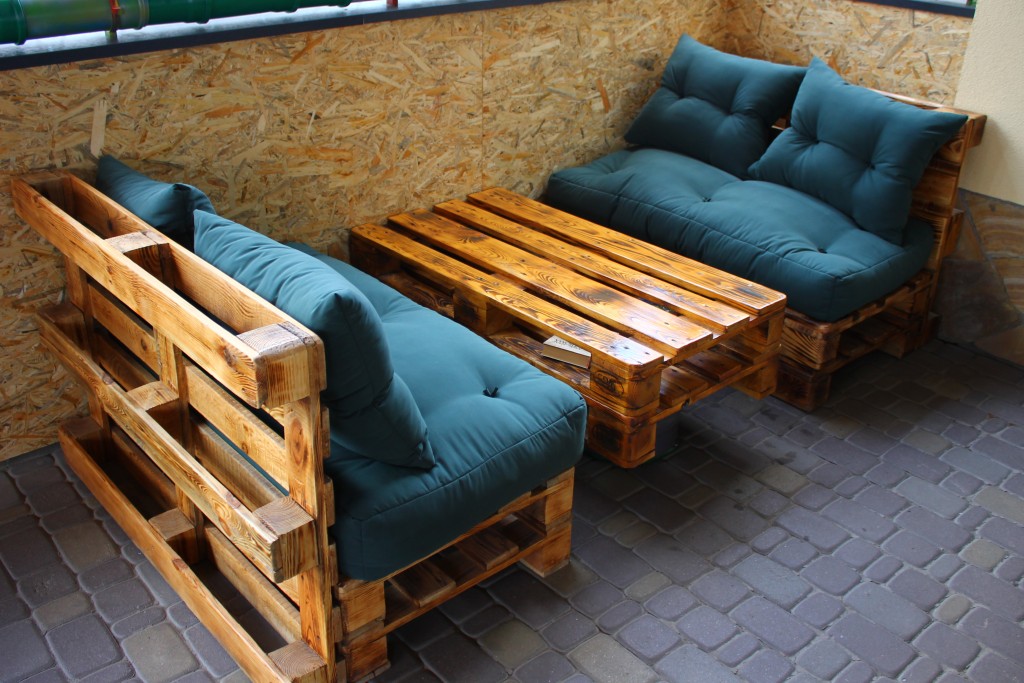
And if after the construction of the house there are several euro pallets left, you do not need to hurry to dispose of them. This is almost a ready-made table!

It is enough to lie down and treat the surface surface, put them one on the other and securely combine each other. And so that the table turns out to be mobile, 4 wheels are screwed below, 2 of which with brakes.

Decorating the coffee table epoxy resin
If there is a panel nearby and there it is possible to get the sawboards with a lot of defects with a lot of defects - just wonderful! It is from such materials that the most beautiful tables decorated with epoxy resin are obtained.

The process of time consuming, but not too complicated:
- Cropped board glue glue for wood in a worktop. For clamps, smooth boards are sure to fit - for uniform fixation.
- After a complete drying of the adhesive, the countertop grins, all cracks and holes from the bitch are cleaned. Before applying epoxy resin, the surface must be cleaned of dust and shallow shavings.
- In order for the table to shone spectacularly, use fluorescent paint in powder. On 2 liters of the finished resin solution you need about 100 g of paint. The resin and hardener are mixed 1: 1, the dose should be measured accurately and so that the hand does not flow. Throwing over with a hardener, the resin will crack, the lack of a hardener will drag out a period of frozen.


Such a countertop is suitable for both the coffee table in the living room of the cottage and the bedroom of the urban apartment.
If there are several meters of wooden bars left at home, a table can be made even from them! On the video in detail and accessible shown how to make an unusual design furniture from construction residues:
Even if the production of furniture is not your sphere, to make a cottage table with your own hands to gather with family and friends with warm summer evenings - a completely satisfied task.
The main advantage of its advantage is unlike purchased - undoubted savings. It is not necessary to make the table from scratch: just mounted purchased items, you will save 30-50% of the cost. If you manage to use the materials that remain from construction or repair, expenses will be limited to the acquisition of fittings.
To select the design, it is necessary to decide where the product will be used.
Using cheap non-consistent boards for a dacha or kitchen table - a non-thendition - you will get advantage of inaccessible for mass production. Sounds doubtful? But this is: bitch, because of which the boards are rejected, have the most interesting decorative properties. If you succeed successfully emphasize them - you will become the author of a completely unique designer product, which is sorry to leave in the garden in the rain.

Make a cottage table with your own hands to gather with family and friends with warm summer evenings - quite a satisfying task.
To choose a design, it is necessary to decide where the product will be used: on a grassy lawn under the tree, complement the gazebo, stand in the workshop or in the house.
The simplest summer cottage can be mounted in a few hours with a minimum of materials, but he will not last long. To get a product that will be really pleased to use, you need to carefully prepare boards and perform all the technical operations on each of the steps.

The main advantage of its advantage is unlike purchased - undoubted savings.
If you have found a big stump in the forest, it may turn out simple in the manufacture of a garden table. It is only required to remove the bark with the stump, make it up to the top smooth slice, pollute it, handle the antiseptic and cover with varnish. It is enough to kill or fasten to the "leg" made of stumps finished furniture shield - and ready.
Well watching countertops from the boards bonded at the bottom of the transverse rails. If you taste more to taste, it can be done with your own hands, but it will require great efforts.

If you succeed successfully emphasize them - you will become the author of a completely unique designer product, which is sorry to leave in the garden in the rain.
A beginner master is difficult to fasten the legs reliably, so try to choose a design, correctly appreciating your skills and taking into account labor and time. Most simple to make crushed and Mr.-shaped legs. To attach straight legs - you need to carefully connect the parts.
One of the most cozy options for the garden is a collapsible table with benches that can be installed in a gazebo or on a veranda. It is easy to fulfill it, the main thing to choose high-quality materials and properly prepare them for work.

The simplest summer cottage can be mounted in a few hours with a minimum of materials, but he will not last long.
How to choose a tree?
For the garden or kitchen table, the wood is suitable for the wood of many breeds, both soft (pine, spruce, cedar, fir) and solid (oak, birch, ash, nut, maple, apple trees, pears, acacia, etc.) Exception is too soft. Woods (poplar, alder, aspen, Iva).
One of the main parameters of the fitness of the wood for the manufacture of furniture is resistance to rotting: the above breed of this requirement corresponds.
If you do not plan to engage in furniture work constantly or just start practicing, prefer the most common tree breeds - pine and birch.

Well watching countertops from the boards bonded at the bottom of the transverse rails.
For tabletop, frame and legs, it is possible to use wood of different breeds. At the stage of assembly, you will need the seasons: they are usually made from acacia or says. Wood birch has a non-heightening pattern and can be significantly overcome due to the spilled fluid - it is better not to use it as a tabletop material, but due to the hardness of this breed from it you can make legs.
The countertop is best done from oak or pine. If you know how to brag the tree, the surface of the kitchen table can be a real work of art. The brash is amenable to wood of soft species: the tree is burned with a gas burner, and soft fibers are removed by iron brush. Work is better carried out in the yard due to a large amount of dust. If you managed to burn wood evenly, the result will delight you. Brash can be toned by verses, beans, diluted with artistic acrylic paint water. Of course, the brashing of the tree is not required: it is only a finish option.

If you taste more to taste, it can be done with your own hands, but it will require great efforts.
Selection of paints and glue
Before starting to install, the boards need to be protected from rotting. The tree must be impregnated with a water-polymer emulsion (VPE): processing is carried out twice with an interval of 3-5 days. This is enough so that the product last long.
Some models will need glue. Along with special carpentry adhesives (BF-2, etc.), it is possible to use a building PVA: it is applied on both bonded surfaces, dried to "lowlight", then connect the parts and kept under the press to three days.

A beginner master is difficult to fasten the legs reliably, so try to choose a design, correctly appreciating your skills and taking into account labor and time.
The choice of paints and varnishes is determined by the way it is planned to use the product: in the yard or indoors. For a garden table, which is inevitably exposed to precipitation, alkyd, alkyd-urethane, nitrocellulosic varnishes and oil paints are suitable. For the kitchen table, as well as for any furniture constantly located in the room, it is better to use acrylic paints and varnishes: they are more eco-friendly, they do not have a strong smell. Lucky marked with the "Blue Angel" sign recommended for children's furniture and toys.
If you decide to cover the wood by the veil, paint or simply tinted varnish, it needs to be made before assembly. It is necessary to take into account the compatibility of materials. The varnish is toned suitable according to the composition of the paint: if the lacquer is alkyd, the paint must be oil, if you use acrylic varnish - it can be toned only by acrylic paint. At first, a small amount of varnish is thoroughly mixed in a separate container with paint, and then the mixture is added to lacquer lacquer.

One of the most cozy options for the garden is a collapsible table with benches that can be installed in a gazebo or on a veranda.
What instruments are needed
For work you will need:
- hacksaw,
- circular saw or jigsaw;
- drill;
- screwdriver;
- hammer (if it is decided to use nails).

For the garden or kitchen table, the wood is suitable for many breeds.
This list includes only the most necessary tools, but that the work is more comfortable, and the finished product looks aesthetic, it is advisable to buy or rent a rotary stouch, an eccentric grinder and a milling machine.
The swivel stubbob makes it possible to do Spike exactly at the desired angle. Eccentric grinder will make it possible to prepare the details simply, quickly and efficiently: you get excited the boards in an hour, instead of doing this whole day by hand emery paper. For high-quality processing of the ends, a ribbon grinder is useful, and the milling machine allows you to choose a tree for the necessary grooves and process the edges.

If you do not plan to engage in furniture work constantly or just start practicing.
Homemade pallets
The spectacular rustic style table can be constructed from pallets (wooden pallets). If you are a happy owner of such a container, especially a two-bedned pallet, - just disassemble it: there are no problems of acquiring boards!
Do you think that buy new boards is always better? You probably did not work with the tree before: it is impossible to use raw wood (a product is deformed after a few months), and dry boards are much more expensive. To dry the boards from raw wood, they are placed in stacks in a well-ventilated room: this necessary process will derete your project for 4-6 months! A good option for the kitchen table can be already mentioned discarded boards, too dry.

For tabletop, frame and legs, it is possible to use wood of different breeds.
Let's go back to the pallets: they are disassembled. Now at your disposal strong boards with different pattern and color, it is possible that from trees of different breeds. These features should not be considered as disadvantages: they will give the product a highlight: it is only necessary to create an interesting composition of them, alternating a similar shade board.
From the side parts of the pallet there is a great framework, and the remaining planks will be used to assemble the countertops.

Work is better carried out in the yard due to a large amount of dust.
To make legs, it will take a ram with a thickness of at least 5 cm. All items must be prepared: strictly for the fibers to sand sandpaper first large (NO120-150), then smaller grainability (NO400-600), carefully removing dust.
Some boards can be painted acrylic or oil paint. Loft style fans can use stenchers in the form of numbers or simple graphic symbols. Boards with a beautiful natural pattern "Morim" or just cover lacquer. After a filling or the first layer of acrylic varnish, soft fibers are risen; They need to be stupid by sandpaper of medium grain and apply a new layer of varnish.

The spectacular rustic style table can be constructed from pallets (wooden pallets).
If there is a varnish on a non-aqueous basis, it is enough to apply 2-3 layers, and if the acrylic - the number of layers can reach up to ten.
A good option for the kitchen table can be discarded boards, too dry.
Boards Countertops fasten the straps that are placed on the joints of the boards. With the help of a drill, a screwdriver and self-tapping screws, secure the boards to the planks (on the joints we use two screws, on one-piece boards - one). The use of drills is necessary that the wood does not cracked when screwing the screws. We collect a frame from the prepared sidewalls of the pallets. Using the drill, the diameter suitable for the diameters is drilled on the joints of the hole. Shakes with glue and fix the screws. We install legs: just screw the boards to the frame, screwing the screws diagonally. To reinforce the design, in a similar way, we do the bottom of the jumper.

To make legs, you will need a ram with a thickness of at least 5 cm.
Wooden table with glued table top
For glued countertops, you need to pick up the boards of the same width. If the table is intended for the workshop and its appearance does not matter much, you can use old floorboards: there are already grooves. To make the grooves yourself, the milling machine will be required.
For countertops, a flat surface is needed. Just wist the sidewalls glue, we connect the boards without gaps and we are tightened by the resulting design with clamps. Depending on the glue used, the countertop should dry from 1 to 3 days. If everything is done correctly, you will get a worktop with an absolutely smooth surface without cracks. The ends remains to be worked out - first pour a jigsaw, and then passionate. In the absence of tape grinders, it must be done by hand - sandpaper is first large, then medium grain.

After the varnishing parts, it is possible to move to the installation, which consists of several stages.
If there is no desire to mess with glue and clamps - you can use the finished furniture shield from the construction store. Then the worktop remains to be covered with a transparent or toned varnish.
For a good result, you need to apply 5-7 (for acrylic varnish to 10) layers. After each third layer, the working surface of the table tops must be stupid with fine-grained emery paper, carefully removing the dust with a wet cloth. At the stage of the varnish, it is important not to hurry: each layer of varnish must be good.
It remains to make the legs of a garden or kitchen table: Let us dwell on the variant with M-shaped legs. We need boards with a thickness of at least 22-25 mm.

For glued countertops, you need to pick up the boards of the same width.
Mr. legs consist of two parts connected at an angle of 90. On the connectable boards, it is necessary to make a sample, to wash the joint with a joinery glue, and then install the screws.
When the glue dries, cover the legs with varnish and after drying it is simply creating on the touch of the tabletop.

The connection of the legs with the worktop has several options.
Straight feet
To make straight legs, it is enough to drink a thick bar into pieces of the same length. The connection of such legs with a worktop has several options.
So that the straight legs have been installed securely, at home, you can use the connection on the sewage. They can be made independently of acacia wood or buy ready. For the assembly of the drain compounds, quick-drying carpentry glue (BF-2) is needed.

To make straight legs, it is enough to drink a thick bar into pieces of the same length.
Table with X-shaped legs
Sequence of work.
- On the inner side of the tabletop, kpripim on a screw of two strips on each side.
- In order for the table well, the edges of the slats need to pre-trim at an angle of 52.
- Parry strips are fastened so that the legs fit, we make a 2-3 mm sweat on each side.
- We put the boards on a flat surface, crossing them under the desired angle. We measure the distance between the ends of the boards: it must match the width of the table.
- The place of intersection will result in chalk: here it is necessary to choose half the thickness of the boards so that after the assembly they lay in the same plane.
- We embroider with glue and put the part under the press for 1-3 days. For greater reliability, the connection can be strengthened with self-draws.
- Varnish legs.
- It remains to attach them to the tabletop, having placed the grooves in the grooves formed by the slats - and the table for the cottage is ready.

X-shaped legs are made of bars or boards with a thickness of at least 50 mm.
Table with benches
The optimal solution for the gazebo is a dining table with benches attached to it. This design is better to make collapsible to remove for the winter room.
For the table, thick boards will be required (from 32 mm), which need to cut into pieces according to the drawing. In this embodiment, two benches are attached to the table. When all the details are cut, they must be seized, paying special attention to the ends. Each board is separately covered with varnish.

The optimal solution for the gazebo is a dining table with benches attached to it.
To connect parts of the structure, we prepare the stud (length 160 mm), nuts and washers - 24 pcs. For other connections, we use a screw or nails of a suitable length. With the help of a drill, it is necessary to prepare all the holes for fastening.
According to the drawing, we collect a countertop and upper parts of the benches. Transverse rails cut around the edges, the angle must be 45. It is convenient to do with a rotary stouch.
We make and fastened on the self-tapping screw all the legs. Breep spoiled at an angle of details.

Each board is separately covered with varnish.
We tighten the product with stiletts with bolts. Holes for the heels must be pre-drilled drill. By installing the hairpin, you need to wear washers on both sides and spin nuts using the key.

We tighten the product with stiletts with bolts.
Seat boards Fresh with gaps from 5 mm. When the seats are connected to the cutting supports, they are attached to the assembled boards 160 cm: you will need 4 boards.
We establish the remaining studs and enjoy the result.

With the help of a drill, it is necessary to prepare all the holes for fastening.
Video: Wooden table in a gazebo do it yourself
50 photo ideas: how to make a danish table with your own hands


We will analyze practical advice that facilitate the process of assembling the table with their own hands and help achieve the best results. The construction of the country house is divided into several stages. A serious step is to arrange cottage. An important role in the comfort zone is played by furniture. The wooden table complements the overall interior and improves the functionality of the room. But his purchase can not always be successful, so we suggest to consider the homemade version. It can be put on the street or in the house. Such furniture plays an important role in arrangement.
As building materials, we use either pallets or wooden boards. An unforgettable material requirement is the lack of moisture. With sufficient availability and desires, new boards will be very effective in construction. Quality and long service life of any furniture depends on the quality of the acquired materials for its assembly; How well they are processed before operation. After the successful purchase of the necessary materials, and in this case it is wooden boards, fold them in the ranks and leave to ventilate them. This type of materials than longer just gives and ventilate, the better will serve in the future.
Any furniture is primarily manufactured only from dry wood.
As mentioned above, the tables are suitable for a variety of places and serve as an complementary element of furniture literally everywhere. Individual manufacturing methods are selected for each table. For example, you set the goal to decorate the gazebo with a wooden table. And this is pretty comfortable and correct, as in the summer time in a gazebo without a table is somehow uncomfortable. Just homemade furniture does not hurt anywhere. During the work, it is not necessary to glue the boards. It is enough to fasten with special fixtures. This approach greatly simplifies the manufacture of tabletops for the street. Or you can buy them on the site https://stone-fortress.ru/. First, you do not spend a lot of time to build. Secondly, it is quite realistic to replace glue by other effective means, which means financial expenses will decrease.
Pallets, like wooden parts, are very distinguishable in color. Accordingly, you visually decorate the table as you want. The pallets have side parts. They are used as a frame. True before this material needs to be pulled as follows. It is worth considering that all the material is not spent. The remaining planks can serve as the fastening elements of the countertop. The place of the bond is located in the area of \u200b\u200bthe bog. For the boarding of the board will need only two self-pressing. For the last one-piece - one.
The sidewalls and two boards will go to the construction of the frame. In the end, fix the part of the frame with the help of self-tapping. Frame is not necessarily attached by self-draws, it is enough just to glue it. Since the length of self-soles is large, drilling individual holes.
Our table will soon be released. It remains to turn it out and grinding it. At first, use sandpaper with a large grain, a little later with small. The turn goes for installing the legs. For this, you will need four boards with an absolutely identical size. If required, of course, it will have to be corrected by wooden boards in order to achieve a general positive result. In this case, grinding is also an integral part of the work. Then you need to fasten each leg. For this, you will need two self-pressing, which is important to locate diagonally from each other. Ensure maximum stability will help the jumper installation. The distance between the floor and jumpers should be at least 10 cm. When everyone was fixed, start drilling holes for the screws. Thus, fasten the material so that it is not cracked.
Now you got a full-fledged design. Naturally, it does not prevent somehow decorate it. For example, start with painting. Of course, with the first time a hard pile will arise. No need to be afraid, it's in order of things. We again take over the sandpaper and begin to grind the surface until it becomes smooth. Due to such a work done, dust is definitely formed. Accordingly, it will have to get rid of it. Next, we take again for varnish and cover the surface. It may be necessary to grind and for the third time, since the lacquer will not fall exactly from the first time. In general, it all depends on the type of wood. So it is better not to neglect excess grinding, but to provide your wooden product a beautiful view. After completing all the above procedures, we get a beautiful wooden table made by your own hands.
Suppose the option of making from a newer material if you do not want to remain visible traces from nails or skidding scared with your variety. The tabletop is manufactured by the most different shape: rectangular, square and round. The result depends on your personal preferences.
Table from remnants of materials
Sometimes it happens that at the time of construction or the next repair of the cottage remains extra boards of various breeds. Instead of throwing them away, it is better to use this remaining material for more weighty tasks. Make the same table. To do this, choose a pine board, which will go on the frame (25 mm thickness, 50 mm width). For the legs, leave a plate with a thickness of 15 mm, a width of 50 mm. As for the size of the frame, so here everything is purely at your personal discretion. This table is well suited for the veranda. And since this room is not large, it is advised to make it unintently (60 cm - width, 140 cm - length, height - 80 cm). Of course, if the family members are not high, it is quite permissible to play with the sizes of the table top.
Next, you need to assemble the frame and consolidate the boards that act as legs. Two 140 cm long boards must be cut. The width parameters are consistent with 60 cm. You need to take away the double thickness of the used board - 5 cm. That is, the used bars should be 55 cm. Now fold the frame with the screw of the screws. As the bars folded, you need to double-check. Decent attention Diagonal location of bars. If something does not converge, must be transferred, as the construction of the tabletop will be injured in the future.
Cut four boards and secure them inside the frame (80 cm length). For each board, use four screws. The lower shelf can be the complementary element of the table top. For its equipment in the middle of two legs, fasten the crossbar. It will serve as a frame for the future shelf. Similar way, work is performed with other pairs of legs. In addition, the shelf will give more convenience, two jumpers significantly increase the level of stiffness of the structure as a whole. The jumper mount should be made strictly at right angles (check with a special square).
Now the frame is ready, it remains to check it. If the design is properly manufactured, the frame does not stick. It remains to polish it. Next is to work assembly. Perhaps you have remained boards of different colors. Why not apply them to the right direction. For example, place the boards on the surface in this way so that they alternate in color.
The last stage of the worktop manufacturer implies the mounting board with nails. Shelf from below fix the nails or self-drawing. Again, you need to polish the assembled product. And in conclusion, it remains to paint. But it happens so that they went with the choice of varnish or paint. And then what to do? If you want to change the appearance, it will have to stop sanding the surface. Next, you need to re-take for painting with a new color.
Table with glued surface
The difference between previous options is that the legs of this design go to the letter "g". Their assembly comes from the same width and thickness of the boards (20 mm thickness). So, the volume of legs here more than previous, respectively, and more screws will be required (5 pieces). In advance, you need to drill holes with a diameter of 1-2 mm (the hole must be less than the diameter of the self-built itself). The second time you need to drill a hole with a larger diameter. It is intended for the screw of the self-press, which is then closed with a furniture plug. In other cases, the rod is preferable to choose a furniture color.
Another excellent idea is a furniture putty. In the mixture, which you will put shit, add wood dust (take the remnants of grinding). When the putty dry, traces of holes find it difficult.
We work on legs
When assembling legs, it is necessary to carefully follow the angle to be equal to 90 degrees. If there is no flow, use the usual timber. For docking two boards, spread one and other joinery glue. Install the screws in the right places. When the glue dries, cover each leg with varnish. But before that, do not forget to polish.
Assembling table top
How did the legs, the turn goes behind the top of the table. The countertop is made of the same boards in the thickness. Sizes choose which wanted. Boards can be different widths. It is important to comply with the organic of appearance. It is important that the side parts of the boards are docked smoothly with each other without gaps. Side of the boards, too, lubricate glue. Further, we put them on the surface.
To avoid possible slots, pull the boards with clamps. Leave the surface of the table for the night. How the day will be held, remove the clamps - the tabletop is ready. As before, we grind the surface and equalize the edges. Lobzik or saw start to penal. Sometimes the grinder is used, but in this way it is difficult to ensure the limestone. And these stages of grinding are over, and it turns out a completely flat tabletop of the diligent species.
Covered tabletop from boards
According to the above method, make a round, oval or any other tabletop. Of course, it is possible to achieve the flattening countertops in the event that it is possible to draw the lines in advance by which its shape is cut. An attractive view can give a frame, and make them better with their own hands. Take a thin bar and process it with sandpaper. Fasten according to the perimeter of the table top. Finish nails and glue are suitable in the role of consolidation (first of all it is necessary to handle the slats with glue). The glue will dry, and the bar will need to handle the sandpaper in the connection places.
The table without legs does not happen
The table is ready, which means it remains to put the table on the feet. To attach the legs to the main part of the table, a frame of boards will be required. It is attached to the back of the glue. But this is not enough, for it is necessary to consolidate it from above, using confirmates. First, on the table top you need to drill holes with a diameter under the hat. And then disguise them, like past holes. Now the frame of the table is firmly fixed, start the attachment of the legs. The location of the dock should be inside the frame. For fasteners, we use conventional screws. Table ready!
Table and shops in the garden
In the manufacture of table and benches, boards of different sizes can be used. To connect benches with a table, studs are used for 16 cm (in addition to them washers and nuts). Other connecting fasteners are no longer than 80 mm. So, each part of the garden for the garden is set to its right place. Then the drill is drilled through holes. And then, as you yourself have already understood, the turn goes beyond the washers and nuts.
When spinning nuts with washers, it is better to use a wrench. Thanks to this approach in winter, you can easily promote the design and attributed to the warehouse, in the garage, shed or any other place to store such things.
Each board should be carefully polished and penalted. For bonding three boards that are designed for seats, you need to cut short bars. Each of them cut 45 degrees. First of all, it should be proceeding to the assembly of exactly the part of the design that is below. We take one big board (in the amount of 160 cm) and we attach small bars to it. At the time of joining, they must be fastened in the middle of one large. Now adding legs to this design (secure with nails). Adop the short boards again. All these elements need to be pulled by studs, bolts and nuts. Thus, it turns out a support node that protects the seat from the bottom.
And it remains to attach seatboards. By the way, if this design is intended for the street, it is not necessary to make a narrow gap between the boards. Not less than 5 mm. Sketchs are fixed to speiled supports. We have formed two shops. They will not hurt to fasten with four boards long 160 cm. To secure all four legs, we use 2 studs for each leg. Install them either on the same level or diagonally.
Table in Sadik
The principle of assembling the table is completely different from previous options. The countertop is held on the boards that are cut on the sides of 52 degrees. Clean supports need to be located in such a way that the feet for the table can be included between them. Secure them with finish nails. If you do not want to admit good visibility of the caps, score them deeper. Just make the surface with a special lubrication as a disguise.
The feet of the table are not standard here, but similar to the cross. For their assembly, take two boards and cross in this way that below the gap between objects was 65 cm. Leave a mark on the board to cross the boards. The mark is drawn in the form of a square and half the thickness of the board itself. The same needs to be done on another board. We get two material of the same plane. The process of compound occurs with four nails. By analogy, the second pair of legs is done.
Now the assembly of the table is as a whole. First of all, the most important thing is to consolidate two pairs of legs into the main construction on which shops are placed. Place the legs in parallel to each other in the middle. Naturally, they need to be copped with studs so that they do not flip in the future. The tabletop is attached by a similar method. If the studs are screwed, proceed to grinding and painting. Color design to any color satisfying. In addition to this design, those options that imply a separate table from benches are admissible. Build construction occurs in a similar way. Of course, with the exception of the seats.
Make the wooden table with your own hands, as it turned out, is not so difficult. There are moments requiring marginal attention to some things in manufacturing. If you follow the above recommendations, your table will work perfect. Choosing good materials and competent performance will provide a product for a long service life. The design will be able to impress its functionality and decent appearance.
Video: Wooden table do it yourself
Photo Gallery: do it yourself with your own hands
A great way to supplement the interior of the house or giving is to make the original and stylish piece of furniture. About how to make the table with your own hands, we speak this article. Such a piece of furniture will be a real decoration of the living room, a kitchen or a working office. It can be collected at home from specially ordered boards and bars or from remnants of materials. For this, the wizard will need drawings, tools and a little fantasy. But the experience of making homemade furniture may be absent. We offer you a very simple project for assembling a strong and sustainable table. Making furniture on this scheme even newcomer.
Everything starts with ideas
How to make the table? It is necessary to start work with the selection of a ready-made furniture project for the living room or with compiling your own scheme of the future product. You can not limit your fantasy, however, it should be remembered that the drawings according to the degree of complexity should correspond to your skill level. In the absence of sufficient experience, it is better not to try to collect a very complicated design itself.
The table for the house can be depicted with a pencil on paper. First, you need to draw the design of the desired form, and only then designate its size. Most often, the table is made with their own hands for the living room square or round, but for the kitchen or the work office (and any small room) is suitable for a compact corner or adjustable table.

The size of the table with their own hands can be absolutely any, when choosing the dimensions of the product, it is recommended to take into account, first of all, the size of the room in which it will stand. Then, using drawings, you can count the amount of material to buy. Acquire materials recommended with a small margin (just in case).
If you are a novice that first collects furniture at home, then you better give preference to soft wood (for example, pine).
Such materials are very compatible and not split during the assembly. If you make the living room furniture and aesthetics are important to you, choose a poplar. If the homemade table is used outside the house, it is recommended to choose a treated wood or a red tree.

Durability will also be distinguished by a wrought table with a wooden countertop. Charm Your yard will add a wood product decorated with wrought-iron elements.
To collect a simple table at home, you will need:
- edged or tipped boards, a square cross section (for legs) and with a rectangular cross section (for frame);
- white or yellow wood glue;
- screws (preferably taking sammes of 4x60);
- screwdriver;
- drill;
- clip set;
- sandpaper or grinding machine.

We make a countertop right
Work is starting with the description of the process of manufacture of table top. There are several ways with which you can solve this task. What does the choice of this or that way depends? First of all, from the skill of the furniture maker and the intended appearance of the table for a living room or a country house. So, here are the main ways of making homemade countertops:
- Production from boards. This material is relatively low cost, excellent appearance and environmental friendliness. If you are a beginner master, you can make a table with your own hands from t-shut-off boards (that is, blanks with crests and grooves.
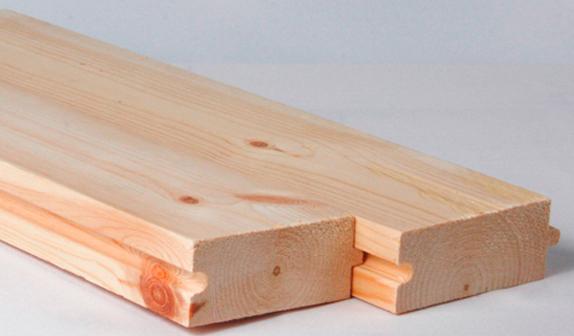
An experienced master can collect furniture for the living room of their edged boards. To do this, he will need a dowel or primeros small length. They will be used to connect boards with each other.
- Making from a single piece of wood. In this case, you can generally do not break your head over how to make a table with your own hands with a sufficiently durable and beautiful countertop. The optimal option is to purchase plywood from hard wood. However, such a product will cost quite expensive.
- Assembly of products from remnants of materials. This is a very cheapest way to make furniture for the house, but quite complicated performed. It will be necessary to choose fragments of wood, which will harmoniously combine with each other and do not create problems in the process of installation and further use of the product. Connect the remnants is also not easy. In this case, you will have to use screws and a large amount of glue or create a substole (rigidity edges).
In the first case, the boards lay down on each other, connecting with the help of screws and glue. Because all the boards of different sizes, on the finished product it will be necessary to trim the protruding elements and spend thorough grinding. As a result, it turns out the original and comfortable table.

The second method provides for the fastening of the material residues by any convenient way (with the help of glue, screws), followed by strengthening the structure by means of the installation of the podstoly or rigidity. Such a table will be distinguished by stability and durability.

If the table is located in the yard near the house or in a stylized living room, then you can order for it a wrought-made frame with legs. This will add a product of a special color and identity.

When the countertop is ready, it can be left overnight for the night so that it should be drunk. The technology of manufacturing this part of the table is approximately the same, regardless of the selected shape of the product. The main differences in projects in this case are in the form that you need to give the edges of the boards or a solid sheet of wood.
If you make an original corner table, then the edges of the boards will have to do at an angle. It is very important to correctly calculate degrees of each cut, so that the edges of the product are smooth.
However, if as a result, unevenness was formed, the edges of the table will need to be collected. You can also first bore the boards, and then draw a triangle on the workpiece and cut the finished product.

If you make a round table in a living room or a product with rounded edges, it is recommended to bore the boards of the future product, after which it is on the workpiece to draw a pencil or chalk of the future cuts.

The finished countertop on such a project will look like this:

Frame as a basis for a reliable table
The next step is to make a frame of a table for the living room. The frame is a wooden square (for a square or rectangular table) or a polygon (for a round item), which is fastened with the worktop and ensures the fixation of the legs.

Make a frame for an ordinary table will not be difficult even for beginner. To do this, turn the tabletop to the bottom up, measure the canvas, count several centimeters deep into and make a mark. Then, by marks, you can draw a rectangle or square.
After that, you need to cut off four pieces of wood of such sizes that correspond to the drawings on the table top. For the manufacture of a frame, it is recommended to take a rectangular timber. The frame of the boards may not be durable enough. Then the frame must be attached to the tabletop with the help of glue or screws. The second option provides a higher reliability of the design, but the hats of the screws will be visible on the surface of the table top in this case.
We make durable and reliable legs
At the next stage of the realization of an unusual project, you need to make the feet of the table. You can first cut off one leg of the desired height (for the production of legs it is recommended to use a square sections ram), and then using it as a sample, cut off the remaining 3. If you make an angular table, then the legs will not be 4, and 3. After completing the cutting process, Click all the legs together and cut them off in such a way that they were the same length.

At the next stage of the work, the legs need to be pasted with a grinding machine or sandpaper. But the top and bottom of the products should not be grinding, as you can spoil the correct cutting angle. Then you need to attach the legs. For this, the table can be turned upside down.
The first leg should be put into one of the corners of the frame in such a way that the top slice touch the countertops, and the two sides of the legs were adjacent to the frame. Then the parts of the contact details must be abundantly lubricated with glue and connect using fastening screws that are screwed through the table frame. Holes for the screws are preferably made in advance so that the screws do not split a tree in the process of screwing.
From the use of nails and hammer in the manufacture of a standard or corner table, it is better to abandon how nails can split the wood, and the use of the hammer requires the manufacturer of special skills. In addition, the screws are better holding a tree than nails, and if necessary, they can be turned out of the product.
Be sure to trace the legs attached to the table at the right angle. One of the advantages of screws is that they are easily adjustable. If necessary, their position can be easily changed. Then the same operations should be carried out with the rest of the legs. You can also scout legs through the worktop, but in this case there is a risk of splitting the legs. Yes, and the aesthetics of the table for the living room will suffer from this.

When the glue is completely dry, it is necessary to check the product for stability, strongly loosening it. However, if you made an angular table, then this stage can be skipped. It will come in contact with two walls of the living room or office, and it will give him extra strength. Then it remains only to polish the surface of the finished product and cover it with a varnish for wood or special paint. On this work is completed. Now you can supplement the interior of an apartment or garden with a beautiful product.
The table is the second after the top item, which should be able to be able to every novice fans-furniture. The table can be created from different materials and have unique characteristics. An excellent intention for you will be a desire to make your product from wood.
The table from the tree is sufficiently easily created by itself, there are enough possession of minimal skills in working with a joinery tool. And the cost of material will be significantly less than on the table using metal, glass or plastics.
The piece of furniture produced by their own hands will be as accurate as possible to meet the desires of the happy owner, and please the eye will be incomparably more acquired. And the most important thing is that when creating a table, it is most importantly important skills of working with the material, which will make the restoration of operational defects much easier.
What can make a good table
A particularly beautiful countertop can be made from cheap non-varietal pine boards, drowned and swivel (without drop-down bumps, rot, fungus, wormochin), which, with good processing, give a wonderful pattern, to achieve which when working with expensive trees it is necessary to make much greater costs and efforts. .

When the material is selected, it is important to take care of the strength of the future product. To do this, pay attention to the density of wood.

Soft (spruce, pine, chestnut, dogwood) is easily damaged during operation, which adversely affects the durability of the table. But scratches and dents can be hidden, although the restoration process is quite frequent.

Solid rocks (beech, ash, marsh, oak, nut, fruit breed, elm) It is quite difficult to handle yourself. And you may have to look for masters for working with them. But ensure the product durability.
External characteristics
It is very important to determine in advance for yourself the appearance of your future product. The main rule of good table is considered if the design fits well into the space allotted for it and leaves for a lot of free space for sitting.

It is also important to take into account that the table with a rectangular table top will contain less people than a table with a round or oval shape with the same area. A table for guests will be more appropriate to perform in a folding version, which is unfolded for large holidays, and in the daily life is folded. Also, such a folding table will be convenient in the subsidiary farm.

Most often need to choose a kitchen table. It should be roomy and delight eyes, to facilitate the work process. But should not interfere with movements in the room and in no way interfere with the process of culinary creativity.

Based on this, it is absolutely clear that the size of the table is selected depending on the area of \u200b\u200bthe room. Also for the kitchen table it is impossible to use soft woods due to its use in "extreme" conditions.
The choice of external characteristics of the product is a responsible process, so before the start of the proprietary formation of the table for giving, it is imperative to thoughtfully assess the needs for which this table is being done.

Practice on paper
When creating a design that is the fruit of your imagination, you will have to develop a scheme and drawings of your desk personally. For which there is a huge set of electronic programs.

After a thorough development process, it is imperative to transfer the result on paper. For quick and high-quality work it is very important to use this manual constantly.

Creative process
Preparing the drawings is the last preparatory stage. Next, you can proceed to the most important part of the work - the manufacture of details. Wooden tables with their own hands are created much easier if the drawings and schemes are as informative as possible. This reduces the likelihood of errors to minimize.
You can actually personally, you can both a desk and a coffee or a children's option. With a certain skill, it is actually created and a computer desk. As well as a dining or dacha model. Each option is slightly easy to perform.

The canteen for tabletops and boards with bars, from which the remaining parts will be formed, are processed in the presence of the tool or, at worst, coarse sandpaper to remove the defects present in the form of irregularities and protruding knots.


The boards are grouped from all sides, including side faces and corners. If you create a canvas from the spikes of a tree, you need to make sure that they are sufficing sufficient, as well as close small cracks found after visual inspection. And better to splash them. To get a more reliable clutch of the canvas and save time on the element assembly.

Shift to the finished canvas. The main elements are cut out with an electrolovka and, if necessary, cuts are grouped. The protruding reference elements are trimmed by about 3 centimeters. From both sides of the supports (legs) horizontal outlines.

The billets are covered with a drug that prevents moisture and pests from entering, and only after the final drying is allowed to resume the process of its own design of the table.
We collect details together
After the manufacture of all necessary parts can be proceeded with the priesthood. Namely, collect the desired masterpiece together. And it can be both a round table and any other selected product.

First, it is necessary to collect a supporting structure with screws and glue (at first the drill is drilled thin channels on the short-circuit length, otherwise there is a possibility of splitting the part). Galvanized screws can be used for the compound, as they do not rust, and for wood products it is very important. Either joinery glue.

According to the basic rules, the frame for length and width must be less than a tabletop by 30-25 cm.


From the sides you need to attach additional boards to give rigging and to hide the place of attachment of the legs. Cut the chamfer in places setting the legs.

Then the leg of the table is attached on its place with clamps, and the holes for bolts are drilled in the frame. Install the support elements in your own seats and fix them with staps. Strengthen the design with joinery glue. Then install the worktop to the place for what are used furniture corners. At the very end, all visible screws are hidden by plugs under the color of wood.

The final stage. Finish
The photo of the completed table can be seen below. Achieve this result is surprisingly simple. Optionally, you can round or only the angles, or completely the end, depending on the type of table. It will be beautiful on the ribs countertops to make chamfer.
In the entire design, irregularities are grouped, with the help of a putty, the mistakes are hidden. To extend the service life of the personally assembled table, it is necessary to cover it with several layers of varnish or veil.


Thus, it's owning a beautiful tree table of a fairly simple lesson for leisure. And easily executed. The guarantee of extracting a good, ideal in dimensions and aesthetic result in its drawings is: accurate following the management, error-free execution and weighted selected material. And the resulting table will harmoniously fit into the exterior.

Photo tables do it yourself


 Why you can not give icons
 Is it possible to give icons as a gift: Signs, the opinion of the Church
 A year ago left her husband, and now I do not know what to do