What you need to know about the reinforcement for a drain tank toilet: characteristics, firms, prices. What you need to know about the reinforcement for a drain tank toilet: characteristics, firms, prices Operating instructions for the drain tank
Constantly burning water in the tank and, as a result, money that is paid for water supply, drowning in the sewer - a typical picture of a broken toilet. To solve this problem, you need to change the reinforcement for a washing tank. How to do it and how to choose the desired, will be told in this article.
Everyone is familiar with the sound of water pouring in the toilet. This sound suggests that the toilet is time to repair. At first glance, the problem is very serious and without relevant knowledge and skills unresolved. However, it is only at first glance. In fact, the repair of the toilet is most often the repair or replacement of the broken reinforcement of the washed tank. This procedure is simple and does not take you a lot of time.
How is a worn tank? In fact, it sets two devices independent of each other - this is a dummy valve (through it water enters the tank) and the drain column (it provides water from the tank in the toilet and, respectively, washing). The combination of these two devices and forms fittings for a flip of toilet bowl. Various manufacturers offer their own models with some unique structures, different shapes and colors. Despite such a diversity, it is important to understand that almost all of them are universal (the likelihood that the universal fittings purchased in the store is suitable for you, is about 95%). That is, knowing the type of your, you are easily at any plumbing store buy fittings you need. As part of this article, fittings for embedded tanks are absolutely not considered. The fact is that they just do not fall into the above 95% of universal options.

And so, it remains only to find out what types of reinforcements are and how you can determine how you need in your case.
Types of reinforcement for washing tank
Since the armature, as mentioned above, consists of two independent devices, the classification can be carried out by:
- Type of the filling valve:
- side Supplies - Valve is fastened on the side wall of the tank. Accordingly, the filling liner (flexible hose from the tap to the tank) is suitable on the side;
- with the bottom line - the valve is mounted on the bottom of the tank. The eyeliner in this case is connected below.
- The type of drain column:
- with the button - for washing, you must press the button on the tank cover;
- with a rod - for washing up the rod with a decorative element at the end.

It should be noted that push-button columns, in turn, are also divided into two subspecies:
- With single wash - one button. Pressing the entire water contained in the tank merges.
- With double wash - this column is divided into two parts. Pressing on one makes a washed using only half the water contained in the tank, to another - it causes a full washing.

The reinforcement for a tank with a double wash is considered more economical - you can independently choose the required mode. Speakers with single and double wash interchangeable, that is, nothing interferes to buy and install the one that suits you more, but it should be noted that the tanks have different litters. With a small amount of half flush may not be enough.
Under the button reinforcement in the tank lid, a larger diameter hole was done than under the rode. Therefore, in most cases, it will not be possible to replace the column of one type on the other column.
So, considering everything that is said, we get six types of reinforcement: with a stem with a side supply, with a stem with a lower supply, with a single button with a side supply, with a single button with the bottom line, with a dual button with a side supply and a double-tone button with a double .
Separately, it is worth staying on the armature of the old sample. Now there are still quite a few tanks installed on the toilet with such reinforcement, or tanks attached on the wall and connected to the toilet pipe, in which the armature of the old sample is also mounted. It consists of a column with a rod (vertical or side) and a side-filling valve. By virtue of the design features and softer requirements for economy, a drain column from such fittings cannot be replaced with modern. It remains either to repair and configure the reinforcement for the tank so as not to miss the water, and this is very difficult to achieve, or just buy a toilet bowl with a modern tank, which is more preferable, especially if you have a water account meter.
Summing up, illustrate all types of reinforcements:
 Bay valves. From left to right: lower supply, side approach, old sample
 Drain columns. From left to right: push-button, with stock, old sample
How to choose a reinforcement for a tank
Now let's go from the theory to practice. When the question about the purchase of new reinforcement for a washed tank, there is a completely natural desire to save somewhat. It often leads to some characteristic errors:
- Despite the fact that the reinforcements are universal, their designs from different manufacturers may differ very much. Therefore, it is incorrect to try to look for only one broken spare part. Most likely, you will not succeed, and you will only spend time. Conclusion - buy only entirely. As a last resort, bring with you the entire fittings element (column or valve). There is a small chance that such a spare part exists, for example, from defective reinforcement.
- It is wrong to look for fittings for a specific your tank, that is, exactly what was. It is here that it is important to remember that they are universal, and therefore knowing the type of yours, with a high probability of any universal fit you fit.
The question arises, how to determine the type of your fittings?
To determine the type of the filling valve, it is sufficient to look at your tank, namely, in what place the flexible water supply hose is connected to it. If on the side - then you have a sideline valve. If there is no side of the hose, the valve with the lower supply. Look at the tank and make sure that.

To determine the type of drain column, pay attention to how the action is performed during washing. If you click on the button, then push-button, if you twink for the rod, then the column with the rod.
Define the type of its reinforcement and select the corresponding one of your name (one of the above) - it is necessary that you will need to inform the seller when buying.
Most likely, in the store you will be offered a choice of several variants of different manufacturers and, accordingly, with different prices. What to choose?
The price range is quite wide - from 150 rubles. up to several thousand. To choose high-quality and not overpay, you should pay attention to several nuances:
- All connections of parts with each other must be durable. Rubber, as a rule, snatching should be tightly enter each other with a characteristic click. Inequate should not have a backlash.
- Sealing pads must be of good quality. Purchase them. Soft, plastic and with the elastic, they speak about the quality of both the gaskets themselves and, accordingly, the reinforcements in general.
- Complete set - the fittings of acceptable quality in the kit are all necessary for the installation of the part, including bolts that fastening the tank to the toilet. In some cases, the valve is equipped with spare parts (as a rule, by gaskets). Pay attention to the quality of the petty. Unscrupulous manufacturers do not pay due attention. As a result - low quality components. It should alert you.

Generally speaking, it is necessary to know that the price for riding fittings of acceptable quality begins from 10 y. e., for push-button - from 15 y. e. For the price of 30 y. e. You can buy very good fittings with an enlarged resource (as a rule, this is reflected in an increased warranty period).
So, the reinforcement is purchased, it remains to mount it.
Replacing fittings
Replacing the reinforcement begins with the dismantling of the old. In some cases, there is no need to change the reinforcement. It is enough, for example, to change the drain column or the filling valve. If you change the column, you will have to completely remove the tank. The replacement of the filling valve does not require this. In any case, you must first dismantle the old elements. Consider this process in full in gradually on a specific example. As an experimental sample, we take such a toilet:

It can be seen that the reinforcement is one-bedroom with the lower supply. The replacement procedure is any other, including rod, for example, with a side supply, will differ little from the described. Differences in operations will be indicated.
All work begins with water overlap on entering the tank or the entire water branch. After that, it is necessary to lower water in the toilet existing in the tank.
1. We dismantle the button. In our case, it turns off counterclockwise. It happens that the button is attached to the tank lid. The lid takes off without dismantling it. Then just go to the second step. For rod reinforcements - turn off the decorative knob on the rod and unscrew the pad closing the hole in the tank through which the rod passes (of course, if it was screwed).

2. Remove the lid and see such a picture. In the center - the drain column. On the side - the filler valve. If the laying hose length is sufficient to remove the tank and put it on top of the toilet, then go to the next item. Otherwise, we turn the eyeliner.

3. The drain column column - consists of two parts. To make it easier to carry out work, dismantle the upper part. To do this, turn it on 90 ° (it will disconnect from the bottom with the squeeze):

and take out:

Inside there will remain the lower part of the column. On the sides of it are visible hats of bolts, fastening the tank to the toilet.

4. Under the tank, unscrew the mounting nuts. As a rule, it can be done just with your hand.

After the drain there will remain a small amount of water. When unscrewed nuts, this water flows outward. Therefore, lay a rag.
5. Nothing bothers now raise the tank up and put on the toilet for the convenience of subsequent work.


The sealing gasket remained at the landing site:

6. Dismantling the tank in our case could be made without prior disconnecting of the eyeliner. If you need to change the filling valve, then we produce this operation now.

Flexible hoses wrap up and turn away from hand. The key is used only in case of extreme need.
7. Remove the column fastening nut:

and valve fastening nut:

8. We take out everything from the tank. Here, in fact, this is dismantled fittings:

Now you can start installing new fittings. All operations are made in the reverse order, the only nuance - the gasket between the tank and the toilet for convenience it makes sense to wear onto the mounting nut before installation.

The whole operation takes five to ten minutes. Threaded compounds, as mentioned, wrapped by hand and only if necessary, tighten with a wrench.
You can endlessly attempt to repair the old flowing reinforcement, every month surprised by huge bills for the consumed water, and you can spend 10 minutes and solve the problem for a long time, just replacing the reinforcement completely. How to do it, you now know.
Connecting water to the toilet tank can be made from below or on the side - it depends on both the design of the toilet itself and on the characteristics of the water supply system. Armature for the drain tank with side eyeliner is easy to maintain and reliably, and its price is at an affordable level. In this case, it fulfills its functions, so when arranging an inexpensive bathroom, it is appropriate to choose it.
Function functions for a tank:
- automatic set of the desired amount of water;
- draining a certain amount of water in the toilet;
- protection against overflow.
The side approach is easier to connect to the water supply system, especially when it comes to the homes of the old building, in which the water seals are calculated on such a connection. In modern universal fittings with lateral supply, the role of the decking element can play both rod and button.
Our offer
In Moscow, you can buy high-quality fittings with side connections in the Santekhkomplekt online store. We work with Russian brands "Ani Plast", "Inkoer", "RBM" and "Laying", whose products are highly appreciated for consistently high quality and affordable prices.
There are rod and push-button reinforcements, including dual-mode. If you need help in choosing or tip the characteristics of the model you like, call our managers, and they will help you understand and place an order. You can find the room for your city at the top of the page.
For a comfortable atmosphere in the house it is necessary that Plumbing worked well. At the same time, I would like to note that the system of sewage and the toilet, which are its components, play a far from a latter role. In turn, in order to work well to work well, it is necessary to pay attention to its technological features, its designs, as well as in what state of the reinforcement.
What kinds may be
Before deciding the question, how to choose fittings for the toilet, try to understand what should be understood under the word "fittings". Under this word, you should understand all components of the elements that are aimed at ensuring the work of plumbing, it includes, including the toilet.

In accordance with the functions performed, several following types can be distinguished:
- armature overlapping the flow of water after the tank is filled;
- armature, providing a fluid descent.

Each of the species is separate mechanisms, which are nevertheless closely related to each other. The latter circumstance leads to the fact that when breaking one of them, the second one is stopped.


How the tank is filled
The filling function of the tank, as already described earlier, is assigned to the mechanism under consideration. We highlight its main details. Thus, the shut-off system is a totality of shut-off valves, levers, floats and feed fittings.

Several levers usually constitute a single totality of metal or plastic parts connected to the float. For the manufacture of the latter, a foam is usually used or a hollow plastic cylinder, it is intended to adjust the water level in the drain tank and determine when the tank is filled.

At the same time, all shut-off valves works as follows. First, the liquid fills the drain tank. At the same time, the float is raised to a certain limit.

As already described earlier, the float and the levers are connected, therefore, when the float is reached a certain limit, the lever affects the valve specially installed for the constipation, the flow of water overlaps.

You can also distinguish different types of reinforcement for the location of the fluid supply. So, water, in the presence of fittings for a toilet bowl with a side lining, can come on the side, while the water supply is located, as a rule, on top.

With this location, the water is usually recruited with great noise. The smallest noise creates water supply from below. Also, water can be applied from above, but it is a rather rare design.

Thus, the most preferred reinforcement for toilet bowl is preferred.

How to make a plum
Consider the principle of work of reinforcement, which ensures the descent of water. Composite parts of such reinforcements will be:
- hole to descent having a certain angle of inclination;
- necessarily the preliminary tube;
- no system without a lid for valve and gum
- an important part should also be considered a drain button and a system of mechanisms that ensure its operation.

There are several systems that differ in design. So, there is a system of full drain with the button; A system that has two water drain modes provided by a special function - can be interrupted by the release of the fluid.


In the latter case, an analogue of the key producing either the water is completely or partially. A separate point I would like to highlight the rod fittings used for the toilet bowl acting on the basis of the rod.

There are three types of valves for the float. These are valves acting on the basis of the piston equipped with a special lever. "Croydon" - such a mechanism was previously used, in modern toilets, as a rule, replaced by another. The valve based on silicone or rubber membrane replacing the gasket.

It is necessary to add that if the float fails, you will have to change the entire locking system completely.


Choosing fittings for the toilet, pay attention to the choice of high-quality, durable plastic parts so that the valves are resistant to overheating and cooling, withstand the mechanical load.

The membrane valve must be chosen taking into account the fact that water-rich in salt with impurities quickly removes the membrane. It is also recommended to choose goods of a good brand to eliminate the presence of marriage. It is also useful to read before purchasing a photo of reinforcement for toilet.


What to do with breakdown
If there are problems during the operation of plumbing, then for their elimination it is worth sticking to some algorithm. To begin with, find out the causes of the breakdown, adjust the flow level of water, replace the extension items.

Then it should be cleaned with channels, as well as system parts from plaque and contaminants. With a serious breakage, you should contact a specialist.

Photo of reinforcement for toilet


Fittings for a drain tank with the bottom liner. Installation and operation instructions
Complies with the requirements of TU 4953-001-02903999-2014
Purpose of the product
The reinforcement for the washed tank is designed to fill the washed tank (in the people of the drain tank) with water and feed it on the flush in the toilet.
Security measures
Materials used for the manufacture of reinforcement, under operating conditions, do not emit harmful substances into the environment and do not adversely affect the human body with direct contact. Work with reinforcement does not require special precautions.
Specifications
- Range of operating pressures, MPa 0.05 - 1
- Tank fill time in a volume of 6.0 liters, no more than 2.5 minutes
- Stability of level: change in water level when pressure changes by 0.1 MPa, not more, mm 5.0
- The diameter of the hole in the lid of the tank, 38 ... 44 mm
- Established resource at least 150.0 thousand cycles
- Size G1 / 2-B
- Product weight, no more than 0.62 kg
Completeness
The set of reinforcement includes:
Storage and care of the product
The reinforcement should be stored in a packed form in dry closed rooms at a distance of but less than 0.6 m from the heating devices.
It is not allowed to use detergents, which include abrasive, acidic alkali-containing substances, organic solvents.
Manufacturer's warranty
The warranty period of operation of reinforcement is five years from the date of commissioning, but no more than six years from the date of release, the life of the reinforcement is 6 years.
The warranty on the product does not apply in the case of:
- its mechanical damage;
- installations with violation of the requirements of this manual;
- incorrect maintenance during operation:
- water mismatch Technical requirements GOST 2761-84.
To improve the reliability and durability of the reinforcement, it is recommended to additionally install the filter in the plumbing network.
Installation of fittings
Armature comes assembled, equipped and configured under a certain tank type
- The order of installation of reinforcement in the tank

After installing the valves, do not allow the moving parts of the valves by each other and the walls of the tank.

When connecting the plumbing hose to the intake valve, hold the valve from turning.

In order to avoid leaks from under the laying, tightening nuts tighten evenly on both sides.
- Install the tank and push button

Check that there was a gap of 3 - 19 mm between the tank lid and the push-button node inserted to the pulp.

To reliably center the turns of the thread before screwing, make 1 - 2 turns counterclockwise to a characteristic click, which will show that the carving "sat" in its place.
Armature adjustment
- If the distance between the tank lid and the push-button node goes beyond
limits 3 ... 19 mm, need to adjust the release valve in height
(see Fig. 2 and the setup table of the armature height), disconnect the craving 23 from
pereliving body 12. Press the clamps of the glass 10 and moving
racks 6 up-down achieve a gap 3 ... 19 mm.
Connect the craving for the overflow housing.

- To adjust the water level in the tank
disconnect the craving 2 (see Fig. 1), move
float up or down and join again
to him craving. Minimum distance between
water level and upper edge 45 mm tank.

- After adjusting the water level in the tank, adjust the pipe overflow 7
(See Fig.2). To do this, screw the bayonet lid 9 and move the pipe
overflow to a position in which the risk on the pipe corresponds to the level
water in a tank. Tighten the bayonet lid.

* For fittings with an elongated counter
** When setting up on this division, remove the overflow pipe 7
Armature for washing tank, installation of the toilet cover
Instructions for installing fittings for a drain toilet tank. Instructions for assembling and installation of toilet seats
Armature for washing tank with lower water liner
Looking at the ingenious plexus of sewer, plumbing pipes, hoses, the invostal "adopting" with the gentlemen of Plumbers from the HFA, who arrived with another visit about the extraordinary blockage or leakage, after the surface study of the structure of the toilet, rereading a bunch of responses and tips for the experienced, Volps-Nolence comes to The conclusion that the toilet with the lower eyeliner is the optimal option. 
Pros and disadvantage of toilet bowls with lower eyeliner
Undoubted pluses include:
- neat, aesthetic appearance of the toilet, due to which sewer and water communications are not visible;
- the lower eyeliner is almost silent and economical - water does not "run", since water flow comes from the bottom of the drain barrel;
- the lower eyeliner is reliable, rarely requires repair.
- such a type of eyeliner is complex in installation;
- difficulties when replacing parts - it is easier to replace the system completely.
The efficiency coefficient of sanitary equipment directly depends on the quality of cleaning the sediment from the knee of the outlet pipe, this function performs the reinforcement for a drain tank toilet.
Device of a drain tank
- reservoir where water is located;
- reinforcement;
- plum systems;
- buttons of water flushing.

How to choose fittings for drain tank
Initially, the tape measure is measured the diameter of the water intake pipe. At 1.5 cm eyeliner - 3/8 inches, at 2.0 cm - ½ inches.
Armature is better to buy the same model as old. To do this, dismantle the mechanism failed, show a sample to the sales assistant. Now the fittings are more often sold already assembled, which will not require additional effort. 
How is the armature for a drain tank toilet bowl with lower eyeliner
Materials from which reinforcement is made - plastic, metal, bronze. Plastic is the most popular, but fragile material, the cost of the product from it is low, bronze, respectively, more durable material and the cost of the product is high enough. There is nothing complicated in the structure of the reinforcement of the drain tank. Despite the diversity of models, the principle of construction of the reinforcement one. 
Armature intended for the bottom liner is divided into:
- The drain mechanism is fixed in the tank with a precipitant nut. To seal the joint, on the shutter pipe, before installation, special seals are put on, and there is a gasket between the tank of plum and bowl, which prevents water flowing. Drain of water occurs by pressing the button or with a slim ride, the lever lifting up.
The push button, in turn, is divided into:
- a single-button device that provides a complete drain, that is, the entire tank is empty;
- a two-button device, in which the full and partial devastation of the reservoir is possible, respectively, such a drain device has two valves.
- Also different designs can be float:
- With the piston - the float is attached to the piston, with a pressure on the lever, the drain opens, when the water is set, the valve closes;
- With the membrane - the mechanism of action, as with the piston.
- The shut-off valve consists of: the float, the pipe overflow tubes, the drain mechanism of water, thrust, glass, membrane valve. The drain occurs as follows: after pressing the button, the water flows out of the tank, the float is lowered down, the membrane valve opens, and water flows from the tap pipe, which fills the shred tank. The float rises to the established level that limits the thrust. The membrane valve is closed, not allowing further water intake.
Materials and tools required for installation and replacement of replacement
- Roulette, you can do the usual ruler.
- Deploy key number 1.
- Spanners.
- Armature.
Installation of fittings
Install the mechanism in the shred tank may be a non-professional. Initially, you should familiarize yourself with the instructions attached to the set, neglect its study, the right is not worth it.
Reinforcement for toilet bowl with lower eyelid device which is better
Armature for toilet bowl with lower eyeliner is replaced. Valve for toilet bowl with lower liner 3/8.
Reinforcement for toilet bowl with lower and lateral liner: differences, choice, installation
No residential premises are impossible to imagine without equipped toilet room. In order for the toilet to function correctly, it is necessary to pick up and install the reinforcement in the drain tank. Modern fittings for the toilet with the lower eyeliner or side liner is able to last for a long time if it is properly chosen and mounted.

Unitaza Tank Interior
Types of fittings and their features
Modern locking fittings for toilet can be two types:
Fittings with lower eyed
The components of the lower reinforcement are:
- float, regulating water level in a tank;
- the guide at which the float movement occurs;
- inlet valve;
- trigger;
- sealing rings that make it possible to install reinforcement as much as possible.

Tank reinforcement with lower eyeliner
The main advantages of the lower reinforcement are:
- peckless tank water filling;
- simplicity of construction that affects the durability of sanitary equipment;
- the ability to hide the bulk hose.
Stovetur with side lining
Armature for toilet bowl with lateral lining includes the following design elements:
- inlet valve for water connected by a lever with a float (4), which determines the maximum water level (5);
- trigger;
- lever control of the trigger.

Armature for toilet with side lining
The positive qualities of lateral reinforcement include:
- simplicity of design, allowing to inspect and repair individual elements of the system;
- the absence of the need for a strong seal at the site of attachment of the bulk hose;
- low cost.
The only negative factor is the occurrence of noise when filling the tank with water.
Criteria for the choice of reinforcement
Replacing the toilet reinforcement is required when malfunctions in the system work. For a new device to serve for a long time, when choosing should be guided by the following aspects:
- armature can be made of plastic or brass. Brass products are capable of listening to a longer time than plastic;

Types of reinforcement depending on the material used for the manufacture
- if plastic bottom or lateral fittings are purchased for toilet, then it is necessary to check the quality of component elements. Plastic components should be smooth, not harslers and deformation;
- it is more expedient to acquire plastic reinforcement made of polypropylene or low pressure polyethylene. Such devices are considered the most reliable;
- applied to the assembly gasket must be as soft as possible to the touch. If a slightly stretch the sealing element, then cracks should not be visible. This aspect testifies to the quality of gaskets and the correctness of their manufacture. All gaskets must be the right form;

Sealing elements for fittings
- fasteners of reinforcement can be made of plastic or bronze. Metal fasteners are more durable when installed. On the fasteners should be located at least two gaskets;

Set of elements for fixing reinforcement
- the course of the float crane should be smooth. No sharp jumps or jackets are allowed;
- the prefabricated design should be durable. All items must be securely fixed to each other. If a separate component has a free move, the armature will quickly fail.
Independent installation of fittings
Installing fittings in the drain tank is made according to the following scheme:
- the fastening nut turns out from the trigger, located at the bottom. Under the nut there is a rubber gasket, which serves to seal the compound;
- the sealing ring is installed on the bottom of the drain tank;
- on the prepared gasket with the help of the nut, the trigger is recorded;
- next, you need to remove the fixing nut from the filler valve. If fittings are used with a lower eyeliner, the nut is located at the bottom of the device. If side fittings are used, the nut is located on the side of the valve;
- under the nut there is also a sealing ring that you want to install on the hole from the inside of the tank;
- the intake valve is mounted inside the tank and fixed by a plastic nut;

Installation of inlet and drain valves
- installed intake and exhaust valve should not come into contact with each other and with the walls of the drain tank. If the specified defect is detected, the elements of the reinforcement are unfolded in various directions until the shortcoming elimination is eliminated. After proper installation, the locking nuts are tightened to the maximum possible level;

Armature, correctly located in the tank
- installation of a flexible eyeliner is performed, according to which water will flow into the tank. When plotting, you should also not forget about the sealing laying;

Water lining for drain tank
- verification of fitness performance. If necessary, the float setting is carried out. If the float is used on the lever, it is enough to use the lever to be adjusted to its setting. If the float is used, moving along the guide, then the stroke limit is fixed by a special locking ring or clamps;

Install the required water level in the tank
- installing the lid and connecting the drain handle (buttons).

Rules for connecting the handle for water drain
Self pick up the fittings for the drain tank, knowing the basic rules, maybe an absolutely unqualified person. When installing the reinforcement, the main thing is to clearly adhere to the scheme described above and check the tightness of the compounds obtained.
Armature for toilet bowl with lower and lateral lining: Rules of choice and installation
The armature located in the toilet tank performs a specific function - support for the specified water level for washes. An independent selection and installation of the device does not cause difficulties.
Fittings for a drain tank with lower eyeliner: Mounting features, views and reviews
Plumbing repair is a delicate matter, which is why most people prefer to contact the specialists. But it is not always possible to cause a professional, and there is a breakdown in most cases completely eliminated by our own forces. For example, the toilet tank is forever "noisy" without a breather and the water constantly pouring inside the faience throne will probably lead anyone to the conclusion that the repair of the drain tank of the drain tank with the lower eyeliner or other manipulations within the accumulative tank is required. Such an operation is quite able to perform my own. 
Other signs of worn fittings
The water constantly flowing in the tank can be alarmed about several types of breakage:
Wear a locking membrane. This often happens with long-term water shuts off, the rubber is dried during operation dries and cracks. A new reinforcement for a drain tank with lower eyeliner will be required.
Incorrect float level relative to overflow. It will only require adjusting the position of the float inside the tank performed in minutes.
Leaks inside bulk reinforcement or shut-off mechanism failure. Such breakdowns are eliminated by the replacement of the entire node.
Also wear of the pads can lead to the appearance of leaks at the junction of the supply hose and the tank. This problem can solve the replacement of a spoiled gasket, replacing the worn hose entirely or the new shock fittings of the drain tank with the bottom liner. There are also leaks on the places of the tank fastening, which can talk about its incorrect installation or damage during operation. In any case, to begin with, it is necessary to finally decide how serious the breakdown is, to determine the faulty node and calculate your own forces, since after an inaccurate intervention in the plumbing system, the costs of a specialist can grow at times. 
Determination of the type of fittings
To identify reasons, it is often necessary to look inside the drain tank, it is pretty simple. Most of the existing systems, besides completely outdated with ropes, has the working buttons or rod, which is attached using the inner thread. By reloading this element from the main part of the reinforcement, you can remove the tank cover and look inside. The reinforcement for the drain tank with the lower eyeliner is distinguished by the fact that the waterproof hose is connected more hidden to the toilet tank, namely behind and below. 
Choosing a suitable replacement
If you came to the conclusion that you need a complete repair of such a node, such as fittings for a drain tank with a lower eyeliner, then you need to decide on the replacement. Unfortunately, obsolete types of shovel reinforcement will have to change together with a tank, and even with all the toilet, so their repair is reduced to temporary measures or the use of handicrafts. But most of the modern models of flushed tanks are compatible with universal fittings. When choosing a suitable fittings model, it is important to decide on the liner, lower or side, while the way of inclusion, the button or exhaust lever can be selected for your own taste. Push-button reinforcements can be made with two buttons with the realization of the incomplete drain mode, when choosing such a model, it is worth considering the tank capacity. It should also be known that different manufacturers have their own design and assembly of the reinforcement of the drain tank with the lower eyeliner, so it's possible to choose a separate detail to be extremely difficult. 
Preparation for work
If your fixture for the drain tank with the lower eyeliner requires a replacement, and you decided to repair yourself independently, you will need to prepare a workplace and some set of an easy tool. First of all, it is necessary to overlap water access to the tank and pull the water. Working with plumbing implies possible splashes of water and drops on the floor, so it is worth a cloth or a sponge. Threaded connections on tanks are usually tightened only by hand, since plastic is the main material of the reinforcement. You may need passed clutches or adjustable key for highly tightened nuts. To wash the tank and remove the climb, the detergents used for the bath or tile can be needed.
Dismantling of the reinforcement of the drain tank with the bottom lining
Standard reinforcement consists of two independent nodes: water intake valve with a system of constipation and a shrill washed valve with manual control. Often, the replacement requires only one of the nodes that can be considered when purchasing. To remove the intake valve, you must first unscrew the flexible liner hose, and then the locking plastic nut, after which the entire valve design can be removed through the top of the tank.
The mechanism of flush in universal fittings is attached to an external nut, to access which will have to remove the tank entirely. At first, special bolts are removed, on which the water capacity is kept, then the tank is rotated for convenience and unscrew the exhaust valve nut. With a sufficient length of the supply hose, the procedure for replacing the exhaust valve of reinforcement can be carried out without dismantling the inlet mechanism. 
Installing the reinforcement of the drain tank with the bottom liner
Installation is made in reverse order. Manufacturers clearly indicate the instructions for the use of special gaskets. All connections must be twisted without the use of keys or other tools. First, install drain reinforcement in the tank and fasten it with the nut. Two tank fastening screws to the toilet should be twisted at the same time and evenly to avoid connecting the joint. The attachment of the intake valve also needs to be done by hand, these precautions protect the fragile porcelain tank from chipping and soft gaskets from overs.
If you got on sale identical fittings for a drain tank with lower eyeliner, which was before, the setting can be made by the marks of the old mechanism. In another case, you will have to customize the product right in the tank, the benefit is not particularly difficult. Universal fittings are equipped with special moving connections on snags, allowing you to fit the device for a large number of tank models. At first, the inlet valve is set to the level of the type of water to be sufficient, but did not exceed the drain hole of the exhaust valve. Check is better to produce immediately by typing water into the tank in the usual way through the feed hose. Next, the drain valve is adjustable to the tank height, the without screwing button must be higher than the lid level. Later, when installing, the button drops down and will become one level with the surface of the tank. 
Even the most reliable plumbing device can break. Especially unpleasant if this is a product that is used daily by all family members. If the reinforcement of a drain tank of the toilet fails, then wait a couple of days while the plumbing comes at all, do not want, agree? Moreover, such a problem can be successfully solved on their own.
Before proceeding to repair, it is necessary to understand the design of the tank, the drainage device and understand the principle of operation of the waterproof. The article discusses in detail all the listed moments, and the possible breakdowns of the toilet reinforcement and their elimination methods are described.
The toilet occupies a central place in any bathroom. If without a shower or bath, you can do, using the pallet for ablutions, then the toilet is an indispensable device not only for each family member, but even for some pets.
Therefore, it is simply necessary to know its features and the device so that Saturday morning does not turn out to be one one with such a breakdown.
Consider or replace the reinforcement of the tank and do it yourself. The main thing is to overlap water before starting work and read the recommendations of the manufacturer on the structure of the structure
Features of drain Bachkov
Tanks for toilet bowls differ in the material manufacturing, method of installing and connecting to the water supply, the layout of the button / lever. Yes, and the price range of this type of plumbing devices is very wide - from low-cost domestic models to exclusive design versions of famous plumbing manufacturers.
By material material, the following types of toilet tanks are distinguished:
- faiences;
- plastic;
- cast iron.
Water fittings used for toilet bowls are mainly produced from plastic. This applies even expensive models.

Only in exclusive versions of plumbing use metal reinforcement. Moreover, it is made of brass and bronze alloys
Faians Tanks Recognition and the greatest distribution worldwide. It is this material most often can be found in the bathrooms where the pair of the toilet + tank is installed.

Faiansse products produce both domestic manufacturers and famous Western firms. Pick up the most optimal option for your bathroom will not work
Plastic models Drain tanks have a flat shape. This is due to the specifics of their use - the so-called when the device for washing is installed in the wall. The design is distinguished by reliability, simplicity in maintenance and long service life.

Plastic toilet tanks after installation must have an audit window. It is usually located beyond the button for washing.
Cast iron balls - This is the relic of the past. Heavy, bulky and non-primary structures still remain in the use of many of our country's maffers. But when repaired, often old cast iron products are replaced with a beautiful modern plumbing.
By the method of connecting to the water supply there are tanks for toilet bowls with upper and lower eyeliner. The second are more preferable - they look more presentable and create less noise when working.

An option with the upper eyeliner produces many Russian sanitary firms. To reduce the noise during a set of capacitance after the drain, reinforcement was improved
Three ways of installing a drain tank are possible:
- top mount;
- installation in a false wall;
- on the shelf toilet bowl.
Top mount - This is a retro version. This location of the drain device is used in the bathrooms performed in retro style.

Bachs for toilet bowls in retro style are very popular with large square bathrooms. In a modest bathroom, such a product will be inappropriate, and the price of it is very high
Installation of toilet bowl Used for suspended models when the tank is hiding in the wall. It allows you to save space in the bathroom and to harmoniously enter the plumbing in the overall stylistics of the bathroom / toilet room.

Built-in installation, hidden fake wall tacks are characterized by a higher price compared with an inexpensive domestic plumber from faience
Montage on the shelf toilet - Traditional solution. These are the usual plumbing patterns, when the drain system is attached to the shelf bowl of the toilet bowl.
Advantages: simplicity and price availability. Yes, and the choice is very wide - you can pick up both the domestic option and the elite plumbing of Italian, French or German producers.

The drain tank on the toilet shelf is the most convenient option in maintenance. If you need to repair, then you just get to the reinforcement
Interior device Bachka
Inside each drain tank, there is a shut-off valve for controlling the work of the toilet. Many models fittings are included with all the necessary fasteners and nuts.
According to the water supply method and the installation site in the tank distinguish such types of reinforcement:
- upper eyeliner;
- lower liner;
- universal.
Construction with top eyeliner Embed into the tank to collect. A flexible tube for water supply is joined from above. This must be taken into account, because such fittings are not suitable for each model of the drain tank. Basically, only domestic manufacturers provide an upper eyeliner in their plumbing products.
Fittings with lower eyed It comes complete to most drain tanks of Western production. Moreover, the design of plastic, but the quality of all components is high.
Most often you can encounter such problems:
- filling does not occur;
- water constantly flows into the bowl of the toilet;
- lack of reaction when pressing the / lever button;
- leaks in places of compounds;
- weak plum head.
Problem number 1.. The filling does not happen if the intake membrane closed very much. Then without cleaning it or the replacement could not do. If the state of the membrane is a working, and the tank filling with the working fluid does not occur, then you need to check the correct functioning of the float. Perhaps to be.

In the built-in models, inspection, adjustment and repair of the reinforcement passes through the audit hole, hidden behind the decorative panel with the button
Problem number 2.. Water constantly flows into the toilet, increasing the testimony of cold water meter. This problem occurs when in a tank of large garbage or other items. Everything is superfluous interferes with the normal operation of the tank reinforcement. It is necessary to remove foreign objects from it.
Also can cause distortion, weakening the fastening or breakage of the float. Running the float valve without any special difficulties with your own hands:
Gallery of images
Before you begin repairing a float valve controlling the water supply to the tank, overlap the water supply to it
We wash off all the water from the toilet tank by clicking on the key to be intended for this, the button or handle
Screws attaching the valve to the float, located around it, unscrew
If necessary, you displaced the device holding the floor of the toilet tank
Remove the membrane or washer from the valve shut-off mechanism. If they are damaged, change to similar
Using vinegar and brush, instead of which you can take the old tooth, remove the calcium and rusty sediment around the float valve
Install back membrane or washer, we collect plumbing devices, close the tank cover
Check the work of the renovated float valve. If everything is in order, proceed to operation
Step 1: Disable water supply to the tank
Step 2: Wash off all water from a plumbing tank
Step 3: Revealing fasteners around the valve
Step 4: Offset Holder Float
Step 5: Deleting washer or valve membrane
Step 6: Removal of the sediment around the float valve
Step 7: Reverse Installation of washers or membranes
Step 8: Checking the operation of the float valve
In the case when everything is in order with the float, you need to check the condition of other plastic parts of the valves - the rods, the lever of the diaphragm or the spokes of the float.
Problem number 3.. When you click on the flush button, nothing happens. It has to check the presence of gaps in those places where they should not be in places of compounds. Also, plastic parts of the reinforcement may be broken, which is especially common in cheap models, who served for more than 3 years.
Often, the cause of the water supply disorders into the tank is the inappropriate length of the drain and bulk tubes or their damage. In the fight against the situation, we perform the following steps:
Gallery of images
If the water goes too much into the tank or sprinkles upon admission, check the condition of the transfuse drain mechanism. The overflow tube must be approximately 1 cm below the drain button or handle
If, on the descent of water from the tank, splashing occurs, we shorten the bulk tube to the required length
If damage is detected on the bulk tube or its condition does not inspire confidence in the long service, cut off the tube of equal dina. It must be equal to the diameter of the worn tube
In the landing place of the old bulk tube insert a new segment, if necessary, clamp it in length
Step 1: Checking the position of the overflow tube
Step 2: Checking the status and length of the bulk tube
Step 3: Cutting a new bulk tube for replacement
Step 4: Installing a new tube in place
Problem number 4.. Another trouble that occurs with the toilet bowl - leaks in the places of the threaded connection. To eliminate this trouble, it will take to replace the sealing gasket. If this item has not yet managed to wear, then you need to check the nuts are well twisted and there is no distortion.
 Why you can not give icons
 Is it possible to give icons as a gift: Signs, the opinion of the Church
 A year ago left her husband, and now I do not know what to do
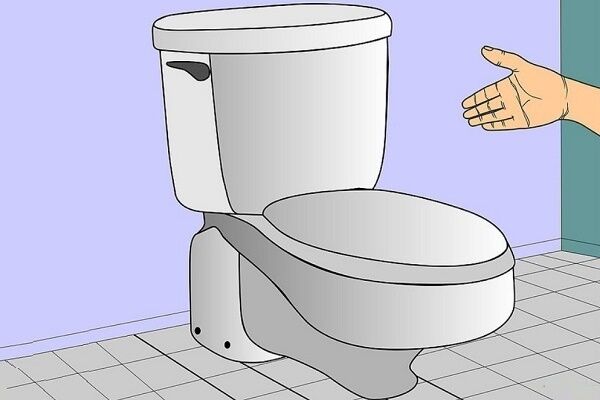