Is it possible to bend a tan. How to make a boiler with your own hands - the best of the proven ways. The most powerful homemade boiler
Production of objects beneficial in the farm, tools and electrical appliances are not always connected with the desire to save. The spirit of invention lives in almost every one who at least once held in his hands wrench or screwdriver. For those who are not able to throw a gram of copper wire and even an old unnecessary blade from a razor to the garbage, it will be useful to find out how from such well-made items you can make a healthy boiler.
Boiler with your own hands can be made different waysbut not all options for self-assembling this device allow you to use it for a long time. The article describes the main, time-tested options. independent manufacture Boiler.
How to make a boiler with your own hands - the best of the proven ways
Most often in handicraft conditions, boilers are made of:
- Shaving blade. Satellite blades.
- Nails.
- Tan for the kettle.

TEN from the old kettle
TEN from the old kettle
It can also be made at home. Comprehensive water heating devices from nichrome wirewhich is installed on a ceramic insulator.
The main task that must be performed in the independent design of heating elements is minimizing the possibility of short circuit and lesion electric shock. When using low-voltage self-made electrical impact products, it is almost necessary to fear, but devices running 220 V network can cause accidents and fire.
Boiler from blade
Make a boiler from razor blades is absolutely not difficult. To perform work it is necessary to prepare the following components:
- 2 "satellite" type blades.
- 2 matches.
- Two-housing wire with a fork.
- Threads.

Electric boiler diagram from blades
The process of assembling the homemade boiler looks like this:
- Each blade is tied with copper custody of the electrical wire.
- 2 matches are stacked between the blades, which will serve as stripping for short-circuit protection.
- Blades threads are primed up to matches in such a way as to eliminate the free movement of metal parts.

Homemade water treatment device assembly
The homemade boiler from the blades is fully prepared for use!

Test of homemade device
Now it remains only to choose a reservoir, in which water will be boiled. The container that will be used with a boiler of such a design should not be made of conductive material. You should also be extremely careful when you turn on and disconnect the device. Before switching on homemade electrical appliance In the network of 220 V, it is necessary to initially lower the device into water. During water heating, it is strictly forbidden to touch electrical device or water tanks.
In addition to the necessary security measures, it is also necessary to remember that water heating is thus only possible if there are conductive metal salts in it. Distilled water with a boiler from the blades will not be heated, due to the lack of a conductive medium between two metal planes.
In addition, the use of an electrolytic water heating method is negatively reflected on its taste qualities, therefore this heating option is most suitable for technical fluids.
Boiler from Tan
Make a boiler at home from Tan is not more difficult than when using razor blades. This option of the self-made device when proper manufacture It is safer.
TEN is not difficult to "extract" from, the fault of which is not related to the heating element.
In addition to the availability of a working air, it will also be necessary to prepare a two-core wire with a fork, which can also be borrowed from a faulty kettle. Also, for fastening the wires to Tan, it is recommended to purchase terminal blocks whose use will be greatly simplified and will speed up the process of self-making device. In this case, the assembly process is carried out in such a sequence:
- The ends of the wire are cleaned of isolation using a knife or special device.
- The wires are triggered in the terminals and are then fixed on the Tsen's outputs with built-in screws.
- Using a multimeter resistance is checked heating element, as well as a possible leakage on the body of the product.

Water heating device from a tear from the kettle
With successful diagnostics homemade device can successfully compete with factory products, and the quality of the connection of the main wire with the Tan can even be fulfilled better than the store household appliances. The absence of the soldered compounds will allow you to last this adaptation much longer, but if there is no terminal, then the above-described version of the manufacturer of the boiler can be made by soldering wires to the heating element contacts.
This version of the homemade boiler can be used without any restrictions. Quality boiled water, thus cooked, allows you to brew tea, coffee or any other drinks without loss of taste.
From nails
The electrical appliance from the nails is the variation of the boiler from the blades, but with a more "civilized" execution. For the manufacture of this hot water device, it is necessary to cook:
- 6 Nails 80 mm.
- Two-housing copper wire with a fork.
- Electrode and drill 3 mm.
- Section wooden board 100x100 mm, a thickness of at least 25 mm.

Nails for homemade water
The process of manufacturing a boiler from nails is carried out in such a sequence:
- In the middle of the wooden plate is made 6 holes with a diameter of 3 mm with a distance between them 3-5 mm.
- In each hole in the wooden plate, a steel nail is installed.
- From the cable with a fork, each contact is connected to 3 nails.
- The wooden plate is installed above the capacity and turns on in the 220 volt network.
When making these actions, it is necessary to strictly monitor that the wires can be pressed as close as possible to metal surface Nails. To implement a reliable contact of wires with electrodes, it is recommended to start 1/3 copper wires in each hole, before installing nails in a wooden plate. If all actions have been made correctly, then when checking the resistance between the plug contacts, the multimeter should show the zero value.
Use this water heating device in such a sequence:
- In a non-metallic mug, pour water that should not be distilled.
- Set on a mug wooden plate with electrodes down.
- Include a device to network 220 V.
- After the liquid boils, the homemade boiler should be disconnected from electricity.
As in the case of using the product from the razor blades, the quality of the puffed fluid leaves much to be desired, so this method Cooking boiling water is also better to use for technical needs.
The most powerful homemade boiler

Nichrome spiral
In order to boil a large amount of water, you can make a powerful portable device from the remedies. For the manufacture of the instrument, the following details will be needed:
- Nichrome spiral with a wire diameter of at least 1 mm.
- Industrial fuse series Mon 2.
- Two-housing cable from the wire with a cross section of at least 4 mm 2.
- Screwdriver and screws on a tree of 20 mm.
- Collapsible plug.

PN-2 fuse
Making a powerful water heating device is carried out in such a sequence.
- PN-2 fuse is disassembled to extract the ceramic body of the product.
- 8 self-tapping screws that were formed during the disassembly of the device are screwed into the holes in the body of the ceramic insulator.
- The end of the nichrome spiral is cling to one of the 8 screws of the screws.
- Then inside the housing of the electrical insulator, the helix is \u200b\u200bdyed to the opposite end of the circular insulator and is repeatedly fixed around the screw.
- The spiral unfolds B. reverse sideBut it is already fixed to another screw screwed into the insulator.
- In the same way, the spiral and self-tapping screws are connected at 5 points, after which the stripped copper wires and the self-tapping screws are connected to the first screw and the self-tapping screws into a ceramic insulator. Given the significant power of such a homemade boiler, the cross section of the connected copper wire There must be at least 4 mm 2. On the other end of the wire is carried out installation of a plug.

Checking a powerful homemade water heater
The operation of the boiler can be carried out only in a limbo. The heating element must be completely omitted into the water and should not touch the walls and the bottom of the tank. When using homemade, it is strictly forbidden to touch the tank and the body of the device during water heating.
Conclusion
Boiler from the primary means can be made with their own hands without financial costs. All without exception homemade products It should be operated in such a way that there is no contact of the human body with a heated liquid or with a uninsulated part of the current-carrying elements. It is forbidden to leave a boiler made by your own hands, unattended, as well as in places where children access is possible to enabled the device.
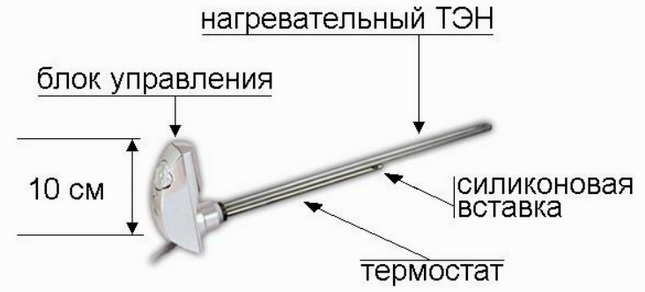
TEN - fluid electric heater in the form of a metal tube, inside which is a spiral. Designs, varieties set. Heaters are manufactured for large and small industries.
These heaters are massively installed, for example, in electrical boilers and electrocotes, therefore are also produced by well-known manufacturers.
But on any market, you can meet the Tennery are intended for installation in heating radiators. These devices are made more often in Poland, Ukraine, China. They can be equipped with built-in thermal sensors, i.e. Work in semi-automatic mode, tracking the degree of heating.
Based on such electrical heaters, you can easily create a heating device with your own hands. What the homemade masters use, constructing the simplest heating and "saving" at the same time, as they think, the fair amounts of money.
But is it profitable to use Tenny?
Where usually, in what situations, these electric water heaters are used? How to install and apply Teni ...
How big is the benefit from the Tan
If available old battery, why not turn it with the help of a tan in the heating system for a small utility room- Chickentechik, workshop, garage ...
There are even myths that Tenami is profitable. But "Dreams are broken about the harsh reality," the electricity is to make more expensive. Since the most expensive energy carrier is used.
It does not matter whether there is a corporate programmable electrocotel, or a barrel with lowered to it is installed on it, - the efficiency of such electric heaters is about 97%. And then we pay across the meter ...
Warm at night
But there is a loophole, a night cheap electricity tariff. Find out exactly the current tariffs and the possibility of connecting the night, you can in the local power grid.
True and night electricity can not be called cheap, but in conjunction with the indicator "comfort", the night heating becomes very attractive for the user.
But the price of heating the heating system with electrical heating can vary significantly.

Heaters in batteries
When in apartments with central heating cold, then they are heated additionally with electricity, as well as gas kitchen stove or column.
Here and applied a couple of heavy cast-iron batteries With Tanni. Compared to branded electroconvectors, they have a much greater heat capacity, so they can be turned off for longer and not to follow their work. But the heating is respectively longer.
Such radiators craftsmen are installed mainly in garages where they like to spend time. Or, for example, for heating animals in frosts on small farms.

Equipment systems of heating
It happens that on a dacha, in the garage, etc. There are remnants of the former heating system, for example, a couple of batteries with steel pipes. Return the system to life is the easiest way, inserting electrical heaters in it ....
But the tanes can create auxiliary heating in the home heating system. Electric heating Perfectly complements solid fuel boiler. Especially at night, with cheap tariff. And here "homemade production" is also in demand.
If in a large enough metal pipe Secure a couple of tenons of 2 kW, it will turn out a 4-kilowatte electric boiler. The nuance is that at night it can be included in the low-power network of 220 V, as other consumers "sleep", except the refrigerator, for example.
Such a "creation", in practice, can become the main heating during the season in a warmed house, unless, of course, the buffer container is used - the heat accelerator.

What power will need
In the integer home heating system, 2-kilodate samples of electric heaters are better.
But in individual radiators of homemade registers, trimming of heating in garages ... To use too powerful, the Tane can not.
Consequently, the power of the Ten should not be greater than thermal power, Delivered by the device at +70 degrees. This is about 75% of the radiator passport.
One section and cast iron and aluminum radiators (500 mm between pipes) has a capacity of 170 W heat transfer at 90 degrees of liquid and 20 degrees of air. At +70 degrees. Heating - one section - 140 W, 7 sections - 1080 W, 10 sections. - 1400 W.
Thus, for the radiator of 7 sections, the power of the TEN should not be more than 1 kW. And for the radiator out of 10 sections - not more than 1.4 kW.
It is more difficult to deal with self-made registers, - their heat transfer is unknown. It remains only to start using the least powerful heaters.
What are the waist for the radiator to choose
Tanes for radiators are made on the basis of a plug (base) with standard diameter Threads 40 mm. It remains from the radiator to unscrew the bottom stopper, the heater is screwed into its place.
The selection of these heaters for power for radiators was mentioned above. Do not take more powerful devices, in order to avoid emergency situations. No need to overheat the radiator, achieving greater heat transfer.
But these heaters differ in length. For a separate radiator, without moving the fluid, preferably the net is more complete. Then the heating will be more uniform.

In the protocate electrocot, the other selection priority is less hydraulic resistance. Minimize the effect of heaters by successful supply of tubes and configurations of their location for homemade craftsman is not a problem.
The manufacturer, the "Chinese", still, scold the most, the best Tanes are considered local spill - Russian-Ukrainian.
As used
Teni may turn on room thermostat. Then they are managed by set temperature air.
But in most cases heaters use built-in temperature relay- Heating on the temperature of the coolant.
Liquid during heating expands. It is impossible separate radiators, and other closed heating systems, fill in liquid completely. In the heating systems, an expansion tank is used to compensate for expansion.
In the case of a separate radiator, it suffices to leave at least 10% of the internal volume not filled, - fill the radiator over the upper tube.
Installing Tan Next. The system merges, the radiator cork is twisted, the Ten is screwed. It is commonly used flax with lubrication as a seal (metal-in metal).
The heater is connected to the power grid in accordance with PUE, with the corresponding insulation of contacts.
Oil is not allowed
You can meet the recommendations to fill with oil radiator, - allegedly it turns out an analogue of the "oil heater". Before following such advice, it is recommended to explore the experience of "pyrotechnics", which poured oil to the cardboard, set fire, and then tried to put out.
Oil-filled industrial electrical units (for example, high-voltage oil disconnectors) are operated with special fire safety measures.
If the system is frozen, it is necessary to use non-freezing fluids, for one radiator you can use the same automotive toosol. Fuel fluids are not allowed.

There are other disorders.
Designing with your own hands - profitable?
Independent design of electrical heating devices is not welcome for security reasons.
Much more expedient to purchase ready electric heater For premises, for example, an electroconvector that meets the requirements ... The manufacturer is responsible for its operational qualities.
Economic feasibility in Tanni may arise, as stated when there is a "abandoned" and "free" shell for him.
But security issues are actually much more important than the benefit obtained in this way.
Now they understand it more often, because there are less and less.
Build a heating boiler in country houseswhich are not connected to the central gas pipeline quite possible even on their own. In this material it will be about how to make an electric heating boiler with their own hands. We will look at 3. available options Electrocotors are shadan, electrode and induction.
What instruments need
To collect self-made electric heating And encountered with a minimum of difficulties, at your disposal should be high-quality tools.
To work, you will need:
- the welding machine is the most convenient to work with the inverter model;
- cutter - if you do not know how to use a gas cutter, better use the plasma;
- bulgarian - even 2 models are needed - a large cross section of 230 mm and a small cross section of 125 mm;
- electric drill;
- a hammer;
- kern;
- roulette and circula.
Electric concrete on Tanah
The diagram of the electric boiler with the shadow is the most simple for execution and is already known for a long time.
Principle of operation of a shadow boiler
The device of all household appliances in which heating elements are installed (tanes) are equally. When power is turned on, the voltage is fed to the TEN, which gradually heats up and transmits thermal energy Located around it liquid.

Advantages of such devices:
- a large range of heating elements of various shapes and power;
- ability to use in any heating system with liquid coolants;
- on the housing of the boiler is insulation, so the voltage is supplied exclusively on the TEN;
- do not require complex maintenance;
- the heating level is very simply controlled, even with a minimum set of automatic controls.
Among the shortcomings of the self-made electric boiler of this type can be called:
- "Voraciousness" in the consumption of electricity, since for heating 10 m 2 area requires 1 kW of power;
- impurities in the coolant accumulate on the heating element in the form of scale, so it must be cleaned about 1 time per year;
- TEN can only function if there is a fluid, it is recommended to install a idle sensor.
Order of the assembly of the boiler with Tanni with their rivers
Before making an electric boiler with your own hands, it is worth taking care of the presence of a reliable power line. On regular networks with a voltage of 220 V and a frequency of 50 Hz, only equipment with a capacity of no more than 6 kW can be connected. If a more powerful boiler is required, it is necessary to make a three-phase wiring and a separate input.
So, we begin the assembly of the self-made electric boiler of heating from the pipe with a cross section of 159 mm with a wall thickness of 10 mm. This pipe will serve as a boiler. It will take either a sequence of 159 mm and a thickness of 10 mm or a thickness of 10 mm, or sheet metal With a thickness of 8 mm of the same cross section.

The hook of the boiler in which the heating elements will later be embedded, can be made from a channel with a thickness of 8 mm.
In the dome of the boiler, we cut a coupling with a cross section of ¾ inch. In this clutch we will screw the drain valve. In addition, you will need 2 nozzles with a cross section of 1 inch for tributary and reversal. Threads on the nozzles can be made both inner and external. It all depends on how more convenient for you to work.
To reset the excessive pressure, you need to prepare a pipe under the clipping channel. You will also need 3 adapters, each of which will be screwed for an electrocotel. Another adapter will be needed for a thermal sensor. In addition, you will need automation holders.
Please note that the threads on the nozzles and adapters are preferably chopped at once.
Prepared pipes with carvings, the same as on beans, you need to immediately screw into adapters. It is necessary that the threads are damaged during welding to the sum. For marking parts of the inserting heating elements, the outer diameter of the pipe must be divided into 6 equal sectors in the size of the radius. Then blacks are three identical sectors strictly at an angle of 120 °.
At the next stage, we proceed to cutting. Having completed with the markup, with the help of a plasma cutter, cut the hole under the pipes for the Tan. Their cutting should be performed only on an external contour. With all the other nozzles, it does not matter concept.

We proceed with welding work. Pipes first intercept at several points so that they are not led. Then check the accuracy of the location, if necessary, slightly climb the hammer, and then we perform a solid seam. It is important that adapters for Tanners in an electricotel for heating with their own hands performed above the surface of the boiler arch of 1 cm.
We proceed to cutting the arch from the chaserler. In his center we make a hole for the air valve nozzle, after which we weld the nozzle itself. On the side we make a hole for the thermal sensor and also weld the nozzle for it.
All protrusions, burrs and remnants of welding work must be carefully cleaned with the help of a grinder. The inner surface of the vest area should be perfectly smooth. Tanning nozzles will only come with outside 1 cm.
We had a rather powerful electric flocity with their own hands with 3ndes. If you need an aggregate simpler, according to the same principle it can be collected by 1 or 2nd.
Assembling boiler heating on electrodes
Devices of this type have become actively used only in the last 10-15 years. These are more technological devices, compared with the bean.
Design
In electronic electric bolery The liquid plays the role of the heating element. The electric boiler of this type assembled with their own hands is a metal housing, inside which is located an isolated steel electrode.

0, and the electrode is supplied to the housing. During the supply of tension, the oscillation of water ions with a frequency of 50 hertz begins. In this case, the liquid is gradually heated. Thanks to this property, such boilers are also called ionic.
The dimensions of the electrode boilers are small. They can be made from the pipe with a cross section of up to 320 mm and up to 60 cm long. However, the electrocotel for heating at home with their own hands can be made much less.
Benefits:
- small sizes due to which the ion boiler can even be placed in small apartment;
- the absence of the so-called "dry stroke", which guarantees the health of the boiler, because without fluid inside it will not work;
- resistance to voltage drops;
- high speed heating and cooling, which means ease of adjustment;
- efficiency in electricity consumption compared to the instruments on theta.

Among the shortcomings of such boilers, the following points can be called:
- an important condition for the effective functioning of the electrode boiler is the level of thermal conductivity and quality of the coolant;
- the device must be reliably grounded, since the risk of electric shock is large;
- it is important to exclude the possibility of entering the air system, otherwise, the electrodes will be disretened due to corrosion.
Instructions for assembling homemade electrode boiler
As a case for an electric heating boiler, we use a pipe with an internal cross section of about 50 mm and a length of 40 cm. In addition, it will take a one-piece rod with a diameter of 20 mm and a length of 30 cm, as well as two adapters with sliced internal thread. In the end of the rod drill deaf hole With a thread for a bolt Ø10 mm.
We prepare nozzles. 1 We will welcome in the end of the pipe, and the other side. In order for the side nozzle to fit perfectly to the pipe, it is cut off with a grinder, and then reconnected with a round file.
Cut holes for nozzles. If there is no cutter, then around the circle you can drill a lot of fine holes. Before the ideal, the work is adjusted by the appropriate and a round file. A hole for the side nozzle must be placed 10-15 mm from the edge of the pipe.
In the next step, it is necessary to welcome pipes to the pipe. To prevent them, first do point welding In several places, and then apply a solid seam.
We prepare the platform for the electrocotel. To do this, you can take a sheet of fiberglass with a thickness of 2 cm and cut a piece of 120 × 120 mm with a hacksaw metal. Then in this platform it is necessary to drill one hole in the center, and four on the perimeter. The opening cross section should be 10-12 mm.

Through the holes around the perimeter will be skipped fastenings of the boiler housing, and the central hole is designed to fix the steel electrode.
We proceed to fixing the housing for the boiler on the platform. To ensure reliable adjacent, you can spend four Ø12 mm nuts on the housing from 4 sides. The Ø10 mm bolts will easily pass through them.
Such nuts need to weld with a small indentation from the platform. To ensure it, it is necessary to turn on the bolts suitable for them in size of the nuts, to turn them into wide nuts, and the bottom is once again fixed smaller. Thus, it will be easier to perform welding work.
In the last stage, perform final assembly boiler. To do this, cut out the rubber gasket with a slightly more external diameter boiler. In its central part, we perform a hole and produce through it the electrode. Then the housing is installed on the platform and screw.
Induction boilers
Among all the options for assembling heating with electric boiler with their own hands, the manufacture of an induction type model is the most innovative.
Principle of operation of an electric induction boiler
If you lower the parts, the operation of the induction boiler is based on the heating of the coolant by means of a magnetic field.
Among the advantages of such aggregates:
- high efficiency;
- safety;
- the possibility of using any coolant;
- no scale.

- high cost of factory boilers;
- the complexity of the structure of the automatic control unit. Without preparation, it will be difficult to collect it.
Instructions for assembling homemade induction boiler
It is worth noting that it is often an instruction, how to make an induction electric motor, so complicated and contains such labor-intensive drawings that independent assembly The equipment looks pretty dubious. However, we found a non-standard solution.
Before making an electrocotel for heating itself, it will be necessary to purchase an induction furnace with a capacity of 2.4 kW and 3 meters of profiled pipes Ø25 × 50 mm with walls, 2.5 mm thick.
If we consider how this design will work, we first collect flat container from the profile - the liquid will move along it. And then to the pipe fix the induction stove and connect it to the network. All together will look something like a saucepan on the stove.

Cutting pipes must be performed as accurately as possible. It will take several pieces of 400 mm, carefully stripped from burrs on the ends.
Since the liquid inside such a boiler will move the snake, it is desirable to take an even number of pieces of pipe so that the input and outlet is located on the one hand - so it is more convenient to connect them to the heating circuit.
Insofar as profile pipes Not perfectly even, they must first dock with stupid edges with sharp and numb, so that they do not confuse.
At the next stage, the joints between the pipes need to be slapped. We put the design on smooth surface, tighten the clamp and weld. First we make point welding so that the design does not learn, and then perform capital seams.
Now you need to close the end part of our container. Use for this steel strip carved from profiled pipes. We carry out the welding with a similar method - first point, and then capital.

From the opposite side, we also weld the strip, not forgetting the installation of input and reverse pipes on extreme pipes. To ensure the maximum contact area of \u200b\u200bthe container with the stove, all seams must be carefully cleaned.
In order for our boiler to hang on the wall, it is necessary to quickly welcome 2 corners, in which the induction stove will be placed, as well as hinges for hanging.
The last stage of work is painting. You can use heat-resistant paint. This assembly work completed. You can hang the boiler and connect it to heating and power grid.
At the time of buying induction furnace Please note that it is designed for continuous operation. Otherwise, the system restarts every 2 hours.
RESULTS
Each of the listed models is fully functional and reliable. The choice in favor of any of them will do it yourself. The main thing is to carefully treat work and, in case of difficulties, consult with knowledgeable people.
Making flowing water heater do it yourself - great ideaif you suffer from absence hot water In the summer or want to organize a shower at the cottage. The test referee can be made independently, because it is quite just arranged. What you need to work and what steps to go through, you will learn in the article.
In detail how the boiler is arranged, we wrote in the article ".
We list the main nodes and consider the principle of work. The enclosure of the device is equipped with a flow of a tan, which is placed in a protective flask, so practically not affected by scale. Water passes through the heater, reaching optimal temperature. The advantages of such a job are that you can get hot water at any time.
To create an electrical heater, the most important thing is to purchase a TEN. You have two options:
- Simple - buy new element in the shop. It is important to choose the right power: the usual network will not stand more than 5 kW, and for the cottage it is better to take 3-4 kW.
- Make homemade tan.

What will be needed for the manufacture of the heater:
- Spiral (TEN).
- Copper tube for the manufacture of a protective housing.
- Two steel pipes with a thread diameter ½.
- Sheet steel 3 mm thick.
- Nichrome wire.
- Heat-resistant glue.
- Anticorrosion paint.
- Gas-burner.
- Apparatus for welding.
- Bulgarian.
- Drill.
- Metal brush.
- Acute core.
- Electrodes.
- A hammer.
How to make a tan yourself:
- Tighten the spiral from the copper tube. Do at least three turns at a distance of each other.
When twisting the tube can be laid on bends. To avoid this, we recommend filling the cavity of the sand, and the edges close the plugs.
- Around the tube tightly wind the wire so that there are no gaps between the turns. At the ends, fasten the heat-resistant glue.
- For greater power, the helix is \u200b\u200bpowered in parallel. With sequential power, heating will be performed worse.
- Then the element is placed in copper tube and searched.

To accurately make an electrical device, you need to calculate the materials.
Calculation for the manufacture of direct-flow tan
It is necessary to calculate the dimensions of the future heater, how much wire and copper pipes need.
How many wires can you need? To make a shower with a normal pressure and water heating, power should be at least 5 kW. From the calculations below shows the current strength:
P \u003d ihu; I \u003d p / u \u003d 5000 W / 220V \u003d 23 A
Therefore, in advance, take care of the normal posting indoor. It is better to use a thick-seen cable. Now calculate the figures for such a formula:
R (maximum resistance is 1.1 Ohm x mm² / m) \u003d P (wire resistance) x L / S (cross section area).
How to find out area cross section? Only by calculating:
S \u003d πr² \u003d 3.14x0,5² \u003d 0.8 mm²
Wire length:
L \u003d 8.8 / 1,4 \u003d 6.2 m
Exercise this number on the number of Tan's turns.
Suppose the dimensions of the tube are 10 mm, and the thickness is 1 mm. With parallel wiring wire, the distance between the turns should be 2 mm.
How to assemble the flow heater
Before starting the assembly, prepare all the details. Metal needs to be cleaned with rust, it uses a drill with a brush nozzle. Consider that the diameter of the sheet should exceed the sizes of the Tan flask.

Mark the places on the sheet where the spiral will be located. Use a drill with a drill diameter greater than the heater leg. Do the bolt mounting holes. Keep the core at the end of the product. They must be located strictly in the middle.

Make two sketches with a grinder. Follow the scheme and markup. In the second version of the openings are not needed. As a result, it turns out the lower and upper part of the device. Next, do this:
- Connect the detail with the holes and the flask of the Tan. Make sure that all connections are sealed, after which you breed the part to each other.
- Make sure the length of the flask does not exceed the size of the spiral more than 1.5 cm. Otherwise it is necessary to shorten it.
- In the pipe, make two holes for the supply of water, top and bottom.
- We weld the pipe segment so that the side without carving contacts the flask.
To work mechanically heating, you need to adjust the temperature. Therefore, set next to the TEN thermostat. The start button is better installed on the surface of the tank.
- We weld two housings that were cut out of the sheet.
- Inside the chamber, install a grounding bolt.
- Connect the device to water and run to check.
- Inspect how tightness are the details, there are no leakage.
- If everything is in order, you should turn off the device, primed and paint the surface of anti-corrosion paint.

If you wish, you can organize gas or wood heating water. But then it is better to make a cumulative-flow case.
Plain homemade instrument It is not safe, so you need to constantly monitor his work, control the flow of water so that the tan does not work inust. After all, this technique does not have protective sensors.
 Why you can not give icons
 Is it possible to give icons as a gift: Signs, the opinion of the Church
 A year ago left her husband, and now I do not know what to do