Make an arch in the apartment with your own hands. We make an original drywall arch with our own hands: what is useful to know? Choosing the type of arch
Unlike the usual interior doors, drywall arches look solemn, visually raise the ceilings and expand the space of the apartment. The plasticity of this building material allows you to cut oval reliefs and all kinds of smooth curves from it, which complement the interior so beautifully. About a variety of plasterboard arches, their features and design functions will be discussed later in the article.
Features of drywall arches in the interior
Plasterboard arches are volumetric structures that decorate the openings between rooms in private houses, apartments, cafes, galleries, theaters, educational institutions and temples. They can be different diameters, narrow or occupying almost the entire wall, simple or unusual shapes.
The base of the arch is a metal frame to which a curved drywall is attached. To shape the material, factory processing is used (production of arched blanks of the GKLA brand), as well as dry and wet bending of initially flat sheets. In the first case, cuts are made, in the second, drywall is impregnated with water, bent and dried in this form under a press.
The positive sides of drywall arches are their aesthetics, ease of installation and low cost (compared to concrete, brick, wood). Among the disadvantages can be noted low resistance to moisture. In some cases, the disadvantage may be that the arched opening in the wall remains open, which means that drafts, extraneous sounds, smells, and light will penetrate through it.

What are the forms
Reminiscent of ancient temples and palaces of the Renaissance, the vaulted passages add sublimity to the interior. They are great for visual zoning of hallways, corridors, staircases, living rooms, reception rooms. A large number of geometric shapes, which can be given to drywall, provides the opportunity to choose perfect option for any type of interior.
Round plasterboard arches
Round and semicircular arches will harmoniously complement the classical, Greek, Byzantine, and also victorian style... They should be decorated with plaster moldings, golden or silver ornaments, and the side parts should be made in the form of columns. The finish should be solid, white or very close to it.


Rectangular plasterboard arches
Such portals are very similar to doorways. This a good choice for minimalistic and modern interior... They can be part of partitions with shelves located on the sides, and, if necessary, even closed with sliding screens.

Elliptical drywall arches
Plasterboard arches, the upper part of which is made in the form of half a horizontal ellipse, are suitable for rooms with low ceilings (from 2.5 m). They fit well into styles such as modern, provence, loft, country - you just need to find the appropriate frame.


Arabic / Oriental drywall arches
The eastern openings are like pointed domes. This type of arches is typical for India, Turkey and all Muslim countries. As an addition, serrated and wavy reliefs, complex miniature patterns in saturated colors are possible.


Drywall trapezoidal arches
Arches with geometric angles look good surrounded by wood and stone, because these materials do not allow smooth curves. They are especially good for country houses, cabinets, pubs and libraries.

Curly drywall arches
Fantasy soft reliefs can be the highlight of an interior made in a futuristic, romantic or playful style. By the way, a drywall arch is able not only to decorate the opening in the wall, but also to perform the function decorative frame around some niche.


Finishing plasterboard arches
After shaping the drywall arch into the desired shape, applying the base putty and primer, it appearance can be greatly improved with decor. There are a great variety of finishing options, and among them you can choose any that is suitable for the price and aesthetic qualities.
Painting
Glossy effect will help to achieve alkyd enamel, and a matte surface will be provided by water-based and water-dispersible compositions.


Painting
You can use stencils to apply drawings to the arch, and if you have artistic talent, you can make them by hand. Techniques and materials in this case are limited only by the imagination of the master.

Stucco and PVC decor
Stucco molding, as well as inexpensive polystyrene foam products in the form of all kinds of shapes and lace will instantly decorate any arch. Due to their low weight, they easily adhere to the plasterboard base.


Wallpaper
Wallpapering is one of the most available ways finishing of arched structures. It only takes more skill and accuracy than smooth walls- so that the seams are not visible.

Decorative rock
Natural or fake diamond will perfectly frame the opening, giving the interior a luxurious and complete look.


Wood veneer
A unique cut pattern of expensive tree species on a drywall arch will make a simple interior elite with minimal financial costs.

Stained-glass windows, glass, mirrors
Decorative cuts can be filled with translucent or reflective inserts. This design looks sophisticated and creates a beautiful play of rays.


How to make a drywall arch with your own hands
To complete the installation of the arch, you will need the appropriate materials:
- drywall (for beginners it is better to choose an already curved arched (GKLA);
- metal or wood profiles, plywood;
- self-tapping screws, dowels;
- putty, primer.
Of the tools should be prepared measuring instruments(carpenter's square, tape measure), large compass, pencil, drywall knife, scissors for cutting metal, screwdriver, fine-grained sandpaper edge polishing, spatula, personal protective equipment.

Stages of work
1) Design. Based on the parameters of the room, design ideas, it is necessary to find out exactly the dimensions and relief of the future structure.
2) Calculation of materials. It is better to take more drywall and consumables than required. So in case of accidental damage, you can safely continue the installation.
3) Cutting and fastening of profiles. As a result, you should get a kind of frame, suitable in width. TO concrete wall they must first be attached to the dowels, and then fixed with self-tapping screws. Optimal distance between the screws - 10-15 cm.
4) Cutting drywall blanks, giving them a curved shape. You can clearly see this process in the video.
5) Sheathing of the frame. The diameter and length of self-tapping screws should be selected depending on the thickness of the sheets. After screwing in, their caps should be flush with the drywall so as not to create unnecessary irregularities.
6) Strengthening the structure. For this, a curved metal profile is attached to the outer edges of the arch.
7) Alignment. At this stage, you need to smooth out the roughness, putty the surface and prepare it for finishing.

Drywall arch design - photo
Our gallery contains the most interesting and vivid examples of how drywall arches can look in the interior. For convenience, they are grouped by different types premises. After looking at the pictures, you will certainly find inspiring design options for yourself!
Plasterboard arches in the living room


Plasterboard arches in the hallway / corridor


How to make an arch in a doorway - choice of material
To create an arched structure, you can use any materials: brick, stone, wood, metal and plastic. The former are distinguished by their high weight, and the latter by their high cost. The most popular and acceptable option is to install a drywall arch. It is a lightweight, environmentally friendly and practical building material.
This design has several advantages:
- strength;
- reliability;
- simplicity.
Its installation is not accompanied by large-scale works with increased noise and great expense building material. It will not be superfluous to note the affordable cost of all building elements used in the installation of a drywall arch and a huge assortment in every hardware store.
How to make an arch in a doorway - preparing a doorway
Having chosen the type of arch to be installed, you can proceed to the preparation of the opening. First you need to get rid of installed structure, instead of which you want to build an arch. Take off the door and disassemble door frame... For this purpose, you can use a crowbar and grinder. If the dimensions of the opening do not suit you, correct the situation. You can cut out part of the wall, or you can build a smaller structure by reducing the distance in the opening. The surface must be free of chips, dust and pieces of concrete. To protect against mold and mildew, treat the wall with an antiseptic impregnation.


How to make an arch in a doorway - installing a frame
The main frame of the arch is made from the guide profile. The pre-prepared strips must be attached parallel to each other on both sides and to the top of the opening. Drill holes in the ceilings with which you will fix the profiles with dowels. Please note that you need to install the main frame with a retreat deeper into the opening. The deviation should be equal to the thickness of the drywall sheet and putty. Thus, the surface of the door arch will have one plane with overlappings.
To make the arcuate part of the frame, you will have to perform a "simple" manipulation: cut the side flanges of the profile and bend to the state of the arc. The cuts are made with a grinder or scissors at a distance of 50 millimeters from each other. The resulting arcs are attached with self-tapping screws to the main guides. A do-it-yourself drywall arch must be strong enough. To do this, you need to install stiffeners from the structural profile.


How to make an arch in a doorway - an arched fragment of an arch
Use a tape measure to measure the length and width of the arc. Take a knife and cut a piece out of the drywall to fit your measurements. Now, to bend drywall, you can use 2 methods:
- Get it wet. Suitable for creating slight curvature.
- We make cuts every 10 centimeters. Use building level so that the cuts come out strictly perpendicular to the side edge.
The drywall must be turned over with the notches up. Gently shape it to the desired shape. Be neat and drywall will quickly take shape. Start fixing from the top of the arch with self-tapping screws. Step by step, the drywall sheet will take on the intended shape.

How to make an arch in a doorway - decoration
The formed and filled arch needs additional decoration:
- Painting. The interior is painted with light paint.
- Sticking wallpaper over the arch. This is a simple and affordable way.
- Stucco finishing made of polyurethane. Skills will not be superfluous, but everything is quite simple, because all the elements are assembled and glued in stages. The assembly starts from the top of the arch. The side elements are adjusted to the required height.
- Plaster stucco decoration. The method is similar to the previous one, however, doing the work with your own hands, you run the risk of making poor-quality seams and ruining the appearance.
- Masonry decorative stone... It is better to entrust this work to professionals.


Arched doorways lend a distinctive architectural charm to the design of the house. Arches are designed to visually increase the space of the room. Do it yourself or contact a specialist - everyone decides for himself.
How to make an arch in a doorway? This question is of interest to many owners of apartments and private houses.
It should be noted right away that the arched opening can only look perfect in rooms with high ceilings.
At low ceilings such a structure visually significantly reduces the opening. Therefore, you should think carefully before deciding to build an arch. If you accepted it, then you can find a lot of materials for implementing the idea.
Methods for constructing arches
How to make an arch instead of doors? Today there are such ways to create arches:
- For an arched opening, a wall is hammered according to a pre-made markup. This method is more suitable for rooms with not very high ceilings.
- With a sufficient height of ceilings and doorways, their upper part is sealed with pieces of drywall or plywood to give them an arched shape.
When chiselling the walls, proceed as follows:

- All decorative trim must be removed, including the door frame.
- From the floor itself, a vertical line is marked on both sides of the opening to the height of the future arch. For accurate marking, use a level or plumb line.
- The width of the marked opening is measured and halved. It turns out the value of the radius of the arch.
- The center of the arch is marked on the top horizontal line... A screw, self-tapping screw or nail is fixed to this point.
- A strong thread is tied to the self-tapping screw, the other end is attached to a pencil. Excess thread is wound around a pencil, leaving a length equal to the radius of the arch.
- A mark is made on the vertical from the center point of the line downward at a distance of the radius.
- A semicircle of the upper part of the arch is outlined.
- On the other side of the wall, the marking operations are repeated.
Now you can start slotting with a hammer drill or other tool. The choice of tool depends on the material of the wall. It is recommended to drill as many holes as possible along the marked contour. They will help with the chiseling process. V wooden wall the opening is cut out with a jigsaw or a hacksaw with a narrow blade. The final stage preparatory work- processing the edges of the resulting opening and decorating it with prepared materials.
With high ceilings, do door arch you can, if you adhere to the following sequence of actions:

- In an opening made of wooden or metal profiles the frame of the future arch is going.
- Plasterboard or other material is marked from which rectangles need to be cut. Their width is equal to the radius of the arch, and their length is equal to the width of the opening. Using a large compass or thread with a pencil, the upper arcs of the arch are marked and cut out with a jigsaw.
- The resulting blanks are attached to the frame with hardened self-tapping screws. Their caps are recessed 0.5-1 mm into drywall.
- The end of the opening is closed. This can be done using fiberboard. This material bends pretty well. You can use an 8 mm drywall strip. It is rolled several times with a needle roller and sprayed with water. Punctures are made to a depth of up to half the thickness of the drywall sheet.
- If there is no needle roller, punctures can be made with a regular awl. The distance between them is about 1 cm. They are made only from the side where the part will be bent. After a while (after about 1-1.5 hours), the gypsum soaks and the strip bends quite easily. It is better to bend it on a wooden or plasterboard template. After drying, it becomes hard again.
- Plasterboard is putty and the arch is made at your discretion.
Arches configurations
The arch in the house gives the rooms a certain personality. Configurations and forms arched openings there are many. Let's consider some of them:

- The classic version is suitable for rooms with a height of 3 m or more. A regular-shaped arch has a bending radius of 45 cm or more. If you add it to the height of the doorway, then the total height of the room may simply not be enough.
- The Art Nouveau arch is often erected in typical apartments. Its radius exceeds the width of the doorway, so corners remain between the vertical elements and the arc. They can be made sharp or rounded.
- Romantic style - a variant of the arch for large openings. A horizontal insert can be located between the corners with rounding, it can be installed at an angle.
The configuration of the arch depends on the desire and aesthetic taste of the owner of the dwelling. The arched opening can be wavy, polygonal, backlit, with different niches and shelves with stained-glass windows and so on.
Materials for equipping arches
An arched opening can be made from monolithic concrete, plastic, brick, metal, wood, chipboard, fiberboard, plywood, plasterboard and other materials. When using bricks, concrete or stone, take their weight into account. For such structures, you may need a special foundation and reinforcing elements to be connected to the walls.

Metal is a material that fits in with any style. But not every metal is suitable for these purposes. Option from of stainless steel is very expensive. Galvanized iron in indoor areas does not look. It is not easy to make complex shapes out of metal.
Wood is a beautiful natural material. It practically does not require additional finishing.
Plasterboard, fiberboard and chipboard are best processed and allow you to make arches of any shape. These Construction Materials can be finished with plaster, painted, covered with a layer of decorative or ordinary plaster, paste over with wallpaper, revet with decorative stone.
Plastic is a material that is easy to process. Plastic structures do not require additional processing and finishing.
For the decoration of arches are sold and ready-made structures from different materials.

- The appearance of the arch should correspond to the general design of the room. Each side of the opening can be designed differently.
- Any work on the construction of arched openings begins with dismantling the door frame.
- For convenience and speeding up the markup process, it is recommended to use the template in life size... It can be made from cardboard.
- When constructing curved frame elements from metal profiles, slots are made on them, which allow the workpiece to be bent. The slots are made in increments of about 5 cm.
- For work, a drill or perforator, a hammer, iron scissors and a hacksaw are usually used. Sometimes you may need other tools.
- The frame is attached 10-12 mm deep into the doorway so that the drywall attached to it is flush with the wall after plastering.
- The assembled structure is treated with sandpaper and putty. You can cover surfaces and corners with fiberglass mesh.
Once upon a time, only a professional could make an arch. This was before the advent of drywall. Now even a beginner can make an arch from drywall. You don't need a special tool for this, the technology itself is simple and straightforward - just follow our instructions.
Where to begin
The most common arches simple forms- parts of a circle or oval. They are best suited for most traditional interior styles, where they are welcome correct forms and symmetry. In addition, they are easiest to do with your own hands.
 1. Classic rounded arch. 2. Modern. 3. Romance. 4. Ellipse. 5. Trapezoid. 6. Semi-arch
But first you need to decide whether the height of the vault will be sufficient. And if for a niche in the wall dimensions do not play a special role, then for the passage between rooms, the ratio of the width of the arch and the distance from the floor to the point of conjugation of the arch with the wall of the opening means a lot.
 The wider the opening in which the arch is formed, the greater the bending radius will be required so that the shape of the arch is proportional
Usually they are guided by a simple ratio of a standard interior door - 80-100 cm wide by 200 cm high. That is, in the plane of the opening, taking into account the arch, it should be inscribed in " pure form»A rectangle of this size. Following this rule, you can determine that the width of the opening:
- 100 cm corresponds to the height of the lower points of the arch about two meters;
- 200 cm - about 180 cm;
- 300 cm - about 160 cm.
It follows from this that if the arch is made where the standard interior door, then the height of the opening will have to be increased.

The easiest way is to arrange an arch in a new place during redevelopment, when the interior partitions are re-installed. And here it is already necessary to remember the recommended distance from the top point of the arch to the ceiling - usually it is 40-60 cm. Often the height of the ceilings does not allow "inscribing" the arch in accordance with this rule, and this point is raised a little higher. But even in this case, you should not reduce the clearance to a ceiling level of less than 30 cm.
After the approximate values for the mating points with the opening and for the height of the vault have been established, the arch in the opening can be modeled from improvised means and make sure that it matches the general design.
 Convenient to use special plastic corner for arches, which will ultimately be used for finishing the opening
One of simple ways modeling is the use of a long strip of flexible material as a template, for example, plastic skirting board with hard edges. The skirting board is applied with the edges at the lower points arched opening, bend to the height of the arch, if necessary, change the shape of the arch by adjusting the degree of bending. Mark the points of conjugation of the arch with the opening and put the appropriate marks on the plinth.
Plasterboard blanks
For the walls of the arch, you need to cut out two rectangles from the gypsum board. The dimensions of the workpiece are the width of the opening and the distance from the mating point of the arch in the opening to the overlap of the opening itself (or to the ceiling for new partitions).

Then, on one of the blanks, using a plinth, the shape of the arch is modeled. To do this, aligning one of the marks on the plinth with the corner of the workpiece, it is bent until the second mark is aligned in the corner of the workpiece opposite in width. Draw an arc on the workpiece with a pencil and cut out the first wall. And already it will serve as a template for cutting out the second wall.
To get a sector along the radius, it is better to use an awl, a nail and a pencil tied with a thread or rope. The length of the thread from pencil to nail will determine the radius of the sector.
 L is the width of the opening, H is the height of the arch, R is the radius of the sector, D is the stock of material equal to the thickness of the finishing of the ends of the opening
If an ellipse is needed, then two nails are fixed on the workpiece under the arch along the long side, retreating the same distance from both sides by about 10-15 cm.A thread is tied to the nails so that it sags freely, and when pulled along the edge of the sheet it reaches its edge ... The pencil is wound by the thread and the shape of the arch is outlined.
For the arch of the arch, you can use a strip of ceiling gypsum board (it is thinner, only 9.5 mm), but the remainder of a standard sheet is also suitable, since with a small width of the strip it is not difficult to give it the required shape. The size of the blank for the arch in length is equal to the distance between the marks on the plinth, and in width - to the thickness of the wall in the opening. The narrow sides of the workpiece are cut at the ends along one side of the corner so that the arch fits more tightly at the ends of the walls of the opening.
Forming the frame of the arch
The supporting frame for the walls is usually made of a metal rack profile. Depending on the materials of the partition and its thickness, the profile width may vary.
So if the arch is mounted in an opening where the walls are made of gypsum plasterboard, then the same rack-mount CW profiles are used that are in supporting structure... In this case, the profiles are fixed in the opening with self-tapping screws for metal.

For walls made of bricks, building blocks (gas or foam concrete, gypsum), monolithic concrete, the width of the rack profile is selected individually. It is often easier to use a double frame (for each side of the arch) from a narrow CW profile with a 50 mm back, than to select a wide profile for a single frame. For fastening to the wall, dowels are used, and for each material they select their own type of fastener. If the frame is mounted from a narrow profile, holes for the dowel are drilled at an angle so that the edge of the opening does not crumble.

For side posts, the profiles must have a length equal to the distance from the overlap of the opening to the mating points with the arch. Since the arch "fits" in the opening to the partition at an angle less than 90 °, the lower corners of the profile are cut so that they do not protrude beyond the edge of the walls of the arch.

If the frame is mounted in a plasterboard partition, then you can clearly see how it must be fixed so that the arch is flush with the wall surface.
For partitions made of other materials, when attaching the frame, it is necessary to retreat from the edge of the wall at a distance equal to the thickness of the gypsum board plus the thickness of the finish (and this is at least 1-2 mm per layer of putty for wallpapering or painting).

If the wall has a layer decorative plaster or lined wall panels, then the fastening of the frame must pass to the main material of the wall so that the walls of the arch are in the same plane with the surface of the partition itself, and not its decorative finishing... This rule is followed on each side of the arch.
Arch installation
The walls of the arch are fastened with self-tapping screws with a distance between the attachment points from 15 to 25 cm, but at least three points on each side. Distance from corner to each extreme point the attachment should be within 5-10 cm, and the attachment line should be at a distance of 15-20 mm from the edge of the arch wall.
 If a built-in backlight is provided in the arch, then the wires should be laid in advance, leaving leads or loops at least 15 cm long
After both walls are fixed, two strips of an arched profile are screwed to them from the inside through drywall to fasten the arch. If there is no arched profile, then it is made from a CD profile, symmetrically cutting wedges on the sides at a distance of 4-5 cm from each other.

To bend the strip of the workpiece with an arc, it is moistened with a sponge on both sides before installation. Then, on one side, they are rolled with a needle roller (another method is to prick with an awl over the entire surface by 1/3 of the sheet thickness) and once again moistened only along the perforated side. They are placed on the floor at an angle to it and the wall. When the workpiece begins to bend under its own weight, it is screwed into place to the arched profiles.

Finishing works
The final stage begins when the vault is dry:
- the surface of the drywall is primed;
- the seams and joints with the wall are reinforced with a serpentine, and the ribs of the arch - with a plastic perforated corner;
- putty, rubbing the attachment points, seams and joints;
- Angles at the ribs are "taken out";
- dry and grind.

The arch is ready. You can start decorative finishing.

When starting to renovate an apartment or house, people strive to make their home as comfortable, stylish and elegant as possible. One of the most popular design ideas is the design doorway in the form of a semicircular arch. Having studied the technology, it is quite possible to make an arch from gypsum plasterboard with your own hands.
Using an arched structure, you can influence the design of the entire environment and set the tone for the arrangement of the entire interior.

Arched structures are used not only for decoration doorways, but also for the zonal division of the corridor. In this article, you will learn how to make an arch from gypsum plasterboard with your own hands.

Necessary tools and material
From the tools you will need a screwdriver, tape measure, construction square, pencil, spatula, grater, container, knife, sponge, drill, jigsaw, metal scissors.
Draw the outline of the arch on the drywall. To draw the upper part of the arched structure, use a homemade compass from a self-tapping screw screwed into drywall and a thread with a pencil tied to it

The longer the thread is, the larger the radius of the arc will be. Here you have the opportunity to experiment until you get the arch shape you want.
The blade of the tool must cut through the material strictly according to the markings - the quality of the arch directly depends on this. Next, start creating an arched frame. It can be metal or wood. Both options have their merits: aluminum profile it is characterized by evenness and lightness, and the wood is distinguished by great strength.

If you have a wall of concrete, then you first need to make holes with a drill, insert dowels into them, and only then screw in the screws.

Then, after attaching all the profiles to the wall, start the installation of the gypsum board. Installation of sheets is done using a screwdriver. The size of the screws depends on the thickness of the drywall.
Secure the curved aluminum profile to the edge of the plasterboard. This will increase the rigidity of the structure. First, attach both ends of the curved rail to metal frame and then screw to it drywall sheets... Self-tapping screws need to be screwed in in increments of 0.1-0.15 m.


Mount the perpendicular sections of the profile to connect the side walls of the arched structure with each other.

Secure the lower arcuate arch section. Using a tape measure, measure the length and width of the arc. Cut the appropriate piece out of the plasterboard. Attach it to the bottom of the arch, bending gently to shape.

The edges of the plasterboard rectangle should be flush with the walls of the arch. Secure the section with self-tapping screws on both sides of the arc. Read from the center of the arch.

Inspect the resulting structure and remove minor defects. Proceed to finishing... Tape the edges of the plasterboard with fiberglass mesh or paper tape.

Apply putty (at least 3 coats). Sand thoroughly with a trowel. The arch is ready. It remains only to paint it.


Varieties of arches
Exists different types drywall arches. They usually differ in the configuration of the top, and in some cases in the way they are connected to the vertical segments.
The photo of drywall arches shows that they are usually divided into six types:
- Classic.
- Modern.
- Romance.
- Ellipse.
- Trapezium.
- Portal.

The semi-arch is also distinguished separately.

It is not so difficult to make and mount an arched structure yourself. You just need to study the technology and choose suitable design drywall arches. We wish you success.

Photo of a drywall arch


 How to make a boiler with your own hands from improvised means?
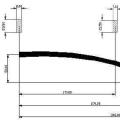 How to make a crossbow: throwing an office battle!
 What to do if neighbors steal electricity What to do if electricity is stolen from a house