Interior decoration of walls under brick with your own hands. Decorative brick laying DIY imitation brick wall in the apartment
They emphasize the naturalness and nobility of design. However, boast of availability this Wall Brick B. own apartment Maybe a rare lucky man.
What to do adherents like this design? For them, several ways of finishing walls are invented, allowing to reproduce the color and texture of natural building material. Everything available options We looked at the imitation of brick masonry in our article.
What options for creating a brick surface are available to us?
Issue concrete base In the form of a wall of antique bricks in several ways. The easiest is the use of finished panels for interior decoration. They are made of plastic and have the type of square, the front side of which is decorated under the real brick.
This finish is performed quickly, it is acceptable, but also looks not very realistic. In addition, not every interior is the presence of artificial materials.
If you want to make a more realistic brickwork imitation, use one of the following types of finishes:
- tile;
- stucco;
- putty;
- cardboard;
- styrofoam;
- wallpaper;
- paint.
The choice is quite diverse. Immediately stop at some option is impossible. If you are not too limited by the budget, give preference to the finished tiles under the brick. In cases where you need to upgrade the interior with a minimum cost, use sweater materials. For such work, it will take a long time, but the result will be sure to please.
Consider the technology of using each method for creating a brickwork imitation with your own hands.
Tile for decoration walls
In the construction market, you can purchase several types of tiles with imitation of bricks. It can be ceramic products, flexible elements and squares from plaster.

Ceramic finish Traditional. Its analogue can be found in almost every bathroom. It has one drawback - glossy shine. This allows you to distinguish the wall from this masonry. If you prefer the finished option, consider the use of clinker tiles for ancient brick. She repeats all irregularities natural materialWhat makes the surface very similar to the original.

Flexible elements can also be an excellent choice. Such tiles consist of a PVC base, a layer of fiberglass and polyurethane coating. This option is wear-resistant and easy to use.
The most popular material for imitation of brickwork is considered a gypsum brick. It is distinguished by a light weight rich color gamut, affordable cost and ease of installation. You can even make such a cladding yourself. In this case, the costs will be minimized.
Method for creating gypsum bricks
For the manufacture of bricks you will need a special form and gypsum mix. Capacity can be purchased at any construction market. It is represented in the form of a square shape, the bottom of which is decorated in the form of reliefs.

The manufacturing process is divided into 3 stages:
- Prepare a form to work. Lubricate it with soap solution or vaseline.
- Prepare the solution. In the dry mixture, gradually pour water until the liquid acquires the viscosity of the fatty sour cream.
- Fill the mixture into the mold. The thickness of the layer of the solution corresponds to the desired thickness of the brick. For the thinnest products, 5 mm is enough, but such a finish will break more often. If you make bricks very thick, then you will need more culforal mixture to fill the seams.
- After half an hour, check the density of the solution. If products dried, gently turn the shape and get the finished material.
To imitate brick masonry on the wall looked realistic, every facing element cover paint. In some cases, several treatments may be required.
How to make a wall with bricks from gypsum?
The technology of cladding walls with tile under the brick consists of the stages of the surface markup, the masonry and grouting of the seams. First, take the wall at the bottom of the wall. Take it over to lay out the first row. Between adjacent elements, leave a gap for seam design.

As an adhesive composition, you can use special glue for plaster and even liquid nails. Start the second row from half the product. So the imitation of brickwork will be performed in a checker order, which will give the wall a natural appearance.
Alternating rows, lick the entire surface. Upon completion of work, fill the seams with a grouting mixture of the appropriate color. If bricks are stacked in the kitchen, cover the layer of transparent varnish. It will protect the product from moisture.
Stencils and forms to work with plaster
Durable I. beautiful finish In the form of bricks you can create with ordinary plaster. However, for such works, you will need templates and other aids.
Today, in any store you can buy stencils for imitation of brickwork. It is represented in the form of a kind of grid that helps create seams between bricks. It is placed on the wall, the plaster is applied on top, after which the stencil is removed.

Also for this purpose you can use paper tape or reinforced ribbon. It is pre-glued onto the wall in places where the seams between bricks are planned.
Preparation of the surface before work
Creating a brickwork imitation for home outside or indoors begins with surface preparation. The walls are aligned, the old cladding is removed.
If there are bugs on the basis, they are knocked down. Wpadins are embarrassed by putty. When bricks are stacked on old paint, in the wall make notches. Surfaces are minced several times. For this purpose fit universal means based on acrylic.
After alignment, you can proceed to decorative facing.
How to create a brick masonry imitation from plaster?
If you have chosen the finished stencil for decorating the wall, secure it on the surface. In the case of the use of Scotch, the basis is pre-searched. Make it as follows:
- Every 7.5 cm set the points from one edge of the wall (moving from the floor to the ceiling). Similarly, make marks on the other edge. Swipe straight lines between opposite points.
- On top of the lines cover paper tape. Optimal thickness Ribbons - 1.5 cm. Horizontal bands Check the level.
- Every 25 cm proof vertical lines. At the same time, in the second strip, place the first mark after 12.5 cm. So you will have a staggered laying.
After marking, you can make a brickwork imitation. Do with your own hands it is not difficult to do it. Simply mix the solution, following the instructions from the manufacturer, then apply plaster using cells. The thickness of the layer is 3-5 mm.

After leveling the solution, start pulling the ends of the scotch. Pay attention to the fact that the paper tape quickly turns, so act quickly. After removing the tape on the wall, a clear drawing of the seams is drawn. Thus, on the surface, bricks will appear from plaster. If the edges turned out to be sharp, lay them emery paper.
Staining of the surface of plaster
After drying, cover the bricks of paint suitable color. Latex, acrylic and water-emulsion formulations can be used.
Seams between bricks color in a separate color. For this purpose, use a thin brush and contrast paint. White shades are most often used. So imitation of brickwork in the interior looks spectacular and natural.

If you do not want to spend time on staining, add the kel immediately to the plaster mix. But at the same time, knead the solution at once on the entire wall, otherwise the shade of different parties may differ.
Imitation of putty bricks
Create similarity brick wall It is possible from putty. However, in this case, the depth of the seams will be minimal. Technology of conducting work is similar to the principle of working with plaster. First mark up, then the mixture is applied.

You can also use a special roller to imitate brickwork. It helps to create a stone texture and designate the seams. All you need - put on the wall working mixture And walk through the entire surface with the appropriate tool. After drying the composition, apply suitable paint to the decorative layer and draw the seams between the bricks.
Decorating the wall using foam
Affordable foam can be used as a material for creating bricks. For this purpose are used as large listsand small ceiling tiles.
To begin with, draw straight lines on a sheet every 70 mm. Draw in them vertical strips in 170 mm increments. Cut the plate with a construction knife along the lines. So you will have optimal bricks.

If you need a smooth wall, immediately fix the items on the basis. To create a tile under the vintage brick, the front of the products you need to make a curve.
Finished elements fasten on a pre-trunk wall. To do this, you can use PVA and liquid nails glue. Cover the paint finished cladding and separate seams separately.
Imitation of cardboard bricks
Create a spectacular finish in the form of a brick wall can be from an ordinary corrugation. For this, any boxes from under household appliances are suitable, building materials And other things.

Imitation is created as follows:
- Distribute bricks on the cardboard the required size. It is better to take the basis of the dimensional building material.
- With the help of a stationery knife and ruler, cut the sheet by the specified markup. So you will receive rectangular elements.
- Prepare the wall. Clean it from pollution, old materials, grate irregularities.
- Process the base of the primer.
- Make marking on the wall. At the same time, consider the sizes of your bricks. LINDS LINKS construction level.
- On the wrong side of the bricks from the cardboard, apply PVA glue. Tightly press the rectangular item to the wall. In accordance with the markup, lock on all the bricks on the basis.
- Apply a layer of PVA to the sealed wall. Position over bricks paper napkin. At the same time, the minor folds do not need. Tightly press the napkins to the cardboard, sell them deep into the places of seams.
- Once again, apply glue on the surface and fix the second layer of napkins on it. Well press them to the wall. Leave the surface to dry.
Thus, you will have a relief imitation of brick masonry. From putty, plaster and plaster finish turns out more durable, however, the method using cardboard is the fastest and economical.

After drying the glue, you can paint the surface in any color. As in all previous versions, the seams are drawn up with bright paint with a thin brush. To extend the life of such a wall, cover the layer of colorless varnish. He will protect paper from negative impact moisture and make a decorative layer more durable.
conclusions
The popularity of finishing with the imitation of the brick wall contributed to the creation of many options for its manufacture. This allows you to choose the option that will arrange any homeowner. However, remember this method of finishing requires careful preparation of the foundation.
Brick masonry Receive only smooth walls. In this case, it absolutely does not matter the cost of your chosen cladding. If errors were made during the installation process of expensive tiles, the final result will be worse than the best. At the same time, a cheap cardboard fixed on smooth wall, It will look much more attractive.
At all times, people sought to make their dwelling beautiful. A variety of finishing materials, unusual furniture, original structures Ceilings and much more allows you to give any room stylish and originality. But quite often the situation occurs when with a minimum of funds you want to get the most spectacular result. It is to this option that the wall decoration is plaster under the brick.


Features
The brick wall fits well in almost any interior, as this is one of the most ancient building materials. Bled, such walls are perfectly combined with Provence styles, Shebbi-Chic. Red and brown brick are an integral part of the Loft style, and gray and beige - wonderfully complement the modern urban design of kitchens, bedrooms and holls.
It is the design of the premises with the help of bricks and its imitation brings together different interior stylesSo, it is perfectly combined with modern metal parts of the interior, and with antique wood products.


Finish "under the brick" in the house is always a bright, fresh solution that attracts views. And even if there is no brick wall in the house, there will be no good work to create it with your own hands with the help of finishing from plaster.

Materials
Stucco is different from others finishing materials Durability and excellent external data, a variety of textures, "naturalness" and excellent heat and sound insulation qualities. In addition, it is easy to care and allows you to further update the surfaces by staining.
There are many types of plaster.So, the mineral plaster of a special texture will make the wall rough. Its, by the way, can be used in external work, as well as on balconies and loggias. Venetian plaster is very popular in latelyBut for imitation of brickwork, it is not used - this is the knelling material, which includes marble flour.


Stucco is sold in construction stores in a dry form.At the heart of any plaster - binding materials, and the role of the filler can play sand, stone crumb, fibrous additives, thickeners and paint. The most beautiful imitation of brickwork is obtained from gypsum plaster and stucco "Graffito", characterized by large decorativeness. In addition to decoration of walls, with the help of "graffito" design fireplaces, doorways, walls on an open loggia country house etc.
 Stucco "Graffito"
 Plaster plaster
If you are preparing plaster from a dry mixture, then its consistency should resemble a thick sour cream, and you should not cook too much mixture, because otherwise the solution will grab and it will not be applied.
For the convenience of transferring the drawing on the plaster, you can make the model of the end of the brick.It is perfect for these purposes a dense cardboard or linoleum. On the brick, you need to designate the seams, making an indent to the entire perimeter of the workpiece (from the front side), and also designate another central seam - in the middle. The model of the brick is used when applying the pattern of masonry on the wall and further sinking the drawing of the scotch. Start the markup is best from the top corner of the wall, simply bypassing the model with a pencil.


Attention! If large spaces have to be placed (trading room or cafe room), then it is worth thinking about saving materials.
This will help the application of plaster with a machinery manner. The mixture for mechanical shockting is cheaper than standard options. In addition, work using modern equipment Save time and material to spend less than 20-25%.


Application technology
Before starting work on the design of the walls of the plaster "under the brick", the surface must be pre-aligned with the primer, get rid of all curvatures and drops of more than two centimeters. It is necessary to make it necessary, because the plastering mixture will fall in a layer of no more than 2 cm, and serious curvatures will be noticeable. It is important to remember that various primer needs for walls of concrete or from wood. After preparatory work Completed, it is better to wait 2-3 days to make the applied composition completely dry. After you can start plastering.
For the image of bricks, plaster plaster is best.It has the ease of application, the lack of "shrinkage" (does not change after drying) and ecology. The mixture is applied with a layer of approximately 1-2 cm, while the total consumption of plaster will be 8-10 kg per 1 kV. m. You should not mix gypsum plaster with some other substances, for example, cement glue. This can lead to cracks and even disposal of plaster.


The imitation of brickwork using the plastering layer can be performed in two ways: apply seams with a scraper or use greasy tape for this purpose. For applying seams, the scraper will need spatulas, wide and narrow. Wide Used for Application and Leveling plaster mixand narrow will need to adjust the corners and small depressions. It will take a scraper, but its role can be performed by a conventional chisel or steel plate, as well as a rule of 1.5 to 1.8 m long and the extension used in stone work.
The plastering mixture is applied with a wide spatula, then smoothed.The seams are placed after the solution is reduced, but has not yet grabbed finally. For markings to the wall, you need to attach a rule and read the seams. Width can range from 5 to 10 mm, we recommend that you avoid too wide and deep seams when this method Application.
In the markup it is better to navigate standard Brick and use a predetermined model from dense cardboard or linoleum.


After the seams are fixed, you can proceed to elaborate, that is, directly applying the pattern. You need to start with long horizontal seams, spending a scraper under them and removing the "superfluous", and then begin short vertical. The recommended seam depth is 3-5 mm, and you can give a beautiful shape, working with the extender.
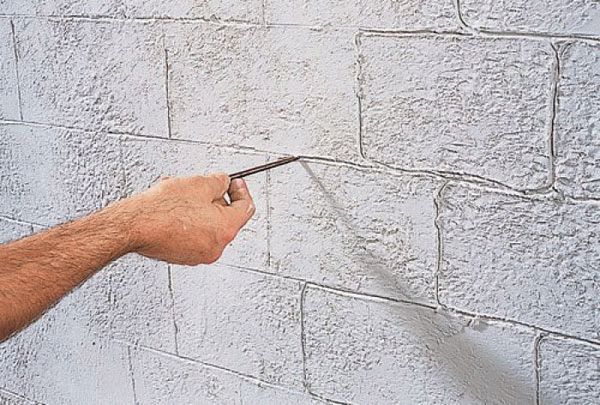
Malyary Scotch - a popular seam image toolAlthough this method and more time consuming than the first one. Initially, the walls are ground, and then paint the future seams (can be ordinary pencil). The lines impose a greater tape, and its ends should go beyond the walls being processed. Scotch should be glued to the mustache.


Further, the entire space of the wall is covered with plaster along with seams and scotch, and rolls up. You can use a spatula, and you can put the plaster with your hands, it turns out even more naturally. Just do it preferably in latex gloves. It is necessary, without waiting for the drying of the plaster, pull in the ends of the tape and remove it along with the part of the plaster. If the scotch still cut off, you can use any sharp object to free his tip.
The main problem is that the malarious tape is not always neatly separated from the plastered surface.It can be removed more than necessary, part of the solution or rush. Tightening the work is not worth it, since the rapid drying of the plaster plaster will not give carefully to extract the tape. The edges of the bricks after removing the painting material must be additionally handled with a spatula and extender. For those who work with scotch seems too complicated, there is an option to use ready-made stencils. They are sold in large building supermarkets.


Brickwork imitation can be very different. Two common options - gypsum tile, imitating brickwork, and drawing on raw plaster. If everything is clear with the first option, as it is very difficult to spoil the wall, the second option is very difficult, then the second option causes many questions. Choosing this technique, you need to understand how to apply the picture neatly and what kind of image as simple as possible. No need to be afraid of these finishing work "They are simple, do not take a lot of time and even let it save."


An exercise on drawing brick masonry on the plaster will deliver joy and pleasure not only in the process, but also after the completion of the work, if:
- the seam lines will be slightly twisted: the perfectly smooth brick wall is extremely found, so small errors in the outlines will create the illusion of real brickwork;
- color the wall in natural color (beige, milky white), and the seams make darker.
- experiment with the texture and give bricks roughness, as well as to further work out the edges, making it from more noticeable, protruding;


- brick imitation will be processed by "under ancient" or painted accordingly;
- bricks will be different size or long, with natural notches or chips;
- make the faces more smooth - the usual wet sponge will help in this, and the residues of the solution on the edges can be removed with a dry cloth.


Casting beauty and accuracy will also help staining, and it is possible to use paint to apply paint, both brush and a spray gun.
Beautiful examples in the interior
- Imitation of brick masonry looks great in any residential room. If you need to distinguish the zones, for example, to separate the lounge from the space for a rest, the wall with the imitation of brickwork will perfectly cope with such a task.
- For brick texture image, you can use different materials - Natural sponge, metal washcloth washing, brush for shoes and much more. When imprinted on a wet plaster, a natural sponge turns out a very beautiful, natural pattern of texture.
- So that the finish looked naturally, the imitation is painted in brown-brown color, and the seams can be made lighter or darker. The decoration "under the brick" looks harmoniously in the interiors of modern urban styles loft. Distinguish from the real brick wall a high-quality imitation is almost impossible!

Brick imitation for interior finishes Apartments and houses allows you to make interior unique.
You can arrange the walls with different types of bricks, more precisely from different material.
Imitation of brickwork with their own hands is carried out simply, and the main methods of the design of your apartment will be considered in an innovative way.
Surface preparation
Preparatory stage, before separating the walls of a stone - an important process. Bricks need to put smoothly, applying certain tools and devices, for example, plumbing and level. The laying of material on the wall is carried out only in the horizontal plane, extremely rarely, brick is put vertically. The seams between the bricks are made the same so that the size was one width everywhere. The brick wall itself should not be overwhelmed, in other words perfectly smooth. This often arises difficulties.
First you need to align the walls to lay out an artificial brick on them. For this, the old coating is removed from the walls. If the walls are concrete, from a brick that old with large quantity defects, as well as from other building materials, are held plastering. But shuttering is not always convenient to use, some simply will not be able to make a wall for the brick.
To accelerate the preparation of walls under artificial brick, it is recommended to use a simpler preparation method - installation of plasterboard or plywood. Farm plasterboard sheet You can glue to any wall or on the frame. With the help of GLC, the alignment of the walls will be rapidly, and the plane is ideal for brickwork. When the wall under the artificial brick will be ready, you can move to the immediate design of the apartment or country house.
Bricks from wood
Bricks on the walls can be made of wood. Step-by-step instructing following:
- Purchase of the material is carried out, in this case, a tree can be used, a chipboard, to create artificial bricks.
- Wooden material should be placed on the desired rectangular pieces, like brick, and cut in size. All parts should be made the same, cardboard is used as a layout.
- The front part of each brick is polished by sandpaper.

- Next, the markup is applied to the wall to get the desired drawing for masonry brick.
- Wooden bricks are laid on the markup. The beginning is carried out from the bottom of the wall, in opposite corners. Each brick is installed with the same interval from each other, so that the seam thickness was correct. Optimal size is 2-4 cm.
- It is necessary to glue to silicone or glue. At the end of the work, a transparent varnish or paint is used, you can apply a gouache if the masonry of the brick was carried out in the children's room. You can decorate with a canister or other paints. To create a specific drawing, it is better to use stencil.

The inner view of such brick will be excellent. Facing material It is cheap, while decorative brick Eco-friendly and is distinguished by unusually long-term operation. Outside, of course, use this brick for walls is not recommended.
Decorative plaster bricks
You can imitate brick using gypsum material. Make a gypsum brick is easy, and the result will be similar to what construction sites are offered. The work is carried out in stages, all the details are presented in the table:
|
Stages of creation: |
Description: |
|---|---|
| Creating a template, forms: | For decoration you need to make bricks for walls on the walls. Brick thickness should be 5-20 mm. If you make a template less, then the brick will easily break, and very thick bricks for the walls, require an increased consumption of plaster and putty for grouting. In addition, a large artificial brick will take the square, and square meters Premises will reduce. |
| Preparation of the mixture for fill: | The solution is made of dry gypsum, which is divorced in water to the consistency of sour cream and plasticizer (PVA glue) is added. The form for brick is lubricated with a solution of soap so that the fence of artificial bricks for the walls was light. After that, the fill of the solution is carried out. The mixture is leveling a ruler and left for half an hour for pouring. Then the form turns over and gets every brick. Artificial material for walls must be painted. Painting is carried out in 2-3 layers using acrylic paints, and varnish can be applied. |
| Facing wall bricks: | Make a brick wall imitation with your own hands. The wall is placed on the desired area. The profile is installed below, as the starting line, from where work will be started. The casing is carried out with tile glue that you can buy in any store. The finish of the first row is carried out with the same seams, and then the installation of bricks on the walls is carried out in the chess sequence. Tile glue is applied with a toothed spatula. |
You can create a special effect with the help of the edges of the edges of artificial brick, due to this edge there will be torn and uneven, on the wall such design looks beautiful. Keep the decor should be about 3 days, it all depends on the glue used, the instruction can be read on the package.
Tip! Often, a panel of plastic is used to create artificial bricks for the walls, make tiles of foam, clay. Finishing brick, you can apply in bathrooms, except for gypsum, as well as in the corridor or as an outer material for the facade.
Imitation of brickwork (video)
Visually familiarize yourself with the process of creating an artificial laying stone on the wall on the wall, in which the master class is demonstrated:
Formation of seams using painting scotch
This method allows you to imitate the walls of the stone, and work can be carried out with your own hands, directly to the concrete. All major defects are removed on the wall at once, putting a putty in gaps and cracks, pits. In this case, there is no need to smooth the surface to the perfect state, which is great for giving. The underlying condition is to remove strong differences. For work, it will be necessary to use plaster, but it can be replaced with a color putty.

The masonry simulation process is to use paper painting tapes, the ribbon width is necessary such that it will repeat the seam of masonry. Detailed process This works:
- The walls are made on the wall, which will mean lines of seams vertically and horizontal. Vertical seams are shoe in each row of half an artificial finishing material.
- Strips need to draw paint that the color resembles a conventional solution. To do this, it is better not to use gouache, but replace paint with other types.
- If the paint is dried, the stripes of the ribbon horizontally glue, after which the vertical strips are made. Having made the process differently, it will be more complicated to spare the greampy tape.
- The surface needs to be plastering or putty.

- While the solution is not yet dry, everything is smoothed to the desired state. Some prefer perfect evenness, others want to see wall panels Textured.
- After a slight drying of the solution, it is necessary to remove the scotch from the walls, pulling it out of the edges.
- When everything is completely dry, you can build the desired drawing, make stucco, decorate the surface under ancient or choose another finishing finish option.
Tip! Wall under the brick with your own hands will get the most realistic if the plaster is painted into light tones, because after complete drying the color becomes darker. Such a way is suitable if you need to build a masonry on the chimney pipe, oven. The option is suitable to decorate the kitchen, hallway, windows or doorway door. This method is many times cheaper than applying a clinker stone.
Decorative Facing Finish
When the artificial material becomes durable on the wall surface, then the outer sides can be decorated. For this, a sponge or sandpaper is used, and the upper part, artificial image slightly smoothes. This procedure can be missed, if desired. Finish finish The artificial wall is to remove the extra parts, the remainder of plaster, which spoils the general picture.
Working depends on the materials used. If the wall is artificial material It turned out white and without color, then you need to paint it. Always try to recreate the real stone material, although you can paint in any color that complement the interior design.

To create an unusual effect, the backlight is not needed, during the painting of the artificial wall you need to apply the dye to the material, after a couple of minutes, take the use of another color. Some artificial stones You can paint separately, due to which the styling of the material will stand out, and the house will become a cozy and living room, emphasizing the style.
Based on the style of the house, namely the lighting, color gamut gender, ceiling and other parts, the impressions of the wall of artificial masonry will not be separate, but cumulative. If furniture, niche in the wall, wallpaper, or a fountain plate will not fall into color or by material, then artificial masonry will not complement the design of the house. Artificial masonry is recommended to use in the style of Gothic or Loft, it will be the most optimal option. Some after the artificial masonry wall can draw a picture on the surface or make a bas-relief, to impart effect.
Imitation of a brick wall with your own hands with a photo
Selecting the material for artificial masonry must be borne in mind that the interior in the house may not just change, but also be fringe. It is not recommended to use artificial stone laying on all walls, it is better to decorate individual parts of the walls or only 1-2 walls, on which the picture or clock is hanging. The rest of the walls are better to stick the roll of wallpaper or plastic panels.

Before artificial laying is performed, it will be necessary to fully visualize stone walls. Any of the presented materials can be used to decorate the walls. The presented methods are used not only for walls, but also for cladding certain items, for example, artificial masonry are made on furniture, vases. Patterns are created under the antique for retro styles, as in the photo:
It does not look great for the wall, but the selection of the opening of the artificial masonry, which can be on the door or window. The imitation of masonry on the wall is done, moving away from the standard technology, applying original solutions. Artificial laying of stone on the walls perfectly complements the kitchen, namely working area. Also, it is suitable for zoning premises to highlight certain places.
Photo gallery of finished work

Exist various options Imitation of brickwork with their own hands. They allow you to create a surface that will completely repeat the coating of the brick. This makes it possible to embody exclusive designer ideas In life, creating an interior that will be filled with beauty and comfort.
Imitation of the brick wall with your own hands is performed different ways. Some of them require the presence of the necessary skills, others - are practically ready options. Each method is suitable for a specific case.
Finished species
Currently exist that completely repeat the texture of the brick. The advantage of such products is the low cost and simplicity of laying, which varies depending on the type of product. The following options are highlighted:

All options have their advantages and disadvantages, but there are ways to make the imitation of brickwork - solely with their own hands.
Application of corrugated cardboard
The use of corrugated cardboard sheets is a fairly kind of way that makes it possible to create decorative surfaceBy spending for this minimum of materials. Work requires the following components:
- Directly cardboard. You can use boxes for household appliances. The main thing is that their density is not low.
- High-quality paper napkins (dense, not learned).
- PVA. To work, you need a large amount of glue.
- A handheld gun (filled with a terromem).
- Knife stationery, ruler and pencil.
- Paint and varnish. For the final stage of the finishes.
 Materials necessary for the manufacture of brick tabs from corrugated cardboard
 Tip! Thin cardboard - not the best decision. It will not allow creating the necessary texture. If there is no possibility to use a thicker material, then you can go for some trick. It lies in the fact that the fragments glued together to create the necessary thickness.
 To simulate brick masonry from corrugation, it is better to use dense material
 The technology is a sequence of actions:

Thus, it is possible to form decorative wall Under the brick do it yourself, which will not require large financial costs.
 Ready brickwork Corrugated cardboard
 Using a stencil and drawing pattern
This is a simple option that requires only extreme accuracy. The work is as follows:
- A layer of plaster is applied to the surface. Thickness should be more than 4-5 mm, otherwise it will not be expressive texture.
- Next, the stencil takes. It can be rubber or plastic.
- It is well wetted with water so that the main side does not stick to raw solution.
- Stencil is applied to the surface and pressed. It is necessary to remove it from the wall neatly, because with sharp movements you can remove part of the mixture.
- The procedure is repeated. It is important to take into account that horizontal lines should coincide. If you do not follow this, then fragmentary areas are obtained, unrelated.
- At the end, the imitation of brickwork is well ground and covered with wax. Suts are expanding. The surface is painted with acrylic paints.
On a note! To create a more interesting effect - the kel is added directly to the plaster. Then it is possible to create a game of shades, because the joints are painted in other options. Do not forget that if you paint the wall directly, then after drying the shade will be a little darker.
Brick wall with their own hands from fresh plaster can be obtained without using the stencil. Technology is as follows:
- On the surface there are lines that indicate the seams of brickwork. This is done a little arbitrary to achieve more naturalness.
- With the help of a narrow scraper - plaster removed. The joints are immediately rubbed with a dry brush. This will make it possible to form the relief, as well as smooth a little bricks.
- The finished wall is soaked and stained.
These methods allow you to decorate only the newly made layer of plaster. If after applying the plaster mortar, some time passed, and he managed to dry, then create a brick wall in the ways described above will not work.
Bricks on putty
This option is used when the idea of \u200b\u200bcreating a wall under the brick has come after some time after plastering. In this case, the putty is used to embodim it, which is pre-stained in the desired color.
 Wall "under the brick" from putty
 The general procedure of action is:
- The wall is well cleaned from dirt and dust. If necessary, degreased. Apply a layer of primer.
- On the surface there is a markup. It should repeat horizontal and vertical seams so that it is impected brickwork.
- The joints are crossed by the selected color and leave until complete drying.
- Next, paste the painter tape. Its strips should pass through the painted seams. This is done like this: first, horizontal lines are covered, and then the vertical (they should go to the previous one).
 Marking with a painting tape for brickwork
 - A thin layer of putty is applied to the surface. Immediately the necessary texture is formed, so the layer is made uneven. Can be used additional toolsSuppose to create relief.
- The mixture is left for a while, it should grasp. Now remove the scotch. This is done very quickly, because the segments are bonded. Putclone leaves to complete drying.

- The layer imitating the brick wall is additionally grinding, creating an original texture.
Thus, all the work is carried out exclusively with their own hands. It is possible to form an excellent decorative surface that will be an interior highlight. But you need to read that the question of how to make a brickwork imitation - has not only the technical side. It is much more important to correctly enter it into the decor of the room so that there is no excessive gravity, ill-impaired.
"What should we build a house? Draw - We will live! "
(Author unknown)
Still, the repair is the case primarily not household, creative)) I was all surprised - well, how can people do "kapitalk" in the whole apartment for three months? .. And now I understood - if there is just a task "just make repairs", Her decision is truly for such short time. However, as soon as a light taste of creativity and romanticism is mixed to the repair process, everything - writing gone!))
I'm just for the third year (after placing the room in a harsh classical style, and the kitchen - in the style of "Russified Provence"), finally decided - which I want to see the hallway. Loft-non-loft, but here is a brickwork - unconditional yes!
I estimated, I calculated what the "turns out" to lay out some of the walls with tiles under the brick ... and it was slandered.
And then she took spatulas and paints, and suffered - o-axis!)
***
First of all, it is necessary to measure the whole wall thoroughly (the wall has been pre-covered and progressed). Merila I am on the template:

The template "stole" from this beautiful video tutorial, but the system of highlights of the wall from it was not useful to me.
Simply, using the template and applying it into the right places, I drank a pencil, the horizontal and vertical bands were vertical - simply as it swings.


After the whole wall was thus drawn up, the future "seams" between the bricks stuck with scotch.
At first, the horizontal seams squeezed. Then, making a step "through one" to keep the drawing of brickwork, vertical.


If you use a tape with smooth edges when the tape is tape (for example, the isolate), then the seams between future bricks are smooth and it turns out.
Since in my case there was an idea to imitate old masonry, I used the creek for the core as currency scotching strips. Roded hands. Just carelessly broke the right strips and that's it.

Shavi clamp - the most tedious and nasty stage :)
After all the seams turned out to be sealed, started decoration.
For these purposes, I used the texture paint "Tex" (in the "OBI" five-liter bucket costs about 450 rubles.) Previously in "OIS" it was chloride into the most approximate to the brick color.
Already at home before the start of work on the decorated wall, experimented in a not yet renovated bathroom. In small volumes, different colorants, paints and impurities were added to small volumes of the clown texture paint. The task was to "felt" the desired color of the old brick. Well, read, of course :)

The results of these experiments evaluated only the next day - after the experimented area will finally dry and the "brick" will become as it will eventually be on the decorative wall. After all, it is no secret that any paint after drying changes the color, becoming lighter on the tone, or even a few. And I do not like such "surprises".
As a result, I stopped at the following combination: 5-6 incomplete spatulas of clown texture paint + 4-5 complete tablespoons of gray cement (in "Obi" - 50 rubles.).

I did not add any colors in this composition. Seryos, rubbing, volume, pebbles-inclusion, some can even be said the sophistication of the composition attached a poorly stirred cement.
After I was determined with the composition and color of the coating, started the finish itself. With a small spatula of uneven hillside layers, we apply the composition on the wall - right on the stuck paper tape seam.

After the composition is applied, but the coating is still wet (!!!) neatly adhering the edge of the scotch and drag for it. It breaks off from the wall, forming a drawing that simulates the laying seams. And because of the fact that my tape was torn unevenly, then the drawing of the seams also came out the cryption. What was required. As if this wall of the eyelids gave the shrinkage, and the "bricks" one hundred years weathered and destroyed.


I worked as sections - I personally seemed easier for me.


All: The whole wall is covered, all scotch is exhausted. "Bricks", due to the texture of the paint and adding cement, came out with bugish and pupils. Almost like real!)


I left my arts to dry up indefinitely - I needed time to determine the decoration of "bricks" and giving them a complete similarity with the laying.
After studying a huge amount, I made two conclusions:
- In old masonry bricks are never monophonic. Some necessarily darker, other lighter. Some - almost black, as if soot covered, other - as if burntown in the sun.
- Old Masonch Never without heighters.
The task from the first point decided quite simple. Taking as the basis of the paint of a juicy brick color, I mixed up an additional intensity with one or another intensity.
To give a lighter tone - white color (in "Obi" - about 100 rubles.)
To give a dark - in our own hooks, I found artistic bitumen (its use was not impressed by direct appointment, and therefore it was almost a year dust in the box).

A wide dry brush and sponge selectively tinted in brighter, then in more dark tones By basic color of texture paint.

And that's what came:


Firstly, a little blame. Secondly, this brightness and had to mucis, that is, the solution of the problem from the point two.
While I solved the question in my head - how to competently make it, so that they were as much as possible to natural, with their hands and engaged in the "sealing of the seams".
"Seam" was decided to smear the texture composition. For this, I simply fluid the remains of cement (to the state of the liquid sour cream) and added some white colora in it.

Gently, so as not to smear the "bricks", but at the same time I blur in the layers between the "masonry" also looked at old, painted the "seams" of a tough tassel.


So the wall looked at the end of this stage:


And with the heights of them, there was a real stall ... How to make them? Dry brush? Or sponge? White paint, only to highlight the structure? I tried (on the same experimental wall in the bath) for any, and I did not like it!
But now I know 100%: imitate the supreme dry brush and the paint can not, it looks caught !!!
Thanks to Andrey Volkov from Ufa - gave the most valuable advice: "The best zips on the masonry will turn out of the water + add white grout for tiles to it."
So I, in fact, did. In a jar with water, it was literally a little grouts, all this was shed, and a wide brush had horizontal watery divorces.


During the night, water drops evaporated, leaving small grouts, perfectly imitating real suits.
It turned out - excellent! Old, dirty :) and what to do: the wall of the century stood out!))


After artworks were completed, all the "masonry" covered with varnish. To not dust. Varnish used acrylic, applied with a regular sponge.


PS.To the greatest regret, the camera (as I did not try) could not convey true color.
Removed with an outbreak - "bricks" are too red that turn out. Although in fact they are not so bright. Gray cement and heels perfectly muffled paints.
Removed without an outbreak - everything is gray-gray ... And after all, I got a living, overflowing.
PPS I want to convey the flame hello to all chauvinists from the shop "Obi. White cottage, "where I was" lucky "to buy ... I didn't meet anything about the worst attitude towards my consultants! Even 15 years ago at the dawn of his highway in auto parts stores. Then on women, residents of car missions, of course, watched as a dirky and stupid blondes, but at least rusted not in the face and did the view that they were seriously understood that the aunt was required. I can notify with satisfaction that today in most auto-shops and services consultants to the ladies relate to already immutant patience and respect. Really rose above yourself.
Apparently all chauvinists moved to "Ob"))) not only that consultants from the department of the paint did not consider it necessary to answer not one of my question regarding the same paint "Tex" (like - "What is it, it's just for those Who understands! "), so also managed to discuss my humble person with each other without even going aside - well, what are these women climb with their idiotic questions? Anyway, not a horseman not disassembled! Which of the aunt master?)) ha ha ha!
Disgusting.
 Why you can not give icons
 Is it possible to give icons as a gift: Signs, the opinion of the Church
 A year ago left her husband, and now I do not know what to do