Flooring a soft roof. Technology laying up soft roofs from bituminous tiles: step-by-step instruction. Laying soft tile
Soft roofing includes rolled bitumen based materials, as well as a piece coating, an externally imitating tile. Soft roofs are widespread due to reasonable prices and the possibility of performing work from and to do it yourself. Another important plus is a small weight of soft roofs, thanks to which the load on the truck system and the foundation of the bath is significantly reduced.
It is worth choosing a type of soft roof, pushing out not only from the external design of the bath, but also from the angle of slope.
Rolled roofs
Laying rolled materials is most often produced on flat roofing and single-sided with a small slope. The roofs with a large bias are usually not covered with rolled materials, since the appearance of the bath will be non-primable.
| Material | Description |
|---|---|
| The most famous roll coating is the runneroid. It is glued to the base with bitumen mastic. The material is the maximum budget, simple in laying, but the service life of the roof from the regularoid does not exceed ten years. | |
| Ruberoid Film - a material that is characterized by better quality compared to its predecessor. A layer of bitumen is already applied to the baseline. The material during the installation is warmed with a burner and rolled into several layers. | |
| Gymelockeroid - Material with a fiberglass base, resistant to temperature differences and UV rays. A large or fine fraction is applied to the surface of the material. So, for example, the glassbreaker C-RK, which is placed by the upper layer, with the front side, has a sprinkle of a large fraction, and with an invalible shallow, similar to dust. In the glassberoid C-RF, which is also placed by the top layer, the sputtering of the scaly. And the oppression of the finest fraction on both sides of the C-PM glass gilder, which is placed by the lower layer of coating. The laying is made by the method of smearing or mechanical fixation of the material. The service life of the roofing of the glasskerberoid does not exceed 10-12 years. | |
| Membrane materials are the most modern of all of all of the above, differ in a much longer service life, high waterproofing properties. Membrane materials are not susceptible to climatic factors and the action of sunlight, durable mechanical, light and elastic. In addition, you can independently choose the shade of the material. |
Bituminous roofs
PC bituminous tile - economical material with high decorative and noise insulating properties.

Flexible Multilayer Tiles TechnoNIKOL SHINGLAS "Dragon Tooth"
The rich color palette of the shingles makes it possible to implement many designer decisions, create your own unique design of the roof.

Flexible Tile Tekhnonikol Shinglas "Modern Brix"
Soft gears of small size can be laid on the roof of any configurations, including tent and dome, while the amount of waste is always minimal. Caring for bituminous roof is not difficult - it should sometimes be cleaned of snow and accumulated foliage foliage. And the repair of the roof is performed as simple as possible and quickly - it is enough just to extract hardware and replace the defect element.

The top layer of bituminous tiles is the sprinkler of natural materials, such as basalt. The rough surface of the shingles allows you to delay the snow on the roof and prevents its avalanche. In addition, large springs ensures mechanical strength to the coating.

Flexible Tile Docke, Collection "Cologne"
Roofing should correspond to the quality of GOST 32806-2014.
Stacking can be done on your own, having a minimal set of tools and following the manual.
Prices for flexible bituminous tile
bituminous tile
Phased guide to laying bitumen soft tiles
Soft gears are laid only on a solid base, be sure to hard, dry. As a base, it is recommended to use plywood sheets of increased moisture resistance or OSP-3 thickness of 11 or 12 mm (for some type of tile, it is permissible to use slabs with a thickness of 9 mm). Recommended gabarits of plates of 1.25 x 2.5 m.

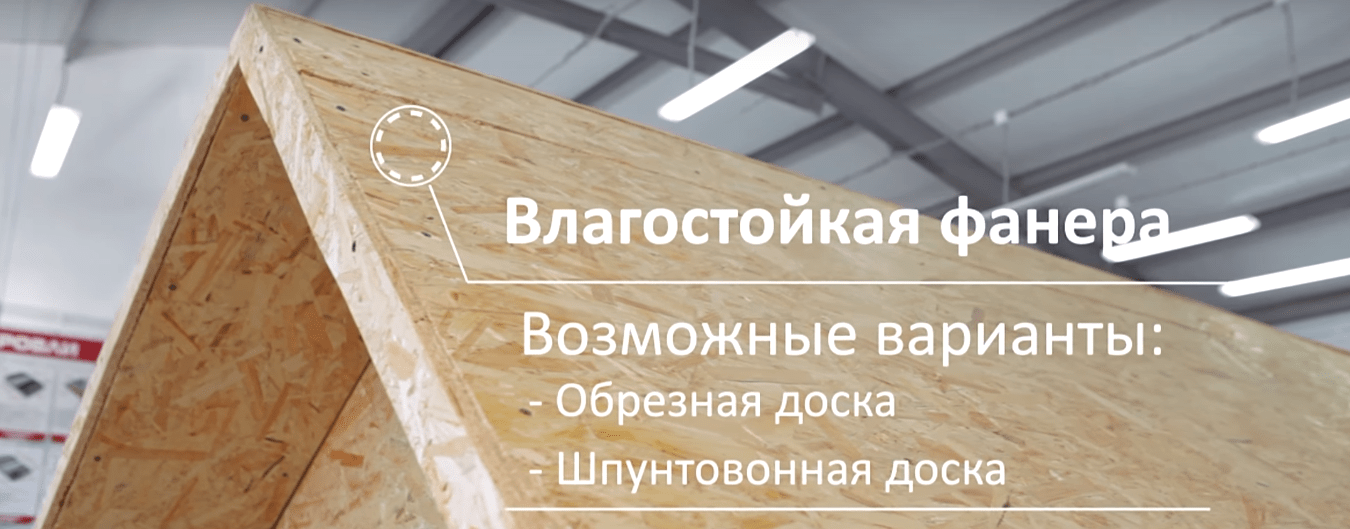
It is also permissible to make a solid crate of a trench-made or edged board with a relative humidity of less than 20%.


Plates fasten over the crates from the "inches" board, mounted in 100 mm increments. Mandatory condition for the installation of a solid crate - compliance with spreading, that is, at one point, the roof should not converge at once 4 corners.
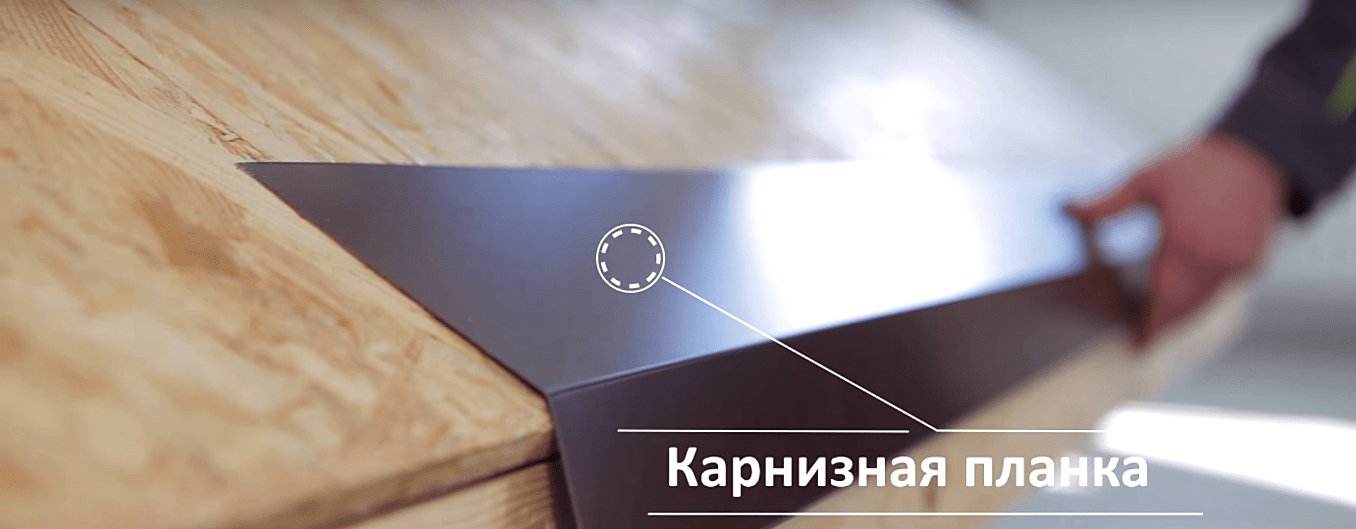
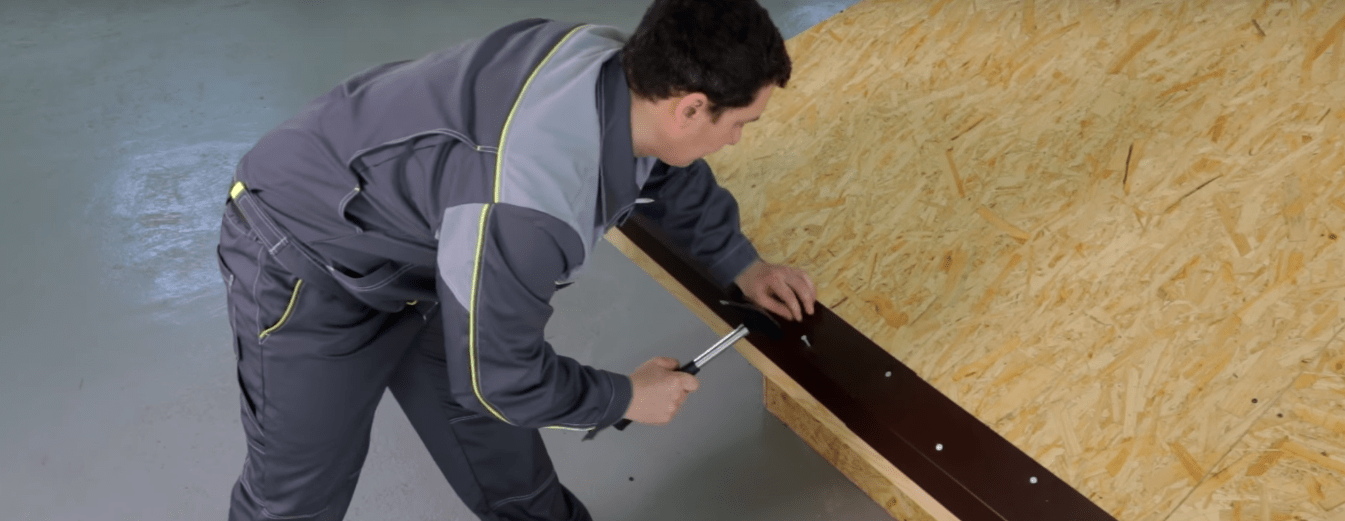
Stage 1. Before laying a flexible tile, it is necessary to fix good items, the first of which is a cornice bar. The element is necessary for draining water and enhancing the roof design.

The bar is placed on the edge of a solid crate and fixate with roofing self-drawing. Hardware is driven into a checker, observing a step of about fifteen centimeters. The nestings of the ends next to the planners are not more than five centimeters.

Stage 2. To ensure additional roof tightness, lining carpets are used.


The first roll is rolled in parallel to the cornice bar, and the lower edge of the carpet should not reach 2-3 mm to the inflection of the plank. Fix the lining layer with roofing screws on the edges from above and below. It is important that the carpet be laid with a small tension to eliminate the appearance of folds and waves on the surface of the material.

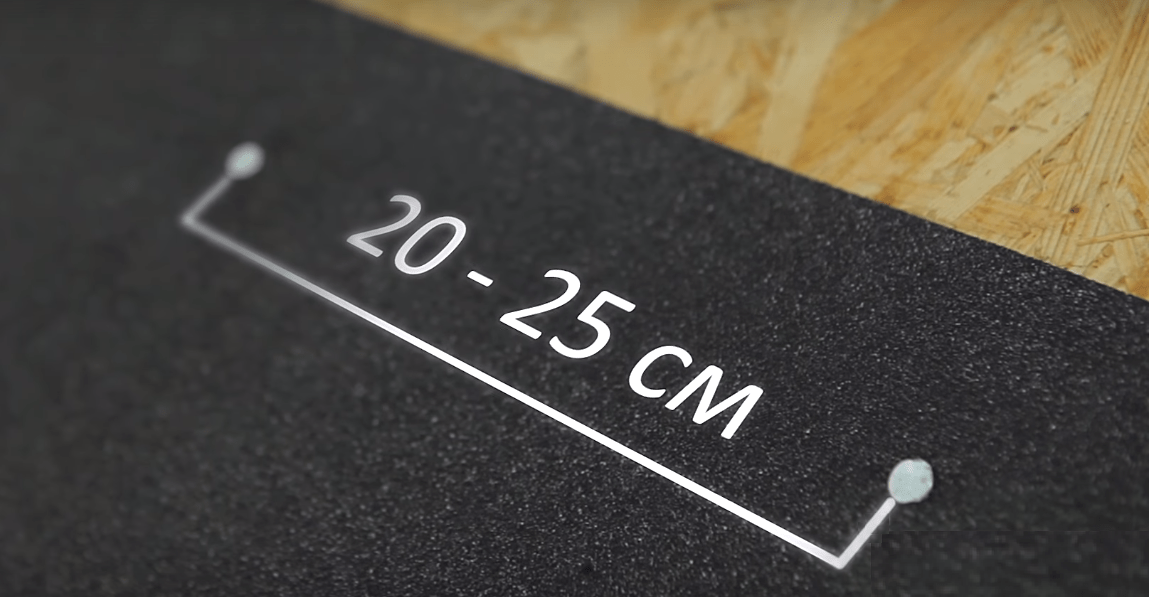
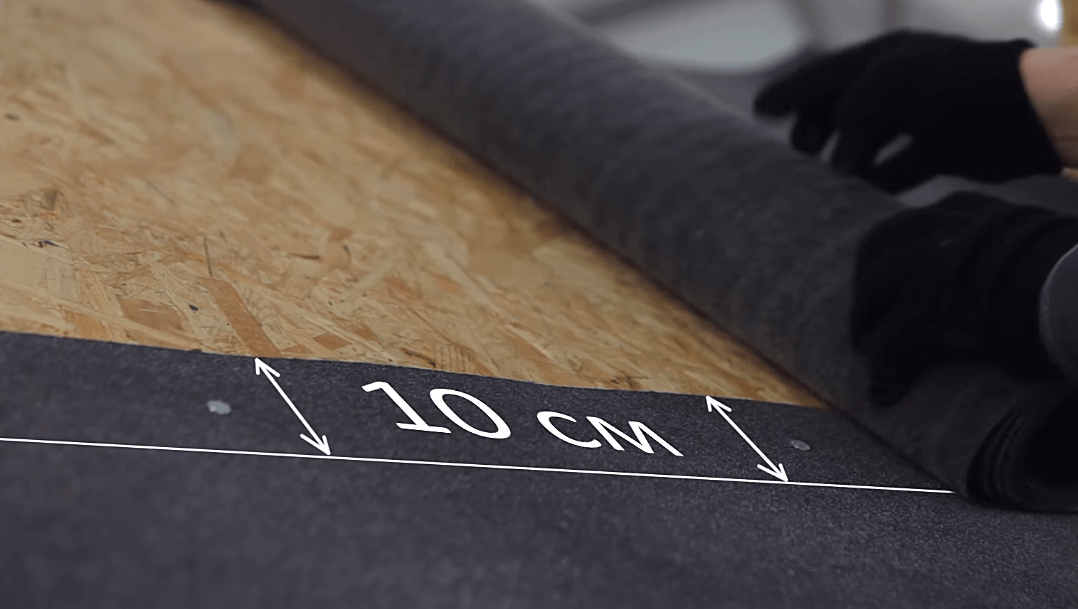
The second series of material is laid with the allen on the first 10 cm and on the upper edge is fixed with nails, observing the distance between them from 20 to 25 cm.
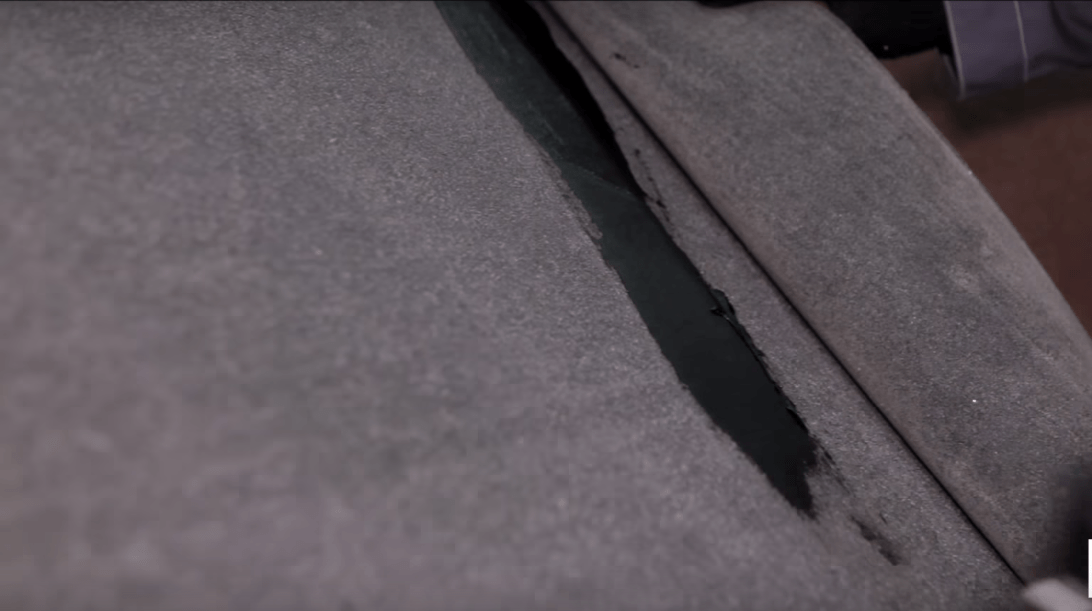
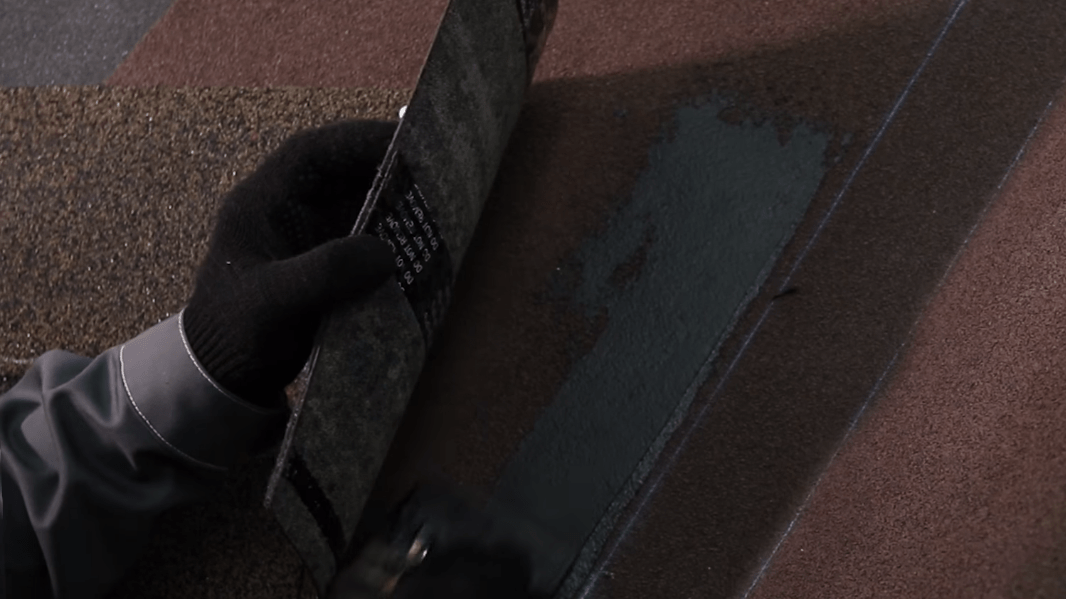
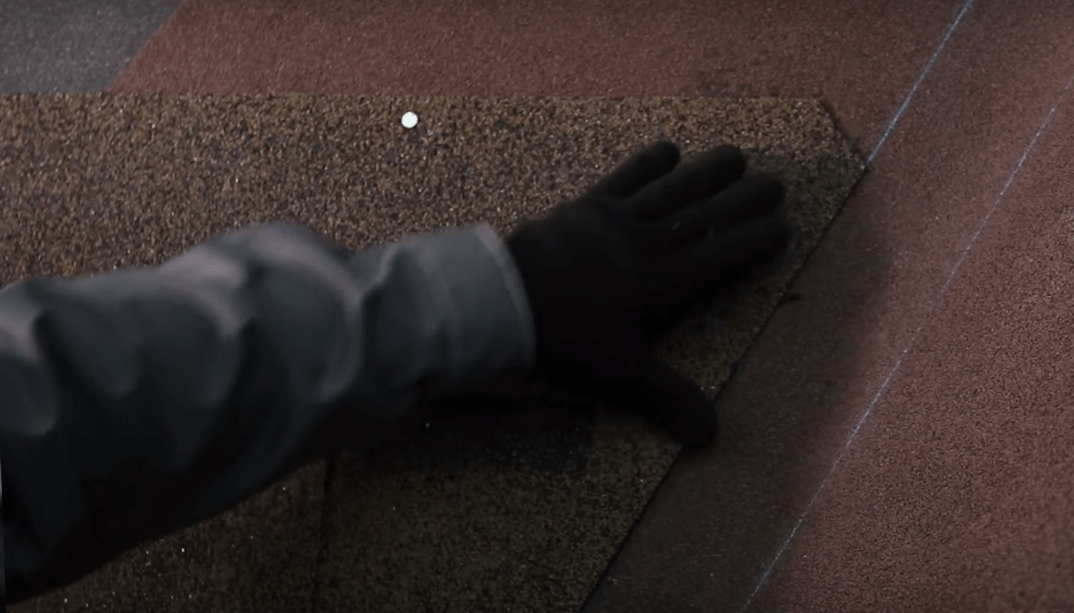
Between the canvases (in the place of the allen), the spatula is applied to a fixing mastic with a layer of 1 mm thick. If you put the mastic too thick layer or to pre-excessively dilute it with a solvent, you may appear on the root and incl.

If the lining carpet across the edges has adhesive strips, then additionally apply the mastic.
On a note! If there is a junction butt (endow) on the roof, the lining carpet will be spread along the joint first along the joint, and only after that rolls roll in parallel to the cornice bar.
The overall width of the lining carpet on it should not be less than 1 meter, that is, 50 cm in each direction from the line of the junction of the skates. It is desirable that the lining carpet on Endaho does not have a junction, but if this cannot be avoided, the layers are placed from the bottom up with the adhesive 30 cm and necessarily the place of the compound by mastic.

Stage 3. The front-distance strips are fixed over the lining layer, which are also called wind. Fixation is carried out by nails. Hermers are inserted in a checkerboard with a hammer, step 12-15 cm. Furious overlaps 3 cm.

Stage 4.Registration of funds.
Prices for moisture-proof
moisture-resistant plywood
Method 1. Open
On top of the lining carpet stacked ongovna.

The width of the omene carpet should also not be less than 50 cm in each direction from the axis of the stools of the skates. Bituminous adhesive mastic (strips of 10 cm wide along the edges of the material) are applied to the carbon outfit side of the carpet.


Fixed material around the perimeter with nails with a step of no more than 25 cm and indent from the edge of the carpet 3 cm.

Method 2. With trimming
The option of the design of endhouse does not imply laying the carpet. Gonts cut and put the braziness directly at the junction of the skate.

Stage 5. You can go directly to laying bitumen tiles.

The first row is the starting. A distinctive feature of the starting row shots is the lack of a slot. One-piece strips are glued, retreating from the inflection of the cornice bar for 2 cm. Additionally, the trunns are fixed by twelve nails each (along the upper and lower edge of 6 nails).
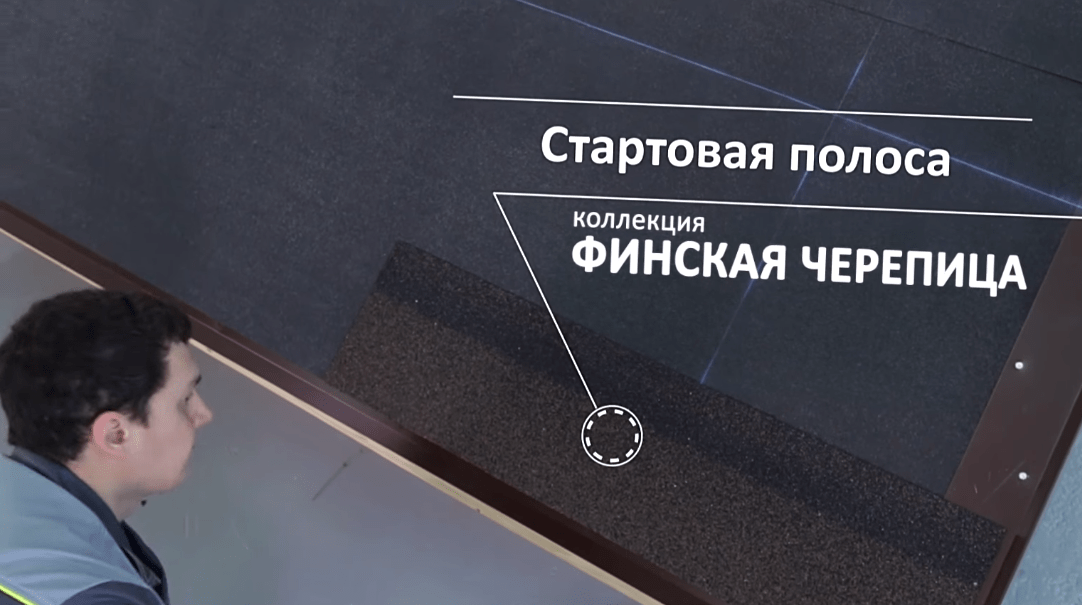

On a note! If you have not additionally purchased a bitumen tile for the starting row, simply take a sharp mounting knife, the strip of the ordinary tiles, put it on a suitable plate and cut the petals (teeth, triangles, etc. depending on the shape of the rice cutting). Bituminous tile with the form "Dragon Tooth" can not be trimmed.
Flexible tile can be mounted under all weather conditions, but if the air temperature is on the street below zero, then it is preferably a roofing material in small batches to serve on the roof from the warm room.
Important! Do not forget to extract bitumen tiles from cardboard boxes and mix each other. So the roof covering will be more homogeneous by shade. Stir need not less than 5 packs at the same time.
The second row begins to lay down, shifting the gears of the second row relative to the gentle of the first row on half the petal horizontally and retreating 2 cm from the lower edge of the starting row.

The edge of the shingle, which will be laid on the wind bar, trimmed at an angle of 45 degrees. The wind bar before laying tiles is lubricated by mastic.
The shift of the "Dragon Tooth" shift is produced by 15 cm. That is, the fastening of the lower row should be overlapped by the petals of the overlying row.
If the tiles have a protective film on the reverse side, it is removed by pulling it towards the lower edge of the shingle to the bottom.

In some collections of the tiles, the presence of a protective film is not provided, the shings are simply folded in the packaging by the invalid side to each other. If the bands are difficult to spool, they can be slightly warm the construction hairdryer and gently bent into different directions.
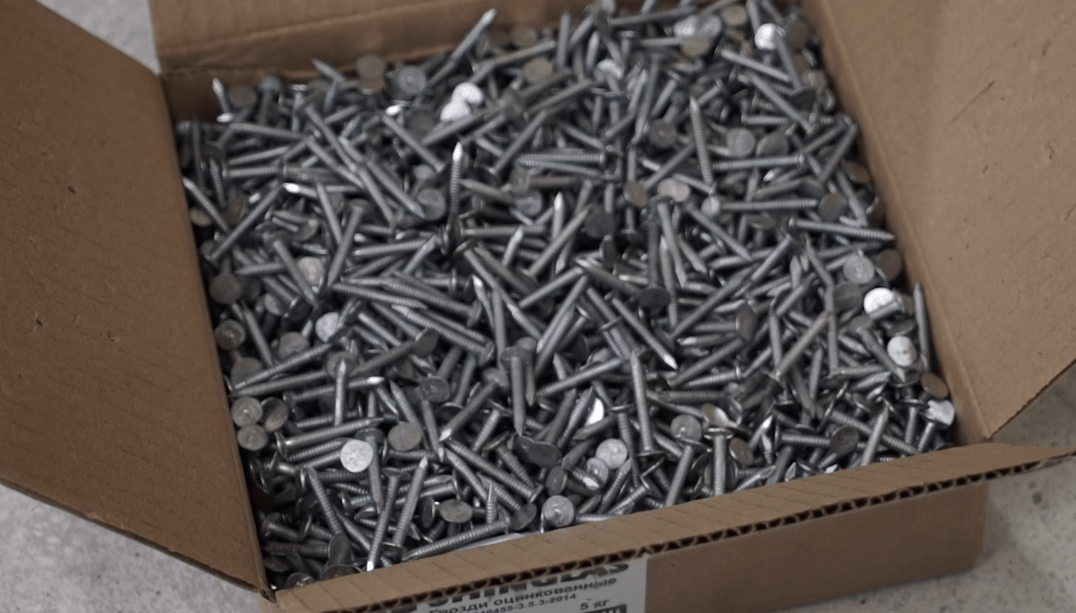
Nails for fastening tiles are used galvanized with wide hats, the length of hardware is 30-45 mm, 3 mm thickness. Strip hardware in a strictly defined order, which is recommended by the manufacturer, depending on the shape of the shingles and the angle of inclination of the roof. The greater the angle of inclination of the roof, the more nails are used to fix the coating.

Metiz arrangement schemes depending on the corner of the skate

It is important to score nails perpendicular to the crate so that the hat is to be flushed with roofing material, it was not overly relended into it, but also was not above the surface of the shingle.

The nails of the overlying row must simultaneously fix the underlying gears. This is necessary for the durability and reliability of roofing.
Tile laying on top of the fundamental carpet leads, truncating the corners of the shingles and missing the wrong side of the bituminous mastic. Running nails are recommended at a distance of 30 cm from the central axis of Endowa.


Stage 6. When the bituminous tile is laid to the skate itself, go to the design of the printed pipe.
Be sure to take into account that walking in shoes on the laid roofing coating with hot sunny weather, as well as the negative air temperature is prohibited. For displacement on the roof, the abilities and other devices are used.
The decoration of the adjunction is performed using a fundamental carpet.
- From the strip, the pattern is cut out for the front side of the pipe (the tile should be closed with a carpet by 20 cm, and the material should be on a pipe for 30 cm). On the opposite side of the pattern, the spatula is applied by a thin bed of adhesive mastic. The pattern is tightly pressed and smoothed so that there are no bubbles and irregularities.


- Next, cut out the right and left pattern, lubricate them with mastic, stick to places, starting the edges under ordinary tile.
- Lastly, closes the back of the pipe, the cloth on the upper edge is fixed with metal straps.

If a pipe is width of more than 50 cm, it is recommended to make a flap to prevent the caution of rainwater.

Instead of fundamental carpet, adjoining can be issued using metal elements.
Video - chimney finish
Stage 7. For decoration of the skate apply skate-carnice tiles.
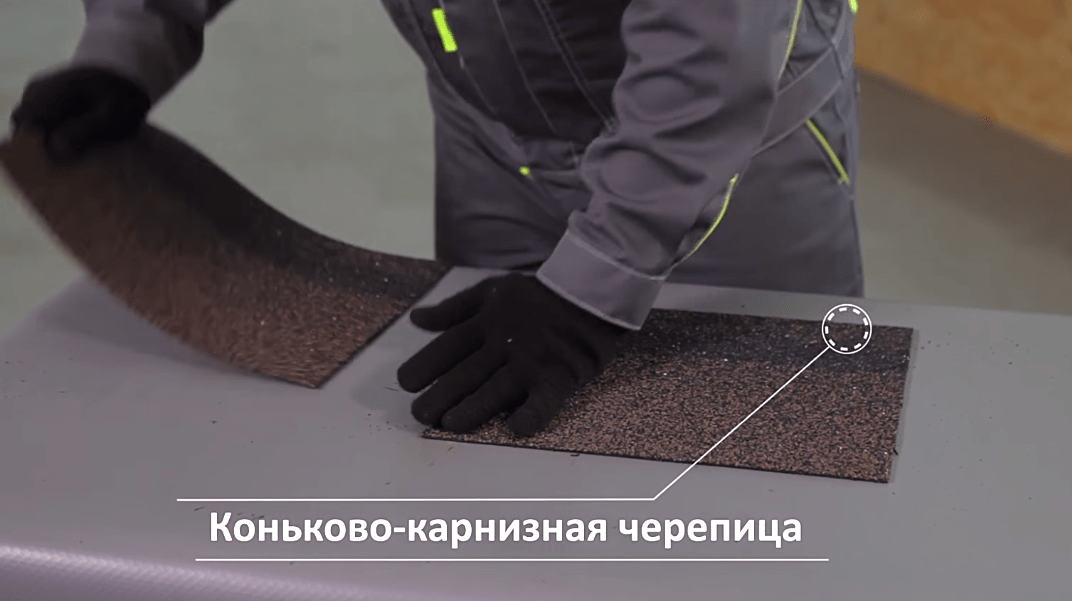
Each shings are cut into 3 parts before laying. The skate elements are placed from the bottom up (for four-sheet roofs) and fasten four nails in the corners. Fall elements 3-5 cm, sufficient, so that the hats of clogged hardware become invisible.

On the hob with a width of 3-8 cm along the slit and horizontally, it is recommended to lay an aerator.

This is a plastic element necessary to ensure the ventilation of the underground space.
Each element bends along the central axis is applied to the roof of the roof and fix it with nails, which are driven through the factory openings of the element. The connection of the element located near the element is performed similarly to the design, by snapping the fasteners.

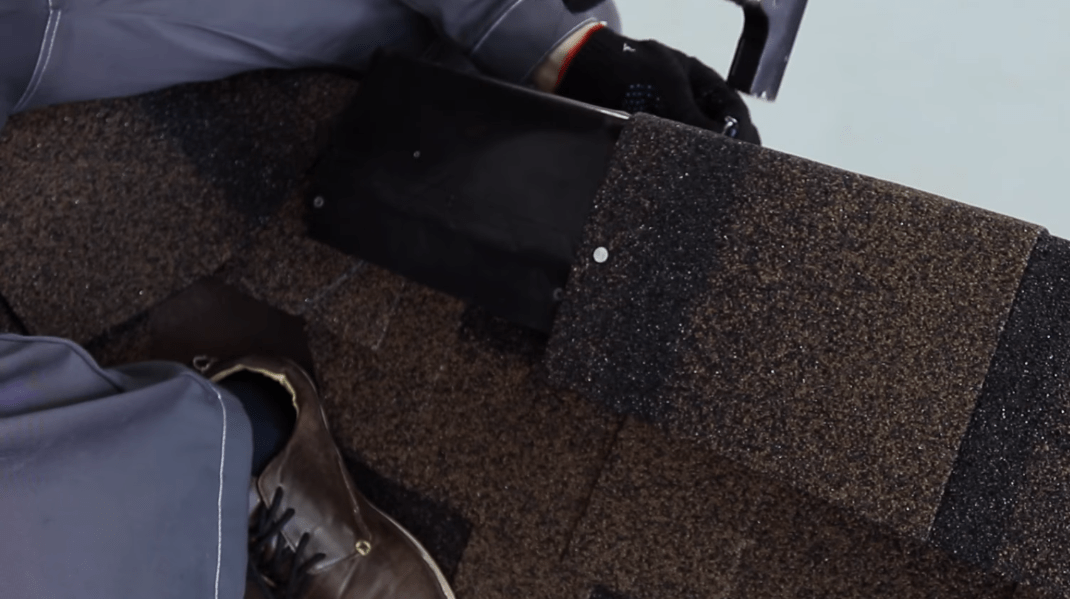
Tile laying on top of aerator lead, given the direction preferential to the locality of the wind direction.
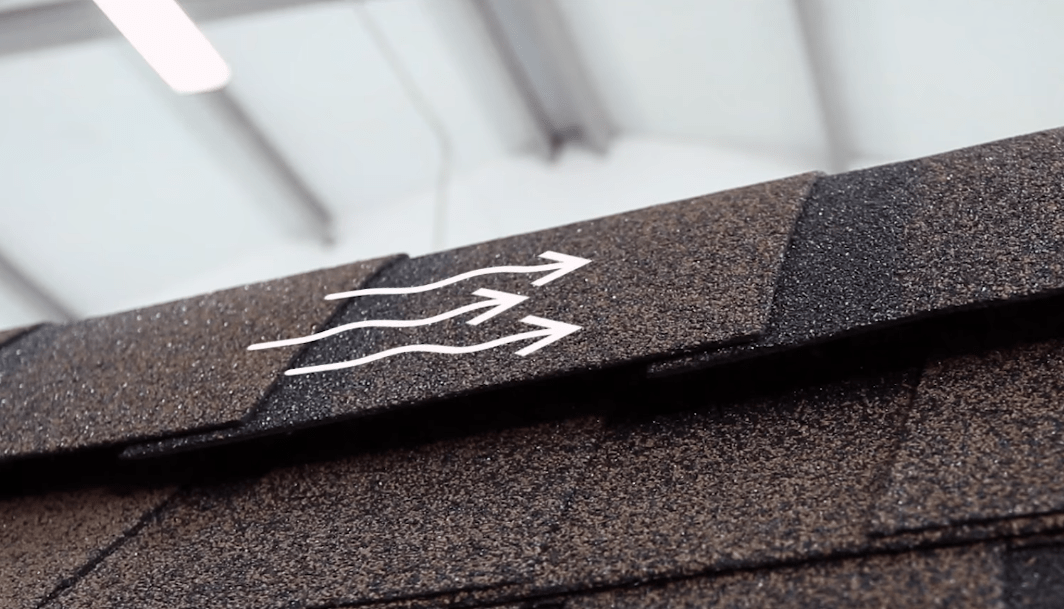
Fasten the skate-carnice tile starts from the other side, where the wind is most often blowing. Fixing the roofing material is performed using roofing nails of increased length.

Video - Installation of a soft roof
Answers on questions
How to arrange an adjoint visor's porch bath to the facade?
If the roof is adjacent to the wall (it can be including the roof of the roof of the bath to the wall of the residential building), regardless of its shape, it is necessary to water the joint, using the omene carpet.

Procedure:
- take a lining carpet on a wall of 5 cm, from the wrong side to mark with fixing mastic, grip tightly;
- if the adjoining roof is located at an angle, then at the bottom of the bottom, the plastic woolen-swivel sampling is secured. If the adjoining is horizontal, the tide is not installed;
- to lay an omene carpet so that it can be 30 cm on a wall, and on a lining carpet by 20 cm;
- masting an olemal carpet on the reverse side of the mastic, glue and align so that there are no bubbles or folds;
- the upper edge of the omene carpet is fixed with a metal slat with holes in which screwing the screws;
- to lay flexible tile, missing the edges of the shingles by fixing mastic (at least 10 cm from the edge).
Rental row prices
endalous carpet
How to move on the roofing droplets during the installation of the coating?
For safe and convenient operation at the height, the scaffolds of forest belts are installed. The brackets have holes through which nails are poured for fixing. From above, the bracket is placed on the board, which is fixed with self-draws. The boards length is chosen in such a way that the free ends be out of the brackets are not less than 150 mm and no more than 300 mm. Cross-section of boards for work on the roof - 200 x 40 mm.
The top part of the bracket is installed under the petals of the bituminous tile. For fastening it is recommended to use nails with a length of 10 cm and a thickness of 5 mm, 3 nails per element. Nails should be driven through the crate in the rafyled.

One bracket withstands 140 kg. The distance between the brackets should be no more than one and a half meters (only one roofer may be on these one and a half meters).


To dismantle the brackets, it is necessary to simply bend the lobes of the shingles and pull out the nails, then return the tile to the place and fix it again. The brackets need to be lowered with the roof neatly, without dropping them down.
Important! It is forbidden to navigate on wet, iced. Work on the roof in the conditions of extreme heat or cold is urgently not recommended.
How to install roofing peak?
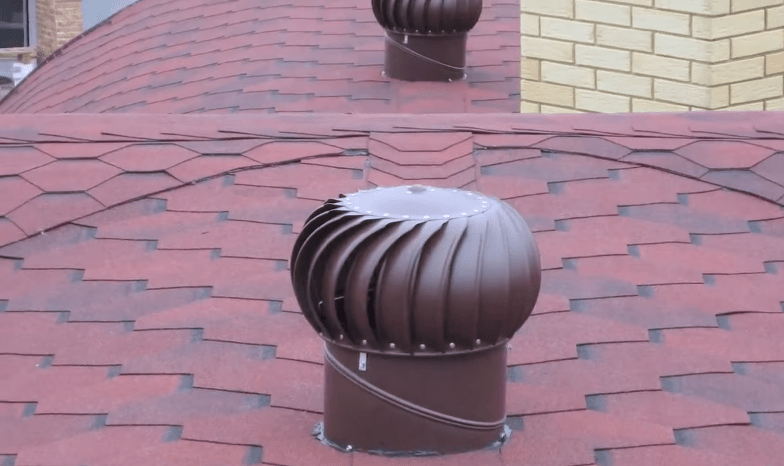
Roofing penetrations are installed for passing through the roof of ventilation pipes and antennas.
General Mounting Principle:
- on the roofing coating make the installation location of the element;
- bitumen tiles are cut on the markup, the cut part is cleaned;
- in the crate pinch a hole under the size of the passing element;
- if necessary, the hole is closed with shallow mesh;
- the contour of the penetration is lubricated by fixing mastic and pressed to the place of installation;
- in the holes of the contour of the element screwed up the tapping screws;
- install the upper end element.

There are also penetrations that are mounted with a small difference - the edge of the passage element is closed with tile petals, with an invalible side by a bitumen.
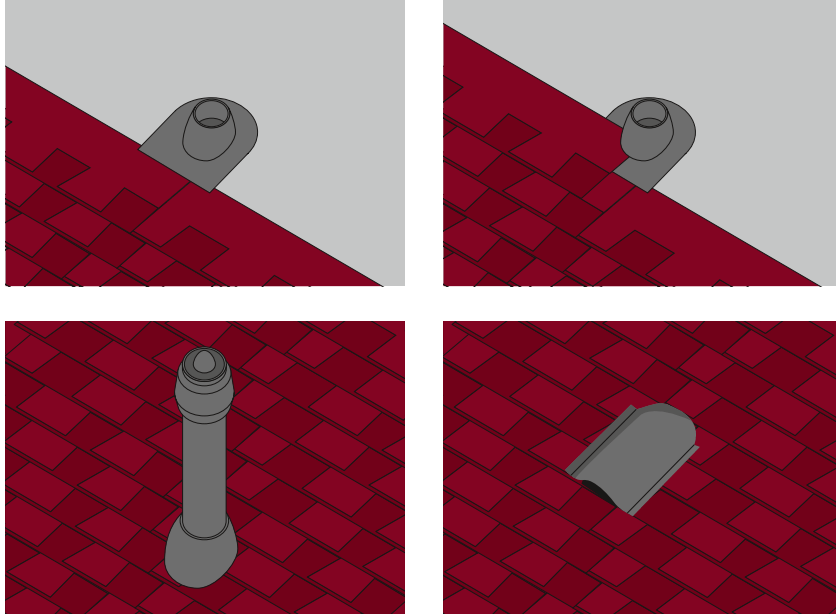
A variant of the installed ventilation pipe. Base closed with bituminous tiles
What snowstores to install on a soft roof?
To prevent uncontrolled snow from a soft roof, the simplest snowproofs are installed in the form of corners on a long leg. Snowbornels are metal and plastic, it is recommended to make a choice in favor of the first due to their greater durability.
Installation of snowproofs produce simultaneously with the stacking of shots. The hooks are fixed with self-drawing to the crate, processing the mastic on the attachment. From above, the feet of a snowmobile closed with petals of bituminous tiles.

The distance between the corners is about 60 cm. The minimum number of rows of snowproofs - 3. On steep roofs, it is desirable to increase the number of rows or even secure corners throughout the area of \u200b\u200bthe skate.

How to care for the roof
Care rules are very simple:
- it is necessary to periodically visually inspect the coating;
- purification of the roof from snow is performed by a wooden shovel. Moreover, it is necessary to remove not all the snow, the roof should remain a layer with a thickness of about 10 cm;
- it is necessary to clean the drain gutter and pipes in time, eliminate blockages;
- if a moss or a lichen began to grow on the roof, it is removed, and an antiseptic with algicidal composition is applied to the coating.


Manufacturers of soft tiles usually provide a guarantee for at least 10 years. The coating is ideal for both hot southern regions and cold northern. The coating is environmentally friendly, does not require care, ideal for any facade of the bath. Soft roof - an excellent solution for the bath and sauna!

Surely, you have repeatedly noticed that many private houses are covered with flexible tiles, noble, solid and aesthetically attractive roofing material. You can equip such a roof and you, because it is possible to lay this coating on the roof of any complexity, the slope of which reaches 12 to 90 degrees. Bitumen is very easy, which makes it easier to install a soft roof with your own hands. Today we will talk how to cover the roof of soft tiles.
Calculation of bituminous tiles
Before buying a soft tile, it is necessary to consider that the price of the soft roof will depend on the area of \u200b\u200bthe coating and the number of challenges. A feature of the material that is used for the organization of the roof is the minimization of waste during work. It is this factor that allows you to accurately calculate the roof and calculate the required number of main material.
We give an example of calculating the number of flexible tiles. So, let the bartal roof have such parameters: the length is 6 meters, the height is 4 meters; The angle of inclination is 32 degrees. Then the area is total equal to 48 square meters (4 * 6 * 2). Consider that one packing of flexible tile is enough for 3 meters square. But be careful, since the covered area is indicated on each package. Then you will need 16 packages (48/3).

Similarly, it is possible to calculate the amount of required lining material and an end carpet. It should be noted that the coating technology of the roof of soft tiles is that there will always be cropped parts and waste. Therefore, boldly add to the calculated quantity 10-15%. After buying a soft tile, it is necessary to store it in a warm dryly shaded place, folding one on one no more than 12 packages.
Installing the crate under the roof
To lay bitumen tiles correctly, it is necessary to properly prepare the basis. The soft roof can be laid on an ordinary crate, which is a lattice or solid and fastened to the rafters. The frame is most often made of wood. If you need to arrange a lattice crate, then take for this board.
At the same time, it is desirable to use clay boards from a conifer, which have a thickness close to 20-25 millimeters. To create a solid crate, you can use moisture-proof paneur or chipboard, tipped and edged boards. Material moisture should not be greater than 20% of dry weight. Material is fixed to rafters using conventional nails or screws.
To increase the time of service of wooden elements, they must be impregnated with an antiseptic until the installation. When creating a crate, calculate the setting step of the rafter and the thickness of the board used for its device. If the step is 60 centimeters, then you can apply the board, which has a thickness of 20 millimeters. At a step of a rafter, 90 centimeters require a bottle with a thickness of approximately 23 millimeters.
The joints of the boards must be placed on the places of the supports, and the boards must have a length of at least 2 spans between the supports. In the flooring of the crates under the soft roof, it is necessary to remember that it is worth leaving between separate materials a pair of millimeters to compensate for the process of expanding wood when drying.
The clamp between the boards make a gap in 1-5 millimeters, between the large-scale elements - in 1 - 3 millimeters. Phaneur and slabs on the rafters are placed with the disintegration of the seams. You may not leave such gaps if all the wood was previously susceptible to technical drying.
Installation of the lining layer
After the arrangement of the crate under the soft roof, it is necessary to put the lining layer, the main purpose of which lies in the protection of the house from moisture ingress with possible leaks of flexible tiles. According to the current standards, if the angle of inclination of the roof is 18 degrees and slightly more, it is possible to equip waterproofing only in parallel to the end and cornice edges. It is these sites that are considered the most likely plates.
In a different way, things will be faced if the roof has a smaller angle of the slope - from 12 to 18 degrees. Mounting technology of such a waterproofing layer provides its laying throughout the area of \u200b\u200bthe roof. This layer is mounted parallel to the eaves in the bottom upside down with an adhesive at least 10 centimeters for transverse seams and at least 15 centimeters for longitudinal, fixing the edges with nails with an interval near 20 centimeters. Seams are mounted sealing glue.

To protect the edges of the roof frame design under a soft tile on the cornese rods from moisture, it is necessary to mount on top of the lining carpet Metal carnisic strips called "Ducks" with an adhesive minimum in 2 centimeters. They nail them with zigzag, with special roofing nails, withstanding a step of 100 millimeters. To protect the root on the end parts, the front-distance strips with the same adhesive in 2 centimeters are mounted. Pock the bar on the eaves and the ends on top of the lining layer.
If the design has elements such as rtands, then it is necessary to put a special carpet that corresponds to the color of the tiles, on both sides. The edges should be fixed with roofing nails, withstanding the interval of 100 millimeters. It will not be superfluous after fixing to wove the carpet along the edge of the bituminous mastic.
Device of ventilation space
Without sufficient ventilation in the attic, the microclimate will be disturbed, increase humidity and condensate. Ensuring ventilation is carried out thanks to three elements: channels over thermal insulation, hole, which serves for the influx of outer air and exhaust holes, which are located at the top of the roof.
If the eaves in a residential building are laid by siding, then Sophyte strips will perform the ventilation gap.
If, when the roof is under the soft roof, the cornice is made in clapboard, then it is customized to shift between the boards the gap. The ventilation of the roof of the flexible tile is performed due to the skate, which is customary to lay on a special ribbed profile. But often there is not enough bandwidth and you need to install special ventilation elements on the surface of the roof.
If the roof slope is 15-40 degrees, the area of \u200b\u200bventilating space is calculated as a private total area of \u200b\u200bthe skates and the coefficient of 300. And if the slope comes to 41-85 degrees, it is calculated as a special area of \u200b\u200bsoft roof and 600 coefficient. Let the total roof area are 50 square meters, the angle of inclination is 35 degrees, and the cross section of the ventilation element is 258 square centimeters.
The ventilation area in this case will be 0.167 square meters (50/300) or 1670 square centimeters. Then the required number of ventilation elements is equal to five (1670/258). The number of ventilation elements that are installed on the horse is half their number on the roofing rods, that is, 3.
Installation of soft tile
Flexible tile manufacturers do not recommend fixing it at temperatures below plus 5 degrees, because the scenes in the frost become fragile and the procedure for the device of the soft tile roof is hampered, and the lack of heat affects the tightness of the compounds. In winter, the joints and bends of the shit should be heated with a construction hairdryer or other adaptation that forms a heat flux. To lay the material on the roof in the summer, it should be taken in parts, because the protective film is removed from the tiles heated by the sun.
When laying the tiles, it is often roofers commit the same mistake, as a result of which the roof has a different shade in different places. Remember that the tile in different packages may not be from one batch, but from different, therefore it differs its color. Thus, it is necessary to immediately use several packages of the material so that the roof color is uniform.

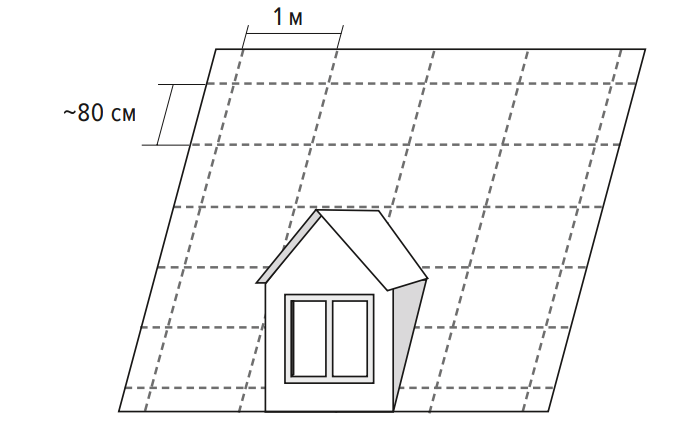
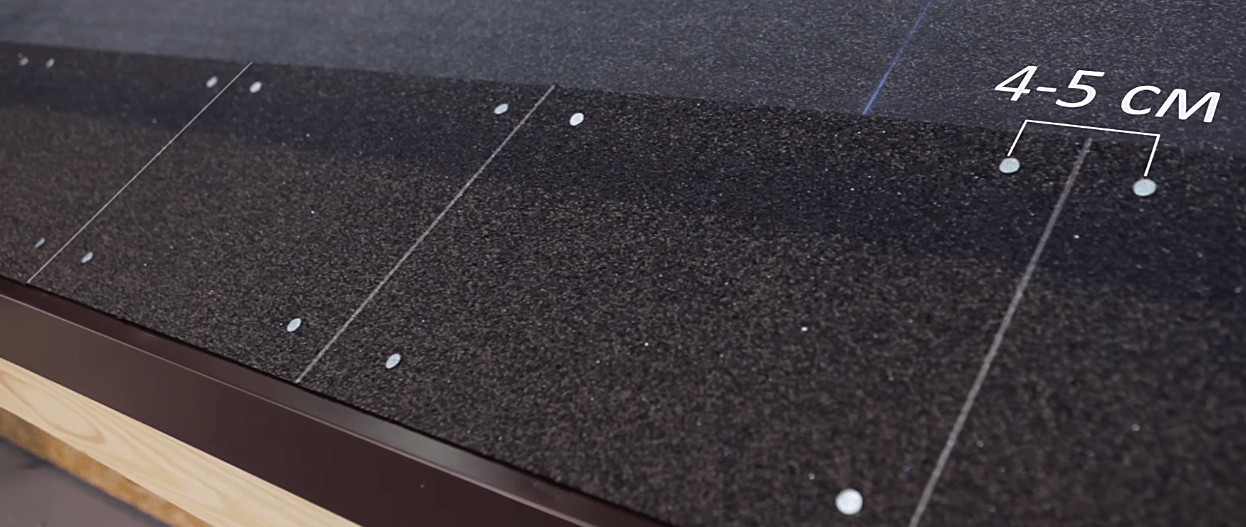
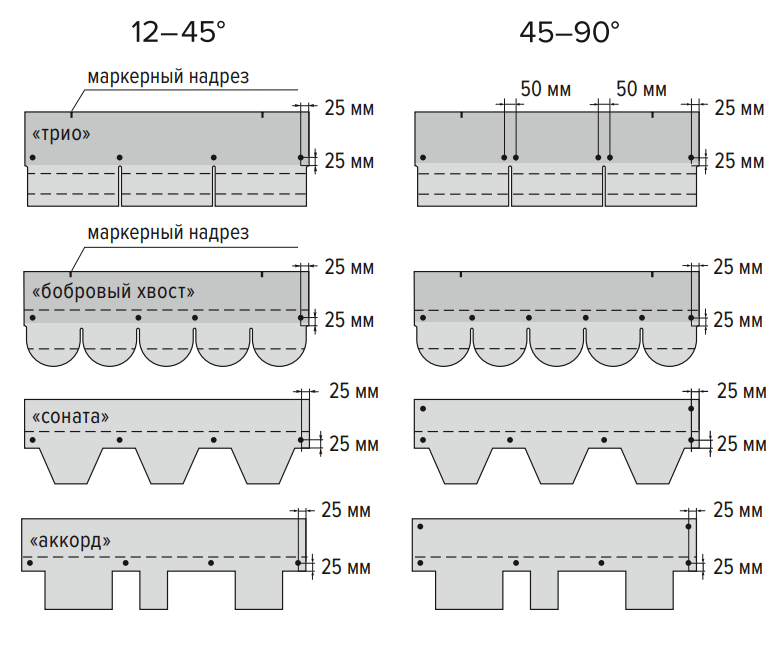
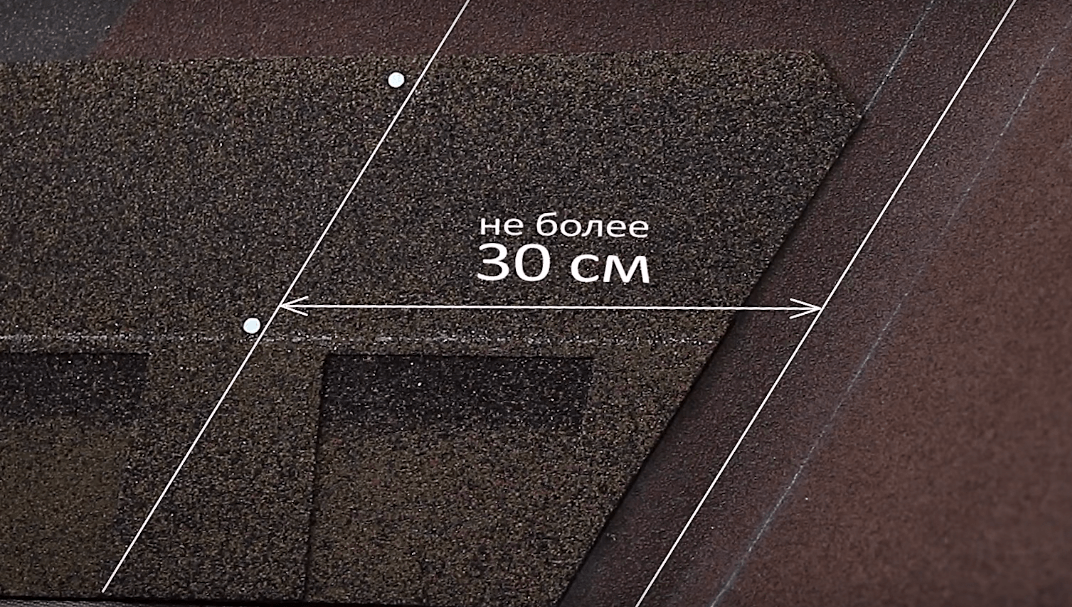
To simplify the work and ensure smooth lines before coating the roof of a soft tiled on the roof, the skate markup of the shaft and lining is carried out. Horizontal lines are drawn parallel to the cornese sve with an increment of 80 centimeters. Approximately 5 rows of tiles. Vertical lines are applied along the length of the skate in a step of 1 meter.
Installation of the roof of flexible tiles start with the arrangement of zero "cornice" row. Self-adhesive skate-carnice tile is pasted on top of the metal stack of jack. From the edge of the skate you need to retreat 1-2 centimeters. On the other hand, the tile is nailed on the other side, and the first row of ordinary flexible tiles is placed on top of the attachment. If you did not buy a skate-carnice tile, you can attach to the cornice and simple gears, but without petals.

The first row of ordinary flexible tiles begin to lay from the center of the eaves, heading to the skate and the front. To move in hot weather on the roof you need to use special lazes, otherwise you can stay on the roof coverage tracks from shoes. First, they remove the protective film from the back side with separate roofing tiles and glued them to the base. Also tile requires additional mounting.
Tiles are fixed with nails, scoring them when laying two neighboring rows. When you score a nail into the first row, then simultaneously you and the second. You can not fasten the shock - score a nail from the very edge or to the center of the petals, since the device of the soft tile roof does not allow chaotic mount, it is impossible to drag the nail much - it is necessary that the hat is located at one level with roofing.

For one gear, approximately 4-5 nails are consumed. This is enough, since the bitumen tile among themselves under the influence of solar heat is glued together and stick to the crate. The length of the nails are selected under the type and thickness of the crate. The diameter of the nail should be approximately 3.2 millimeters, the diameter of the hat - 10 millimeters.
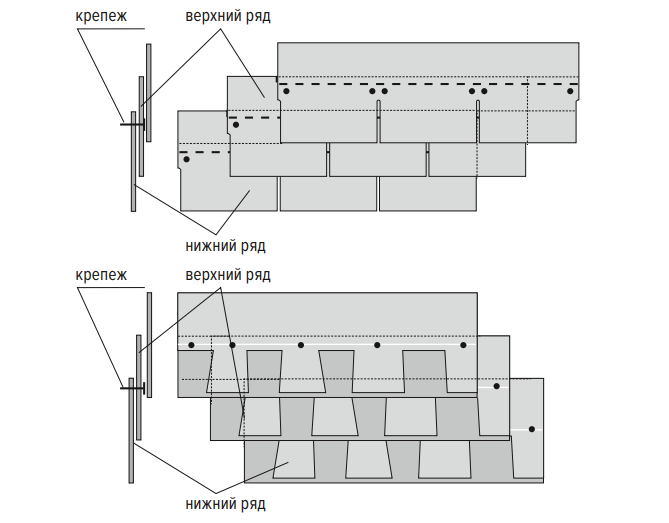
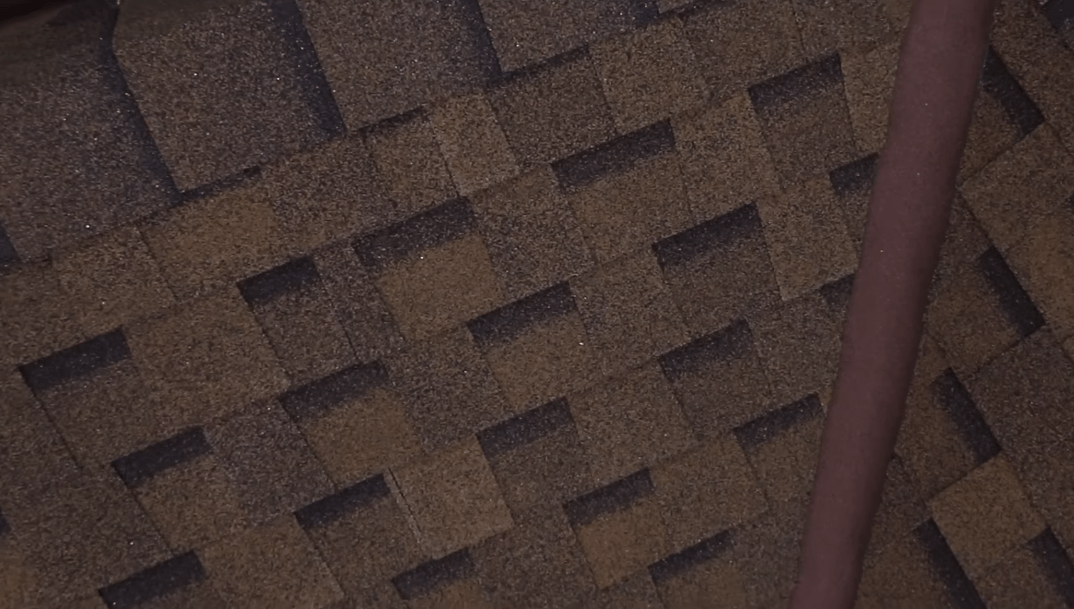
When installing subsequent rows of the tile, remember that the lower petals of the material must match the upper, which are located on the already nailed row. Along with this, it is customary to remove half a petal to the left or right.

The skating tile is obtained if you divide the cornese tile into three parts at the places of perforation. Introduce on the roof of the roofing tile, having previously cutting the tile, while the short side should be placed parallel to the skate. Subscribe to four nails so that the nails are located under the applied tile with the adhesive 5 centimeters.
Proper decoration of adjoins
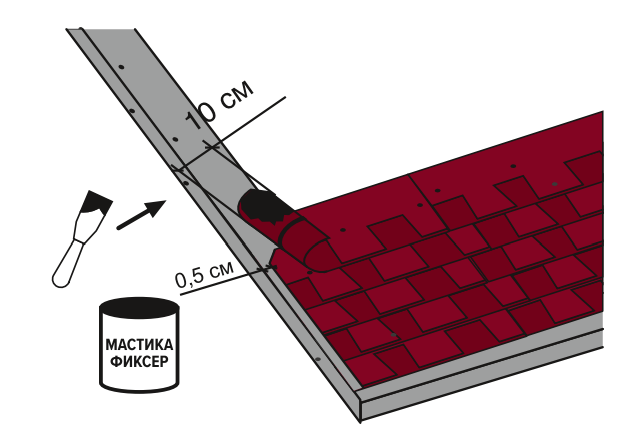
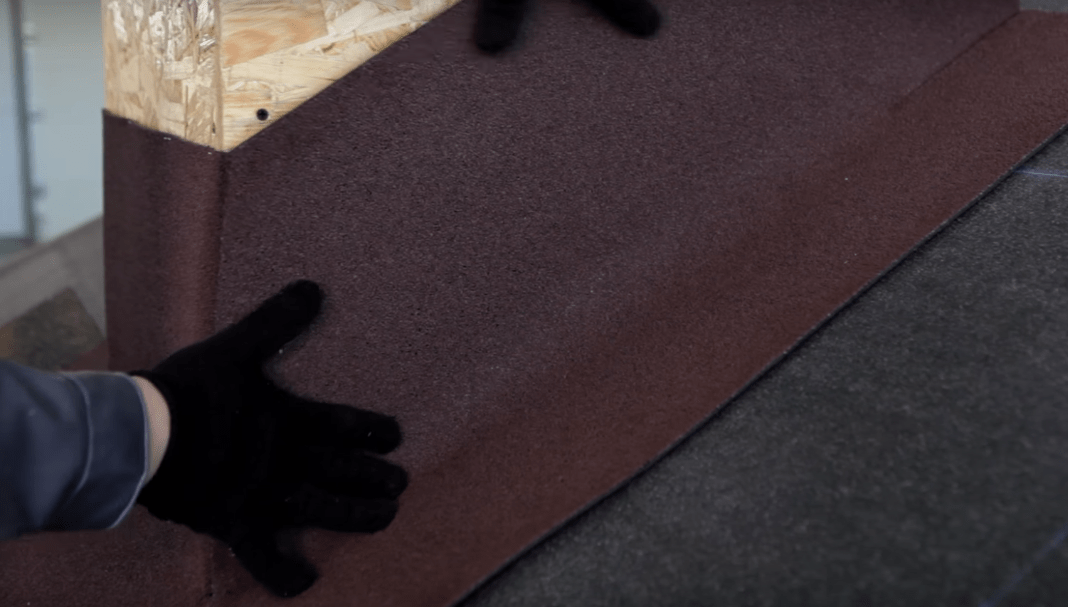
In the process of installing a soft coating for the roof, it is often necessary to deal with some difficulties and various items to which the roof is adjacent. Say, the most elementary object of this type is the pipe of the furnace heating. In a plot where the pipe is adjacent to the roof, the slot is always formed, which flows moisture.
To get rid of this shortage, you need to correctly attach flexible tile. First, scroll to the corner between the surface of the roof and chimney. It is desirable that she had a triangular shape, like an ordinary wooden plinth. Next, it is recommended to start tiled on this rail and directly on the pipe. After that, it is necessary to put the carpet of the endand, starting with the chimney.

It should cover the entire channel at an altitude from the roof surface of 30 centimeters. After that, the lower part of the pipe with the carpet and bitumen tiles is placed in a metal apron - it is placed on all sides with sheets of painted tin. To avoid accumulation of the pipe of snow, it is necessary to equip the rash, installing the pyramid with two faces to the pipe. Thus, both snow, and rainwater, will fall on the slips of the suspension and drain down the roof down, flowing the pipe.
Sometimes through the roof you need to withdraw some communications. In such cases, it is best to apply passage elements that are manufactured specifically for tiles. They are fixed to the root base with nails. Such elements reliably protect the roof from the flow. For example, the antenna passages of a small diameter through the roof can be performed by rubber seals.
The procedure for sealing junctions
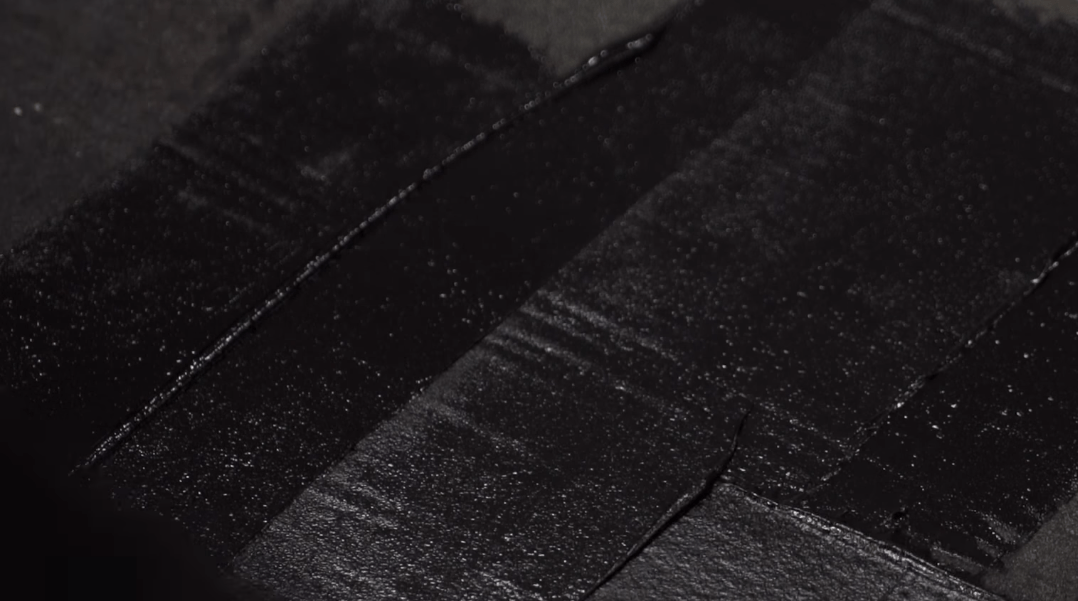
To seal the roof of soft tiles, lining carpet faders and ordinary bitumen tiles on the end carpet, the aisles of the ventilation system and various adjoints are used by a special sealant. Immediately before applying the composition, clean the surface from bulk materials, oil and dirt. For dusty and porous bases, apply a bitumen solution. Remember that when an excess of glue may, there will be excessive dissolution of bitumen.
The composition is applied to one of the spatula gluable surfaces. Hold the layer thickness of 0.5 - 1 millimeter. The calculation width is indicated in the instructions. When pasting the adjoints to the pipes and walls, apply the sealant over the entire surface of contact. Slip the seams of brick masonry with a brick with brick. The gluing process lasts 1-3 minutes, depending on the air temperature. At low temperatures, it is necessary to warm up before applying.

Now you know how to cover the roof of soft tiles! In addition, you can always update the roof of a flexible tile without removing the old coating. Laying on top of an old new soft tile is not very different from the styling process from scratch. To do this, you need to put an inverted gear and glued onto the protruding cornese strip, and the protruding part of cropping on the eaves. Next, the tiles are laid exactly over the previous pattern.
The process of installing a soft roof is relatively simple, it is quite realistic to perform with your own hands, without the help of specialists.
Soft roof is a good alternative to traditional roofing materials.
Its advantages in front of them: flexibility, ease of processing and a small price.
About what to start the roof device, as well as the advantages of this type of roof and surface requirements for them, you will learn in this article.
What is a soft roof?
Sometimes it is also called flexible or bituminous tiles. This is due to the fact that it is made from bitumen.
But it is not necessary to scare and turn away from this roofing material - this is not runneroid, but modern and popular (in some countries) material.
The soft roof is much stronger and durable of an ordinary ruberoid. Everyone knows that bitumen is very unstable material: it breaks, melting and destroyed.
However, due to modern developments, it was possible to achieve its sustainability for negative impacts.
Tehtonikol, a soft roof producer Shinglas (shinglas), is guaranteed from 10 to 55 years of impeccable service.
The modern soft roof on a bitumen basis is not inclined, and the high or low ambient temperature does not cause its destruction.
Thanks to the introduction of modifiers (different rubber), it was possible to add bending and resistance to the effects of negative temperatures.

Due to the technology of processing the melt of bitumen oxygen, it has achieved an increase in melting point to 90-110 degrees Celsius.
Now, even in the strongest sun, the roof will not melt.
In addition, strong and durable fiberglass is used as a reinforcing layer in the production of soft roof. This allows you to increase its strength.
As the upper protective layer, stone sprinkle is used, as a rule, basalt crumb. It performs not only protective, but also decorative functions, dyes add to it.
He generalized all the above, we have a conclusion: a modern soft roof is a durable and beautiful material with which it is easy and easy to work. Of course, if you know how. For this, there is an instruction that will help to figure out how to work with this material.
You can get acquainted with the rules of work on the video existing here.
It is worth remembering that laying the soft roof on the roofs with a slope less than 11 ° is extremely recommended. Since there is no guarantee that, with such a slope, it will perform its functions.
At such small inclons it is worth using the applied materials.
Getting Started
Since with flexible roof it is easy enough to work, then the independent installation is quite simple, which you can not say about other types of roof.
However, if you decide to spend your work yourself, you need to know how it is done.
Looking at the video, it can be noted that the technology of laying a soft roof is different, different from traditional, where leaf roofing materials are used.
Therefore, consider this moment more details. And from the very beginning - with the preparation of the foundation.
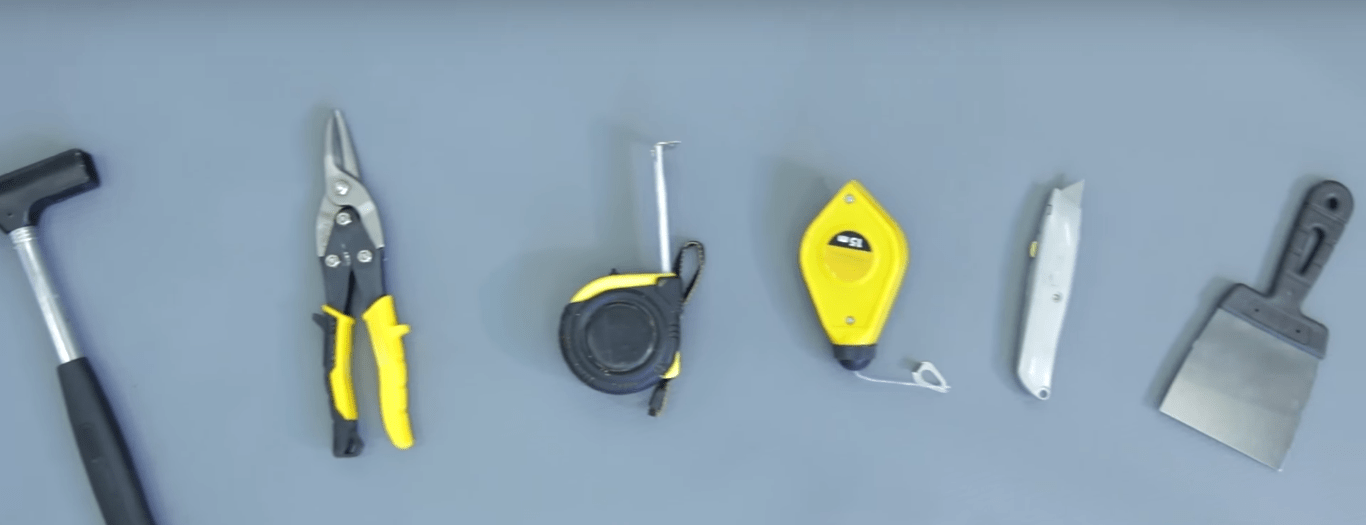
To work, you will need a minimum set of tools: a hammer, a knife, a spatula, a roulette and cord for marking.
From consumables: galvanized roofing nails, with a wide hat and mastic, for gluing roof elements. Mastic technological.
Preparation of the foundation
The device of a soft roof does not have its own stiffness, in contrast, for example, from metal products or slate. Therefore, the roof surface must be solid and durable.
An excellent solution to this question will be the use of moisture-resistant plywood or OSP. The thickness of the sheets are selected based on the distance between the rafters.
The shape step of the crate also depends on the distance of the rafter than it is more, the more often the lamp is stuffed. The sheets of plywood or oriented chipboard are attached to the self-tapping screw.
Be sure to scroll the edges so that they do not wrap up with time.

It is worth noting that the use of plywood or OSP, as already mentioned earlier, an excellent option, but not the only one.
You can sew a roof with a solid edged or tipped board, 30 mm thick. Naturally, this option is longer and, in the case of using a t-shirt, more expensive.
But if there is a desire and the opportunity to make it not to do.
Please note that all of the above refers to a simple roof, if the attic is done, then the entire complex of works is being carried out: insulation, hydro and vaporizolation, and only then, having stamped a counterclaim, is equipped with a solid surface under the soft roof.
The ventilation gap is also required to remove the resulting moisture. Therefore, in the karnis, they leave the gap and in the skate make slits for aerators.
It is worth paying attention to the ventilation pipes. If the pipe is wider than 50 centimeters, then it is better to make a flap.
Such a decision will not give precipitation accumulated behind the pipe and they will be unimpeded. As it looks, you can look at the video.
Lining
For example, consider the installation of soft roofing Schinglas.
After preparing the ground, start working with the substrate, it is also called a lining carpet.
This rolled material, which is a mandatory part of a soft roof and gives additional protection against moisture, and also makes it easier to work with roof elements.
The substrate is fastened with roofing nails and at the joints - Tekhtonikol mastic.
The roofs with a slope of less than 18 degrees are fully covered with a substrate. Roofs with a bias from 18 to 90 degrees, allowed to be stuck partially.
With partial application of the substrate, only: eaves, frontal edge, endowa, hip, horse, the outlet of auditory windows and ventilation pipes.
For clarity it is worth watching a video.
A solid device of a lining carpet. Rolls roll off horizontally. Start at the bottom and go up. Horizontal overlap - at least 15 cm, vertical - at least 10 cm.
The place of the joint is additionally sick, with the help of Tekhnonikol mastic or any other mastic.
Partial device of a lining carpet.
The roof is covered with lining around the perimeter and in complex places - Konk, Endow, and so on.
Use the entire width of the lining material.
The lining sticks to the base and break through the edge of nails. The distance between the nails is no more than 20 cm. If the material is joined, then the nest is done at least 10-15 cm.
Complex elements such as Endow, Walma, the places of adjusting the ventilation pipes and hearing windows, is carefully combined by the full width of the lining roll.

For better clutch, the mastic technology is used. In the lining on the skate make slots for aerators.
After the carpet device, the cornese and frontal strips are installed. Start with cornice. They are attached directly to the lining, fixed with roofing nails.
Then the front-distance strips are fixed. Nails are hit at a distance of 15 cm.
Laying tile
Before mounting it is removed.
Stacking a soft roof (including with your own hands) begin with a cornice and skate. Over the entire length, universal skate-carnice tiles are fixed.

The edges of this element of the roof are sampled by Tekhtonikol mastic and nail roofing nails. Bute nails to a distance of 15-20 cm from each other.
Then the coated lace beton the guide lines, for the reference point. Tiles are laid on them.
The color of the shingles may differ slightly.
So that it does not work out that one part of the roof slide was different from another, you need to open all the packages before starting work and use the elements of them in turn.
So the difference in color, if it is, will not be noticeable.
After all, gears from different packages will be mixed.
Installation of the first row of elements start from the middle and alternately move in both directions. Each shingle, especially extreme, is well sampled by Tekhtonikol mastic.
Roofing nails, with wide hats, clogged in specially provided places. For each type of tile, they are different.

Therefore, the instruction for the purchased roof necessarily needs to read. Having reached the skate, do not forget to leave slots for aerators.
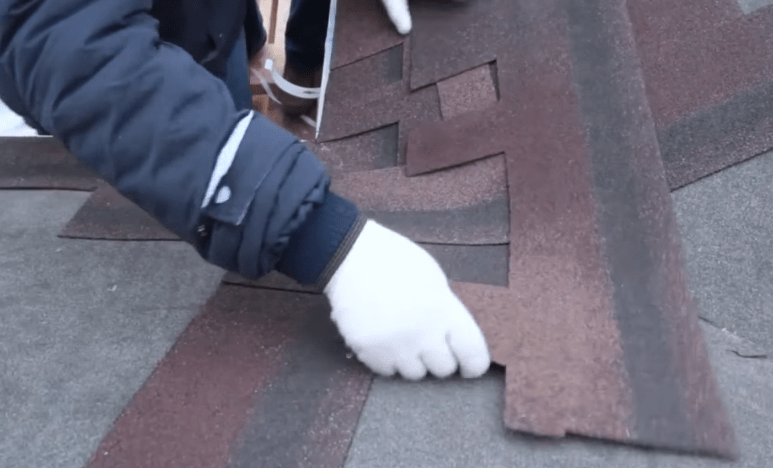
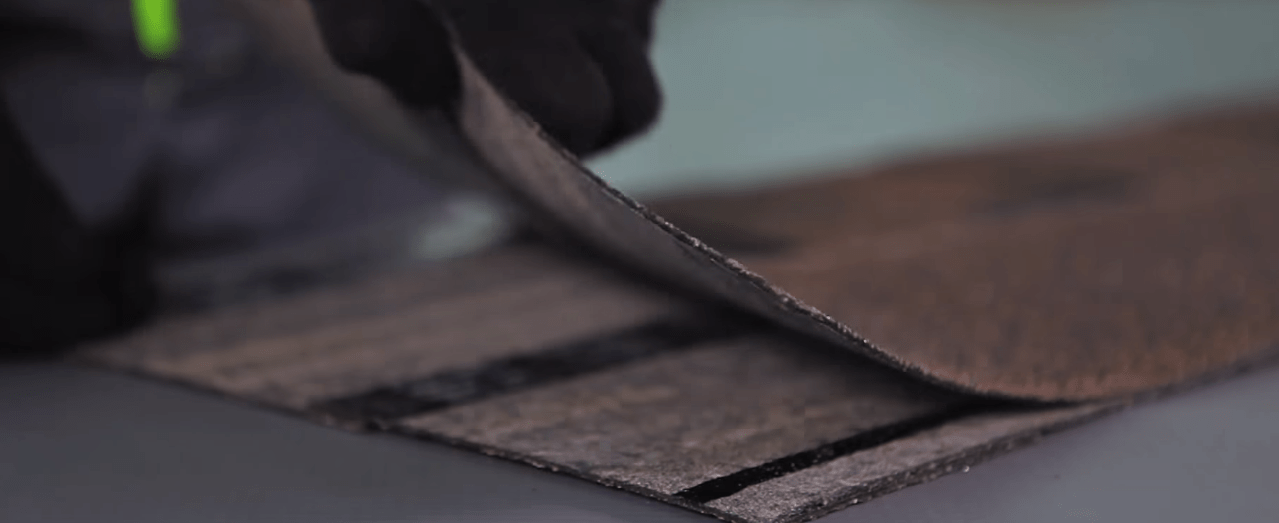
When laying on the edges of the roof - you need to customize the tile size. It's just done. Elements are cut in size with a sharp knife.
In the same way, the soft tile is cut into the stroke of hearing windows and ventilation pipes, endhouses and hips.
For cutting of the shingle, a small sheet of plywood is used, which is put under a sliced \u200b\u200belement. It is necessary in order not to damage the already laid shings.
Finishing stage
This includes the installation of the skate and aerators. The latter are used for ventilation devices. Air moves from the eaves up, so the installation of the aerators is made as high as possible.
Best in the skate. The method of fastening the aerators is the same as the tiles. The attachment of the aerators is carried out with the help of nails. After installation, they are covered with skating tiles from above.
Bituminous tile in recent years has become one of the most popular roofing coatings, due to its original appearance by imitating classical ceramic tiles. A simple gear fixing technology using a self-adhesive layer simplifies an independent laying of the material, but in front of the installation work of the roof construction requires solid preparation. In this article we will tell how the device of roofing pie is performed under a soft tile.
The soft roof is called bitumen tiles, which is made from glass cholester or polyester, impregnated with a modified oil bitumen or synthetic rubber. The outer surface of the shingle is sprinkled with basalt or mineral crumb to give color, textures and mechanical strength material. The soft tile is made in the form of tiles with a curly edge of which is 100 cm, width 30-45 cm, and the thickness of 0.3-0.45 mm. This roofing has the following features:
- A light weight. The square meter of the soft roof weighs no more than 13 kg, which allows not to lose the device of the rafter frame with additional elements.
- Flexibility. Material has high elasticity and flexibility, so it is easy to fit on the roofs of a complex shape.
- Durability. The service life of the roof with such a coating is up to 70 years, and it does not require much maintenance.
- Resistance to the factors of the external environment. The soft roof is valued for high moisture resistance, tolerance to the effects of ultraviolet and temperature drops.
Note! Soft roof is not recommended to mount on structures with a high risk of fire, as it refers to flammable materials. In order to reduce the likelihood of fires, the device of the rafter frame is performed with mandatory treatment with fire-links.

Nuances of work
The soft roof is fixed on the base using a self-adhesive layer from a slightly melting bitumen on the underside of a material protected by a polyethylene protective film. The roof device from bitumen tiles can be performed only under certain weather conditions:
- The ambient air temperature should not be below 5-10 degrees, since otherwise the bituminous layer will have to warm up forced with the help of a construction dryer or gas burner, risking damage to the tile.
- The ambient air temperature should not exceed 25 degrees so that when the roof improves the roof, the bitumen layer is not melted and does not glare down the slope.
- Perform in dry, not rainy weather on the dried base, in order to prevent the plumbing frame and the finish coating during operation.
Important! Store a bitumen tile for roof flooring is necessary in a dry, protected from direct sunlight place to prevent the bipathy layer of melting. Remove with a shingle protective film in order to avoid sticking material before mounting the coating is not recommended.

Requirements for the base
The device of the soft roof is beginning with the preparation of the base, the strength and reliability of which depends the service life and moisture resistance of the design. The process of creating a roofing pie to the bituminous roof must be carried out strictly according to the technology. The base provides the following conditions for flexible tile:
- Mechanical strength. The soft roof is laid exclusively on a solid crate, as it is not capable of independently hold. Therefore, the base for mounting the coating is made from the sheets of moisture-resistant plywood or chipboard.
- Smoothness. The lower surface of the flexible roof is easy to damage, so the laying is produced on the lining carpet, however, the base does not prevent the stiffness, free from the knots and jar.
- Smooth surface. Installation of the roof from bituminous tile does not tolerate curvature. Any skew of the crate will lead to the appearance of gaps between the gates.
- Ventilation. The ventilation gap between the roofing coating of the bituminous tiles and the rafter frame should be at least 50 mm to avoid the "greenhouse effect" and the appearance of condensate.
Note that the compliance of the foundation of the correct technology guarantees a long service life of the roof, the absence of leaks and mechanical damage of the frame.


Technology training
Roofing pie, with the help of which the device is performed with a soft roof, consists of a layer of vapor barrier, insulation, waterproofing, controllattices, a rarefied crate, lining carpet and finishing coating. The quality of the design depends on the correctness of the calculation, the order and compatibility of materials. Preparing the roof under soft tile is as follows:
- First of all, it is necessary to check the condition of the rafter frame. All rotten elements need to be replaced. Repeated with antipiren and antiseptic.
- Through rafted strips with an adoption, secure vapor-permeable membrane waterproofing. The waterproofing material is fixed with a construction stapler with sagging to avoid a break in case of leakage.
- On top of the waterproofing, the rails are tapped with a thickness of 3-4 cm to provide ventilation gap. Then perpendicular to the rafters fix the rarefied cladder from the edged board in a step of 30-50 cm.
- Plywood or OSB sheets are taken to an additional crate, making 1-3 mm gap between them.
- A solid base is placed on a lining carpet, which, in the subsequent, fill the soft roof.
Experienced masters note that the device of a qualitative, reliable base make bituminous roofs more durable and resistant to mechanical damage. Therefore, in the process, it is necessary to strictly comply with the technology and recommendations of manufacturers.


Video instruction
The basis for soft bituminous tiles serves glass choles, bitumen and sprinkle from stone crumbs. Popularity The material provided full immunity to corrosion and waterproof. It can be used on the roof of any form, including the dome. Basalt powder protects against heat and ultraviolet, protects the bitumen base from precipitation and mechanical damage. Fiberglass ensures the strength of the material, and the bitumen is complete waterproofing. Thanks to the versatility of the coating, many are interested in how to cover the roof of soft roof with their own hands.
Among the advantages of bituminous tiles:
- ease of transportation and unloading due to low weight;
- a small percentage of waste during installation, even on a curvilinear surface;
- soft material absorbs rain sound;
- high and low resistance;
- plasticity and flexibility that allows you to create various geometric forms;
- long exploitation;
- lack of electrical conductivity.
Manufacturers of soft roofs offer several forms of tiles cutting and many colors.

Tools for work:
- Hacksaw.
- Roulette.
- A hammer.
- Mastic craftsman.
Where to start laying

Cover the roof of tiles can be scrupulously observing the technological sequence of work. The first stage of arrangement is the preparation of the foundation. It affects the waterproofing of the roof not only the quality of bitumen gears, but also a doom. The base should be extremely smooth, durable and hard. The shadow step depends on the angle of the row and the strength of the winds in the region, it is 50-100 cm. The base of sufficient strength will become a cutting board of coniferous wood, OSP, moisture resistant plywood. To protect against rot, materials are treated with an antiseptic. Between adjacent sheets retain a gap of 3 mm for thermal expansion. The material used should be succeeded, humidity is allowed to 20%. The boards are joined over the supports, the length of each overlaps two spans of rafters. The plates are placed by the rotary and fixed by self-drawing.
To avoid metal corrosion, galvanized nails use.
Ventilation for soft roof

To ensure air circulation, leave the holes at the highest point (on the skate) and at the place of the abandonation of the eaves. Ventilation makes it possible to reduce the temperature in the attic room, divert pairs and condensate from under the roof, avoid land in the winter. Holes for natural ventilation are evenly distributed along the length of the skate and cornice.
The base should not be adjusted to the waterproofing, so it is important to make a gap of 5 mm.
Device of the lining layer

With the bias of the roof from 12 to 18 degrees, the rolled insulating material is spread across the entire roof. Start work from the bottom, from the cornice, laying the canvas in parallel. The junctions of the lining layer are performed by braziness, every 20 cm nails are nails. All seams are sealed with glue. If the angle of inclination is large enough, the individual sections are isolated: mansard windows, skates, endow, eaves and ends. On items, the lining material is spilled on both sides, its width is at least 50 cm. On the cornese swell, the magnitude of the lining material is 60 cm.
Additional elements

The edges of the crate need to protect against rain. For this, a metal dropper is nourished along the cornice. It is attached to the laying layer with an allen in 2 cm, nails are clogged every 10 cm.
The ends are closed with special metal frontal strips, they are also fixed as cornice - braziness and on top of the insulating layer.
Endow - a plot on which the leaks are possible to eliminate the end carpet. It is made of polyester fabric, processed by bitumen and basalt sprinkle. Fixed on the roof using mastic and nails, which are clogged 3 cm from the edge. The end carpet is selected one color with soft tiles. The edge of bitumen trunks is trimmed so as to leave open 15 cm carpet. It is necessary to create a gutter for which rainwater will flow. The described method is considered optimal.
Nuances that need to know

- It is recommended to carry out work on the laying of rows of soft tiles at air temperature from +5 degrees (° C). When freezing, it is impossible to ensure normal bonding bitumen. In addition, the material becomes fragile and does not allow creating a curvilinear design. The connection of tile trips with the base and between itself occurs when solar heat is heated.
- Working at low temperatures, tiles are made by small batches, and the main mass is stored in the warm room.
- It is impossible to leave a soft roof under the scorching sun, so as not to melted the bitumen.
- Bituminous tile has small divergences in color, it is better to take gamns from different packs, then the transition will be smooth.
- Do not clean the roof using a shovel, you can damage the coating. When installing, it is necessary to install the angle of the skate, which does not allow the snow to accumulate on the roof.

Before starting work with flexible tiles make the layout of the base. Horizontal lines are drawn in increments of 70 cm (five rows of tiles), the vertical markup is equal to the genth size. This will allow them to be stacked with smooth rows. Bitumnic roof tiles are laid first. It is performed from a universal self-adhesive soft roof. Before work, a protective film is removed. Sheets are stacked and attached to punching nails. Fixation sites overlap as follows.
Installation of flexible tiles start from the middle of the eaves and move to the ends. The first row must overlap, laid over the eaves, tile, the distance between their lower edges 1 cm. When the slope is bodied to 45 ° to attaching one tiles, 4 nails are used, with a greater value, 2 nails are added for reliable fixation.
The head of the nail should be located on the same level with the surface of the bituminous tile, and not crash into it.

The petals of the following rows should be at the same level and cover the perforation of the previous row. Depending on the tile cutting, the next row is selected. This allows you to form a chaotic or ordered pattern. Most models are stacked with a displacement for half a petal. The markup, made before the start of installation, will continue to continue the rows of flexible roof, interrupted by auditory windows or chimney pipes. On the ends, the soft tile is cut, not reaching 1 cm to the plank, and its edges are sampled by a layer of mastic width of 10 cm and nailed.
When cutting a material as a substrate, you should use Phaneur, it will save from the random damage of the lower layer of soft tiles.

On the endland carpet, the size of the gutter is noted, it can be from 5 to 15 cm. It should be noted that 30-centimeter zone is formed near the gutter, not nailed. Tiles cut down the border of the gutter. The top corner of the shingle is cut for a feet of water. With the help of a trowel on the edge of the tiles, mastic is applied and attached to the carpet.
Features of the finishing of the skate and ribs roofs

To make a tile suitable for the skate, an ordinary bitumen tile is needed into three parts. On the ribs of the roof, the ski tile is laid below up. After removal of the protective film, it is glued and fixed with four nails in two centimeters from the edge. The next part is glued with an allen in 5 cm.
Tiles on the skate laid towards the prevailing winds. For ease of installation, each part of the skunk tiles warm up in the middle and bend along the ribbed bar to the angle formed. Tiles are attached to the bitumen base and 4 nails. In the skate row, soft tiles are superimposed on each other with the allen, like ordinary.

To ensure sealing in places of connection with the antennas, chimney or ventilation pipes, laid an end carpet or galvanized metal. When choosing a carpet on the pipe installed plinth. The pattern of the material used is stacked with an approach of at least 20 cm on the ordinary tile. The back of the carpet is missing with bitumen mastic. It is glued along the perimeter of the pipe, the places of touch with tiles are processed by bitumen mastic by 10 cm. The top of the carpet coming on the pipe is closed with metal planks.
For the roofing device, special passing elements are purchased. Such an element is placed at 2 cm on the roof. Based on the hole. The skirt of the element is sick with mastic and nailed with nails. Its surface is closed with bituminous tiles, and the remaining joint is smeared with mastic and sprinkle with basalt crumb, to protect against ultraviolet.
Competently laid soft roofing will be a reliable home protection at least 30 years.
Video
A detailed video on the installation of flexible tile:
 How to return the love of her husband to his wife - Tips of the psychologist
 Why you can not give icons