How to make a manure pit out of bricks. DIY compost pit: manufacturing options, photos and useful tips. Self-construction of a compost pit
Every experienced gardener knows that in order to improve the yield, you need to fertilize the soil with compost. It will be much easier to save money on the purchase of fertilizer if there is a do-it-yourself compost pit on the site, which is not difficult to do. Accumulating in a private house enough organic waste suitable for composting. Thanks to the fertilizer, sandy soil will retain moisture better, and clay soil will become much more crumbly. Below are the main recommendations for the construction of the pit, as well as what needs to be put in the structure for the formation of quality.
How to choose a seat
 Before deciding on the location of the structure, it is important to think through all the nuances. Do not forget about the groundwater level, as the fertilizer should not come into contact with them. Dig a ditch at a level lower than that of the well. Between the well, the reservoir and the prepared ditch there should be a distance of at least 25-30 m.
The design should be in the shade, and not under the scorching rays of the sun. In the second case, decay will stop, and the humus will simply begin to dry out. To equip a compost pit is important near the fence in the shade or near the house. The building should be located away from the neighboring house, so that sometimes the aromas that appear do not reach them.
simple pit
 In the process of arranging the most common compost pit, you will need to dig a depression in the ground 60-100 cm wide and 50 cm deep, 200 cm long. Leaves, weeds and other plant remains from the garden are laid out at the bottom of the ditch. Then the remains of food waste are poured into the recess and again covered with various weeds. A similar procedure is repeated with the formation of each layer, since with this technology flies and stench will not appear. A compost pit will look much neater if you enclose the recess with a wooden rim along the perimeter.
It will be much easier to count on high-quality fertilizer if organic residues are periodically watered. Do not forget to also mix the compost with a pitchfork, covering it with polyethylene on top.
Compost pit do-it-yourself closed type
 Before choosing one of the types of structures, you need to understand in more detail what compost pits are. Except the ditch open type you can also choose a building of a closed type. Making the structure will take more time, but is considered more practical. The pit consists of two compartments, where one section is for new raw materials, and the second is for old compost.
It is very important before making a compost pit on the site closed type think over the design scheme and do not forget about the cover. The process of preparing the structure includes the following steps:
- Level the area where the structure will be by removing upper layer earth.
- Prepare ditches in the form of a rectangle. Width - 1.5-2 m, depth - 70 cm, length - up to 3 m.
- Decorate the walls when using concrete, they should be 10 cm thick. When arranging a compost pit with your own hands, make sure that the walls are 30 cm higher than the level of the pit;
- Place a metal cover on top of the structure. It will also be possible to supplement the structure with a wooden cover. In the latter case, drill a few holes for ventilation.
Slate compost pit
 This design option is considered very convenient to use. Slate is a fairly durable material in which it is convenient to store humus. When making a slate box, first take all the measurements and think about where it will be located, and also think about the number of sections.
Before making a slate compost pit, you need to dig a small rectangle-shaped depression in the ground. After that, make supports at the corners of the ditch using boards or metal pipes. Lay sheets of slate along the contours of the ditch to form a symmetrical rectangle. If necessary, use slate to divide the structure into two or three compartments.
Regardless of the option for making a compost pit with your own hands, you need to remember a few rules for the rapid formation of fertilizer. Don't forget to moisten organic residues with water and add composting preparations with live bacteria.
Wooden compost box
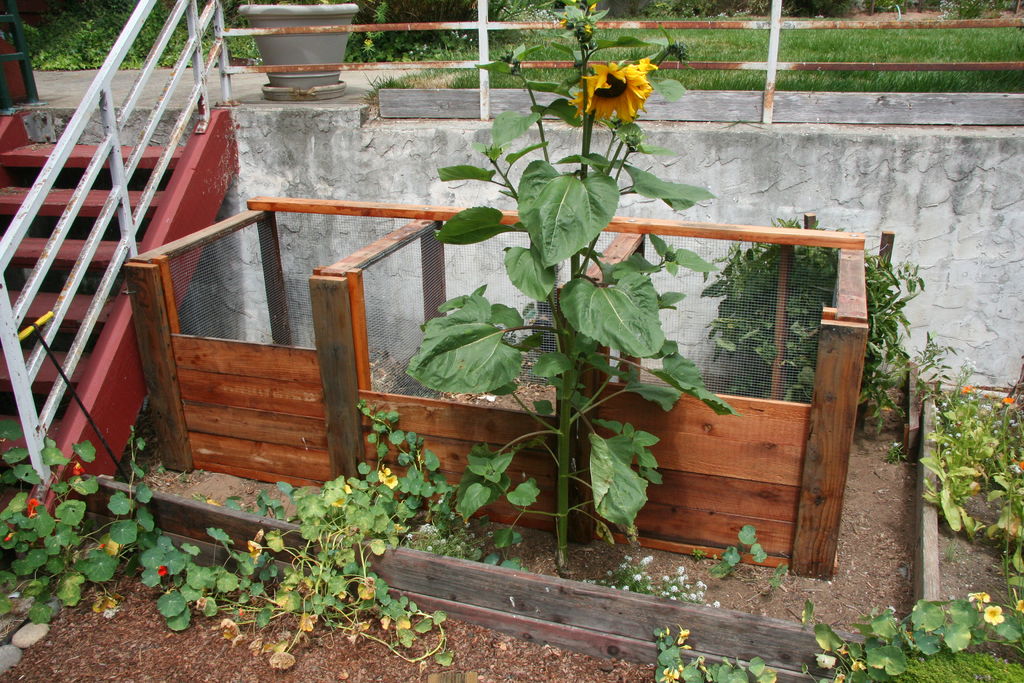
 It will be easier to prepare a convenient compost pit with your own hands if you pay attention to this design. A wooden box implies the presence of three sections: the first - for the receipt of waste, the second - to turn over the humus, the third - for storing ripened fertilizer. During the manufacture of the fixture, wooden boards will be required.
The process of making a box includes the following steps:
- Prepare 8 wooden blocks. Process lower part engine oil or tar to prevent the wood from rotting.
- Bury the posts in the ground. If desired, attach 4 bars to the fence so as not to dig an additional hole under them and do not make the back of the box.
- Make partitions in the box by attaching boards to the pegs. Small gaps should be formed between the boards for free air access.
- When making the first two compartments, sheathe the pegs with boards to the middle, since then it will be more convenient to attach doors to the structure from above.
- In the process of decorating the third compartment, nail one small board, this department will be the largest with one massive door.
- Install crossbars to form partitions, back and end.
- Attach the doors, they will act as a cover. Install two small and one large doors on the front of the box.
The wooden crate will not decompose and become part of the compost if the boards are pretreated. Choose a non-toxic impregnation at the store that will protect the wood from moisture and insects.
Regardless of how long the compost pit should be and how long the humus will build up, don't forget to paint the wood planks.
Cover the surface with two coats of paint. Choose the color of your choice, the main thing is that it fits perfectly into the landscape. At the final stage, install the latches and handles.
If you are at a loss as to whether you need a bottom compost bin, but if you want to install the structure for several years, then consider a concrete bottom or make it out of plastic. Line the concrete with drainage from above so that the process of humus formation takes place as efficiently as possible.
Tire compost pit
 This design option is considered budgetary and at the same time easy to manufacture. If you have old tires in your house, then feel free to proceed to the manufacture of the structure. When preparing the design, use 4-6 tires. Before making a compost pit with your own hands, cut out inner diameter tires to increase the size of the future design.
Install the tires on top of each other and pour the already prepared waste into the middle of the structure, then place the fittings (2-3 units) in the center. With its help, sometimes move the layers so that oxygen enters the lower layers of humus. By autumn, the whole structure will be filled. Leave the compost until spring in a cylinder of tires. In the spring, the contents will settle, and you can remove the tires, extracting the finished humus. Then repeat the procedure for the construction of the compost pit.
DIY compost: manufacturing options
 It will be much easier to count on high-quality humus if you not only prepare the right design, but also learn how to sort waste. Get high-quality fertilizer will be obtained from such organic waste as:
- rotten fruits and vegetables;
- needles, straw, leaves, branches and roots of trees and plants;
- coffee grounds and tea leaves;
- manure;
- small pieces of paper and newspaper.
It is important to understand not only what can be thrown into the compost pit, but also what waste is not suitable for the formation of humus. This category includes the following products:
- tops from tomatoes and potatoes;
- bones;
- tops treated with chemicals;
- pet excrement, dangerous insects(Zhukov);
- synthetic waste;
- coal ash.
Thanks to the arrangement of the compost pit, you can count on free and completely natural fertilizer. Choose the type of construction, taking into account your budget and capabilities.
Composter from wooden pallets - video
In summer cottages and household plots, the problem of recycling organic debris often arises - leaves, weeds, cleanings, sawdust and other things. Unlike inorganic waste (glass, plastic, etc.), all this can be used to produce clean, environmentally friendly fertilizer - compost. It turns out as a result of the biological process of decomposition under the influence of the vital activity of microorganisms. When compost is added to any soil, it improves quality characteristics. Clay soils acquire a lighter, crumbly structure, and sandy ones retain moisture better. Consider how you can make a compost pit and properly prepare the compost.
The following organic wastes are suitable for raw materials, which are conditionally divided into two large groups.
brown waste
These include those that emit carbon.

green waste
 Green waste is considered to be nitrogen-releasing waste.
- berries, vegetables and fruits unsuitable for food and processing;
- sleeping tea and coffee cake;
- cores and cleaning;
- tufts of wool;
- leftover soups, cereals;
- eggshell;
- waste products of herbivores.
When bookmarking a large number freshly cut grass, the compost preparation time will increase significantly. To speed up the process, lightly sprinkle small layers of grass with earth.
What can't be put in?
Not all organics are suitable for laying for fertilizer.

Do not put in a compost pit:
- fresh pet excrement;
- loach, wheatgrass;
- bones;
- leaves and other parts of plants affected by diseases, especially powdery mildew;
- plants treated with any chemicals;
- weeds that have had time to ripen seeds;
- inorganic non-degradable waste (rubber, metal, glass, synthetic materials);
- tops of potatoes and tomatoes;
- fats, meat, dairy products;
- fresh and boiled eggs(except shell).
Potato and tomato tops, even healthy in appearance, can be a carrier of late blight. Subsequently, such a fertilizer can infect all plants. In addition, this raw material is disposed of for a very long time, the process will take about 5 years.
Everything that is not suitable for a compost pit, but should be thrown into a latrine or taken out of the site as garbage.
Placement Requirements
A place on the site is chosen, as a rule, not in plain sight and one that is not a pity - where nothing grows due to dense shade or infertility of the soil, somewhere behind outbuildings, if any, in the backyards.
There are other important points as well.
- You need to understand that rotting raw materials will not exude the most pleasant smell, so you should think about moving away from the resting place and about the neighbors. It would be nice to know the wind rose so as not to place a pile on the leeward side.
- Consideration should be given to ensuring free access to the pit, since raw materials will be added and taken constantly throughout the season.
- It is advisable to choose a site on flat surface, and not in a pit, it is possible with a slight slope to eliminate stagnation of water, which interferes with the flow of oxygen, and therefore stretches the process in time.
- The compost heap, although called a pit, must be above ground level. In this case, it will warm up better, it will be more convenient to loosen it, water it and generally serve it. The optimal parameters are 50 cm deep, 1 m of the barrier above the ground. Higher walls will make it difficult to loosen and use compost.
- Avoid proximity to the source drinking water(should be over 25m).
- The place should be in the shade or partial shade - sunlight slows down and dries out the raw materials.
- Do not place the structure under the trees, they can get sick and die. Neighborhood with coniferous and other evergreen crops is especially not recommended. The best neighbors are alder and birch.
Do not cover the bottom of the pit with film, slate or other material that does not allow moisture to pass through! It must penetrate from the soil unhindered (deepening will contribute to this), otherwise everything will dry out. The bottom must remain earthen.
Design features
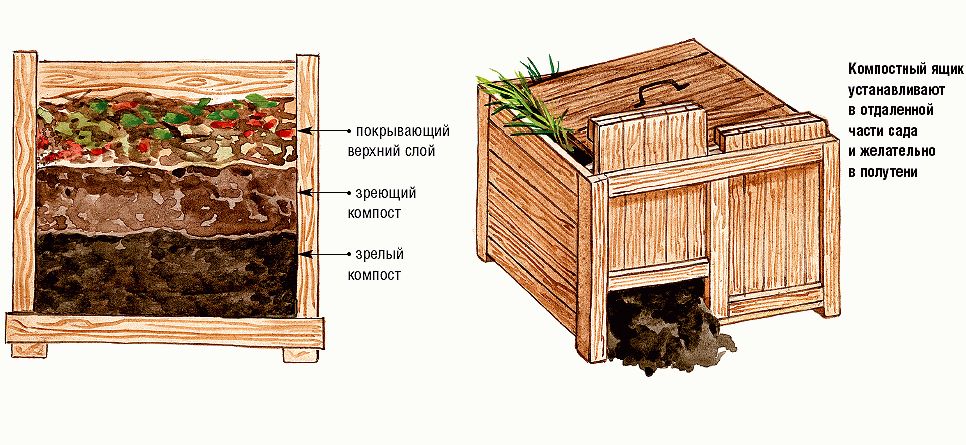
The ideal dimensions of the structure are usually indicated by the parameters 1.5m x 2m, but in the end they are determined based on the amount of raw materials that can be accumulated in 2 years. This is how long the process of preparing the finished substrate will go. Therefore, the ideal well should be twice as large and two-section, designed for two cycles. In the first compartment there will be a ready-made bookmark, in the other over the next two years fresh waste will be added.

It is important to know that a small pit will not warm up well as a result of decay, and this temperature may not be enough to kill all pathogenic microflora and harmful spores. Experts determine the desired temperature at 60C and the above optimal dimensions.
From above, the structure must necessarily have a removable cover.
Design Options
You can equip a compost pit in different ways, consider a few common options.
regular pit
The simplest construction that does not require additional costs and materials. A shallow pit is made, no more than half a meter deep, into which everything is folded according to the usual principle. Top contents are covered with black polyethylene. In order to make it easier to remove it to add waste or use, it is rolled up on both sides long stalk, which simultaneously serves as a load. After each new bookmark, it is recommended to cover the waste with grass.

The option is simple, but it is difficult to call it effective and convenient. There will be difficulties with mixing, and such a pile will not be able to warm up enough, which means that in order for it to overheat, it will take a longer period.
Two-section composter
Boards, old slate, metal sheets, corrugated board, walls from plastic containers, brick, etc. can serve as material for manufacturing. The optimal dimensions, depending on the size of the plot, are 1.5-2 m wide and 2-3 m long. To make a deepening of 0.5-0.8 m. To fix the structure in the corners (stepping back to the required distance from the pit), pipe sections or metal rods of large diameter are dug in that can withstand the weight compost heap. wooden poles they are not suitable for this purpose, since the process of decay will invariably affect them, and the structure will not last long due to the load.

Install the walls, not forgetting about ventilation holes. A partition is installed in the middle, dividing the structure into two equal-sized compartments. Ready-made humus will be stored in one of them, and “young” waste will be added to the second. It is better to make the lid hinged, on hinges, so that it does not move out and tightly covers the contents.
It is desirable to treat the supporting sections of metal pipes with an anti-corrosion bioprotective composition, and all wooden details - protective impregnation and then cover with two coats of acrylic paint.
The bottom, as already mentioned, cannot be covered with waterproof material, but straw, sawdust or tree bark for this they are the best fit - they will provide the necessary air exchange and allow excess moisture to calmly leave.
If desired, you can make three sections. In the first one there will be a ready-made substrate, in the second - a fully laid ripening one, and the third one will be intended for laying new raw materials.

Single section composter
A simpler and more compact version. You will have to pick up the finished product from below, for which in one of the walls (or even better - with different sides) you need to make a hole from which the ripened fertilizer will be selected. A distance of at least 30-40 cm should remain between the wall of the box and the ground. In this case, it is not necessary to mix the substrate.
Concrete box
A construction that will be done literally once and for all. Accurate and reliable. To do this, you need to dig a trench of the desired perimeter with a depth of 70-80 cm and make a formwork. Pour concrete into it, remove the formwork and remove the earth from the box to the desired depth. As a cover, you can use a wooden shield or a film pressed with a metal mesh.

Finished plastic container
The modern market offers ready-made plastic composters. They have different size(within 400-1000l), the necessary ventilation holes (make sure of this!) and a cover.

Their cost depends on the size, design and region and usually ranges from 2 to 10 thousand rubles.
Do not make compost pits too large, their contents will overheat, which is also undesirable, as this will lead to the death of necessary microorganisms.
How to properly fill a compost pit?
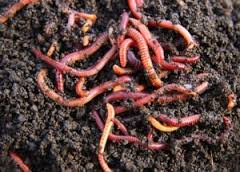
Before laying the raw materials, clean the bottom of the pit from the sod and dig it well to a depth of 30 cm. This will provide conditions for the active life of worms and the penetration of beneficial microorganisms, which will provide indispensable assistance in the waste processing process. In addition, excess water will go well into loose soil.

We start laying, alternating layers of wet and dry, brown and green raw materials. Their optimal ratio should be approximately as follows: 3 parts of brown waste to 1 part of green, and there should be 5 times more wet raw materials than dry ones. Everything large should be broken or chopped.
Moisturize (not much) and close the lid.
Raw materials should not be heavily compacted, but excessive looseness is also undesirable. Everything should be in moderation, especially humidity.
Putting compost in storage is not everything. Proper further actions will help speed up the process of decay and make the fertilizer more nutritious. Stick to the following guidelines.

More quick cooking the following supplements.
- Rotten horse manure.
- Some types of plants (valerian, chamomile, dandelions, yarrow).
- Specially produced activating preparations, for example, Baikal EM-1, Compostin and Compostar.
- Stale (dried) bird droppings.
- stems legumes.
- Bone and dolomite flour.
- Superphosphate and complex mineral fertilizers.
In the process of rotting the contents, the temperature inside rises, and light steam may even rise from the heap. This is normal and indicates that everything is going well.
Do not spare your time and effort for this uncomplicated structure. This will also solve the problem of recycling a considerable part of organic waste, and will provide the most valuable fertilizer, in the quality and environmental friendliness of which you will be absolutely sure.
If you got bad land on the site, on which nothing wants to grow, start enriching it. It is easiest to bring black earth, but it is not always possible to get it, especially in the city. It is also unprofitable to introduce chemistry abundantly: in the end, you yourself will consume it. There is only one thing left: to make nutrient soil ourselves. Or rather, learn how to cook healthy compost. It is only ignorant people who are afraid of compost pits, because they think that they emit a stench that spoils the air in the entire area. In fact, compost does not smell if it is properly laid and bacterial activity is maintained. How - let's take a closer look.
So, the first thing they pick up on the site comfortable spot for the compost pit. As a rule, she is given territory in the backyard of the garden, behind outbuildings, where the appearance of a pile of waste will not spoil the overall landscape. The only caveat: look during heavy rains, where the water flows. It should not run towards the well (if there is one), otherwise decay products of the waste may get there, which will affect the quality and taste of the water.
There are two arrangement options: you can dig a deep hole and put raw materials for compost in it, or knock down a wide box from wooden planks with a removable wall for ease of use.
Pit technology
A deep pit is more convenient because all plant materials will hide in the ground and will not hurt the eyes, but the compost in it takes longer to cook, and it is more difficult to mix it. If, nevertheless, only this option suits you, equip the pit correctly, because oxygen and ventilation are necessary for the normal decomposition of organic matter. And the dense earthen walls and the bottom will not let any air through. Therefore, the hole is dug as follows:
- They take out the soil no more than a meter deep, three meters long and one and a half wide.
- 20 cm on each side retreat from the walls of the pit and knock down wooden box, having dug 4 columns in the corners and nailed planks to them.
- Between the boards, the distance is about 5 cm, so that all layers of the compost are ventilated.
- Divide the hole into two equal parts with a wooden shield to fill only one half.
- The bottom is covered with thick tree branches, bark, spruce branches and straw (whatever you find). This will be a drainage that removes excess moisture and helps the compost to ventilate from below. The height of the drainage layer is 10-15 cm.
Vegetable waste is stored in one part of the compost pit, but during the season they are thrown several times from one half to the other in order to saturate the heap with oxygen.
The hole can be made halfway in the ground, and not buried completely, then it will be easier for you to stir up the contents and air access will improve
The second option for laying compost is in a box made of unpainted wood (or factory made of plastic). By appearance it is absolutely identical to ordinary boxes, only several times larger. When creating a frame, do not forget to leave gaps between the boards and make one side removable, so that it is more convenient to lay and mix the raw materials. Alternatively, you can hang a door.

The plastic composter has perforated doors at the bottom on each side, through which the contents are ventilated, but you will have to moisten the waste yourself
Since such structures are usually made for many years, the floor can be concreted, and drainage can be laid on top (such as in the pit). Some owners put wooden or plastic shields on the bottom. True, over time, the tree will become unusable, but nothing lasts forever.
Now it remains to fill the prepared place with the right raw materials, which will rot into high-quality compost.

Two compost bins located side by side are convenient in that you can transfer waste for ventilation from one to another without littering the nearby area
Features of the correct laying of waste
In order for your pile to successfully rot and turn into nutritious soil by the new season, you need to throw only plant waste into the compost: leaves, mowed grass, the remains of root crops and fruits, sod, weeds, finely chopped branches of trees and shrubs.

By laying waste from your own garden in the compost pit, you thereby solve the problem of removing plant debris and get fresh, high-quality soil
To make the composition of the compost even more nutritious, put in it everything that you didn’t eat yourself: leftover soups, coffee grounds, tea leaves, yesterday’s salad, etc. In a word, put another container for plant waste in the house next to the garbage bin, and you'll be surprised how quickly it fills up. Suitable for compost old carton boxes, newspapers (black and white), worn items from natural materials(cotton, wool).
Unwanted Ingredients
And now let's focus on the harmful ones, from the point of view of experienced gardeners, waste. It is strictly forbidden to put the remains of animal products into the compost: dead birds and animals, old fat, fats, intestines, spoiled milk, sour cream, etc. All this, when decomposed, begins to exude bad smell and attract to a pile of harmful insects, neighbor's dogs, cats and crows. In addition, decay processes in animal remains are slower than in plant remains, and your compost will not have time to ripen by the next season.
But summer residents have not decided on marine life. Some do not add them so as not to attract animals to a bunch, but others are happy to throw into the compost everything that remains when cleaning the fish (heads, scales, entrails), citing the fact that they contain phosphorus valuable for plants. Only it is necessary to bury such waste deeper in a pile so that the cats do not smell the smell.
Indeed, fish feeding is useful. Therefore, we advise everyone who is sorry to throw away a valuable product: do not put them in compost, but bury them right under the trees, in near-trunk circles. Just dig a deeper hole. Thus, you will feed the garden, and you will not attract stray animals.

If you knock down a compost bin with an opening roof, then feel free to put fish waste inside, because animals will not crawl into such a container.
Do not put plastic, glass in the pit, metal objects, rubber, washing water, etc. They are harmful to the soil. All paper products with a laminated base or with color drawings will not be useful either. There is too much paint and chemicals in it.
An undesirable ingredient in compost is tomato and potato tops. By autumn, it is all affected by late blight, and the spores of this disease will be transmitted with compost to healthy plants.
Do not lay in the compost and weeds with the beginning or end of the flowering period. For example, if a dandelion has had time to form a flower, the seeds will still ripen, even if it is plucked and placed in a pile. Therefore, try to mow weeds before flower buds appear.
If there is nowhere to put nightshade tops and large weeds that have had time to seed, spread them on a solid base (concrete, linoleum) near the compost pit and let dry. Then throw all the vegetation in iron barrel and set it on fire. Everything will burn, along with diseases and seeds. Useful ash will remain. Add it to your compost heap.
How to compost waste?
In order for the waste to decompose quickly, moisture, oxygen and accelerators of putrefactive processes are needed. You provide moisture yourself by watering abundantly during those periods when it is hot outside. Oxygen will penetrate into the compost more actively if you correctly lay out the layers of raw materials. So, dry waste (potato peelings, straw, hay, fallen leaves, husks, etc.) should be alternated with green waste (tops, fresh grass, rotting vegetables and fruits), soft with hard, in order to avoid excessive compaction. It is very important that the compost is made from brown and green ingredients in equal proportions. Fresh waste is the main source of nitrogen required by all plants. Brown (i.e. dry) act as a layer that prevents the compost from sticking together. They are considered a kind of fiber, which makes the soil airier and lighter.

Try to put green and brown waste in equal proportions, as excess green will cause compaction, and excess dry material will suck nitrogen out of the compost.
If you need compost by next spring, add decomposition accelerators to it. These can be concentrates bought at a garden store that need to be diluted warm water and activate the work of beneficial bacteria contained in the preparation.
An excellent accelerator fresh manure(horse or cow). They find a couple of cakes on the field, dilute them in a bucket of water and let it brew for two days. Then the finished solution is poured into the compost and the contents of the heap are mixed. If this goodness is not near your dacha, finely chop the leaves of dandelion, nettle, legumes, fill it with a bucket of warm water and put it in the sun. After day 4, the mixture will begin to ferment. Then pour it into the compost.
To avoid nitrogen weathering, the compost heap is covered on top with non-woven material or black film. V closed rotting is faster, and a sign of this will be the active release of heat. Inside the compost, the temperature should be at least 60 degrees.

Wrap with foil wooden box from top to bottom is highly undesirable, because by doing so you block the path of oxygen, and the quality of the finished compost will be much worse
During the season, the pile is shoveled 3-4 times to ensure uniform decay of all layers. By spring, plant waste will turn into rich loose earth smelling soil that can be applied under trees, mulched strawberries, or mixed with garden soil to improve its composition.
compost pit This is a place for the disposal of organic waste. As a result of the activity of microorganisms, garden debris decomposes in it, which becomes the basis for highly effective organic fertilizer. In the article, we will consider options for making a compost pit with our own hands.
In one form or another, compost pits, in the form of the simplest heaps of garbage, are present on every personal plot. But correct designs in the form of modern composters or specially equipped boxes, they can increase the amount of valuable fertilizer and the speed of its creation.
The simplest compost pit can be made with your own hands from utility building materials available in the country.
Compost pit principles
The main function of the compost pit is to create the most comfortable environment for the life of bacteria, microorganisms, earthworms, the number of which determines the speed of the process and the quality of the resulting compost. To do this, a fairly high temperature and humidity must be maintained inside the compost heap with a regular supply of oxygen.
To do this, the compost tank must have the following design features:

Make compost boxes from any available materials. These can be boards, slate trims, corrugated board, metal construction mesh, and even car tires. More capital structures are built of brick or concrete. There are also lightweight, portable utilizers in metal or plastic barrels.
The main sanitary requirement for the construction of a compost pit is its distance of 20 meters from water bodies and sources of drinking water. Rain streams should not drain from the compost heap in the direction of wells, wells, pools.
Choosing a site for a compost pit
The location of the composter on the site should not become a source of groundwater contamination, a threat to human and animal health. Do not place a compost pit in wetlands or in places with stagnant water.

The external design of the compost pit can be absolutely anything. It can be decorated with beautifully colored shields, fenced with loach plantings and perennial ornamental plants.
Making a compost pit with your own hands
On a garden or personal plot, you can use the most simple tools make a quality construction and turn a pile of garden debris and decomposable household waste into valuable fertilizer. There are the most different kinds compost heaps, from earthen ditches to real concrete structures.
Compost pit in the ground
To create a compost pit:
- In the ground, a site is selected away from residential buildings.
- On an area 1.5 m wide and of arbitrary length, the top layer of turf and soil is removed.
- The bottom of the pit should be located at a depth of no more than 0.5 meters.
- The bottom is covered with a sand cushion to drain excess water.
The first layer performs the function of drainage and promotes aeration of the pile and consists of cut branches.
They are laid in layers:
- cut grass;
- dry foliage;
- sawdust;
- household food waste;
- manure;
- weedy herbs.
Layers are sprinkled with peat or garden soil, spilled with water. To speed up the decomposition process, it is advisable to grind all the ingredients before laying, simply chopping with a shovel.
The total height of the pile should not exceed 1.5 meters. This means that it will rise 1 meter above the ground. The structure is protected from above with a covering material or a slate shield. In hot weather, a pile is watered with ordinary water.
Under natural conditions, microorganisms will be able to process such a waste dump in two summer seasons. This is the easiest and most economical way to get compost.
Use EM drugs. A temperature of +4°C inside the compost heap is enough for microorganisms to successfully process waste.
Making a compost pit from boards
For ease of use and speed up the recycling process, the compost bin is made from boards. Optimal size compost bin 1x1.5 meters.
Instructions for making a pit from boards:
Garbage is placed in such a container through the top general principle starting with branches. And you can rake out the finished compost already from below.
Photo: drawing of a compost box, composter diagram
Variants of compost pits made from boards
Slate is durable and is perfect for the walls of the compost bin. You can use both wave and flat sheet slate.
 Options for making a composter from slate:
- Marking is done at the location of the compost heap and deepen cut-to-size sheets. They can be fixed with an external, wooden or iron crate.
- In another embodiment, metal pipes are buried in the ground. A frame of bars is attached to them. Outside, it is sheathed with slate. The second design is more durable.
Everything wooden elements should be treated with an antiseptic to prevent rotting. A cover for the pit is made from plywood or boards. The front wall of the pit is made lower, at a level of 40-50 cm above ground level. Rigid walls allow you to cover the pit with a film or garden covering material.
Compost pit from corrugated board
When making a compost bin from corrugated board, choose a material with an anti-corrosion coating.
Work order:
- At the chosen place, a base is constructed from a metal or wooden block.
- The dimensions of the pit are chosen according to the length of the sheets, which allows you to make a compost bin with two or three compartments.
- The base is made, as for a wooden structure.
- Outside, the profile strips are fastened with self-tapping screws with gaps of 3-5 cm.
- It must be taken into account that metal surface gets very hot during hot summers.
- From above they make a shelter for their plywood or boards. It is desirable to cover the frame with a protective compound.
Metal mesh compost bin
To make compost, you can make a cylindrical container from a metal mesh. In such a cylinder, the compost is well ventilated and does not rot.
How to make a compost bin:

To simplify, you can put a large plastic bag (polyethylene) inside the basket, which is used for garbage. These baskets are easy to assemble and install anywhere. They are filled with waste according to the principle of a compost pit. And also compost can be made in special bags that are sold at garden centers.
Concrete compost pit
A concrete compost pit creates many benefits:
- Thick walls maintain a positive temperature for a long time.
- Such a pit is durable and reliable, not affected by adverse environmental conditions.
It is desirable to make it large, into two or even three compartments. Compost of different seasons will ripen in the first and second blocks. The third store bags of finished compost.
How to make a concrete compost pit:

During operation concrete pit It must be taken into account that the process of making compost is slow. To speed up the process, you need to manually add earthworms or commercially available special products to it.
Other material options for the compost pit
Compost pit from car tires
Car tires are quite suitable for arranging a compost heap:

Compost in an iron barrel
Old iron barrels are great for composting:
- We cut down both bottoms with a chisel and put them near the track.
- We put weeds, mowed grass, kitchen waste in layers in a barrel.
- To increase the temperature, you can paint the barrel black, pour the compost with a solution of ammonium nitrate ( Matchbox to a bucket of water).
- We get the finished compost from below. To do this, you need to lift the barrel with a crowbar.
To improve the design:
- Using a grinder (angle grinder), you need to cut the barrel into two unequal parts and punch holes in the walls for air circulation.
- Then we put them on the priest and connect them with wire or rope. Cover with a lid on top.
- The advantages of this design are the easy accessibility of the contents of the barrel for worms and bacteria from below.
- To get ready-made compost, you only need to untie the rope, and you will receive two hundred liters of ready-made fertilizer.
Compost in a plastic barrel
 The ideal material for a compost bin is plastic. In conventional compost heaps, compost takes two years to mature. In plastic barrels with a capacity of 150-200 liters, liquid compost can be prepared in two weeks.
For this:
- We fill the barrel with cut grass or weeds to half, and fill it with water to the top.
- After about three days, the fermentation process will begin.
- After using the solution, you can again add water to the barrel and let it brew for one week.
- Having spent the liquid compost completely, the remaining grass is folded into a compost heap.
Brick compost pit
A brick compost pit is made in three walls. It can be done on cement mortar or without it. On a cement mortar, a compost pit is made no more than 1 meter high. Between the bricks you need to leave gaps for ventilation.
A brick compost pit without a cement binder is convenient in that it can be moved to another location if necessary.
In the compost pit, you need to provide a place for throwing the compost mass. Make a lid from available material. The front wall is made temporary so that it is convenient to take out the finished compost.
Compost pit made of concrete rings
In the inner cavity concrete ring you can successfully store garden waste and get compost as a result. For comfort the ring is partially buried in the ground, and after filling, cover with a lid or film material.
The disadvantages of the design include the absence of an underestimated front wall. To unload the finished compost, you need to climb inside. Otherwise, very durable compost chambers are obtained from such reinforced concrete products.
Compost pit according to Finnish technology
 If there is no desire to make a compost pit, you can purchase a composter at Finnish technology. It is modern with two containers, with a capacity of 80 liters. Its contents are mixed with a layer of peat and sawdust. You can also recycle food.
When the container is full, it is pulled out and another is inserted. Due to the high concentration, the finished compost is mixed with earth or sand and fertilized with plants. The empty container is washed and returned to its place.
Do not confuse compost and cesspool. Organic matter is stored in compost bins with garden plot. The remains of protein food should be disposed of in a cesspool.
What can and cannot be put in a compost pit?
Thanks to composting, the amount of waste in landfills is reduced, and our vegetable gardens and orchards receive additional fertilizer.
 In the compost pit, first of all, organic garden waste is laid, in the form of:
- branches;
- dry foliage;
- cut grass;
- weeds;
- straw.
Good ingredients for a compost heap are:
- food leftovers from vegetarian food;
- egg shell;
- onion peel.
You can layer the compost with manure and chicken manure.
The prohibited ingredients of the compost heap are:
- construction and household waste with a high content of phenols;
- remnants of printed products;
- plastic.
Do not compost leftover protein and oily foods, as they decompose slowly and attract mice and rats.
From plant residues do not compost weeds with ripe seeds and with roots that can take root well, such as:
- thistle;
- wheatgrass;
- loach.
Drought-tolerant plants should be dried before being placed in the compost pile so that they lose their ability to root. Sawdust can be used in moderation as it slowly decomposes and takes up nitrogen. And also do not use feces of domestic animals and humans when composting.
Preparations for the compost pit
The main task of preparations containing biological activators is to accelerate the decomposition processes with the help of microorganisms.
The preparations do an excellent job with the processing of organic matter and do not allow pathogenic microflora to develop in the compost pit:
- Compost preparation can be significantly accelerated by using Baikal EM. This preparation contains effective microorganisms (EM).
- The drug "Doctor Robik" significantly increases the number of effective microorganisms (EM) in the compost. They are engaged in the processing of organic matter into humus, and also prevent the development of pathogenic microflora and destroy the larvae of harmful insects.
- The bioactivator has similar properties. The Green-Master bioactivator package must be diluted in 20 liters of warm water, let it brew for 4 hours and water the compost heap. After 2 weeks, you need to turn a bunch of pitchforks. For the preparation of compost, one treatment with a bioactivator solution is sufficient.
- Good results are obtained by the drug "Compost Boost" for composting.
- Manufacturer Lucky summer resident produces "Biocompostin"- compost preparation. Saneks plus releases the EcoCompost product.
- Manufacturer Dezon Bio K produces several types of drugs:"Green all-rounder", "Compost of one season", "Compost for the next agricultural season", "Bioactivator for compost".
By using preparations, microbiological processes can be significantly accelerated and compost can be obtained in 2-3 months.


Preparations-bioactivators for compost
Rules for the operation of a compost pit
After the construction of the compost box and its filling, it remains occasionally to look inside and, depending on the changes taking place, correct the decomposition process.
Tips for using the composter:
- In dry periods, it is necessary to water the compost with plain water, preventing it from overheating, which leads to a reduction in the population of some types of beneficial bacteria.
- At least once every two weeks, you should loosen the compost heap., thereby providing an influx of oxygen into all, even the lowest, layers.
- Add "Effective Microorganisms" to your compost content in the form of solutions and various additives.
- To speed up the process, you can add a ready-made compost substrate, which contains a full range of microbiological activators.
- If the pit design does not have a top cover then simply tighten the top with a covering garden material black, which will increase the temperature and the greenhouse effect inside the structure.
Summarizing
Creating a compost pit does not require serious material investments. It can be made with my own hands from improvised materials, which are always enough on any personal plot.
Having spent a little time on making a compost pit, in the future you will not have to solve the problems of disposing of garden and household waste.
If you have a decent land plot, from time to time it still has to be fertilized. So why not use high-quality compost for these purposes? No, we do not offer you to buy it with delivery to household plot. This pleasure is not cheap. Much easier to do it yourself useful fertilizer on your own land. All the conditions for this already exist - it remains to establish the system. You can combine business with pleasure: clear the site of unnecessary waste and produce selected compost. Let's find out how you can build a compost pit with your own hands and try to avoid mistakes.
What are the benefits of a compost pit?
On a piece of land, compost pits are used to store waste, surplus products. Subsequently, they decompose and turn into fertilizer quite High Quality. If at the beginning of the season you build a compost pit at your favorite dacha with your own hands, already in the fall you will have ready-made, incredibly useful fertilizer. The average compost "ripening" time is three months. Of course, provided that the composter is made correctly, and due attention was paid to the pit. Otherwise, the decomposition process may take 1-2 years.
Compost pit building codes
To build a good secure home need a thoughtful design. The requirements for a compost pit are not so severe, but they are also there. To speed up the ripening process of fertilizers, try to ensure a regular supply of heat, oxygen and moisture. Follow these rules:
- The pile should rise above the ground, not be level with it or be below the ground. This is really important, because in this case the pile warms up much better, it is much more convenient to water and loosen it. We advise you to go deep by 45-50 cm, but leave barriers about a meter. An ideal do-it-yourself compost pit has a width of 1.5 meters, a length of 2 meters.
- Keep in mind that if there is at least one water source on the territory, it must be located 25 meters or more from the compost pit. If the site has a certain slope, the pit is always built below the source. Otherwise, the water in it will cease to be drinkable.
- The compost pit in the country is located at some distance from the dwelling or gazebo. You don't want to greet the morning with bad smell or fry kebabs in the yard, inhaling completely different “aromas”?
- It's great if there is some kind of big tree on the site. For compost, it is always recommended to choose a place that is in partial shade. This will protect the pit from drying out quickly.
- You should choose the size of the pit with your own hands, taking into account the volumes of garbage that are in the country, and are planned to be brought in in the next two years.
- Fences for a compost pit according to Finnish technology should have a height sufficient for convenient loosening and collection of compost.
Never make the bottom of slate, do not cover it with rubber or metal. These materials prevent the soil from rising up, but the compost will dry out regularly. The bottom is made of earth, the walls are covered with any of available materials.
 Diagram of a ventilated compost bin
 What is allowed to be thrown into the compost pit, and what is prohibited?
Building a composter with your own hands is half the battle. To get really high-quality fertilizer, you need to know what can not be put in the pit, and what can be.
To achieve maximum efficiency, you can safely lay the following types of waste:
- Bark and leaves, chopped branches.
- Grass, dried weeds.
- Dung that has long overgrown, droppings of birds and other domestic animals.
- Any fruits and vegetables, as well as their cleaning.
- The rest of the tea.
- Small sawdust, shavings, straw.
- The ash that remains after burning wood.
Any video about the construction and further use of such structures will confirm that ash can be put into the compost pit, and even paper in any form: cardboard, napkins. When laying fresh grass, especially if we are talking about a sufficiently thick layer, the decomposition process stretches for a year. To speed it up, we advise you to sprinkle the grass with soil.
 Compost filling scheme
 Never mortgage:
- Bones and very thick branches. They rot long enough.
- inorganic products. In particular, these include rubber and polyethylene, metal and plastic, synthetics.
- Tops of tomatoes, because it is often infected with late blight.
- Plants that have previously been treated with chemicals.
Now you know for sure that you can’t put it in a compost pit under any pretext.
Popular ways to create
At a do-it-yourself compost pit, all manufacturing options can be divided into several types. Let's list them.
Regular waste pile
It is not difficult to prepare such a heap option. You only need to choose the most suitable place to place the compost heap. Then gradually stack the waste. If possible, they are laid in layers. For example, food waste can be alternated with straw, green grass and manure.
As soon as the height reaches a meter, you will need to make 3-4 recesses and pour compost liquid inside. It significantly speeds up the process, so the first compost will be ready in three months.
The option described above is one of the most quick ways compost production at minimal cost.
 All you need to create a compost heap is a wheelbarrow and a shovel.
 classic pit
One of the manufacturing options is that you dig a small depression in the ground in a square shape. You cover your version of the pit with branches and hay at the bottom, as well as bark. Next, put food, plant waste. The temperature inside will not be very high, so it is recommended to immediately cover with foil.
Please note that this option is the least successful of all. Firstly, such a pit warms up much worse. Secondly, the temperature in it is not always high. But she has small area and easy to set up.
 classic compost pit
 Building a compost bin out of wood
How to make a compost pit so that the design is inexpensive and practical? To do this, you can use bars, sheets of metal with slate. The process of making a hole is as follows:
- You remove the top layer about 35-40 centimeters thick.
- Next, drive in pegs around the perimeter.
- A fence will need to be installed around the hole. You can make it from pallets, use wood blocks, boards and shields. It is allowed to use other materials: flat and wavy type slate, polycarbonate, metal sheets.
- The height of the fence is not more than one meter. Otherwise, even with big stature you will be uncomfortable mixing the compost.
- The structure is covered with plywood or film. Compost warms up very well, so this design considered optimal in all areas.
Very original version execution is the construction of a wooden box. The lower edges of the structure do not reach the surface by 25-30 centimeters. Boards and other materials are also attached at a certain distance from the ground. At the bottom, the compost matures several times faster, as it is laid much earlier. Ready fertilizer is taken from below, the pile gradually falls down. The main plus is that there is no need to loosen the pile, because you will always have the opportunity to get the right amount of compost.
 Compost bin with sliding wall
 concrete pit
Perhaps the most reliable and durable option that will serve you for decades. The arrangement of the building is as follows. After choosing a suitable building site (about 2 by 3 meters), you will need to choose a soil of about 60-80 cm. Next, you build formwork 10 cm thick around the perimeter, mix the concrete solution and pour it into the formwork. As soon as the solution hardens, the formwork must be removed. We lay the waste in layers one by one, cover it with wooden shields or film on top.
Despite the fact that this method is one of the most expensive, it definitely has no equal in terms of efficiency. It is advisable to immediately divide the compost structure into two sections. In one of them you will lay the waste of this season, in the other the compost from last year will decompose.
A compost pit can also be replaced by an ordinary large barrel. However, in this case, you will definitely need the use of special preparations or the addition of worms.
How to use the pit?
In conclusion, a few tips for those who already know how to make a compost pit with their own hands. It is equally important to use it wisely throughout the season.
- From time to time loosen the compost with a pitchfork. This will help oxygen to penetrate inside, and waste - to mix with each other.
- Water the pile from time to time to maintain required level moisture.
- Cover the contents with a dark film to create a greenhouse effect. When the heap is covered, the compost in it can mature even in 3-4 months.
- Plant earthworms in the prepared compost. They perfectly loosen the pile, recycle it.
There are more than enough videos and articles on the Internet on the topic of building compost pits. All of them agree that, with proper construction, a compost pit can provide the owners of the site with very useful and almost free fertilizer.
 How to build a profitable business selling shawarma
 The right advertisement for a hundred
 Own business: cosmetics and perfumery