Simple cesspools. Do-it-yourself cesspool. Of concrete rings
In the context of globalization, more and more people tend to settle outside the city. Private ownership is not just a tribute to fashion, it is independence and comfort. But in order to be independent from utilities, you need to initially think over the project of future communications. The most important element that must be done correctly is a cesspool in a private house. The frequency of treatment of contaminated water and waste, and the maintenance of the drainage system in good condition in the future, will depend on how conscientiously you approach the layout of the sewer drain.
Since ancient times, mankind has paid attention to the issue of hygiene in public places, since sewage waste is a source of infection and spread of infection. That is why, when forming a drainage system, you need to think about what structure to build on your site.
Making a pit on your own is quite simple, for this you need to think over the device of a cesspool, sketch a diagram, purchase or use improvised materials and start arranging the sewage system.
The drain pit in the country house can be made according to the old scheme: a deep rectangular, square or round pit with lined walls and a closing lid. This structure must be cleaned regularly.
The walls can be made of concrete in a monolithic way, or it can be an old barrel (it is advisable to grind it for this purpose), worn out car tires, the remains of broken bricks. Recently, ready-made polypropylene tanks have been used for installation.
To equip the sewage system on your site with your own hands, you can choose one of the following options:
- Absorbing structures;
- Hermetically equipped containers that periodically need to be cleaned;
- The simplest septic tanks.
Absorbing drains

Absorbing structures include all types of cesspools with lined walls and a moisture-permeable cushion made of gravel-sand mixture. The liquid, passing through the rough cleaning of the pillow, enters the ground and is absorbed by the ground. This option is the most economical; even a person who does not have any construction experience can lay it out with his own hands. A clear advantage of such a sewage device can be called soft cleaning from filling with contaminated water, since moisture seeps into the soil on its own. Only hardened waste should be removed from such a structure. Of the minuses, it should be noted the small throughput of such a drain system. It is possible to use the cesspool device in this way only if there is no automatic washing machine and bath in the house, since the earth will not be able to cope with a large volume of waste water.
At the first stage, you need to dig a hole of a certain size. Next, a layer of filter cushion is laid. The walls are either laid out or filled with concrete using the constructed formwork. For tightness, it is worth treating the pit with a bituminous mixture or lining the walls with a waterproofing material. The device of a cesspool can be made independently by doing all the operations with your own hands.
Sewer pipes should be laid below the freezing level of the soil so that they do not burst during severe frosts. The rates of water occurrence should be viewed in geodetic maps.
Sealed drains
Sealed include large-sized containers buried deep in the ground, or laid out of a material that does not allow water to pass through, the bottom and walls of the well. Due to the tightness, the absence of odors is ensured, especially if pelleted biological bacteria destroyers are thrown into the pit. The disadvantage of such masonry is that the owner is forced to regularly use the services of a sewer. Before building a sealed type sewer, find out the volume of the machine that serves your area. The possible volume of the pit should not exceed the capacity of the sewer. You can ask the driver or the village council for the collection rate.
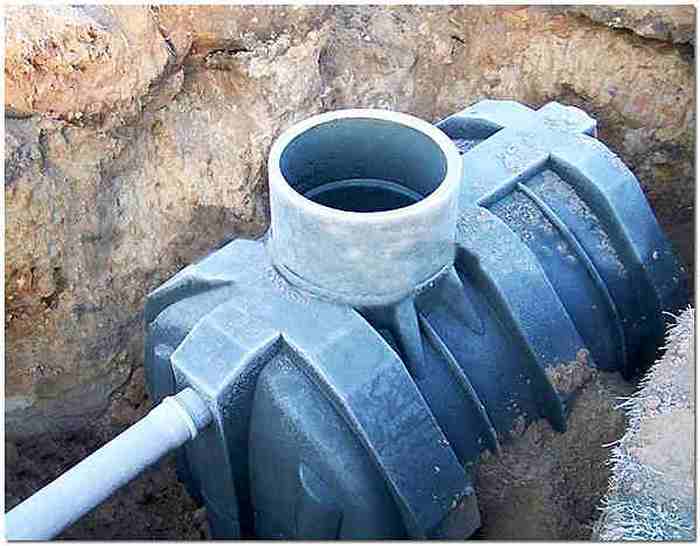
The simplest option for arranging a sealed sewage system with your own hands is to install a plastic mold made by a factory method into a pre-prepared pit, into which you will need to cut a pipe. From time to time, you will have to call the machine to clean the mold filled with waste. The advantage of this design is that it can be installed even on the ground, without having to take into account the depth of the groundwater table. Among the disadvantages are the fragility of the structure and the need to clean the tank when it is filled by two-thirds of the norm. When burying the mold in the ground, in order to extend the life of the container, it is advisable to strengthen the earthen bottom with a monolithic cement pad, and the walls with additional reinforcement.
The simplest septic tanks

Septic tanks are a cesspool system that can be done by assembling cameras with your own hands. Such a system consists of two or more chambers with sequential bacterial purification processes. Microorganisms recycle contaminated water and destroy solid waste, turning it into useful fertilizers for later use. After purification, water becomes suitable for domestic needs and irrigation. But in this case, the owner will need to make a lot of effort to ensure that the system functions flawlessly.
The scheme of the septic tank is as follows: dirty water enters the first chamber and lends itself to coarse filtration, after which it moves to the second chamber, where stronger purification takes place. Further, the water enters the third chamber, in which microorganisms maximally purify the water from solid impurities, and with the help of a pump it rises upward. Now this clean liquid can be used further.
You can make a septic tank according to a single-chamber scheme, laying out a well from an improvised material, and as an additional filter use a thick layer of broken brick or gravel crushed stone of a coarse fraction, laid on the bottom of the structure. The bacteria will fulfill their role in the destruction of solid waste, and the liquid will get into the soil almost clean. With this model of sewage, the tank will periodically empty itself, and the need to call a sewer truck will disappear by itself.
Multi-chamber septic tanks are the most environmentally friendly. The costs for them are considerable, but it is much cheaper to maintain such a sewage system. In addition, this type of drainage device allows you to pump a large volume of liquid, therefore, for large buildings that use a lot of water, it is better to drain it using this method. The plus is that, using water from the sewage system for irrigation and cleaning the local area, you do not have to additionally pump it from the water tap, thus saving a lot of money for water utility services. The walls of the chambers can be mounted from any material that does not allow water to pass through.

It is important to make the right choice of the place where the drain pit in a private house will be located so that the structure cope with the task at hand, does not harm the environment and does not undermine the foundation of the house and other outbuildings.
You can build a structure with your own hands, you just need to comply with the construction standards and take into account the following points:
- The ideal place for arranging a drain should be in the backyard behind the house at a distance of 5-10 meters from the living area.
- A cesspool in a private house, from which the surplus is supposed to be pumped out with the help of a sewer, should be laid close to the roadway with a convenient approach for the car and the possibility of free access to the hose reservoir from the car.
- When laying a septic tank or an absorbing structure in a pit, it is advisable to place the pit at a distance of at least 30 meters from a well with drinking water and from a neighboring drain in order to avoid the confluence of water flows and a possible accident.
- Sewerage should be carried out based on the volume of the passed liquid. If the volume of the accumulating liquid exceeds the normal threshold of 1 m 3, then the tank must have watertight walls.
- In order to lay out a pit-well, you can use any material, for example, old rubber tires, reinforced concrete rings, concrete, reinforced mesh, whole or broken brick, rubble stone and others. You can not use only a cinder block - its porous structure is destroyed by constant contact with water.
- The bottom should be laid out with a slight slope away from the house.
- It is better to make a hatch for a well of wood. It should be laid on a slab made of wood with a hole for a hatch. On top of the wooden flooring, you can put a clay solution, after drying, concrete it and, if desired, fill it with earth.
- The dimensions of the well depend on the required volume, but most often the structure has the following dimensions: depth - 2.5 meters (but not lower than 1 meter from the occurrence of groundwater), width from 2x2 meters with a rectangular shape of the well, diameter - from 1, 5 to 2.5 meters in round shape. Calculations of the required sizes can be made based on the average daily water consumption for each family member. According to statistics, each person consumes at least 0.5 cubic meters of water per day. Therefore, for a family of three, the sewage flow cannot be less than 5 cubic meters. When using a water heater, the water consumption increases to 150 liters per person per day. So, it turns out that a small family spends up to 450-500 liters per day.
- The inner surface of the walls of the well must be plastered with a cement mortar, you can not be very careful.
- The coarse bottom filter, laid on the bottom of the well, should preferably be laid out with a height of 50 cm to 1 meter.
To equip a cesspool, many owners of summer cottages and suburban areas use modern polypropylene material. Although its cost is high today, it has excellent technical characteristics, is easy to install and is not subject to corrosion.
The device of the cesspool, as you can see, is simple. In order to do all the work with your own hands, you need to understand the principles and norms of arranging the sewage system.
If you want your site to look nice and tidy, you can decorate the entrance hole with planted flower pots or do-it-yourself funny figures.
Output

Whichever type of arrangement of the well for the drain you choose, remember that you always need to monitor the level of filling the pit with sewage. Remove everything unnecessary from it in a timely manner and enjoy your independence. Remember that it is better to do a job once with high quality than to improve or redo it later! Spare no effort and time, do everything yourself.
A cesspool is an integral part of a comfortable stay in the country or in a private house. If it is not possible to connect to the city sewer system, you should take care of an alternative solution. Making a cesspool with your own hands is not an easy task. But if you want to fully enjoy your time in the country at any time of the year, you will have to work a little. In this article, we will tell you in detail about all the methods of arranging a cesspool.
In the city, the issue of utilization of domestic wastewater and waste is solved quite simply - the communal services are engaged in this, and in order to make the sewage system, you just need to call the foremen. In the case of organizing such a system in the private sector, things are a little more complicated.
Cesspools are different, and the choice depends not so much on financial capabilities, but on the specifics of the use and volume of wastewater. For a large house where 3-5 people live permanently, a spacious septic tank or a local cleaning station is needed. For more modest country houses, the simplest cesspool will be enough.
Speaking of the simplest designs, one cannot fail to mention the “predecessor” of all modern systems for wastewater disposal. This is a simple hole in the ground, the walls of which are plastered with clay and reinforced with boards. This design was replaced by wooden barrels, which were buried in the ground, metal tanks, containers and any other suitable containers. Today this method is also actively used, but capacious plastic tanks have replaced barrels. They can be installed if the daily volume of wastewater does not exceed 1 m³.
You can make the most ordinary cesspool for a toilet, but in some cases their arrangement is contrary to sanitary and epidemiological standards, and it is not very convenient to use them, to put it mildly. This is useless - today many inexpensive and practical options have been invented.
It is clear that every owner of a country house wants to save as much money as possible on the construction of a cesspool. Below we will take a closer look at the most relevant methods, among which you will definitely find the right one.
Depending on the design features, cesspools are absorbing and sealed. Septic tanks are also designed to collect and filter wastewater, but they are more complex from a technical point of view.
Absorbing sewage pits do not have a bottom, so the drains that enter them undergo a rough cleaning with a layer of sand, gravel, broken bricks or other bulk material that can act as a filter. This option is the most economical, and it will not be difficult to do it yourself. Partial infiltration allows you to reduce the frequency of calling the sewer to a minimum. One such pits can be built only if the volume of wastewater is small, and the house does not have equipment that works with water (washing machines, jacuzzi, etc.). Otherwise, the earth will not be able to absorb as much liquid.

Sealed cesspools are watertight reservoirs made of concrete, brick, plastic, or other materials. As they are filled, they must be emptied by calling the suction truck. The tightness of the structure allows you to avoid the spread of unpleasant odors throughout the site, however, the pit must be constantly monitored so that it does not overflow. If the house consumes a lot of water for domestic needs, it is impractical to resort to this method, because the tank will quickly fill up, and the services of the sewers will cost a pretty penny.

The fastest and easiest way to make a sealed cesspool is to buy a spacious plastic container. It is buried in the ground, and a hatch is installed on top for pumping out drains.
Preparatory work
Despite the fact that technology is developing at a breathtaking speed, and human civilization is in full bloom, it has not touched some aspects of everyday life. It is very difficult to carry out a centralized sewage system in a village or settlement, so many people still have to make do with cesspools.
Choosing a location
Whichever design you choose, it is very important to find the right place for it, otherwise all efforts will go to waste. For this, there is a special SNiP, which describes in detail the requirements and norms of a cesspool for a residential building.
In short, the pit should be at least 12 m from the house, but as close to the fence or driveway as possible, so that the sewers can do their job without hindrance. If you are making a bottomless drain with a coarse filtration system, you should take care that the distance from the cesspool to the sources of drinking water (well, well) is as long as possible. Consider also the constant direction of the wind so that unpleasant odors do not interfere with your life or your neighbors.
Cesspool calculation
When you have decided on the location of the future cesspool, you can start calculating its size. In this case, one should start from the number of people permanently living in the house. If an adult on average consumes about 180 liters of water per day, then a family of 3 people per month will produce 12 cubic meters of wastewater. Since it is better to take the volume with a margin, then the cesspool of such a family should hold at least 18 cubic meters.

The second thing you should pay attention to is the presence in the house of equipment that works with water - washing machines, dishwashers, jacuzzi, etc. The mechanical composition of the soil also plays an important role and affects the size of the future pit. If your site is on light soil, for example, with marl, then the water will seep well, and you can take 40% of the flow per month for the volume of the cesspool. If the house is on clay or hard soil that does not allow moisture to pass through, then the volume will be required with a margin exceeding the monthly rate.
The depth of the cesspool should be no more than 3 m, while the distance between the surface and the hatch should be about a meter so that the drains do not spill out.
Sump construction
If there is no way to enjoy the benefits of the central sewerage system, why not do the maximum in order to feel comfortable in your own country house? We invite you to consider several simple but effective ways of how to properly make a cesspool.
Brick pit
The most difficult thing in the construction of any cesspool is to dig a foundation pit. It will not be easy to get rid of several tens of cubic meters of land without large specialized equipment. Therefore, if you do not have familiar excavator operators, pick up a shovel and be patient. The best option would be to dig a drain hole during the construction of the foundation.

For the construction of a brick cesspool, it is better to use only red fired brick, since it withstands moisture better and has greater strength compared to other types.
The cesspool construction scheme is quite simple:

Bottomless pit
The design is similar to the previous one, except that the bottom is missing. In some cases, only a metal mesh is laid on it in order to retain large particles of sewage. The walls are also laid out with bricks, but using the half-brick method. The result is a less stable structure, but it will better drain wastewater, and its cost is very low.
To save even more, use improvised and used materials. For example, use inexpensive half-blocks instead of a regular cinder block. Instead of bituminous mastic for waterproofing the walls from the inside, coat them with oily natural clay.

Such a pit will serve you for about 20 years with regular use. After that, spot repairs may be required, but no more. It does not have to be pumped out too often, since due to the lack of a bottom, water flows into the ground, and only large fractions remain in the pit.
Of the minuses, one can single out the fact that the pit will overgrow with silt over time, therefore, after pumping it out, it is recommended to additionally clean and disinfect it.
Concrete pit
Making a cesspool from concrete is much more expensive than from brick, and it takes much more time, but the result will more than pay off all the efforts. There are two types of such structures: a cesspool made of concrete rings and one-piece.
In the first case, the bottom of the pit is poured with a concrete screed, and concrete rings of the corresponding diameter are laid on it. It is possible to build such a pit very quickly, but the work will require the participation of large construction equipment and several people. This design is of the sealed type, so keep in mind that you will have to call flushers quite often.
We offer you to watch a video about a cesspool made of concrete rings, built on a site with a high level of groundwater occurrence:
It is more difficult to make an all-cast pit, since not only the bottom, but also its walls must be reinforced, and then poured with concrete. Even a beginner will not have difficulties with horizontal surfaces, but making even and strong walls of a hole several meters deep will not be easy. The principle of operation resembles the construction of a foundation, when formwork is made, reinforcement rods are inserted into it and poured with cement-sand mortar. After the walls have hardened (3-4 weeks), they should be covered with a waterproofing material. Bituminous mastic or liquid rubber will perfectly cope with this task.

An all-cast pit will surpass any other in terms of durability. Moreover, it can last longer than the home itself. It is also environmentally friendly, since it is completely isolated and does not release impurities into the ground. It is not clogged with silt, so the volume will not decrease over time. Unfortunately, sewage from such a pit will have to be pumped out no less often than from a brick or plastic one, and the price is several times higher.
Tire pit
What do a cesspool and old tires have in common? The answer to this question will be a common "life hack", which was invented by resourceful summer residents to save money, effort and precious time.
To build such a structure, dig a pit of the required depth and diameter slightly larger than the diameter of the car tire. Then fold the tires in a stack until the pit is filled, install an elementary overlap made of waterproof material and a hatch.

How to make a cesspool without spending a dime? Contact the nearest tire service - maybe they will give you old unnecessary tires for free. The durability of such a structure is impressive - the pit will last 20-25 years without repair. Tires are best used from cars. They are strong, waterproof and durable.
Disadvantages of the "tire" pit are also present. First, the strong carrying capacity (water seeps between the tires and through the bottom) can be detrimental to the condition of the soil. Secondly, the pit is heavily silted up, so it must be cleaned often. Thirdly, tires can start to rot if the sewage is not pumped out in time.
We have described the most common ways to make a cesspool in a private house so that you can evaluate all their advantages and disadvantages and choose the most suitable option. Reminds you that before that you should calculate the required volume - the nature of the structure and the scale of the work to be done will depend on it.
Cesspool: photo


For residents of the private sector who are not connected to the sewage system, the question of how to make a pit for domestic waste water is always relevant.

Depending on the amount of drained water, you can choose the appropriate option:
- a pit without a bottom (drain) is a suitable option to drain in a bath;
- sealed cesspool - for a large number of drains;
- septic tank - for partial cleaning and draining.
Which is better - a sealed cesspool or a drain sump?
If the daily amount of drained water does not exceed one cubic meter, a drain pit can be used. This is convenient, for example, when organizing a drain in a bath. It is enough to dig a pit with a volume of 3 m³, lay a pillow of 30 cm of sand and 50 cm of stones on the bottom, reinforce its walls with bricks, concrete or even tires and close the hole.

Through such a filter cushion, water will slowly seep into the ground, clearing itself along the way.

If much more water is discharged, it does not have time to seep out and be cleaned. Then you can make a completely sealed cesspool. Ready-made containers are on sale, which can be immediately buried.

Or you can do it yourself by concreting a pit or installing concrete rings on a concrete base.

The only drawback of such a pit is the monthly pumping of waste.
The septic tank is the best cesspool
If the amount of discharge exceeds one and a half cubic meters per day, but ordering monthly pumping of the pit is expensive, the best way out is to make a septic tank in a private house. It filters waste quite well, polluting the environment much less than a typical pit latrine. Ready-made systems are being sold, which are enough to bury on the site, or you can do it completely yourself.

Advantages and disadvantages of a homemade septic tank
A do-it-yourself septic tank has a number of advantages over ready-made solutions:
The final cost is significantly lower;
A large area is not required to organize a filtration field;
You can organize one septic tank for two houses;
Depending on the type of wastewater, pumping is required every few years;
A full cleaning can be done every ten years.
But the disadvantages of such a septic tank are also present:
- significant labor costs - it is problematic to cope with a septic tank alone;
- time - pouring cement into the formwork and its hardening takes about a month;
- additional equipment - to simplify the process, you will need a concrete mixer or drill with a mixer.
Choosing a place on the site
The requirements for a septic tank are the same as for a cesspool - no closer than 15 meters from a well and 30 m from a reservoir. At the same time, do not forget about the neighbors - the distance to their well should also not be less. But it can be placed almost close to the house - 3 m from the foundation with a one-story structure, and 5 m - with a two-story structure. In addition, this is how the issue of insulating the drain pipe is solved - the greater the distance to the pit, the deeper you will have to dig a trench and insulate the pipe.
It is imperative to take into account the direction of groundwater and flood waters - they should not go from the septic tank to the house or well. At the same time, it is also undesirable to arrange a septic tank in the lower part of the site - melt and runoff water will flood it. To protect the septic tank from flooding or raise it above the groundwater level, it is not necessary to bury it completely in the ground, insulating the above-ground part to prevent freezing.

Step-by-step instructions on how to make a septic tank
After choosing a place for a septic tank, work begins on its organization. It is necessary to calculate the required volume of the main chamber and the overall dimensions of the pit. So, for four people, a main chamber is required at least 150x150 cm, and for five or six - 200x200 cm. In this case, the depth should be at least 2.5 m, but not deeper than 3 m. This is done for the convenience of future pumping. The second, or drainage, chamber cannot be less than a third of the main one.
If there is a shower in the house and it is used daily, the size of the chambers should be increased by another 50%. It is also better to leave a small margin, since the filling of the working chamber should not exceed 2/3 of the total volume per day. In addition, the drains in the working chamber should settle down a little, and not immediately overflow into the drainage chamber. The optimal volume of the septic tank is the daily amount of drained water multiplied by 3.
- After determining the size of the chambers, a marking is made and a foundation pit is dug out. The top fertile layer is removed - it can be used to cover the septic tank and garden beds.


The improved do-it-yourself sump is ready to go. After a while, the bottom of the main chamber is silted up, bacteria develop there, increasing the filtration capacity of the pillow, and in the second chamber, the final purification of waste water takes place.
Cesspool with your own hands
Do-it-yourself cesspool. Communications. For residents of the private sector who are not connected to the sewage system, the question of how to make a pit for domestic waste water is always relevant. Depending on the amount of drained water, you can choose a suitable option: a pit without a bottom (drain) - a suitable option to drain in a bath; sealed cesspool - for a large one.
How to make a cesspool in a private house with your own hands
Residents of apartment buildings do not have to worry about the disposal and utilization of biowaste, for them everything is done by housing and communal services. Those who live in a private house need to solve such problems themselves. One of the solutions is the construction of a cesspool. It does not require large installation costs, it perfectly performs the function of sanitary cleaning. You just need to know how to make a cesspool in a private house with your own hands.
Choosing the location of the cesspool
There is a system of rules and regulations that controls the construction of a cesspool for a private house. Sanitary standards determine the location of the cesspool on the site, the distance from it to various outbuildings. When planning biowaste pits, the following rules should be taken into account:
- The cesspool should be located at a distance of at least a dozen meters from residential premises;
- There must be more than a meter from the cesspool to the fence;
- When installing a bottomless pit, the location of the wells must be taken into account. The nearest well must be at a distance of at least 30 meters.

The simplest cheap options
The predecessor of the cesspool was an ordinary pit dug in the soil, at which the walls were smeared with clay and reinforced with boards. Then they began to bury old barrels, cisterns, and other used containers in the ground. Today, such tanks for collecting and partial cleaning of waste are installed only when the daily volume is not more than one cubic meter.
If the owner of a private house is not too eager to spend money on the arrangement of a cesspool, he can use old car tires. You just need to put them in the dug hollow, connecting them with bolts. Then the hollow is sprinkled with earth, a concrete slab with a hole for the ventilation pipe is placed on top, as well as a hatch for pumping out.
Popular types of structures
According to the characteristic differences in the design, the pits for biowaste are divided into absorbing and sealed. Septic tanks are used to collect, store and purify waste. These are structures with a more complex structure.
Absorption tanks (bottomless)
A distinctive feature is that there is no bottom, in view of this, the liquids, after cleaning with a sandy, gravel and brick filter, are sent to the soil. The absorbing tank is the most inexpensive and easiest to equip. Due to the partial infiltration of treated wastewater into the soil, there is much less need to call a sewer service.
The absorption type is selected if there is no need to remove a lot of wastewater... Large volumes of soil will not be able to accept and process. Also, such a pit cannot be called an environmentally friendly option, because waste, falling into the soil, will pollute it.

Sealed containers
They are closed watertight concrete / brick / gas silicate tanks. They must be emptied regularly after filling. If you know how to properly make a sealed cesspool, you will be provided with the absolute absence of odors characteristic of the toilet, but sometimes you will have to call the sewer workers. Remember that the use of cinder blocks is unacceptable for the construction of a cesspool (they quickly collapse when in contact with water).
The simplest solution for arranging a cesspool is considered to be the installation of a plastic tank purchased in a store. It does not need to be sealed, but it will be necessary to fill the bottom of the basin with a special cement screed and reinforce the walls with reinforcement.

Simple homemade sewage treatment plants
These are structures that not only perform deep cleansing, but also turn drains into fertilizer useful for the garden and vegetable garden. They are often two- or three-chamber systems. In the 1st chamber, collection and partial cleaning is carried out, in the 2nd and 3rd chamber, complete processing of waste takes place.
Can use old car tires... To install such a cesspool, a solid concrete foundation is not required; a dense sandy cushion with rubble thirty-five centimeters thick, as well as a screed of one decimeter, is enough.
- To increase the capacity of the reservoir, the sides of the tires must be cut off;
- A vertical concrete pipe with a diameter of about a couple of times smaller than that of tires is placed in a well made of tires. The upper cut of the pipe is one decimeter lower than the well constructed from the covers;
- The bottom of the pipe is poured with concrete to form a solid cylinder.
From above it will be necessary to make holes for infiltration and installation of pipes that will ensure transfusion. The sewer pipe must be inserted into a concrete tank. Sections of entry of sewer pipes into vertical concrete must be sealed.

How to Build a Absorption Pit from Concrete Rings
- It is necessary to dig a mine-type hollow, its diameter should be approximately eighty centimeters larger than the diameter of the rings. It will take three rings;
- A concrete screed is made around the perimeter. This is the future base for the rings;
- In the lower ring, make holes through each decimeter so that the purified liquid can leave the cesspool. The diameter of the filtration holes is five centimeters;
- The depth of the structure underground should not be more than three meters, otherwise it will become difficult to pull out the sediment from the cesspool;
- About a meter, the finished pit is filled with sand, brick, gravel and gravel mixed with soil;
- The outer basin is filled with the same mixture. Before backfilling, the cesspool is waterproofed, which will protect the structure from groundwater;
- At the end, a plate with a couple of holes is placed. One is for the hatch, the other for ventilation;
- To increase the quality of cleaning, the filter well is recommended to be located slightly higher than the cleaning tank.

Installation of a sealed structure
The construction method is similar, only you do not need to make infiltration holes, you need to completely concreted the bottom. Reinforcement of the lower platform of concrete is recommended. So that the reinforcement does not get stuck in the concrete, it must be slightly raised and fixed on pegs.
It is desirable to seal the walls. Bitumen is considered an inexpensive internal insulator, and clay is an external one. If the walls of the cesspool are made of brickwork, it is possible to cover them with plaster.
Laying bricks takes much longer than assembling concrete rings... At the bottom, a concrete screed is made, the bricks are placed in a circle / square. Before starting the laying, you need to wait a week after creating the concrete platform.
The sewage pipeline must be slightly tilted in order to ensure spontaneous drainage of the drains.

Toilet rake
Those who want to build a toilet should also know how to properly make a cesspool. Most often, a small hole is dug, to which you can freely drive up to emptying. The cesspool is laid out with bricks or filled with concrete.
The depth can be arbitrary, it all depends on the soil of the litter. It is recommended to dig the rake to a layer of sand that will absorb the waste. The bottom of the pit is filled with sand and gravel mixture, gravel.
Other dimensions are to be installed on site. Ventilation is recommended. A pipe that rises about six decimeters above the toilet roof is suitable.
How to make a cesspool in a private house with your own hands
Details on how to make a cesspool with your own hands in a private house. How to choose a place. The best options. Arrangement technology.
Cesspool in a private house - diagram, materials, device
 A cesspool in a private house, the scheme of which has been selected in accordance with existing requirements and regulations, is capable of collecting domestic wastewater without the risk of soil contamination. Despite the fact that the pit design is simpler than, for example, the construction of a septic tank, there are certain nuances that directly affect the efficiency of such a sewage system and, accordingly, the comfort of living.
Pros and cons of using
The advantages of cesspools are determined simplicity of their design... You can build such a structure quite quickly. In addition, its cost will be low - the most affordable materials are often used, including used ones.
The disadvantage of the cesspool is, first of all, the need to pump out wastewater... Depending on the circumstances (the volume of the pit, the number of people, the availability of water-consuming household appliances), the frequency may change, but the services of the sewer machine will always be one of your expenses.
 Pumping out the cesspool with sewage equipment
Important: The maximum depth of the cesspool should not be more than 3 meters, otherwise there may be problems with pumping it out.
Another significant drawback that you need to know about before making a cesspool in a private house with your own hands is sanitary "unreliability" when it comes to a leaky version. It is necessary to very carefully consider the location of the cesspool and its design, calculate the required volume so that the structure does not poison the existence of the inhabitants of the house with unpleasant odors and, even worse, does not cause harmful substances to enter the soil of the garden or the occurrence of infectious diseases.
Types of cesspools
The device of cesspools in a private house largely depends on how the suburban structure is used. For a small amount of drains and periodic residence, you can choose a pit without a bottom, but if a family of several people constantly lives in the house, it is better to prefer a sealed drive. Each of the options deserves more detailed consideration.
Cesspool without a bottom
A cesspool without a bottom is a kind of "well", the walls of which prevent drains from entering the upper layers of the soil, and instead of the bottom, a kind of filter of crushed stone or gravel is arranged... Passing through it, the drains are partially filtered, after which they enter the soil and, passing through it, are cleared more efficiently. The advantage of this option is that there is no need to constantly call the flushers. You cannot do without cleaning at all, but its frequency can be significantly reduced.
 The photo shows a diagram of a cesspool in a private house without a bottom
Expedient separation of effluents and the installation of separate cesspools for the toilet. In this case, the toilet pit will fill up more slowly (and, accordingly, it will be less likely to require a call for special equipment), and the drains from the shower, bathroom, kitchen sink with a minimum amount of insoluble impurities will almost completely go through the filter into the soil.
 One of the options for separating wastewater into different reservoirs
Use of bioactivators promotes the decomposition of impurities in wastewater, improving the quality of cleaning and slower filling. Only sludge remains in the tank, and purified water is removed through a filter. The bacteria in the soil act in a similar way, however, if the total volume of effluent exceeds 1 cubic meter, they will not be enough to process such an amount of liquid.

It is important to know that such a cesspool with your own hands for a private house has "contraindications".
- The close location of groundwater excludes the possibility of installing the model without a bottom, since when their level rises in floods or during heavy rain, the pit can spontaneously fill. In addition, under such conditions, the quality of filtration is noticeably reduced - the wastewater does not pass through the soil, being purified, but immediately falls into the groundwater.
- Clay soil has too low permeability to water in order to ensure timely disposal of the contents of the cesspool.
- The volume of such a cesspool should not exceed 1 cubic meter.
Sealed cesspool
Sealed structures with a bottom are only accumulators. The drains must be pumped out using a sewage machine. Despite the need to pay for the services of special equipment, this option also has its advantages:
- sanitary safety and exclusion of the likelihood of soil contamination and the spread of pathogenic bacteria,
- the ability to use with any type of soil.
For sealed structures of a small volume, ready-made waterproof containers are often used. A large cesspool in a private house, the scheme of which involves the collection of wastewater from a large number of points, is most often built from one or another material suitable for its characteristics.
Materials for cesspools
Having considered the features of the materials often used for the construction of such structures and comparing them with the conditions of a particular object, it is possible to decide which cesspool in a private house will be the most effective and economical.
Finished goods
The use of finished products can significantly reduce the duration of construction work, and in some cases, their labor intensity.
- Tires cars are used as blocks - they are installed one on top of the other, fixing with clamps, waterproof glue and sealing the joints. In most cases, tire cesspools do not have a bottom. The advantages of this option are low cost, easy and quick installation.
 A cesspool made of tires is one of the cheapest options for organizing sewage.
- Concrete rings- another option for block construction of cesspools. They weigh a lot, so lifting equipment will be required to install them in the pit. At the same time, construction will not take much time, and the resulting structure will be strong and durable. Concrete rings can be used for the construction of both sealed storage tanks and filter structures without a bottom. In the first case, the rings are installed on a concrete foundation. Sealing joints and treating the inner and outer surfaces of concrete products with waterproofing compounds (one of the most affordable options is ordinary bitumen, although special mastics can be purchased if desired), regardless of the type of product.
 Concrete rings for sewerage
- Iron or plastic barrels require a minimum of effort during installation, but their significant drawback is their small volume. As a storage device, they are suitable only for summer cottages, and for arranging a cesspool with a filter, the bottom will need to be removed. Iron products require a waterproofing coating on the outside and inside to protect against corrosion.
 Plastic barrel as a sewer tank
- Plastic storage models anchoring to the foundation is required to prevent them from floating up during a flood. In addition, at the stage of backfilling the mounted structure, it is recommended to fill the container with water in order to prevent its deformation due to crushing by the soil.
Plastic storage tank
 Installation of plastic Eurocubes
Construction Materials
The use of building materials slightly increases the time to create a structure. At the same time, a significant advantage is that a do-it-yourself cesspool in a private house in this case can be arranged in any configuration, taking into account sanitary requirements and site planning. It can be round or rectangular, including narrow and long, if it is more convenient to place such an option on the territory.
- Concrete cast structures are made using formwork by gradually increasing the height of the wall.
- Brickwork can be performed in a circle, but more often, for reasons of convenience, brick pits are made rectangular.
Both options can be used for the construction of storage or filtering structures and in most cases require the application of a double-sided waterproofing layer.
 In certain situations, for better drainage, additional holes are made in the walls of the pit.
Rules for choosing a place and volume
The volume of the cesspool should, according to sanitary standards, be at least a three-day rate of water consumption. The estimated number is considered to be the value of 200 liters per day per person, however, it is important to know that this figure is relevant for permanent residence. With a periodic visit to the cottage, it is less, and water is not consumed daily.
In a house with permanent residence for a family of 3 people, a pit of at least 1 cubic meter is needed. Sometimes it is more convenient to use two small ones than one spacious pit. The scheme of a cesspool in a private house should take into account the necessary distances from significant objects - at least 30 m from the place of drinking water intake, at least 3 m from garden and garden plants and 5 m from the road. In this case, accumulative models should be located so that the sewer truck can easily drive up to it.
 Sump pit layout

Sump cleaning
You should be aware that the work of the sewer does not guarantee a complete cleaning of the tank. Only liquid can be pumped out, while sediment will remain and accumulate at the bottom. Speaking about how to clean a cesspool in a private house, it should be noted that cleaning can be optimized by using special preparations.
- Bioactive complexes, which are bacteria colonies, work effectively, eliminate odor and are environmentally friendly. However, at temperatures below + 4 ° C, microorganisms die, so it is impossible to use such products in winter.
- Among chemical preparations, nitrate oxidants are preferred, which are not toxic and do not pose a danger to humans, domestic animals and plants. They are usually used during the cold season.
Important: To eliminate odors from the pit, which will be in the event that special preparations are not used, ventilation of the cesspool in a private house is required. Plastic sewer pipes with a diameter of 10 cm and a height of 60 cm, which are installed in the upper part of the pit, are suitable for her device.
Proper arrangement of a cesspool in a private house will allow you to safely dispose of wastewater with minimal effort and without significant costs. In this case, the container will not be a source of unpleasant odor.
Cesspool in a private house: diagram, do-it-yourself device, video
Cesspool in a private house, circuit, device with filtering and storage tanks. Materials, features of various designs. The choice of location and volume, cleaning.
Do-it-yourself cesspool - review and comparison of design options

For the townspeople, the problems of drainage and disposal of domestic wastewater are solved by utilities, but adherents of a spacious suburban life have to think over such pressing issues on their own. If the owner of an estate intended for a large family to live most often has to order an installation on the site of a volumetric septic tank or a local cleaning station, then a summer resident with his own hands may well build a cesspool from inexpensive or waste materials. She will perfectly cope with an important sanitary function, and will not require too much funding for the arrangement.
The simplest and most budgetary options
The historical predecessor of this sewerage facility was a simple hole dug in the ground, the walls of which were coated with clay and reinforced with boards. Then they began to bury old barrels, tanks, and other used containers in the ground. Now such "reservoirs" for collecting and partial filtration of wastewater are arranged only if the daily amount does not exceed 1 cubic meter. m.
An elementary cesspool for a toilet can satisfy the needs of summer residents who stay on the site a couple of days a week during the summer season. However, its device is not approved, and sometimes it is completely prohibited by the sanitary and epidemiological services, often accompanying the prohibitions with the imposition of administrative punishments.

Elementary cesspool: from the simplest clapboard container for a closet to a tank made of concrete rings
Attention. The depth mark of the bottom must be at least 1 meter higher than the maximum (spring-autumn) groundwater level.
If the owner of a suburban area really does not want to spend money on the construction device, and he has a certain amount of worn-out tires, this material can be used with benefit. You just need to lay the tires in the excavated pit, fastening them together with bolts. If the pit is made outside the house or toilet, a hole must be cut in the side of the tire to be laid on top to connect the sewer pipe. After the pit around the self-made sewage treatment plant is covered with soil, a concrete slab with an opening for a ventilation pipe and a pumping hatch is laid on top.

The owner of N-number of worn tires can build an excellent reservoir for collecting waste from them.
Common types of structures
According to the characteristic design differences, cesspools are divided into absorption structures and sealed tanks. The functions of collecting, accumulating and treating wastewater are also performed by septic tanks. They are technically more complex installations with forced stimulation of the movement of wastewater inside and with biological and chemical treatment methods.

Violation of sanitary and epidemiological standards for the location of the cesspool is unacceptable
Bottomless containers - absorbent
Direct descendants of the "people's" cesspool. Their characteristic feature is the absence of a bottom, due to which the liquid component of the effluent, after being cleaned by coarse filtration through a layer of a mixture of sand, gravel, broken brick and other "ingredients", passes into the ground. The absorbing option is considered the most economical, besides, the construction of a pit of this type may well be carried out by a performer who has absolutely no experience in the field of construction. Another savings: due to the partial infiltration of treated water into the ground, it is much less often necessary to call a sewer.

Structural diagram of a cesspool without a bottom - wastewater is filtered through gravel
An absorbing variety of pits is chosen if there is no need to drain a large amount of drains, if there is no jacuzzi, dishwashers and washing machines in the country house. A large volume of land will not be able to process and receive. In addition, the cleaning performed cannot be classified as one hundred percent effective procedures, which means that the effluent from the absorbing pit will still pollute the environment.
Sealed waste water tanks
There is a direct clue in their name that speaks of the main design feature. In fact, these are closed containers made of water-resistant concrete, brickwork, plastic, gas silicate blocks that need to be constantly emptied after filling. Sealed structures will ensure the complete absence of odors inherent in drains, but will force the owners to regularly call a sewer truck to remove accumulations.
Important. A cinder block is inapplicable for the construction of a cesspool; it will collapse too quickly from contact with water.

The easiest way is to buy and bury a factory-made plastic container in the ground for collecting sewage, bring a sewer pipeline to it and periodically call a sewer truck to empty it.
The simplest scheme for a sewage tank device will be the installation of a store-bought plastic container. It does not need to be sealed, however, it is advisable to fill the bottom of the pit with a kind of cement screed and reinforce the walls with reinforcement. In principle, if the owners are not embarrassed by the unpresentable appearance, then there is no need to bury it in the ground. Another very compelling argument in favor: a plastic structure can be installed regardless of the close groundwater level. Anyway, no harm will be done to the environment.

The tank should not be completely filled with sewage, there should be at least one meter between the manhole cover and the liquid level, if the level has exceeded the limit, the container should be emptied
The simplest homemade septic tanks
These are already more complex structures that perform not only deep cleaning, but also process the waste mass into fertilizer valuable for gardeners and gardeners. Most often they are a system of two or three chambers, in the first of which only collection and rough mechanical cleaning takes place, and in the subsequent chambers specific bacteria enter the battle, finally processing the polluting inclusions of the effluents.
A cesspool with an overflow cleans the water so efficiently that it can be successfully used for economic and technical purposes, for example, for watering or for cleaning the site. But in order to make a septic tank with an overflow, it will take a lot of effort.

The principle of operation of a three-chamber septic tank consists in multi-stage purification of waste masses: in the first tank, the collected effluent is subjected to coarse filtration, in the following chambers, more fine purification is performed
If efforts are not a pity, but there is no surplus of funds, you can again resort to worn-out automobile tires. In the sense of "bald", but not worn to holes tires. Moreover, the owner will save not only due to waste building material. For the installation of a septic tank from tires, you do not need a powerful concrete foundation, a compacted cushion of crushed stone with sand with a capacity of 30-40 cm and a ten-centimeter screed is enough.
- To increase the volume of the created reservoir, the sidewalls of the tires must be cut off.
- In a well made up of tires, a concrete pipe is installed vertically, its diameter should be approximately two times smaller than the same tire size. The upper cut of the concrete pipe is located 10 cm below the well made of rubber tires.
- The bottom of the pipe is poured with concrete so that a monolithic concrete cylinder is obtained.
At the top, you will need to make holes for infiltration and for installing pipes that provide overflow.

Sump design with overflow: the pipe entering the chamber must be located higher than the overflow pipe
- The sewer pipe must be inserted into a concrete container located inside the tires.
The points of entry of sewer pipes into vertically installed concrete pipes must be sealed.
How to make a cesspool with your own hands
Consider the stages of installation of several design options.
Absorbing
Owners of small suburban estates, who decided to make an elementary sewage system with their own hands, most often choose this option. It is attracted by the simplest design and the ability not to resort to the services of sewers too often. The walls can be laid out of bricks or gas silicate blocks, but it is easier and faster to build them by placing concrete rings on top of each other.

It is much faster to build walls from gas silicate blocks than to lay them out of bricks, it is even faster to make a pit from concrete rings, but to install them you will need a crane
- It is necessary to dig a pit of a mine type, the diameter of which will be about 80 cm larger than the diameter of the reinforced concrete ring. You will need 3 rings.
- Along the perimeter, leaving the central part free, it is necessary to make a concrete screed, it will serve as a support base for the rings.
- In the lower ring, holes must be drilled every 10 cm so that the treated water can penetrate outside the cesspool. The diameter of the filtration holes is 5 cm.
Important. The depth of the underground structure should not exceed the 3m limit, otherwise it will be difficult to extract the dense silty sediment that has settled at the bottom of the pit.
- The constructed "well" should be filled with sand, gravel, broken brick, crushed stone mixed with the ground by about a meter.

Approximately a meter of the lower part of the absorbing sewage system must be covered with a "folk" filtering composition: sand, crushed stone, gravel, broken brick, as in the figure
Advice. In order to improve the quality of cleaning, it is recommended to supplement the filter well with a purification sealed storage tank with an overflow located just above.

Schematic design of a home-made septic tank: from a sealed cleaning tank, the effluent is poured into an absorbing cesspool, from there the purified water enters the filtration field
Sealed
The principle of construction is similar, only it is not necessary to form holes for the infiltration of treated effluents and the bottom must be completely concreted. It is advisable to reinforce the lower concrete platform by placing a concrete mesh on the bottom before pouring. To prevent the reinforcement from "sinking" in the concrete, it must be slightly raised above the surface and secured on pegs.
An important aspect: it is recommended to seal the walls. A cheap option for internal insulation is bitumen; on the outside, a homemade sewer facility can simply be coated with clay. If the pit walls were built of bricks, they can be plastered.

The standard design of a sealed cesspool with a concrete bottom, walls can be built from concrete rings, laid out with bricks or gas silicate blocks, made a monolithic tank by pouring concrete into the formwork
Masonry will take significantly more time than installing concrete rings. At the bottom, by analogy, they arrange a concrete screed, and you can lay bricks both in a circle and by "drawing" a square or rectangle in the perimeter. The poured concrete platform must "mature" before laying, after 7-8 days.
Important. During the execution of the masonry, holes must be formed for the supply of the sewer pipe. The connection point is located below the freezing level recorded by the local meteorological services.
The sewer pipeline to the collection point should be slightly inclined to ensure the spontaneous movement of the contaminated mass.

The pipe introducing drains into the pit should be located below the freezing level, the pipeline should be laid at an angle to ensure the spontaneous movement of the waste mass
Installation of ready-made complexes
It is impossible to think of anything simpler and more convenient than their use, the arrangement of a cesspool from components precisely calibrated in size is carried out extremely quickly. The only drawback: the volume parameters specified by the manufacturer. But they produce a factory product mainly with the expectation of an average consumer. That is, finding the necessary kit is not difficult at all.
- The first thing is to dig a pit according to the standard scheme for all pits.
- With his own hands, the owner will first need to make a pillow at the bottom of the mine from a mixture of concrete and gravel. It should get stronger for a week, during which a kind of foundation needs to be slightly "irrigated" with water.
- Then the delivery of the kit is ordered by car with a manipulator for the production of sequential installation of the bottom, rings, cover.

A ready-made set of rings and concrete slabs for the operational construction of a cesspool
There are many ways and methods on how to make a cesspool. From a variety of options, it remains to choose the optimal type of construction that meets the needs. What costs are more important, what is better to save on, choose the owner and the performer himself, and knowing the design differences will help make the right decision.
How to make a cesspool with your own hands - design options and installation steps
Types and arrangement of cesspools. DIY installation and arrangement.
One of the main tasks that arise before the start of summer cottage construction is the laying of utilities. Without them, even the minimum level of comfort cannot be achieved. How to make a drain pit (septic tank) with your own hands? This is the question many homeowners are asking. In the absence of a central sewerage, it is necessary for the drain to work around the clock and uninterrupted.
The choice of material for the construction of a septic tank

From building material used for the septic tank depends on the cost of the drainage pit itself, as well as your labor costs. Traditional and fully justified options are as follows:
Septic tank from a plastic tank and plastic components.
Prefabricated reinforced concrete septic tank designs.
Drain pit made of in-situ concrete using metal inlets and outlets.
Drainage structure made of bricks.

Choosing the volume future drainage pit, focus on cistern capacity of the sewage truck... You will have to call it periodically to pump out waste water. The volume of the septic tank must be equal to or a multiple of the volume of the "barrel"... Then you don't have to order cleaning several times a year.

If in the house you are planning live seasonally, then wastewater disposal is a solvable problem. It is necessary to make the most primitive cesspool of any sealed container... For a family from 3-4 a person its volume should be at least 1,5-2 m³. If there is no such container, you can lay out the hole in the ground with red refractory bricks. Diagrams of simple drainage structures are shown in the picture above.
But with permanent residence such a sewerage arrangement not good... Why - now you will understand. The life of the family involves the daily use of water in large quantities. These are baths, showers, washing dishes, wet cleaning, washing, natural needs.
The calculation of the water consumption is always based on maximum consumption and this 180-280 liters per day for one household. That is, a group of 4 -th person spends in a day 0,5-1 m³ of water or up to 30 m³ per month. Based on this, even a large drain hole in 15-20 m³ must be cleaned 1-2 once a month.
Such a sewage system will drain your family budget... In addition, the cleaning procedure itself is specific and a rare owner has a desire to perform it too often. We are talking about unpleasant odors that can spread throughout the area.
Sometimes improvement the drain hole is carried out by creating holes in the ground so that dirty water leaves through them, filtering in a natural way. But this method of disposal has many disadvantages, including prohibited by sanitary standards... Therefore, you have to equip a septic tank with natural liquid purification.
Principled difference the septic tank from the cesspool is that in the first one leaks anaerobic decomposition of organic matter.

Solid particles will linger at the bottom the first chamber, and the second serves for biological processing dirty water with putrefactive bacteria. The number of cameras may be large, but the principle of operation itself will remain similar to that shown in the figure above.

First, let's decide on water consumption in the house based on data tables:
Minimum height septic tank should be not less than 1.2 meters, otherwise, solid suspensions will not densely settle at the bottom of the drain pit.

In the figure you see the diagram single chamber septic tank made of reinforced concrete rings 2 m³. You can make such a cesspool for your home with your own hands.
Inlet pipe must be above the water level by 5-7 centimeters. This will prevent a hydraulic short circuit between the inlet and outlet pipes. Both connections must be immersed in liquid for 30-35 centimeters.
The lower part of the pipes should be made open, and these ends should be removed above the sewage level by 20 centimeters so that gas does not enter the pipes, which will be released during the fermentation of putrefactive bacteria.
Channels between both concrete rings the septic tank should be located within 30-60 centimeters relative to the water level. If the channel, which is located between the chambers, is lower, then large suspended matter will start falling into the small chamber. If the channel is higher, then fractions that float on the surface can get into this chamber.
For a septic tank, even the simplest, you need to provide venting gases to the outside(ventilation pipe in the diagram above), and hatch for pumping out liquid(wooden).
Configure Cameras drain pits can be done in different ways, since their shape and location do not affect on the quality of sewage water treatment. It is only necessary to observe following proportions: a large camera should take up 2/3 from the entire volume of the pit.
Ideal the form for a septic tank - round. Such a solution requires 10-15 % less building materials. In addition, the "cylindrical" pit is stronger because it better handles the force of the ground pressure. For cladding and wall reinforcement better use brick.

Water in the pit does not freeze, as the temperature is raised by the fermentation processes. But cooling the liquid on the surface inhibits the activity of bacteria that purify sewage. Therefore, the upper part of the shallow septic tank is still it is recommended to insulate... At least half the depth of soil freezing in the region.
Insulation can act expanded clay, which is covered with a layer of thickness 25-40 centimeters, or foam plates PSB-25 thickness from 5 before 10 centimeters.
To collect household waste in private homes or garden plots, a drain pit is required. Its construction is not difficult, so you can do it yourself, without the involvement of specialists. To create a drain pit with your own hands, you will need some knowledge, we talked about them in this article.
Sanitary restrictions
In order to avoid penalties and litigation with neighbors, the following sanitary and technical requirements should be taken into account when choosing a place for a drain pit:A storage pit for household waste is located only on the territory of a private household; you have no right to post it outside of it; distance from the fence - from 1 m;
In order to avoid the ingress of sewage into drinking water in case of violation of the tightness of the pit, it is necessary to place it at a distance (at a distance of 10 m) from the branch of the water supply; at least 20 m recede from the well from drinking water (on loams up to 30 m, sandstones - 50 m);
The close location of such a pit, when it is drowned or washed out, can lead to the destruction of the foundation, therefore the distance from residential buildings (including neighboring ones) is 10-12 m;
The depth of the pit depends on the occurrence of groundwater, the maximum depth is 3 m.
When choosing a site for a treatment plant, one should also take into account the possibility of access to it for special equipment for pumping out.
To avoid the appearance of an unpleasant odor in the house, do not place it near the windows either - you should retreat at least 5 m.
Sump distance
Violation of sanitary standards is fraught with more than fines. In the event that a waste water spill causes damage to the natural environment or the health of others, a criminal case may be opened against you (Article 250 of the Criminal Code).
Important! The construction of cesspools without a bottom is allowed only if the volume of domestic wastewater per day does not exceed one cubic meter. In all other cases, the container for collecting waste must be airtight.
Types of drain pits
A variety of materials can be used to build a storage tank for domestic waste:Concrete (including concrete rings);
Plastic;
Rubber tires.

Brick drain pit
Due to their low tightness, wood and rubber tires are used only for the construction of small drainage structures. Most often, cesspools are constructed of concrete or brick.
Drive volume calculation
The size of such a container depends on the number of residents, the number of installed plumbing devices, the presence of a shower or bath, a bath, a dishwasher, a washing machine, the frequency of pumping out and other nuances. Generally accepted without further filtration is the rate of effluent per person in the amount of 30-50 liters (0.03-0.05 cubic meters) per day.Thus, provided that the drain pit is pumped out once a month, a family of 3 people will need at least:
0.03 x 3 x 60 (number of days in 1 month) = 4.5 m3
Advice. In case of unforeseen situations (for example, snow drifts and the impossibility of timely pumping out), it is better to make the size of the drive with a margin. Since the volume of one GAZ sewage truck is on average 3.8-4 cubic meters. m, so as not to overpay for running the car, it is more reasonable to make the pits a multiple of this value.
Concrete drainage pit. Construction stages
1. Initially, the pit is prepared manually or with the help of an excavator. Usually its width is no more than a meter. The length of the cesspool is calculated depending on the volume of wastewater. For the convenience of pumping out, it is better to make the bottom of the pit with a slight slope.2. To prevent the walls from crumbling, they are leveled.
3. Pipes are supplied to the pit. In order for the wastewater to flow into the pit by gravity, it must be located at a certain slope. For pipes d160 mm, it is 10 mm per meter of passage; the slope of 100 mm pipes is 20 mm.
4. It is desirable that the drain pipes are located below the freezing level. Otherwise, they will have to be carefully insulated.

Pipe supply
6. Between the walls of the pit and the ground, it is better to make a hydraulic lock. For this, wet clay is poured and carefully compacted between the formwork and the ground. This must be done as the formwork is being erected.

Clay castle
7. It is advisable to waterproof the walls of the concrete pit using ordinary polyethylene film.
8. For the side parts of the structure, a standard formwork is being prepared. Since the concrete walls have a significant mass, the formwork is fixed as firmly as possible using self-tapping screws.
9. The structure must be reinforced. All metal rods are tied with wire.

Reinforcement of the cesspool
10. The thickness of the walls of the concrete cesspool is 25 cm.
11. To avoid the appearance of cold joints (places of "weakness" in the concrete), the walls are poured in only one step.
12. The mortar is mixed in a ratio of 1: 2: 3 (cement, sand, crushed stone). It must be fairly liquid. If you throw a small pebble into it, with a sufficient amount of liquid, it should be completely immersed in the solution.
13. In the process of pouring, the solution should be periodically compacted with a shovel or vibration compactor (bayonet). Otherwise, voids will form in it, which will negatively affect the strength of the structure.

Compaction of concrete makes it stronger and prevents voids
14. In hot weather, in order to avoid cracking, it is better to cover the drying concrete surface with bags.
15. After the concrete has completely hardened (this occurs on average within a week), the pit is carefully waterproofed with bitumen. For this, the walls are first cleaned of irregularities. The bitumen is crushed into pieces, heated to a boil, then removed from the fire and gradually, in a thin stream, a small amount of kerosene, gasoline or diesel fuel is added to it (10 liters of bitumen will require a liter). This is done to make the bitumen more liquid. If not diluted, it will solidify almost immediately after removing it from the heat.

Heating bitumen over a fire
16. Do not overheat the bitumen or heat the mixture with gasoline, kerosene or diesel fuel, otherwise it will flare up. If the heated bitumen nevertheless catches fire, in order to extinguish the flame, immediately cover the container with plywood or a suitable lid.
17. For waterproofing, you can also purchase a ready-made solution of roofing bitumen mastic, but this will cost more.
18. The resulting mixture is applied to the walls with a brush. After the first layer has dried, another one is applied.
19. As a cover, you can use a reinforced concrete slab with a hatch for pumping out and cleaning.

Drain pit hatch
Advice. In the drain pit, as a result of waste decay, methane is formed - a fairly explosive gas. It is removed by means of a ventilation pipe located in the pit lid. The diameter of such a pipe is 100 mm at a height of 600 mm.

Ventilation pipe device
Video: Drain pit: construction stages
 What is the dream of an office based on a dream book Office based on a dream book of the sorceress Medea
 Characteristics of the Capricorn man by zodiac sign - an avid pragmatist
 Strong biofield in humans, signs