Desktop Electrolovik do it yourself. Lobsik Table or manual - what to choose for home? Stationary electric bison on wood with their own hands
The table for the electrolovka can make any man with their own hands, not even possessing special joinery skills. Since the jigsik that receives nutrition from the network is an integral part of any farm, it will take a workspace for it. Such a device significantly accelerates the time of work, and also allows you to spend it high quality, clearly and quickly.
However, do not forget that to achieve highest quality can only be through proper use This tool, that is, hoisting it on the logging table.
The stationary device will make it possible to make a mini-machine from your instrument, thanks to which you can make a variety of patterns.

Electropolitanzik
The table for the jigsaw electric hand has many advantages. In particular, what to choose everything required tools For this product is possible without problems. An important condition is the rigidity and alternation of the surface. Therefore, it is best to stop your choice on such a material like plywood. But the boards at the same time should not be thin, as they may be swore. Therefore, it is best to take a waterproof laminated phaneer with a thickness of about 1 cm.
Workbench-drawing box for jigsaw
You can take a chipboard, which is somewhat thicker plywood as well as tougher. But most suitable option There will be a high-quality laminate-covered table top for the kitchen. The only substance of such a material is a bad fastening of tools to the material, so you have to carefully choose the fasteners. The main advantage of the chipboard is availability - checkout the order for all the necessary items can be in any workshop. At the same time, stop the choice of about two cm thick.
Table for the jigsaw (sizes) Lobzik Install on the table top of 12 mm laminated plywood and screw the base from the DSP base to attach to the left with the left edge of the table top. From other sides to make small indents to strengthen the equipment
Make a pair of holes for bearings M-shaped design with bolts to the base of the table with a piece of tight organic durable G-shaped design, back view
Workflow now the pubsik hat is not bent, even if drinking parts from a thick sheet of wood
The table do it yourself from the metal - the alternative to the wooden. The only difficulty is that it is somewhat difficult to find a suitable metal part - it should not be just smooth, but also thoroughly processed. In addition, this detail will be difficult to make holes under fastening. If you look at the video and arm the drill, everything will be much easier.
At the same time you should stock simple pencil (It is better to take soft so that it is brighter), a ruler or tape measure, a screwdriver, drill, self-drawing. In addition, we will need a square with which we will post the product, as well as use it at the last stage of the assembly. At the last stage there will be no superfluous fiolent and bearings.
How the process occurs
In order to construct an elementary table, you must prepare the drawings. Properly drawn or selected scheme will greatly facilitate your work. Use the plywood board to one cm wide as a workplace. If the elements are small, you can take a smaller board. At the same time, retreat from the edges to twenty cm and make several holes. Do not forget to mark the bottom of the places for fasteners.
In the event that the jigsaw stand is devoid of holes, they must be made in the number of four copies. On ready-made marks, make holes in plywood. Please note that it is necessary to attach the legs of the steel on the board. At the same time, the height of the legs depends on the body itself. At the same time, the planks are rejected at an angle of 90 degrees. For this, the holes under the fasteners are done. The device at the same time is fixed under the plywood element so that the saw peeling through the hole.
Such an ordinary table can be installed on the same work desk or desktop. At the same time, such a table does not need legs, and it is fixed along the edges of the workbench. The device must be beyond the table. This product is perfectly fixed on wood blanks with a thickness of up to three cm.
As you can see, such a table for the jigscription is not difficult to do. All that will be required of you is a bit of attention and collens. And, of course, do not forget to clearly stick the scheme.
How to make a table for jigsaw
If you want to make a table for ordinary jigsaw, the process will pass much easier, since you will not need to bother the preparation of the workplace to power from the network. To begin with, drink a blank for a tabletop from plywood.
Do not forget to prepare holes with a drill in which the self-tapping screws will be screwed.
In the corners of the future design there will be squares from plywood, which will give stiffness. Prepare holes in such a way that the jigscription is fluently located in them. The countertop is attached with the help of self-tapping screws. Do not forget to cut at the top of the future table of holes under the appliances. Pay attention to the fact that the countertop is fixed parallel emphasisFor this, screws are clogged into the holes. That's all. The most primitive table for the jigsaw is ready.
It is even easier to make a pumping table:
Pilot Drawing Drawing Drawing Drawing Table Other Dispip Design
The drawing of the classic epippler table is made of two blanks of the workpiece connect to each other. Screws must be drowning into the material of the blanks, whatever they interfere with when working
Lobzika from plywood does not fade by decades. Masters manage to make a real work of art from ordinary plywood. But what I wanted to draw your attention to: While our person creates a work as a result of considerable physical costs, making millions of reciprocating movements by a regular jigsaw, his foreign colleague all burned on the shoulders of a small one, but very convenient mechanism, entirely focusing on the aesthetic side of his child.
Many people did not hear about mechanical jigsaws and do not know what they are, although in fact they exist for many years before the saws appeared electrical drive. In view of not familiar with all the manual electrolovka, but stationary.
Below are three examples of these vintage jigsaws. These copies are really interesting, but there were many early models, some of which were made of wood, some of them were with foot driveAs in these paintings, and some used the flywheel, which turned his hand.
Now our fellow use more advanced technique, naturally with an electric drive. Here and adjust the speed of the canvas, the backlight, blowing and sucking sawdust from the workpiece (nicely true?), Drilling holes. There are household with a price of from $ 120, and there is also a pro more expensive than 1500 again green.

In principle, this technique can be bought from us, in extreme cases via the Internet even cheaper. But many now simply do not have the opportunity to allocate some kind of green presidents from the budget for the purchase of jigsaw, and some prefer to make such a jigsaw alone. And since our "home craftsman" club and created for such people, for them I post an article about how to make desktop Electrolovik From the magazine "Make yourself" for 2003.

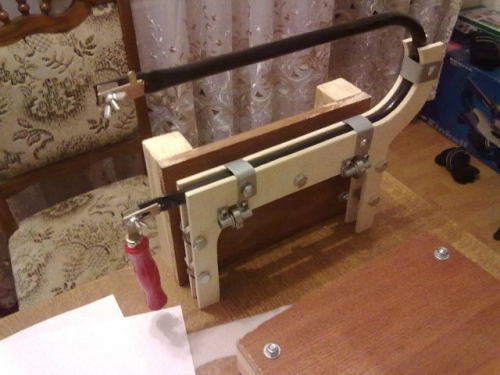
The desktop electrolovik is designed to cut wood and sheet metal: aluminum, copper and even steel. You can install in it as standard canvas for manual jigsaw and homemade, made from tape saws, cuttlers of hacksaws for metal, etc. This significantly expands its capabilities and makes an indispensable tool in any domestic workshop (photo 1).
Lobzik has three speeds - 706, 1323 and 1730 work moves per minute. For drive, an electric motor with a capacity of 120 W was used. The length of the soda of the saw can be set equal to 12 mm or 24 mm - it switches it to the permutation of the crank mechanism. The saw has the ability to be tilted by 45 ° both to the left and right. The tilt adjustment mechanism is arranged in such a way that the desktop jigsaw always remains in a horizontal position. With a vertical position of the saw on the machine, you can process materials with a thickness of up to 66 mm, and with a slope of 45 ° -to 44 mm.

Fig. 1. Diagram of the device of the electroll bias and its drive mechanism
The desktop has sufficiently large sizes - 500x870 mm, which is very convenient for work, as it allows the processing of large-sized parts. A table made of steel plates with a thickness of 8 mm. The design turned out to be very difficult and therefore it is better to install a jigsaw in the workshop
inpatient on a special bed or on a solid table.
Schematically, the jigsaw device is shown in Fig. 1. It is the basis of it is a C-shaped frame with two levers swinging on the axes, mounted on a common platform with an engine and a crank-connecting drive. The upper and lower swinging levers form a parallelogram frame, with which the fastening, tension and moving up-down (work stroke) of the padlie saw are carried out. Ice up-down oscillatory crank mechanismwhich is driven by the electric motor through the clinorem transmission.

Fig. 2. Construction of the machine bed (corner 50x50 mm) and sizes of the desktop plate (steel sheet with a thickness of 8 mm)
The base of the machine is a flat rectangular frame measuring 870x500 mm, welded from angle 50x50 mm. In the corners of the frame welded racks
330 mm high, on which it is stacked on top and fastened with the screws with countersunk heads of the desktop plate - Fig.2.

View from the rear pillar of the turning platform.
To the base of the machine is suspended by an oblique-rotary platform with a C-circuit frame and all parts of the electric drive mechanism. This device ensures the installation of the saw at an angle to the plane of the desktop plate. The details and the principle of its work are well visible in photo 2 and 3, and the design of the front and rear rotary racks is shown in Fig.3.

Fig. 3. Front and rear Rotary platform racks, providing the capabilities of the saw to the plane of the desktop
The front swivel counter is a semicircle with a semicircular groove groove, screwed down to the table. This design of the front rack allowed to get rid of the protruding parts over the flat surface of the desktop. The rear swivel rack has a conventional design.
Both swinging levers are made of steel pipe external diameter 27 mm with a wall thickness of 2 mm. They have almost the same design - rice. 4. Each lever is welded from two pipe segments. In the middle part welded a bunch with a hole 010 mm

Fig. 4. Upper and bottom swinging levers
for the axis on which the lever is attached to the C-shaped frame. (Instead of welding for assembling levers, you can use a solid solder, for example, PSR. But in this case, round shanks of central bobbies and end plugs should enter inside the pipe segments of at least 15 mm, otherwise the soldering strength may be insufficient.)

Fig. 5. Node setting the rotary axis of the upper lever on the C-shaped frame.
The installation unit of the axis of the upper lever is shown in Fig. 5. The axis of the lower lever is installed on the C-shaped frame in the same way. Here, as in all other nodes with rotating details, ball bearings in protected version (608) are used, which do not need any maintenance or additional lubricant, and in case of failure, it is easily replaced by new ones.

Front rack of an oblique-turning platform.
The details of the clips are made of annealed, high-carbon tool steel (see Fig. 6 and photo 4). Use the usual structural (soft) steel for these parts is not recommended. Clamping clips made of soft metal cannot provide reliable fixation of the saw blade. Both halves of each of the clamps have a rather complicated form. Fill them on turning machineUsing a 4-hcchuchki clamping cartridge.

Fig. 6. Top and lower clamping devices for saws.
Install clips for clamping saws on bearings pressed into round nests at the ends of the upper and lower levers (see Fig.4 in No. 3,2003). At opposite ends of the levers, a device for tensioning saws is installed. 7 (see also Fig. 1, photo 2 in №3, 2003). In the tension mechanism used protected ball bearings (608), pressed into the corresponding nests of the upper and lower levers. Adjust the tension of the saw, screwing the rod with an emphasis in the shank earrings attached at the end of the lower lever. Spring, tightening the ends of the levers, lifts the top lever when the saw breakdown.

Top clamping device for saw
The main elements and drive parts are clearly visible in photo 5 (see also photo 1 in # 3, 2003), and the design of the crank-connecting mechanism is in Fig. 8. Rotation from the engine to the crank mechanism is transmitted using klinorem transmission (Used by a wedge belt 8x710 mm). On the shafts of the engine and the crank mechanism, three pullees are installed, the dimensions of which are calculated in such a way as to provide three speeds - 706, 1323 and 1730 work moves per minute - at the speed of rotation of the engine shaft 1497 rpm.

Fig. 7. Construction of the saw tension mechanism.
The mechanism of the drive (photo 5 and Fig. 2 in №3, 2003), which provides the oscillatory movement of the saw up-down, consists of a crank and connecting rod. The crank assembly and the connecting rod node with the lower lever have the same design (see view I and II in Fig.8). Both nodes are attached to screws and can be easily removed or rearranged to another position. This made it possible to simplify the length of the working stroke of the saw.
The change in the length of the working stroke is made by turning the jack of crank in the position closer to the axis of rotation of the secondary shaft (see Fig. 8, view A). To do this, you must unscrew the bolts in and C and weaken the bolt A. Then turn the crank housing in the direction indicated by the arrows, and re-spin all the screws into place. The length of the working stroke saw can be set equal to 24 or 12 mm, which corresponds to the removal of the center of the crooked 10.2 and 5.1 mm from the axis of rotation of the secondary shaft.

The crank drive mechanism.
In addition to the accurate and accurate manufacturer of all parts, the electrolybiz is very important to properly collect and adjust the drive mechanism. We are talking About vibration, which inevitably accompanies the work of any crank drive. The fact is that provided for in the counterweight design, which is installed on a single shaft with a crank (see Fig. 8), it turned out to be not enough to compensate for vibrations when working at high speeds.
Therefore, the drive mechanism was supplemented by another device - a balancing lever with two additional moving cargoes. Mes-

Fig. 8. Construction of the drive mechanism.
The crank drive mechanism.
that installation of the balancing lever and the method of its connection with the drive mechanism is clearly visible in photo 1 (see No. 3, 2003). The bottom lever, the connecting rod and the crank node from the second set of parts made "about the supply" were used as the balancing. The knot of the balancing lever crank is installed on the side of the block of pulleys "in antiphase" in relation to the position of the crank main drive (Fig. 8). When moving the connecting rod of the main drive up the rod of the balancing lever must move down.
Reducing the vibration to an acceptable level is achieved by adjusting the position of moving goods on the balancing lever. The balancing procedure may require quite a lot of time to select the optimal weight of the weights.
In addition to wood, this stationary electrolybiz allows you to cut a variety of leafy materials, including aluminum and steel. It is comfortable and easy to work.
Attention! You do not have permission to view hidden text.
Lovers of their own crafts have long appreciated the benefit of such a tool, like a desk jigsaw, with their own hands, which allows you to further expand the instrument capabilities. His combination with an electric drive gave a huge positive effect in improving quality and performance. Manual electric jigsaws have found widespread among homemade craftsmen.
Thread quality desktop Lobzik Depends on the hardness and accuracy of human hands.
Manual electric logsikWith all undoubted advantages, it should be in the hands of a person when working. The quality of the thread in this case depends entirely on the hardness and accuracy of the hand of Cleells. It is possible to simplify the process of making complex figures if you collect a table jigsaw yourself.
Desktop Lobzik Desktop Principles
The principle of having a manual electric jigsion is based on the condition that the part is fixed motionless, and the cutter is made due to the movement of the device manually. The accuracy of the cut, the slope of the pink is entirely dependent on the skill of the employee. If you make homemade table jigsaws, you can change the principle of sawing - the device will be enshrined perpendicular to the plane of the table, while the sheet is fed to cutting tool. Moving the workpiece is made on the plane of the table, which does not require effort, and the direction should be controlled by guide rails.

Desktop Lobzik has a number of positive qualities. The quality of cutting at the expense of a fixed vertical position of the pink and the controlled movement of the workpiece is increasing. It is easier physically process, as there is no need to keep the tool in the hands. Placing the peel from the bottom up allows you to improve the quality due to the removal of the material of the material on the edges of the cut.
Desktop Lobzik should be a stationary design in which it is necessary to provide a plane to move the workpiece and the mounting system to it hand tool. Additional elementsAimed at improving the quality of saws can be a guide system, the mechanisms of tensioning the cutting element and the device to facilitate the rearrangement of the peel. The working surface is usually a worktop, and its size is determined by the dimensions of the workpiece, and the installation height is ease of maintenance.
If it is decided to make, then the following tools should be prepared:
- electric drill with a set of drills;
- bulgarian with cutting discs;
- screwdriver;
- hacksaw;
- chisel;
- hoven for metal;
- a hammer;
- taps;
- dice;
- screwdriver;
- file;
- calipers.
Back to the category
Desktop Lobzik for Urgent Use

If you need to fix the tool, you can quickly make the simplest design. Working countertop Made in the form plywood sheet A thickness of 12-15 mm in size is 50x60 cm. At a distance of approximately 15-20 cm from the edge of the sheet on one side, the hole with a diameter of 20-25 mm is drilled. On the bottom of the plywood drill holes for fixing the jigsaw soles, and so that the pink entered earlier drilled hole in the center. Usually holes in the sole of the jigsaw, and they have a carvings. If no such holes are observed, they will have to be done on drilling machine (better from professionals). With the help of four bolts, the electric jigneling is fixed from the bottom of the plywood sheet, and its fender is displayed upstairs through the hole.
Such a simple design can now be installed on the edge of any massive table or workbench. Lobzik should be outside the table top. The rest of the plywood sheet is attached to the table with clamps.
More universal simple design It turns out if the corners of such a table jigsaw fasten the metal legs. They can be made of a steel strip with a thickness of 4-5 mm. The height of such legs should exceed the size of the jigsaw for 2-3 cm so that it does not rest in the surface when installing a new design on the legs.
Back to the category
Stationary table of simple design

If the jigscription is used often, its stationary design should be based on his desk. A simple table can be made of a 16-18 mm thick chipboard. Such a table is collected from two sidewalls with a width of 45-50 cm and back wall 70-80 cm wide. The height of the walls is selected, based on the employee's growth, but usually it equals about 80 cm. Walls are collected in the table frame with wooden bar or corners. In the lower and the top, it is recommended to fix the hardening collet (jumpers) from a wooden bar or rail.
The countertop is made of plywood with a thickness of 12-15 mm and the size of about 70x100 cm. On the tabletop, the hole is drilled to exit the saw in a convenient place for the employee. An electric jigsion is fixed below the case similar to the case. To improve the quality of the sawing, it is necessary to eliminate possible unnecessary oscillations of the pink, which is suitable for a simple device. The pink is sent between two small bearings (10-15 mm) of any type. For fastening bearings, you can use the bracket from the metal strip installed on the table top. On the surface of the countertop it is recommended to place movable rail guides, which are attached at the end of the table top with clamps.
Back to the category
Stamp improvement

The table for the jigsaw can be significantly adding if you make it from wooden Bruschev. You can use a timing of 70-80 mm thick.
The legs of this table are connected by the colors at the top and bottom. BRUSEV connection is recommended to produce with the help of spikes, headed in the groove. Connection locations are labeled with joinery glue. The height of the table is about 80-100 cm, the distance between the legs is 60-80 cm.
Desktop logging machine will be useful to each wizard, discharged thin details. However, it is not always possible to have the opportunity and make sense to acquire a full-fledged machine. In this case, take the case and make it with your own hands!
Lobzic machine device - what lies inside?
Lobzic machines belong more to the tools special than to the devices that are needed as experienced MasterAnd a lover hovering in the garage. Their appointment comes down to a special task, namely the discharge of complex curvilinear contours from sheet materials. A special "chip" of such machines can be attributed and the execution of cut without disrupting the integrity of the external contour. Most often, drinking occurs on wooden and derived materials (plywood, chipboard, fiberboard), although modern machines equipped with appropriate sawmills are capable of working with other materials, such as plastic or plasterboard.
Such equipment has been applied in the music industry (manufacturing musical instruments) And, of course, in the furniture. Buy such aggregates and lovers to make their own workshop. Traditional device lobzic Machinadesigned for all rules, looks like this: working surfaceTo which the saw was removed, hides with the drive (electric motor) and the crank-connecting rod design. The tension mechanism can be both bottom and top of the machine.
To handle the item, it must be put on the desktop. Many models have the ability to turn it at different angles to perform inclined cut. Stops and guides on the surface as well rotary mechanism May be marked, which greatly simplifies and speeds up work. It is from the length of the desktop and the length of the cut is the majority of models are limited to 30-40 cm. The power of the electric motor is important, but still far from the most fundamental factor, since the machine has a huge reserve for unclaimed power. For example, for a home workshop or even small production Enough "engine" is only 150 W.
Crop-connecting mechanism - wherever more important detail, In this case, in this case, it is from it that the quality of the drive of the drive in a progressive-return movement directed in the vertical plane is depends on the vertical plane.
Standard feeding machines are considered to be apparatuses with an amplitude of motion in the region of 3-5 cm at a frequency of oscillations up to 1000 per minute. Many models provide a change of high-speed regime for different materials. The lyobzic pink itself is usually made up to 35 cm long and able to cut the material to 10 cm thick. The width of the sawmakes can fluctuate in a fairly wide range - from very thin two-millimeter to more rough ten-millimeters, with a thickness of from 0.6 mm to 1.25 mm.
Even the thick and wide sawing will be easy to break if it is not enough to ensure a sufficient tension of the saws along the entire length. This uses spring and screw springs. Quite often such machines are equipped air pumpwhich cleans through blowing cut from sawdust, as well as a drilling unit. The last device is especially useful, because in this case the master does not need to be distracted by connection electric drill And drill holes - everything happens on the working plane of the machine. Of course, for convenience will have to pay!
How to make a logging machine with your own hands from the manual electroball?
On the network you will find many different designs Homemade machines, but most of them are reduced to repugrnation in this device. Applying the smell and watching the video, you will be completely easy to make a homemade logging machine from this tool. You need to refine an electrolovka only a bit. In fact, it performs the role of the drive of the machine and the crank-connecting mechanism, the rest must be infidant and implement.
Of course, manufacturers are trying to please consumers and in this area, offering their platform options for fast and convenient alterations, however, in fact, only you can make the apparatus corresponding to your needs.. So, the first thing you need to make a support table, for which most often use sheet metal. It needs to make a relaxed oblong hole for the saws and holes for fasteners (screws with secret head), And attach the jigscription from the bottom of the support table.
This design remains only to strengthen wooden table. You may not be limited to this and install guide rails. The convenience of such a device is that in addition to performing the functions that do not quite inherent in it, you can always disconnect the drive and the easy movement of the hand turn it again in manual Electrolzik! If this tool is constantly required to work, it makes sense specifically for the machine - it will be cheaper than spending on the real machine.
Advantages and disadvantages - we continue to modify!
But such an unit inherits not only the advantages of the instrument, but also its disadvantages, in particular, too broad for filigree works, which significantly limits the curvature of lines. If there is a need for this, there is a way out. So far, our machine is different from the classic logging unit in the absence of springs that would provide sufficient tension of the sawmill. But to build a simple rocker, which on the one hand will be under the tension of the springs, and on the other is fixed on the sawing, quite easily.
There is another option - to clamp a sawtur between two guide rollers, but the first option is still reliable. Do not forget to turn off the pendulum on the electric bike before you start using homemade machine. There is another design - if your tool is quite powerful, then it can only serve as driven in the design of two rockers, between which the sawo is stretched. The movement is transmitted by means fixed on the lower rocker.
Machine from the sewing machine - give the second life with old tools!
If you inherit the grandmother or mom you got a foot or manual sewing machine, consider yourself the owner of a great logging machine! Of course, for this you need to "put a little" above the machine. First, remove the device for the nitcutting, which is usually located at the bottom of the device. There is nothing difficult in this, it is enough to unscrew two bolts. Then we knocked the pin and remove the drive shaft leading to the mechanism of the nitcipette.
Revealing top panel, protecting mechanisms, it is necessary to expand the slot in which the needle walked. Focus on the needs and width of the file that you will apply in work. Pilking for a logging machine of this kind also need to modify slightly, namely it is cut under maximum length The needles that could be used on this typewriter. Streeting the upper teeth and sharpening low part On the edge, you will only stay insert a file in a needle holder and experience your machine in action!
The desktop electrolovik is an indispensable thing for any owner who is accustomed to independently cope with homework. Especially electric jigsaws are good for residents of the private sector, lovers of manual labor and dacha rest. From its pre-edge, ordinary manual jigsaw, desktop electrical model Gone far enough. The desktop electrolovik makes it easier and speed up the pumping procedure, not to mention the quality improvement.
Concept of desktop electroballs
The jacket is a saw that is characterized by reciprocating movements of the saw blade, serving the working body. It has a ski, intended for the direction of the saw blade when moving over the surface, which is processed, and performing movements with a frequency per minute to 3000 oscillations.
This tool was invented in 1946. His creator is Albert Kaufman, who replaced the needle in sewing machine On the blade. On sale the tool appeared already in 1947. The manual electrolovka has a housing with a flat platform and a handle. The main difference between the electric jigsion from manual lies in its greater functionality and the quality of cutting.

Inside Located electrical engine and a special mechanism that leads the blade. In stationary jigsaws, the handle is absent, and the platform is located on top. In the front of the mechanism there is a guide, in the lower - the retractable web, which moves and moves the cuts.
The tool works as follows: The table for the desktop electroballs is securely fastened with the clips in the slider. Recurrent movements have a frequency of up to 3000 moves and can be adjusted. The reference platform allows the jigsaw to focus on the sawn item, so the work is very accurate.
Purpose of desktop electroballs
Lobzik is an integral affiliation of each workshop and every amateur. His thin leg can be successfully divided by Phaneur, copper, iron, thick boards, brass, steel. Tools happens with a motor, foot or manual drive and differ greater performance. The electric jigscription is simply indispensable for carpenters, workers with wood, furniture designers, drywall, manufacturing complex parts.
Electric jigsaw can perform direct and curvilinear cuts on the workpieces with a complex shape and various sheet materials without disrupting the external contour. Most often, desktop jigsaws are used to cut wood and wooden plates, figures with a complex essay from laminate and drywall, plastic blanks, also for cutting sheet metal.

Desktop electric logsik performs clean cuts complex form and works with small
Details. Due to the persistent and fixed position during operation achieved high accuracy cut. The pedel has a stable course due to the tension system and guides, which are deprived of manual jigsaws. The big size of the table makes it stable, therefore the exactly given direction of sawing is observed.
Types of electroballs
Today, the power tool market presents a wide variety of electric bits, which differ in the nature of the application, technical characteristics, power supply and constructive features. In construction stores you can buy a desktop electrolybiz for every taste and wallet.
According to constructive features, it is difficult to carry out a classification, because each manufacturer's company seeks to provide its products that are designed to facilitate and improve the operation of the tool. In this regard, the shape of the handle is a significant parameter.
Two varieties of the handle were established - mushroom and D-shaped. Lobzik with a braceband requires a job with one hand. This increases the possibilities of using the jigsaw, but somewhat negatively affects the quality of the material cut.

Mushroom pens suggest the execution of more neat cuts when holding the jigsaw with two hands, pre-fixing the cutting blank. The choice of jigsaw with a specific shape of the handle depends on the financial capabilities and personal preferences of the buyer. You have to choose that the logsik, with which it will be more convenient.
Household electrolovka are not intended for intensive use, but the low price of the desktop electroballs and the power, which is enough for household needs, make them indispensable in the household.
Professional electroballs are characterized by high wear resistance and the possibility of daily many hours (up to 8 hours) use. The essential power of similar jigsaws allows the processing of materials of large thickness. Extended equipment and improved characteristics are reflected in price.

Among professional Lobzikov Industrial is also distinguished, which are characterized by a greater fitness to complex operations and actuations of the drive - for example, an increased voltage of the power supply. Industrial models are machines that are intended for the woodworking industry.
By type of power there are network and rechargeable electroballs. Network models are powered by a power supply network with standard voltage. If productivity is important for you, it is worth choosing a network power tool.
Rechargeable electroballs provide independence from the availability of outlets and greater mobility during operation. When buying a battery model, it is worth paying attention to the type of battery. Increased performance characteristics are inherent in lithium-ion batteries. Battery capacity is responsible for the duration without recharging.
Advantages of desktop electrolovikov
Desktop Electric Lobzik is stationary design, therefore, this cutting type The tool has many advantages. Modern models C. wooden materials 40-50 millimeters thick. A narrow saw, which performs vertical progressive movements, acts as a working body. Due to the peculiarities of the notches of the teeth and mechanics of movements of the saw, the material is cut by the way up.
Desktop Eletkrol Compact allows you to drink complex decorative details, produce longitudinal, straight, inclined and transverse propuls. A wide countertop allows you to process large details and make cuts inside wide blanks. Reliable fastening protects the body from unnecessary oscillations and allows you to have a good material, so the motor can work without overload.
The advantages of desktop electroballs can be called good accuracy and clarity of cutting, high safety and ease of operation, the wide possibilities of setting up from the material and the required part of the cut blanks.

If you need to cut the items little sizeThe manual electrolybiz will not be very convenient. He is pretty heavy, so it will have to keep one hand and direct the workpiece. And the desktop logs is deprived of this shortage. Perhaps inconvenience are too large size and difficulty working with large details.
The desktop electrolovik is a kind of mini-machine for cutting blanks. If you acquire an electrolybiz in the store, most likely there will be possible to select the power and adjustment of the frequency of the pink. However, you can make the simplest homemade desktop electrolybiz, and very quickly. It will take a manual electrolybiz, several screws, a piece of plywood small sizes And just an hour of work.
Production of desktop electroballs
Carefully made electrolovka little to give up to the factory-made, and in some respects even surpasses it. Collect such an electrobzik is not difficult if there is essential materials. Next, we describe simple schema Such manipulations.
The design of the electrolybiz includes the following components: handle, switch button, insulating washer, power cord, frame, heating thread, screw clip and earring. First you need to make a frame. You will need a duralumin tube with an outer diameter to twelve millimeters.
You can also use for the base textolite with a thickness of at least ten millimeters or a thick phanener. But keep in mind, the easier it will be the frame, the more convenient the electrolybiz will be used. Be sure to pride the channel so that the power cord can be laid in the future. The best form of the frame is the one, one side of which is rejected by 45 degrees.

Next you need to make an earring. It is performed from a copper sheet of one millimeter thick. After that, it is attached to the screws to the frame, where it connects with the handle. Thus, the screw, the bars nut and the earring will form a clamp, in which you can fix the heating thread. The thickness of the duraluminum sheet should be up to 0.8 millimeters. It is necessary to make the clamping cheeks, between which the switch button is located.
After that, you need to cut into the plywood of the gap, through which the fend can pass. It can be done using a drill. To do this, drill holes along the markup line, and the transitions are smoothed. Instead of plywood, you can use plastic, metal, plexiglas and others. Next, you place and drill fasteners on the plywood and the support plate of the jigsaw.
Then it is necessary to fix the jigsaw screws on the plywood base so that the pilper can pass through the slot. You attach the design to the table using a clamp so that the pilper is pointing upwards. You can also consolidate the platform in any available way.
The pilot for the electrolybiz remains usual, but the possibilities for good drinking are expanding due to the release of the hands.
You can use nichrome spiral from any household heating device (iron for example) as a heating thread. It is necessary with the tension to fasten between the ends of the frames of the frame. To heat the thread, it is necessary to submit a tension of about 14 V. To control the mode of operation, you can use the row.
The current is determined by the thickness and length of the nichrome thread. With the help of the row, it is possible to establish the optimal current strength (no more than 3-5 A), which will affect the temperature to which the thread is heated. Before starting work, it is necessary to determine the strength of the current. But keep in mind when too high power The cutting material can be seized with a flame, and with insufficient - it will not take. Made with your own hands the desktop electrolybiz will allow cutting figures with complicated contours from of various types Materials.
Rules for using desktop electrolovka
When working with a desktop jigsion, you must adhere to some rules:
- During cutting, do not press much tool, otherwise the needle will break at the worst, you will spoil the work.
- From time to time replace saws. Old saw can spoil and destroy the surface of the material.
- If you work with organic glass and colored alloys, the plane of the product must be mixed with water. Such an operation will speed up the process and extend the service life of the saw.
- If you cut the surface with a thickness of less than one millimeter, put a sheet of wood or plywher under the treated material.
- Before speaking, it is necessary to secure the material. Long cuts are better not to do from hand, the line may turn out to be a curve.
- For cutting different materials, appropriate canvases are needed, with a special step and length.
- Turns to the tool, turning only the back of the tool.
- When cutting a laminate, a tape is pasted on the cut line, which removes the material from chips.
- If there is a need for curvilinear cuts, install the jigsaw pendulum at a minimum.
If you have not yet fully understood how to make a desktop elet collectrol bzya, see the video about this procedure. This tool allows you to drink complex parts from wood and other material, producing longitudinal, inclined, straight and transverse propuls. With the help of an electric bike, you can process large parts, wide blanks and minor products, which is not excess at home.
 Why you can not postpone the pregnancy
 Effect from regular use of home recipes
 Features of the structure of the neck