Ribbon-grinding machine: we study and make it yourself. Making a homemade belt stanking machine on a tree Homemade ribbon saw on wood drawings
Make yourself saw - painstaking and complex, but quite complete task. The easiest all the homemade belt saw is going on a wooden frame - you do not have to boil anything, and there are almost everyone to the joiner tool.
Assembly of the carcass
For a frame, it is better to choose a strong and solid wood, otherwise the design will be unreliable and will vibrate. Some elements, such as a desktop, can be made from plywood, and ribs for stiffeners are edged with rails. The cheapest option is to disassemble the old furniture, putting the pixel on the pulleys and the table. A maple beam is suitable for the carrier bar.
First of all, you need to decide on the drawings for which the framework will be collected. So, the size of the working room will depend on the size of the tape saw. It is necessary to think over the convenient height of the table in advance, the length of the rod and the diameter of the pulleys. Drawings can be both conditional, reflecting only total sizes and detailed, as in the photo.
Installation of rods and support for pulleys
The simplest band sawed with your own hands - on a wooden C-shaped frame, where the support bar is made of a timber with a thickness of at least 8x8 cm, to which two supports are attached with one (conditionally rear) part.
They will hold the pulleys. Such supports are better made of a strong material, a multilayer plywood with a sturdy core is allowed.
The distance between the supports must be selected in such a way that the logs are fit there for sawing. In any case, it is recommended to make the distance "with the reserve" so that there are no problems in the future.
Assembling desktop
The height of the table should be comfortable to work on it, and at the same time the lower pulley and the drive pulley, the engine and a large amount of chips. The form itself may be any, it is often done in the form of a closed tube serving as a container for sawdust.
It is desirable to provide an easy way to open the table and waste tray - so clean the saw will be much more convenient.

The countertop can be installed directly on the lower support. If the height of the lower support is not enough, make a simple stand under the entire design, raising it to the desired height.

Cutting the pulleys and fasten them to support
The diameter of the ribbon drive pulleys can be selected arbitrary, but the more pulley - the longer it works better. At the same time, it is necessary to choose the cloth, the perfect ratio is 1/1000 canvas to the diameter of the pulley. Thus, for the fortycantimeter pulleys, the tape should be 4 mm. But with proper operation, even on narrow pulleys, you can safely work with 6 mm canvas.
The diameter of the pulley of the belt drive must be chosen depending on the diameter of the main pulleys, the length of the tape and the rotation of the engine.
1. Calcifiates the length of the circumference of the pulley saw: d \u003d 3.14 * Pulk diameter.
2. On average, the speed of the canvas should be 30 m / s.
3. The number of revolutions is determined: O \u003d 30 / D;
4. The ratio (C) of the rotor (OM) is calculated to the rotation of the belt drive pulley: C \u003d OM / O;
5. Drive pulley diameter \u003d d / s.
The edge of the cloth pulleys is made by convex, with an angle of 5-10 degrees - thanks to this, the saw tape is self-centering and does not fall.

But on the belt drive pulley, it is better to make a shallow groove, in which the belt will be located. Cut the pulleys can be conventional cameras from a bike or cars.

The diameter is chosen on one or two sizes less pulley. Such rubber tightness prevents cloth slipping.
The upper pulley is attached on a moving block, which should move horizontally, providing tension tape.

This provides for a special lifting mechanism. The easiest option is a bar located under the block and attached to the lever very tight spring. Pressing the lever, the timber raises a block with a pulley, providing the desired tension.
It is necessary to provide a method for fastening the lever in a given position, for example, several bolts located at different levels. The spring will provide the necessary pressure and it will extinguish the voltage without giving tape to break.
The lower unit consists of two pulleys fixed on the axis - slave and leading.

It is important to properly balance the upper and lower pulleys in the same plane, minimizing the "eight" when the wheels move.
For fastening the upper pulley, it is convenient to use self-centered bearings, which will quickly remove and wear the wheels.

But they need to be attached to the pulleys as thick as possible, otherwise the bearings will break very quickly. After fastening the wheels on the frame, a trial launch of a saw should be carried out, observing maximum caution.
Installation of guide canvas
So that the ribbon saw on the tree makes a smooth cutting and the canvas is not "melted" with a sawn tree, along the stupid end of the saw on a narrow timber assembled guides.

The easiest option is to fasten three roller bearings to Brus. On one, the flat side of the canvas is based on, the other two tightly hold the ribbon on the sides.

Be sure to perfectly align the guides at the point of attachment on the support, otherwise even the microscopic variation vertically can pour 3 mm at the opposite end. It is best to note the position of the beam with the maximum stretched canvas and already mounted guides. This ensures the exact position of their relative to the saw tape.
Instead of two bearings on the sides, wooden limiters can be made. It will also be superfluous to install additional guides under the tabletop, and not just on top.

It should be borne in mind that the guides should be as close as possible to the workpiece, ideally - at a distance of 3-4 cm from the log. Therefore, if it is planned to saw different billets, it makes sense to adjust the height of the guides.
Finishing finish
A saw from the tree is ready for operation after the assembly, but it is better to make a casing covering the upper pulley.

It does not have so much aesthetic goals as the safety is served - even when the tape is slipped from the pulley, it will stay in the casing.
It will not be superfluous to make a container for chip, which is easy to get and empty.

The belt drive is better to take out from under the table, so that they do not hit the sawdust. To protect the engine, it is also recommended to organize a casing that prevents the penetration of dust and other particles.
The final processing of the tree with varnishes or paint will not only extend the service life, but also protects the hands from unpleasant rods and sinters from raw wood. Previously, all surfaces need to sand and treat with antiseptics that prevent rotting.
The video presents a review of the self-made wooden saw and the advantages of such a solution are told:
You'll like it
How to make a homemade ribbon wood on wood with your own hands
Conducting a large number of works of one or another, which implies the widespread use of the board, wooden bar and the like materials, is associated with the need to conduct log sawing. It is clear that it is always possible to purchase materials ready for use that in our time will not be any difficulty, or buy a belt factory in industrial belt. But such solutions are associated with significant material costs, and this is not always justified.

Homemade saw
The cheaper option is to develop with your own wood ribbon saws, but for this you will need to have drawings, a canvas made of durable metal, cutting material, as well as some other details.
The main part of such a home sawmill is a saw and a motor that will lead it into motion. The optimal version is the engine, the power of which is 10 kW: In this case, it will be possible to cut any logs without any problems on the boards using a machine made with your own hands.
What is needed for self-making machine?
To assemble with your own hands, such a tape sawing machine is quite possible on ready-made drawings, thanks to this it will be possible to paint on the boards any logs right at home. To perform such work - the machine's own assembly - will need:
- some details of old cars;
- rent a variety type;
- conducting locksmith and turning works;
- minor welding.
During the assembly of a similar ribbon machine on a tree, you can use old pulleys from any agricultural machinery, the optimal diameter of which is about 30 cm. Guides such a homemade panel are best made from pipes of two types of metal: half-imaging diameter and a little more, as a result of which the latter can It will wear on smaller pipes, leaving a slight gap of about 0.5 mm.
Making bases and devices for fixing logs

At the first stage of the personnel of such work, the basis for the future machine to turn ordinary logs to high-quality boards is manufactured. As a material for this, a metal corner is suitable. It should be installed up to the side, while it is necessary to achieve maximum precision adjusting the wheels, otherwise they will quickly wear out.
The profile pipes with dimensions of 2.5 × 2.5 mm are delivered perpendicular to these corners, between them - the pipe with a diameter of half yield, on which claws are fixed, which are fasteners for logs.
Such fasteners should be easily moved on the right side. To reliably fix the logs, it is enough to hit the hammer on the climb, as a result of which the material fixation mechanism will occur, and it will be possible to carry out all the required operations.

With a hand-made assembly of a ribbon-type saw, profile pipes made of solid metal, which are mounted perpendicular to the base, must be made in such a way as to perform a little for the base. In addition, jumpers should be installed on the pipes: they will place logs before drinking on the machine.
How to install pulleys

The machine pulleys should be told so that when equipping the belt, he played for their edge to a couple of centimeters. The whole design moves along a special guide - pipes that are located horizontally. This node, if necessary, can be fixed in the right place with bolts.
To prevent the tape from the pulleys while working on the machine, they need to be installed not in parallel, and under a slight inclination - as a result of such an installation, the tape saws will "stretch" to the rollers itself.
The right pulley is used as the slave, so it is necessary to attach a spring that automatically pulls it during operation. The left pulley, consequently, is the lead, so it is necessary to fix it with his own assembly of the ribbon machine. When changing the sized saw, the drive pulley must be shifted.
How to make the right roller knot
In a hand-made belt, the optimal option will be the use of rotable rollers. The right solution will make the entire knot with the rollers personally and be confident in its reliability, and not use ready.
This node consists of 3 bearings, two of which are grades 202, and one more, behind, a little bigger. The shaft and rollers must be chopped in such a way that in case of decreasing or increasing the width of the saw saw remains the ability to install washers between the bearings.
The shaft must be in two tubes: Halfood and slightly large, inserting one to another. In the midwayer tube, the shaft must have a slight offset of the axis, in fact it is welded to the bottom wall.
All this machine knot, which consists of tubes and shaft, to the guides are attached with their own hands in this way, so that it is possible to adjust the roller node in height, shifting it to the sides, depending on the diameter of the logs processed on their own hands, and also reliably fix it After the end of the adjustment.
Frame and additional elements
The frame, the height of which should be one and a half meters, is made with its own hands from the channel 100, to give the design of additional stiffness, they are strengthened with jams. The block of the machine, which will carry out the logs, will move on the chapels using spills. Rigid fixation to the sawmill sawmill saw through bolts with locknuts.
To make the machine more convenient to use, it can be made with your own hands an additional device in which the chips will be collected. In the simplest case, this is an ordinary wooden or plywood box, you can also use something like that.

Finished homemade belt sawmill
Thus, a homemade belt saw in drawings can be made independently even in a garage or a small homemade workshop. But thanks to such a homemade tool with a saw right on its site to produce boards, sawing logs.
Work on such an instrument made on ready-made drawings with your own hands is quite simple. Putting on the bed in the bed, fixing it and turn on the mechanism, it will quickly make the necessary log processing with a ribbon saw.
In the process of using a homemade machine, it is necessary to constantly monitor that its saw always remains acute, as well as to hold safety regulations.
For a good owner, the availability of all necessary equipment is happiness. It is especially important to have different adaptations to those people who live in their own home. For example, homemade belt saw will greatly facilitate work with wooden products. At the same time, as it is already clear, the device can be constructed from the girlfriend.
Application scope and design of the unit
In principle, the device is used on sawmills in industrial or home. It has certain advantages and disadvantages, but it is used very widely.
The device of this unit is sufficient. On a stable frame attached an electric motor and pulleys. They join the cutting canvas. Thanks to the engine, the device is ensured. Depending on the type of canvas, you have the ability to cut not only wood, but also metals, alloys, polypropylene.
Advantages and disadvantages of the device

Ribbon saw with their own hands is done fast enough. Naturally, it is necessary to comply with all the drawing requirements and be accurate. However, you must first decide whether to do it. To do this, it is necessary to consider all the pros and cons of the aggregate. So, among the advantages you can allocate such:
- High level of performance.
- Low heat recovery.
- Excellent accuracy of work, as well as high speed.
- the ability to make blanks according to individual parameters. At the same time, you can cut not only in direct, but also curvilinear bends.
- For the manufacture and use of the tool, you will not need a large amount of cash.
- Belt saw, with their own hands, which is not so difficult to do, leaves a small width. Thanks to this, you get a minimum of waste. It is very important for the production of various wood products.
Naturally, the band saw, with their own hands, which can be done in a few days, is not devastable. For example, such a device you can make only longitudinal cuts, as its design will not allow something else. During operation, the machine can produce strong noise and vibration. In addition, the device has large sizes. If you decide to independently make such a machine, then you will have to use special equipment.
If you do not scare disadvantages, such a device can bring a lot of benefit to the owner.
Which canvas should choose?

Ribbon saw with your own hands can be made from those materials that can be found at home. However, the cloth will have to buy. Before it should be decided what exactly it should be. To do this, you need to know what you are going to cut. So, there are such canvas:
1. Bimetallic. They are used for cutting sufficiently strong alloys, stainless steel. At the same time, you can be sure that the tape will not burst.
2. Diamond. They are used if it is necessary to process marble, granite, quartz and other solid materials.
3. Carbide. They can be applied to cutting such alloys that are quite complex in operation.
4. From instrumental steel. Such canvas are most often used at home or small workshops. They are most suitable for working with simple materials.
Varieties of machine tools

Before starting the manufacture of band saws, it should be sorted out in their types. There is such a classification of devices:
- toothless. They have high performance and can work with metal. A feature of such devices is that they still have small teeth. They work due to friction and additional heating.
- Tog. They can be used for sawing wood or plastic. A feature of the canvas in such devices is that they are closed.
- Electrical science. Most often they are installed on large industries, where you need to process a large amount of material.
What materials are needed for manufacture?

It should be noted that not the entire design can be built from the remedies. Therefore, before making a ribbon saw, you should collect the necessary details:
1. Wooden shields, chipboard, MDF or plywood. From these materials, frame and cabinet for saws are manufactured, as well as pulleys.
2. Sheet steel for the production of cutting canvas or the ready-made item that can be purchased in the store.
3. Channel and steel rod. These parts are used to manufacture the support frame and the axis on which the pulleys will be installed.
4. Sheet rubber. It is used to protect wood.
5. Durable belt that will provide rotation of the wheels on the machine.
6. Polyurethane adhesive for connecting some parts.
7. Fasteners: self-tapping screws, brackets, bolts, washers and rubber gaskets.
9. Electric engine. Do not buy a very expensive model. Just decide what power should have a machine.
Thus, it can be constructed a belt drank with their own hands. The drawings of this design should be done, as accurately calculating every step. Naturally, you can find all the schemes in the finished form.
Required tool
In order to start making a ribbon saw with your own hands, you must prepare. You need such tools:
- cut and grinding machine.
Naturally, other tools may also be needed. For example, the milling machine.
Instructions for the manufacture and assembly of the device

Now you should proceed to the production of the presented unit. To do this, have several stages:
1. If you decide to make such an aggregate, like a tape saw, do it yourself, you should already be drawings. They are the key to success. Starting stands from the construction of the table and the stands, on which the mechanism will be recorded. For this you need a furniture shield or tree.
3. Now you can make a frame for assembling the entire device. It can have a s-shaped form that provides good tape hold. The support frame is made from the schveller, which is put on the steel axis.
4. Now we will deal with pulleys. They must be put on the axis with the help of sleeves, and at different ends. Naturally, both pulleys must be balanced.
5. In order for the tape does not vibrate, you need to apply damper.
6. All movable parts should be connected to the electric motor.
7. Also you can build a guide mechanism, with which the material being processed will be supplied. For this, metal corners are used.
Features setup apparatus

A ribbon wood sawmid saw should be carefully prepared for work. To do this, it should be experienced and configured. The cutting tape should be strictly at right angles. Any minor skew can stop the operation of the machine and become life-threatening.
Note that the cutting tape should be tensioned as much as possible. Use the slave pulley to configure. It is with his help that you can normally adjust your machine. It should also be noted that the tape welding used in the manufacture of welding (it is easy to implement it simply) will provide good strength and stability of the machine.
Sharpening saw
Naturally, any technique needs periodic repairs and inspection. For example, the sharpening of the ribbon saws with their own hands is quite simple. The main thing is to know its technology. A special machine is used for work. All work consists of several stages:

1. The initial sharpening (eliminates the cracks that have appeared, restores the symmetry and profile of the teeth).
2. Cleaning the canvas from sawdust and dust.
3. Wiring (to restore rear and front corners).
4. Final sharpening. She eliminates all distortions and gives the severity to the tooth.
If you do not have the experience of sharpening drank, then all actions should be made as careful as possible. The quality of the device operation depends on this procedure. If you are not sure about your abilities, then invite an experienced specialist.
What problems may occur during the manufacture of the device?
First of all, it will take complex equipment to perform some works. For example, not everyone knows how to use the welding machine. Not everyone has milling machines. Note that the whole design must be sustainable. At the same time, do not forget about the mass of the material that will be processed.
Not everyone can deal with the drawing. Note that the disadvantage of such an apparatus is quite wide. In general, if you want to build such an aggregate yourself, stock up the necessary tool, material and patience. 
Features of the use of saws
Even after you can make the presented design, you should learn how to use it correctly. For example, try to comply with all the necessary security rules. Please note that in some cases the canvas can burst, so if you are not sure about the strength of its fastening, then you are not too close to the machine.
Observe such rules of operation of the device:
"The more the workpiece that needs to be treated, the larger the teeth should be at the saw.
- Better to use universal cutting ribbons. In this case, you do not have to change the cloth every time you need to process any other material.
- Before making the device, you must definitely choose the place where it will stand. It takes into account the size of the room, the presence of electrical wiring. Naturally, this place should be well ventilated.
- Before work, try to pull the cutting ribbon as much as possible. Otherwise, the machine will not only not fulfill its functions, but will also be dangerous to health.
- The unit should not work for more than two hours in a row. After that, the tape is removed and left alone at least for a day.
- After long-term operation, the machine must be lubricated. Select suitable substance for your car.
- The correct divorce of teeth is required.
That's all the features of the manufacture and use of the ribbon saw. Note that this device requires appropriate care. If you see that it works incorrectly, it is better to postpone from the beginning of its operation. Be careful and careful.
The top 10 of the broken stars turns out, sometimes even the loudest glory ends with a failure, as in the case of these celebrities.

Do these 10 little things man always notices in a woman think your man does not make sense in female psychology? This is not true. From the look of the partner who loving you does not apply a single little thing. And here are 10 things.

Never do it in the church! If you are not sure about whether you behave in the church correctly or not, then it is probably done yet not as it should be. Here is a list of terrible.

Alternatively to all stereotypes: the girl with a rare genetic disorder conquers the world of fashion this girl is the name of Melanie Gidos, and she burst into the world of fashion rapidly, emptying, inspiring and destroying stupid stereotypes.

Suddenly: husbands want their wives more often these 17 things if you want your relationship to be happier, you should more often do things from this simple list.

What is the virgin in 30 years? What is interesting, women who did not have sex practically until the middle age achieve.
Ribbon saw do it yourself - not so terrible drawing as its embodiment
With a large amount of lumber using, sooner or later, the question arises about its own sawmaker. Such installations are available on sale, but the cost of them is excessively high.
Therefore, many homemade masters make a dispersion machine on their own. The following options are used:

The desktop contains a slot from which part of the toothed disk comes to the surface. The billet moves across the saw placed stationary. From the point of view of independent manufacture - the easiest option;

The chainsaw is installed on the bracket with the guides, or stationary. The operator either leads the tool along the workpiece, or the blank moves to the chain. Just enough for self-making, but it is suitable only for rough cut;

In such a design, the infinite canvas moves in a circle, relying on two shafts (pulley). The most difficult device, from the point of view of handicraft production. But the quality of work and versatility compensate all costs.
Homemade belt saw - how to make a sawmill
The main problem of this installation is its dimensions. Owners of apartments with loggias may not worry. This device is not for you. Is that the desktop version is a replacement of manual jigsaw.
If we are talking about ROSPASK REDUCE on the logs - a spacious canopy, a barn or a separate workshop is necessary. Of course, all this is located in the courtyard of a private house.
IMPORTANT! Given the potential danger of construction, and the size of the workpieces - the room is selected taking into account the free space around the panel.
The drawings are better made using specialized programs, such as AutoCAD. The general type of construction in the three-dimensional image is shown in the illustration:

This material describes the vertical tape saw.
Making frame
The most responsible part of the machine is Rama, or Stanna. It carries the whole severity of the design and is support for the desktop. You can make it from a steel profile or corner, but in terms of the value of the material - the tree is preferable.
The sawmaker can be on a wood or metal, depending on the selected web. At the same time, a properly manufactured bed will ensure reliability of working with any material.
Build a frame from plywood or chipboard is undesirable. The best material will be a 20 mm board, from which you can collect any configuration of the bed. The design is glued according to the principle - each next layer crosses the direction of the fibers the previous one.
It is possible to strengthen the design by applying the screws to fasten the layers, however, the main binding material remains glue. The design "C" of the shape is rigid, and at the same time relative to the elastic. That is, the frame in addition to the carrier component, performs the role of a peculiar damper, which allows you to smooth the leaf jet for a ribbon saw.

Block of the upper pulley
The next responsible part of the installation is the adjustable block of the top wheel (pulley). The shaft must move vertically to ensure the tension of the canvas when it is inevitable stretching during operation. The frame is made of durable wood (beech or oak).
Inside the frame is a wooden insertion from the same tree, in which the shaft is directly fastened. The shaft is pulled in accordance with the inner diameter of the wheel bearing.
The insert with the shaft must have one degree of freedom to adjust the tilt axis.
This will be required when adjusting the tension of the ribbon canvas. The slope is adjusted with a thread with a thread and a set of integrated nuts.

Vertical movement is carried out using a screw mechanism with a hexagon head. You can tighten the block of the end key, or set the stationary handle to adjust. The frame itself is moving along the guides installed in the top of the bed.
To do this, the grooves corresponding to the frames of the frame are pre-obtained.
IMPORTANT! All nuts in the adjusting mechanism are enhanced by metal plates. If necessary, nuts can be used.
The shaft is pulled out with the flange, with which it is fixed from the back side on a wooden inset. An example of such a flange on the illustration:

Production of wheels (pulleys)
Material for gluing wheels - plywood circles. Cut with a milling circulation. Depending on the thickness of the material, the layers can be 2 or 3. The total thickness of the wheels of about 30 mm. After gluing, it is necessary to cut a hole for the bearing.
For the stability of the design, the bearing is better fixed in the coupling, isted out of fluoroplast or textolite. You can do aluminum if you find a circle of a suitable diameter.
On the side of the block on the shaft is put on a fluoroplastic washer.
Metal is undesirable, due to accelerated wear. The outer side of the bearing is fixed with a flange, on an illustration of it square shape.

The running surface of the wheels is calculated to the barrel-shaped form. In this case, the ribbon saw is self-established. A cycling chamber is put on the finished surface. After the final assembly of the wheel is balanced. This can be done by changing the diameter of the holes that are worn in the disk.
IMPORTANT! When installing the bearing, it is necessary to ensure the perpendicularity of the shaft. In case of deviation (even insignificant), the wheel will have a beyon on the plane, and the ribbon canvas can jump.
The drive pulley is mounted on the bottom wheel. The shaft is installed hard, without adjustment. The tension of the drive belt is better to adjust the position of the engine, its foundation is equipped with longitudinal grooves in the mounting places to the base of the machine.
The normal rotation speed of the wheel for a ribbon saw - 700-900 rpm. When calculating the diameters of the drive pulleys, it is necessary to take into account the operating turnover of the electric motor.
Speed \u200b\u200btable
The countertop along with the base is also made of wood. The base is performed in the form of a couch, inside which the engine with a starting device, and drawers for devices and spare parts will be hidden.
The table is made of thick plywood, the working side paste textolite. A good option may be a tabletop from kitchen furniture with durable laminate on the surface.
For convenience, the countertop can be performed turning.
In this case, you can perform cut under the desired angle. The mechanism of tilt countertops does not make sense, since each master will decide that he will need any degrees of freedom.

Included with the table you need to make a parallel focus. The design is the most diverse: from the profile with two clamps to the roller system of the guides.
Configuring a ribbon saw
To begin with, the wheels are strictly parallel to each other. The vertical displacement of the pulleys is cleaned with the help of fluoroplastic washers, put on the shafts. The primary launch is carried out without guides, and a trial cut without load is done. Properly configured wheels are rotating without jerks, the tape does not seek to jump from the pulleys.
After adjustment, a block of guide canvases is installed. Without it, it is impossible to cut under load. The feature of the design - the module consists of two parts, but both halves must be exhibited strictly along the saw blade line.

Pylons for ribbons
There are masters that independently make the canvas for a ribbon saw. You can purchase a workpiece in the form of a steel strip, and sharpening the ribbon saw by the template. The connection of the web into a closed ribbon is the most difficult stage of manufacture. Ribbon saw welding is made by the contact method. Adjust should not be.

After connecting the joint is grouped.
However, a modern assortment of cloths, allows you to buy a kit for any material at an affordable price.

So do not waste your time on the manufacture of consumables - this is not the case when it makes sense to apply your skill.
Before you buy, use the Reference material for the selection of the width of the web depending on the roundabout radius. Perhaps you will drink curly products from wood on your sawmill.

In the video, step by step is told how to make a homemade saw on a tree from plywood and hubs from Zhiguli. After the assembly, the 6TPI 3380 × 0.65x10 mm can be used to work on the saw. From the machine JWBS-18 Jet PW10.3380.6. In general, the saw tape must be selected by the profile of the tooth depending on the tree of the tree. For example: solid wood species saw a ribbon wide from 80 mm.
How to make it yourself a ribbon saw
 When selecting the equipment for the domestic workshop, the belt saw is rarely included in the discharge of the primary tool: most operations can be performed without it. I have done a long time because I had, but as a result matured for the manufacture of a ribbon saw. As a result of the search, I came across the website of the Canadian inventor Mattiasa Vaddela. He offered to make a ribbon saw almost completely from the tree. At the same time, its characteristics were very decent, and any spare part is still easy to do.
The main characteristics of my homemade belt saw
My saw differs from the one that was in the developer drawings, but I didn't strive to repeat the project one to one. Much depends on the selected engine, saw tapes and blanks. I used those canvas that I could find. The asynchronous electric motor of the suitable power also fell into the covers. The saw blades were slightly shorter than recommended - I decided not to risk and reduced the inner size of the frame by 10 mm.
Construction of a ribbon saw. Most of the details are made of wood.
Height (without cabinet), mm
Width (with table), mm
Depth (with table), mm
Table (width x depth), mm
Tilt table, degrees
Mass (without a cabinet), kg
Maximum thickness of the workpiece, mm
Popper indent from frame, mm
Length of the canvas, mm
Width of the canvas, mm
We make a frame of a ribbon saw
This is the main element of the machine. I used a pine thumbnate, rushing on the flight to a thickness of 19 mm. The frame is glueding from several layers of boards with a turn. You can not use for the DSP frame, MDF, Paneur or furniture shield. The frame has a C-shaped form where the base is mounted for the tension guide mechanism with the top wheel, and the bottom is attached to the bottom, connectable with the base. The frame consists of six main layers and additional linings. To increase the rigging, diagonal elements are provided. In gradual gluing, it is necessary to control the perpendicularity of the elements so that the frame is flat (without twisting). Rama glued down without reason, leaving empty grooves under it. Insert the base is more convenient after installing the axis block of the lower wheel. My reserve of clamps lacked, and I additionally used the screws. The surfaces of the finished frame stallped and covered with varnish in two layers.

1. Bonding the first layer of the frame. This operation sets the shape of the frame. 2. When gluing the following layers, the shortage of clamps is compensated by self-draws. 3. The guides are screwed to the finished frame for the moving block of the top wheel. 5. Distribution of grooves in the movable frame of the upper wheel unit under the insertion. 5. Now the triangular inserts can be glued into the groove frames ... 6. Select quarters on the sides. 7. The device tensioning the saw blade. 8. In this position, the emphasis was visible yet without rotation handle. Three adjusting screws of the adjustment unit Oak plates perform the role of a spring. top wheel. 9. Clipping wheels from three plywood circles. 10. Flants (part - with bearings) with linings are adjusted to wheel billets and are marked. 11. Engine pulley sharpened directly on the engine itself.
Top Wheel Mounting
The next step is the assembly and installation of the movable mounting unit of the top wheel. It should move in the vertical direction and ensure the tension of the saw blade. For this, on the prepared "horns", the frame fastened a profile from oak, which forms a guide groove. The block is a rectangular frame with a movable top wheel shaft holder inserted into it. Frame made of oak wood. Additional inserts used to enhance the angular connections. By gluing the frame, drank in the corners of the groove. Then cut the triangular inserts and pasted them in the grooves. At the end of the sides of the frame chose a quarter under the guides in the main frame. The frame should move in the grooves without tangible backlats. At the top of the frame, a long bolt has installed a long bolt for its movement and adjustment of the tension of the saw blade. On the holder (bar with a hole and selected quarters from opposite sides) the wheel shaft at the top is the screw for adjusting the tilt wheel. The holder is attached to the frame with two self-testers, and due to the hollows, its mobility is achieved for adjustment. Under the screw installed a metal lining. The shaft in the holder after setting the saw is fixed with a self-tapping screw. The spring effect during the tension of the canvas creates three oak plates.
Manufacture of wheels saw
Wheels of saws have a diameter of 400 mm. They just need to do from plywood or MDF. My wheels came out with a thickness of 29 mm. Sklexed them from three plywood circles. The most responsible plot here is the central part of the wheel. Billets cut with a milling machine. In the center of the circle, the hole was drilled 0 6 mm and installed the center of the milling circulation. Then this hole used to combine blanks and gluing. Cut circles with a pulp 10 mm under the finish processing. Trees 0 25 mm (under the acquired bearings) I made a turner. They have a limiter on one side, and on the other - the inner thread M12. For the manufacture of flanges, I used Phaneur. Before drilling in them holes for the bearing drilled in the center a hole 0 6 mm and, aligning it with the center of the wheel, drilled four holes for the seasons. The position of the flange on the wheel labeling. The flange consists of two parts. The outer part of the thickness of 15 mm is holding the bearing, and the internal - 10 mm thick forms the gap between the wheel and the bearing. The diameter of the hole in the wheel should be slightly larger than the diameter of the shaft. The most responsible operation is the drilling of the opening with a diameter of 52 mm under the bearing in the outer part of the flange. Especially for this, I bought an annular saw of 0 52 mm and after checking it turned it along the outer diameter by 0.3 mm. Bearings then pressed with the help of a queen. Before sticking flanges to the wheel cut the holder of the shaft of the bottom wheel - a wooden bar with a hole for the shaft, which is attached to the bottom of the frame. Drilling a hole directly in the frame is undesirable: the likelihood that the drill will lead it. The holder is easier to turn the angle to the correction. In the wheels drilled four technological holes so that the clamps can be sold when gluing. Immediately after gluing the wheel put it on the shaft. Due to the preliminary centering of the flanges and the drilled holes for the seasons, one of my collected wheels had practically no beat, and the second was uncritical "eight" to 3 mm. To fit the wheel in the size of the diameter and to form a profile, it was necessary to connect the wheel with the engine. At the first stage, I used a temporary pulley from plywood - screwed it with self-strains to the wheel. I pulled out a pulley for the engine using the engine itself, and then joined the engine with the wheel and the temporary pulley of the wheel. Fixing the wheel, screwed the wooden bar as the stop and with the help of turning cutters, covered the wheel to 0 400 mm. The diameter of the wheel on the shaft is difficult to control, so I measured the length of the circle. It is 1 256 mm. The processed edge of the wheel gave a barrel shape. Due to this, the tape does not slide from the wheel, but, on the contrary, it is self-centering. The angle of the bevel must be 5 degrees on each side. 
12. When all the details were ready, glued the flanges to the wheel. 13. As the holder used the fastening unit of the bottom shaft. 14.Collaly drew to the desired diameter giving the edge of the barrel shape. SCOS in each direction - approximately 5 degrees. 15. After the preliminary assembly of the wheel. 16. Drinking in a set with blocks of support bearings. 17. The guide is installed with the upper support bearing, but so far without "sugar". Rubber cameras are stretched on the wheels (after final assembly need to be glued). 18. The desktop is equipped with an adjustment in one plane. The mechanism of inclination
Having made both wheels, on one of them installed a regular drive pulley (read about a similar solution here). Its thickness and shape caught up under the used belt, and the diameter calculated so that the speed of movement of the saw ribbon canvas was about 800 m / min. Now it remained only to delete the wheels. For this, I took the bearings with an external 0 22 mm. They were then used as supporting for saw blades. Pluging the horizontally time axis and putting on her bearings, installed the wheel so that it is easy to rotate, and its most severe part fell down. The forstner drill did small recesses in the lower zone of the wheel from the back side. As a result of such manipulations, I achieved that the wheel stop rotating in any position. On this balancing ended. Wheels covered with varnish in two layers.
Then it pulled the cut cameras from 16 "wheels of the children's bike. Rubber protects the surfaces of the wheels from damage to the web, reduces the noise and prevents slipping. Balancing, however, I had to repeat.
Fastening the wheels on the frame of the ribbon saw
The first installed the top wheel. On the shaft put on the washers from fluoroplast. Wheel fucked by a bolt with a thick washer, screwing it into the ends of the shaft. Adjusting bolt put up the top wheel parallel to the frame. The block of the bottom wheel fixed on the frame of the clamps and hung the bottom wheel. With the help of the ruler and fluoroplastic, the washers put the wheels in one plane. The displacement of the lower unit has achieved that the line connecting the centers of the shafts was parallel to the vertical frame rack. This operation was performed with the installed pile of the saw blade. After setting, the fastening unit of the lower shaft fixed. After checking the rotation of the saw manually, I decided on a trial start. Observing caution turned on the machine. Tests were successful. The ribbon moved in the middle of the wheels, no vibration and suspicious noise. Replacing the cloth to the very narrow, spent a re-test. It was possible to incur base for the engine and secure it to the frame.  21. Installed desktop with a zero gap plate and a knotting of the saw tension mechanism. The machine is ready for testing. 22. Working table can be tilted under the desired angle. The support self-adjustment of the desktop position adjustment is visible. 23.Protable frame mobile stand-stand.24. Protective engine screen.
Setting the guide wheels
The sleek end of the saw tape rests on the outer ring of the bearing, and with the sides, they hold it "SUKHARI". At first I made a cracker from fluoroplast, but they quickly wear out. Therefore (according to the author's advice) replaced them on wooden. As a protective casing, a rectangular duralumin pipe was used, cutting it with a disk saw. The casing screwed to the tire of self-draws. The tire must be set with high accuracy, since with a length of 300 mm, even a slight skew with respect to the saw blade will notice. For fastening the tire in the frame chose a groove. The markup was performed on a stretched wide web. Then clarified the marking of the groove in the sizes of the guide bus. But as I tried, when the groove was sampled, it was a 0.3 mm error, which led to an error at the bottom of almost 4 mm. Therefore, from the residue of the duralum pipe, I cut the corner, expanded in the frame of the groove on its thickness, and for the correction of the position, several pieces of self-adhesive paper with a thickness of 0.1 mm. Having achieved the desired result, fixed the corner with self-draws. Two holes are provided in the retainer. One main one - for the maximum tire clamp area, the second is used only with very thick blanks to maximize the bus.
Making a desktop for a ribbon saw with your own hands
First, made a support with the tilt mechanism. Did it from oak wood. The lower block of support bearings is attached to it. The tilt mechanism of the table attached a lining from LDSP to enhance the rigidity of the table. On the table, I let the trim table tops from the chipboard. It is pretty thick and durable, and her surface is smooth and slippery. The edges were trimmed with beak racks. The working area in the table saw a rectangular hole, and then pulled out the recess under the insertion from MDF. The insert was installed when the saw turned on: started insertion into the grooves and stirred until it stops, simultaneously separating it on the desired length. When turning the table at an angle insert either at all take out, or I make a new one for a specific angle. I made a knot on the nut of the tension mechanism. I set the power of tension on the eye - to break the canvas is almost impossible. For more convenient to put the table perpendicular to the canvas, made an additional stop for the table. Screwd in the focus on the stop allows you to adjust the position of the table. And so that the sawmills do not stick to the wheels, installed a cropped toothbrush to the bottom wheel.
Manufacture of Saw Couples
I chose the sizes based on the size of the base of the saw, and the height was adjusted so that the table was at the level of 1,050 mm from the floor - for me this is just right. The cabinet made from the trimming of a tipped genital board with a thickness of 35 mm. The skeleton of the cabinet assembled on the wanks. Corners from the inside reinforced with metal corners. Side inserts - from laminated chipboard. Rear wall - from MDF. In general, everything is from cropping. The top box of the couch serves to collect sawdust. The cabinet is installed on the wheels with the possibility of their fixation. 
25. The right wall of the housing of the bottom wheel is bevelled at the top to simplify the replacement of sawspit. 26. The rear wall protection wall of the bottom wheel is installed obliquely and sends the sawdust in the box. 27.Parallel focus is mounted on the desktop. Installation protection. 28. So looks like the protection of moving elements. Installed paddock button and backlight switch.
Protective covers and saw blade elements are simultaneously and guides to remove sawdust. All working elements saws are protected by screens. As a material for housings and screens, I used MDF with a thickness of 8 mm and pine boards.
Wiring
In addition to the start button, immediately decided to set the backlight of the working area. To do this, used a lamp with a flexible bracket, and its switch placed next to the start button. The wires missed through the frame and secured the back.
Parallel emphasis
The tape saw could have been used, but the lack of parallel stop was felt. The stopping mechanism of the stop built on the basis of the eccentric. Due to the rounded front edge of the table, it was necessary to additionally cut a movable pusher with a semicircular front edge. The stop tire made of larch. From the opposite side of the tire attached the grip, which rests on the edge of the table. For the manufacture of saws I took almost two months. True, I worked on her far from every day. The project turned out very exciting. The work of the machine is pleased. Now I can not even imagine how I used to do without a ribbon saw. As a dough for a saw, I made a few boxes.
Tape saw on wood with your own hands - all photos
© Sergey Golovkov, Novocherkassk
Below, other entries on the topic "How to make your own hands - householder!"
Alexander Kupriyanov, Bryansk
2017-04-07 (17:26) #
Saw with a coal with her own hands
Code You need to cut off the board or rack strictly at right angles, and there is no coal at hand, I use hacksaw with a small addition.
To the canvas at the handle itself, two suitable on the shape of wooden lumps were shown, as shown in the figure. To apply markup, I apply the handle to the edge of the workpiece and the pencil (you can nail) spend the line along the web in the detail, then I cut off the necessary part by the mark.
good machine .. Molden master..a about chipboard - I have a ribbon saw made with wheels from a 16 mm thick chiffon ... from the door from the old bulletier who lay in a barn of 20 years old - a hundred and 25 cm with a diameter .. any tape 6.3 mm long 180 cm .. it propyl \u003d 200 mm .. my machine on the street has been three years old. Culkin Cellofanov covers .. in Mins 20 I drink calmly firewood .. Who wishes to make a ribbon saw on a tree - do it's necessary .. Economic on electricity - I have a 550 watt engine .. the engine is 900 revolutions .. I decreased in three .. and noise Not a loudly .. Only Council - Make a frame from plywood - less vibration .. Stand all the same, there is a slightly webribe .. Chugun does not give vibration but the cast iron corners does not happen
Well done. And where can the drawings be taken?
Alexander
2015-07-28 (20:41) #
Well done! The first site where the most fully described how to do a saw (dimensions there and everything else), the rest of the rice, but showing, they say like I can or reprint friend friendkin. From chipboard and MDF clear why you can not do, and with plywood, what's wrong? I will say honestly in the woods I am not strong. And it would be necessary to add here about the engine (turnover, the power of the Eishkiva under the belt). And so everything is classes, thank you so much!
If you have any hobby, special tools are usually required. Hobbies are different, respectively, the amount of technology also affects imagination. It can be very difficult or simple as the Soviet Point. To the first, for example, belongs a ribbon saw on a tree or metal. Use it, of course, not only to meet their creative needs, but also for more serious work. For example, for repair.
What is this tool?
A tape saw is a cutting tool equipped with a multitude of cutters.
Actually, only the cutting surface is called, and the tool itself is called the machine. And it is precisely it can be called working appliances. The tape itself itself is a metal ribbon, preferably of steel, which is rolled into the ring. On the one hand, the teeth are cut, which allow it to work as a cutting tool.
This should be installed on a couple of rotating machine pulleys - an electric motor with a network connection is used to create movement. Thus, you can create both direct and curvilinear propulsions.
Why make it yourself?
Preferably, of course, to purchase a tool in a special store, which trades just such a technique. True, there are two "but" here:
- The price that may seem too high for an ordinary person.
- Functionality - the matter here is that the tape drank is far from always on the list of mandatory tools for the workshop. Most operations can be made without its help, and therefore, the reasons to acquire too expensive the aggregate of meaning is not.
The second reason basically follows from the first one - if the price would not be too high, most would acquire such a tool. It is logical, because it is very convenient to work on it.
Design
As the basis of the project given here, the development of Matyasa Vadelia is taken here - a Canadian inventor who collected his saw mainly from the tree. You might think that it is better to use metal for such a tool, but everything is not quite so.
The tape saw-machine of such an assembly demonstrates good indicators, quite comparable with purchased models. In addition, the easily changeable material allows you to instantly carry out the current repairs. Caring for the replaceable details will go to the background.

It is also important to remember that much will depend on the selected engine (it is better to use it ready), saws for tape machines and blanks.
Frame for saws
It is the main carrier element of the entire design. It is necessary to use a strong tree - in no way chipboard, not MDF, Phaneur or furniture shield. Perfect for such a goal is a pine inches.
Form frame - C-shaped. From above, it is necessary to make the basis for the guide tension mechanism with the top wheel. From the opposite side, two supports are fixed, which in the future will connect with the basis. The design itself is a multilayer - order of six layers for strength. But this is not counting additional linings.
Phased gluing is fraught with distortion and inaccuracies. Therefore, you need to strictly monitor the perpendicularity of the elements. You can also make a frame without reference legs, but be sure to leave the grooves for them of the desired size.
Top Wheel Engine
This is the second step towards the tree and metal belt in your hands. The block is a movable design element that provides tension tension.
The installation occurs on the already prepared frame - the horn of the letter "C", which remained empty. You need to secure the profile (preferably of solid wood). It is a wooden rectangular frame, inside which a movable top-wheel shaft holder is installed.
Corner frame connections can be strengthened by inserts. In such a work, reliability is in the first place.

The block itself must move freely. In the upper part, make a hole for a long bolt - thus sawing the tape for metal will be able to adjust the tension.
In the shaft holder, tilt adjustment should be installed - a screw is usually used for this purpose. The holder itself is fixed in its place with two self-draws. To achieve mobility desired in the future, you need to leave sufficient backlash.
Under the screw is installed with a metal lining, and the shaft itself will be fixed after the set using the next self-press.
Wheels saw
Here it is quite appropriate to use those materials that were rejected before. For example, MDF or chipboard. The design, on the basis of which the ribbon saw is assembled, provides for the size of the wheels with a diameter of forty centimeters. Thickness can be different, but about two or three centimeters.
The design here is also glued, from several layers.

The responsible moment, as you can guess, is the central part.
Make the wheels can be on the milling machine. For convenience, drill the hole immediately in the center to combine circles, and also try to leave around a centimeter for finishing after the assembly.
You need trees for ready-made bearings, with a limiter and internal carvings on opposite sides. Flanges can be made from the same plywood. They consist of two parts - the first holds the bearing, and the second provides a gap between it and the wheel itself.
The diameter of the drilled hole should not strictly match the extensive shaft - better so that the first was a little more than the last.
You will need two wheels, because the tape saw on metal or wood provides such a design. They are the same in size and manufactured simultaneously.
Also that the tape saws does not slip, you can give round initially wheels slightly barrel shape - it will help to avoid many problems. The angle of the scale on each side must be made at five degrees.
On one of the wheels, install a regular drive pulley, fitted under the belt used.

The last part of the work is balancing. For this, small bearings are used as a support for the tape. The time axis is attached horizontally, the bearings specified earlier are set, and light rotation is started.
To improve work, you can make several recesses at the bottom of the wheel of the wheel - it helps to avoid rotation in any position.
Mounting wheel
The top is set first. The washers are put on the shaft. The wheel itself must be fixed with the help of a bolt plus a thick washer. It is screwed it all into the ends of the shaft. With the help of regulating screws, install it parallel to the frame.
The block of the lower wheel is fixed with clamps, after which it is hosted on the frame. Next, set the wheels so that they constitute one plane, at the same time parallel vertical rack. After do not forget to lock the bottom shaft.
Setting the guide wheels
It requires some skill here - one of the ends of the ribbon (which is smooth) to remove into the outer ring of the bearing.

From the sides, she must be held. You can use fluoroplastic "crackers", but the tree is better fit - the last slower is bent.
The protective casing is simply an outcast pipe, securely fixed by self-draws or screws.
The tire must be installed with the utmost accuracy - for the ribbon saw, any skew will become tangible. The fastening of the tire in the frame is made using the groove. It is possible to place everything on a wide web.
If you make a mistake with the groove, then simply expand it and make a corner of metal and gasket from pieces of paper pasted on it. Thus, the tape should get up smoothly. Corner, of course, needs to be carefully fixed.
The lock is also equipped with two holes. The first is used to press the tire as securely as possible, and the second is only when working with very thick blanks. It allows you to raise the first part.
Instead of imprisonment
A very important procedure is a sharpening of tape saws.

Moreover, the teeth should be smooth, otherwise the device will quickly fasten. You can use a common grinding wheel. Depending on the saw blade - corundum, elboronic or diamond. You also need to bring the work to the end of a fine-grained donkey.
The main thing in such a process is to come to the case with the mind and patience. Ribbon saw, with their own hands created, - labor-intensive and long-term project. Errors are unacceptable here. But if you do everything according to the instructions and checked with the advice of specialists, then a new tool will appear in your workshop.
So, we found out how the ribbon drank was done with their own hands.
Ribbon saws - a powerful industrial tool for cutting wood and metal. The cutting canvas is a continuous tape moving in one direction along the drive pulleys and one side of the interacting with the cutting material. With relative simplicity of the design, the ribbon drank with their own hands is quite real. How to make it and how to configure it correctly in this article.
The tape saw was known for quite a long time, from the beginning of the 19th century (the first patent - 1808). The principle of continuous movement of the saw blade itself (unlike reciprocating from the knife) has long been interested in engineers. It is more technological for many reasons:
- The ring saw is cooled naturally - in contact there is a minor part;
- The movement of the teeth in one direction less damages the cut area;
- Ribbon is easier to sharpen;
- The mechanism of the drive and stretch is simplified as much as possible, as well as the grease mechanism.
But on the path of implementation there were some difficulties associated with the connection of the saw tape into the ring. The tape should be durable, elastic and, at the same time, flexible and enough elastic. Welding such metals so that there are no seams that interfere with its movement in the body of the material and caused overheating (as a result, a break in the connection site).
On wood ribbon machines, these difficulties managed to minimize, but everything was different in metalworking machines. Only by the end of the century in France managed to establish the production of acceptable saws, which were welded with contact welding and then the seams were thoroughly grinding.
Currently, several varieties of sawing canvases of ring action are produced:
- gear;
- friction saws;
- electrospar.
As a rule, focuses on the gear blade of the bimetallic design. It is a tape made of durable steel (spring or similar by properties) with teeth of particularly durable tool steel M42-M71 hardness. Sharpening teeth different for different materials.
For example, for cutting of pipes and a channel, a ribbon with enhanced teeth backs will be required, for a stainless steel - with an acute sharpening of 15 0 and an increased distance between them. The stainless steel forms a viscous chips that interferes with the movement of the saw, shooting between the working edges. If you have to cut a metal of large sizes, then you need a canvas with a periodic wiring - narrow and wide alternate, to eliminate the threat of tape jams into the resh.
In order for the belt-saw machine with their own hands, it is properly, counting it under the tape of the factory manufacture. It is difficult to make it enough to do it, even if you manage to find the appropriate metal and in your workshop there is all the necessary welding and sharpening equipment.
Construction of a ribbon saw
The cutting machine of a tape type is characterized by high versatility. You can cut wood and metal on it:
- vertically;
- horizontally;
- at an angle.
There are machines with the supply of the working console, when the material is fixed motionless, and the canvas comes to it, and there are built on another principle - the sawnage unit is fixed, and a log, a board or metal sheet serves. The second option is more accessible to self-making.
Basic tape saw nodes:
- The bed (frame) is made heavy and durable. It should ensure the stability of the machine during operation and lack of vibrations;
- Work desk with focus and ruler;
- Drive pulleys;
- Engine (from 2 kW);
- Remote Control;
- Lubrication system;
- Protective casing.
It should be remembered that the cutting speed of various metals is somewhat different. The range is very wide - from 30 to 100 m / min. The averaged rates of the sawing of homogeneous solid metals are shown in the table, but for each specific saw model and saw tape, they may differ within 10-15%.
Ribbon saw do it yourself
About how to make a ribbon saw with your own hands on the Internet you can find quite a few materials, photos and videos. For example, the Canadian site of Mattiasa Wandela offers the drawings of the machine almost completely made of wood. But we will stop on something less exotic, which can be done both in the home workshop and a small shop on wood or metal processing.
Making beds
The initial stage is the manufacture of the bed. For a tree saw, it can be wooden or metal, for metal - only steel. You can cook it from a chawller or corner. For a small workshop or shop, it is not problems. The sizes of the bed are selected depending on the intended size of the material being processed. A normal sawmaking machine can cope with a tree with a thickness of up to 350 mm and a metal in several centimeters.
The carrier bar is Schweller No. 8, which is welded to the bed or bolted bolts. It should be strictly vertical and fixed at least two points in length to eliminate the threat of deviation. When the saw is sealed, for example (which sometimes happens) or sawing the material of large load sizes is quite large.
The view is located a horizontal desktop with ribbons to move the ribbon, line, focus, clips and other devices for feeding and holding blanks. The height of the table from the lower stops is 0.7-0.9 meters. The height of the rod over the table is 0.6-0.8 m.
At the bottom of the bed, an asynchronous motor with a start-up condenser connected by belt transmission with a driving pulley of a variable diameter is established. If necessary, change the cutting speed, the wedge belt is simply transferred to another diameter. The belt tension is provided by a spring tensioning mechanism.
Mounting drive
Wood or metal pulleys of the same diameter (240-260 mm) are used to drive the ribbon (240-260 mm), which are fixed on shafts planted on bearings. The lower pulley is connected with the engine drive. Shafts of saw pulleys are fixed on the rod. Nizhny - motionless, upper - in the slots of the fixed tensioning mechanism. This allows the use of ribbons of different lengths.
From the tape beats, the machine protects the special mechanism of the damper, which is located under the desktop. The drawings of this device can be found on the Internet. Sometimes you can see tape saws with two dampers - from below and on top of the working area. This is justified if the machine is designed to work with large-sized blanks or extremely high squeaking accuracy.
Lubrication and Protection System
The lubricant system (adjustable) is installed above the desktop. Oil Self comes to the saw blade in the required amount, which for each self-made machine is determined experimentally.
All work units where something rotates or moves, it is necessary to protect with covers. It is best to make them from waterproof plywood with a thickness of 10 mm. It will cost inexpensively, and polished plywood, painted enamel, looks very good.
Starting system is a standard button with an emergency shutdown. The bottom of the machine is desirable to perform in the form of a bedside table with a wide door, or even two. One is used to select falling sawdust, the second is to access pulleys and adjust the speed of the tape.
Make your own hands a ribbon machine for an experienced locksmith will not be much difficulty. Part of the necessary parts and nodes can be taken from the written off or dismantled machines of your own company or buy on the market or and on the Internet, part - to make it yourself. In any case, the machine made independently will cost two times cheaper than the factory, with the same level of performance and accuracy of adjustments.
Manufacture of wheels saw
Wheels of saws have a diameter of 400 mm. They just need to do from plywood or MDF. My wheels came out with a thickness of 29 mm. Sklexed them from three plywood circles. The most responsible plot here is the central part of the wheel. Billets cut with a milling machine. In the center of the circle, the hole was drilled 0 6 mm and installed the center of the milling circulation. Then this hole used to combine blanks and gluing. Cut circles with a pulp 10 mm under the finish processing. Trees 0 25 mm (under the acquired bearings) I made a turner. They have a limiter on one side, and on the other - the inner thread M12. For the manufacture of flanges, I used Phaneur. Before drilling in them holes for the bearing drilled in the center a hole 0 6 mm and, aligning it with the center of the wheel, drilled four holes for the seasons. The position of the flange on the wheel labeling. The flange consists of two parts. The outer part of the thickness of 15 mm is holding the bearing, and the internal - 10 mm thick forms the gap between the wheel and the bearing. The diameter of the hole in the wheel should be slightly larger than the diameter of the shaft. The most responsible operation is the drilling of the opening with a diameter of 52 mm under the bearing in the outer part of the flange. Especially for this, I bought an annular saw of 0 52 mm and after checking it turned it along the outer diameter by 0.3 mm. Bearings then pressed with the help of a queen. Before sticking flanges to the wheel cut the holder of the shaft of the bottom wheel - a wooden bar with a hole for the shaft, which is attached to the bottom of the frame. Drilling a hole directly in the frame is undesirable: the likelihood that the drill will lead it. The holder is easier to turn the angle to the correction. In the wheels drilled four technological holes so that the clamps can be sold when gluing. Immediately after gluing the wheel put it on the shaft. Due to the preliminary centering of the flanges and the drilled holes for the seasons, one of my collected wheels had practically no beat, and the second was uncritical "eight" to 3 mm. To fit the wheel in the size of the diameter and to form a profile, it was necessary to connect the wheel with the engine. At the first stage, I used a temporary pulley from plywood - screwed it with self-strains to the wheel. I pulled out a pulley for the engine using the engine itself, and then joined the engine with the wheel and the temporary pulley of the wheel. Fixing the wheel, screwed the wooden bar as the stop and with the help of turning cutters, covered the wheel to 0 400 mm. The diameter of the wheel on the shaft is difficult to control, so I measured the length of the circle. It is 1 256 mm. The processed edge of the wheel gave a barrel shape. Due to this, the tape does not slide from the wheel, but, on the contrary, it is self-centering. The angle of the bevel should be 5 degrees on each side.
12. When all the details were ready, glued the flanges to the wheel. 13. As the holder used the fastening unit of the bottom shaft. 14.Collaly drew to the desired diameter giving the edge of the barrel shape. SCOS in each direction - approximately 5 degrees. 15. After the preliminary assembly of the wheel. 16. Drinking in a set with blocks of support bearings. 17. The guide is installed with the upper support bearing, but so far without "sugar". Rubber cameras are stretched on the wheels (after final assembly need to be glued). 18. The desktop is equipped with an adjustment in one plane. The mechanism of inclination
Making both wheels, on one of them installed a regular drive pulley (read about a similar solution). Its thickness and shape caught up under the used belt, and the diameter calculated so that the speed of movement of the saw ribbon canvas was about 800 m / min. Now it remained only to delete the wheels. For this, I took the bearings with an external 0 22 mm. They were then used as supporting for saw blades. Pluging the horizontally time axis and putting on her bearings, installed the wheel so that it is easy to rotate, and its most severe part fell down. The forstner drill did small recesses in the lower zone of the wheel from the back side. As a result of such manipulations, I achieved that the wheel stop rotating in any position. On this balancing ended. Wheels covered with varnish in two layers.
Then it pulled the cut cameras from 16 "wheels of the children's bike. Rubber protects the surfaces of the wheels from damage to the web, reduces the noise and prevents slipping. Balancing, however, I had to repeat.
Fastening the wheels on the frame of the ribbon saw
The first installed the top wheel. On the shaft put on the washers from fluoroplast. Wheel fucked by a bolt with a thick washer, screwing it into the ends of the shaft. Adjusting bolt put up the top wheel parallel to the frame. The block of the bottom wheel fixed on the frame of the clamps and hung the bottom wheel. With the help of the ruler and fluoroplastic, the washers put the wheels in one plane. The displacement of the lower unit has achieved that the line connecting the centers of the shafts was parallel to the vertical frame rack. This operation was performed with the installed pile of the saw blade. After setting, the fastening unit of the lower shaft fixed. After checking the rotation of the saw manually, I decided on a trial start. Observing caution turned on the machine. Tests were successful. The ribbon moved in the middle of the wheels, no vibration and suspicious noise. Replacing the cloth to the very narrow, spent a re-test. It was possible to incur base for the engine and secure it to the frame. 21. Installed desktop with a zero gap plate and a knotting of the saw tension mechanism. The machine is ready for testing. 22. Working table can be tilted under the desired angle. The support self-adjustment of the desktop position adjustment is visible. 23.Protable frame mobile stand-stand.24. Protective engine screen.
Setting the guide wheels
The sleek end of the saw tape rests on the outer ring of the bearing, and with the sides, they hold it "SUKHARI". At first I made a cracker from fluoroplast, but they quickly wear out. Therefore (according to the author's advice) replaced them on wooden. As a protective casing, a rectangular duralumin pipe was used, cutting it with a disk saw. The casing screwed to the tire of self-draws. The tire must be set with high accuracy, since with a length of 300 mm, even a slight skew with respect to the saw blade will notice. For fastening the tire in the frame chose a groove. The markup was performed on a stretched wide web. Then clarified the marking of the groove in the sizes of the guide bus. But as I tried, when the groove was sampled, it was a 0.3 mm error, which led to an error at the bottom of almost 4 mm. Therefore, from the residue of the duralum pipe, I cut the corner, expanded in the frame of the groove on its thickness, and for the correction of the position, several pieces of self-adhesive paper with a thickness of 0.1 mm. Having achieved the desired result, fixed the corner with self-draws. Two holes are provided in the retainer. One main one - for the maximum tire clamp area, the second is used only with very thick blanks to maximize the bus.
Making a desktop for a ribbon saw with your own hands
First, made a support with the tilt mechanism. Did it from oak wood. The lower block of support bearings is attached to it. The tilt mechanism of the table attached a lining from LDSP to enhance the rigidity of the table. On the table, I let the trim table tops from the chipboard. It is pretty thick and durable, and her surface is smooth and slippery. The edges were trimmed with beak racks. The working area in the table saw a rectangular hole, and then pulled out the recess under the insertion from MDF. The insert was installed when the saw turned on: started insertion into the grooves and stirred until it stops, simultaneously separating it on the desired length. When turning the table at an angle insert either at all take out, or I make a new one for a specific angle. I made a knot on the nut of the tension mechanism. I set the power of tension on the eye - to break the canvas is almost impossible. For more convenient to put the table perpendicular to the canvas, made an additional stop for the table. Screwd in the focus on the stop allows you to adjust the position of the table. And so that the sawmills do not stick to the wheels, installed a cropped toothbrush to the bottom wheel.
Manufacture of Saw Couples
I chose the sizes based on the size of the base of the saw, and the height was adjusted so that the table was at the level of 1,050 mm from the floor - for me this is just right. The cabinet made from the trimming of a tipped genital board with a thickness of 35 mm. The skeleton of the cabinet assembled on the wanks. Corners from the inside reinforced with metal corners. Side inserts - from laminated chipboard. Rear wall - from MDF. In general, everything is from cropping. The top box of the couch serves to collect sawdust. The cabinet is installed on the wheels with the possibility of their fixation.
25. The right wall of the housing of the bottom wheel is bevelled at the top to simplify the replacement of sawspit. 26. The rear wall protection wall of the bottom wheel is installed obliquely and sends the sawdust in the box. 27.Parallel focus is mounted on the desktop. Installation of protection. 28. So it looks like the protection of moving elements. The pads and a backlight switch are installed.
Protective covers and saw blade elements are simultaneously and guides to remove sawdust. All working elements saws are protected by screens. As a material for housings and screens, I used MDF with a thickness of 8 mm and pine boards.
With the help of a ribbon saw, it is possible to cut a different kind of materials having impressive volumes. The cost of this tool is very high, so it is much easier to make it yourself. On the peculiarities and stages of the manufacture of homemade belt saw, consider further.
The device of the tape saw and the principle of its operation
The ribbon saw is called a device consisting of a canvas and a cutting gear located on it mounted on the pulley surface. In the process of rotating this element of the saw, it is powered by a large diameter of logs or metal products, depending on the functional purpose of the tool.

On the ribbon saw price is quite high, so its independent manufacture will cost several times cheaper. Before starting work, we recommend familiarizing yourself with the device and the principle of operation of this instrument.
Depending on the teeth installed on the saw, it happens two types. The first option is a narrow saw, the teeth of the cutting mechanism of which constitute no more than 5 cm. Wide saws imply the use of teeth mechanisms more than 8 cm.
In addition, the quality and speed of the belt saw also depends on the shape of the teeth located on the cutting mechanism. The maximum height of the teeth is twenty percent of the width of the working platform. Otherwise, the canvas will not stand the load and simply break.
In addition, the speed and the quality of the saw is depends on the correct location of the teeth and the interval between them and the working platform. In case of insufficient interval, sawdust will begin to accumulate between the saw and lead to its breakdown. Therefore, the minimum width of the canvas on the tape saw is twenty-five centimeters, and the minimum size of the teeth is five centimeters.

Wide saws differ greater performance. In addition, in their use, there is practically no problem of scoring sawdust between the timber and the working surface. They are not prone to breakdown or appearance of cracks on the surface of the cutting mechanisms.
In order for the saw did not join in the process of work, work should be done on the divorce of the teeth. At the same time, the first tooth is located with a slope to the left, the second - to the right, and the third is directly. This order is repeated constantly. Thus, the first and second teeth perform the function of the propyl, and the third, is engaged in purifying the surface from the sawdust. In this case, each of the teeth helps to cleanse the third of the sawdust. However, the performance of data tools, somewhat lower, as each third tooth, does not participate in the process of sawing. Compared to saws in which there are high teeth, where each of them works for its intended purpose, and sawdust is removed without the participation of teeth.
In the production of tape saws, some tricks use with which it is possible to achieve high performance saw. To increase the quality of working saws with low teeth, the width of the working path increases. In this case, it is possible to raise the teeth for a large height. The teeth are exposed to a special sharpening, after which the performance of their work is one hundred percent. Sawdles are made automatically, and the teeth do not need additional wiring.

How to make a ribbon saw with your own hands
The process of manufacturing a belt saw depends on many factors, such as the engine of the device, its sizes, saw tapes and additional workpieces. First of all, the presence of an asynchronous engine will be required, it can be purchased on the market. This version of the saw, the manual for the manufacture of which is presented below, is made from virtually a tree and is characteristic of:
- height 120 cm, width and depth of 90 cm;
- the wheel diameter is 40 cm;
- width and depth of the workplace - 51x47;
- the table is able to be tilted at an angle of 45 degrees;
- total weight - about 50 kg;
- billets with a maximum thickness of 26 cm;
- length of the canvas - 2.66 m.

Before starting work, it should be made of drawings of a ribbon saw. The main and very important element of this tool is the work surface, which should be made first.
For its manufacture, a tree, a sinth, 2 cm thick were used. Note that the use of plywood, chipboard, furniture shield, or MDF for the manufacture of this saw element is unacceptable.
The form of the frame resembles beech C, in its upper part there is a mechanism on which the wheel is stretched, and on the bottom two legs are fixed connecting it with the base. As part of the frame present six mess and lining. In order to increase its rigidity, diagonal parts are also used. All elements can be glued together. At the same time, the stiffness of their fixation and perpendicularity of the location is carefully checked. The frame is shut-off without reason, it is mounted later, upon completion of the work on the saw. After making a frame, it grinds and is covered with varnish or paint.

The process of manufacturing a frame made of wood is as follows:
- in order to determine the form of the element, the materials for the first layer should be combined;
- in the process of gluing the subsequent layers, the shortage of clamps is compensated with the help of screws;
- the guides are installed on the finished frame, the impeller will be recorded;
- for inserts under the wheel, special grooves should be equipped;
- next is equipped with a mechanism responsible for tension of the canvases;
- in order to glue the wheel, three plywood circles are used;
- rastaching the motor pulley is carried out before its installation.
Further work on the manufacture of the ribbon saws are related to the arrangement of the fastening unit for the top-wheel. This element is located vertically and ensures the tension of the canvases. An oak profile is used to form a guide groove. The block is called a rectangular frame, inside which the movable holders and the top wheel are installed. For the manufacture of the frame, it is precisely oak, due to its strength. In order to additionally enhance the angular connections apply inserts. The bonding of the frame, the grooves divent inside it.
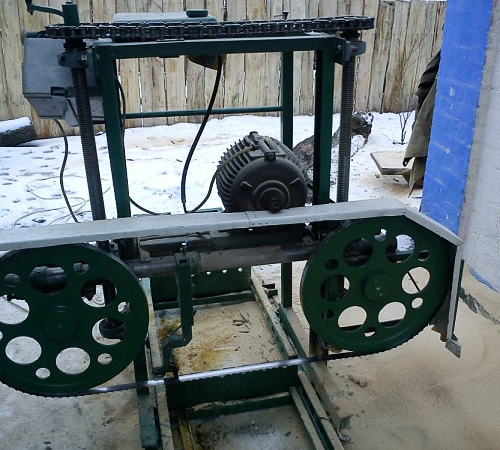
Rama moves in the groove smoothly and easily. In the upper part of it, a special element is mounted in the form of a bolt, which is responsible for the transportation of the frame on the canvas and for its tension. The holder uses a bar having a specific hole, a screw is installed on its surface, which adjusts the slope of the wheels. The fixation of the holder on the surface of the frame is carried out using self-tapping screws, and the additional elevators help to make it moving. Under the screw, the steel lining is mounted, providing its rigidity.
To fix the shaft on the surface of the holder, the screw is used. With the help of three plates made of oak, it is possible to achieve a spring effect on the canvas.
The next no less important stage involves working on the wheels of the ribbon saw hand. The wheel diameter is about 40 cm. MDF or plywood is used for their manufacture. The thickness of the wheels is about three centimeters. For example, using Phaneur, three circles should be made, which are further glued together.
Special attention is paid to the central part of the wheel, use the milling machine for cutting under it. A hole is drilled in the central part of the wheel, with a diameter of about 0.6 mm. At the same time, a milling circular is installed inside it. In the future, the remaining blanks are combined with each other.
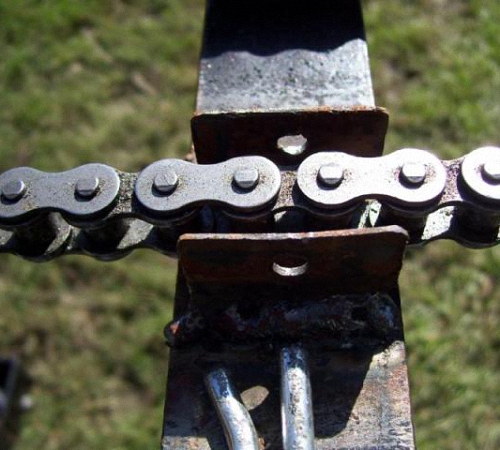
Paintings when cutting circles are up to one millimeter. In the absence of experience working with a mechanical instrument, order bearings and trees for specialists from specialists or make them yourself if you have the necessary equipment.
One side of the part is distinguished by the presence of a limiter, and the second - internal thread. In order to make the flanges use plywood. In each of the four wheels, it is drilled by one hole for the seasons, the hole diameter is 0.06 cm. The main components of the flanges are the external part of it, the thickness of which is 1.5 cm, the bearing and the inner part, with a thickness of about one centimeter. The wheel diameter is slightly larger than the diameter of the shaft.
A very important stage is the process of drilling holes for bearings, their diameter is 5.2 cm. To work, it will take the presence of a ring saw, and to press bearings inside the holes, use a pivot.
Before fixing the flanges on the surface of the wheel, the holder is installed on the lower shaft. It has the shape of a wooden bar fixed on the bottom of the frame. In each of the wheels, the technological holes are drilled in which clamps are installed. After completing the wheel, it is fixed on the shaft. Make sure the wheels are missing when it rotates. In order to fit the wheel and form the desired profile, the connection of the wheel and motor should be performed.

For these purposes, the use of a temporary plywood pulley installed on the wheel using self-tapping screws is recommended. To extract the motor pulley, you can use directly the engine, which is later connected to the temporary pulley with a belt.
The wheel should be clearly fixed, and a wooden timber is used as a resistant mechanism. In order to avoid slipping the tape from the surface of the wheel, it is given a barrel form. At the same time, the SCOS is located about five degrees.
Instructions tape saw do it yourself:
1. After the manufacture of all parts, the flanges are installed on the wheel, their fixation is carried out with glue.
2. The mounting unit on the lower shaft is also the holding mechanism.
3. The edge of the wheel should not be smooth, and sheed at 4-7 degrees. This is followed by the installation process of all guides and bearings. The wheel is installed on the wheel of rubber.
4. The desktop is installed in the same plane with an inclined mechanism.
After the manufacture of two wheels, the pulley of the standard drive type is mounted. Its size and thickness depends on the belt used.
Next follows the process balancing wheels. For these purposes, the presence of bearings will be required, which will become supporting mechanisms for sawing cloths. After fixing the horizontal time axis, the wheel is installed and the level of its rotation is checked. With the help of a special drill, the recesses are done, in the lower part of the wheel outside, thus, the wheel will only rotate in a certain position. Wheel settings are completed, they are covered with varnish.
In order to protect the surface of the wheels from destruction due to friction and pressure, they can wear rubber on their surface, for example, from a children's bike. In addition, the noise level published by the saw during operation will be significantly lower.

Next follows the fixation of the wheels on the surface of the frame. Initially, the wheel is installed on top. A washer is put on the surface of the shaft, which is based on fluoroplastic. To fix the wheel, a bolt and a thick washer screwed into the end part of the shaft are used. Using an adjusting bolt, the wheel is installed in a parallel frame.
To fix the bottom wheel unit, use clamps and install the wheel located below. The ruler will help arrange the wheels in the same plane. After that, the block fixation should be fixed, on the lower shaft. Check how the wheels rotate manually, check them out again, and then start the engine. The tape should be located in the middle of the wheels, movements must be smooth and symmetrical.
If there is vibration and additional sounds, turn off the saw and check the wheel installation parallel.
Next, you should install the guides to the saw blade. For their manufacture best use a tree. In addition, a protective system should be made in the form of a rectangular pipe from duralumin. To fix protection on the bus, use self-tapping screws. When setting a tire, observe accuracy, since the presence of distortions is unacceptable. The tire is fixed on the surface of the frame using the groove connections. When conducting markup, the canvas should be tightly tight. Next follows tire fixation.
Further actions involve the manufacture of a working surface for a ribbon saw, for these purposes, you can use a chipboard with inserts from MDF. In addition, a tube must be made under the saw, the dimensions of which depend on the size of the tool itself.
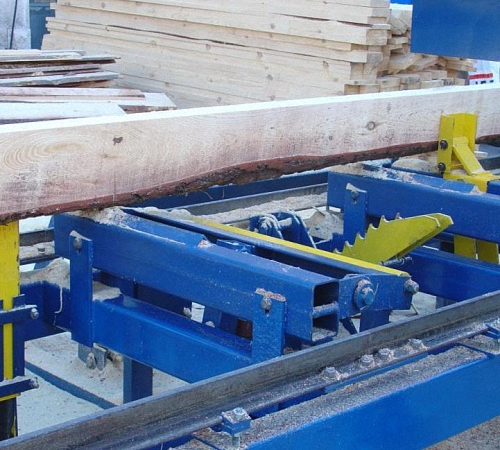
Installation of electrical elements that make it possible to ensure the performance of the mechanism is made at the end. An option is also possible to install the backlight of the working area, for these purposes it will be necessary for the presence of a lamp. In order to ensure the parallelism of the resistance of the saw, an eccentric was used.
Ribbon saw video:
 How to return the love of her husband to his wife - Tips of the psychologist
 Why you can not give icons