How to make from paper origami furniture. Doll furniture with their own hands. House of folders for papers
Inspiration for creating beautiful furniture May come, from anywhere, and some things inspire more than, just fantasy. Creating many furniture items inspired by the art of "origami".
Origami armchair was developed by Jan Browera and was made of a processed 3 mm aluminum sheet. This laser cut Folded and bolted bolted. As a result - intriguing furniture you can integrate in modern style your house.


Sofa Origami is designed by architects for a special exhibition. White laminate panels from birch plywood, collected in geometric shapes, have tubular steel legs. Workshop design and fantasy give rise to think that the sofa is folded out of paper.

The structure of the triangular shelf has a sculptural project and uses triangles as a basic concept. Modular system It can be converted and collected in various forms. System functions are also different.

Here's another very interesting project. It's a table with sculptural wooden base and glass countertop. The transparent coating allows the basis of the geometric form to stand out and become a focal point.

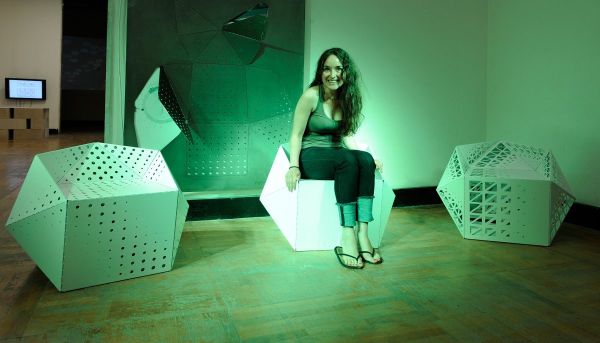

Hedronic has been created by a polyhedron-based chairs. Furniture made of solid piece of stainless steel. Folded makes it very similar to the paper product.


Another origami sofa is designed with a special fantasy. It is especially interesting for its transformation into a flat mat. Very easy and universal object, which becomes compact when folding. You can easily take this sofa with you on the road.


The chair (supervisor) is very similar to the sofa in the sense that it can also be expanded to the state of the mat and become flat. You can collect chair in the style of "Origami" yourself. Such a design will help save a lot of space, and keep a piece of material - a small problem.

The chair is made of carbon fiber. Designers used origami folds when developing it. Furniture is a very interesting design, which makes a product similar to something unusual, as if from a science fiction film.
This is a fun and intriguing chair withdraws the idea of \u200b\u200bcreating furniture in the style of "Origami" on new level. The shape and design of the chair are intricate, and in fact it is made from ordinary cardboard.
Inspired by the art of folding from paper, this coffee table has a light table top and the base made of steel.

Another option coffee table With a glass countertop, Anthony Dickens and Tony Wilson was developed. Steel legs are going easily, without any screws or pins, forming a tripod.

This light plastic Chair He is the representative of the "Origami" of furniture. It is made of a single sheet of plastic, can be folded in a solid form in 10 seconds. When you unfold it, the chair will become flat, very convenient in storage.

Marco Kirsch developed a folding lamp according to the "origami" scheme. A single square stainless steel lamp takes 5 minutes to build without tools.
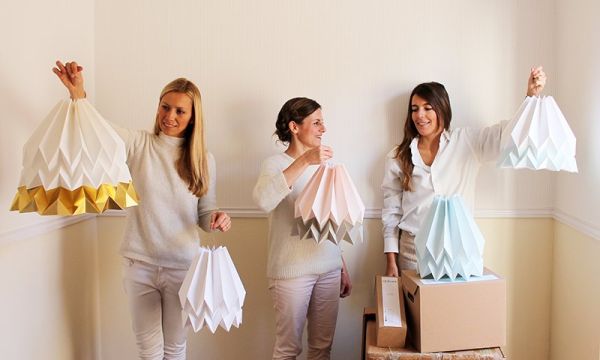
The suspension lamp is designed and made of paper everything in the same way - "origami". Product handmade elegant design produced in Portugal. It looks simple, but in fact a very difficult job.

Smart table with square shape table top. Deep diagonal gap in the center is designed for newspapers and magazines.

The collection "Origami" VAZ is made of concrete. They are poured manually by complex scheme. These are disposable vases, each of which is unique.


The art of folding paper also inspired a number of large projects in world architecture. For example, this office building is located in Paris, France. The facade is decorated with double glass trim with pleated marble pattern "Origami",


The hotel located in Tokyo has a brave geometric facade resembling "origami". The building itself is tiny, but with carved niches, including the covered parking lot.


Modular space that can accommodate two people, covers an area of \u200b\u200b86 square meters. m and is a cabinet with very interesting design. The house is built of wood, rubber and plywood.
Origami Furniture is one of the most popular origami from paper. If you do not know how to make furniture origami, then on this page you will find everything you need to assemble this simple paper figurine.
In the first photo you can see what you succeed, if you follow the assembly scheme below. The second photo of the Origami furniture made one of our users of the site. As an example, he made a table and paper. It turned out very realistic. If you have a photo of the origami you collected, send them to the address This adress email Protected from spam bots. You must have JavaScript enabled to view.

Assembly scheme
Below is a scheme of assembling furniture origami from the famous Japanese master Origami Fumiaki Schingu. If you will clearly follow the instructions, the assembly of furniture origami does not take much time, and the result will be the same as in the picture. Having done described in the Scheme several times, you will understand how to make furniture origami quickly and without peeping into the scheme.

Video master class
Collect the origami furniture for beginners may seem a challenging task. Therefore, we advise you to enter the request "Origami video furniture" on the largest video hosting of the Internet YouTube. There you will find a lot different videos About the furniture origami, in which the actions for the assembly of furniture are clearly shown. We hope that after watching the video master class on the assembly, you will not have more questions, how to make furniture origami.
This video will teach you to collect such an object of furniture origami, like the table:
And in this video shows the furniture that contains the idea of \u200b\u200borigami:
Symbolism
Furniture often acts as a symbol homemade utya, or even beautiful Life. As a rule, individual furniture items emphasize a special style.
Give or make a home for her dolls for her daughter - it's just the beginning. Next, this house will have to furnish. It is a bunch toy furniture, machinery, accessories. On how to make furniture for dolls will be told in this article.
How to determine the size
Dolls, their houses and furnishings are reduced copies of us and our dwellings. And most reliable way Make doll furniture with your own hands and not mistaken - measure the real objects, reduce them several times, and then work with the obtained values.
Furniture for dolls - copies of our furniture
How much to reduce real sizes depends on how small or a great doll is, because they are from 7 cm to 60 cm or even higher. Accordingly, the furniture is needed for them different sizes. To determine the number to which real dimensions should be divided, the average human growth in centimeters (170 cm) is divided to the height of the doll. We get some kind of number. Here on it and it will be necessary to divide the size of real furniture.
For example, the height of the doll is 15 cm. Calculate: 170 cm / 15 cm \u003d 11.3. That is the number and divide all the parameters of "human" furniture. It is still worth saying that it is 14-15 cm that is the most popular size among the doll population. Therefore, most finished furniture Made in the ratio 1:12. It is possible for us to use existing dimensions at least in order to be oriented with the scale of the required parts and the number of materials.

So, the most common sizes of dolls:
- doll-man 150 mm;
- doll-Woman - 140 mm;
- doll-child - 75-100 mm;
- toy baby - 65-75 mm.
If you need furniture for dolls of such sizes, its parameters will be such:

If you have more toys more / less, you can not adjust the dimensions. With a great difference, you will have to increase or decrease (and you can count on your own).
Doll Furniture made of match boxes
The easiest way to do furniture for dolls do it yourself from ordinary matching boxes. They are glued with the help of PVA glue, creating certain structures, then glued with paper or cloth, self-adhesive film, etc. You can use wooden beads as legs, drawers for drawers from small butt on legs or from long beads.

From match boxes you can make chairs, table, chest of drawers, bed, bedside table. Another thing is that the furniture is obtained for very small pupae, no more than 10 cm high. Although, you can use large quantity Boxes, glueing them into blocks, and from these blocks to create furniture for dolls with a height of about 15 cm. Also the option, but not much more difficult to work with other materials, but they are more plastic and allow you to create products of more elegant forms.
This may be your first experience in making doll furniture. Later it will be possible to take on something more serious.
Furniture for a doll house of cardboard
You can try your hand in the manufacture of furniture for dolls using cardboard. The material is inexpensive, affordable, it will be possible to try and mistake, redo. Cardboard usually connect with the help of PVA glue, you can use adhesive Pistol Or any universal glue that can glue cardboard, fabric, wood. Just making furniture for dolls with your hands from cardboard, you will also use these materials. If we talk about convenience, it is preferable to the adhesive gun - glitter quickly, it is convenient to work comfortably, the connection is reliable.

To make furniture for dolls, you can use the usual packing cardboard. He is cheap, but the furniture from it turns out very tender. It is unlikely that the child is enough for a long time. But, as "first experience", this a good option. More reliable obtained products from cardboard for scrapbooking. It is a tight, uniform, has a different thickness (from 2 mm and more), may be with a textured surface, extruded by one-photon patterns, a pattern with one or both of both sides. The lack of such cardboard is to buy it, and some types of such cardboard are not too cheap.
Cardboard Bed for Dolls
This bed for dolls from cardboard is designed for big doll - up to 50 cm height. If necessary, all specified dimensions can be reduced.

This option can be made literally for 10-20 minutes. It does not need glue or other clamps. Details are kept due to grooves cut in cardboard. The width of the groove is equal to the thickness of the cardboard, the length of the slots and the size of the blanks are listed on the diagram.

Green and yellow dots indicate the combined cuts. They are inserted alone in another, on what the assembly ends. If you like this model, it can be done from plywood.
Schemes for the manufacture of cardboard doll furniture
Basically, furniture for dolls from cardboard is glued. Make something openwork from this material or very complex it is unlikely to succeed, but the manufacture simple models It does not take much time. Having a diagram with dimensions, you can even do without explanation. Everything is so clear.
Such models can be done on the eye. Without a "upholstery", they look unsightly, but after quite decent bedside table with doors and an open regiment - a scheme alone, different execution
Furniture schemes for dolls can be used not only for making cardboard. They can be transferred to the paneur and cut with a jigsaw.
Cabinet for dolls of girlfriend
The toy cabinet can be made of plywood, paint or envelop wrapping paper or self-adhesive film. There, probably, the questions will not arise - everything is clear, and if there are questions, you can look at their solution in the "natural" closet. But you can make it from all inexpensive materials. Furniture for dolls with your own hands and good that the cost of it is very small.
From a cardboard box
The main task is to find a box of dense cardboard suitable size. Moreover, it will be easier to work if it is packaging - with rejuvenable edges. Such a bending part is the finished door. It will only be necessary to finish it - hang the mirror, attach the handle, etc.

One of the options homemade furniture la dolls - wardrobe
What is needed for work
It will take good tape for work, better - on a paper basis, as it is then easier to glue the finish. If there is a glue gun or construction (a large stationery fit) stapler with brackets is also not bad. If, in addition to cardboard and paper, you will also use other materials, the glue is better to find the universal, which glue paper, cardboard, fabric, plastic. We still need scissors and a stationery knife, a ruler.

If the box found is too big, it can be reduced, cutting off unnecessary. So that the bends were smooth, take a ruler. We apply to the place of the future fold, several times we go along the lineup of a stupid solid object (with a snap or fork). After that, the cardboard bend will be easy.
Filling for a toy cabinet
From trimming or from another box, cut the shelves. They should be a little - by 5-8 mm - longer and wider inner cabinet space. Surplus bend so that sides are formed from all sides. In the corners, folds are formed, they are gently cut off. One of the parts bending 180 ° and glue to the shelf itself. This side of the shelf will "look into the world." Three other parts bend at an angle of 90 °, we wash the glue and the shelves insert into the closet. In the photo on the right you can see how the shelves are glued. But that the places of attachments do not get into the eyes, the sides are better to wrap down.

Make furniture for dolls with your own hands - it's no less pleasure than playing with her
In addition to the shelves, you can still make a crossbar for hangers. It can be made from bamboo speakers, for example, you can try to use a tube for juices, a wire, etc. The hangers can also be twisted from the colored wire or cut out of pieces from juice, from plastic bottles, etc.
Finish - creative process
Next, it's a finish. You can paint the cardboard with watercolor or acrylic (better) paints, shove the wrapping paper, cloth, felt. You can simulate surrounding - Plan a foil (food, for example). If you want to make a "plastic" surface, look for bottles of water the desired color, Cut the neck and bottom, and the "body" use as a finishing material.

Finishing - the process is creative, but, first, use the materials simpler, softer, feel easier to work with them
Handles can be made of wire, from beads, long beads. For toy larger cabinets, you can find buttons or buttons. All this "beauty" adhesive after "washing" the cabinet.
Warding Doll Cabinet Newspapers
We need old newspapers, PVA glue with a tassel, a glue gun, a couple of wires or threads, wrapping paper for trim and paint.
From the newspapers twist the dense tubes, we wash them along the edge of the PVA and leave up to dry. Then the tubes can be glued together. For this operation better suitable Adhesive pistol. There are two ways: first collect large blocks, then chop them into fragments of the desired length or immediately cut the tubes of the desired length and glue immediately blanks in size. The second path is more painting, but the waste is less.

The finished walls of the cabinet should be copped with each other. To rigidly fix the angle of 90 ° better to use a thin wire. First, wash the joints with glue, then put the walls one to another. If the wires interfere, they can be removed after drying the glue.

For the same technology, the bottom, the top, shelves are glued. Doors will need to do a little differently. So that they open up, two strips of about 1.5 cm wide from the scotch. On the edge of the door, the tape is sampled so that a little more than half hung in the air. With this free tape, we glue the door to the wall, but so that between the wall and the door there was a clearance of 2-3 mm (just tape). This will give the opportunity to close the doors. The glued door is fixed on the other side of the second scotch band.

The second way to fasten the doors - on wire. Only this time it should be tough and thick enough. Cut a piece that is 2 cm longer than the height of the cabinet. Immediately on the wire on the one hand, we make a loop using 1 cm. The loop is bending at an angle of 90 ° to the wire. Make a hole in the bottom and roof, we skip the wire through the bottom, the loop remains downstairs. We wear the door on the wire using the extreme tube instead of hinges. Slightly flexing the wire, we produce it into the hole in the roof of the cabinet, bending the surplus, fixing the door. We repeat the same operation with another door. Please note the door to the tape is needed to finish the cabinet, and on the wire - it is possible after.

There are some little things that need to say a few words. The legs and handles for the cabinet can also be made of paper tubes. Just twisted them from the paper that you finish the toy. Cutting it into a dense roller, the edge is glued with glue, then cut on the segments of the desired length and stick to the right places. Instead of tubes can be wooden sticks, beads, etc.
Puppet Bookcase or Lines Shelf
You can make furniture for dolls with your own hands from school wooden lines. They are good for those already processed, have the same width and thickness. In the shop of stationery can be found desired size - More / less, wider / already - at will. For example, for the manufacture of puppet bookcase We need 6 lines 15 cm long.

Still, you will need a jigsaw. If there is an electric - excellent, if not, is suitable and manual, as it is not too much work. We also need emery paper with small grain, glue (PVA or carpentry) and paint (acrylic or gouache).
From the line, cut segments: 4 pieces of 6 cm, one - 8 cm. The edges sand up to an even state, remove the markup and bar codes. Between the two line, we have the shelves (which are 6 cm), we leave the same distance from above the same distance - under the cover (segment of 8 cm). The joints are missing the PVA liner or carpentry, we connect and tighten with a painting tape, we leave for a day. When the glue is dry, we glue the latest item - the lid on top. Actually, the shelf itself is ready, it remains to paint it.

To get even and bright colorThe design is better covered with white, after drying, you can already paint the desired tint. Also made with your own hands, doll furniture can be decorated in.
Furniture for dolls: photo ideas
You can make furniture for dolls with your own hands from the most unexpected materials. How to use newspapers and wooden rules you have already seen. But you can make tables, chairs, chairs, sofas, beds, shelves, cabinets, etc. From sticks for ice cream.
Garden bench or sofa - depending on the finish
What is good for this material, you probably have already understood - it has rounded treated edges, the same in size and well-processed. If the sticks seem too rough, add them to smoothness with emery paper With small grain.
From the clothespins, quite good chairs and chairs are obtained. They are disassembled on halves and are connected using joinery glue. Figure products are obtained by almost several dozen minutes.
Armchair, table - also you can make clothespins
Almost always for the manufacture of doll furniture use wooden clothespins. But no one forbids to take plastic. It is also difficult to work with them just the difficulty in the fact that the wooden is easier to refine, changing the thickness of the form, etc. If the product is simple, refinement does not require, you can also take plastic. They are more diverse in shape and sizes, already painted, so there is less than one with them.
With an increase in skill, you can go to a more complex material - a fane or wood. The complexity is that the outtage and cutting of miniature parts requires filigree accuracy, perfection and takes away the mass of time. But you can do everything you wish.


Angular desk for doll .... all as a present


Plywood Wardrobe Cabinet - Play Accuracy Very High


Once in the children's stores, the country was delivered something in pink boxes. Thousands of parents rushed to look at the overseas miracle, which turned out to be nothing more than two-storey house For Barbie doll. Not many could afford this luxury, and children whose parents acquired a toy, immediately became the favorites of the yard. To make the life of Barbie is real, the manufacturer complemented the house with pink furniture and a convertible.
Now the choice of furniture and houses for dolls has increased significantly, but the price for many remained inaccessible. We offer to learn how to make furniture for dolls with your hands from cardboard and please the baby without excess spending from the family budget.
Master class number 1
Let's start to furnish the dwelling doll from the chair. Do it easy: Please note that the dimensions are indicated in the photo. You have left to transfer them to cardboard. We do not specifically give templates of the chair, as it is done on the basis of the personal considerations of a child or parent, which is engaged in the process of creating furniture.
Cut from cardboard Details that you see in the photo and take about the case. For creating Seat seats Apply square blanks. Their quantity depends on the thickness of the cardboard used. Fold the stack of cardboard together, glue together.  Attach the seat to the back of the chair, stick to the bottom.
 Lubricate the face of the seat with glue and fit detail plug. It is a rectangle with ascending elements of the middle. Now the supports appeared between the back and front part of the chair cylindrical fences are attached.
 Secure Cylinders of the compets and hide the side parts under the cardboard.

 Chair is ready! In order not to leave the furniture in this form, cover it with a beautiful cloth or secure decorative paper.
 Note: If the baby is small, the paper will become a short-lived coating for the chair.
Master class number 2
Furniture for dolls do it yourself from cardboard - an excellent find for needlewomen. In this master class, we will not give a clear instruction: a demonstrated bed is so easy to execute That even a child will cope with its manufacture. So, look carefully on the template And on the road: to create a wonderful puppet bed!
 Important: Bed sizes are installed independently based on the toy parameters for which it is planned.
Master class number 3
 and how about simple sofa and armchairs? Such furniture will fit busy parents, because to raise it to be required at least time and effort. Moreover, the performance of these interior elements is available to any baby. Look at the photo: Have you already understood how to make a sofa and chair? If not, here is the mini-instruction:
- Decide with sofa size. Sofa length It must coincide with the backrest length, and the length of the compete with its side. Height sofa It is ½ of the back of the back.
- Cut the cardboard with rectangles according to the intended length. Two rectangles use as back, others as seating places.
- Stick to the sides doubts Rectangles fence. The sofa is ready. The chair is made by analogy. After the furniture is collected and glued to cover it with a cloth. For consolidation Fabrics use glue or construction stapler.
Master class number 4
Large dinner table - An integral part of the interior of any dumping dolls. Look at this wonderful table: I want to sit down for him and adults and children, however, such happiness got a little long-haired toy.
Follow the instructions, To assemble a cardboard table for puppet Domika:
- Decide With the size of the future table. Then cut three cardboard rectangles for the table top: several layers of cardboard will allow a tabletop to keep the shape, without letting it over time.
- Go to the legs. If you cut the cardboard out of the box, use four sides of the box on the legs. This will facilitate the task. If you have a direct piece of cardboard, then draw a leg pattern on it: two legs on each template. They can be made figured as in the photo, and can be made in the form of a trapezoid. After the template is ready - cut the legs.
- Scrape Details with the help of glue.
- Purley the table Any. beautiful paper. Wherein guide common style Puppet house.
Photo Gallery
To show more ideas, Website editions Cheerful learning Collected photos of interesting interior solutions from cardboard with their own hands. Perhaps it is here you or your child will find and make dollhouse infinitely stunning.


 Make furniture for dolls with your hands from cardboard is quite simple. Often it does not need templates for this: quite fantasy, time and slightly slightly. We hope that the article was useful, and you will not return to us again.
50 ideas and descriptions of work for a house and furniture from cardboard.
Playing with dolls, children learn to communicate with their peers and adults. They project the world, who see around themselves, on the world of their toys. If the little girl played in childhood with dolls and cared for them, then she would be able to skillfully cope with the duties of his children and the custodian of the family hearth.
Of course, you can buy a house for dolls, but if you make it together with your child, it will not only be more interesting and more beautiful, but more functional because the size and style of such a house can be made absolutely arbitrary. They can be somewhat somewhat, if the dolls live in each house separately.
The most simple housekeepers from cardboard are obtained if the cardboard sheet bend and add a roof. Walls of such a house look comfortable by salarying with a soft cloth.

Closing the house with four walls can be one-storey.


And also they can be two-story.

Make such a house is easy if you use a cardboard box rectangular shape. Its width becomes the base of the house, and the second floor is glued inside the cardboard box. As well as two-storey and even apartment house It turns out if cardboard boxes are delivered to each other and glued together.

For the manufacture of one-story house with double roof It will take a simple pattern and colored paper for decorating the walls of the house.


The size of such a house and the form of windows and doors depends on the wishes of the child. A boring house made of gray cardboard can be transformed after colored paper. To simplify the salary of the walls of the house, they can be saved in a disassembled form, and even then collect them.


Domok for toy dogs in the form of dog booths have round window and semicircular door. Dogs near the booth are also made of cardboard.


How to make a bed from cardboard for dolls
For the manufacture of a bed for dolls, use the cropped cardboard box.


Box cut into a bed height. The backrest is glued to the headboard.


On the edge of the bed glued paper malarious tape to close the ugly cuts.


Now the crib can be painted in any favorite color. It is better to take opaque gouache paints for this.


On the bottom of the crib, you can put a mattress and other doll bedding. And so it may look like the same bed, if it is not painted, and put on her a fabric case on it.


On the edge of the bed, rushes are sewn, and the back is decorated with lace.


The crib can be double and the child can put two dolls at once.

Bed for dolls from cardboard can be made on a simplified version. It is glued out of two boxes of cardboard. One of them performs the functions of the bed frame, and the other head restraint.


In order for such a bed, it is possible to put a curved cardboard ribbon inside.

 Cardboard tape inside bed
 Cardboard sofa for dolls
For a cardboard sofa, you will need a cropped corner of a cardboard box and a cloth-plated cardboard. The sofa seat and its side parts are covered and insert into such a corner.


In the boxes stick the seat of the sofa and the lateral parts of it.


Wake up with a cloth six sofa pillows.


The sofa with pillows is collected and give adhesion to dry.


Cardboard armchair for dolls can be made according to the diagram for assembling the sofa, but in this case the corner of the cardboard should be less and collected from two pillows. And for the manufacture soft chairsIn the cardboard box, the seat is cut off and covered with a sheet of cardboard. Empty places under armrests and seats are filled with foam rubber or other material.


The chair is covered with a fabric cover. To give the volume to cardboard, you can glue pieces of synthesis. Corner from little sofa And the square punch is made in the same way.


Cardboard cabinet for dolls
The cabinet for dolls of dolls from can be done with the doors, and you can do without them. Inside such a cabinet in the slot in the cardboard, the crossbar for hangers with dresses is inserted. And at the bottom you can put boxes for trifles.


Cardboard Chest for Dolls
The chest of drawers are collected by putting small boxes in two or three rows into one large boxes. Such boxes can be decorated with paper. different color And make handles from the caps from the bottles.


Computer from cardboard for dolls
The computer from the cardboard will be able to make it possible to make it myself, for this you will need to bend a cardboard sheet in half and glue the square to it on one side of the squares that will symbolize the keyboard, and with another picture that will symbolize the monitor.


If on black paper cardboard boxes Glit paper with a hand-drawn keyboard, and the lid box pictures, then the doll computer will be.


For the manufacture of a TV from a cardboard, it is enough to draw on the cardboard box of the knob of sound and channel switches and cut a rectangle in it symbolizing the screen and insert the picture to this place. If the box is big enough, children themselves will be able to speak and speak it.


Cardboard kitchen for dolls
Cardboard kitchen for dolls may include a stove, refrigerator, kitchen tables and chairs. This furniture is not necessarily simulated from zero. Use ready-made cardboard boxes for this. These boxes are painted under household appliances or seal with colored paper.


For the manufacture of the refrigerator will need a box of rectangular shape. The shelves for products are glued inside it. The door is cut in size back wall Refrigerator and stick with box. A handle is glued to the door of the refrigerator.

For the manufacture of cardboard stoves, you can use ready-made cardboard boxes. The burners for the stove can be unnecessary discs for the computer, and the handles are multicolored covers from plastic bottles. To attach such a handle, cut plastic bottle A few centimeters below the lid and insert into the holes in the cardboard.


Food from cardboard for dolls
Food for dolls cut out of books with pictures, and you can draw it on paper and stick to the cardboard, so as not to rot and the images were not lost.


Cardboard dishes for dolls
Dolls for doll cuisine are cut out of cardboard and glue to them paper images of plates that can be printed on the printer.

Silets and cups make two parts. One of them is the bottom, and the second side wall of the dishes. The pot for the pan is cut a slightly larger diameter than the bottom of the pan.


Decorate such dishes appliqué or drawings.

Cardboard table for dolls
If you connect three boxes of rectangular shape, a sufficiently stable table for dolls will be obtained. From large boxes, you can make not only a small doll table, but also the table for the game of the child in the kitchen.

A cardboard sheet is glued on top to it, and you can decorate such furniture to stick to the surface of colored paper or sheets of wallpaper.

From match boxes can be made small table from drawers. Farliances OT. matchboxes Printed to the walls of the table, and in them insert boxes. Such boxes are put forward by the handles.

Cardboard chairs for dolls
Using the same assembly scheme, as for a table of three boxes, you can make chairs in the form of stools. Very small chairs for dolls are obtained from cardboard boxes For matches. Boxes glue glue, and for strength they can be combined with paper painting tape. If you glue a circle from cardboard from above, tightened with a piece of fabric and put a piece of synthesis of synthesis - the chair will be soft. More complex design At the chair from the cardboard with the back. In this model, the back is inserted into the slits in the side parts of the chair.
From the boxes interconnected with each other, a great labyrinth with obstacles is obtained.


Cardboard hanger for dolls
For the manufacture of hangers for clothes of dolls, it is enough to measure the width of doll dolls along the shoulder line and cut from the cardboard hangers of the same size. You can strengthen the hangers from possible beggars and glue such details of two together. And if you stick paper on cardboard hangers and paint colors, they will be not only functional, but also beautiful.


The phone from cardboard for dolls can be both mobile and disk.

Cardboard cradle turns out if a deep cardboard box wrap a beautiful cloth outside and inside.


Or paint the cardboard with paints, then bend and glue it from four sides in the shape of the cradle.

Stroller for Cardboard Dolls
To make a carriage for dolls of cardboard, it is enough to wrap a small box with a beautiful cloth or paper and attach a handle. The handle is inserted into a smaller flat cardboard boxes than a stroller. Boxes with a handle stick to the cradle of the stroller.


Video: How to make a toy house from fabric and cardboard?
 Why you can not postpone the pregnancy
 Effect from regular use of home recipes
 Features of the structure of the neck