Beautiful bulk tree made of paper. Trees manufacturing technology Trees from foam rubber
Hello expensive masters! Today I imagine how to make trees layout with your own hands. I never thought I would have to do it. The fact is that such trees ordered me dad, which is engaged in the manufacture of temple layouts and churches. Promise promised, and how to do - I do not know! But the promise is given - you need to perform. Found a video and started work. The video for which I did my trees can be viewed here - http: //yandex.ru/video/search? Filmid \u003d 1iwlfm7auxi & text \u003d% d0% BC% D0% B0% D0% BA .... I decided and for you to show how I did them, especially since very often or at school or in kindergarten asked to make any craft on this or that topic and then my MK and the author's video will certainly help you in this matter.
Here is a tree and a few more from me. I will say honestly: I did not think that the trees would be so exciting. Dad asked two trees, I got carried away and made 4.

To work, we will need: a small wire, a sponge for washing dishes or ordinary foam rubber, any cap or cardboard on what we will wear out our wire, pliers, which are usually used in beadwork and green paint of different shades.

Wash the wire on the lid. For one tree, about 8-10 mi height is enough single coil. But if you want the trunk to be thickening and the tree of the penette vehicles, then you can take a bigger wire. Shuffling the wire thus cutting it from one end.


Straighten.

Below we leave centimeter one and a half - two on the roots. They will continue to serve as the stand of our tree.


Below straightened the roots, twisting a few wires into one. Next, begin to form our crown, starting from the lower branches. To do this, we separate 6-7 wires and twist the spiral about half the spiral. Next, we divide our wires in half and twist further separately.


Then, on each branch, we leave one alone alone, and then twist two. So as shown in the photo.

According to this principle, we make 3-4 lower branches.

So that the branches of the second tier can come into contact with the branches of the lower tier, scroll through the barrel is still a little up.

We make the second tape of branches, again scroll the trunk and form the top as well as the rest of the branches did. That's what we should get.

And this is already the coax of a future birch.


Here our tree is covered completely with PVA glue (as if covered with snow. We leave our tree to complete drying, about 2-3 hours. As soon as our tree is completely dry, we start to paint it. Unfortunately, it's not a picture of painting, but it can be seen On video. There is nothing complicated here. Prayer trunk and twigs or brown acrylic, or if it is birch - light gray with black dots.

Next, we can paint our future krona. For this purpose, I took a sponge for washing dishes and a simple white foam rubber. Poured a little water in a bowl and added some acrylic paint of different shades. Filty her in the water so that the sponge was painted evenly.

Wet sponge again and without squeezing, the tassel began to put paint on the sponge: first with one tint, then the other, then the third. It is enough to apply a little paint on one side.

And then just shim it in his hand, putting on the hand of a glove or polyethylene. Sponge, as you can see, it turned out unevenly, what we need. As the sponge was yellow - it gave us an extra shade of yellow. That's what we did.

We press our sponge from excess water and put on the battery to complete drying.

And such a shade turned out when painting an ordinary white foam rubber. As you can see this more green. The first, brighter sponge went to the birch foliage.


fair in Kroshevo. And so every twig. Then he gave dry, shook out what was not glued. The pressure again applied glue on the twigs, but no longer with a brush, but just dripped on a drip from the bubble and plucked the little bit and again to complete drying. And so several times. It is certainly more troublesome, so it is better to do as the author advises.
BackTrial lesson for makety http: //bestmaket3.ru/ochnoe-obuchenie ...
In this video, we will tell how to make trees, bushes and flower beds for your layout. There are several options for the manufacture of bushes and trees that master the guys passing training in the studio of the pale. The simplest, and therefore often used, it is the manufacture of trees from a stranded copper wire. The thickness of the wire, that is, the sections, selected through the thickness of the trunk of the trees depicted.
Then the wire flashes into separate branches. Then on a suitable piece of foam, it can be fixed on something piece of plasticine, into which we inserted trees and bushes, we paint them into brown colors.
It is advisable to fix the paint with a layer of varnish. Even simple hair lacquer is suitable. Next, the branches are missed by glue. Something suitable with whom you have already worked. It may be uranium, and Cosmofen, and Pva. Just need to take into account the speed of drying of one or another glue.
Foliage used for pasting trees and shrubs can be both purchased, from finished sets and self-made.
For homemade, the ordinary sponge will fit well. It is painted in various tones of green shades rather chaotic and randomly.
After drying, the sponge is kneading either by hand, but in a blender to small pieces, but not in dust. Then the trunks of trees and shrubs, wrapped with glue, sprinkled with finished foliage.
If the autumn foliage is needed, more yellow and red tones are added to the paint. Making layouts with their own hands - the process is interesting and creative. See our lessons, go through the full video course or the course intensive and everything will work! http://bestmaket3.ru/
Maketing lessons. Production of trees, bushes, flower -
We continue the topic of paper crafts in 3D technique and today we want to offer you to make a small 3D composition. The most important thing is that for this kind of crafts, it is practically no material costs. Take ordinary white paper, scissors and PVA glue and forth for new paper achievements!
Let's start, perhaps, from a tree. It is made of three parts cut from paper one template. Only one item differs from the other two in that suspended rustic swings were added to this detail.

Print templates and cut out. Fold all three details in the center. It is on the central line that we will glue them to each other. It is necessary to glue well through the central lines, as shown in the photo. It is thanks to such a reception that the tree will become volume and we will achieve the effect we need.


The composition complements the snow-white rustic fence and a small rustic toilet with a cut-made heart or a month - Romance! (Only the haystacks are not enough and a burenki, in the grass).

Bend along the lines of the fold and fold the paper toilet, as shown in the photo. Secure PVA glue.


So I want to ride on these suspended swings and beched with thoughts in deep childhood when the world seemed magic and full secrets and mysteries!

In case of successful completion of our mini project, you can make 3D products from more expensive paper, for example, paper for scrapbooking.
Trees, bushes and flowerbeds can be made in different ways. We will tell about one of them.
This option is the easiest, and therefore more frequently used. Trees are manufactured from a stranded copper wire.
The thickness of the wire must be chosen in such a way that it coincides with the thickness of future trees.
The next step is dissolving the wire for individual branches.
Next, you need to take a suitable piece of foam and paint them into brown (or any other, based on the task) color.
It will be fine if you secure the paint with a layer of varnish, you can even use simple hair polish.

After the paint is driving, you need to wash it with glue. You can use uranium, Cosmofen, PVA or any other. with whom you have already worked. Here you need to take into account the speed of drying of one or another glue.
Fur for pasting trees or shrubs can be bought or made yourself.
Alone foliage can be made from a regular sponge. To do this, you need to paint the sponge into various tones of green shades. So that the foliages look natural, it is necessary to paint and randomly. In color, water-soluble paints are used.

When the paint is driving, the sponge can be arched with hands, and it is possible, and even in a blender. The main thing is not to overdo it and do not be confused in dust.
Now the trunks of trees and shrubs remained, losing with glue and sprinkle with the manufactured foliage.

If we want to show autumn, paint our foliage into more red and yellow tones. If we make a winter layout, you can stick watts, as well as sprinkle soda or semolina.
The article is prepared by the Center specialists
Not long ago I was fascinated by the manufacture of models for the railway on the scale of 1:87 but
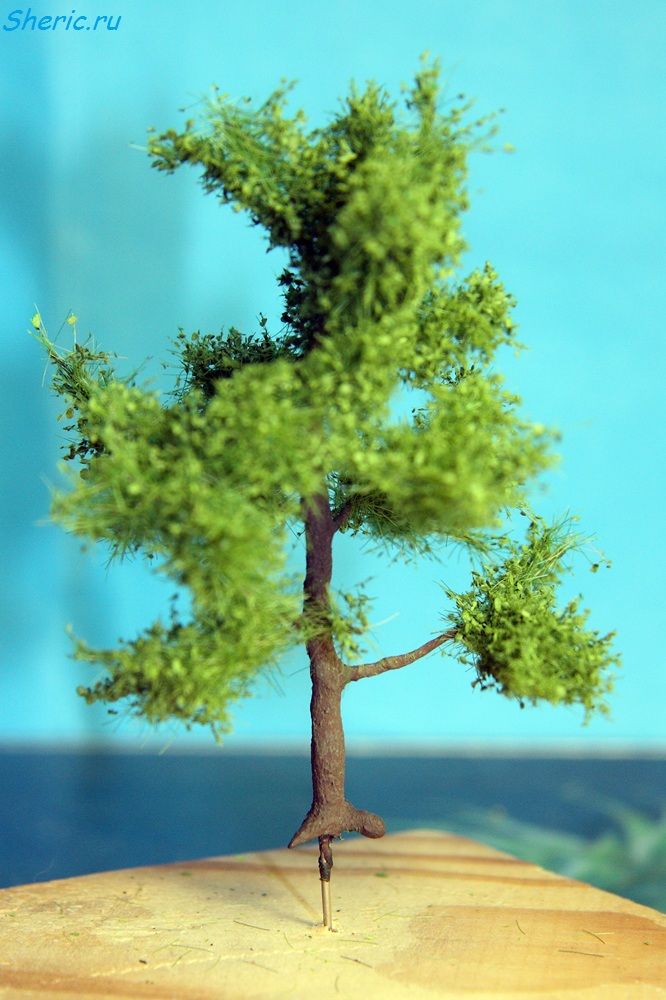
The first experience is visible in the photos. It looks more like a palm tree ...
Some options were more attractive
It looks like a deciduous tree. There are even leaflets.
How it's done.
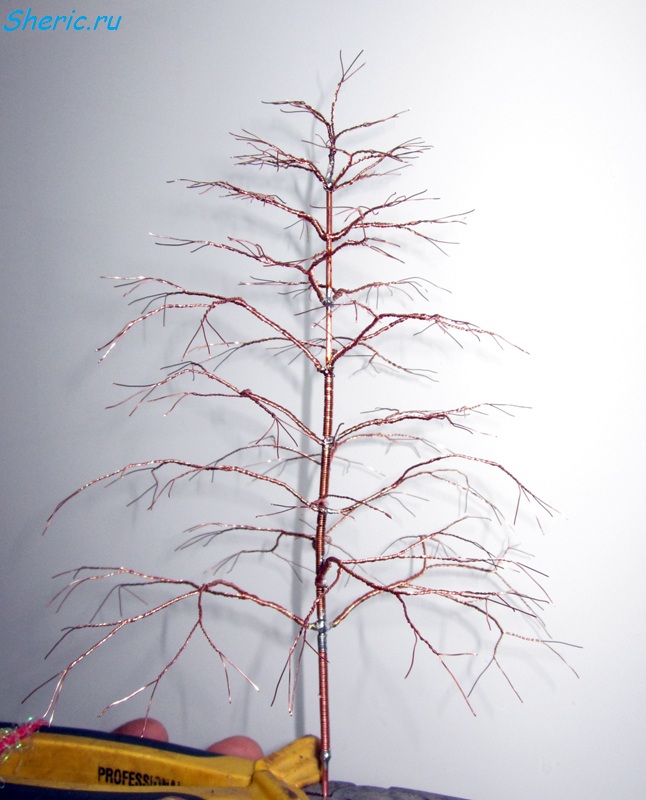
Wire of different diameters is taken for the manufacture. For the barrel of 1.5 - 2.5 square, for winding the branches is thin.
A thin wire is wound on the trunk, from which the branches periodically depart, so to the top slowly the thin wire does not remain and the tree naturally thinned. Such technology is best suited to deciduous trees with a gradually thinning trunk.
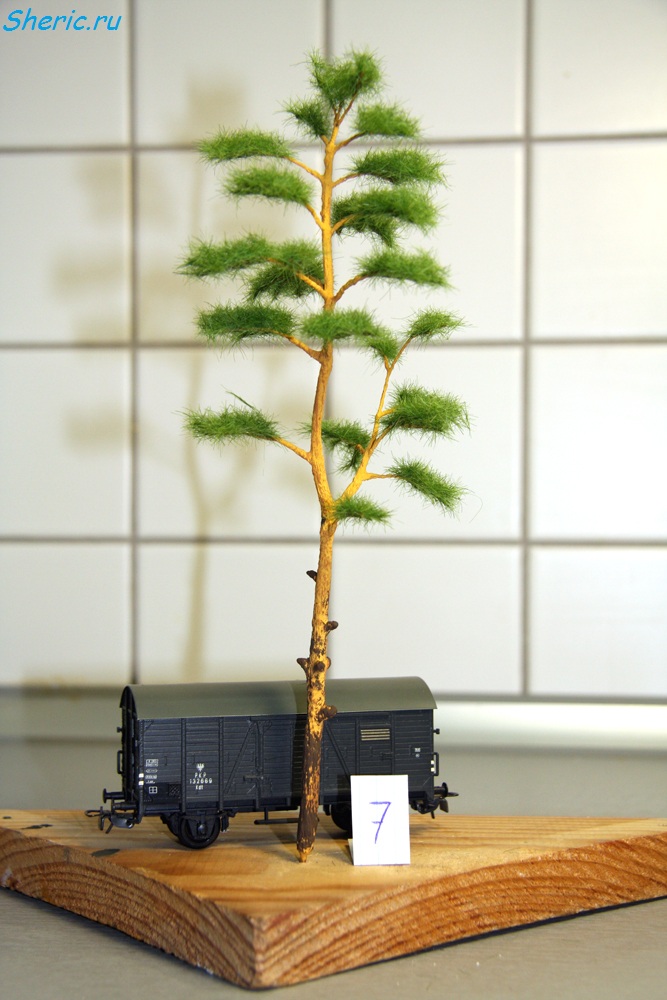
Pine trunk is made a little different. Wire winding is going, but the branches are departed and returning back, and there is a winding further. Thus, a uniform pine trunk is obtained. Gradually, you can reduce the amount of wire for the refinement. You can still screw the branches additionally, regardless of the winding of the barrel. Here is an example of such a pine winding growing in the open space.
Further, I sprinkle with fine sand with glue and paint acrylic paint.
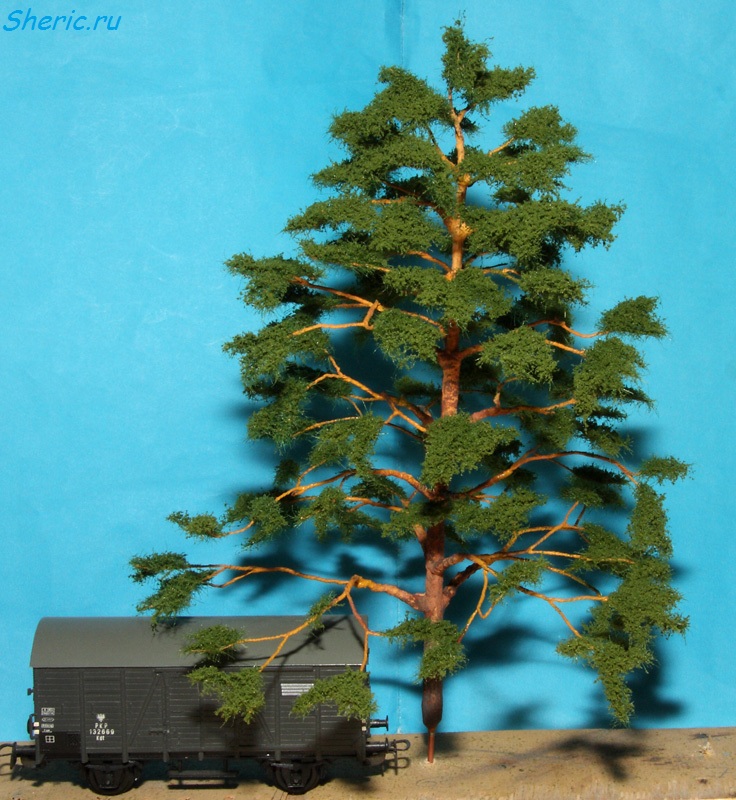
The needles are formed with the help of "grass" for the "seeder", called Gross. Next is covered with a small peat. It appeared later. Here is an example of such a pine, by the way the completed from the above workpiece:

I like this option more.
Here with the trailer.
Deciduous trees are covered with extra minor leaves, which are also sold in model stores. For deciduous trees there are a variety of sprinkles, many very realistic, but they are not always on sale ...
 Why you can not give icons
 Is it possible to give icons as a gift: Signs, the opinion of the Church
 A year ago left her husband, and now I do not know what to do