Interesting ideas with your own hands. Unusual and useful things for the home that will decorate your life! Do-it-yourself fabric needlework for the home
The most interesting do-it-yourself needlework for the home is much simpler than it seems to inexperienced hand-made lovers. Hand made literally translates as handmade, that is, to hand made can be attributed to absolutely all types of needlework. It can be both the manufacture of a rug, and mittens, knitted with your own hands.


If you like needlework, adding a twist to the interior of your home is not difficult. We present you ideas not only for experienced needlewomen, but also for beginner craftswomen. Prepare your materials and start creating!
Newspaper baskets

It is not necessary to spend money to have such baskets for every little thing at home, because you can make them yourself.
We will need:
- braiding box
- thick cardboard
- many newspapers
- scissors
- knitting needle
1. We cut the newspaper sheet in half and begin to wind the newspaper strip on it at this angle:


2. Glue the tip of the newspaper to the tube.

3. We take a cardboard box for the bottom of the basket and glue the tubes to it.

4. Glue another piece of cardboard on top.
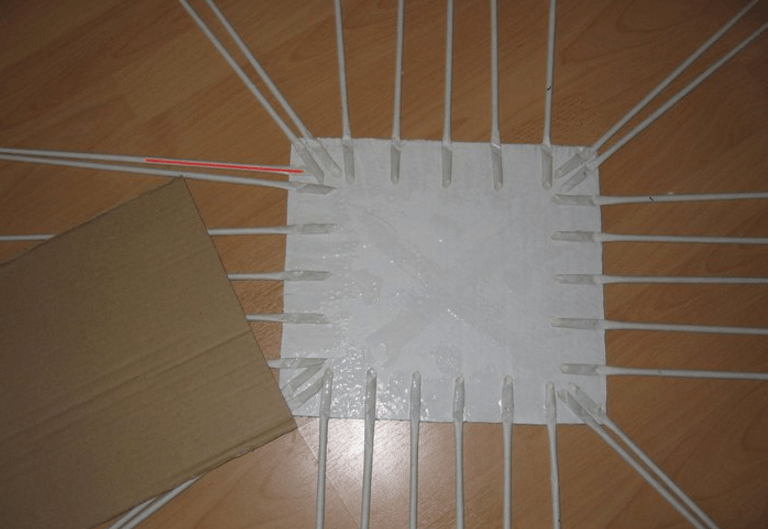
5. For the first row, simply wrap the tubes one after the other.

6. We wrap the last tube, as shown in the photo.
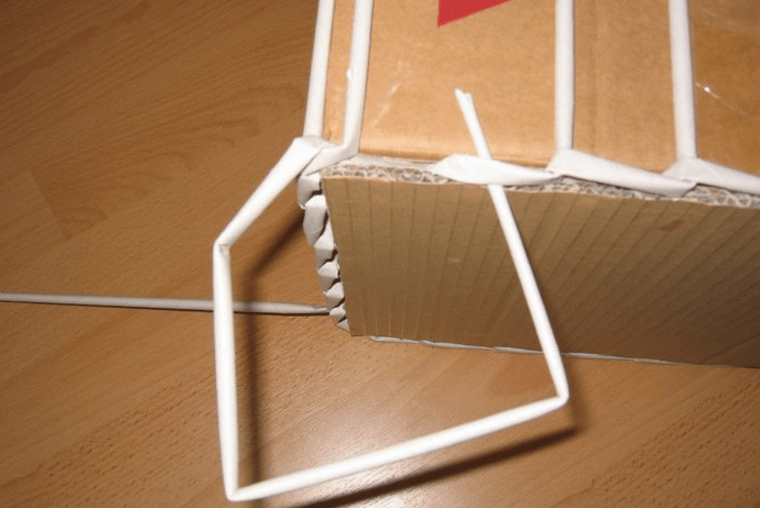
7. We glue an additional tube and start weaving a basket.

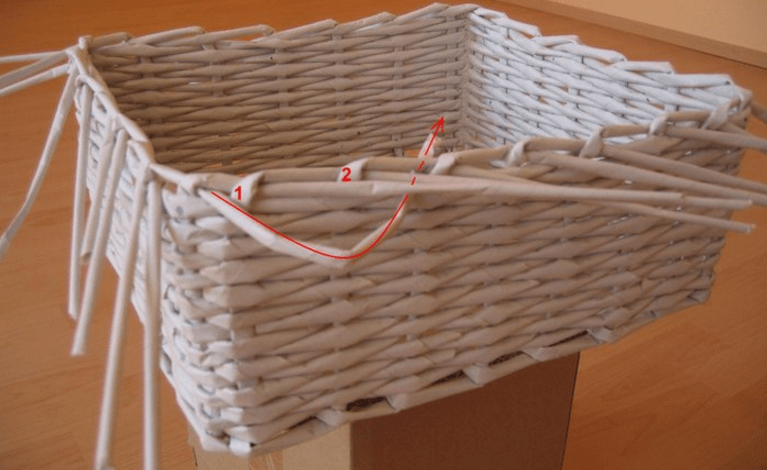
8. Attach the tubes by inserting one into the other.

9. We build up the tubes in the process of weaving.

10. We look at how weaving ends.

11. Place the wrapped tubes inside our basket.

12. At the final stage, the tubes must be cut and singeed.

13. The finished basket can be painted in the desired color.

And in this video you can learn how to knit a rug from bulk yarn
Cork rug

We will need:
- basis for the rug (laminate can be used)
- tubes of the same size
- knife and scissors
- glue or glue gun

1. Cut off part of the base.
2. Cut the corks in half.
3. Glue the corks to the base. voila, new rug ready for the hallway!
Rug from unnecessary things

Such a rug will not only decorate the entrance to the apartment, but also save you from old, unnecessary things.

1. Cut unwanted clothes into thin strips.
2. Tie the pieces of fabric tightly to the net.
3. Secure with tape and the rug is ready.
Plaid from pieces
A plaid of pieces can be made in different ways:
1. From knitted pieces. First you need to knit squares of different colors with knitting needles or a hook, and then connect these squares together.

2. From different scraps of fabric.

Bead painting
Furniture decoupage
AT recent times decoupage is becoming more and more popular, because it is a great way to update your furniture and decorate the interior of the apartment. For decoupage, photographs, old books, newspapers or magazines, fabric are usually used. These materials are painted over with varnish or glued to pieces of furniture.
Table decoration


Dresser decoration


Such crafts will be very useful in everyday life, and making them is not difficult at all.


Handmade products can decorate the interior of not only your home, but also the garden. Unnecessary things can turn into very useful ones.
Crafts from the vine
If grapes grow in the country, then you are provided with material for needlework for the rest of your life. You can make decorative figurines, benches and much more from the vine.


Planter and rope rug
Rug from caps from plastic bottles
Each of us has at home a whole bunch of covers from plastic bottles, so why not do something useful with them?

The lids are connected to each other with a fishing line, and holes in them can be made with an awl.

Country style paintings
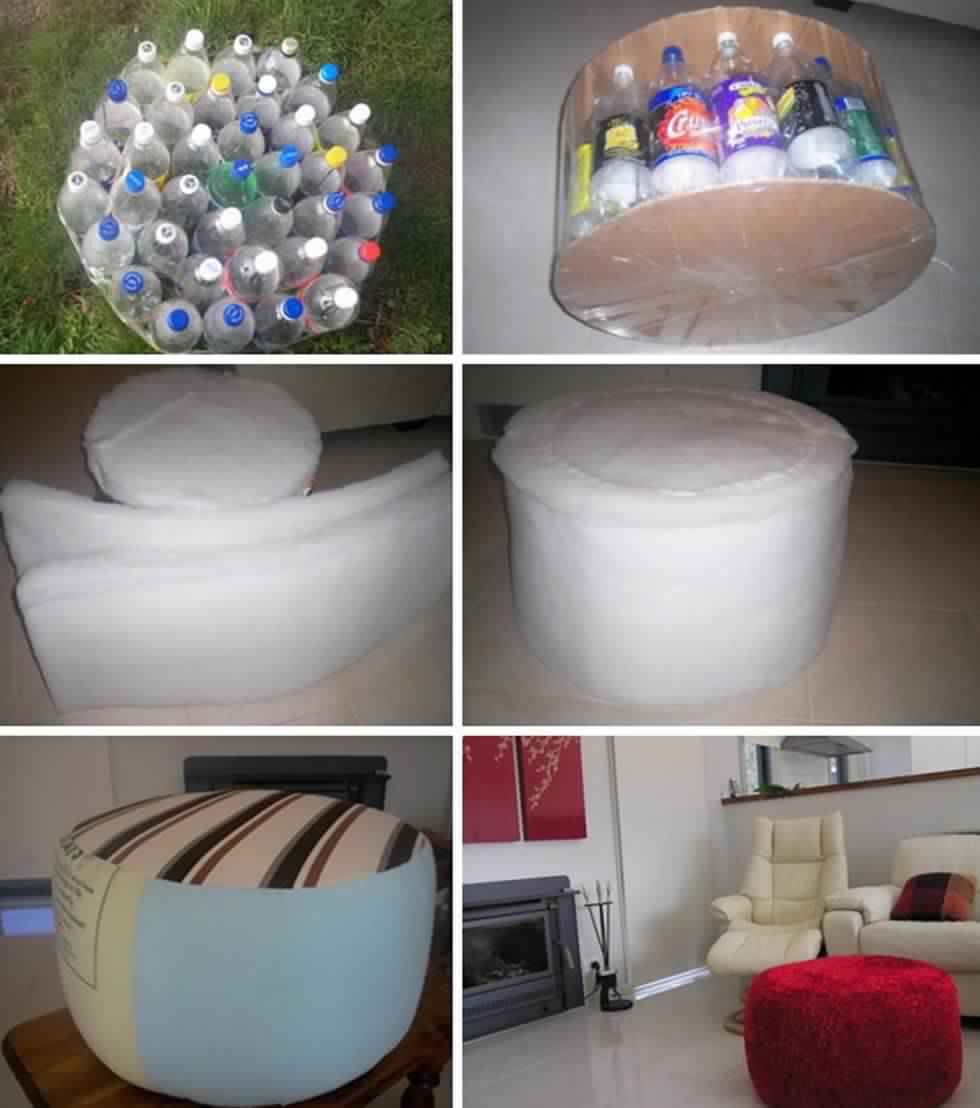
Patchwork ottoman
Patchwork is another latest trend in the world of interior design.

1. To make such an ottoman, we need to cut 12 triangles of colored material and sew them together.

2. Cut out a piece of fabric that will be the side of our pouffe. We sew the cut and sew with the triangles made earlier.

3. Cut out a circle of the same diameter as the top of the ottoman. Sew on from below, leaving a small piece not stitched.

4. At the final stage of manufacturing the pouffe, it must be stuffed, darned and sewn on. decorative button for beauty.
If you have your own cottage, then why not make a hammock, on which it will be so convenient to read your favorite book.

To make a hammock chair, we need:
- dense fabric
- rope
Let's start making:
1. Cut the fabric base (rectangle 115x86 cm) and cut into 14 strips 8x15 cm in size. Each strip must be folded in half and stitched. We fold the resulting tape in half and sew it together, so we get a very strong loop.

Unusual and unique handmade designer items have always been highly valued, especially among decorators and home interior designers. Doing interesting needlework for the home with your own hands is not only profitable, but also useful. This is an extremely exciting activity in which the whole family, including small children, can participate. In a short period of time, without having any experience in performing similar creative projects, from ordinary things and improvised material you can get original decoration, which will become an irresistible individual decor in the interior.
Interesting needlework for the home with your own hands (photo)
To beautifully decorate the living space, there is no need to purchase expensive decorative interior items. Everything can be done with your own hands, the main thing is to have imagination and be able to handle different material and tool.
By investing a piece of your soul into a hand-made product, you will receive worthy decoration, which will bring a special zest to the interior, give warmth and comfort to your home, make your days brighter and more fun.

wall decor
— great idea, especially if they show off good author's works with an original design.
For the first product, we need ordinary things that are in almost every home. And so, we need:
- Cutting board (you can use a piece of laminated chipboard);
- Nails and hammer;
- Thread for knitting;
We make panels with our own hands:
- Draw on the board the pattern or design you have chosen.
- Using a hammer, drive nails along the contour of the pattern at the same distance so that their height does not differ from each other.
- Tie the tip of the knitting thread to the first nail, then carefully pull the thread to the next one and make one turn around it. Continue pulling the thread from nail to nail until the whole picture is complete.


With knitting skills, you can create many beautiful things. For example, using yarn or threads, you can get unusual wall tapestries that will help enliven the interior and create an element of exclusivity.
This decoration is made quite simply:
- To begin, tie the threads of your chosen color into thick braids;
- Connect the resulting braids together into a single carpet. Make loops along the top edge so that the tapestries can be hung on the wall.
- Pass through all loops bamboo stick, with a rope threaded into it in advance and hang the decoration on the wall.


Knitted panel - a good idea for wall decor
Carpets and pillows
Knitting skills come in handy for other useful items or home decor accessories as well.
- Very stylish and original look: floor mats, pillows, ottomans, blankets. You can master the art of knitting them by studying several detailed master classes and lessons with step by step photo which can be easily found on the Internet.


The most popular are soft floor mats with a long pile, having a round or rectangular shape. To knit such a “fluffy decor”, you will need an exquisite artistic taste, a little patience and attention, especially if beautiful handicraft is done for the first time.
- To quickly make a fluffy product, small strips cut from fabric are tied into mesh weaves.
- They fasten all the elements from the inside with adhesive tape, and a beautiful terry rug can be laid near the bed.
Replacing the strips with many pompoms made of multi-colored yarn, you get a soft, cozy product for a child's room.


There are a huge number of different knitting techniques. Despite this - this species handicraft continues to develop actively.
The result is a lot of beautiful designer things that not only decorate the interior, but are also useful in everyday life. For example, a knitted blanket, in addition to decorative function can keep you warm on cold winter evenings.


Ethnic motifs remain the most fashionable trends in interior design. A do-it-yourself “cape rug” will decorate an armchair, sofa, chair, stool. For needlewomen who know the technique of crocheting, the material will be not only strong thick yarn or cord, but also ribbons cut from outdated knitwear and textiles.
Most often, craftsmen knit oval or rectangular multi-color capes. Lace elements sewn around the perimeter give them a special charm.


- To insulate the tiled floor in the bathroom will allow a small cozy massage mat, which is easily made from ordinary corks from wine bottles. They are cut in half along the longitudinal line and glued to a piece of linoleum.

Wine cork rug
- Smooth stones fixed on a rubber base will give the room an element of sophistication. As finishing material wood saw cuts, polished and impregnated with antiseptic compounds, are great.


Free stitch embroidery
Satin stitch embroidery is one of the oldest types of artistic needlework, which consists in embroidering a plane of a certain pattern. Simply put, a piece of fabric with a pattern of your choice is completely or partially covered with dense stitches of thread. As a result, beautiful, picturesque paintings and panels are obtained, which in their beauty are not inferior to expensive masterpieces of art.
It will take a lot of time and patience to master this craft on your own, but believe me, the final result will exceed all your expectations. From seemingly simple things, fashionable, stylish and unique decor elements are obtained that can emphasize the individuality of any interior.


What do you need for embroidery
A set of necessary material and tools that will be required for work:
- Fabric of any density (silk, woolen or linen is perfect);
- silk threads High Quality, the fibers of which have a characteristic sheen;
- Hoop (special device for embroidery);
- Sharp scissors;
- A set of needles and a thimble;
Important! When choosing a needle, or rather its thickness, you should start from the density of the fabric you have chosen. For example, if the fabric is dense (sheepskin or wool), the needle should be as thin as possible, but if linen is used, the needle should be chosen thicker.
As for the technology of pulling stitches, everything is simple here. Each of them can pass in two directions, longitudinal or transverse, the main thing is that all of them are not tightly tightened on the canvas. After the entire pattern along the contour is filled with threads, we can assume that one more original needlework ready for home.


Beautiful needlework for the home has always attracted and attracted people with its subtlety and elegance. So hand-made masters, with their own hands constantly create new, stunning interior items, delighting their fans with real masterpieces of art.
Exclusive handmade things can decorate the interior, fill the atmosphere with warmth and comfort, bring a touch of personal attitude to the choice of design ideas from a variety of interesting options.
Soft toys for children
Tilda dolls in their original and unique design will fit into any interior and it is not at all necessary that it be a children's room, their well-deserved place, these dolls can take in the very center of the kitchen or living room.
Every connoisseur of needlework will appreciate your choice and will not be able to resist admiration, especially if these dolls are made by yourself.


- You shouldn't think that sew a Tildy doll quite difficult. In fact, if you have the skills to work with a sewing machine and you have the opportunity to buy everything necessary materials for the manufacture of clothing parts and accessories - you may well get a unique interior doll.
In order not to spend money on expensive materials, some of the clothes for Tildy can be altered from your unnecessary things good quality, but with the fabric for sewing the doll itself, it is better not to skimp and purchase quality material in a professional store.

Lamp from improvised means
Make original lamp with a do-it-yourself wire lampshade, even beginner needlewomen can do it. To make it, you will need a simple set of materials and tools:
- Colored wire for home needlework;
- Bulb;
- Cartridge with extended wire;
- Multi-colored double-sided figures on a clothespin - in our case, butterflies.
- We fasten the wire to the wire at the base of the cartridge and wrap it around in a circular chaotic motion, fixing the wire in the desired position.
- After a couple of circles, we again fasten the wire to the wire, we do it every time above the previous one. With each new circle, the lamp increases in volume, repeat the work to the size you need.
- Upon completion of work with the wire, you need to give the product a certain flavor. To do this, attach various figures to the newly made lampshade in random order. You can make them yourself or buy them in a specialized store.
The lampshade will gain lightness and airiness due to the free space between the wire, so try not to tighten the product and perform each circle in a different direction.


Decor from old light bulbs
Do you have old light bulbs at home? Don't rush to throw them away. This unpretentious material can be used as a decor for decorating the interior. On the Internet you can find a huge number unusual ideas on their application. Here are some of them.

Miniature garden in light bulbs made with my own hands- will be a great gift for a creative person


paper decoration
Wall compositions in the quilling technique, the material for which is paper, look charming. Even children can create them, which will serve as an occasion for organizing joint family creativity.
On their own, craftsmen make stained glass fragments that fill the space with a bizarre play of color spots. They are trimmed interior doors, lampshades, create screens, zoning rooms


Knitwear, sewing, patchwork, weaving
Do unusual decor for a home with your own hands, you can also use plain paper.
- Wicker vases, voluminous toys, decorative baskets look great and can fit into a variety of interior styles. For their manufacture, not everyone has the opportunity to prepare a willow rod. Home craftsmen successfully replace this wonderful material for weaving with tubes folded from ordinary newspapers.
The prepared sheet is wound obliquely on a thin knitting needle, glued together, obtaining a thin elastic tube for weaving.


- Having set a dream to update the atmosphere of the bedroom, owning the skills of sewing, amazing beauty is collected from individual patches bedspreads in patchwork technique.
Such products are easily obtained from elements crocheted or knitting needles. To update covers, pillowcases, napkins, tablecloths, the application technique is used. Bright beautiful fragments are cut out from any fabric, fixed with an adhesive base and processed along the contour with braid, cord or stitched with a decorative seam.

Patchwork is a fun activity for creative housewives

You can find a use for the patchwork sewing technique in any room - a nursery is no exception.

By crocheting an openwork cover for an ordinary glass jar of cotton threads, you get an elegant candlestick. They put a candle inside so that it does not rise above the neck and set it on fire. The flickering of the flame through the lace creates a mysterious romance, allowing you to decorate a luxurious festive table.


Embroidery, beads
For embroidered paintings, pillowcases, napkins decorating the interior, various threads are used - woolen, silk, synthetic, linen. Embroidered fragments adorn the frames of mirrors, seats of chairs, armchairs, sofas.
Embroidered curtains look great. Amazing three-dimensional panels embroidered with satin ribbons become bright accent, enlivening the premises of various functional orientations.


Stunningly beautiful panels, lampshades, candlesticks are created using beads or beads. They are strung on a fishing line, intertwined in charming openwork patterns.
Can lay out a beaded countertop coffee table, fixing the material on the glue and varnishing on top.


Furniture renovation, garlands
You can update the coffee table using decoupage technique. To do this, you will need to perform the following sequence of actions:
- To start wooden surface need . To do this, it is polished, after which all dirt and dust is removed with a brush.
- Next, the table top is covered with acrylic white paint.
- The top layer with a pattern is separated from the napkin and placed on a dried surface.
- After that, the paper is carefully impregnated with PVA glue, smoothing out all the folds with movements towards the perimeter.
- After drying, the countertop is covered with a layer of transparent varnish.
In this technique, it is easy to give a new sound to a chest of drawers, cabinets, vases. They are used for decoration not only, but also bright fragments cut from fabric, magazines, photographs.


An interesting texture to the surfaces is given by pieces of tile glued in the form of a continuous or fragmentary mosaic, washed and dried eggshell, dyed millet, coffee beans, seeds of watermelons, apples.
The final action is the application of a varnish to the glued composition.


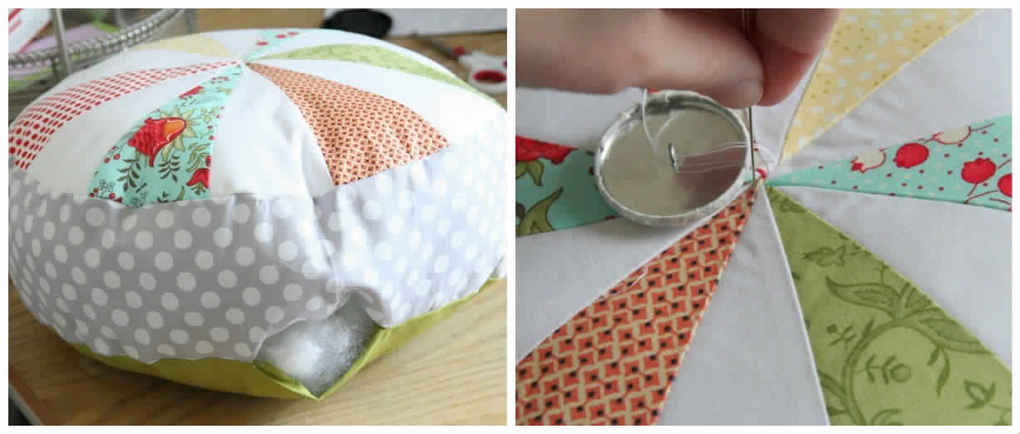
To make the nursery for your child more comfortable and safe, you can sew soft, comfortable and pleasant to the touch ottomans for her:
- In the patchwork technique, two circles are sewn together.
- A strip of fabric is sewn along the edges.
- The product is stuffed using foam rubber.
- A decorative handle is sewn on top in the center.

Soft ottoman - an important element in the design of a children's room


- To zone a room, separating, for example, it can accommodate all kinds of decorative garlands by hanging them in doorways or windows.
- Elastic cords with stars, butterflies, flowers, circles of various sizes cut out of foil will help transform the design of the room. Old gramophone records, which are painted and fastened into a canvas with metal rings, will also contribute to interior decoration.


A variety of ideas for home needlework
There are a large number of technological techniques for home needlework that allow you to make the interior not only more decorative, but also functional.
By connecting the ends of the thick cuts to each other, they get a stand for hot. Such a product can even be made from paper folded into several layers. The resulting strips are glued in a spiral or form products in the form of a square, rhombus, rectangle.


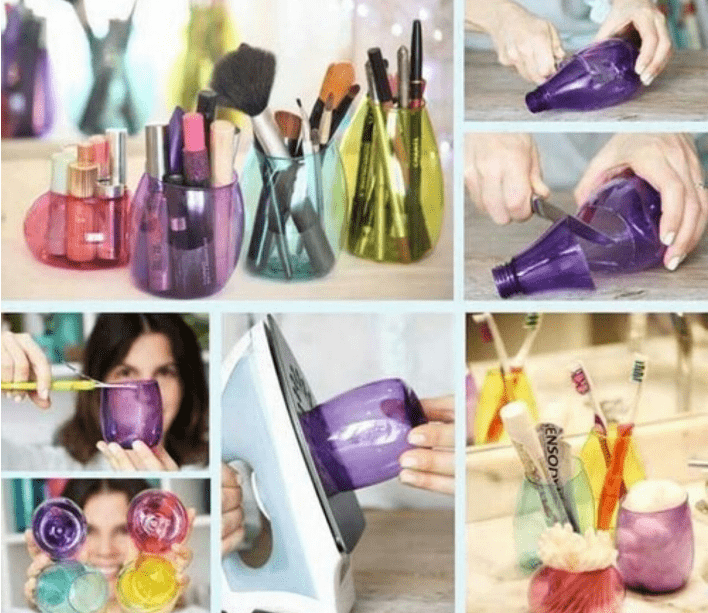
Even the photocopying technique is available for home needlework, which allows you to transfer drawings to fabric. The pattern is attached to the fabric requiring renewal with the front side. With reverse side it is pressed with an ironing press or iron, until full translation Images. It remains only to dry and iron the product.


- From an ordinary glass bottle of a beautiful shape, they get unusual vases. For this outer surface the bottles, in a spiral, must be tightly wrapped with a decorative rope, fixing it with glue.
If there is no desire to mess around with rope and glue, you can paint the bottles in bright colours, decorate them using decoupage technique or make an interesting painting on them.


A simple and concise vase from a bottle will become great gift for the second half
- The room for creativity certainly provides: gypsum and clay. These materials are used to make unique stucco elements for interior decoration. They also make beautiful garden lamps, original vases, whimsical candlesticks, exclusive figurines and other decor.
- Similar needlework can be not only an excellent decoration for home interior but also be useful in everyday life. For example, for safe movement around the local area at night, garden lamps can be placed along paths and paths.


Do beautiful vase using the papier-mâché technique - very simple
Home needlework is fascinating view activities. From the variety of ideas, it is easy to choose an option suitable for a particular interior in order to bring a touch of individuality into it in the form of an original home-made product.

Try, experiment and you will definitely succeed.
The ability to make beautiful, interesting and useful things with your own hands helps a lot when there is a need to save money. But this is not the only advantage of handmade. Needlework and creativity allow you to develop imagination, ingenuity and the ability to see new qualities of familiar things.
This is an amazingly exciting activity, which for many becomes a favorite hobby for life. Anyone who has a creative spark and a desire to create useful things for the dacha and at home with their own hands should try what do-it-yourself needlework for the home is and what an amazing feeling it is to create.
But do not be afraid of such a mega-task. In fact, doing a variety of crafts with your own hands is quite simple. At the same time, many hand-made ideas do not even require any investment. Interesting and necessary things for the home can be created literally from garbage. We offer readers all the most interesting for beginners and experienced needlewomen.
Useful Home Decor Ideas
The design of an apartment or cottage is the very first place and area where you can apply handmade ideas. Curtains, napkins, paintings, rugs, vases, dishes, furniture - all this can be done with your own hands. But you should always start with the simplest, then the creation process will go faster and more fun. For beginner needlewomen, we offer ideas for creating rugs for summer cottages and at home.
Woven rugs in vibrant wool
Even if you are not the most skilled embroiderer or you got acquainted with knitting needles in the fourth grade, and since then you have not met again, you can try to weave such bright rugs from ropes and multi-colored wool, as in the photo.

If you manage to find a couple of meters of coarse rope and a few old, worn-out woolen sweaters in the household, nothing else will be required.
The rope is twisted with a snail, as in the photo, and fastened with threads (each new turn just needs to be sewn to the previous one). Even if you are at odds with a needle and thread or you want to minimize the time it takes to make a rug, you can use glue gun. How to do this is shown in the video.
Such a rug can be made whole or from small circles, connecting them to each other, as in the photo.

As a basis for such rugs, you can use ordinary burlap. It must be glued to a twisted rope, as shown in the video. The burlap will fix the product even more reliably and will not allow it to fall apart over time during operation. By the way, many interesting things can be made from such a simple material as a thick rope. Ideas from videos and photos are suitable even for beginners.
Such a woven rug can be left without decor, as it is, or you can decorate it with multi-colored woolen pompoms and tassels, as in the photo at the beginning of the article. How to make an even pom-pom from woolen or semi-woolen yarn can be seen in our second video. Use bright threads. They can be obtained by unraveling some old sweaters that you or your children no longer wear.
The more fantasy is applied in the process of creating such a decor, the more interesting the product will turn out. Evaluate the design of the rooms in which you are going to lay such rugs. For a nursery, it is better to use the brightest and most colorful threads. For the hallway, a more concise and plain version is suitable.
Cork rugs: simple and bright ideas for beginners
Handmade crafts can be created from just about anything. Even the most seemingly unnecessary things can be applied to business and create amazing products from them that will not only diversify the design of the apartment, but will also be very useful for its residents. For example, it is worth making a very comfortable and almost non-wetting bathroom rug from the most common corks that remain in every home after the holidays (photo).

For the production of such an extremely necessary thing in every home, 200 pieces will be required. wine corks(it will take some time to assemble them) and a piece of polyurethane anti-slip underlay for carpets (sold in a building materials store). The production process of such a rug can be seen in our video. It is very simple: corks are cut in half and glued to the base. Better to work with a glue gun. This cuts production time in half.
By the same principle, you can make a massage mat from ordinary corks from plastic bottles (photo). Corks are needed different colors, so the whole family will have to collect them. When the kit is complete, use the glue gun and design the product as shown in the photo, or come up with your own version.

Simple video ideas: shaggy twisted yarn rugs
To create such a fluffy rug, as in the photo below, you will need about 0.5-0.7 kg of twisted wool yarn. You can use old clothes that you no longer wear. However, after the sweater or scarf is unraveled, the threads need to be straightened.

This is done simply: the threads are folded a couple of times into a small roll, and then suspended with a load. After the yarn sags and straightens, it should be cut into small pieces. The further process of making a fluffy rug is shown in the video.
Crafts for beginners from simple newspapers
Handmade ideas are so versatile that even the most banal items that are usually thrown away or, at best, used as packaging can be used to create anything. For example, many beautiful and useful things can be created from simple newspapers (photo). These are fans, bread bins, fruit stands, jewelry boxes, etc.

Before creating these amazing things, you need to prepare the material - tubes from newspapers. Of these, later you will weave your crafts that will decorate the interior of both cottages and city apartments. How to twist and color tubes from newspapers is shown in the video.
From it you will learn how to make the simplest container for painting, and get some other useful tips.

The photo shows how flat strips can be obtained from rounded tubes from newspapers, which are more convenient for weaving some products. To do this, just use a regular rolling pin to roll out the dough. A step-by-step diagram of weaving crafts from newspapers is shown in the photo below. You can fix parts of the craft in the process of work using ordinary clothespins.

Newspaper tubes can be used both in their natural form and dyed. A pattern can be applied to the lid or bottom of the craft, and in order for the product to become more durable, it should be covered with two layers of varnish. It will add shine and strengthen the walls of the craft.
For beginners, it is better to take more simple products such as a bread basket. How to weave a basket from ordinary newspapers is shown in the video tutorial.
As craftsmanship grows, crafts from newspapers will become more complex and skillful (photo).

Vine crafts for beginners and craftsmen
After you master the technique of weaving from newspapers, you can move on to working with a vine. How to weave from a vine, a video lesson will teach.
Willow vine is a light, flexible and environmentally friendly material that is a pleasure to work with and a pleasure to use. From the vine, you can weave not only coasters, fruit baskets and other utensils, but also flower beds and even a gazebo for a summer residence (photo).

Wood: ideas for those who love carpentry
The concept of "handmade" includes not only weaving, knitting and embroidery, but in general everything that you can do with your own hands. Are you familiar with an ax and a planer firsthand and do you know where you can buy furniture varnish and paint? Perfectly. Then try your hand at creating such things for giving, as shown in the photo.

1-2 logs, a couple of unnecessary wheels from a cart, a few dried tree trunks, a can of paint or varnish - and now your summer cottage is decorated with new benches, birdhouses and a train for kids. Experienced craftsmen can try their hand at larger tasks. For example, create a unique staircase from the trunks and branches of fallen trees (photo).

Mosaic from pebbles for cottage interior design
Not only wood and vine can be suitable for creating original gizmos for the home or suburban area. Even the simplest stones may well become an excellent building and decorating material. From river pebbles you can make a beautiful mosaic. First you will need to collect smooth rounded pebbles different sizes and colors (photo).

Choose a site where your mosaic will look best and cover it with a layer of sand.

Level the sand and draw a pattern on it, which will subsequently be filled with pebbles (as in the photo).

Stones need to be buried halfway in the sand so that they do not move to the side during work.

After all the stones are laid, they need to be leveled. Use for this wooden block and a mallet (or hammer) (photo).

When the drawing is ready, the space between the pebbles needs to be covered concrete mix so that the tops of the pebbles rise above its surface. Then the mosaic is thoroughly wetted with water and covered with oilcloth or tarpaulin for greater safety. She needs to be allowed to stand for 3-4 days so that the concrete finally “grabs” and fixes the stone pattern. When the mosaic is ready, lay out the rest of the path with stone slabs.

The design of the picture can be the most diverse: rhombuses, spheres, labyrinths, etc. If you have some artist skills, you can create paintings and entire stone “carpets” from pebbles. Use our ideas or come up with your own. The main thing is that the process brings pleasure. Then the products will delight with beauty and originality.

Almost every house has a lot of old ones that are often a pity to throw away - whether it's worn, but once beloved jeans or a blanket, a lampshade for a lamp or a table inherited from a grandmother. With a little imagination and patience, you can make these items with your own hands, which will favorably decorate the interior of your home. In addition, the completed craft can be an original and exclusive gift for your friends and family.
Opening the closet
The search for old things for needlework can start with a wardrobe. Surely somewhere on the far shelf there is an old favorite T-shirt or a worn sweater. Don't clutter your closet with things you don't use. Just give your rare jeans or blouse a new life!
Pants turn into... elegant shorts!
Handmade things will create a unique image and emphasize style. Worn jeans can be easily recycled into summer shorts. For this you will need:
- scissors;
- rhinestones;
- lace;
- a little fantasy.
Measure the length of your jeans and mark the line where you will cut excess material. Try to carefully cut the fabric along the dotted line. Do not throw away the trousers themselves. They will come in handy for the next craft. Now decorate the bottom by carefully tacking it. Pockets can be decorated with rhinestones. Thus, a new and exclusive thing was learned.
Denim crafts. Master Class
The remaining trousers can be used to craft one of the following items:
- a mini handbag (you will also need a cream-colored strap);
- sofa pillow;
- hot stand;
- case for mobile phone;
- cover for e-book.
These handmade things will be very useful in everyday life. To create a hot stand, we need:
- 20 identical denim strips (15-20 cm each) cut from the leg;
- lace;
- threads;
- scissors;
- sewing machine.
All denim strips are laid in a braided pattern. Each horizontal row is stitched (10 times in total). The resulting square is cut off at the edges to make them more even. In order for the craft to look neat, braid or lace is sewn around the perimeter. Unusual stand is ready!
Taking care of the printed word

If you're an avid reader and used to keeping your books organized, make a denim cover for them. Despite the fact that this craft requires a minimum of effort, you will get an amazing result!
Materials:
- trouser leg (preferably with a back pocket);
- glue;
- scissors;
- needle with thread;
- book.
Measure the amount of material needed for the cover. To do this, lay an open book on jeans and mark a dotted line for the cut, leaving 5 cm as an allowance. Wrap the book in a cut-out blank, sew the edges well. Decorate the cover with a denim pocket, sequins, rhinestones - whatever you want. Decorate the edges of the cover with lace or braid.
Unusual decor
You can also make interesting things with your own hands and profitably change the interior of the room, giving it originality. Those who have accumulated a lot of buttons can be advised to make simple, but very for the home, such as:

New interesting crafts with your own hands you can also make from disks that have become unusable. It could be like Christmas decorations, which even a child can easily make, as well as household items: chandeliers, curtains, caskets and much more. A lamp made of CDs looks very stylish and unusual. In order to fasten them together, you need to stock up on staples or metal rings. Holes in the discs must be done with a screwdriver.

These items, made by hand from old things, look very beautiful and unusual.
In the shop for craftswomen
You can make interesting things with your own hands using special material that is sold in any needlework store. This can be yarn, the basis for embroidery with a pattern, special paper, etc. This material is intended for practicing certain types of needlework: macrame, patchwork, decoupage, quilling, etc. Knowing the basics of work in this area, you can perform unusual crafts. A master class of this kind of classes is presented below.

We collect on a patch
Recently, patchwork has become an interesting and very popular type of needlework (translated from English means “work with a patchwork”). From scraps of fabric, skilled needlewomen create real masterpieces of art: blankets, rugs, carpets and even curtains. In order for the work to turn out to be of really high quality, it is necessary to select fabrics that are similar in texture. It is also desirable that the patchwork pattern is in harmony with each other. It is necessary to cut out pieces of fabric, taking into account allowances - from 0.5 to 1 cm. The cutting of the material is carried out along the longitudinal thread. Wash and iron the fabric first to prevent shrinkage. The material can only be drawn with soap, pencil or chalk, but not with a pen - there is a risk of traces on the front of the product.
Blanket "Spring mood"
For manufacturing, you need to prepare:
- green, pink, yellow, orange and blue fabric;
- soap, chalk or pencil, ruler;
- template - square 6 x 6 cm, rectangles 24 x 6 and 12 x 6 cm;
- scissors;
- sewing machine;
- a piece of fabric 111 x 83 cm (for the wrong side of the product);
- sintepon.

Prepare the fabric: wash, dry and iron. Lay out the prepared cardboard templates on the material. Cut out 12 squares of pink, blue, green and yellow, leaving a 1 cm allowance. In addition, you will need 60 squares of the same size but in different colors. With them you will sheathe a blanket around the perimeter. Prepare 24 strips of 24 cm long and 6 cm wide from different fabrics and 24 strips of 12 cm of the same width.
We begin to sew: take 4 squares of 6 cm in different colors and sew them together. Then sew 4 strips of the same color along the perimeter of the resulting product: 2 short strips on the sides, 2 long strips on top and bottom. In the same way, collect all the other squares. Sew the resulting products together. You should get 4 large squares in length and 3 in width.
The next step is to sew squares (set aside 60 pieces) around the perimeter of the blanket. The order of their arrangement by color is completely up to your imagination. It is now necessary to sew a fabric measuring 83 x 111 cm to the blanket (3 cm per allowance). Connect the 2 sides to each other with the right side inward. After you have sewn 3 sides, turn the product inside out and stuff with padding polyester. Then carefully join the 4th edge (by machine or by hand). Soft and beautiful blanket is ready!
In exactly the same way you can also throw blankets. Creative things (with your own hands), the photos of which are presented in this article, bring warmth and comfort! Try doing them yourself.
Crafts ... from food

You can even make things for the home with your own hands from food: various cereals, pasta, dough and even sweets. With a little imagination, you can make paintings, pendants and even watches! Buckwheat or rice must be glued to PVA glue on a pre-prepared template. Groats can be painted - and the picture will sparkle with all colors. Involve your child in the work - this will help him develop fine motor skills hands and imaginative thinking. In order to create, you can use coffee beans. You can also make other interesting things with your own hands from this material, for example, a chic bonsai tree that will delight you and those around you with its original look.
Part of the East
To create a bonsai tree you will need:
- balloon;
- PVA glue;
- brown threads (slightly thicker than nylon);
- thick branch;
- flower pot;
- pebble.
The balloon must be tightly wrapped with a thread dipped in glue, set aside. The workpiece should dry for at least 4-5 hours. Next, the balloon must be pierced and carefully removed. On the remaining base, planted on a harvested branch, you need to glue coffee beans. The branch should be strengthened in flower pot using a pebble. A beautiful tree is ready!
Now you know that making things for the house with your own hands is interesting and useful!
Going through the little things that have accumulated at home, you often wonder: what can you do with your own hands at home with all this so that the products are of high quality, beautiful and functional?
I speak from my own experience: sometimes everything that separates us from the great homemade products- this is your own insecurity and absence.
On the Internet, you can find many workshops on making things from a variety of improvised means: plastic tableware, purchased blanks, pallets, old tires, etc.
But you must admit: rarely does anyone really have old tires from Kamaz lying around at home, from which you can make a pouf, but there will be difficulties with pallets if you don’t have your own cafe or shop.
We propose to go the other way and solve two problems at once in one fell swoop: do without costly purchases and concentrate on eco-handmade from natural materials which can be easily found at home.

Postcards, decorations and crafts
The simplest of those things that you can do with your own hands at home are small items made of paper, fabric and simple designer decor details.
The creation of these little things is well suited, as it develops fine motor skills of the hands and stimulates the unbridled creativity of the little ones.
But it cannot be said that the occupation is purely childish: many adults, carried away by handmade, make amazing things from simple materials and even on them, selling on the Internet.
Postcards
Let's start with the simplest. Colorful homemade postcards, with some diligence, are not inferior in beauty and quality to purchased ones.
Tip: if you were suddenly invited to, and you think what you can do with your own hands at home and present to the birthday man, start with a postcard. It's simple - even a novice handmaker can handle it, and the memory and pleasant emotions from such a gift will remain for a long time.
There are many options for postcards: simple (flat), opening, with three-dimensional figures inside; made of paper or fabric; decorated with applications, drawings, inscriptions, etc.
 The simplest and at the same time original gift can be a postcard made by one's own hands.
 As for materials, you can find everything you need to create postcards at home.
The obligatory minimum is a pencil, pen, scissors, PVA glue and, of course, paper (preferably thicker - drawing paper or thin cardboard).
And here's what else you can use to create postcards:
- Colored paper. These do not have to be new sheets - trimmings left over from the child's crafts will do.
- Foil from chocolate and sweets.
- Unnecessary details from old jewelry: cabochons, rhinestones, etc.
- Fabric scraps. Almost any will do, but it is best to take samples without fluffy pile.
- Threads.
- Colored pencils, pens, markers. For the design of the inscriptions, you can take black or colored liners - they practically do not smear and draw with clear lines of a given thickness.
- Watercolor paints. If you have school-age children, then there is a simple set of watercolors at home - they are quite enough for crafting postcards.
 To prepare a souvenir, the remnants of bright, fabric, beads, ribbons will come in handy.
 In addition, you may need a clerical knife and superglue ("Moment", "Second").
The list of materials can be continued for a very long time, because literally anything can be used to create postcards.
At one time, I got myself a special box in which I put any little things that seemed suitable to me - even if I didn’t have specific ideas for using them at that time.
Experience has shown that in the end absolutely everything is used.
 The main thing is to stock up on patience, free time and a desire to please loved one
 Tip: to make your postcards look stylish and harmonious, remember the most popular formats for making them: a rectangle 105x148 mm (A6 format), an elongated rectangle 98x210 mm, squares 140x140 and 120x120 mm.
Let's look at how to make a regular A6 postcard with your own hands.
- The first step is to prepare the base. Let's take the option that you will definitely find at home: a regular A4 sheet. Fold it in half along the wide side, making sure that the edges meet very precisely. Glue the sheet so that the halves fit snugly together. Let it dry, then fold over the wide side again. The basis for the postcard is ready.
- Now come up with a design. Consider the available materials, think about which ones you want to use, which ones work best with each other. You can draw a sketch on a separate piece of paper. Visualize as much as possible in your head the card you want to make - and, having selected the right materials, get to work.
- Process the decor elements. If you decide to place a curly paper or fabric application on a postcard, cut out the required shape in advance. Prepare everything that you will attach to the front of the postcard: colored paper, bows, rhinestones, fabric, etc.
- If you don't want to leave the background of the card white, now you need to color it. Take your watercolors or markers and apply a light coat suitable color. The effect of antiquity on paper can be given by painting it with tea or coffee. And if you throw a few grains of salt on wet watercolor, you get beautiful snowflake patterns. Remember to let the paper dry after painting.
- Decorate the front side of the product with the prepared decor.
- Sign the card on the spread, accompanying it with a beautiful poem or just a short congratulatory phrase.
 The original homemade postcard is ready!
 Do not limit yourself in experiments and flight of fancy.
Try different styles and materials, sizes, and paper options. Look for your own author's handwriting and, most importantly, do not give up trying if the first results are not to your liking.
As in any business, everything depends not only on talent, but also on perseverance and practice.
Decorations
Among the things that you can do with your own hands at home, jewelry is one of the most popular options.
You can wear them yourself or give them to someone, or you can sell them, receiving not only pleasure from your own, but also material rewards.
 Kids just love these original popsicle stick bracelets!
 The simplest option for the manufacture of which you can involve young children is bracelets from ordinary wooden sticks from ice cream.
It should be honestly noted: such bracelets, both in size and in style, are primarily for children.
Little needlewomen and craftsmen are happy to take part in the creative transformation of familiar objects into bright jewelry - especially if you then decorate the bracelet in any way they like.
These bracelets are very easy to make. You will need:
- Ice cream sticks (one per bracelet)
- Glasses of suitable diameter
First, place all the sticks in one container and fill with water so that it completely covers our workpieces.
Since they are wooden and float easily, cover the container with a lid or something else.
Check the sticks after a while. Well soaked, they will begin to bend without breaking.
Then they need to be placed in a glass, bending inside or outside close to the walls.
I prefer to wrap the sticks around the glass, pressing on top with strong rubber bands: so ready product rather take the desired shape.
Leave the blanks to dry in a warm, dry room.
After complete drying, the bases will remain curved, and it will be possible to start decorating the product.
A wooden bracelet for a girl can be decorated with rhinestones, turning it into an accessory of a real princess, and a bracelet for a boy can be decorated with the emblem of your favorite superhero.
 Another useful cuteness is a jewelry stand.
 Tip: for gluing decorative elements to wood, it is better to use superglue, and after painting it is worth varnishing the product.
Bracelets are rich ground for creativity. What you can do with your own hands at home, having a fishing line and beads at hand, is easy to imagine.
But I propose to pay attention to more non-standard products - woven Shambhala bracelets, which are great for both adults and children from 12 years old.
Such a product, made independently - and a talisman, and stylish accessory, combining patterned weaving with beads.
 Popular Shambhala bracelets can be easily made with your own hands
 To weave Shambhala you will need:
- An odd number of beads made of wood or natural stone.
- Two smaller beads - for the clasp.
- The base cord is so thick that the selected beads can be freely strung on it. Take the length of the base cord based on the circumference of your wrist plus ten centimeters on each side for fasteners.
- The cord of the main weave is three to four times longer than the base (it is better to take a longer one for the first samples). Thicker threads are well suited for braiding.
- One lace about forty centimeters long for making a fastener.
It is convenient to weave Shambhala bracelets from waxed threads, but it is not necessary to run after them to the store. Experiment!
I wove one of my coolest bracelets from ordinary twine and a strong “iris” thread at the base.
Tip: to make Shambhala smooth and fine, fasten the weave. For this you can use tight stationery clip and a planchette (or book cover).
We start to weave. About ten centimeters from the end of the warp cord, tie a knot of thread for the braid - so that it divides the thread into two tails of equal length.
Now you need to knit knots from these ponytails around the base cord, alternately threading one thread under it and the other over it.
Having made the desired number of knots, string the first bead onto the base and continue braiding immediately after it.
Alternate beads with weaving knots, using gaps to your liking); at the end, do not forget to knit the same number of knots of simple weaving as at the beginning. Finish with a knot.
 Making designer jewelry may well be for you additional source income
 If you used a natural thread, apply a drop of PVA glue to the final knot, let it dry, then cut off the excess cord.
If the thread was synthetic, carefully cut the ends and burn the tails with a lighter or match - of course, being careful.
Let's go to the castle. Take the ponytails left on both sides of the bracelet, fold them together and tie with several knots of weaving using the third cord.
Fasten the lock in the same way as you fastened the bracelet. Put small beads on the remaining tails of the base cord and tie knots at the ends.
So your own beautiful Shambhala bracelet is ready.
Congratulations! This activity is fascinating, so do not be surprised if after a while you give these amulets to all your friends and you will think about what to do with new products.
Sell - let others appreciate your talent!
crafts
What can you do with your own hands at home for children under 10 years old? Of course, toys will be a win-win option.
Usually for sewing dolls you need a lot additional materials like special fillers, and sewing skills above the base level.
But there is also such an option that the children themselves will cope with (and will be happy to help you): these are motanka dolls.
 Encourage your child to make a cute winding doll
 To make them, you will need assorted pieces of fabric - any pieces of old unnecessary clothes will do.
For the base, the body of the pupa, it is better to choose something light: an old white sheet or thin burlap, but for clothes you can take any color you like.
You will also need ordinary sewing threads, optional ribbons and other little things for decoration.
The doll is made like this:
- Roll one piece of fabric into a three-dimensional rectangle or cube. This is the basis of the motanka's head.
- Put a square piece of light fabric on it, gather it on one side and wrap it with sewing thread. There is no need to make knots: a large number of threads will fix itself and will not unwind.
- Take another square piece of light fabric. The length from corner to corner is our doll's arm span, so choose accordingly. Roll this cut into a roll, wrap the “wrists” with sewing threads.
- Tape the "sausage" of hands to the body of the chrysalis under the head. It is best to do this by winding the threads crosswise.
- Choose a few different-colored pieces of fabric for the doll's clothes. Make a skirt, preferably with two or more layers of fabric: it looks very cool. Secure the skirt with thread, twine or ribbon.
- Another piece of fabric will go to make a scarf. Fold a triangle from the cut and tie on the doll's head.
Traditionally, motanka dolls are made without faces - these are impersonal amulets.
I know that faceless dolls scare some people, so if you do not put any additional meaning into it, then you can safely embroider or draw a face on the fabric, giving your doll personality.
 Such a doll will simultaneously become your personal amulet.
 Today you have learned how to create a variety of beautiful and useful things, and I am sure that you will be able to expand your handcrafting skills arsenal even further.
For inspiration, I suggest watching this video on the topic of what you can do with your own hands at home:
 Blood thinning products: recommendations and prohibitions
 Tank legend, fighters and equipment for the Arctic: what will be shown at the Victory Parade How is the Victory Parade
 Helba yellow tea: properties and reviews