Scherhebel is a popular description for a teenager. Manual plane. Types and device. Application and how to choose. Finishing planers
The choice of the planer becomes no less important process than the direct use of the tool. The plane is an indispensable tool for any carpenter, regardless of whether he is an amateur or a professional. With its help, any wood surface is processed. On this moment There are two main types: hand-held, which is a traditional instrument, and electric instrument, which is gradually replacing its predecessor from use. That is, the second type is better. Below are the characteristics of the planers and considered how to choose it.
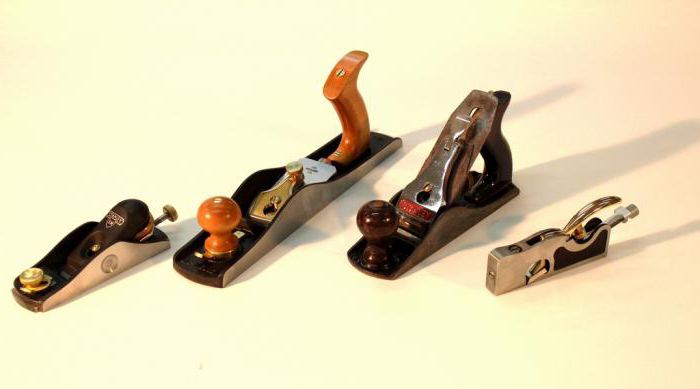
What a hand plane consists of
This type of planer, as a rule, consists of the following elements:
- a body on which other constituent elements are attached;
- the slot from which the shavings are ejected and in which the knife is fixed;
- knife or cutter - a sharpened steel plate that directly cuts the material;
- a wedge or clamp with which the knife is pressed against the body;
- shaving thickness regulator;
- two handles (front and back);
- a chipbreaker that breaks off and rolls up chips;
- cutting width regulator;
- frog - plaque, which adjusts the angle of inclination of the knife.
How to choose a hand plane?

Small planers are used for error correction and finer work.
Choosing a manual plane, you need to know its functional features:
- the material is directly processed with a cutter installed in a special hole;
- the degree of sharpening of the cutter corresponds to the quality of wood processing;
- the correct choice of the angle of placement of the knife reduces the likelihood of creases during work.
When choosing a plane, it is best to pay attention to the following characteristics:
- how well the cutter is sharpened;
- the gap - the wider it is, the better quality processing;
- the angle of inclination and cutter, which is inherent in each type of work.
Depending on the goals that need to be achieved, such planers are distinguished:
- Planers: planes damaged or uneven surfaces.
- Small planers: for performing finer work and correcting mistakes made.
- Jointers: for surfaces with large parameters.
- Scherhebel: for the initial processing of wood.
Electric planer
However, it should be remembered that an electric plane has a significant advantage over a manual one: high productivity in conditions of a larger volume of work, a small amount of effort expended, a more perfect result, etc. The electric plane consists of the following elements:

- the body where the main parts of the tool are located;
- a handle (one or two) for guiding the tool;
- start button and lock button (prevents arbitrary start of the tool);
- processing thickness regulator;
- chip ejection branch pipe;
- parallel emphasis;
- the sole, which consists of a rough part that contacts the surface during processing, and a smooth rear part;
- drum where tungsten or steel knives are installed;
- knives;
- an electric motor driving a drum with knives;
- belt transmission from the motor to the knives.
Electric planers are typically 600 to 900 watts in power and above 10,000 rpm in speed. Moreover, the higher the power and speed, the better the processing quality. Household planers are characterized by lower power and lower speed. Professional planers, respectively, have above average speed and power.
It should be remembered that amateur planers periodically need rest due to overheating, professional planers work much longer.
How to Choose an Electric Planer?

It is necessary to decide on the tasks at hand before choosing an electric plane. When choosing an electric plane, you should be guided by technical and functional indicators.
Technical indicators when choosing a planer. Knife width and quality - a wide cutter means fewer surface passes. This ensures not only the quality of processing, but also reduces the amount of time to complete it.
The amount of power. This indicator indicates the productivity of the electric planer and the quality of the work performed. Accordingly, the higher the power, the better these indicators.
The number of revolutions. Like the previous point, a high RPM provides a smoother and better finish. Fixed mount function. Allows you to use the plane as planer and point the board at him.
The stated operating time. Based on the functional purpose of the model (domestic or professional use), the possible permissible period of work fluctuates. So, professional electric planers have no restrictions, but amateur ones do. For example, 20 min. work, and then a 10 minute break.
Availability of accessories for sampling a quarter. These are additions to the equipment in specific models of planers, which allow you to adjust the parameters of the depth and width of the cut. Thanks to these functions, it is possible to tightly join the boards together.

The choice of a planer based on functional indicators involves paying attention to the following.
Sole. It has two parts. The back, which is in contact with the already treated surface, must be very smooth so as not to scratch the wood. The front can be rougher as it comes into contact with untreated wood. During work, an air gap forms between the surface and the sole, which negatively affects the accuracy of work and the thickness of the cut. This problem is eliminated by placing parallel or V-shaped grooves on the sole, which provide chamfering. Better to give preference to planers with adjustable height soles.
Pens. Planers can be with only one back handle, and with two - front and rear. Considering the bulkiness of the tool, planers with two handles are more reliable. The front handle guides the plane in the right direction, the back handle applies the right physical strength.
Chip thickness regulator. Typically, the slider pitch is 0.1 mm. Most models of electric planers have a regulator scale from 0 to 3 mm, but some remove chips even at a value of 0. Therefore, it is better to choose planers with a scale from 0 to 3 mm, and, if possible, with a minus value.
Knives. The planer drum houses two removable tungsten carbide knives. Sometimes the manufacturer installs steel knives. They are more durable, they can be removed, sharpened and further used. Steel knives are heavier to fit on the planer drum. Some planers have only one spiral blade for faster, better chip removal. Replacing such a knife is not difficult.
Security elements. These include the lock button, which is located next to the power button. Without pressing the first button, the second will not work. This prevents the tool from starting randomly. It is also important to have protective elements knives: plates on the sides of the planer, covering the edges of the drum, as well as a stop that protects the fingers and the surface from contact with the knives.
Ejection of shavings. A huge amount of shavings is produced when working with a plane, including flying to the carpenter. The advantages are of planers in which the direction of chip ejection is adjustable. The possibility of attaching the waste bag is important, but it should not be cumbersome. This issue can be solved by attaching a planer to a vacuum cleaner.
The presence of an attachment that ensures the use of the planer as carpentry machine... This increases the versatility of this tool. Side stops, depth gauges. Their presence allows the joiner to comfortably adjust the width and depth of cut of the chips.
Ease of use. Comfortable handles with well thought-out button positions provide more comfortable work, prevent premature worker fatigue.
It is not enough to choose a plane suitable for your tasks, it is important not to forget about buying a high-quality power cord of the required length.
A plane is a device for planing wood. Most often this tool is hand held. With the help of a planer, the surfaces are given the necessary roughness, flatness, and straightness. They reduce the size of products or make long grooves in them. The job of the planer is to remove chips of a specific thickness during each pass over the surface of the workpiece.
The main components of the plane are:
- block
- wedge.
By size, purpose, equipment additional devices there are many types of planers. However, there are only two modifications:
- manual (mechanical) - can be plastic, metal, wood or combined. All of them differ little in their functionality, however, the technical indicators directly depend on the material of the case.
- electric - due to additional equipment electric motor, such a tool can perform a large amount of work when high speed processing.
The hand planer made of wood is the most popular option for woodworking among home craftsmen.
Classification
Planing of wood can be flat or curly. The following types of planers are intended for flat planing:
- single planers. They are necessary for the implementation of the procedure for leveling the wood surface. They have a straight blade with a slightly rounded edge. After work, such a tool does not leave burrs and irregularities, for this reason it is actively used for fine planing of wood after rough processing.
- a cross-cut planer, in addition to processing the ends, is used for finishing alignment wood. In this device, in addition to the blade, there is also a knife for breaking chips.
- Sherhebel, unlike previous versions, has a rounded blade located at an angle of 45 ° to the sole. Due to the oval-shaped edge, it is possible to process wood material across the fibers. In order to remove thick chips, the hole for its exit in this tool is 3-5 mm higher than in other options. After this device, a rough surface remains, which needs to be finished with a jointer
- grinder. This unusual name is given to the grinding planer, which has a double knife and a chipbreaker at an angle of 50 ° to the work sole. Such a device is excellent for the resurfacing procedure. At the end of the work, an absolutely smooth surface remains
- the jointer is necessary for leveling the edge and plane, and it provides finishing of large surfaces thanks to sharp knife with a chipbreaker and an elongated shoe. This tool should be in every workshop where woodworking is done.
- tsinubeli. Such planers have a single serrated knife, which, after moving on wood or plywood, leaves behind a corrugated surface. It is this surface that is ideal for bonding. The grooves created by the cutter ensure better adhesion of the parts to which the adhesive is applied
- roughing planers are necessary in the process of leveling the ends on gypsum plasterboards. No sanding is required after using this device sheet material... The cutting element is created in the form of a grater
 In the process of figured planing, planes are used, which are designed to process grooves, protrusions and edges. Such tools can cope with the most difficult tasks, for this reason they are quite in demand in the woodworking industry. For curly planing, the following types of planers are used:
- The zenzub is designed so that it can be used to select and clean out quarters, create rectangular cuts, grooves and folds. In addition, they are not suitable for rounding perpendicular elements of workpieces. The chisel cutter has the shape of a blade, the edge of which can be straight or oblique. It all depends on how the edge is attached to the sole. The teeth form a groove " dovetail". Even when processed across the grain, a perfectly smooth surface is obtained
- cantenhobes. This type of planer is an edge cutter that easily handles chamfering, end and edge trimming to give them flat surface... In addition, such a plane will help to fine-tune the given dimensions. The main difference between the catenhobel lies in the trapezoidal shape of the blade. Some models are equipped with two cutting elements at an angle to the side of the sole
- tongue and groove can be called a common type of plane. It will help you quickly and efficiently create longitudinal groove... The groove has two pads, which are connected with screws, one of the pads is a guide, and the other secures the blade. With an adjustable stop, the edge of the groove can be set at a specific distance from the edge. Thrust protrusion guarantees penetration to the required depth without the risk of blade bending
- Federgubel is a figured end planer, the task of which is to form a longitudinal protrusion along the edge of the workpiece. This work is provided by a special shape of the blade, in the center of which there is an opening. In the process of working with such a tool, a kind of ridge remains on the surface, which in the future will be docked with a groove for connecting two parts
- kalevka has an unusual replaceable blade with a curly cutting edge. In addition, there is a multi-stage sole. Most often this device is used in the creation process decorative details, for example, cornices, baguettes and others wooden elements serving as interior decoration
- The falzgebel will help to create a groove along the edge of the workpiece without preliminary marking. Like the kalevka, it has a multi-step outsole. The tool has a wide last, as a result of which it is possible to create grooves of the same size. If it becomes necessary to process the vertical wall of a quarter, an additional side cutter is placed on the seam furniture
- staples. Such a tool is needed to form round edges of the part. This planer is equipped with a blade with a semicircular recess edge. Based design features, the staple has a concave sole. During the processing of the edges of rectangular ends, the knife removes the chips so that the edge becomes rounded.
Hand planer knife
A hand-held wood plane cannot work without a knife. Such knives function under conditions of significant blade loads. During the reciprocating movement of the tool, the knife cuts into the wood to a specific depth. Since wood does not differ in plasticity, a certain layer is chipped off and chips are formed. The chips do not have a significant length and are quickly split into smaller fractions. This is observed during the "creep" of wood cut from the workpiece onto the inclined edge of the blade. During the next movement of the planer, a crack is formed in the subsequent layer, and so on.
The smaller the span and the planing depth, the smoother and cleaner the surface of the workpiece is, at the same time the shear load on the blade decreases.
Due to the fact that the chips break off when bending with an exit upward, then the most high voltages are created in the planer block. That is why the last is made from the hardest types of timber.
The knife has a working and supporting parts. In the configuration of the working part of the knife, there are:
- a chamfer formed on the back of the blade. The chamfer guarantees a reduction in the force of cutting the knife into the wood due to the elimination of friction of the rear part against the workpiece material
- rake angle... It most often coincides with the accepted inclination of the knife in the planer body.
- chamfer clearance
- working angle of sharpening. It is equal to the difference between the values of the chamfer angle and the angle of inclination of the knife in the plane.
- The rake angle is the most important for the durability of the planer: it is this angle that ensures the smoothness of the planed surface, the conditions for removing chips from the processing area, as well as the load on the blade itself.
The working edge of the knife is an edge with a small radius of curvature. Before you start sharpening, you need to visually check the integrity of the edge: there should be no metal breaks on it. If such defects are present, then the knife will have to be shortened.
To keep the corner radius as low as possible, sharpening should be done in two stages. First, the primary sharpening is carried out. To do this, a blunt knife from the side of the chamfer must be brought to the periphery of the grinding wheel and pressed firmly. The number of revolutions of the sharpener should be at the level of 600 - 700 min-1. Otherwise, too much metal removal will result. It is also important not to overdo it with pressing, because blue-violet hues can form on the steel, which is an unpleasant sign of metal tempering. The hardness of the knife will decrease, and it will be necessary to heat treatment to restore strength characteristics material.
 If there is no sharpener, you can do this. Sharpen the knife with a coarse sharpening bar, which must be fixed on a working workbench. Sharpening is performed by circular movements of the chamfer along the surface of the bar. During this work, it is worth moistening the knife from time to time with water or soapy water to clean the sharpened surface and cool the tool.
When you see burrs, then you can proceed to the second stage of sharpening with a finer-grained bar that removes those same burrs. The granularity of the bars looks like this:
- high grain size from 30 to 180 microns. Such bars are made from silicon carbide or corundum.
- average grain size from 7 to 20 microns. Such bars are created from fused corundum or chromium dioxide.
- small grain size from 3 to 5 microns. This material is used for the final sharpening of knives.
At the end of sharpening with a knife blade, you need to hold it over a piece of hard wood. It will permanently remove the burr fragments.
The hand plane is a woodworking planer used by carpenters and joiners. It is used to give the wood surface the desired shape with straight lines. With the help of this tool, workpieces are processed to the required parameters, and various joinery connections are created, such as a tenon-groove and a quarter cut.
Planer design
The hand plane is a fairly simple construction, which consists of a block with a flat sole. It can be made of wood or metal. Handles are installed at its ends. The front is designed to be gripped and held by the hand, while the back provides a comfortable grip for pushing movements. Closer to the rear handle of the tool, there is a clamp into which a hard steel knife is mounted. The block has a through slot through which the knife extends.
There are both more complex, but easily customizable designs of planers, and the simplest, in which a wooden wedge is used as a clamp for a knife, hammered in with a hammer. At correct setting similar tools have the same cutting characteristics. The main criteria that are set for planers are the sharpness of the knife and the material of manufacture. The angle of sharpening of the blade is adjusted to certain material to be planed. This is due to the fact that different breeds wood has different hardness.
A particularly important criterion is the flatness of the sole. In wooden planers, it deforms over time as a result of abrasion. In addition, when wet, such a tool can bend, making it unsuitable for further use. Metal pads are much better in this regard, but in most cases they are made of steel, which is prone to corrosion. As a result of prolonged non-use of the tool, it becomes covered with a layer of rust, which occurs even when it comes into contact with moist air. As a result, the workpieces are soiled during operation.
The big disadvantage of metal pads is the presence of casting errors. If the sole is made helical, then it is impossible to ensure perfectly even planing. In this regard, before buying, it is important to carefully evaluate the smoothness and evenness of the sole surface so as not to get a bad tool. In the case of wooden planers, the presence of defects in the sole can be solved by working.
Varieties of planers
It is worth noting that the manual plane, unlike the vast majority of other carpentry tools, has many varieties. The design of each modification is tailored to fulfill specialized tasks. Doesn't exist completely universal design that will allow you to do any work. In total, it divides 2 groups of planers:
- Direct planing.
- Figured planing.
Manual flat planer
The category of flat planers includes:
- Single.
- Double.
- Sherkhebeli.
- Sanders.
- Jointers.
- Tsinubeli.
- Roughing.
Single hand plane designed to level the surface of the wood to obtain an ideal plane. It provides a straight blade with a slightly rounded edge. Due to the absence of sharp corners at the ends work surface blades, no grooves remain on the workpiece when moving. Such a tool allows you to correct rough work after a saw or an ax.

Double has a similar design with a single blade, but is supplied with an additional knife that breaks the chips. It is used for finishing leveling and allows you to achieve a smoother surface that practically does not need to be rubbed with sandpaper.
Sherkhebeli have rounded blades that are set at a 45 degree angle to the side of the sole. The oval edge allows planing across the grain. Also, the features of this tool include a fairly wide clearance for removing chips, which, depending on the modification, is 3-5 mm. Such a tool is excellent for rough machining. It provides quick chip removal, but the resulting surface will have roughness and notches that require additional processing.

Sanders are planers in which the blade is located at an angle of 50 degrees. This tool is equipped with a double blade and a chipbreaker. When removing wood, a very high quality smooth surface is created, which does not need additional refinement. Grinders are usually used after the workpiece has been cut with coarser tools. The task of such planers is to bring them to a perfectly smooth finish.

Jointer Is a finishing tool that is used to remove chips on large surfaces. It is characterized by a long block, so it effectively removes the protruding parts of the wood, while bypassing the recesses. In fact, the longer the jointer, the more ideal results you can expect after finishing work. The jointer is the most common type of planer that can be found in any workshop where professional woodworking is done.

Tsinubeli have a single serrated knife, which, unlike conventional instrument Creates a grooved surface commonly used for gluing workpieces. By simply preparing the two pieces of wood with a zinubel, you can increase the direct contact area when seated. This increases the strength of the bond. From an aesthetic point of view, the created grooves are not particularly attractive, so this tool is not used for other purposes.

Rough the hand plane is a completely different design from the classic one. Its sole is a metal grater. The tool does not have a knife. It is used exclusively for leveling the ends of drywall. Such a grater allows you to correct defects that were made during cutting. drywall sheets before assembling them into various designs.

Planers for figured planing
This category of tools is intended for creating grooves, as well as processing protrusions and edges. With the development of the electric tool and the emergence hand milling cutters a similar instrument faded into the background, but is still found in workshops.
Figured planers include:
- Zenzubeli.
- Kantenhobeli.
- Shpuntubels.
- Federgubeli.
- Kalevki.
- Falzgebeli.
- Staples.
Zenzubel is a narrow plane with which you can select a quarter. Also, thanks to its narrow dimensions, you can remove the end of the workpieces to get a groove. There are various modifications of this tool designed to work with wood along and across the grain. In most cases, this tool is chosen for finishing on an already formed rough surface.

Cantenhobel- This is a fairly compact hand plane that is used for chamfering. With its help, the ends are processed, giving them a more pleasant surface. This tool has a trapezoidal blade shape. Usually a cantenhobel has one cutting knife, but there can be two. The cutting edge is angled to the side of the sole. With the help of such a tool, finishing processing is carried out, which requires minimal correction with a sandpaper or a file.

Tongue and groove- This is a specialized manual plane with which a groove is selected. The tool is easily recognizable thanks to the double sole. One block serves to guide the trajectory of movement, and with the help of the second, the blade is attached. Such a plane can be adjusted by changing the distance between the two blocks, thereby adjusting the distance to the processed edge.

Federgubel- this is end tool, with the help of which the longitudinal protrusions of the workpieces are processed. It has a special blade shape with a rise in the center. As a result of processing the end of the board, you can get a longitudinal tenon used for gluing with another part, in which a groove of the same size has been previously made.

Mold one of the most unusual planers, which allows for curly processing of workpieces. It is applied to the production of curtain rods, as well as baguettes and decoration doorways... The sole of the peck has a stepped shape, which is reflected in the mirror image to the workpiece.

Falzgebel- it is also a highly specialized plane, with which you can form a strip along the edge of the workpiece, without preliminary marking. The falzgebel has a similar sole to the knuckle.

Stap Is a small hand planer designed for rounding edges. Its blade has a semi-rounded recess. In addition, you can recognize a similar tool by the concave sole. This design soles and knife allows you to make a rounded shape from the ends.

Planer setup
The planer adjustment consists in adjusting the height of the blade point coming out through the sole. The more the cutting edge protrudes, the thicker the chips removed and the lower the quality of the resulting surface. Insufficient blade output removes too thin chips and therefore takes a long time to process. If an excessively large gap is set, the wood fibers of the workpiece may be damaged, resulting in chips, especially if the knife is not sharp enough.
The magnitude of the exit of the knife differs depending on the modification of the planer. If necessary rough processing, then the overhang is set at 0.5 mm. If the tool is adjusted for finishing, this value is reduced.
In order to extend the knife, it is necessary to loosen the fastener and hammer it down a little with a mallet or press it down with your fingers. It should be borne in mind that in the case of excessive protrusion of the cutting edge from the side of the sole, it cannot be returned by blows on the sharp part, since this will damage the sharpening. In this case, you will need to completely loosen the adjusting screw and pull the blade back out.
Despite the wide range of electric planers offered by stores, ordinary hand tools... The fact is that with their help, wood processing can be done somewhat better. Most often, modern carpenters have in stock both types are used in the initial processing of blanks, and manual is used for fine-tuning them.
Design features
To know how to choose a good hand planer, you need to have an understanding of its design. Such tools consist of the following main parts:
Frame. This structural element is most often made of wood. It is in it that all the main units of the plane are attached.
Knife. Sharpened at a specific angle.
Clamp. Can be executed from different materials... It could be metal plate or a bar.
Chipbreaker. Installed slightly above the knife. As you can already judge by the name of this element, it serves for breaking the chips and their direction.
Adjusting screw. This structural element is responsible for changing the position of the knife relative to the work surface.
All universal hand planers for wood have this design. The basic elements described above are also found in other specialized varieties. On the body of any planer, among other things, there are two handles.
What to look for when choosing
The main element of the planer is the knife. It is on its quality that you should pay attention first of all. This element must be made of high quality steel. In this case, the plane can be used for as long as possible without the need for sharpening. Of course, it is visually difficult to determine how successful the material was chosen for the plane knife. Therefore, first of all, it is worth paying attention to the reputation of the manufacturer.
Of course, in no case should he stagger. When buying, it's worth checking the front handle as well. She must also hold on tightly. In addition, when choosing a planer, you should pay attention to the dimensions of the handle for right hand... The length of this element varies. A tool with a small handle may simply not work for a person with large brushes.

Varieties
Of course, you should choose a manual plane based on what specific purposes it will be designed for. Today, there are several types of planers on sale. The most popular are:
Universal. This is an ordinary plane that can be used for most carpentry work.
Jointer. The body of this instrument is longer than that of a conventional instrument. A jointer is used for processing dimensional workpieces.
End planer. The knife of such a tool is located at a shallower angle. This allows for high-quality processing of just the end fiber.
Zenzubel. This type of planer is mainly used for sampling different kinds and folds.

Reviews about the brands of planers
In the modern market, this type is sold from different manufacturers. Many brands are of very good quality. For example, planers from companies such as Bailey and Handyman deserve good reviews from craftsmen. Bailey tools are valued primarily for their excellent knife quality and long service life. Sharpening of a hand planer knife of this brand is done quite rarely. Sometimes there are comments that mention a poor build. But even if any flaws are found in the purchased instrument, they can usually be easily and quickly eliminated, and on their own. Handyman planers, judging by the reviews, are also convenient and reliable. Their only drawback is not too neat design.
Do not advise experienced craftsmen purchase products of the Groz brand (India). Despite the fact that the products of this brand are classified as expensive, especially good quality they, judging by the reviews, do not differ. Their build quality is simply disgusting, and at the same time it is inconvenient to work with them.
How to use
Hand planers for wood are simple in design and quite easy to use. The main thing is to do the work smoothly, without jerking. This is especially true for very long workpieces. If this condition is met, the surface finished product it will turn out to be very neat and even. When planing, you should stand to the side of the workpiece, with one leg forward.
The top and bottom surfaces of the products are very easy to process. It is somewhat more difficult to do the work on the edges. In this case, it is important to secure the knife very firmly. In no case should it vibrate in the shoe. It is supposed to plan the edges exclusively in the direction of the grain.
There is also a technique that allows you to process very wide workpieces with high quality. In this case, the product is first pierced with a plane diagonally, adhering to the direction of the fibers. Next, the plane is checked for evenness using a special ruler. At the final stage, fine-tuning is performed. In this case, a thin layer of chips is removed from the workpiece parallel to the edge.

How to sharpen a knife
Of course, a hand planer, like any other tool, requires some maintenance. No matter how good the steel the knife of this tool is made of, sooner or later it will still become dull and will have to be sharpened. Most often, this procedure is performed on a special stone called a touchstone. The latter is pre-wetted with water. When sharpening, it is advisable to moisten the knife itself. Press it against the stone as tightly as possible.
The sharpening angle of the hand plane may vary depending on the model. Most often, this figure is 30 degrees. When working on a donkey, they usually just pay attention to how the blade was originally sharpened.
Sometimes experienced carpenters sharpen the plane's knife on the circle. In this case, it should not be pressed against the edge, but against the side surface. Using a circle can also get pretty high quality sharpening... It will be very convenient to use a manual plane with such a knife. But only if an abrasive fine-grained abrasive wheel is used. After sharpening on such a tool, fine-tuning is usually performed. This procedure is performed either on a piece of sandpaper fixed on a table, or on a block. It is quite easy to check the quality of sharpening. To do this, you just need to carefully examine the blade. If it is not shiny, then the knife is sharp enough to be used.

How to set up a hand plane correctly
A special screwdriver is required to complete this procedure. Such tools are designed specifically for setting up planers. Their distinctive feature is large in width and short in length. The main purpose of the planer adjustment is to set the amount of the blade coming out above the sole surface. If the knife protrudes too far, the plane will begin to remove very thick chips. A slightly exposed blade will simply slide along the surface of the wood.
For initial processing of workpieces, the knife exit rate should be about 0.5 mm. If the planer is to be used for finishing, the blade should protrude slightly less from the sole.

How to store it correctly
Experienced craftsmen believe that a knife for a hand plane becomes blunt, at least not even during work, but due to improper storage. After finishing shaving off the workpieces, this tool should be cleaned of chips and placed in a box specially designed for it. In this case, the position of the tool should be such that the knife blade protruding from the body is not at the bottom, but on the side.
If the hand plane is supposed to be stored very long time, before putting it in a box, it must be disassembled and thoroughly cleaned. At the same time, knives and other metal parts should be wiped with an oiled rag.
There are a huge number of types of planers and the tasks that they perform. There are hundreds of models and modifications that are designed for straight and curved planing, profile shaping and other specific tasks. In this video, the master talks about the types of planers for straight linear planing. Each of them has its own purpose.
Planer (from German word Raubank) is a hand-held woodworking planing tool. It is used to give surfaces wooden parts the required roughness, straightness, flatness, shape, size reduction of parts, as well as for creating extended grooves of various shapes in parts (“quarters”, “tongue-and-groove”, etc.). (Wikipedia).
With each pass over the surface, the plane cuts the layer of material to a thickness determined by the amount of extension of the cutter, as well as the angle of its inclination.
The plane is an ancient invention (there are archaeological finds in Pompeii, the date is determined - the 1st century AD). It spread among artisan carpenters in the 15-16th centuries. The first planers had a wooden block, and the blade was fixed with a wooden wedge. Nowadays, electric planers are widely used in production and in everyday life.


Numbered dimensional marking of planers and jointers
At one time, back in the 19th century, a dimensional range of planers and jointers was developed, each of which for its own tasks. Each has a number badge from 1 to 8. From the smallest planer to the largest jointer.
Let us immediately note the difference between planers and jointers. If the first is to create a flat and smooth wood surface, then the jointer is used to fit boards, for example, when gluing them.
The # 4 planer is the most popular

The most common plane, which you can most often see at the master's, is the middle one in the row - it has # 4 on it. It is recommended, firstly, for the start of carpentry practice. This size is the most popular in joinery use. It is designed for smooth planing. It should be noted that planers allow you to get a flat and smooth surface. These concepts are not identical. That which is linearly even is smooth, and that which is smooth to the touch is smooth.

Female (junior) plane number 3
The longer the sole, the smoother the surface should be. What is the difference between the plane number 3? No. 4 has a width of 50 mm, and No. 3 has 45 mm. It would seem that the difference is small. But in work they differ due to the fact that one already has a blade and it is a little narrower and lighter. Even a strong master does not always cope with large ones, for women this is all the more important. No. 3 is considered female or junior.

Planer for children No. 2
No. 2. By analogy, we can say that it is for children. It is for planing with children's hands.

The smallest plane - No. 1
No. 1 is the smallest plane, this is a gentleman's tool for various delicate work, and the fact is that if a two is difficult to take in hand, then one can be taken by a not quite usual grip by the handle, but it will be taken with the palm of your hand and will be comfortable.

Half-fugitives, their varieties
It is believed that everything up to 50 cm long is half-joiners. Let's consider the numbered classification of this interesting instrument.
Semi-dough number 5
# 5 is a very interesting tool. Planers are not very different from each other, as well as semi-planers. But the difference between half-joiners # 5 and # 6 is very big. They have a big difference in blade width by a whole centimeter. On the one hand, they can be placed side by side, but they can be classified differently. The logic of attributing semi-planer No. 5 to planers is very simple - the width of the piece is the same. The logic to attribute No. 6 to jointers is also the same - the width of the blade. But nevertheless, it is a half-joiner.

A few words about No. 5. The fact is that if in Russia the most common standard size of the four is characteristic, then in the Western tradition, for example, the British were no less popular with multipurpose planes No. 5. In the English tradition, a jack of all trades who can do anything was called Jack. This literary name is associated with the name of the plane number 5 - jack. The five copes with all the most common tasks perfectly. It, due to its length and width of the blade, planes easier and smoother than any other number.
Semi-finisher # 6 is often used by women for carpentry work.

Experience # 6 can be used in many ways. If we attribute it to a jointer, then we can present it as a female jointer. It is still much shorter than the standard one and therefore lighter. This is its first advantage. Its second advantage is a tool that planes quite smoothly, but due to its small size, relative to jointers, it is convenient to take it with you somewhere on the road. But its most striking manifestation is that it is suitable for planing shields. Shields are planed not only along the fibers, but across and at 90 degrees. The six is the first tool that has a wide piece of iron. The wider the piece of iron, the more convenient it is to plan the shield.
You can plan boards and jointers. But they are heavy. After 10-15 minutes of working with it, fatigue sets in. Therefore, the six is irreplaceable. If the surface is planed smooth, it will be smooth and, accordingly, even.
Jointers
It would seem that they are larger in size and are intended for even smoother planing. This is indeed the case. But its main task is to join surfaces. Why do you need to join? As soon as we see a piece thicker than 50 mm in joinery, 90% of the cases are plywood. For example, a cover assembled from five parts needed to be joined, that is, when the surfaces of the parts were adjusted to each other before gluing.
Jointers, like planers, differ in size, that is, in length and width. They are for the same jobs, but smart choice the average master is a seven. Eight is a heavy, reliable tool that is pressed against the part by its one weight, and it only needs to be pushed.
How to form a planer toolkit for a novice master?
If you are a master, then start with number 4, if you are a beginner master and while it is difficult for you to cope with work on a plane, or you are a slender young lady, then take number 3. And further from the four, it is recommended to take a step to the right or left.
Let's start by taking a step to the left. We are not discussing the eight, since it is a very heavy plane (jointer), therefore, either a seven or a six is considered. If you are a young lady, then after a three take a six. This semi-jointer will perform the tasks of the jointer. If you are just a master, then take the seven.
Now step to the right. We take the most extreme step. Washer, or sander, that is, a plane for very clean planing. They are perfect for processing the ends of products. After that, depending on the specifics of our work, we can fill our row with either No. 4 or six. Everyone has their own specialization preferences, so they can also influence the choice of the size of the tool and the formation of the planer park. How is another article.
 Forbidden Ancient Magic and Ancestral Spells
 The meaning of the name Adam Adam's family relationship
 How to dry a man's love on an apple