Methods and tips on applying decorative plaster. Applying decorative plaster with your own hands: video, methods and rules for performing the work of other techniques for creating relief images
An article on the methods of applying decorative plasters and nuances
Application
decorative
Plasters
Conditions for applying cement decorative plasters
Right Application decorative plaster do it yourself It is carried out at ambient air temperature + 10- + 25ºС. Such a temperature range refer to applying decorative plaster outside on the facade of the building. The base temperature must be in the range of +5 - + 30ºС.
If the decorative plaster is applied indoors during the cold season, then work should be performed with a permanent heating and ventilation system. If the room is not heated, then it is necessary to pre-heat it and provide a temperature of + 5- + 30ºС for 2 days before the start of work, as well as 12 days after the finishing of the finishing works.
Requirements for the basis and its preparation for applying decorative plasters
Decorative plasters are applied only on pre-aligned walls. Application of decorative plaster on an uneven base will lead to its premature destruction, as well as to the appearance of inhomogeneous "defective" sites on the surface of the decorative layer. The basis for which decorative plaster is applied must be tough and not deformed during operation.

Decorative plaster is applied solely on the aligned base.
As a rule, decorative plaster are applied to the walls pre-aligned with cement plaster. Cement materials are poorly compatible with plaster bases.
Decorative plaster on a cement basis is not recommended to be applied to the base containing plaster.
If still the client wanted apply cement decorative plaster on plaster basethen you should consider several important points:
- First, the gypsum surface is pre-needed carefully and properly primed with soil into several layers.
- Secondly, to apply and exploit decorative plaster is possible only in a dry, not freezing room.
The wall should be cleaned of dust, paint and other contaminants that interfering with the clutch of the material with the wall. If the wall "crepts" that, when touched on the hand, traces of the coating are left or the loose layer crumbs, then such bases require additional processing of the strengthening soil. An important feature of the preparation of walls before applying decorative plaster is the need to process the surface with a special "caloring" soil.

Before applying decorative plaster, the wall must be treated with a special "caloring" soil.
Application of a thin layer of decorative plaster on a cement gray base without a "caloring" soil can lead to the fact that the residues of a gray cement base will be viewed through the structurally inhomogeneous layer of decorative plaster. The use of a special "caloring" soil eliminates this problem. A number of masters as a "caloring" soil use a strongly divorced cement white putty.
Technology of work with decorative plaster
Working with decorative plaster is divided into several consecutive stages: preparation of the finished solution, applying and distributing the solution on the finished base, giving them the necessary textures and finish treatment of the wall.
Before proceeding with the process of preparing the solution, you should carefully examine the manufacturer's instructions for working with the material. Initially, you need to measure required amount Clean water and pour it into a stirring container. It should be remembered that when preparing a solution of decorative plaster, it is necessary to use only pure water with a temperature of 15-20ºС.

Next, you must pour the required amount of dry mixture with your own hands. In the process of adding a mixture, a solution must be mixed. As a rule, mixing is carried out by a professional mixer on medium circulation. After receiving a homogeneous solution, the mixing must be stopped and given the time (3-5 min.) The solution to stand out.
The process of preparation of the plaster mortar is carried out with an excerpt of 3-5 minutes
Excerpt is necessary in order for modifying additives in the mixture to dissolve.
After exposure, the solution is intermittently stirred, after which it is possible to attach to applying a solution of decorative plaster on the wall.
Applying a solution with your own hands. To apply a solution to the surface, it is necessary to prepare a pure working tool - a narrow and wide metal spatula, plastic culma. A small spatula is a small portion of the finished solution to be applied to the edge of a wide metal spatula or on the bottom of the metal celma. Next, the tool with the solution is made perpendicular to the base and begin to distribute and spinning the finished solution along the wall, gradually changing the angle of the slope or spatula to the sharp. It should be remembered that the thickness of the decorative plaster layer should not exceed the size of the largest diameter of large filler (crumbs).

The thickness of the decorative plaster should not exceed the greatest size of the aggregate
Depending on the conditions of work, 10-25 minutes after applying to the base of the solution, the process of its thickening (grapping) begins. At this point, it is necessary to begin the formation of the necessary texture of the wall (peer). For this, as a rule, a plastic or metal grater is used. The desired texture is given to the desired texture, while holding the grater with their own hands parallel to the base, the solution with light movements is finally wiping and distributed over the surface to the thickness of the grain.
Ways to form a surface texture
There are two main types of texture decorative cement plaster - Shub and Coroede.
The texture of plaster Shuba Reminds grainy texture. When applying decorative plaster type of a fur coat under the "persister", a part of a large filler is broken, while the grainy surface texture is formed.

The nature of the tool movement under the "persister" does not play a significant role in the formation of invoice, since in the coat-type plasters contain a large number of large fractions of the filler (crumbs), which is evenly distributed throughout the wall. As a rule, the peary of the circular movements from above-down.
The ratio of large and small filler particles in the material is becoming greater on the texture of plastering type "fur coat". Based on this, I highlight additionally a few varieties of decorative coating type "fur coat". The texture of the "fur coat of lamb" is balanced according to the granulometric composition.
In the plaster, along with a fine fraction there is an increased content of large particles of the filler, and the texture of such decorative plaster is distinguished by relief, while the gaps between the particles of the large fraction are filled with a small filler. The plaster of this invoice is distinguished by the density and when finishing the facade on the surface, fewer contaminants accumulate, most of which are washed off by precipitation during operation. Another kind of coat plaster is the texture of the "crocodile" or such an invoice is called the "reared" fur coat. The main grains in the composition of such plaster are grains less than 1 mm. With additional fluttering such plaster, a solid surface is formed, but "island".

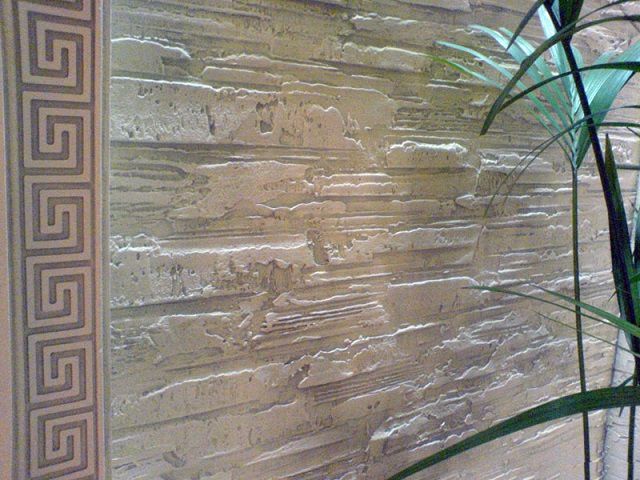
Plaster koroed It has a texture with grooves, resembling the surface of the tree trunk by the beetle pest. With the "peary" of the decorative plaster type of a coroede, a large filler in the composition of plaster forms a furrow, to the entire depth of the layer. Under the "persister" of decorative plaster, the cores is important to pay special attention to the uniform formation of texture pattern over the entire surface, without any clusters of a large filler.

Depending on the direction and method of the "Peritary", different surface textures can be formed. The most simple is the "pederem" with their own hands in one direction horizontally, vertical or diagonal such simple textures were called "Rain". There are also combined and complex textures. These textures are obtained by a combination of several simple movements under the "peary", for example, diagonal movement in different directions "Christmas tree".
In addition, the "peary" of decorative plaster can be performed by circular motions. With such movements, special attention should be paid to the uniformity of the distribution of the filler throughout the surface of the "petering", otherwise the foundation of the base will not be uniform and will lose its aesthetic properties. An accumulation of large "crumbs" should be avoided on the wall of the wall. When carrying out work, a strong pressure should be avoided on the laid mortar mixture.
Features of hardening decorative coatings.
Like most finishing materials, cement decorative plasters are needed when hardening, remove from unnecessary dehydration wall, which can provoke the formation of cracks on the surface. When finishing works outside the building (on the facade or basement) after applying decorative coating It should be forced that there is no excessive exposure to sunlight on the surface of the solid decorative plaster. To do this, on the facade of the building, the special "facade" grid, which disperses sun rays and relieves the surface from superfluous drying under the action of wind. When applied to decorative coating indoors, it suffices to eliminate the appearance of drafts in time of the plastering coating on time.
Surface decoration decorative plaster
When used as a decorative coating of decorative plaster based on white cement, it can be further painted in any color. When choosing paint, a number of recommendation must be remembered.
painting the surface of decorative plaster is possible only after its complete drying, approximately 2-4 days.

The most typical errors when applying decorative plasters with their own hands
One of the main mistakes when working with decorative plasters is the formation of inhomogeneous texture over the wall. In some cases, when working with plaster type "Coroed", there is a "cluster" of a large filler on the border of the "peer" of two sites.

In this case, not allowing the complete setting of the decorative layer to remove the accumulated particles of a large filler with their own hands and achieve a homogeneous "transition" between both sections. Not rare cases when a large filler is missing on any site. Then it is necessary to add a large filler to this section and "grind" to a homogeneous texture.

It is quite clear to the desire of many owners of private houses to give their dwelling a completely unique view. To the aid, they come relief plasters, which are made of solutions on different bases and are applied on the surface of walls or special tools, or imaginary, sometimes - completely unexpected items, depending on what effect is planned to be obtained.
Decorative wall plaster with their own hands is an excellent way to stand out on a general background. Before deciding on the choice of the desired drawing and the technique of its reproduction, it is necessary to consider various finishes. After the desired relief is defined, it is desirable to carry out a practical lesson, and plausing it in accordance with the conceived.
Some techniques of work with decorative plaster can be called art, as there are volumetric paintings from it with different plots, which are able to become an exclusive decoration of the wall of the apartment or a country mansion. Experienced masters, applying them, create real works from ordinary plastering, which set the style of the design of the room or the facade.
For a long time, decorative plaster was used for the walls of the walls, and with a change in interior styles, its plot drawings and relief changed, becoming more complex or, on the contrary, in favor of fashion, simplifying. She did not lose their demand to this day - in our time, with the help of such a technology, finishing both the facade parts of buildings and inland walls premises.

Most often used plastering coating, which in addition to decorative, executes also protective function, not letting penetrate moisture and dust to the capital wall.

For indoor walls, finishing with a homogeneous pattern or relief plot panel can be used. Choosing a relief relief to decorate the relief in the form of a picture, you can be sure that it will be guaranteed original, since twice portray in this technique the same drawing is exactly the same - almost unrealistic.
Reliefs applied on the wall typically cover one or more colors of color, which give them a deeper volume. If desired, when the initial color of the decorative plaster is getting tired, it can be easily changed to another. Moreover, this process can be carried out both on a homogeneous coating and on the panel. The paint is applied to the embossed panel with a brush and a sponge, and on a homogeneous surface - using a sprayer or roller.
Decorative plaster can have a deep relief, which is called bas-relief - it protrudes over the surface of the wall at 8 ÷ 15 mm, or to be practically smooth and allocated only by color. Today in construction stores you can find compounds that can already form a relief surface when applied by a conventional spatula, and for some of them special nozzles installed on rollers are used. They are able to mimic the bark of wood, high grass, layered rocks and many other volumetric drawings.
Plastering mixes used to create relief are plastic enough. They are easy to apply on a pre-prepared surface of the walls and convert into various drawings.
Fundamentals of textured plaster technology

Work on decorative plaster walls is carried out in stages, in accordance with the requirements of the developed technology. It includes several stages.
- The first step is determined by the picture that the walls will have to decorate, as well as the tools necessary for its playback. The sample of the relief during operation should be in front of the eyes so that it can be repeated its contours. This is especially important if the scene version of the panel is selected.
- Next, you need to prepare the tools that will be made of plastering composition, applying it on the wall and creating a relief pattern.
- When everything is ready, you can move to the preparation of the walls. This process is carried out almost the same for both facade and walls indoors - it includes cleaning surfaces from old coatings, black alignment, and then their primer. The primer composition is better to choose with antiseptic additives, then the walls will be protected from lesions mold, fungus, moss, etc., as well as from creating nests insects.
- Then a starter leveling layer of plaster is then applied to the prepared, well-dried surface - it will become the basis for the textured finish layer.
- After the starting layer is well dry, the wall surface is recommended, once again to create more high adhesion between layers of plastering composition.

- The next step, again, after a complete burden of soil, the finish texture plaster is applied, from which the relief is formed. In some of the applied techniques, the upper part of the applied plaster is compared into one plane, and inside the texture recesses that create a homogeneous, but chaotic relief remain.

- When playing some drawings, several layers of decorative plaster are required, and in this case each of them requires good drying.
- Further, if the keler was not added to the plaster mixture, the paint is applied from above the textured layer. If a uniform pattern has been attracted with recesses, then it is best to carry out this process using a spray gun. If it is planned to produce uneven color, then you can apply a sponge for a tinting or a brush. Paint must be applied so that it emphasize the beauty of the relief of the decorative coating. When tinting a panel, paint is applied in several stages to create a visual perception of its depth.
When performing work, you should accurately follow step by step instructions. Making any changes to the manufacturing technology of the relief may not affect the result of the design. Therefore, it is not necessary to hurry - it is necessary to thoroughly dry each of the layers, observing their order. It is better to immediately prepare for the creation of high-quality relief wall covering, it will take more than one day.
Now that are known general principles Wall design with applying decorative embossed plaster on it, it makes sense to consider tools that can be used for these technological operations.
decorative plaster
Tools for working with embossed plaster

By placing the wall with decorative plaster and forming a drawing of the relief using it, the following tools use:
- To mix the plastering solution, drill and nozzle-mixer will be required. With their help, you can easily and quickly enough, without much effort to make a mixture of plastic and homogeneous.

- Spatulas of various sizes - these tools can be called the main in working with any plaster, since they cannot do without them when applying any of the layers of finishing.
- Or trusk is also quite common to coating surfaces with plaster solutions.
- Special mitten, which is used both to create relief and for its staining.

- Brush with hard or soft pile, plastic film, rubber gloves, sponge or plastic mesh for washing dishes.
- The use of roller and rubber nozzles to it can be called the most popular way to make the wall embossed. A variety of these devices allows you to choose one of the numerous textures offered by the manufacturer.
In addition, using similar technique, work is faster, and the print on the wall is accurate and aesthetic, however, it is impossible to call exclusive such reliefs. Putting on rollers may have pattern patterns, waves, various curls, geometric forms and others.

Especially impressive reliefs, imitating the texture of the skin or wood bark, as well as other natural materials.

Nozzles can create a factory, located vertically or horizontally, chaotic or perfectly correctly - this factor will depend on the preference of the owner of the departible housing.

Texture plaster expands the possibilities of wall transformation, and the presence of a variety of tools opens the space in creating numerous drawings. It should be noted that the masters professionally engaged in these art, when performing reliefs, completely unexpected tools and household items, for example, wood cutters, blades for carrying out manicure or even ordinary teaspoons are often allowed.
Materials for decorative plaster
In addition to competently selected tools, you need to choose the optimal plastering composition. The range is quite wide, as many famous manufacturers offer special, which make it possible to easily transform facades and houses.
Starting plaster
Besides decorative mixIt is necessary to purchase starting plaster, with which it will be possible to level the surface of the wall, prepare it for relief design. For this purpose, it is better to acquire the compositions made on the same basis as the finishing finish, then it is safe to say that a good clutch will be created between the base and external plastering layer. So, for the starting, leveling layer will fit:

- Stitching start on plaster basis. Distinctive trait this mixture - short term Before setting, so you need to work with it very quickly. If there is no experience to equalize the walls, then it is better to choose a mixture that will give an opportunity for longer work.

- For example, a cement-based solution is perfect for both experienced masters and beginners. It can be bought in finished videoOr manufacture independently from cement and well-sashed sand taken in the ratio of 1: 3. For the plasticity of the self-made mixture into it, PVA glue is often added or liquid soap. Thanks to these components, the solution will become softer and at the same time - "lipuple" to the walls, and it will be easy to work with it.
- Sometimes it uses clay for the starting layer, which can also be purchased in the construction store in the already prepared form. Most often cleanium Used for plastering wooden surfacebut recently the master is still preferred to work more modern materials. Although clay has numerous positive qualities, such as elasticity, good adhesion with the surface, environmental purity, and in addition, it is a "breathable" material.
Decorative plastering compounds
For decorative trim, special compositions of plastering, which are also manufactured on different bases are used. They are intended for a variety of embossed patterns, so some of them are equipped with various additives. On the package, the manufacturer indicates the name of the relief for which this mixture is intended, as a solid crumb of different materials can be used as additives, having a large and small fraction and giving various finishing effects.
The proposed table presents some types of decorative plaster, which are most often used to finish the facade part of the house and walls indoors.
| Appearance packaging | Embedded Relief Figure | The basis of decorative plaster | Size of the fraction of additives, mm |
|---|---|---|---|
| Mineral "Ceresit CT 35" | "Coroed" 2.5 ÷ 3.5 |
||
| Mineral "Ceresit CT 137" | "Cameshkova" 1.0 ÷ 2.5 |
||
| Polymer "Ceresit CT 77" | Mosaic 0.8 ÷ 2.0 |
||
| Acrylic "Ceresit CT 60, ST 63, ST 64" | "Cameshkova" 1.5 ÷ 2.5; "Coroed" 2.0 ÷ 3.0 |
||
| Silicate-silicone "Ceresit CT 175" | "Cameshkova" 1.5 ÷ 2.0; "Coroed" 2,0 |
||
| Silicate "Ceresit CT 73" | "Cameshkova" 1.5 ÷ 2.5; "Coroed" 2,0 |
||
| Acrylic texture "CAPITEL" | "Quartz coat" | ||
| On the basis of white cement "Master" | "Lakes" 2,0 |
||
| Acrylic "Optimist-Elite" | "Venetian plaster" White thick homogeneous pasta |
As can be seen from the table presented, the plastering mixtures are made in a dry and pasty state. Ready, diluted to the necessary consistency paste usually will cost somewhat more expensive than dry mixes, but it is much easier to use them, since you do not have to calculate the proportions when mixing.
Plasters, ready for use, can be used immediately after the primer can dry on the prepared wall. Upon completion of the work, the residue of the mixture is closed in the packaging bucket, and during the next step, the paste can be used, because in the closed it can be stored for quite a long time.
If you wish to create plaster own manufacture, You can take the formulation of the formulation below in the table below:
| Components of solution | Appearance and color of plaster | |||
|---|---|---|---|---|
| Under white marble | Under Yellow Marble | Under the red granite | Under gray granite | |
| Number in parts by volume | ||||
| Portland cement M400 | 1 | 1 | 1 | 1 |
| Lime dough | 0.5 | 0.25 | 0.1 | 0.1 |
| Marble flour | 0.5 | 0.25 | - | - |
| Marble chips | 3 | 3 | 3 | 3 |
| Mica (from cement volume) | 0.5 | 0.5 | 0.5 | 0.5 |
| Pigment in% by cement mass | - | Ossociation 3 ÷ 5 | Iron Surik 5 ÷ 10 | Manganese peroxide 1 ÷ 5 |
Primer compounds
Means for primer walls used on preparatory Stage, Sold in pasty and liquid consistency.
plaster
- To process the wall under the application of the starting layer, it is recommended to use the liquid compositions of deep penetration, including antiseptic additives.

- After drying off the starting plaster, it should also be projected, creating that a good foundation For the finishing decorative layer. For this process, it is best to apply primer having a more thick, closer to pasty, consistency.

Each of the layers applied to the wall must be finally succeeded, and only after that the next one can be applied. Otherwise, the plaster can start cracking or flap from the surface.
Coloring formulations for decorative plaster
Can be applied, or they are painted before starting work. Sometimes the caliber is applied by the manufacturer to the package to the plaster, in other cases the color additives are purchased separately and also entered into the paste or dry mixture before hesitation or application.
Another option for giving the finished decorative plaster of the desired color is its staining with a spray gun, roller or brush. In this case, the composition of white or gray is applied to the wall, and then, after drying it, it is attached to the homogeneous or volumetric staining.

For painting textured plaster, applied to the wall, paints are used made on water based - These are emulsion and water-dispersive. Such paints are made in various colors, but if you wish, it is possible to give them a shade and independently, by purchasing a separate white "base" and the Koler like. Their mixing is made immediately before applying to the wall, and in this case you can achieve a darker or, on the contrary, a light shade, which will help to give the pattern on the wall volume and depth.
Varnish for decorative plaster
For textured plasters having a shallow relief or relatively smooth surface structure, a varnish or wax protective decorative coating is usually used.

Lucky can be matte or glossy, and are able to significantly enrich the color of wall decorations. Thanks to even one layer of lacquer coating, the plaster will maintain its initial look much longer.
In some cases, to achieve the desired effect of varnish, it is better to apply to the surface of the wall in several layers. For example, if the imitation of the grinding stone or crocodile leather is reproduced on the wall.

Wax is most often used as protective equipment For Venetian plaster, which can purchase a matte or even a mirror shine after applying it. The wax does not smell and is an environmentally friendly material. It is able to protect the walls of the walls from dust and yellowing, and besides this - it creates a water-repellent layer, and at the same time has good vapor permeability, that is, the walls do not lose the opportunity to "breathe". Thanks to such qualities, the wax coating can be applied in residential rooms and indoors with high humidity.
The wax is made in a colorless version and retains the color of decorative plaster in the original condition. In addition, it can be melted with metal pigments or pearl additives. For example, the wax "CERA", presented in the illustration, is produced in three color options - It is a colorless, silver and gold, which allows you to enrich the decorative finish with a pleasant soft reflections.
Painting ribbon.

In some finishing works, do not do without the use of painting tape. It is used to protect nearby surfaces when working on one of them, as well as in cases where different textured or color drawings must be divided. The tape is easy to glue on any surface and removed, without leaving traces. It has a low price, so in any case, stroking all the materials necessary for finishing, it is necessary to purchase it as auxiliary means.
Buying any finish materials, it is very important to pay attention to the clarification of the manufacturer, which is placed on the package - for what works they are intended, internal or external. Many compounds for external use are well suited for finishing walls of premises, but materials for internal use when applied to the facade for a long time, alas will not serve.
versailles plaster
Preparation of surfaces of walls
Now, understanding how to choose the material, and what tools will be needed for work, you can proceed to the consideration of the process of preparing the walls under the application of plaster solutions.
Preliminary preparation of wall surfaces
To get a qualitative result, it is very important to clean the wall from old coatings well, and such actions are performed as on external wallsand internal. It is necessary to remove the old wallpapers, paint or bliss, otherwise the starting layer of the plaster will be insufficient adhesion with the surface.
The main measures for the preparation of wall surfaces are shown in the table below:
| Illustration | |
|---|---|
 | Removing the walls of the old layer of plaster. This process is especially important to carry out very carefully if the old decorative coating began to peel from the overhaul. If you need to remove a thin plaster layer, then for this purpose you can use a grinding machine or a building grater with coarse-grained gear paper installed on it. |
 | In the event that walls are plated by wallpaper, the old canvases must also be deleted. Typically, the glued old wallpaper is moisturized using a spray gun, and this process is produced several times, since the canvases should get into the walls. After that, the finishing material is removed using a spatula. |
 | Another option for cleaning walls from wallpaper is an excrement. For this purpose, a special tool is used or steam ironAnd besides this, an air humidifier can be applied, which is directed towards the wall that needs to be cleaned from wallpaper. |
 | If the wall is painted, then the paint layer is also to be cleaned, otherwise the plaster layer simply will not fall on the wall. Removal of paint is made using a scraper, with softening old paint. Hot stream from the construction dryer. You can apply an abrasive method using a grinding machine with an iron brush or an extension with an abrasive nozzle. |
 | After the old decorative coating is removed from the walls of the walls, the leveling plaster layer will open or simply the capital concrete base itself. On concrete, the recesses and irregularities are often detected, which will have to be aligned by applying a spacion layer. |
 | If there is a good quality plaster, not separated from the capital wall, then it can not be considered. In this case, on the surface of the wall with an ax or chisel, notches are made in a depth of 5 ÷ 7 mm. They will be needed to ensure a better adhesion of the leveling starting layer with the wall. However, they often cost them without them, using modern primers like "concrete contact", which provide excellent adhesion applied plastering compositions. |
 | However, quite often the situation is such that the old plaster has to be removed completely, as it crumbs and unreliable is kept on the surface. This flaw can be discovered when applying notches, since when attacking in some areas of the wall, the plaster layer can "bone", and even just fall off. If the layer is separated on the large section of the wall, it is best to remove the old coating completely - the process, as they say, has already gone, and no one can guarantee that the remaining areas will hold stable. |
 | After the old plaster layer is removed, serious damage in the form of deep cracks can be detected on the wall. They must be neglected, otherwise they will turn on new plaster layers over time, and work will be spoiled. |
 | Detected cracks are expanded, that is, they are wider and deeper. Then they are cleaned and processed by primer deep penetration. Their filling is carried out by plastic repairs. Special repair solutions are presented on sale, and a conventional starting putty can be used for internal works. The repair solution should fill the entire volume of the separated crack, to the entire depth or width. If a wide crack is found, then it can be filled with a small foam with a slight expansion. Her surplus, which protruded outside the material is frozen, cuts the flush with the wall. In some cases, to strengthen the crack and in order to avoid its manifestation through new finishing layers, a reinforcing sulfage grid is pasted on a putty solution. |
 | After repairing "patches" dry on cracks, they must be cleaned with a construction grater with an abrasive grid installed on it first, and then sandpaper. |
 | The next step of the wall is covered with primer antiseptic composition of deep penetration. If the first layer of primer is absorbed into the surface of the wall without a trace, then another or even two layers of primer are applied. The primer composition will penetrate the pores of the plaster or wall material, will strengthen its surface and create good conditions for the clutch of materials. The solution can be applied with a roller or a wide brush. Each subsequent layer is applied only after complete grazing of the previous one. |
On the primed and dried wall, plaster works can be produced.
Application of the basic leveling layer of plaster
The next important stage is plaster works that finally prepare the surface to further apply decorative plaster. Alignment is carried out according to the primed and well-dried wall.
Methods of plaster leveling of surfaces can be somewhat different - depending on the material of the wall and surface quality. But general technology Yet overall, and more about it - in the table below:
| llycation | Brief description of the operation |
|---|---|
 | If when checking the wall with building level It was found that it requires capital alignment, then the first step on the surface are beacons made from special metal profiles. They are fixed on a wall in a step of 1000 ÷ 1200 mm, controlling vertically and horizontally using a construction level and a long rule. Consolidation of these profiles is made using cement mortar With the addition of gypsum or only a gypsum mixture, since this material quickly grasps and will not delay the execution of subsequent work. Between the slides of the solution on which the beacon profiles are attached, withstand the distance of about 400 ÷ 500 mm. |
 | Having exhibit beacons, you can move to the mixing of the plastering solution. It must be homogeneous, without harsh inclusions, otherwise it will be problematic to align it to the ideal, since voids that weaken the coating can form about large rigid fractions. Before applying the solution, the wall can be slightly moistened by sprinkling it from the sprayer or brush. The next step on the surface is thrown into a thick layer of plastic solution, which should be above the beacons by 30 ÷ 50 mm. Excessive solution will be removed by the rules when leveling plaster. |
 | Next, the wet solution applied to the wall is equalized by the rule, moved by the guide-beacons. Work begins with the bottom of the wall - the rule, not in a hurry, climbs up, while they move lightly from the side to the side to better distribute the solution in space between beacons. At the same time, the rule is gathering an excessive plaster mix, which can later be used to apply neighboring sites walls. |
 | Watching the surface, it should be left for 2 ÷ 3 days to set. At the same time, the wall is recommended to periodically spray with water to obtain a greater strength of the applied layer. Further, still wet plaster rubbing, throwing cement milk on it. These works are carried out with the help of plaster cells or grout, which is mesmerized to the wall and circular motions counterclockwise drag the surface, making it smooth. The dried surface is left to a complete burden, which depends on the thickness of the layer and can take from 5 to 15 days. |
 | The dried plastered wall should be well primed using a paste-like thick primer, which is applied using a roller. Inaccessible sections of the wall are processed by a narrow brush. The primer, made on a water basis, dries quite quickly, so very often after 2 ÷ 3 hours the ability to move to the next stage of work appears. |
 | If we are talking about internal work, so that the result of the wall finishing turned out to be high-quality, the aligning plaster layer is recommended to apply thin, at 1.5 ÷ 2.0 mm, layer of plastering on a plaster basis. It will make the surface smooth, correcting all the shortcomings of the base layer. The plaster is applied by metal culma or a wide spatula, producing semicircular movements. At the same time, it is necessary to remember that the gypsum mixture is rapidly grasped and hardened, therefore it is impossible to impose a large amount of solution, since "revive" its addition to the addition of water will not succeed. It should be noted that as this starting layer, the decorative plaster can also use a ready-made mixture on a cement basis, or one of the common plaqua compositions. After driving this layer, it must be primed. |
Decorative Plaster - Application and Coloring
When all leveling layers are dried, and the wall will be fully prepared, one can move to the finishing stage of the work - applying a decorative plastering layer.
Several popular ways of applying relief
This is perhaps the most interesting creative process, upon completion of which the wall will acquire a completely updated look. For such a stage, a decorative paste-like plaster mass is used or a dry mixture that is kneaded alone, just like the base solution, that is, using a mixer installed on an electric drill.
In any case, the mass should be plastic and homogeneous, if, of course, such a coating is not chosen as "cored" or "lamb", which has in its composition additives from stone crumb. But even with this solution, solid fractions should host in a plastic mass completely evenly.
| Illustration | Brief description of the operation |
|---|---|
 | Venetian plaster can have a different pattern of relief, but it is always shallow and chaotic. However, sometimes it is a background for clear geometric or vegetable drawings. Decorative plaster is applied with a metal or rubber spatula with thin layers, the number of which can be from 5 to 8. Despite such a considerable number of layers, the total thickness of the plaster, made in this technique, is only 3 ÷ 4 mm. |
 | To reproduce the Venetian plaster, the already fastened composition is most often used, otherwise it will be after the completion of its application and drying, to make staining, and in this case the part of the intended effect will be lost. The desired effect of the "silk" surface is achieved by the presence of several layers of the same color, and each of them is applied and rubbed in different directions. Thanks to such a technique, strokes that differ in the direction give a different reflection of the light on the wall. Thus, the surface is spinning with silk gloss. In some cases, to create an effect of a deeper spatial volume, translucent from the inside, takes several color shades close to each other. |
 | Each of the plastering layers imposed by smears is smoothed, but this process is made by tangent movements with an application of certain efforts. For each of the layers, professional masters use spatulas and cells differing in thickness and width, creating a multilayer chaotic embossed pattern from a solution. With this plaster technology, you can simulate the structure of the pattern of different finishing stones on the wall. To enhance the effect of imitation, after completion of the work on the application of plaster, waiting for its burden, the surface is grinning with wax or cover with matte varnish. |
 | More accessible for non-professional variant of embossed plaster. The composition is applied using a conventional spatula into one or more layers, each of which should be succeeded. Each layer relief can be smoothed, or its protruding fragments are left in its original form. The smoothing of the solution is carried out with the help of metal celma, neat touches. With the help of such equipment, you can create different reliefs, and their shape and direction will depend on the creative moods of the wizard. |
 | If it is supposed to create a relief having the right smooth shapes and lines, you can use to play a toothed spatula (KELMU), commonly used for applying glue when finished surfaces ceramic tiles, or special comb. |
 | This kind of relief drawing will be easy to reproduce the master who first picked up a plaster tool. The first step using a conventional wide spatula on the wall layer of plaster mortar is applied, and it is not necessary that it is perfectly smooth. It is then an relief in the form of semicircles, lines of chess location or other drawings that can be invent independently. |
 | Another relief option available in reproduction for any creative person is an impression from a conventional polyethylene film on a wet plaster applied to the wall. In this case, the fantasy can also be not limited, since the film can be applied in the deployment or twisted in the roller, and simply jumping it chaotically. In addition, you can come up with your own version of the application of this material, since, seeking the desired pattern, with a solution and a film can be safely experimenting. |
 | When removing the film, after it was pressed to a wet plaster, it will inevitably pull the solution, and as a result, peculiar embossed protrusions are formed, which can be smoothed with a spatula or cell. Applying this method of creating decorative plaster, you can use a tinted solution, or to paint it after the wall is dry after applying the relief. |
 | Pretty popular for the design of both the inner and outer surfaces of the walls is such a factory figure like "Coroed". For this, used special composition Plasters, which includes rigid stone fractions in size of 1.5 ÷ 3 mm. This solution is applied using a metal celma, and it can be distributed on the surface in a different direction, depending on which relief is intended to get. Rigid fractions when applying plaster leave the furrows, imitating surface damage by insects. These in-depth bands can be arranged vertically, horizontally, diagonally, in the form of a semicircle or whole circles - the direction of the relief pattern will depend on the preference of the wizard and the intended design. |
 | The frequently used tool for applying the relief is a roller, leaving a factory pattern on the wall surface. This method of recreating volume can be used by any owner of the housing, even never previously engaged in plastering. It is enough to buy a roller with the relief like that on its rubber nozzle and leave the output on the fresh solution applied to the wall. The choice of nozzles is so great that they can be chosen on any, even the most sophisticated taste. If you wish, you can make the nozzle on the roller and independently using for this segment of the foam rubber, the coarse rope, polyethylene film, fur, a deep-relief fabric or other materials that are able to leave on a wet plaster. |
 | If on the walls it is planned to create a correct vegetable pattern, in the form of grass and leaves of different shapes and size, then the roller with such a pattern will have to be purchased in the finished form. Work on the design of the walls in such a technique passes rather quickly, since there will be no failures in the process - the plaster mixture is applied to the surface, and while it remains moist, it takes place with a roller that leaves the selected pattern on the surface. |
 | And this is an easy way that does not require special costs of purchasing a tool to reproduce the relief. For the finishing process, a conventional flat brush with a soft or rigid pile is used, depending on how clear the drawing is planned to be obtained. The relief is recreated by the same principle as when using a spatula with a toothed comb - according to a fresh plastering solution applied to the wall. |
 | Another decorative plaster technique, which is not performed along the entire surface of the wall, but only in its separate areas. The background for him can serve as one of the above-described types of shallow relief. Panels are usually made from a plaster mortar. The composition is applied slides on the laid wall area in the drawing and left to dry. After drying into the course go cutting tools - It may be a knife, cutters of different shapes and a spatula - with their help the desired forms are being created. In addition to the incisors, elaborate paper with small and medium grain, which is boosted by the cut-made volumetric patterns. In order not to spoil the wall, it is recommended to experiment, creating a small panel or its individual parts on plywood sheet. Just make sure that everything turns out, you can proceed to reproduction of a planned relief pattern on the wall. |
In addition to those listed above, there are other items that can serve to create embossed patterns on the surface of the wall. Not only professional tools, but also tools or even fragments of plants, such as the leaves of trees, or branches of various thicknesses are widely used for this purpose.
Coloring decorative plaster
As mentioned above, in construction stores you can buy a color decorative plaster, but it is much more difficult to work with it, since all the complex needs to be played in one color. Therefore, the white plaster mixture is most often selected, which, after final grazing, is covered with selected shades, which significantly expands the creative possibilities of a home master.
In addition to applying color to the finished relief wall, there is another technique for creating a color surface. In this embodiment, a certain color is added to the white plaster, and then the relief on the wall is made from the material of different shades. This is a rather complicated technique, and a professional artist or a person who has the appropriate talent can cope with it. Therefore, most optimal option It remains painting the finished relief.
Usually for staining of decorative plaster, water-based paints are used, in which the desired color is added. Recommended, picking up the color, to make it on one or two tones darker, because when drying paint - it will light up.
| Illustration | Brief description of the operation |
|---|---|
 | The most used reception when applied to the embossed plaster color color is a coating with a light tone, selected shade. Such staining will become uniting for the whole composition. The paint is applied to the entire plane with a roller, pre-pressing it on the ribbed surface of the painting tray. If the relief has a depth of more than 5 mm, then for its toning, a roller with a long pile is used, or especially deep fragments are tinted with a soft brush. |
 | The first paint layer is applied in one approach, otherwise the painting will be uneven. Therefore, if the paint is toned independently, it must be mounted so much so that it is enough for the first layer for all walls in the room or at least for one wall, but necessarily for its entire area. This is especially important if the surfaces are stained with one color without additional shades and divorces. Staining is carried out in different ways, depending on the depth of the relief and the desired end result. |
 | One of the options for uneven dyeing - it is performed using a sponge. Then, another wet painted surface passes with a soft cloth or a dry sponge, barely touching the protruding elements of the relief. This technique of execution is aimed at strengthening the "depth of space" the relief not only with the help of volume, but also using the color game. |
 | This method of finishing decoration consists of two stages - staining and stripping of the protruding elements of the relief of the emery paper. The first step is the entire area of \u200b\u200bthe walls is painted with a common color - this process can be carried out using a roller or spacing. The second stage is made after the paint is completely dry. A small-ceiling sandpaper is installed on the construction grater, after which this tool is passed through the protruding parts of the relief. In this way, the paint is removed from the surface or brightened, thereby showing a volumetric pattern. If desired, the purified surfaces can be covered close by tone to the main color of paint, darker or lighter, depending on which effect you need to get. Usually the light shade is chosen, as it visually increases the volume of the relief. |
 | Relief panel can only make experienced MasterBut it can be written and independently. However, it is necessary to consider that this process is quite complicated and durable, as it will have to produce thin brushes, so work will take quite a lot of time. The finished relief panel of plaster is recommended to cover with primer, dry, and only then proceed to the painting. Do not take clean bright colorsSince they will not be viewed relief. Therefore, they are diluted to the state of shades of the selected color or add a certain amount of their white paint. |
 | In this embodiment of decorative plaster, two colors are used - one main, and the second is auxiliary, which will highlight the drawing of the relief. Works are carried out in two stages. First, the entire surface is covered with one, basic color. This process can be carried out with a roller, a wide brush or a pulverizer. Then this layer must be well succeeded. The second stage is to apply with tangent movements to the protruding parts of the paint relief using a soft brush, a foam sponge or a mittens on hand. The paint should be sufficiently thick, and the brush or sponge is dry. |
Video: An interesting example of staining wall, trimmed with embossed plaster
The final stage of work on the decorative plaster is to cover the walls with varnish or wax. This process must be taken carefully, since, applying the final layer carelessly, you can spoil all the work.
In conclusion I would like to say that if the experience in performing decorative plastering is small or absent at all, it is not recommended to choose too complex design techniques. In the same case, when a specific pattern was chosen and a decision was made by anything to reproduce it on the wall, it should be carefully examined by the instructions and practicing on a small section of the wall or plywood shield.
Video: Demonstration of various techniques of applying and decorative decorative plasters
"Versailles Plaster": Available to each technology - step by step
In the final section, the design of the wall of the so-called "Versaille Plaster" will be considered as an example. In the proposed finishing technology, instead of plastering composition, two types of putty are used - starting and finishing, which allows you to save a decent amount on the finish. In addition, the advantage of this method of the original decorative wall decoration is that it can be done even to a novice master. The main thing is to purchase high-quality material and use them correctly.

In addition to two types of putty, to obtain the desired result, the Quartz-Soil will need for applying a decorative cladding on the wall, which creates increased adhesion between materials, and also does not allow putty to dry overly. The presence of this material is mandatory condition For the decoration of the wall for such technology.

So that the plaster layer is aesthetic, you need to purchase two more components, without which the proper effect fails.

This, firstly, the decorative coloring coating of the "ADAGIO SILVER" type is on an acrylic binder containing small metal particles of various shapes. It gives a very interesting overflowing effect, giving the wall of silk appearance.

Secondly, the so-called glitter is used, consisting of the smallest particles of a polyester film of different forms. This component is also added to one of the layers of decorative wall decoration.
| Illustration | Brief description of the operation |
|---|---|
 | The first step is mixed with a model mass consisting of a starting and finishing putty in proportion of 1: 1. Alsystem occurs as follows: In turn, part of the start and part of the finish putty, then the sequence is repeated, and so until the desired amount of dry mixture is covered. If necessary, some water is added to the bucket, and then the mass is mixed using the mixer nozzle. Next, the finished solution is left 10 ÷ 12 minutes - this time is necessary in order for it "dose". After this time, the mass is again mixed up to a homogeneous state. It should be very well proteishaned and have a consistency of medium density, that is, not very liquid, and not thick. |
 | The finished putty composition is applied to the prepared, aligned, processed "quartz-ground" and the dried surface of the wall. If the mass is not applied not from the ceiling, but below, on a blank line on the wall, it is recommended that it is recommended to stick the greasy tape first, which will help to leave the top of the wall and retains the smooth upper border of the decorative finish. Work starts from the upper line. First of all, the putty mixture is distributed along the painting tape. |
 | The applied layer must have a thickness of 2 ÷ 3 mm. Special attention should be paid to filling the joints of the planes, for example, if the putty will be applied from the ceiling line. The mixture is superimposed on the wall with a cylma, a relatively smooth layer. This work can also be performed with a spatula that has a width of 300 ÷ 350 mm. It should be noted that in this embodiment, the finishes can not be particularly trying, moving the solution to perfect smoothness, the main thing is that the material layer has the same thickness throughout the wall plane and was flat enough. The greater the putty layer, the easier it will see the flaw flaws in the drawing. |
 | The smooth facing layer is applied to a height of 1000 ÷ 1500 mm from the top down the wall. Then a relief pattern is formed on a wet putty. To do this, the plastic square is used with a pointed in front of the plate - it resembles an iron in shape. The work begins on the corners or the upper line of the wall. The master produces wave-like movements, stretching the mass, at the same time creating a chaotic drawing in the form of bands that are in different directions. With the help of Kelma, the mass as it would be raised above the surface, creating a larger volume of decorative coating and leaving the furrows behind them of different widths, most often ranged surface diagonal. The convenience of creating a relief is similar to the fact that the drawing applied to the solution can always be corrected if he does not like the master. |
 | Having worked out the first putty putty, and reaching about the middle of the wall in height, produce the manufacture of the next portion of the solution. During this time, the mass applied to the wall will already have time to grab. Therefore, many masters have the problem of uniting the plastered area of \u200b\u200bthe wall with the already seized solution and fresh, which has just been involved in the mass, which will be applied below. The junction between the two areas of the wall should be completely noticeable. |
 | To ensure that the union passed neatly, and it became completely not noticeable, the fresh solution is applied to the wave on the already applied layer by 150 ÷ \u200b\u200b200 mm, and then the total layer is smoothed. This process must be made through the entire line of combining two zones - upper and lower. |
 | The lines of the allen need to smooth out well, and then apply a common embossed pattern on it. |
 | The design of the relief begins with the area where the drawing has already been applied. It turns out that it seems to be "picking up" to the celma and extend to the exactly applied spacing layer along its entire length. |
 | Combining the two wall areas, it is important to ensure that there are no deep dents or pronounced stripes from the Kelma on it. Such defects need to be sworn and give these areas a common relief, since in these zones they will be particularly noticeable. By producing work on the unifying line, it is recommended to move aside and inspect the area of \u200b\u200bwork from afar. So it is possible to more clearly determine the shortcomings and immediately fix them. |
 | Then, the model mass is applied to the entire bottom of the wall with a smooth layer, and the relief is formed in it, in just the same way. When the wall is completely covered with this primary layer of putty with a dealt with a terrain, it is left for full bite for two days. |
 | When the wall is dry, along its surface, a spatula is passing, which must be cleaned with the protruding sharp edges of the embossed strips, as they must be rounded. |
 | Then, the entire surface is treated with a construction grater, with emery paper installed on it. Grout is carried out with a slight pressure, circular motions counterclockwise. |
 | After processing, a relief surface with smoothed protruding edges of the picture should be obtained. An additional surface check, that is, its smoothness, you can produce, spending your palm on it. If untreated areas are found, scratching palm, then this flaw should be fixed immediately. The treated surface must be carefully cleaned from putty dust - this process is performed using a soft wide brush or brush. |
 | The next step is the surface treatment with a primer composition of deep penetration. The soil is applied with a roller with a pile nozzle. The composition must be well distributed over the wall, collecting all the flows formed. This layer will dry 1.5 ÷ 2 hours. |
 | Next, it takes a white paint on a water basis, a keler is added to it, a selected shade (in this case, the wizard applied a beige dye), and the mass is well mixed to a homogeneous state. The paint should be applied easily and not be too thick, so if necessary, the solution is divorced to the desired consistency with water. Relatively liquid paint composition when applied to the wall will become translucent, which in the complex with other layers of different shades will create the illusion of space. |
 | The paint is primarily applied to the edge of the wall with the help of a brush, and then the main part of the surface is tinted with a roller with a pile nozzle. It well distributes the mass along the embossed surface, filling the paint all the deepening of the pattern, and when the composition is rawped, collects its surplus. As a result, the surface should be neat and smoothly painted, not having inclusions. After the entire surface is covered with a tinting composition, it is left until complete burials. Water-based paint applied by a thin layer will dry around two hours. |
 | Further, the composition made from ordinary primer and "silver" - dye "ADAGIO SILVER" is applied to the surface with a foam roller. The mixture is prepared in proportion of 1: 1, that is, in this case, the master took 250 × 250 grams of these materials. The resulting mixture should have a sufficiently thick consistency and do not give inclusions at all. A mass on the wall is applied without push, so that only the top protruding elements of the relief is covered. Deepends to be stained with this composition should not. |
 | The mixture is neatly rolled over the entire wall of the wall, highlighting the relief. |
 | Next, you will need to prepare the finishing composition, which transforms the wall surface is beyond recognition. It consists of a water-based varnish and a small amount of glitter. Varnish is diluted with water, in proportions about 1: 3, and mix well. The additive of water is necessary in order to the surface of the wall, after its coating it was not formed a rigid uneven glossy crust. |
 | A small amount of glytter is added to the varnish, about a tablespoon of 0.5 liter composition. Then the solution is thoroughly mixed with intensive shaking. Before you begin shaking, the capacitance cover with the composition you need to close tightly. |
 | Next, the finished lacquer is applied on relief stucco With the help of a foam roller and is well distributed to rolling over the wall surface. After completing this stage of work, the finish can be considered complete. It remains only to wait for the muzzle of the wall surface, and then remove the larger tape limiting wall. |
 | On the last illustration, the result of this sufficiently long-term work on the design of the wall is presented. But, agree, the technology is not so complicated, and the resulting finish looks very original. |
One of the leading positions among finishing materials has been occupied for a long time, decorative plaster is occupied - an option for designing walls, connecting the simple execution technology and an excellent result. Initially, it remotely resembles a paste, which is applied to the walls and ceiling. This material can be used completely independently or as the basis for subsequent steps of finishing.
Decorative Plaster - Unique wall decoration
The easiest way to get a beautiful lawn in front of the house
You, of course, saw the perfect lawn in the cinema, on the Alley, and perhaps on the neighboring lawn. Those who at least once tried to grow a green platform in their own area, without doubt they will say that this is a huge work. Lawn requires careful landing, care, fertilizer, watering. However, only inexperienced gardeners think so, professionals have long known about the innovative agent - liquid lawn Aquagrazz.
Types of decorative plaster
Decorative plaster is divided into species depending on the components of the composition and the expected effect:
- structural Plaster - mixed composition with a variety of inclusions like a shallow stone crumb, colored quartz pieces or wood fibers. It is produced on a cement-referee basis. This also uses special synthetic latexes or potassium silicate. The solvents in the mixtures are present or organic, so the plaster can be considered an eco-friendly material and apply for decorations inside, without fear of unpleasant odors during the repair work or in freshly acidic Premises on their completion.

Types of decorative plaster - crackerels
An additional plus: structural plaster - a very plastic finishing material, and it is sold ready for use in packaging of different volumes.
- textured Plaster makes it possible to form a smooth, but relief surface;
- venetian The plaster as a result turns into a coating resembling marble.
Applying structural plaster
When preparing the walls there is no need to perfectly align. Due to its heterogeneous, with the embeddings of the structure, the material perfectly hits the small flaws of the draft walls. The main requirement - the walls must be dry, clean, pre-trunk and dried. The primer serves as a peculiar obstacle to moisture penetration into the decorated layer.
For applying plaster, a trowel or spatula is most often used. After a few hours, such a coating will already be strong enough, but until complete drying should pass for at least a week.
In addition, similar compositions are issued both for internal and external work. Such formulations are not afraid of frosts, do not support burning and racks to humidity.

Textured plaster
The compositions of textural plaster may vary, but in the end they all make it possible to create an original embossed pattern on the walls, the complexity of which is largely dependent on the components of the plaster mixture, and on how the decorative plaster on the walls in each case are applied.
Walls with this decoration are found quite often. Such a coating resembles a tree, soap paper, a stone or something like that. In the interior, the coating looks original, giving the room a special, unique style.

Picture on the wall using decorative plaster
It is also wonderful that the composition of textural plaster can be chosen under any room design, and using different techniques Application - give her a complete, harmonious appearance.
The main component of textured plaster is the limestone flour, and the features of each particular solution depend on the fillers used. Polymer materials As the basis, it is possible to obtain a durable surface without cracks and chips.
Walls for applying plaster composition should be smooth, clean, projected and dried. After drying the primer, the so-called substrate is applied to the walls - a layer of sand paint. It helps strengthen adhesion (hitch of plaster and base).

If you work without attracting specialists, you will noticeably save the time to help special compositions that combine the properties of all the materials listed above.
Stucco is applied to one or two or more layers. For work, you can use workflows, spatula, brush and other instrument, which will give the opportunity to get the desired expressive pattern on the surface. A more complex drawing is created by applying several thin layers of plastering composition.
Additional protection for the finished surface can serve as lusters - special translucent paints. They will add the walls a noble pearl shine. In addition, as finish coat You can apply special wax, paint or impregnation.
Venetian plaster
Venetian plaster is called a mixture of marble flour, greased lime and water emulsion. At the end of the work, it seems that the marble stone was used when finished. Initially, Venetian plaster is a viscous composition ready for use, which is sold in large banks or buckets with a volume of 7 to 25 kg.
The only disadvantage of this coverage is that it is necessary to apply it only for perfectly smooth walls. The color can be chosen any. The composition is easily conserved, so if you wish, you can create entire "marble" pictures on the walls. In addition, the Venetian plaster is environmentally friendly, waterproof, wear-resistant, does not support burning and dries very quickly.
Before applying the Venetian plaster, the wall or ceiling must be in perfect condition, otherwise any flaws will be visible. Then, as in the preparation of surfaces to apply other types of plaster, the base must be projected and seeing to dry. The plastering mixture is former and apply a spatula very thin layers. After complete drying of the plaster, the surface is carefully cleaned by very small emery paper, while moving at the same time. In total, such a layer can be applied and stripped from 5 to 12. The wax layer is applied at the end, which gives the surface marble shine.
Despite the seeming complexity, even with the decoration of the walls of the Venetian plaster it is quite possible to cope on its own.
"Under the Starin"
Recently, many pay attention to the stucco "under the old days". This name coverage has received for the fact that it looks on the walls a little dull, as if a little stronger from time. In addition, such a finish will not be smooth, but rough to the touch, as if the texture has changed itself, during the natural aging.

"APPLY" Plaster
The technique of applying and artificial latexes in the composition of the mixture give the coverage a special property - it begins to brighten a little in the places of greater friction.
In addition to finishing the walls indoors, such compounds can be successfully used when finishing the facades.
It is also possible to buy it in filling vessels with a volume of 4-5 liters. When the coating is completely dry, a microporous film is formed on its surface, which ensures the effect of roughness, and at the same time protects the surface from mechanical damage and high temperatures.
Decorative stucco for external work
In addition to plastering compositions for internal work, there is also a facade decorative plaster, which is characterized by increased resistance to humidity, precipitation and temperature drops.
Application on the ceiling
Another pleasant moment - not only walls, but also the ceiling are suitable for decorative plaster. Of course, it must be aligned and clean from the remains of the old coating. Ideally, to align plasterboard, but you can do without it.

The main difference from the wall decoration is that the ceiling cannot be applied a thick layer of plaster, maximum - 5 mm. If more is too many chances that over the time, part of the coating is simply falling off. The rest of the equipment and all the conditions of application are identical to the fact that for walls.
Tools and materials
In order for the plastering composition to put on the basis of Rovno, it is necessary to stock the necessary tools in advance with the necessary tools and materials. We have already spoken about the materials. In addition to the plaster mix, you will need:
- acrylic putty;
- polymer primer;
- semi-wax;
- dense polyethylene;
- paint;
- painting tape.
From the tools will be needed: metal spatula (size 80), one-handed cell (trowel), cuvette (paint bath), paint brush (40x140), dual-duct brush, thread roller (size 150). In addition, you will need a regular bath sponge and cotton rag.
Watching technology
Preparation of the basis

Preparation of walls or ceiling to bothering
The beginning of plastering should be preceded by thorough preparation of walls or ceiling under the application of decorative plaster. The surface must be prepared in the same way as under the painting. It should not be irregularities or cracks, because decorative plaster is not applied with a thick layer and simply repeat all the irregularities of the surface. The basis must be improved by the latex primer of deep penetration and give it to dry. After drying the primer, all places adjacent to the surface where the plaster will be applied (ceiling plinth, wallpaper), stuck with a painting ribbon.
Then the walls are sweeping. The puttyle is applied to the celma and carefully apply on the wall, trying to evenly distribute on the surface with a thin layer.
How decorative plaster is applied
At the next stage, with the help of polyethylene on the surface, the desired texture is created on the surface not yet dry. For this, the crumpled polyethylene is stacked on fresh splitel. At the same time, than "crumpled" it will be - the better, the richer is the texture. Polyethylene area should be larger than the surface area to be processed. Better, if one piece is enough for the whole area.

This crumpled polyethylene should be as if glued to fresh twin so that all folds are simply imprinted in the cheese. During the day, in this way, several surfaces that are not adjacent to each other can be stuck with polyethylene. In turn, the adjoining surfaces need to be processed after drying previously processed. Otherwise, chipsets can turn out in the corners, or the surface is inadvertently spinning with the spatula.
Polyethylene film must be left on the surface for about 15 hours, and then carefully remove with the painting ribbon. It is not necessary to wait for the full drying of the wrap, otherwise there will be ugly chips on the surface instead of texture. However, after removing the film, the textured layer must be allowed to dry. It will take about about a day. Use to accelerate the process fan heaters or calorificates is not worth it - this can cause the appearance of cracks on the surface of the putty and spoil the whole general view.
After complete drying, the spatula or the cattle is neatly, but without excessive caution, all extra chips are removed. Then the dry mellover diligently wounds the entire surface of the wall - all the dust formed will be removed.
Now it is necessary to leave the painting ribbon again all the places where it was adhesive before applying the putty.
Painting

Painting plastered surface
For coloring after decorating the walls you will need pigmented wax. It is tightened to it 20% warm water, then the mass is stirred, bringing to a homogeneous consistency. Wax on the walls most often apply one of two ways: a sponge or a dense roller. If preference was initially given to the roller (so really faster), then the bath sponge is still useful - it is more convenient to evenly distribute wax over the entire decorated surface. The sponge should be soak in clear water, and then with light movements to walk through the entire decorated surface.
Painting wall decorated plaster
A coral coral will become an excellent substitute for a regular bath sponge, but its price is much higher. On the surface of the wall after treatment with a sponge, the texture of the finishing should clearly sharpen. Wax is triturated until the drawing becomes uniform. Casting plated wax should not be. Shkatlevka through the wax alone should not appeal. 15 -20 minutes after rubbing wax the surface of the walls should be easily treated with wet and soft cotton Rifle. After this procedure, the volumetric drawing on the walls will become more pronounced. It should be paid to the fact that the rag should be used white or old, alone. Bright paints can lift and leave colorful stains on the surface.
In the inner corners of the room, the wax can accumulate, which is why dark stains are formed. To get rid of them, experts advise to use a spatula with a windman wound on him. They are easily removed dark spots in the corners.
Today, the technology of building and finishing materials stepped far forward, and we have on the market huge selection decorative paints and stucco, which have long been ahead of the price normal wallpapers And firmly occupied a leading position for sales growth. This segment is already today there is an opportunity to choose both cheap materials with secondary quality from Russian small mining shops of San Marco, Pratta, DecoRazza, Natura Interior, Arte Deco, and not expensive, but very high-quality materials from the Italian Ferrara Design factory, Antica Signoria , Valpaint, etc. However, there is a large selection of grades at high cost, but in their case, the quality will be the same.
If you want to understand the stages and decorative requirements of decorative plaster, it is better to do this on the example of the technologies of Italian manufacturers, as they are still the lawmaker in the world of the design of the premises and sacred read the requirements for materials and technologies.

So, the first stage is the preparation of the wall
Here it is necessary to immediately divide the requirements for two options - under smooth decorative paints and under the textured. In both cases, the wall aligns first gypsum Puckuck - The correct geometry of the walls is created, then the polymer putty wall is taken up to a smooth state (it is important to glue the wallpaper or apply the wallpaper on the plaster putty, since the gypsum does not give a sufficient adhesion of two surfaces due to low adhesion). Now we'll understand in the degrees of the smoothness of the wall. There are two main - the so-called "under the wallpaper" and "under painting". They are distinguished by one property - how ideal is the extrusion surface. The wallpaper is not suitable for the super-perfect wall, it will also be suitable for textural plaster, since the thick layer of plaster will hide all small irregularities. Under painting the walls are prepared for their subsequent staining - both by ordinary colors and decorative, textural. The perfect wall quality is necessary for later on the painted surface you have not seen either scratches or grooves. 
Second Stage - Processing Prepared Wall
After you made the wall perfectly smooth, the wall is still there dust from sanding putty. You should be removed over it, because to glue anything to dust or get good quality The surface is almost impossible. For this, the wall is so ground. The primer compositions are different brands and with various binders - choose to your taste. In our opinion, the safest and most effective are acrylic primers on a water basis. After priming, to create high adhesion (with a wall with a wall), you need to apply a substrate with a roller (this prerequisite For smooth decorative paints, there is sometimes sufficiently specialized soil-substrate for textured). In no case is it not recommended to use ordinary paint for this - the paint has the composition as much as possible in order to cover the surface, in a special substrate - upper layer Creates a porous structure. If the seller tries to offer us a conventional paint - it is not necessary to order it, since the substrate for decorative surfaces is not expensive and this is just a matter of competence and decency of the seller. 
Stage Third - Applying Decorative Plasters
When applying decorative plaster, various techniques are used that can no longer be put in one article. Italian masters today are owned as the secrets of the past, and invent new techniques and new coatings. For example, only Ferrara Design, the usual silk plaster is applied at least five ways and at the same time can also serve as finishing paint and combined by various colors or textures. General rules No, for each coating, they are their own, and even one and the same coating can be obtained different ways Application and various tools. If you do not know how to recognize the correctness of the application technology at this stage - follow the rule of common sense and comply with the coverage of what you see on the sample. 
Companies that value in quality and reputation will make you absolutely free, before applying, a test pattern and you will know in advance - what your wall will look like.
Evgeny Sedov
When the arms grow out of the right place, live more fun :)
Content
Liquid wallpaper, flock, formulations, mamoping (wood breed) are very popular in our time. All this refers to a fashionable way of external and interior decoration. How to apply decorative plaster, what is this mixture? Makeup preparation rules you will learn from the presented review. This seamless finishing option is a wonderful replacement of wallpaper and other materials.
Types of decorative plaster
The manufacture of manufacturing technology is divided into three types:
- The texture has a gross structure of high viscosity.
- The structural contains a marble crumb, the result of applying is an even grainy surface. It is well applied to plasterboard and other mineral surfaces.
- Venetian - decorative stucco under the stone, has a homogeneous texture. As a result of applying, forms a perfectly smooth surface, similar to natural marble.

Depending on the derived surface, texture plaster is divided into several subspecies:
- Baras makes the surface of the wall uniformly grainy.
- Coroede. The surface treated with such a plaster resembles an isolated wood.
- The fur coat makes the wall with a rough and darous.
- Travertine is an imitation of a brick or masonry.
- Panel - bulk drawing.
Classification for the binder substance:
- acrylic (based on acrylic resin);
- mineral (based on cement);
- silicone (based on synthetic resin);
- silicate. (With liquid glass).

Additionally, the specific types of this finishing material should be distinguished:
- Color is represented by 15 shades. Used as internal and facade.
- Roller contains a natural filler in the composition.
- Latex plastic gives surface smoothness and glossy look.
- "Wet silk" contains pearl particles, gives the surface of the wall or solid a view of shiny tissue.
- "Sea breeze" contains small sand, applies only for interior decoration.
How to make decorative plaster
After applying the primer on the walls, you should begin the preparation of decorating composition. How is the decorative plaster? There is nothing difficult in this, the material is realized in the form of a dry mixture, which is bred according to the instructions. If you add solid components (pebbles, pieces of tiles), the surface will acquire an unusual drawing. To give the desired color, the paint is added in the proportion of 1/10.
Decorative plaster out conventional shlatovka Can be prepared independently at home. This option is relevant for those who would like to save money by doing repair in the apartment. The plaster is prepared in the bucket: mix the putty of any manufacturer's company ("Cerezite", Dufa) with a grout and water tool. Complement the composition of the selected dye and other decorating elements.
Materials and tools

Before the start of work, it is important to take care of the preparation of the tools. Next:
- drill with an appropriate nozzle;
- bucket;
- structural roller;
- spatulas;
- ironing for structuring;
- grater or sandpaper for alignment;
- brushes and sponges.
Materials for the preparation of the composition are used depending on the selected putty version. Can be applied:
- wax;
- acrylic lacquer;
- white putty;
- means for grouting seams;
- dyes.
Methods of application
The technique of applying decorative plaster is a creative process that does not require special skills. Anyone may be in the role of a master of painter, studying its room with this material. Before starting work, the walls are aligned and processed by primer. The composition of 2-5 mm layer is applied using a spatula, cell or roller. It is advisable to choose a tool that allows you to capture a large area.

The decoration of walls with decorative plaster is made in different ways depending on the composition and consistency of the mixture:
- The method of applying a spatula. The composition is distributed over the wall or ceiling with circular motions or up-down.
- The distribution of a large brush will give a pattern in the form of waves.
- The toothed roller, Kelma or stamps give a repeating embossed ornament.
- The use of mint polyethylene will provide a non-standard surface relief.
Upon completion of the distribution of the mixture, it will take some time to its complete drying (8-48 hours). After time, the walls are aligned and cleaned from dust using sheet emery paper. After that, a protective layer or wax to the surface is necessarily applied. As a result, plaster will be protected from premature destruction under the action of moisture and dirt.
It is possible to apply decorative plaster on the plaster depends on the type and texture of the mixture. If it is coarse-grained, it is allowed to apply the composition immediately to the primer. The fine-grained decorative plaster, applied by roller, requires an additional layer of ordinary plaster. At the same time, it is important to wait when it will completely dry before the start of application (this may take several days).
How to paint decorative plaster

The decoration of walls with decorative plaster sometimes requires additional painting. Depending on where the walls decorate (outdoor design or internal, the kitchen is or a corridor), the design is complemented by new shades or whole pictures. Due to this, the plastered surface becomes bulk, and the interior is filled. It is important to choose and apply paint.
Facade and inner paints are made on the basis of acrylic, silicate, water or silicone. In addition to choosing paint, it is important to know its consumption, it is indicated on the package. As a rule, the height of the surface relief significantly increases its consumption. The technique, how to apply paint on decorative plaster, differs depending on the surface relief and type of plastering mixture.
How to prepare walls for decorative plaster
Before starting the mixture to the surface, it is carefully prepared. The wall is cleared of wallpaper residues, sucking the layer old finish and other things. Additionally, before applying the prepared decorative plaster, the surface is aligned and ground. An ordinary primer and impregnation will be suitable for the wall processing, which differ only in the method of application.
 Why you can not give icons
 Is it possible to give icons as a gift: Signs, the opinion of the Church
 A year ago left her husband, and now I do not know what to do