Colored whitewashed ceiling. How to whitewash the ceiling - simple options for transforming a snow-white surface. Tools and materials
If the old whitewash began to peel off and fall off in pieces, streaks and traces appeared on it, it is worth thinking about the transformation old surface. For this, one of three whitewashing methods is used - chalk, lime or water-based emulsion. Let's get acquainted with the features of all options, as well as the technology of their application and surface preparation for whitewashing.
We recognize the type of old whitewash - a simple test and dismantling of the layer
Protect yourself before starting work. Wear safety goggles and a respirator to prevent dust particles from entering the respiratory tract and mucous membranes, as well as overalls and rubber gloves, since in addition to water, you may have to treat the surface with an alkali or acid solution. Removing the old layer of whitewash is an integral process. If you skip this step, then soon the new whitewash will begin to crumble again and become unusable. Surface preparation gives good adhesion (adhesion) to the finishing material.
To determine which whitewash is applied to the surface, take a wet sponge and moisten the ceiling area. If it has darkened, the surface does not stain fingers, limestone whitewash. Chalk whitewash it is easily erased and remains on the hands, nothing happens to the water-based emulsion. It is easier to remove chalk whitewash, with limestone the process may be delayed. The more thoroughly you wash off the old whitewash, the longer the new finish will last.
Before proceeding with the removal of the old layer, cover the furniture and floor plastic wrap. Prepare necessary materials for dismantling the finish: a bowl of thermal water, soapy water, sponges, spatulas. Remove the loose pieces of whitewash with a narrow and wide spatula, this will reduce the formation of dust in the first stages of preparation. The lower layers are removed with warm water and soap. We divide the areas into small squares and wet them. Moisturizing the entire surface at once is not worth it - the water will quickly soak into the surface while you remove the whitewash in another area. Wet the wetted areas with a hard spatula. After removing the old whitewash, we check the surface. We clean, putty and open it with a primer. If rust marks and stains remain on the ceiling, we remove them with the help of special solutions. Before removing flaws, we wash the ceiling again clean water.
Rusty marks, stains and irregularities on the ceiling - home remedies
After cleaning the surface of the old whitewash, carefully inspect it to understand what you have to deal with. We definitely get rid of bumps, rust, mold, fungus, stains. Streaks and rust are first washed off with thermal water, and then we treat the areas with a 10% solution of copper sulphate. If the ceiling is soot, prepare a 3% solution of hydrochloric acid, treat the surface, remembering to wear rubber gloves. We process strong streaks on the ceiling 3 times until they completely disappear.
The solution will help neutralize stubborn stains liquid glass and water in a ratio of 1:2. To get rid of greasy stains on the ceiling, use a concentrated solution of soda ash. After the dirt is removed, carefully level the ceiling. To seal cracks, use store-bought or limestone plaster. To prepare the second version of the leveling mixture, take two parts of fine sand, a part of lime and water. Dilute the lime with water. Add equal amounts of sand and water. The result is a thick, plastic mass. When using slaked lime, first mix it with sand and only then dilute the dry mixture with water.
For deep use putty. Buy a ready-made mixture or make your own. home option we make putties from one part of chalk, two parts of gypsum and wood glue. To get the right solution, the glue calculation is 50 g per 1 liter of water. We apply putty on a spatula, distribute the mixture first across, and then along the cracks and irregularities on the ceiling.
After the putty dries, we pass over the surface of the fine-grained sandpaper or pumice stone, removing roughness. Next, prime the ceiling. It is better to choose an acrylic primer, it is odorless, dries quickly and adheres well to the surface. When the primer dries, the ceiling will be smooth and ready for a new whitewash.
Chalk and lime - characteristics of finishes and preparation options
Ceiling whitewashing with chalk and lime – two environmentally friendly and hygienic options. Plus, limestone whitewash also has antibacterial properties, tightens small cracks. However, for some people, lime is an allergen. An alternative option is chalk or water emulsion. Chalk whitewash meets sanitary and hygienic standards, allows you to achieve deep whiteness.
If you put new finish on old whitewash, we apply the chalk solution to the chalk, and the lime to the lime, having previously made a test for the surface soiling.
To prepare chalk whitewash, consider two options - using ordinary dry chalk in bars and chalk paste. To make the first solution, we prepare three kilograms of dry chalk, chop it into small pieces and sift through a sieve. Pour the mixture into a container and pour 3-3.5 liters of warm water. To the resulting mixture, add 100 g of wood glue and 50 g of chips laundry soap. To avoid yellowness, add blue (ultramarine) or color to the solution suitable shade. For this amount of mixture, 20 g of blue will be enough. If you want a deeper blue effect, add more ultramarine. Blue protects the coating from impact ultraviolet rays makes the surface white. Mix the solution thoroughly with construction mixer or manually, filter through a double layer of gauze, get rid of lumps.
In order not to crumble the chalk, purchase a ready-made chalk paste. Dissolve the wallpaper paste in warm water according to the instructions and mix the resulting solution with chalk paste in proportions of 4:1. After mixing, the mixture is ready for use, it is not necessary to filter it.

We check the readiness of the solution with a knife. We dip it into the solution and look: if the drops flow down the blade like water, the mixture is too liquid. To bring it to the required viscosity, add more chalk. The same rule applies to limestone whitewash.
Lime is sold in dry or slaked form. Depending on the quenching speed, it is divided into three types: fast (10 minutes), medium (20 minutes) and slow (more than 30 minutes) reaction. How less speed quenching, the smaller the portion for quenching lime is poured. Consider three options for preparing limestone whitewash.
For the first option, we prepare six kilograms of slaked lime, pour eight liters of warm water into the dry mixture in small portions. Add half a glass of laundry soap shavings and 200 g of diluted wood glue. Mix everything thoroughly and add blue to obtain the desired shade of blue. We make whitewashing more stable: dilute a glass of table salt in the prepared solution. If you want to give the whitewash a deeper shade, use dyes. We dilute them in a separate container and pour in portions. Do not forget that after the whitewash dries, it will become a tone lighter. We take this into account when adding color.
We prepare the second version of lime whitewash at the rate of 0.4 kg of lime per 600 ml of warm water. To the resulting mixture, add 5 g of drying oil and salt. Mix everything thoroughly until a homogeneous mass is obtained. The finished solution should have the consistency of thick cream. Such whitewashing will stay on the ceiling for a long time and not crumble.
For the third whitewash option, mix two kilograms of slaked lime with 100 g of sodium chloride solution or 200 g of aluminum alum. Do not forget about blue, it will take about 20–30 g for such an amount. If you want to add dye, watch the concentration. Dilute 500 g of dye and add it in portions to the solution, achieving the desired color. Stir the mixture thoroughly and pour in warm water, bringing the mixture to 10 liters.
Whitewashing with a brush and roller - the right application technology
Whitewashing the ceiling is carried out in several ways - using a brush, roller, spray gun or vacuum cleaner with a blowing function. At home, as a rule, a brush or roller is used, as well as a combined version. The size of the whitewash brush is 15–20 cm. Before use, we recommend soaking it in water for a couple of hours so that the bristles become softer and do not stick to the whitewashed surface. When choosing a roller, look at the work item. If you want whitewash to be smooth, opt for a short pile roller. When choosing a roller with a long "fur coat", the final staining effect will resemble an orange peel. To speed up whitewashing, we recommend purchasing a telescopic handle along with the roller.
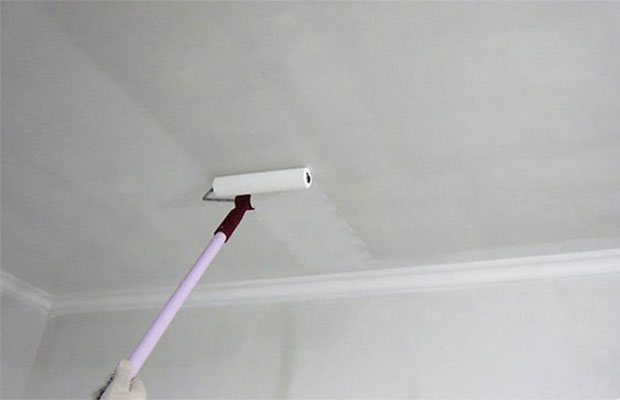
To whitewash the ceiling, divide it into several zones. We advise you to start work from the window and move to the door. Do the work slowly so as not to stain the walls. The first layer is applied along the window, and the second - perpendicular to the window opening. Remember, we apply the second layer after the first has completely dried, otherwise stains will be visible, and the whitewash itself will turn out to be not neat. For beginners, for whitewashing the main part of the wall, we advise you to use a roller, and leave the brush for hard-to-reach places- around pipes, fixtures, joints and partitions. In addition, this method will significantly speed up the work process. For convenience, pour the solution into a tray with a squeezing mesh. Before each application, we outlive the roller, minimizing streaks. The first layer, as in the case of a brush, is applied along the window, and the second - perpendicularly, rolling the roller carefully over the surface. If, after the second layer has dried, the whitewash lay unevenly, we apply the third fixing layer.
The whitewashed ceiling has a finely porous structure, the surface "breathes". This finish option is also considered bactericidal and wear-resistant. This is a budget method that allows you to update the ceiling quickly. Properly whitewashed ceiling retains its perv this species about 5 years.
In order not to waste time preparing chalk and limestone mortars, cover the ceiling with a water-based emulsion. This paint option adheres well even to old whitewash, the finish does not crumble and becomes more resistant to abrasion. The principle of application is similar to chalk and limestone mortar. To apply the first layer, we recommend slightly diluting the paint with water. The second layer is applied with undiluted paint. Such a ceiling will be smooth and even without gaps.
Whitewashing the ceiling with a blown vacuum cleaner - learning to use useful equipment
Do-it-yourself whitewashing with a brush and roller is a reliable process, but it takes a lot of time. A spray gun (spray gun) or a vacuum cleaner with air blowing will help speed up the process several times. The airbrush in the apartment creates a lot of splashes, it is more expedient to use it in large areas (workshops, warehouses, public buildings). But a vacuum cleaner with a blowing function - best option for home conditions.
To whitewash the ceiling with such a vacuum cleaner, fill glass jar solution, cover it with a lid and press firmly. Insert the hose into the opening of the lid, shake the jar, turn on the vacuum cleaner. Cover the air valve of the vacuum cleaner cover with your finger and press the spray button. Bring the sprayer at a distance of 0.7-1 m from the ceiling and spread the composition over the surface with smooth movements, not lingering in one place for a long time to avoid streaks. To get the most even and smooth surface, apply 3-4 layers of whitewash. Applying the solution with a sprayer hides roughness better, since the layer is denser and thicker.
There are a huge number of options for finishing the ceiling, but whitewashing is the most affordable and simple. With a limited budget for repairs, such a solution will be the most optimal, and a clean and smooth surface will in any case give the room a neat, well-groomed look. In addition, whitewashing the ceiling with your own hands does not take much time and does not require much effort.
Ceiling preparation
It is impossible to whitewash the ceiling on the old coating: when wet, the previous layers of whitewash will begin to peel off and stick to the brush, making the process difficult. In addition, the surface will not be perfectly smooth, which is completely undesirable. When cleaning the ceiling, it is necessary to take everything out of the room or cover it with polyethylene, otherwise you will have to wash everything from lime and.
Step 1. Cleaning the surface

For cleaning you will need:
- bucket with water;
- sponge;
- medium-sized metal spatula;
- clean rags;
- ladder.
If you clean a dry ceiling, a lot of dust will rise, and the process itself will drag on for a long time; much faster and more convenient to remove whitewash after moisturizing. You should not immediately wet the entire area, since the surface dries very quickly, it is better to divide the ceiling into small areas and moisten as you go.
After wetting the whitewash, you need to wait a few minutes until the layers are saturated with water to the base, then the coating is very easily removed with a spatula. Finally, the remaining chalk or lime is wiped off with a clean, damp cloth until no traces remain.
Step 2. Sealing joints and cracks
For further preparation, you will additionally need:
- sickle;
- putty;
- sandpaper;
- primer;
- brush or roller;
- level.
Between the ceilings always remain, which gradually diverge from time to time. So that they do not show through on the ceiling, they are embroidered, filled with a putty mixture, and covered with sickle on top. Putty is again applied over the sickle and carefully rubbed with a spatula, smoothing the surface.
While the joints are drying, the ceiling is carefully inspected and defects are eliminated. Small cracks are simply rubbed with mortar, recesses and chips
Step 3. Spot removal
Very often, spots appear on the ceiling that appear through the finish. It can be quite difficult to remove them, but this must be done precisely at the stage of preparation, otherwise after a while they will again be visible through the layer of whitewash. Spots from the flow of water are removed with bleach or whiteness: a sponge is dipped into the liquid and pressed against the stain until it brightens. Of course, you need to work with rubber gloves to protect your skin.

To remove rust stains, you will need copper sulfate. Prepare a saturated solution of bright blue color, smear the stain well, let it dry and repeat everything again. If necessary, re-process until the traces fade. After that, the problem areas are well primed and dried.
Step 4 Alignment

When all noticeable defects are removed, a level is applied to the ceiling surface in different places to determine the height difference. If there are recessed areas, they are puttied separately, and when the solution dries, the whole is covered with putty. Usually, finishing putty is used, which is applied in 2 layers 1-2 mm thick.
For work, they take two spatulas - narrow and wide, when applied, hold the spatula at a slight angle to the ceiling. The resulting sags or stripes are removed after the mixture has dried with sandpaper. It is necessary to sand the entire treated area in order to give the surface maximum smoothness. In conclusion, the ceiling is wiped with a dry cloth from dust and primed.

Prices for mixtures for leveling walls and ceilings
Mixtures for leveling walls and ceilings
How to whitewash the ceiling
Chalk, slaked lime and water-based paint are used for whitewashing. Each option has its own advantages, therefore, in order to decide, you need to learn about the basic properties of these materials.


The chalk solution is easy to apply, has good covering power, and is almost odorless. Chalk - very cheap material, and therefore whitewashing will cost a penny. But at the same time, the chalk gets very dirty, the preparation of the solution takes time, and the surface may acquire a yellowish tint. To prevent this from happening, blue is added to the solution.


Lime has bactericidal properties, well closes small cracks, lasts a long time, has a low cost. The disadvantages include a sharp bad smell, which appears when diluting the solution and the causticity of the material. Whitening with lime must be done with gloves, otherwise it will corrode the skin on the hands.

Paint on water based- this is the best option. Its cost is higher than that of chalk or lime, but the covering power is much greater. It does not smell, it is easy to apply, it is sold ready for application, the painted surface does not get dirty. There is a washable paint that is especially suitable for wet areas.
Prices for whitewashing ceilings
Ceiling whitewash
ceiling whitewashing process
For whitewashing you will need:
- ladder;
- small brush;
- roller 20 cm long;
- plastic container.
Step 1. Solution preparation

To dilute the chalk, you need water, preferably warm, PVA glue and blue. Glue is first diluted in water, and then chalk is added in small portions. The solution is well stirred, all lumps are broken, blue is poured in. Again, everything is mixed until a uniform color. On 10 square meters you will need 3 kg of sifted chalk, 30 g of glue and 20 g of blue.
Less lime is required for the same ceiling area: you need to dilute 1.7 kg of lime in water and add 40 g of blue. At first they take a little water, about 5-6 liters, and then add it little by little, depending on the required concentration of the solution. if necessary, also dilute, adding only clean water. If you want to give the ceiling a color shade, you can use special pigments.
Step 2. Applying the first layer

They begin to whitewash in the corner from the window; first, the joints of the ceiling and walls are carefully treated with a brush, and then whitewash is applied to the surface itself with a roller. You can not strongly dip the roller into the paint, in order to avoid splashing and streaks, the layer must be thin and uniform. Whiten should be parallel movements perpendicular to the direction of light. After finishing the application of the first layer, the surface is left to dry completely.

Step 3. Reapply whitewash

The base can shine through the first layer, the stripes from the brush or roller are also clearly visible. To remove these defects will help the second layer of whitewash, which is applied perpendicular to the first. The solution must be mixed, because lime, chalk and paint could settle to the bottom. After that, they begin to whiten from the same place as the first time. Movements should be as uniform as possible, confident, then the quality of whitewashing will be high. In order to avoid unpainted areas, when applying the composition, the ceiling is visually divided into strips and overlaps 4-5 cm wide are made at the joints.

After completion of work, it is necessary to exclude the occurrence of drafts and ceiling lighting sunlight otherwise the coating may peel off. Also, you can not dust in the room while the whitewash dries; all paint stains on the floor and walls should be wiped immediately with a damp cloth, and then swept up later so that the dust does not settle on. Subject to these simple rules re-finishing will be needed no earlier than in 3-4 years.
Video - Whitewashing the ceiling with your own hands
In the modern world of design, much attention is paid to stretch ceilings with beautiful lighting and multi-level design or ceilings finished with wood and plastic panels. Undoubtedly, such ceilings look spectacular, but they require considerable effort and financial resources to create them. For those who want to receive beautiful ceiling With minimal cost, you should pay attention to the whitewashing of the ceiling. This simple finishing method has been known for a long time and is still relevant. Whitewashing the ceiling has many advantages over modern options finishes and can be performed different ways. There are no particular difficulties or secrets in how to whitewash the ceiling, the main thing is to understand the essence of the work performed and be able to handle the tool.
Surface preparation
The execution of whitewashing the ceiling begins with the preparation of the surface. At this stage of work, it is necessary to clean the surface of the old coating and, if necessary, level and repair the ceiling itself. All of the above works are mandatory if you do not want irregularities to be visible on the surface of the ceiling after whitewashing, and the whitewash itself does not crumble after a couple of months.
Ceiling cleaning
Work on cleaning the surface of the ceiling is required in preparation for its whitewashing. This is due to several factors. Firstly, the old coating may be of a material that will eventually show through a layer of whitewash. Secondly, the old coating may peel off in places and finally disappear after whitewashing. Thirdly, removing old finish, you can more accurately assess the condition of the ceiling and the need for its repair. Fourthly, only by applying a layer of whitewash on a clean and carefully prepared surface, you can be sure of the durability of whitewash. The method of cleaning the ceiling depends on the material of the old finish.
To complete all ceiling cleaning work, the following may be required:
- stepladder or goat;
- putty knife;
- wide brush or roller;
- hammer or perforator;
- spray bottle or water container.

If the ceilings were previously painted with oil or acrylic paint , then you can remove it as mechanically, and with the help of a special wash. In the first case, using a conventional hammer, the paint is knocked off the surface. In the second, the surface is covered with a chemical wash and after some time the paint is carefully removed with a spatula. Which way to choose, decide directly to the owners. But it is worth noting that in the first case, the work is rather inconvenient and difficult. As for the second option, despite its simplicity, the use of a chemical wash is very unhealthy.
To those who have ceiling covered with wallpaper, you need to do the following. The entire surface of the ceiling should be moistened warm water and let the wallpaper absorb the water. And then after 10 - 15 minutes, use a spatula to clean the ceiling from the wallpaper. If in some places the wallpaper will not give in, then you can re-wet it with warm water and then try to remove it again. Once the ceiling surface has been cleaned of wallpaper, it should be rinsed to remove adhesive residue.

Old whitewash and water emulsion removed from the ceiling surface in two ways. First, the entire surface is wetted with warm water using a roller or sprayer, and then the coating is carefully scraped off with a spatula. The second - whitewash is removed "dry" with a spatula or brush for metal. The first method is more preferable, since there will not be much dust during the removal process. Upon completion, the ceiling should be washed to finally remove the remnants of the old coating, and allow it to dry.
Sometimes ceiling surface is tiled. In such cases, a hammer or even a hammer drill may be required to clean the ceiling. After the tile has been removed, the surface is cleaned of the remnants of the adhesive mixture or cement mortar.
Whatever the old ceiling finish, removing it should leave bare and clean concrete or wooden surface overlap. During the cleaning of the ceiling, it is necessary to take care of the protection of the eyes and respiratory tract in advance. It will not be superfluous to cover the floor with plastic wrap, so that later it will be easier to clean up.
After the old finish has been removed from the ceiling, a thorough inspection of the surface for cracks, unevenness or other damage should be carried out. Any deficiencies found will need to be corrected. The order of work is as follows. First we embroider the cracks. To do this, with the help of a corner of the spatula, we slightly expand the crack itself. Next, apply a deep penetration primer to the damaged section of the ceiling and let it dry, then putty. It should be noted that for shallow cracks this will be enough. But if the depth of cracks and depressions is more than 3 mm, then you will have to use a paint grid, which will be hidden under a layer of putty for a more reliable repair.

If rust has previously appeared on the surface of the ceiling, then it is necessary to protect the whitewashed ceiling from this. To eliminate and protect the surface from the appearance of rust spots, the places of its appearance should be treated with copper sulphate.

The next step is to completely level the surface. To do this, the entire ceiling is primed and a paint grid is glued onto its surface. Then the surface of the ceiling is puttied. After drying, the ceiling is polished so that no irregularities remain on its surface.
To whitewash the ceiling, repairing its surface is mandatory both for those who want to see a perfectly even ceiling after whitewashing, and for those who are just going to do redecorating. Indeed, on a whitewashed or painted ceiling, the slightest flaws are visible, which spoils the overall impression of the repair.
Upon completion of the preparation of the ceiling surface, you can proceed directly to finishing. Ceiling whitewashing is done in several different ways using the three most popular materials - lime, chalk or water-based paint. It should be noted right away that the price for whitewashing the ceiling depends on the materials used. So the cheapest will be whitewashing the ceiling with lime and chalk, but whitewashing the ceiling with a water-based emulsion will cost a little more. However, in comparison with other methods of finishing the ceiling, whitewashing is really the cheapest and most environmentally friendly option.

We start whitewashing work with preparation of a primer for whitewashing. It is customary to make it on the basis of slaked lime. But if the primer remains after repairing the ceiling, then you can use it. To make a primer, you will need 200 g of laundry soap, 2 l hot water and 100 g of drying oil, 3 kg of slaked lime.
Soap is cut into small pieces or shavings and then dissolved in hot water. As soon as the soap has dissolved, add drying oil and mix thoroughly. In a separate container, we breed lime using 4 liters of water. After that, the lime and soap solutions are mixed together. The resulting concentrate should be diluted with 10 liters of water, after which it can be used. Sometimes wood glue is used instead of lime for a primer.

After the primer is diluted with water, it must be filtered through gauze or a sieve so that the resulting mixture is homogeneous. Now apply a primer to the surface of the ceiling. To do this, you can use a roller, a wide brush or a spray bottle. After applying the primer, the tool should be thoroughly rinsed. After the entire ceiling is covered with a layer of primer, proceed to whitewashing.
Important! Today, the purchase of a compressor and a spray gun is not a particular problem. But if the funds do not allow, then you can use a vacuum cleaner, which provides for connecting the hose to “blowing”. This function was provided in the old Soviet vacuum cleaners. The set of such vacuum cleaners also includes a special spray nozzle.

The next step will be preparation of chalk or lime mortar. For chalk whitewash, dissolve 3 kg of chalk or lime in 5 liters of water and add 20 g of ultramarine (blue). Mix everything thoroughly and filter through cheesecloth or a sieve. The resulting solution should have a homogeneous consistency without lumps. This amount of chalk whitewash is enough for about 10 - 12 m2.

Important! Ultramarine, or as it is also called - "blue", is added to the chalk whitewash to preserve the white color of the chalk. The fact is that the chalky surface acquires a yellowish color over time, and ultramarine will help maintain whiteness.

For lime whitewash, we dissolve 3 kg of lime in 10 liters of water with the addition of 100 g of common table salt and 200 g of aluminum alum. Preparation of lime whitewash carries the risk of burns, so strict precautions must be observed when working with such whitewash. It is necessary to work in rubber gloves, and when applied to the ceiling, protect the eyes with glasses, the respiratory tract with a respirator. It is also worth noting one more important feature lime whitewash. It is an excellent sanitary remedy for fungi and mold. This is especially useful for those who thought about the question of how and how to whitewash the ceiling in the bathroom and kitchen.
Important! Before applying whitewash, it is highly desirable to cover the floor with plastic wrap to protect it from drops of chalk, paint or lime. Also, it will not be superfluous to protect the walls in this way. The film is glued to them with masking tape. In addition, on the walls in this way you can indent from the ceiling for whitewashing.

Now proceed to the application of whitewashing on the surface of the ceiling. This can be done with a roller, brush or with a spray gun. If you are using a sprayer, then this the best option. Since the whitewash is sprayed evenly and in a thin layer. But two things need to be noted important moments. Firstly, whitewash will have to be applied in several approaches. First, apply the first layer, then let it dry for 1.5 - 2 hours and then apply the next one. Secondly, whitewash should be sprayed in circular motions at a distance of 15 - 20 cm so that small drops fall on the surface of the ceiling.

If whitewashing is done with a roller or brush, then everything is somewhat more complicated, since you will have to very carefully apply whitewashing. The process of whitewashing with a roller or brush is as follows. After wetting the brush or roller, wring it out a little to get rid of excess liquid, then gently apply it to the ceiling. We make smooth straight movements in the direction from the window. So we apply the first layer of whitewash. After allowing the first layer to dry, apply the second perpendicular to the first. In this simple way, flaws will overlap, and the surface will acquire a rich color.

In many ways, it is similar to whitewashing with chalk or lime. The difference lies in the preparation of the surface for painting. Where instead of a homemade primer, a deep penetration primer is necessarily applied. In addition, the purchase of paint eliminates the need to prepare and dilute a solution of chalk or lime. Today, the most common whitewashing of the ceiling is Snezhka. The water-based paint of this manufacturer is famous for its excellent characteristics and affordable price. It should be noted that in addition to ready-made water-based paint, ready-made whitewash chalk and lime mortars can be found on the market. Like, for example, lime paints from Bio Apnena. The main advantage of such paints and solutions is a completely ready-made mixture with the addition of all the necessary components in the right amount. In such mixtures, it is enough to add a little water and mix thoroughly before use.
After 2-3 layers of whitewash have been applied to the ceiling, leave it to dry. It is important to follow a few simple rules. In no case should you speed up the drying process by opening doors and windows wide open. Also, the drying of whitewash should occur in a room shaded from sunlight.
Whitewashing the ceiling is quite simple to perform, and with a certain skill even a beginner can do it. The main thing is to adhere to safety precautions and follow the above recommendations.
Whitewashing is one of the simplest and inexpensive ways ceiling repair. In some cases, you can even whitewash the ceiling with old whitewash, but the quality of such a finish will depend on a competent approach to the work.
Is it possible to whitewash over old whitewash?
If whitewash is applied to the ceiling for the first time, then the preparation of its surface consists only in leveling and applying finishing material. But if there are traces or layers of previous whitewash on the ceiling, then its surface must be carefully examined and checked, since chalk, lime and water-based paint are a very unreliable basis for any ceiling finish.
In order to determine whether it is worth whitewashing the ceiling without washing off the old whitewash, it is necessary to determine the following:
- The type of whitewash available. This is necessary in order to prevent the application of one type of whitewash on top of another, which can lead to streaks and irregularities. In addition, if the ceiling was whitewashed with chalk, then the application of any finishing material to its surface will have to be abandoned.
- Reliability of the old coating. The new layer will only hold firmly if the old one is thick enough.
- Dirty old coating. It should be understood that rust spots, fungus and mold on the old whitewash will show through the new coating, so all contamination must be completely removed before applying it.
- The presence of cracks and chips on the surface of the ceiling. In some cases, leveling the ceiling surface is possible only after the complete removal of the whitewash layer.
Preparing the ceiling for whitewashing
If, after inspecting the ceiling and checking the strength of the existing coating, it was decided to apply whitewash over the old layer, then at the first stage it is necessary to completely clean the surface of all existing contaminants. Dust and cobwebs are removed from the ceiling with a wet cloth. Rust stains are also first wiped with a cloth soaked in warm water, and then treated with a 10% solution of copper sulphate. Grease stains on the ceiling can be removed with a solution baking soda, which after removing the stain must be completely washed off with water.
If there are extensive traces of mold on the ceiling, and there is high humidity in the room, then it is better to completely wash off the previous layer of whitewash.
If the contamination by the fungus is insignificant, then they can be removed with a soapy solution or a special antifungal agent, and after drying, treat with an antiseptic.
The final step in preparing the ceiling surface for whitewashing is a primer. It is necessary so that the new coating layer adheres to the old one as tightly as possible. Priming is carried out both on a clean surface after washing off the whitewash, and on old water-based paint or lime. A roller is best for applying the primer, but a brush or sponge will also work. Before whitewashing, the surface of the ceiling treated with a primer must dry completely within a day.

The choice of material for whitewashing
Whitewashing the ceiling is done using one of three materials: chalk, lime or water-based paint.
- Chalk. This is one of the most popular types of whitewash, the main advantages of which are environmental friendliness and low cost. Chalk whitewash makes the ceiling perfectly white and is easy to apply, but it has a significant disadvantage - the durability of such a coating is very low. After some time, the chalk gradually begins to crumble, so it is not recommended to apply it over an existing coating.
- Lime. Lime whitewash has the same properties as chalk, but is more durable and resistant to abrasion. Due to its porous structure, lime is able to pass water through itself, which makes it more effective in conditions high humidity. Lime whitewash hides small irregularities well and has a higher resistance to mold development.
- Water based paint. This type of whitewash differs from the previous two in its characteristics, which depend on the specific type of paint (acrylic, silicate, silicone, acrylic-latex, polyvinyl acetate). One of its main advantages is the absence of the need to prepare a solution, since the paint is already sold in ready-made. Moreover, big choice shades allows you to use this type of coating in a wider range of design solutions.
The main disadvantage of water-based paint compared to chalk and lime is its higher price and high consumption.

Features of applying whitewash to the old layer
After the type of whitewash has been selected, you can begin to apply it to the ceiling. In this case, the quality of the ceiling coating will depend not only on the material chosen, but also on the tool used. If there is no experience in whitewashing, it is best to use a roller or brush. Using a spray gun or vacuum cleaner special nozzle allows you to whitewash the ceiling yourself much faster and make the coating more even, however, it requires certain experience and skills.
When using a brush or roller, the first layer must be applied with even strokes perpendicular to the window, and the last layer - in parallel, starting from one of the corners of the room. This technology will avoid the appearance of stripes and stains on the surface of the ceiling. Moreover, each subsequent layer of whitewash is applied only after the previous one has completely dried.

Equally important is the correct preparation of the solution. When preparing whitewash from chalk or lime, it is recommended to add 50-100 grams of glue mixture to the solution. This will increase the strength and service life of the ceiling covering. Also, 20-25 grams of blue can be added to the solution, which will give the whitewash a more saturated, bluish tint.
Water-based paint must be applied in a similar way in several layers, allowing each layer to dry completely. In this case, for the first layer, a solution is made from paint mixed with water to a liquid consistency. Subsequent layers are applied using the paint undiluted.
- choose what you want, but with all this good old whitewashing does not lose popularity. Among the main reasons are low cost, ease of application and environmental friendliness. These qualities are sometimes enough to turn a blind eye to the low durability of the coating. Let's figure out how to whitewash the ceiling and walls with lime and chalk, decide whether water-based paint belongs to whitewash, and which material shows itself better.
No. 1. The benefits of whitewashing
Whitewashing ceilings and walls is not the most modern way finishes, and far from the most fashionable. What makes thousands and tens of thousands of people across the country still whitewash the old fashioned way? Whitewashing has enough advantages:
- low price- this is the main argument in favor of this type of finish. When the budget is limited, and it is necessary to put the room in order, the choice falls on whitewashing. For this reason, gypsum and chalk are still actively used in hospitals, schools and other public institutions for finishing ceilings and walls;
- ease of application. A person without special training will cope with whitewashing - no special skills, abilities and tools will be needed;
- careful appearance . Of course, in terms of intricacy and decorativeness, the whitewashed ceiling is inferior to the tension system, and whitewashed walls– trimmed Venetian plaster, but if whitewash is applied correctly, then in the end you can get a fresh white surface with an even matte color. If desired, a dye can be added to the solution with whitewash;
- harmlessness, environmental friendliness ability to pass moisture and air. Ordinary whitewashing in this regard is far ahead and ceiling tiles from expanded polystyrene, therefore, in some cases it will be even more preferable;
- lime whitewash has bactericidal properties, so it will become an additional protection against and fungus.
Among cons low durability(1-3 years), uncomplicated look and dirt on application.
No. 2. How to whitewash: lime, chalk or water-based paint?
When they talk about whitewashing, they most often mean exactly lime whitewash. Lime (this is calcium oxide) is quenched with water to produce a material that is used in finishing.
The main advantages of lime whitewash:
- bactericidal properties of the material, so this finish is used in kindergartens, schools, medical institutions even in damp rooms. The antiseptic qualities of lime also make it possible to actively use it in the arrangement of cellars and chicken coops. For the same reason, the bark of trees is treated with lime whitewash;
- if mortar was prepared and applied correctly, the coating will last about 3 years and even more;
- resistance to temperature extremes and high humidity. That is why lime can be finished if other materials are not affordable;
- excellent adhesion to almost all materials, including wood, plaster and;
- ability to fill small cracks;
- low price, which is typical for any whitewash.
With all the advantages, lime is different and shortcomings. The main one is the possibility of getting burned, so all work must be carried out with gloves. Chalk is much safer in this respect. In addition, there is a chance of leaving stains and streaks. Allergy sufferers are not recommended to use this finish. 
chalk just like lime, it is inexpensive and environmentally friendly, and among its additional benefits:
- safety at work;
- deeper White color, which many like more than the color obtained with lime whitewash;
- the ability to use in rooms where allergy sufferers live.
Chalk, when interacting with water, is able to accumulate it, which leads to the appearance of cracks on the surface and the rapid exfoliation of the whitewash layer, therefore, chalk whitewashing is taboo in bathrooms, kitchens and other wet areas. If the application technology is violated, you can get not only spots and stains, but also bubbles. In addition, chalk whitewash stains. 
There is such a concept among the people as whitewash water-based paint . This finish has nothing to do with whitewashing and refers to. It began to be attributed to whitewashing, apparently due to the composition of the materials used - this lime-based paints. Today, painting with mineral water-based paints can be considered the best alternative to whitewashing. Among the main advantages of this option:
- resistance to abrasion, temperature extremes;
- bactericidal properties;
- the ability to breathe;
- human safety;
- ease of use, high speed drying.
However, the durability of such a coating is also not up to par, but the price is much higher than that of ordinary whitewash. 

No. 3. How to determine what was whitewashed?
Probably, at least once in a lifetime, everyone has heard that different whitewash cannot be mixed. If lime whitewash was applied to the ceiling or wall, then when mounting on top of the chalky one, ugly spots will soon be observed. When preparing a room for finishing and evaluating the condition of the surfaces, it is very important to determine what whitewashing was done before.
It is very easy to check. It is enough to wet a small fragment of the finish with water, and observe the reaction. Wet lime will darken a little, and if you rub the surface with your finger, there will be no white marks on your hands. 
No. 4. How to wash off whitewash and prepare the surface?
Before whitewashing a ceiling or wall, it is necessary to prepare the room and surface for future work. The sequence of actions is as follows:
- if possible, remove all pieces of furniture and decor from the room. What could not be taken out can be covered with plastic wrap and secured with masking tape;
- It will be easier if you wet it first. It is better to wet the surface in parts so that the moisture does not have time to dry. Some advise adding a little to warm water citric acid or vinegar, others use a mild soap solution. You can moisten the surface with a sponge or brush. It is enough to simply remove the wetted whitewash with a spatula. Fragments that fall off, it is better to try to drop them into a separate container, minimizing their contact with the floor. The remains are washed off with a damp sponge. Chalk whitewash is removed much easier;

- if there's visible spots surface needs to be cleaned up. Rusty spots are washed with water, and then treated with a solution of copper sulphate (the solution is prepared by adding 50-100 g of vitriol in 1 liter of hot water). Grease stains can be removed weak solution soda ash: a rag is moistened in a 2% solution and applied to the contaminated surface until the stain completely disappears. Then the treated area is thoroughly washed with water. From soot, treatment with a solution of hydrochloric acid with a concentration of 2-3% can help;
- application of an antifungal composition;

- if there are noticeable on the surface cracks and dents then it is better to get rid of them. If the depth of irregularities is within 1 cm, then you can take it for, if there are cracks up to 3-5 cm, then it is better to take plaster. Putty can be found ready-made, you can - in dry form, it will need to be closed with the amount of water indicated on the package. Apply the mixture with a spatula, and level it with it. If there are large vertical deviations, you can use building rule. Many experts consider it illogical to apply expensive store putty for cheap whitewash, therefore prepare the composition yourself. The easiest recipe: mix gypsum, chalk and wood glue solution in a ratio of 1:2:2. The glue solution is prepared by adding 30-50 g of glue to 1 liter of water;

- after the putty dries, it must be rubbed with sandpaper to get a smooth smooth surface;
- application . In principle, you can take any ready-made composition, or you can prepare your own primer. One of the simplest and most suitable recipes: dissolve 50-100 g of drying oil and 200 g of laundry soap cut into thin chips in 3 liters of hot water, 3 kg of slaked lime are diluted separately in 4 liters of water, then the two solutions are mixed and diluted with water to a volume of 10 -11 l;
- after the primer has dried, you can proceed to whitewashing. It takes about a day to dry.
If your task is only resurface a whitewashed surface, then if there are small defects, they can be repaired with cement-based putty, and then proceed to apply a new layer of whitewash.
No. 5. Preparing a whitewash solution
Since lime is used more often, we will start with it. The process of preparing the material is simple, but still requires care. So, how to dilute lime for whitewashing?

Now consider how dilute whitewash based on chalk:

Note that ready-made dry mixes are also on sale, where lime or chalk has already been mixed in the required proportions with other components - you just have to pour necessary quantity water. Such mixtures are more expensive if you take all the ingredients separately, but the difference is small. 
No. 6. How to whitewash the ceiling and walls: brush, roller or spray?
Theoretically, you can apply whitewash:
- brush;
- roller;
- spray gun;
- vacuum cleaner with air blowing function.
We note right away that the first two options are more applicable - it makes sense to use a vacuum cleaner and an airbrush with a large surface area to be whitewashed. 
Whitewash brush they take a special one, made of natural bristles 15-20 cm wide. After work, the brush can be washed and reused later. For whitewashing brick wall You can use a brush with natural bristles. It is advisable to soak it in water a few hours before use. In this case wooden handle swells a little and holds the bristles well, which will not fall out during the whitewashing process. 
Before applying the mixture, it is important to mix well again so that the shade is uniform. The first layer is applied perpendicular to the window, the second - parallel to the frames. In this case, the stripes from the brush will be minimally noticeable. Experts recommend slightly moistening the surface of the ceiling and walls before applying the mixture. 
It is better not to use a whitewash roller. When there is only one layer, this tool will still fit, but when applying the second layer, the dried first one may fall off. If you act carefully, you can get a beautiful matte surface. 
Sprayer and vacuum cleaner take only when you have to finish a large surface. The consumption of the solution increases, it is applied in a thicker layer, but it will be possible to mask small defects. If you have a sprayer at your disposal, then there are no questions. 
You can also apply whitewash with a vacuum cleaner if it has an air blowing function. Among the numerous nozzles in such models there should be a polyethylene cover with tubes. This cap is the atomizer. It must be put on a jar and connected with a hose to the outlet in the vacuum cleaner. It turns out that when air is blown out with a vacuum cleaner, air enters the atomizer, draws the solution from the can and sprays it through the nozzle. As a rule, there is a special hole on the sprayer, covering which you can get the required solution supply pressure. It is better to apply the solution in a circular motion, spraying at a distance of 70-100 cm. 
No. 7. In conclusion about safety
So that after whitewashing you do not have to be treated, it is better to take care of safety precautions in advance. The respiratory tract is protected with a respirator, a wet bandage or a protective mask. Hands must be protected with rubber gloves, and eyes with goggles.
 Robert Koch's biography and discoveries Robert Koch's significance of discoveries
 The main provisions of the theory of Taylor Frederick Winslow
 By the beginning of the 20th century, almost all regions of the Earth had already been explored by geographers.