How to whitewash the ceiling with a vacuum cleaner: surface preparation, options for preparing the solution, the instruction on the whitewash. Claims and the necessary ingredients. Features of using a vacuum cleaner as a sprayer
If you want your ceiling to be environmentally friendly and snow-white, then you should pay attention to the easiest and cheapest way to finish the ceiling, which is whitewashed. This article will describe in detail the plains of the ceiling with your own hands, namely, how to properly prepare the solution, the surface and the entire room for whitening, which tools will be required for this and in what sequence do all work.
Required tools

- For the solution of the solution, you will need a mixer nozzle that will need to insert into a screwdriver, a drill or a building mixer.
- For blissing you need to choose a special natural paint brushwhose width should be 15-20 cm.
- Malyary roller and tray for him.
- Vacuum cleaner having a nozzle for whitening. For this purpose, it is best to use a vacuum cleaner that has a function of blowing air. In such a vacuum cleaner there is a special hole, which must be equipped with a polyethylene cap with tubes. This lid is a sprayer used for whitewashing. It must be put on a regular half-liter jar and with the help of the hose, connect the outlet of the vacuum cleaner. When the vacuum cleaner is turned on, the air will be inserted through the pressure hose to the sprayer, sucking through a special tube a diluted spray mixture from the can and then pull it out through the nozzle along with the air. On such a sprayer there should be another hole, opening and closing which, you can adjust the flow of a spam mixture.
- Glass jar. In the event that you have little volume of half-liter cans, you can use a liter bank to whitewash, but for it you will have to use a longer tube that will be lowered into the solution so that it takes to the bottom.
- Spray.
What can break the ceiling?

There are two options that are currently the most common:
- whitening ceiling lime;
- ceiling with chalk.
These two options are environmentally friendly and hygienic. But choosing one or another option, you need to consider than your ceiling was previously seen. In the event that it was smelled by lime, it is better not to use a chalk blame, since otherwise divorces can be formed on the ceiling or blurry stains.
How to understand what did the ceiling blended before? First you need to wipe the surface with your hand: if you have traces on your hand, it is chalk, and if the hand remains clean, then lime. You can also spend on the surface with a wet finger: if the surface sticks to the finger, it means that the chalk, and if it does not remain on the finger and will darken, it means that it is lime.
- satisfies all sanitary and hygienic conditions, hygienic;
- it has a deep white;
- not allergen.
Lime:
- contraindicated in allergies;
- forms a smooth and smooth surface;
- able to tighten and secure small gaps;
- it has bactericidal properties.
In some cases, the plains of the ceiling can be carried out with the help of water-level paint, but it is still considered rather painting. Therefore, this article will not be considered this option.

Preparation of the room
In order to proceed to whiten the ceiling, you need to prepare the room. First you need to completely free the room from all the furniture. If the furniture does not work, you need to assemble it in the center of the room and close the sheets or cellophane concerning film. Close the floor and walls with a film that can be consolidated by the usual painting scotch. Close by concerning film all available decorative elements. Remove all cornices, lamps and chandeliers from the ceiling. Prepare for work the surface of the ceiling.
Preparation of the surface of the ceiling
The surface of the ceiling also needs to be prepared:
- you need to wash off the existing whitewash;
- if there is garbage on the surface of the ceiling, it must be removed;
- clean the surface from soot and soot, oil and fat spots, rust, water lines and yellow spots;
- if there is a fungus on the ceiling, then it must be removed using special means;
- remove from the surface of the peeling layer of plaster, putty and other finishing materials;
- if there is such a need, the surface is needed acrylic putty or plastering;
- all damage, such as detachments, potholes, scratches and cracks, must be sharpened;
- after complete drying, the surface must be seized emery paper;
- the surface is then required to be primed using deep penetration for this;
- leave the ceiling to dry for 24 hours.
In order for the lime whirlpool to leave the divorces and lay down exactly, it must be applied to a pre-moisturized surface.
Preparation of chalk solution
For the preparation of chalk, you will need:
- five liters of warm water;
- about 60 grams of dry joinery glue to be dissolved in water;
- in the resulting solution, it is necessary to pour about three kilograms of sainted chalk;
- in order to enhance whiteness and avoid a yellow shade, you need to add a little blue (15-20 g).
The resulting solution should be enough for a whitewash 10-12 square meters Ceiling.
To check the poverty of the solution, the blade of the knife should be lowered into it. In the event that the whitewashing will be flimsy, barring the blade, then the solution turned out to be too water. In this case, you need to add a little chalk.
Preparation of lime solutions
Lime cookeco is prepared as follows:
- in one liter of water you need to stir 2-3 kilograms of hazed lime;
- then, it is necessary to add a predetermined table salt to the solution (approximately 50-100 g);
- you still need aluminum alums (150-200 g);
- and the required dye (400-500 g);
- the resulting solution should be mixed very thoroughly and adding about 9 liters of warm water into it.
If a mortar It is wrong to cook, then defects can be formed on the surface, to remove that can be removed only with complete rework.
Preparation of instruments
Before starting work, you need to check all the nozzles of the sprayer and the tube. If necessary, you can rinse them. If the solution is applied with a brush, then it must be soaked in advance in warm water.
How to make the ceiling with your own hands?

There are three ways with which you can learn:
- vacuum cleaner or sprayer;
- roller;
- brush.
Pooks of the ceiling brush
- first you need to stir well;
- next you need to paint the brush with a small strip around the perimeter of the ceiling. This should be done slowly and very carefully so that the surface of the conjugated walls is not blocked;
- along the windows of smooth movements, it is necessary to apply the first layer of blots so that there are no surplus on the surface;
- after this surface, you need to dry;
- then you can apply a second layer of whitewash, which should be applied perpendicular to the window so that the strokes from the brush can be seen after drying.

In order to be good to whitewash the ceiling with a brush, certain skills are needed, so if you do not have such experience, it is better to use the Ceiling Ceiling to whitewash. The sequence of actions in this case will be as follows:
- first you need to carefully stir the solution;
- then it is necessary to paint a brush with a small strip throughout the perimeter of the ceiling;
- in the tray you need to pour a bit of solution;
- next, it is necessary using a roller to apply the first layer of blots on the ceiling, making it smoothly so that the solution is carefully rolled over the surface;
- after this surface, you need to give well;
- the second layer of the blots should be applied perpendicular to the window.
If we breed the surface of the ceiling with roller, then it will acquire a pleasant matte.
Ceiling with a spray or vacuum cleaner

Being with ordinary vacuum cleaner or sprayer is the most simple way. If you fulfill all the work correctly, then in the end you will have a very high quality surface.
The plains of the ceiling with their own hands using a sprayer or vacuum cleaner in the following sequence:
- first of all, it is necessary to thoroughly stir the solution;
- next, you need to fill in a solution of a predetermined bank;
- the jar must closely close the lid, in advance in water in water, which will provide a more dense fit;
- after that, in the hole of the cover you need to insert the vacuum cleaner hose and turn on the vacuum cleaner;
- the solution in the bank must be thoroughly shaken;
- then close the air valve with a finger or click on the sprayer lever;
- when applying the solution to the surface of the ceiling, you need to ensure that drops are not formed on it. Spraying the solution is necessary for smooth circular motions, holding the nozzle of the sprayer from the ceiling surface at a distance of about 70-100 cm.
To get the desired result, you will need to apply 3-4 layers of bliss. When the sprayer or vacuum cleaner, a thicker layer is formed, which allows you to hide all the available minor defects.
Precautions
When preparing a solution and conducting work, certain precautions must be observed:
- on the body you need to wear a bathrobe;
- to wear a hat or tie a slam on the head;
- on the eyes you need to wear safety glasses;
- in the hands it is necessary to wear rubber gloves;
- the mouth and nose should be protected by a wet bandage, thanks to which there will not be small particles of chalk and lime.
The advantages of plays with lime or chalk
- after complete drying on the ceiling, a reliable film is formed, which will be resistant to abrasion;
- the ceiling will have disinfectant properties;
- such whitewings has small pores, thanks to which it will absorb water pairs and breathe.
If the crying solution is cooked correctly, and the work is made without a violation of technology, the ceiling spoiled in this way will have a wonderful view for 4-5 years.
Price on Painting Ceiling Crusto
I decided to bring the cost of whiten the ceiling by professionals as a comparison, perhaps someone will decide not to do this species Works with their own hands, but trust builders.
Ceiling with lime or chalk - from 0.7 $ / m.kv.
Poles the ceiling water-emulsion paint - from 1.2 $ / m.kv.
Removing the old whitewash - from $ 1.5 / m.kv.
* - Prices are taking into account the materials and depend on the scope of work and the region.
If the old pool began to be brought and disappeared with pieces, there were drums and traces on it, it is worth thinking about the transformation old surface. To do this, one of three ways are used - chalk, lime or water-emulsion. We will get acquainted with the peculiarities of all options, as well as the technology of their application and surface preparation to whitewash.
We recognize the type of old whitewash - a simple test and dismantling of the layer
Before starting work, secure yourself. Put the protective glasses and the respirator so that the dust particles do not get into the respiratory tract and the mucous membrane, as well as rob and rubber gloves, since in addition to water, it is possible to treat the surface with a solution of alkali or acid. Removing the old plating layer is an integral process. If you skip this step, then soon the new whirlwinds will begin to crumble again and come into disrepair. The surface preparation gives good adhesion (grip) with finishing material.
To determine which whores are applied to the surface, take a wet sponge and moisten the ceiling section. If he darkened, the surface is not dirty fingers, the whirlwinds of the limestone. Cretaceous whirlwinds easily erased and remains on hand, nothing happens with a water-free. It is easier to remove the chalk whitewash, with the limestone process can delay. What carefully you can old blissThe longer the new finish will be held.
Before proceeding with the removal of the old layer, shield furniture and floor polyethylene film. Prepare necessary materials To dismantle the finish: a basin with heat water, soap solution, sponges, spatulas. Remove the lagging parts of the spins with a narrow and wide spatula, it will reduce dust formation in the first phases of preparation. Lower layers remove with warm water with soap. We divide the plots into small squares and wet them. Moisten the entire surface at once - the water is quickly absorbed into the surface until you delete whitewear on another site. Swimming sections process the rigid spatula. After removing the old whitewash, check the surface. We clean, put off and open it with the primer. If rusty traces and divorces remain on the ceiling, we remove them with special solutions. Before removing flaws, wash the ceiling again clean water.
Rusty traces, divorces and irregularities on the ceiling - home remedies
After cleaning the surface from the old whitewash, carefully inspect it to understand what you have to fight. From irregularities, rust, mold, fungus, divorces are delivered. Things and rust are first washed off with heat water, and then process areas with 10% copper sulfate solution. If the ceiling in the soot, prepare 3% solution of hydrochloric acid, Treat the surface, without forgetting to wear rubber gloves. Strong drips on the ceiling process 3 times to a complete disappearance.
Neutralize the impaired spots will help the solution liquid glass and water in a 1: 2 ratio. To get rid of oily spots on the ceiling, use a concentrated solution of soda calcined. After the contamination is removed, thoroughly align the ceiling. To close the cracks, use shopping or limestone plaster. To prepare the second version of the leveling mixture, take two parts of fine sand, part of lime and water. Divide lime with water. Add an equal amount of sand and water. As a result, it turns out thick, plastic mass. When using harated lime first mix it with sand and only then we dilute the dry mixture with water.
For deep use putty. Buy a ready-made mixture or prepare it yourself. Home option Puttails make from one piece of chalk, two parts of plaster and joinery glue. To obtain the right solution, the calculation of the adhesive is 50 g per 1 liter of water. The putty is applied to the spatula, distribute the mixture first across, and then along cracks and irregularities on the ceiling.
After the putty dry, go through the surface of fine-grained emery paper or pembia, removing roughness. Next, the burning ceiling. It is better to choose acrylic primer, it does not smell, quickly dries and hips well with the surface. When the primer is driving, the ceiling will become smooth and prepared for the application of a new whitewash.
Chalk and lime - Characteristics of finishes and cooking options
Ceiling overlap using chalk and lime – two environmentally friendly and hygienic options. Plus, the limestone whims also has antibacterial properties, delays small cracks. However, for some people lime - Allergen. Alternative option - chalk or water-emulsion. Cretaceous whirlpool corresponds to sanitary and hygienic standards, allows you to achieve deep whiteness.
If you are putting new finish According to the old whitewash, the chalk solution is applied to the chalk, and lime to lime, having previously done the surface test test.
For the preparation of Cretaceous Pochings, consider two options - using conventional dry chalk in bars and chalk paste. To make the first solution, prepare three kilograms of dry chalk, crumbling it into small pieces and sifted through the sieve. We spend the mixture into the container and pour 3-3.5 liters of warm water. To the mixture obtained, add 100 g of joinery glue and 50 g of chips economic Soap. To avoid yellowness, add to the sink solution (ultramarine) or a kel suitable. At this amount of the mixture of 20 g, blue will be enough. If you want to get a deeper effect with blue, add more ultramarine. Sink protects the coating from the effects of ultraviolet rays, makes the surface of snow-white. Ready solution thoroughly mix with building Mixer Or manually, focusing through the double layer of gauze, get rid of lumps.
In order not to crumble the chalk, get ready-made chalome paste. Dissolve the wallpaper glue in warm water according to the instructions and mix the resulting solution with the chalk paste in the proportions of 4: 1. After stirring, the mixture is ready for use, it is not necessary to polish it.

The readiness of the solution is taking a knife. Jump it into the solution and look: if the drops flow through the blade as water, the mixture is too liquid. To bring it to the necessary viscosity, add more chalk. This rule concerns limestone bliss.
Lime is sold in a dry or hazed form. Depending on the rate of quenching, it is divided into three types: with quick (10 minutes), medium (20 minutes) and slow (more than 30 minutes) by the reaction. Than less speed deviations, the smaller portion to quench the lime. Consider three options for the preparation of limestone bliss.
For the first option, we prepare six kilograms of hazed lime, in small portions we pour eight liters of warm water into a dry mixture. We add a floor of a glass of chips of the economic soap and 200 g of diluted joinery glue. All thoroughly mix and add blue to getting the desired shade of blue. We make the whitelle is stable: a glass of cook salt in a prepared solution. If you want to pick up a deeper shade whitewash, use dyes. We dilute them in a separate container and pour portion. Do not forget that after drying the blots, it will be on the tone lighter. Consider this when adding a kole.
Second option lime blob We prepare at the rate of 0.4 kg of lime on 600 ml of warm water. To the resulting mixture, add 5 g of olifa and cook salt. All thoroughly mix until the homogeneous mass is obtained. Ready solution should have a consistency of thick cream. Such whitewashing will stay for a long time on the ceiling and not to crumble.
For the third version of the blots, mix two kilograms of harated to lime with 100 g of a solution of a salt or 200 g of aluminum alum. Do not forget about the blue, this amount will be needed about 20-30 g. If you wish, add a dye, follow the concentration. Divide 500 g of dye and add it portion into the solution, achieving the desired color. The mixture thoroughly stirred and pour warm water, bringing a mixture to 10 liters.
Pooks with brush and roller - Proper application technology
The ceiling temperatures are performed in several ways - using a brush, roller, collapse, or a vacuum cleaner with a blowing function. At home is used, as a rule, brush or roller, as well as a combined option. Brush size for blissing - 15-20 cm. Before working, we recommend soaking it for a couple of hours in water so that the bristles become softer and not adhered to the surface surface. When choosing a roller, take a look at the working element. If you want the whitewashes to be smooth, give preference to a short pile roller. When choosing a roller with a long "fur coat", the final staining effect will resemble an orange crust. To speed up whitewash, we advise you to purchase a telescopic handle with a roller.
To bother the ceiling, divide it into several zones. We advise you to start working from the window and move to the door. Do not hurry work in order not to blur walls. The first layer is applied along the window, and the second is perpendicular to the window to the window. Remember, we apply the second layer after a complete drying of the first, otherwise the divorces will be visible, and the whirlwinds itself will not be neat. We advise you to use the roller to whitewash the main part of the wall, and leave the brush for hard-to-reach places - around the pipes, lamps, junctions and partitions. In addition, this method will significantly speed up the work process. For convenience, pour the solution into a tray with a squeezing grid. Before each application, we cut off the roller, minimizing the drums. The first layer, as in the case of a brush, is applied along the window, and the second is perpendicular, rolling thoroughly roller on the surface. If, after drying the second layer, the whirlwinds layered unevenly, we applied the third fixing layer.
The whitewashed ceiling has a fine-resistant structure, the surface "breathes". This option is also considered to be bactericidal and wear-resistant. This is a budget method that allows you to update the ceiling quickly. Correctly whitewashed ceiling retains its primary appearance of about 5 years.
In order not to spend time on the preparation of chalk and limestone solutions, cover the ceiling by water-free. This option is well clips even with an old whitewash, the finish does not appear and becomes more resistant to erasing. The principle of applying is similar to the chalome and limestone solution. To apply the first layer, we recommend that the paint is a little diluted with water. The second layer is applied by undiluted paint. Such a ceiling will be smooth and smooth without lumen.
Poles the ceiling with a vacuum cleaner with blowing - learn how to use useful technique
Applying whitewash with your own hands with a brush and roller process is reliable, but takes a lot of time. Speakers (spray) or vacuum cleaner with blowing air will help to speed up the process. The paintopult in the apartment creates a lot of splashes, it is advisable to apply it on large areas (shops, warehouses, public buildings). But the vacuum cleaner with blowing function - optimal option For home conditions.
To bother the ceiling with such a vacuum cleaner, fill in glass jar Solution, close it with a lid and press tightly. Insert the hose into the cover hole, break the jar, turn on the vacuum cleaner. Cap Cover Air Valve Cover your finger and press the sprayer button. Apply the sprayer at a distance of 0.7-1 m from the ceiling and smooth movements distribute the composition on the surface, without lingering for a long time in one place to avoid drowshes. To get the most smooth and smooth surface, apply 3-4 layers of bliss. The application of a solution with a sprayer is better hides roughness, since the layer is more denser and thicker.
The ceiling in each room is one of the main components general interior. If you correctly arrange its surface, you can visually increase the room, create a romantic setting in it. It should take into account the functional purpose of the room, as it is covered during the daylight and in the evening. To satisfy all the above wishes, while improving the appearance of the surface can be used by applying the most common and practical way of design - these are the plains of the ceiling with water-level paint.
Even the most inexperienced builder will cope with the task quickly and easily. In order to whitewashing the ceiling yourself, you will not need big skills. Choose the desired shade of water-free paint, read it with its characteristics, prepare the surface for painting and begin to apply the coloring composition.
To date, there are several types of waterfront paint: mineral, silicate, acrylic and silicone. Consider the characteristics of each composition:
- The mineral dye includes hawed lime and cement. Low price Such paint is available to a wide circle of consumers. The product is suitable for a concrete and brick surface, that's just the service life is small. A couple of years will have to update the surface.

- Silicate paint consists of liquid glass with the addition of scenery pigment. This composition is not suitable if there is a high humidity (kitchen or bathroom). For material affordable price, Large service life (up to 20 years).

- Paint with the addition of acrylic resins is popular, durable and wear-resistant. Its value is an order of magnitude higher than that of previous dyes. It is used in any rooms with high humidity.

- Silicone waterfront paint is the most expensive among the presented species. It includes silicone. Is used for internal work. Moisture-proof and durable.

In the texture, the water-emulsion paint can be divided into matte and glossy. That is, with their help you can achieve various finishing effects. Matte paint will give the surface of velvety, and also helps to hide minor flaws. The glossy dye is suitable only for an even, ideally processed ceiling.
The main advantages of the water-emulsion dye are:
- rapid drying;
- lack of toxic smell;
- the ability to quickly cover the ceiling;
- used for any surface (except metal);
- diverse color palette.
If after a certain period of time you want to change the color of the ceiling, it can be repainted at any time. Before applying the water-mounted paint, align the surface of the ceiling. To do this, use putty and primer. The basic requirement before painting - the surface must be smooth.
On video: What is water-making paint.
Tools and materials
To prepare the surface and whiten the ceiling may be needed the following materials and tools:
- putty;
- primer;
- spatulas of different magnitudes;
- rollers;
- tassels are flat of different quantities;
- paint tray;
- kraspopult (or household vacuum cleaner);
- water-emulsion paint;
- overalls.
Take care of the furniture that is in the room. If you do not take it before the start of the whitewash, it is tightly cover with a glue or polyethylene film, it will protect it from pollution.

Surface preparation
Before painting the ceiling, it should be prepared, that is, to remove the dirt and align flaws. If there is no old whirlpool or paint on the surface, wipe it with a damp cloth to clean from pollution.
Fat stains can easily be removed using soda calcined, and mold and rust rinse with conventional warm water.

Old paint can be removed using a metal spatula or a special solution. With a whitewash, everything is much easier, take a wet rag and detergent. Wipe the surface of the ceiling with a rag several times, so you can wash the old finish.

Ceiling defects can be aligned with putty. Initially, it must be applied with a small spatula on cracks and potholes. After complete drying, the places of the place of sandpaper of large grain grain. Processed areas cover the primer. It is convenient to apply it with a roller with a long handle. Now it is necessary to sharpen the entire ceiling to reach a smooth surface, after drying, pollute and ultimately handle the primer.
Does the surface be placed? If the ceiling is not to align, ultimately all of its flaws will be visible, especially after painting with water-emulsion.

In Soviet times, our moms and dads blew ceilings. Covered the surface with water-level paint, lime or chalk. Moreover, to facilitate their work, used for this vacuum cleaner. Do not be surprised, it is the vacuum cleaner. To such a method of covering the ceiling will return a little later. First, consider a simpler method - the ceiling of the ceiling with water paints with a brush and roller.
Painting with a brush and roller
We proceed to deposition on the ceiling surface whitewash:
- Stir the water-emulsion paint in the bank, after which the part pour into the tray and split the water.
- Prepare roller, brush and greasy tape. In order not to be staining the plinth, creemet them with scotch.
- The paint will be applied in two layers. Remember how it is necessary to start a whitewash: pass the brush in the corners of the room and at its perimeter. Now you can continue staining, but already roller. Apply the water disposal from the long corner of the room. Keeping should be carried out in one approach to avoid irregularities. Now the surface should dry at least 12 hours.
- We continue to cover the ceiling with water-emulsion paint. The first layer is dry. It is necessary to check the surface for homogeneity, that is, if all the places are processed. To remove minor gaps, paint should be applied perpendicular to the first layer. Pour a small number painting composition In the tray, it is not necessary to breed it for re-painting.
- Each paint layer must be applied with a new roller, it will allow evenly and without flaws to bother the surface. At the end painting work Check the surface for homogeneity and no stains.

Teaches with a vacuum cleaner
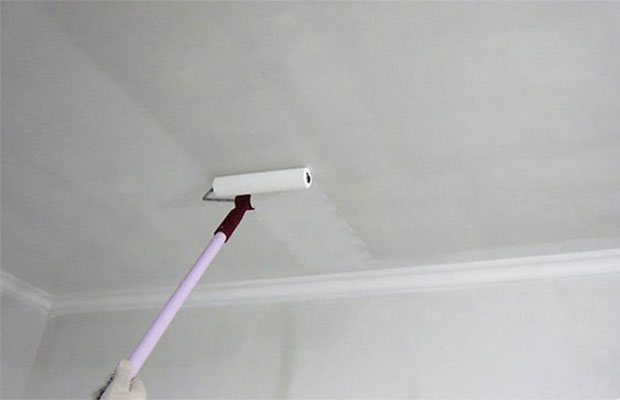
Consider how to whitewash the ceiling with water-mounted paint with the help of a vacuum cleaner:
- Initially, stir and break the paint into a small jar. Top put on the nozzle, which will be attached to the vacuum cleaner hose.
- You can proceed to work. Turn on the vacuum cleaner and apply paint at a distance of 30 centimeters from the surface. Control the distance if you bring the nozzle to the ceiling, you can get hanging drops.
- To cover the water-based paint ceiling uniformly, spray it with circular motions at an angle of 60 degrees. Coloring should be carried out by two layers. Do not forget to apply the second ball of paint, the first must completely dry.

Kraspopult to help
It will also be easier to whitewash the ceiling with the help of a collapse. This is special construction toolThanks to which the paint is evenly sprayed to the surface.

The technology of applying water-emulsion paint fully complies with the previous description. When using collapse, it is possible to achieve such results:
- The paint does not flow, but sprayed, while it turns out a smooth layer.
- You can bother hard-to-reach places.
- Quickly paints large areas.
- Minimally sprinkles paint on the sides.
There are manual, electrical and pneumatic paint. Even a novice builder will cope with the manual. Such a model is suitable for whitening walls and ceilings in an apartment or a private house. There is one inconvenience: while working with a manual paintopult, it is necessary to constantly maintain the pressure in the barrel, so that the jet is uniform.

Pneumatic models prefer professionals. With their help, a large amount of work is performed. In such a paintopulum, the pressure in the tank is supported by the compressor. In the process of staining, the jet on the surface comes evenly, the surface is smooth and impeccable. The price of pneumatic collapse is significantly higher than the manual model. And since it will not be used, it will not be often, acquired it is inappropriate.

The electrical model, according to the reviews of professionals, is similar to the characteristics of the pneumatic model. In such a paintopulum, the pressure of the jet is carried out at the expense of the motor.

It doesn't matter what tool you will apply the waterfront paint on the ceiling. With the help of the blots, you can make a surface with unique, and most importantly, smooth and neat transition of shades. Create a bulk drawing using one light paint tone and several necessary color pigments. All you need is a few trays (or cylinders, if the paintopult is used), in which you can breed paint with a kel. Such a blinking technique will allow to hide the most minor ceiling errors.
Cheer the ceiling yourself quite a simple occupation. This will save family budget. The most responsible should be taken to preparatory work. It is from how the surface will be leveled, the final result depends.
Composition and properties of paints (1 video)
Instruction
The proceedings are preceded by the preparatory period. Everything that can be - take out, bulky immovable furniture and floor cover the film. The thick layer raided removed, for this moisten the plane with water and remove the spatula upper layer, Holding a pallet in one hand - a deleted whitewash will fall into it. If a small, but the ceiling is strongly polluted, rinse it with warm soapy water. With a relatively clean surface, it is enough to smear dust. Cracks, if any, are covered. Cut the surface using the desired composition, for limestone and chalk, the soils differ. Blooming to apply better on the rigorous soil - the solution falls into a wet surface smoothly.
Traditionally whiteline and lime whites, but a good result is obtained when using spit. The chalk solution is prepared as follows: in 5 liters of water, you will distribute 30 g of carbon black glue, then poured 3 kg of sainted chalk. If you wish, you can add a little blue. Lime must be predetermined: lime stones pour water and leave for several hours. Delivered lime (2-3 kg) dilute 1 liter of water, add 50 grams of the table salt, pigment (if necessary), mix the ingredients and decrease the 10 liters of water. Spacryl is divorced simply: put a substance from the jar into a large container and spread with water at the rate of 1 kg of spacier - 800 g of water, mix well.
You can bleach the ceiling with the help of a vacuum cleaner or spray gun - it's fast, but at the same time the splashes fly in all directions, in the whitewings there will be all movable and immovable. If we decided to take advantage of this method, strain the solution through several layers of gauze, pour it into a liter can, put a special cover with a spray with a spray gun and connect the hose with a vacuum cleaner, turn on the air blowing function. Applying a whitewash on the ceiling to make a solution to be evenly, without drops.
In the room forced furniture, it is better to bleve into a manual, roller or brush. Brush for whitame Choose a natural, 15-20 cm wide. Hold it for a while in hot waterHair will become softer. The first layer of whitewash is across the stream of light, the second - along so that the bands are not visible. Exactly, the winds applied with a roller lays down without divorces. To do this, take a bath with a grid, pour into it a solution. Roller suck on a long handle, the layout of it into the liquid, squeeze it on the grille and ride the ceiling first parallel to the wall with the window, then perpendicularly.
Staining the ceiling by a water-free ... What can be easier?! We take a roller and paint! But does it all arrange in the end? To make you as a result, it is necessary to know how to bother the ceiling with water-emulsion paint correctly. To do everything correctly, let's consider the most common defects of the painted ceilings and try to avoid them.
Defects of painted ceiling
Spots and divorces
They are able to overstate not only the surface of the ceiling, but also the beauty of any interior. The reason for the appearance of stains is a violation of the color technology. And it's not even that you chose paint domestic production, not foreign - no big difference, the main thing is not to buy a frank fake. More, probably depends on the roller. As practice shows, you can blame the ceiling without divorces can be a roller with long threads (usually he yellow color). The velor in this case is better not to take - it absorbs little paint, work with its use is very slow, and the foam leaves bubbles.
Strip
If you did not know how to beat the ceiling with a roller, but they decided to do it, get ready to face paint strips. They are formed due to a small roller roller paint. In order to avoid it you need to roll the roller along the painted surface when there are practically no paint.
Another reason for the appearance of strips is an uneven paint distribution on the sides of the roller, try to evenly dip it into the paint and press it uniformly.

Wide, slightly different in color stripes, suggest that you have poorly mixed the water-free paint.
Remember that the ceiling does not turn out without flaws, if the surface is not flat. Therefore, before starting a whitewash, you need to make sure that the basis is smooth and properly prepare it.
Instructions for staining the ceiling with roller
Stage of preparation
First you need to prepare the base of the ceiling. On the aligned ceiling to sharpen all the cracks, apply a primer. On the old paint it is unwanted to apply a new one, but if you only want to change the color, and old paint. It does not leave the base and applied in one layer, you can risk. If everything is not so smoothly - you are waiting for painstaking work on lying on the old layer of paint or bliss. It is impossible to inflict on the old whitewash the water paint - everything will quickly fit. We need a whitewash at least to wash off.
So, the ceiling for painting is prepared, all things are removed from the room - you can start work. If you want to quickly bother the ceiling, and then you still paint the walls - start with the ceiling, because you can put the room by negligence. If the repair is not so global, it is enough to close the furniture and the floor with a glue or film.
Now it's time to prepare required tools And paint.
Painting preparation
It is necessary to dilute the paint in accordance with the instruction, often the necessary density is indicated there. Usually manufacturers recommend adding 10% water. If nothing is said about the water, it is necessary to mean paint just mix with the electron drill, a nozzle-mixer. If you want to get a colored solution, add a bit of a dye for water-mounted paints and mix well.

Forward with roller and song!
- Begin to break the ceiling yourself. The paint from the bucket must be pouring into a special container where the roller will be comfortably comfortable. So, we roll it over the bodied, grid or pure piece of linoleum, slightly pressing. Now the main task is to wet the roller evenly so that not the proceeds did not appear.
- After the threads of our roller are evenly filled with water-free, you can start painting. the main task At this stage, it is evenly applied to the paint to the surface. There are nuances here: looking at right angles, you will not be noticeable to the place where you were already rolling. And it is also difficult to estimate how many times they taught the same place - it seems that everything is scratched equally, because the surface has gained a wet shine. Alternatively, you can periodically move aside and look at the reversion at a different angle.
- Remember that each layer of paint should be good. Ideally: Color the ceiling by the first layer in the afternoon, and the second will apply only in the morning.
Video about how to whiten the ceiling with brush and roller
To correctly whiten the ceiling, in hard to reach places You can use a brush, for example, in the corners of the room.
We work in the bathroom
To whitewash the ceiling in the bathroom of water-level paint - this is a separate story and a number of additional difficulties caused high humidity. First you need to choose the right paint designed for staining in such facilities. Painting better roller, not a brush and apply paint only on the prepared surface.

If before this ceiling was painted oil paint, she does not need to be sidewalk, it is enough just to clean up to the mattiness, then wash it out with water. If the appearance of the ceiling suits you, you can not do anything with him, just start painting, otherwise you will have to sharpen the irregularities of moisture-resistant putty, everything is projected and only to paint.
What else can you beat
In addition to roller and brushes, you can use other inventors in the whitel. And if you do not know how to beat the ceiling with a vacuum cleaner, it will time to learn, because it is a fast and practical way. The minus is just that whitewashing the ceiling is unlikely to succeed, an assistant needs - one supports the pressure in the device, the other Belit.
As in the previous case, the first stage is to prepare the surface. To get rid of the layer of old whitewash, you need a spatula and a bucket of warm water with the addition of vinegar / citric acid. Softening and removing the old whitewash is better enough, throwing it onto the shining floor or in a bucket that is in your second hand. Small parts of the blots are easily removed with a wet sponge.

Do not forget the treated surface to be covered with a special anti-risk agent, then the primer, after which you can start it with a vacuum cleaner:
- Put on vacuum cleaner special nozzle For spraying paint (nozzle-pulverizer).
- In the bucket, stir the paint, break into the jar. Secure the nozzle on the vacuum cleaner hose (the hose must be inserted into the hole from which the air is distributed). If the nozzle is securely fixed, you can include the network.
- Stand up on the stepladder, and send the sprayer into the place of painting with a distance of 30 cm. Before turning on the vacuum cleaner, close the hole on the nozzle to the nozzle so that the air does not go out.
- We flee the circular movements - this is necessary for uniform application.
- Do not forget about the respirator and protective suit - breathe sprayed paint is unsafe!
- For even bliss, it is important to control the distance - when the sprayer is too close, drops will appear.
- Start better from the corner, moving in the opposite direction. It is important to be careful and not to rush.
Successful work!
Today you have learned how to boil the ceiling with water paint using roller and vacuum cleaner.

These skills will undoubtedly save money to you, because many are known how much it costs to bother the ceiling - just say, not cheap, like everything in repair. Thanks to our prompts, you will learn to independently repair workAnd hopefully share your impressions with us!
 How to return the love of her husband to his wife - Tips of the psychologist
 Why you can not give icons