Surface aging in decoupage and not only. Decoupage Bottles from under champagne with an old T-shirt
MK How to "Agree" new subject
I bring to your attention another master class on decoupage. Today I will tell you how to "form" a completely new color boxes.

To work, we will need:
Flower box (made of wooden bars),
Acrylic paints (white and brown),
Brushes
Paraffin or wax candle
Napkin with a picture of lavender or violet,
Water based lacquer.
Step 1. In fact, any thing is quite simple. I will talk about the most primitive admission: making up with a candle. Slightly squeak the subject we need (in this case, wooden porridge for flowers), then in some places we cover the wooden box with dark brown paint and give this paint to dry carefully.


Step 2. We take a simple candle and rub it all the painted brown surfaces. We rub it carefully, but we try to make the large paraffin lumps on the surface remain.


Step 3. Cover the whole box with white acrylic paint. I used a tassel, however, it is better to use a sponge for these purposes, so the paint falls on the surface more evenly.

Step 4. When the paint is finally dried, we take scissors, knife or sandpaper and gently scrape with paraffin drawer along with white paint. So in some places a brown paint begins to appear and there is a feeling that white paint Some places have shuffle.

Step 5. Cut from the napkin of the lavender twigs or the flowers of violets and gently with the help of PVA glue glue flowers to the surface.

Step 6. But that's not all. For greater compilation, we splash the kashpo brown paint. I have already written that I use an old toothbrush for splashing. I'll fall into the paint, and then I spend on it with a wand.
Tip: Before sprinkling the finished thing, practice on an old newspaper or on a sheet of paper so that fat blots do not fall on the finished surface.


Step 7. Last. Covered porridge by several layers of varnish. ACCORTED, WARNING DIRECT BIRT FOR FLOWERS is ready.
Note: Instead of brown paint, you can use bitumen varnish. It is better absorbed and gives a stunning effect.

And here are some more kashpo options with different drawings.

Unique design elements have always been valued for their special character, inimitable appearance, exception. Decoupage bottles makes it possible with your own hands to create stylish and outstanding decor items that can demonstrate the unique feeling of the taste of the owner of the apartment, his creative start. How to make decoupage bottles at home, and what options are most popular - read in the article.
Decoupage can be done with your own hands absolutely on any tanks, regardless of their material, sizes and shapes. It is suitable for registration of both glass bottles from alcoholic beverages and the tank for the manufacture of which metal (for example, flasks) was used.
Decoupage of glass bottles has several characteristic features:
- The surface of the bottles is necessarily prepared before design: labels and glue are removed; irregularities, if any, are sandwiched; The surface is thoroughly washed, dried and degreases with alcohol, acetone, special means.
- For the first layer of glass decoupage, a soil is always used, which guarantees the maximum clutch of the surface with applications, allows you to use any colors and materials in the design.
- Applications are attached to a dry surface, and the glue is applied from the center to the periphery. As appliqués, blanks for decorative and applied arts, drawings, cut from magazines, newspapers, books, etc., Napkins, printed pictures, stickers, brands, etc.
- The finished product is covered with a finishing lacquer for decorative and applied art.
- Sometimes the surface is polished with wax.

Decorations for decoupage bottles can be the most different: you can decorate the glass of bottles as traditional rhinestones, waters, glitter, colored threads, etc., and non-standard materials (sea salt, pasta, dried flowers and dry grass).
What are the bottled decoupage
Decoupage technology allows at home to make a beautiful and unique decor element: decorated bottles can be used as a colors vase, a special storage capacity for holy water, an original vessel for olive oil.
Decorated champagne bottles brought into the registry office, in honor of the holiday of the newborn, on the statement of a child from the maternity hospital, etc. Create an appropriate solemn atmosphere, and decorated in a certain topic of the container are great gift For a professional holiday!
In addition, the decoupage decoupage decoupage is perfect for congratulations on his birthday, anniversary, public and professional holiday. The main thing is to choose the right decor.

For the decor of the gift bottle to the day of the border guard as a decor, a tree can be used, with a cloth in the colors of militaries. On the day of the fisherman, you can give bottles decorated with ropes, twine, appliqués with ships. For New Year's bottles, napkins are suitable with the image of Santa Claus and Snow Maiden, decor with artificial cones, etc. For registration wedding bottles An ideal decor element will be Kanzashi.
Decoupage bottles with their own hands: how to get the thighs
Often for decoupage bottles require bulk elements. Get bottleighting on bottles different ways. Best - with polymer clay. This method makes it possible to get a monophonic, convex element of any form. Must the decorations of clay on the decoupling glue, "second".
When working S. polymer clay should be used special tool For softening, it is necessary to bake the material in the oven at 130 degrees.
Volumetric patterns on the bottle can be made by the usual putty, reflecting the empty tube from under the PVA and squeezing the material along the contour of the desired pattern.

After drying (about a day), the putty must be sanded: all the irregularities and sharp edges are removed.
Get the volumetric details of the decor can be used with sweater. For example, the spots on the bottle can be made salted dough or pasta. The dough is kneaded from flour, glue, water, vegetable oil. Pasta glued to the surface and color in needed color.
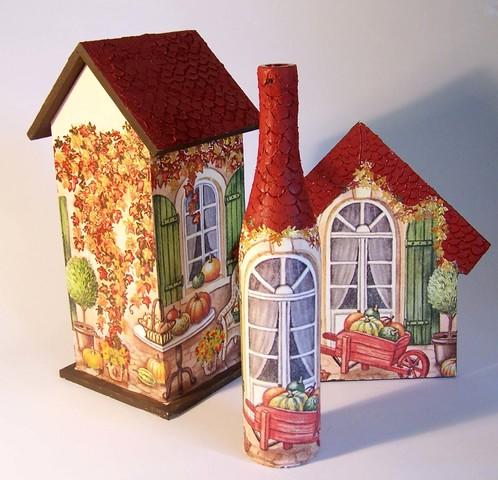
Master class on decoupage bottles "Domiki"
With the help of growths decorated bottles-houses. In addition to the options described above, the volumetric elements can be done using foamflast (food packaging is suitable). In addition, for the decoupage of "houses" you will need, wands for ice cream, acrylic paint (for walls and roofs, windows and doors), metal suspension, pva, soil, brushes.
For the manufacture of "Domika" you need:
- Prepare and cubs glass, area under the window and the door to paint black acrylic.
- Cut out of foam bricks for walls, tile, window.
- Stick cut parts on a bottle using PVA (when using a "second", the foam is compressed), leaving the place under the door.
- Install the door by gluing cutted sticks from ice cream (in this way, you can "install" and wooden fence, sticking sticks for bricks from foam).
- Paint the elements acrylic, not forgetting about the drawing of the loops on the door, handles.
- Cover the bottle of varnish, wipe the right places and re-operate the product by the fixer.
The same master class can help make a bottle-lock. Decorative elements and colors, in this case, must imitate a natural stonewhich is used to masonry real locks.
You can leave on the surface of the bottle are not covered with primer space as "windows" through which you can "look" on the contents of the bottle.
How to make decoupage skin bottles
Skin can be spectacularly decorated as a conventional rectangular bottle and "puzzled" jug (the skin can create exquisite folds on round, large tanks that are perfect for the decor in the ancient style).

Decoupage skin begins with standard training Glass surface (cleaning, degreasing, primer). Then the surface is covered with leather, pre-impregnated PVA, forming relief fingers. When you first work with the skin, it is better to cut the material into pieces and apply alternately: this method is quite simple, it will be more convenient for an inexperienced wizard. Working with a whole web is more complicated, but gives a cleaner and accurate result. Upon completion of the decoupage, the skin is toned in the desired color, varnished.
The thinner the skin, the easier it is to create a different relief on it.
How to make a decoupage on a bottle of brandy with rice napkins
For cognac bottles, the decor with rice napkins is perfect. To do this, we will need soil, pigment to the background of the napkin, file, pva, napkins, stamps or stickers, brushes, lacquer fixer.
To make a bottle need:
- Prepare the surface (clean, degrease and cover the primer).
- To the file impose a rice napkin to the image inside, slightly moisten the napkin with water and put an image on the bottle.
- Remove the file and cover the PVA napkin. In this way, to completely reorganize the bottle.
- If necessary, add decorative elements (stamps, stickers, etc.).
- Cove the product with aqualak.
- After drying, apply a pigment on the protruding parts of the bottle.
- Cover the product by a fixer.
.JPG)
Such decoration is suitable for small bar bottles, and a more spectacular decoupage technique with an abundance will suit for anniversary bottles of brandy. decorative elements.
"Lady in a hat": decoupage bottles from under wine
Wine is a favorite drink of women. Therefore, the appropriate and outstanding will be the design of the bottle of wine in the style of "Lady in the Hat".
The main element of this decor is a hat on the bottle cork, which is made as follows:
- The cardboard is taken from which the hats and a circle with a hole for the stopper of the desired diameter is cut.
- Elements glued and draw up with satin ribbons different size. Ribbons are applied to the melted surface.
- The hat is on request decorated with feathers with beads, roses, etc.
.jpg)
Depending on the style of the hat, the bottle itself is drawn up. Most often, the decoupage is performed using the tissue: on the prepared surface of the bottle, pre-tested in the PVA solution with water is laid out (proportion 1: 1) fabric, forcing elegant folds. After drying, the fabric is placed several times with glue and painted in the desired color. The most effectively such design looks on a round bottle.
Unusual decoupage bottles: master class
The decoupage of the bottle in the form of a violin can be original and unusual. Clearance can be made as in classic style (Brown "under the tree") or in a country style (pastel background, roses on the surface of the violin, etc.).
Anyway, for such a decoupage it is necessary to have a primer, acrylic paint of several colors (for background and drawing elements), thin and thick synthetic brushes, aqualak (matte for country and with a brilliance for the classics), contours to simulate protrusions on the violin. If necessary, decorative elements (napkins, rods, neck, etc.).

Decoupage is performed by standard scheme: Preparation of glass, primer, applying the main background, decorative elements and fixing the effect of varnish.
Such a bottle will become the perfect gift for the girl, the original instance in your own hand-maid collection.
Ideas for decoupage bottles
Depending on the type and purpose of the drink you can use different kinds Decoupage. Thus, the wedding champagne can be made by photos of newlyweds, and a new year bottle - to decorate the semolia, blue or white sea salt. For lovers of the culture of the East and adherents of ornaments, a point decoupage is suitable, and for admirers of classics - decoupage with toilet paper and dark acrylic paint with drawing protrusions "under marble".
Decoupage ideas can be learned from the forums on needlework, groups in contact.

Bottles of vodka, thanks to the transparency of the liquid, are perfect for registration "with the window" (lessons on how to make such a decoupage can be found on YouTube). Bottle with wine can be decorated with artificial grapes. Decoupage of beer bottles can be performed in the topic "Beer shop" (mill with a militant, illustration of beer barrels, wooden mugs, etc.).
Ideal for the design of the Bottle of Roma will be a decoupage in a pirate theme. You can decorate such a container with sea shells, coins, the application on which is a country or continent in the form of a map, compass, etc. The most spectacular decoupage of the puzzled bottle using the grout. Whiskey bottles can be decorated using textiles in a red-green Scottish cell, as applications can perform labels Jack Deniels, illustrations to the novels Conan Doyle about the popular detective, pictures with boils, coat of arms of Scotland, etc.
The original decoration for the bottle can be bought in stores for decorative and applied arts or online stores (such as, for example, "Fair Masters").
Master class on decoupage bottles (video)
Decapaded decoupage bottles - it's creative and unusual gift On the birthday, anniversary, professional or international holiday, both a man and a woman. Such a present the best way It will be able to emphasize the solemnity and uniqueness of the event, because the decoupage of the bottles does not have a framework and restrictions. The main thing here is the originality and originality of the idea!
Is there a way to turn conventional bottle in decorative vase And decorate it, for example, the windowsill in the kitchen? Of course. And it will help this type of decorative creativity as decoupage. Of course, without elementary knowledge, it is difficult to perform a decoupage of bottles, the master class in this case helps a lot. Although the technique itself is quite simple and does not require special skills and talents. It is enough to be able to work with paper, scissors and glue and find free time for this. The scope of the imagination of the borders has no.
Decoupage - What is it?
French words always sound beautifully and mysteriously, although it is sometimes the most ordinary things. So in the case of decoupage, which is translated as "cutting". In fact, it is an application that is pasted on a variety of surfaces.

Material for decoupage can serve whatever, if only it embodies creative banner Masters. Most often used pictures cut out of paper. After all, it easily takes any shape and can be fixed on glass, wood, stone and any other surface that you want to decorate.

For example, using the decoupage technique, you can turn the old porcelain teapot into a great flower pot and supplement them kitchen interior. The old buffet, cooked to the reference to the country, may well come apart with his antique brethren, if his doors cover the floral ornament in the style of 18th century, artificially aged with a special crockel lacquer giving the product an antique look. But the most popular is a napkin decoupage, when the imaged image is cut out of ordinary paper napkins and fastened on the glass or stone layer of varnish.


Materials for decorating the bottle in the technique of decoupage
In general, the technique of decoupage for beginners and for more experienced masters It does not differ in the work. Before starting, it is better to stock patience and necessary for creativity to fitness and materials.
In the first place stands herself glass bottle - Its surface should be smooth, without embossed decorations.

The following is a drawing selected either on paper napkins, or on decoupage maps, journal cuts downloaded from the Internet and printed on the printer pictures, etc.

To remove fat spots from glass, anyone capable of liquid will be required.
Safety glass is required to be pricked. For this, any acrylic paint, combined in color with the main pattern.

Sponges for applying primer
As an adhesive, it is commonly used both special adhesive for decoupage and school PVA.
Of course, there will be brushes, preferably flat and from synthetic bristles that do not lose hairs during operation.

Fan brush for decoupage
In addition to paint for primer, under hand, there should be simply colored paints from acrylic for decoration, and the same varnish for fixing the image on the glass.

To give the product an old look, an indispensable will be the crustaceous varnish, it will also fix the drawing. After applying it, the thing acquires the features of the antiques.

And, of course, it is impossible to do without a number of things - small scissors, painting tape, foam rubber, tanks for paints and varnishes, sandpaper, vehicle for wiping.
Napkin Decoupage Bottles: Step-by-step instructions
Preparation of glass surface
Any bottle of used, is placed on all sides by various labels and labels. Get rid of them not so simple, but it is quite possible. A bottle must be in the soap solution for some time, then with it with the emdrate, all traces of paper and glue are clenching. Only after that there comes a solvent queue that removes the residues of fat from the surface of the glass.
Primer
In principle, the bottle can not be primed, and choose such a drawing that the decoupage on the glass will be wonderful and on the transparent surface. But to enhance the brightness, relief is better to cover the acrylic paint, suitable for the color of the selected pattern, and at least one tone is lighter. Here it takes a foam roller or sponge. Foiling it into a wide jar with paint, neatly soaked either the entire bottle, or the part of its part to which the drawing will be applied. To create a saturated color, it is better to put two or three layers of paint.

Cutout of ornament
To work with thin elements of the napkin, it is better to use scissors from a manicure set or simply gently separate the drawing from the rest of the paper. Then the image will be more natural.

Not only napkins are suitable for appliqués, but also journal cuts on more dense paper. To obtain the effect of drawn right on the glass of the image, cutting out of a more thick paper, you need to cover the two-three layers of varnish, dry carefully, and then minutes for twenty put this picture into the water. If the layers of the spacious paper gently remove, then on patent surface There will remain a transparent picture, which passes on the basis. This decoupage of the bottles not every master class will teach.
Gluing pictures on a bottle
On the prepared dry degreased surface of the bottle, the same dry napkin is superimposed, and then a brush with selected in advance of glue begins onto her surface. Very neat and carefully from under the napkins are extruded air bubbles, smoothed out the formed wrinkles formed. If scary to spoil your first masterpiece, then you can practice on a bottle-dubler.
In the case of the use of decoupage cards, they should first soak in warm water, and then lay out for drying on the towel.
This is a painstaking and very accurate, it is impossible to break the map even with a lacaround. It is carefully lubricated with glue first on the reverse side, and then laying on the glass, gently lay and scrub the outside, kicking out the remnants of the air and eliminate the folds. If it was intended to use not one picture to decoupage a bottle, then all other images are glued in the same way.

Fastening the result of varnish
After gluing the image on the bottle must pass sufficient number Time so that the paper is completely dried. But in this form, the drawing is completely defenseless in front of air, light, water and sharp objects. To preserve the surface of the surface without failure, the lacquer layer is fixed. And so that the bottle is not afraid of water neither from the inside, nor outside and was used for its intended purpose, this lacquer layer must be applied at least three times. But the result will be a thing that is not ashamed and to friends to show.

If you fix on the camera, how the decoupage of bottles looks like stages, then you can demonstrate to friends or other needlewomen.

Decoupage bottles with rice paper
Among all types of decoupage, the use of the rice paper is particularly space. To carry out a master class, it is advisable to determine what it will be necessary for this.
- A glass bottle, if possible, is not very narrow to be, to get roaring and decoupage it turned out noticeable and bright.
- Rice paper sheets of two colors - light green and white. It will be used as the basis for decoupage.
- Paper napkin with pattern. Plant ornaments will give the decor of the grace and tenderness.
- Glue and brush with artificial bristles so that there are no hairs on the bottle.
- Special marker white color Based on acrylic leaving a line on any surface, and varnish for fixing the pattern.
- Scissors, solvent for degreasing glass, napkins or towels for applying decorative ribbon..

So, let's try to figure out why it still needs paper rice for decoupage and how to use it correctly.
The most important process is degreasing a glass surface. After all, the quality of the attachment of the image depends on it. We will do it with any cleansing agent and a conventional napkin or cloth.
It is necessary to prepare paper from rice.
ATTENTION!!! It can not be cut by scissors, it just needs to gently tear into small fragments. Scissors will create a smooth edge, and if the rice paper is broken, the fibers will give the surface with the necessary naturalness.
No wonder the Chinese came up with making paper from rice. It is more elastic than the usual, it is much easier to work with it. This is the opinion of everyone who happened to take this paper in hand.
Apply rice paper on glass in two different ways:
- Fragments of dry paper press to the bottle and streaming through the glue paper. Then dry and handle varnish from acrylic.
- In another embodiment, also attach pieces of paper from rice to the bottle and thoroughly moiste them with water. Drying almost to the end (for the speed you can use the hairdryer), the pieces of paper are then covered with acrylic varnish.
In this master class, it is represented as with the help of the first method of an ordinary bottle, a completely pretty and original vase can be made. From the rice paper of the green color, we choose three long pieces with pointed ends, glue them with a narrower edge up around the entire bottle, carefully pulling and paint all the folds and wrinkles.

All free glass fragments gently fill in white rice paper edge into the edge. It is allowed to block the edge slightly, it is still in ready product No one will see these roughness. But only if the fragments were torn off, and not cut off.
Protectly wrapped all rice paper with glue, we retain a bottle aside for complete drying, and at this time we are engaged in the neat cutting of the ornament from the napkin prepared for decoupage.
Once again, we lubricate the entire bottle with glue, carefully press the drawing and carefully pass on it with a tassel, carefully removing air bubbles from under the napkin.

The bottle once again goes on drying, and then the entire surface is covered with acrylic varnish. To fully protect the image, you will need to repeat this procedure 2-3 times.
After complete drying, the contour of the pattern is powered by a white acrylic marker. This will give the whole product brightness and expressiveness.
Decorative tape was useful. The neck of the bottle, remaining without the decor, is very cleverly hiding.

Original master class
After all the work done, the glass bottle from under milk turned into a nice decorative vase, in which the flowers are not ashamed. If you can not know friends if you can notice that all this beauty is done with own hands And fast enough.

Rubric
Often, grandmothers can find a whole warehouse of old stabbed things that can be converted to beyond recognition. Either for some reason, not old things were spoiled and sorry to throw them away, because they can still serve a long service, that's just the appearance of her. These are the most suitable items for the decor and the conversion. It is these things that I want to give a second life.
Decoupage for today there is a fairly common decor technique. Today we will use it. In the master class, I will show how to make craklers without special varnish, as well as some elements of Shebbi style chic will be present.
Decoupage will be done on the old tray or it can also be called it - a plate for fruit.
What do we need:
- Same Decor itself - old tray
- Paints
- Napkin
- PVA glue
- Sponge
- Pussy
- Wood Varnish / Decament
- File
- Sandpaper
The first thing from which any work begins is to prepare the surface. I already wrote in my master classes how to prepare the surface to work.

All irregularities need to be cleaned, everything that can be kept, gently tear up so as not to damage the surface. When the surface is cleaned - covered with its primer or acrylic paint.

After drying, you can start decoupage.
My tray is much more napkins, and in order that the drawing does not look with a breaking, it needs to be placed over the entire surface. To do this, we will make the holes in some places and the napkin spread over the entire surface.
When the wet napkin, it is very difficult to work with it - the folds are almost impossible to eliminate, etc. This task will facilitate the file.
Perhaps you have already heard about this method, and maybe even tried to use it. Those who at least once enjoyed them will agree with me that it is much easier to work with a napkin by the method of the file. It is especially good to use it novice decopaics.
Decoupage with the use of the file.
This is a fairly simple method and you can see for yourself.
The file lies the napkin to the front side inside. It pours out some amount of water, we look until the whole napkin becomes wet, the field of what excess water We merge.

While the napkin on the file, I immediately did in some places a few holes, so that the napkin becomes about the same size as a tray.
Then the napkin with the file lay on the surface so that the file is from above, and the napkin between the decorated surface and the file.
Oversights can be done at this stage.
When the napkin with the file was put, carefully push the edges of the napkin on the surface, after which we remove the file.

What function does the file in the decoupage?
When we put a napkin on the surface, folds, which cannot be removed without a file. Also, if the napkin was not exactly applied, it can be moved, which cannot be done without a file.
At first glance, insignificant moments and help to make work qualitatively.

About this way it should look like. Of course, not perfect)))
Now we need to process the edges of the napkin in such a way that in the final result they were not visible - everything looked as one.
In this we will help sandpaper. When the napkin is still wet, neatly tear the edge and only after everything dried, we wash emery paper.

Splashing without napkins We carry the gold paint (the color of the paint takes such what we want to see in the final result of the crack.)

In the photo it may seem that the paint is bronze. Unfortunately, the camera could not pass the desired color.
She promised to tell how to make cracker not using multiple varnish. Everything is very simple.
Used with the help of plow glue
The whole chip here is in the globe itself. I have already tried to make cracker with the help of PVA glue and all the works of the pump. As I read that it is necessary to use the construction glue PVA and indeed, trying it to me everything turned out. So, glue for crabeller buy in building stores.
Well, let's proceed to the technique itself. We apply glue to those places of surface where we want to be visible cracks. Let me dry and cover the paint. I did it with the help of a sponge. The color of the paints took up the background color, climbing the edges of the napkin and in those places where he considered it necessary.

After everything is breathing well, you can see the resulting cracks.


And we will finish the decoration of the tray in the style of Shebbi Chic.
At the edges of the tray will pass emery paper. On the protruding edges tears upper layer Paints will appear to blame us. It is not necessary to rub the sandpaper strongly so as not to the tears and the bottom layer of paint.


And at the end everything needs to be secured by varnish. I used a glossy wood varnish. Covered in several layers. You can use a hairdryer, which will significantly speed up the drying time.
Here is such a tray turned out.


Because Only the inner side of the tray was damaged, I decorated it. Outer side It remained not touched.
In addition to the tray, you can make a similar decor at any other subject, for example on a vase, and you will already have a set that will harmoniously look at any interior.
Creative inspiration and good luck.

Detailed master class for beginners How to decorate a bottle of your favorite drink with decoupage egg shell. The bottle will be an excellent gift for your beloved man or father.
Storage tanks are often used to store homemade wine. In order not to be ashamed to put homemade wine on the table, or even give home cooking bottle - re-adjust any empty bottle.
Here is such a big bottle with a handle from the vodka got me for the decor. Now we turn her into beautiful bottle For wine.

First day - cover a bottle of white acrylic
All labels from the bottle were removed, the glass was washed and thoroughly with acetone.

Then with the help of a piece of foam sponge (you can cut off a piece from the washcloth washing) a bottle was painted with white acrylic paint in two layers with an intermediate drying of each.

At that time, while the paint dries - the drawing is selected for decoupage. Since in the bottle is supposed to store home cooking - a napkin with bunches of grapes is selected.

Second day - prepare and apply a napkin
If you are not sure as a napkin - you can safely inspire yourself. Square the napkin with a lacquer for hair and wait a couple of minutes until it dries. It will prevent the spreading of paint during the decoupage and, if the napkin is thin, - slightly compact it.

The drawings of grapes are pulled by hand (so that after gluing the edge of the paper is not visible) and the top layer of napkins is separated.

In order to glue a napkin without folds there is a special tool: a spray from IDEA. It sprinkles on reverse side Figure and surface becomes sticky.

A few seconds can be glued to the bottle of a broken fragment. Apply the napkin to the surface and try to carefully smooth it with your hand so that folds are not formed.

If the napkin is sticking not as you like, it can be easily teamed and glued again. Similarly, the second fragment is glued.

Since glue spray has a short action (if you leave a bottle for a day - the napkin will break down), a thin layer of any glue for decoupage or acrylic varnish is applied on top of the glued motif. Now the fragments are glued smoothly and firmly.

Third day - draw patterns
In order to make a contour painting on a bottle for wine - take advantage of this admission. Initially, the pattern is applied simple pencilAt the same time you can easily adjust the errors in the lines.

Then with the help of an acrylic circuit (you can use in any color, I painted with a gold circuit) the entire pattern of the thin line is neatly scored.

The bottle is left somewhere for a day so that the contour is frozen.

When drawing the contour, watch the lines do not smear when you write the reverse side of the bottle.

Fourth day - we apply the gold acrylic
The main background of the decoupage for this wine bottle will be gold, so now just at the time to put the gold acrylic. Poroolone sponge apply one layer of gold at first acrylic paint On the entire surface of the bottle (around the decoupage).

Wait for a complete drying acrylic, perhaps this layer of paint will not be very dense - it does not matter.

Fifth day and sixth - we apply patterns on the finite
Repeat the contour pattern once again so that they become quite convex and volumetric, and leave the bottle again. And then, tightly and evenly apply the second layer of gold acrylic sponge.


Seventh day - apply transparent gel and acrylic varnish
To give volumes of grapes and petals - apply a transparent gel on them. Work alternately on two sides of the bottle, placing it horizontally and waiting for a complete drying of the gel.


Now the entire bottle with decoupage is covered with a layer of acrylic varnish to fix the previous stages of work.

Eighth day - aging
After drying, the varnish is preparing for the aging of the decoupage. If you do not have a special bitumen - use the mixture of acrylic color of the color of Luggage umbra and droplets of the acrylic moderator.

Do patrolon put paint with a drying retarder on a bottle, and quickly wipe (and rub) with a napkin or cotton swab. The acrylic retarder will allow working with paint more time and remove or complement the blackout. As a result brown color Fill the deepening around the contour painting and a little darkening (creating a picturesque "dirt") gold.
 Why you can not give icons
 Is it possible to give icons as a gift: Signs, the opinion of the Church
 A year ago left her husband, and now I do not know what to do