Vase from plastic bottle with their own hands. Beautiful vases of plastic bottles
Our article is intended for lovers to make products with their own hands and give the second life to things that have already served their direct appointment. A vase from plastic bottles with their own hands is exactly the example that can show how to create beauty from the cast material.
To begin with, a little plunge into history. Vase is a vessel when manufacturing which the most applied various materials: Glass, metal, porcelain and, of course, clay. The man learned them to create another ten thousand years ago. Lepili vases with hands, and it was a time-consuming and complex process. But progress does not stand still and now the vase can be made from very prose materials. Time will need quite a bit, and we guarantee pleasure from the creative process.
Such a product can be a worthy gift. After all handmade Valued at all times.
Look at the photo of this magnificent vase with flowers. Is it possible to say that this is an ordinary plastic bottle, which in tremendous quantities are under our feet? The master showed a little fantasy and now a vase for flowers from plastic bottle becomes decent decoration Our dwellings.
Step-by-step instructions with photos
So, if you decide, we present detailed instructionsHow to make a vase from a plastic bottle.
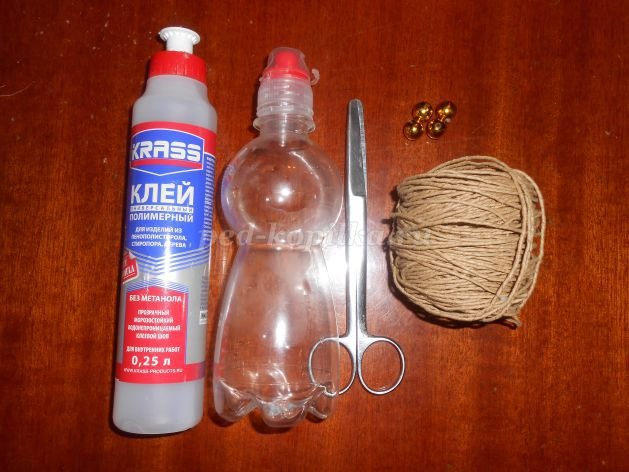
Prepare everything you need in work:
- plastic bottle you liked you like;
- glue that is used when working with ceiling coatings;
- beads;
- twine paper;
- scissors.
Production process with photo.
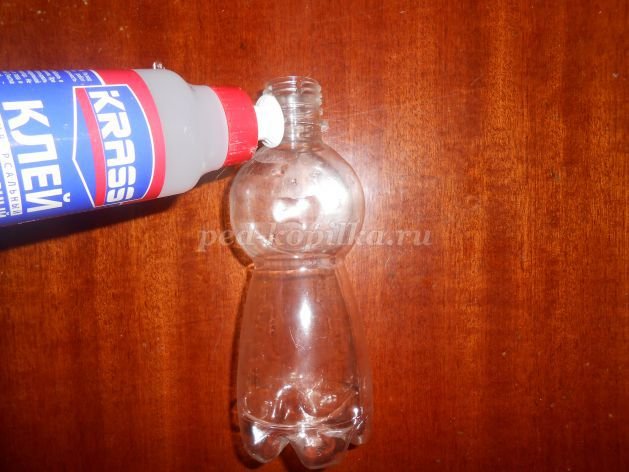
Well grease the glue of the neck of the bottle.
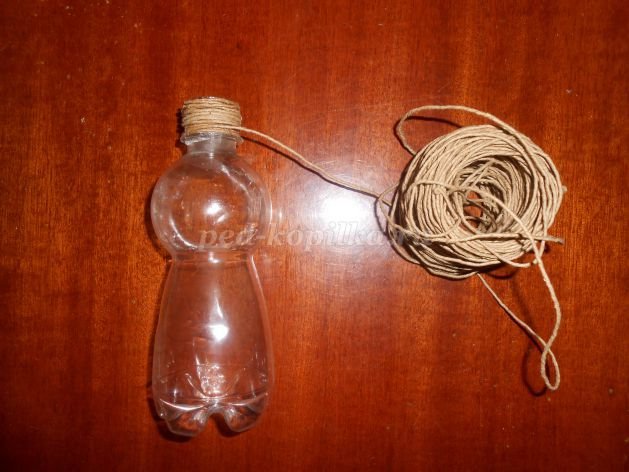
Take the twine and glue it to the top cut of the neck. Next, turning our bottle in a circle, wind onto it twine, gently gluing it to the bottle.
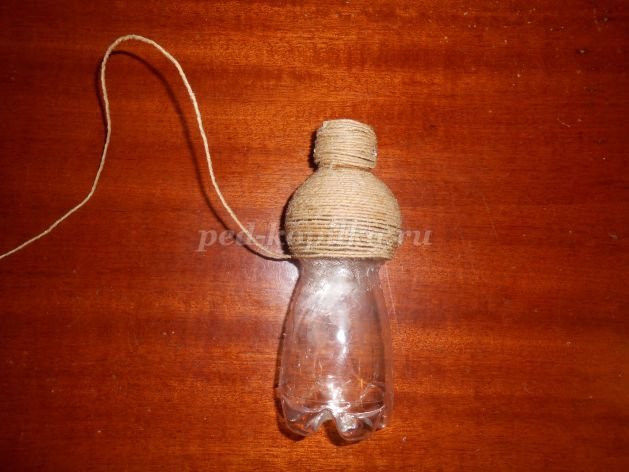
So gradually failing glue a bottle, turn it off with a twine. Make sure that each turnover of the twine fits tightly to the previous one, otherwise plastic will be visible. Thus, we reach the bottom of the bottom.

Now we need to decorated the upper cut of the neck. To do this, cut off a small piece of twine and expand it.

With this piece of twine and close the slice, sticking it with glue.


When the glue dries, we will decorate our product. Small twine segments, twist into the circles and fix with glue.

With these decorative elements, you can decorate the neck of the bottle, as well as its lower part.
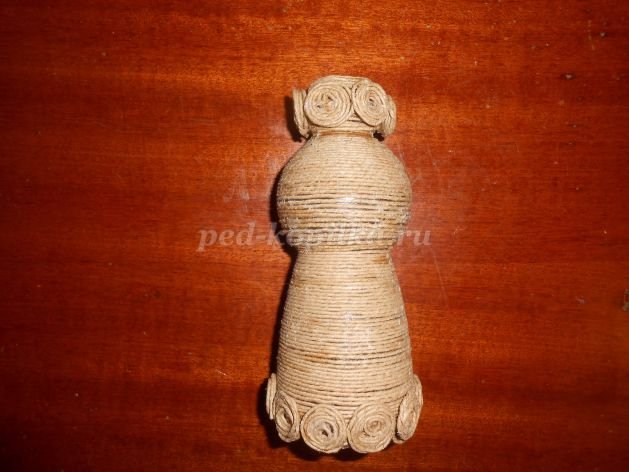
The top half of the bottle can also be decorated with such circles. Put them in the form of a flower.
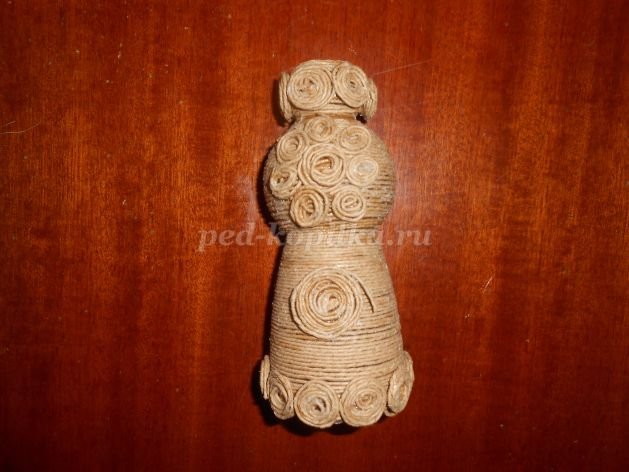
For the bottom half, the flower can be slightly larger. To do this, make a couple of extra revolutions when you turn the twine.

Our vase acquires a finished look. Let's decorate her beads that we have prepared. Let them be the middle of the flowers.
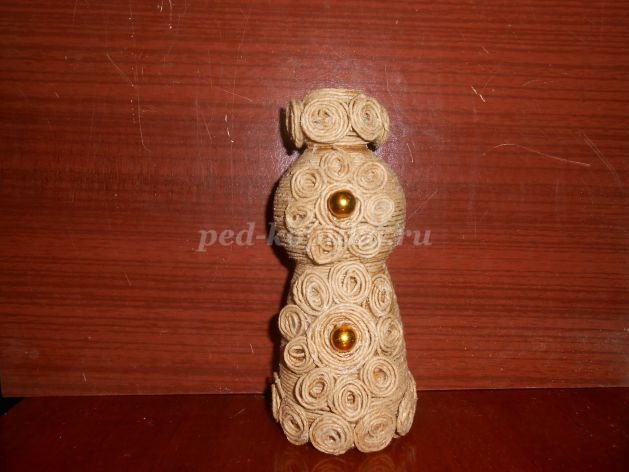
This is how our completed work looks like.

We hope that you liked the presented master class crafts from plastic bottles. Vases are just one of the infinite set of ideas that you can implement. Look for and implement them to life on the joy of yourself and others.
Video lessons for beginners and more experienced masters
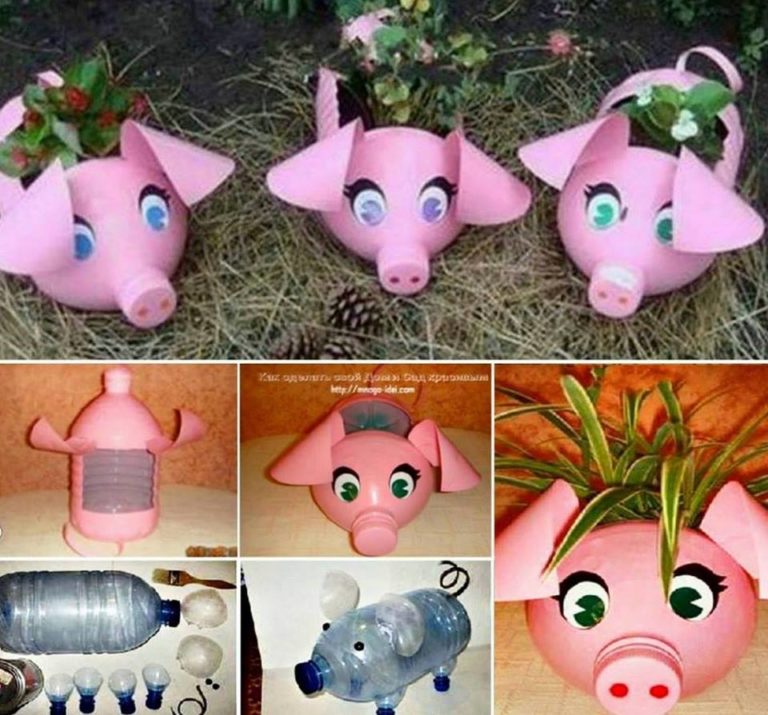
With bottles of plastic you can make many original and useful things. These are solonks and funnels for liquid, palm trees, flowers, pigs from plastic, shelter for seedlings in the country and vase. And how many varieties of these vases can be made of multicolored plastic bottles! But mint vases from the bottles probably no longer did. But they are a sample modern design. So how to make vases from plastic bottles with your own hands?
In order to make mint vases from plastic bottles with their own hands, we will need:
A bottle in which the draft wine is being vacuized;
Acrylic paints of two colors;
Pliers - 2 pairs;
Two liters of steep boiling water;
The contour on the glass;
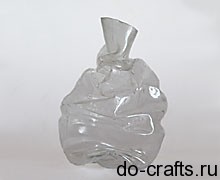
1. First you need to trim from the bottle of the neck. If the plastic, from which the bottle is done is thin, then you can use scissors, and if it is quite thick, you will have to use hacksaw. The cut, which turned out after cutting the neck, may not be very smooth. Cut the bottle as it turns out, and then read it with the help of a skirt.

2. Then we need to handle a bottle with boiling water. Put it into the sink, preparing the tools for giving the form of the future vase. In a concrete case, we will use two pairs of pliers. But you can also do and just with two forks. Gently start pouring boiling water into a bottle, while holding it for the neck pliers. During this procedure, the bottle will soften. With the help of second pliers, form a bottle of dents on the walls at the same time, press the bottle to the sink, so that the bottom of the future vase is stable.
Be sure! During operation, pay attention to the fact that during the treatment of boiling water, the bottle did not shimmerally and did not narrow. While boiling water will still be in a bottle, it will be possible to fix it a little. It is best to try to handle with boiling water than a similar bottle.
3. Here we have a blank for a vase from plastic bottles. But on this moment This is just a mint bottle. But already completed the most difficult stage of our work!
4. Now we need to paint the bottle of paint dark color, while thoroughly score all the folds and dents.
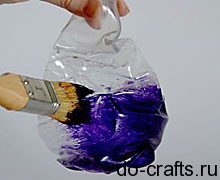
5. It is best to paint a vase in two or even three layers so that the color of the vase was smooth and saturated.

6. At the next stage of manufacturing a vase from plastic bottles, you need to apply a dry brush to the surface of the vase gold paint. To do this, take a dry brush, a little dip it in the paint and make several smears on a newspaper or paper, while the paint brushes almost remains. Then this brush should be brushed by the convex surfaces of the vase, as if wiping her about the edges of our vase.
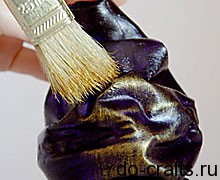
7. The required volume will give a vase gold in folds, and no one will no longer guess that this wonderful vase was made of simple plastic.
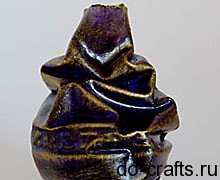
8. After that, draw small strokes around the circumference of the vase in the form of hieroglyphs with a gold circuit on the glass.
Crafts from plastic make it possible not only to pass free time or get rid of the already unnecessary packaging. They allow you to preserve peace and calm in the family. The proof of this is a vase from a plastic bottle, which no kid can be broken down. Therefore, in order not to cry over a grandmother crystal, make a pair of spare vases and arrange them around the house.
Master Class: Plastic Bottle Vase
Option 1 - Fruit Vase

What needs to be prepared:
- old 19-liter water container;
- 6-liter water container;
- pVA glue, brush, scissors, toilet paper, twine, paint-spray black and golden colors.
1. For the manufacture of this vase, only the neck of the bottles are used. It is necessary to cut off a piece of capacitance along the line just below the expanding part. Of the greater capacitance, there will be a cup of vase, and from the bottom - the leg.

2. Each of the halves of the vase is necessary to decorate before connecting. If you have no time to do this, you can simply paint the two parts and bore the resulting parts with glue and twine. Otherwise, you need to do the following. On the surface of the workpiece in the papier-mache technique is glued with a PVA several layers of toilet paper. Once parts of the vase acquired a solid and even look, put them on drying.

3. Decorative stucco can also be made from pieces of toilet paper. For this, we can slightly wet your hands in the water and make lumps or harnesses, which will make relief patterns on the surface of the vase and even berry clusters. All these elements are glued with PVA, and then the product is well dried again. These operations are made from the upper and lower half vase.
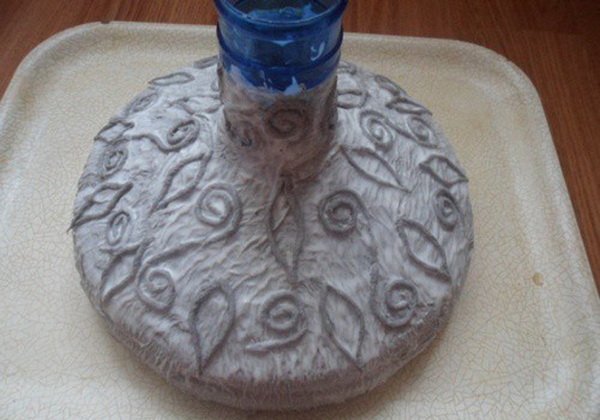
4. The dried pieces are covered with black paint, and then golden (spray spread well on the surface and does not leave traces like a brush). Tassel make missed spaces.

5. We connect the two parts of the vase with the glue for plastic and twine, moistened in the PVA, which completely closes the necks of two tanks.

Option 2 - Vase for trifles and colors

What will take:
- 1,5-liter bottle of carbonated drinks;
- scissors, glue for plastic.
1. Cut off the top of the bottle so that only even cylindrical surfaces and the bottom remain.
2. Do not cut, strictly perpendicular top line, forming many thin and even strips, about 8 cm long.
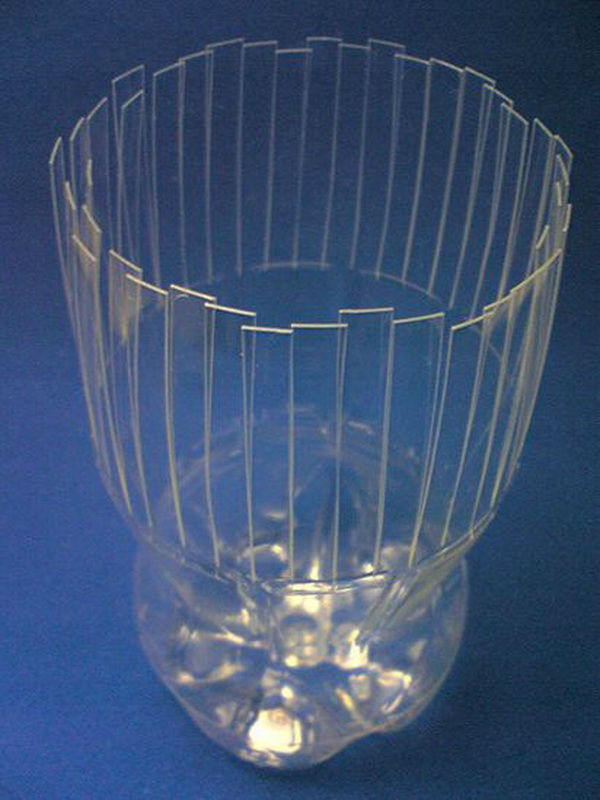
Unscrew them at 90 °, tugged well a blank to the table. There should be such a "sunshine".

3. Now it is necessary to weave the rim of a vase from the prepared thin stripes. Go counterclockwise. Choose an arbitrary strip. Let's call it number 1. Counterclockwise will continue to follow No. 2, №3, №4. Bending approximately in half a strip number 1 and carry it out before # 2, and then for №3 and №4. Now the strip number 2 is carried out before number 3, №4, and then No. 5. The bend of the strip number 3 is the same as in №1, and No. 4, as at №2. Those. It turns out that the order of weaving alternates. When you have the last three stripes, secure them in neighboring parts, you can additionally fix with glue.
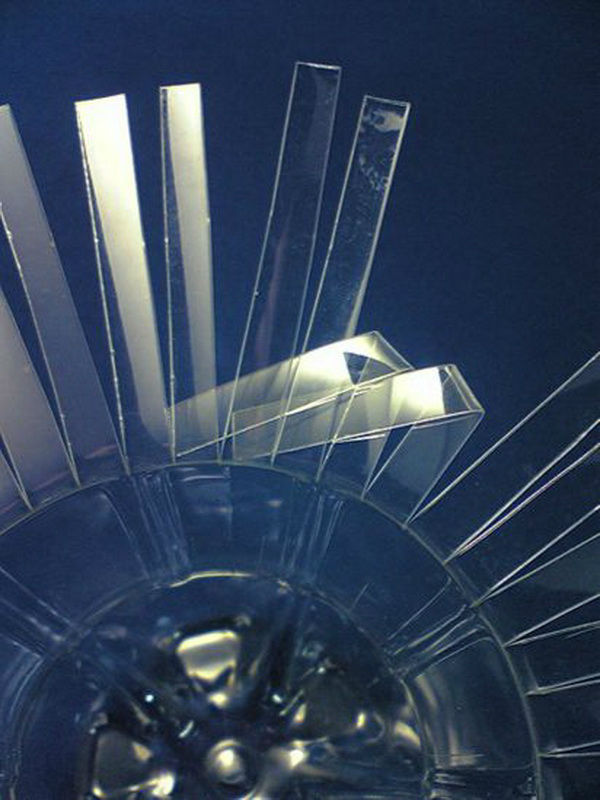
VAZochka is ready, in it you can store various minor items that should always be at hand, for example, in the hallway.
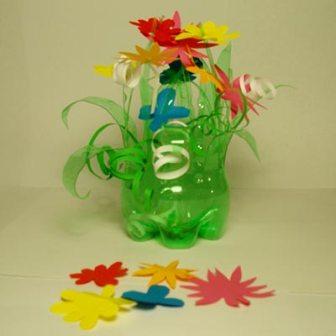
Option 3 - Decorative vase with flowers

What will take:
- 1,5-liter bottle of green-colored plastic;
- foam substrates of different shades;
- scissors, candle.
1. Cut off the neck of the bottle. We make vertical strips with a length of 8-10 cm and 1 cm wide. Correct the tips of each strip. Flower stems turned out.
2. Cut out the flower substrates of various shapes and shades. Purify the middle of each scissors. It is necessary that the flower and stem are proportional.
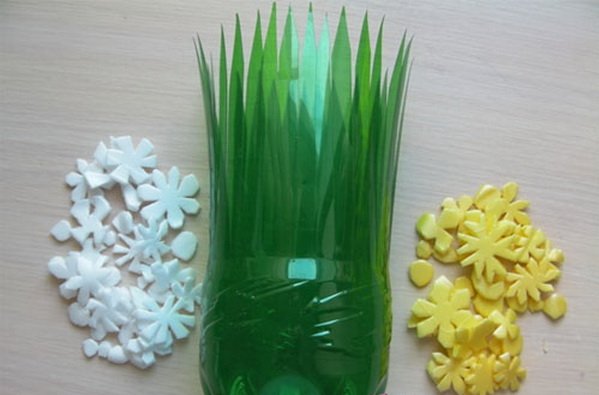
3. We wear flowers on the stems, after placing a candle sharp tip so that no one hurts about the homemade vase. Then this craft can be delivered even in the nursery.
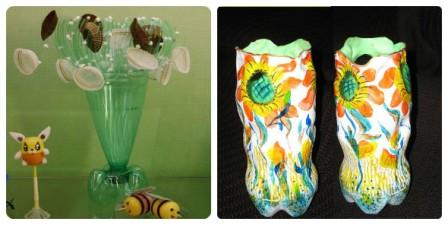
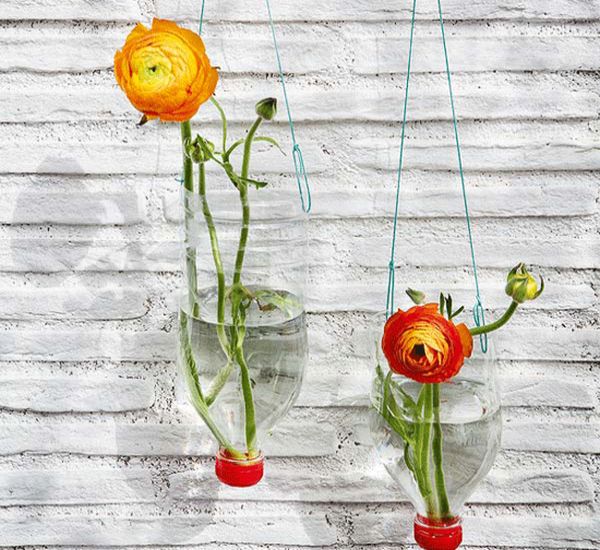
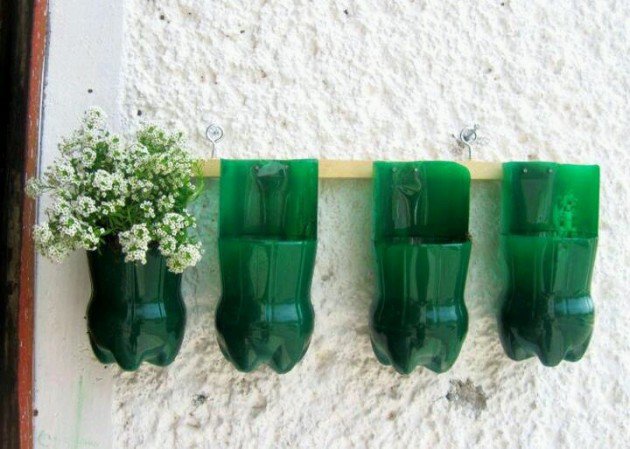
Any vase from a plastic bottle is capable of becoming a decoration of a house or garden. You can use them for bouquets of fresh cut or dry flowers, for storing small items or for fruits.
Flowers create a pleasant atmosphere in the house and please the eyes. Unfortunately, sometimes there is no suitable vase for a cute bouquet of valley or elegant red roses. Today, plastic bottles are used not only for storing fluid, but also as an ideal source raw material for making crafts with their own hands. We collected for you stock Foto Vaz from plastic bottles — different ideas For inspiration from experienced craftsmen.
Stock Foto Beautiful vases for flowers from bottles
One of simple ways Make a vase from bottles - cut the neck and part of the bottle to cut the same stripes. At the same time, do not forget to leave the distance to the bottom so that the flower can be placed in the vase.
Even children can make a vase from plastic bottles. For this you will need scissors, plastic bottles and acrylic paints. The bottle is cut into three parts. The middle part will need to just throw out. The bottom element of the bottle becomes an excellent stand. On it you can draw which patterns or floral prints. Upper element It is better to trim and paint into some one color so that the vase turns out to be contrasted and the patterns drawn on it were visible on it.

Vase with flowers can raise the mood even in the most gloomy day. Surely, every home, there is one or more VAZ, but there are no many of them - after all, it is pleasant from time to time to change and alternate them, and not from year to year to use the same. The wonderful solution to replenish the existing stocks will become a vase made by hand from plastic bottles.
- cheap Material (At the same time, the secondary use of plastic - plusing in karma from ecologists),
- Simplicity of manufacture , wide range of options,
- such Vase does not break What is very important if you have children, cats or dogs at home.
- And even when one get bored, you can make a new one, and the previously throw out without any remorse.
Offer 6 master classes for the manufacture of vases at home. You can strictly follow them, or add your own elements, should turn out beautifully.
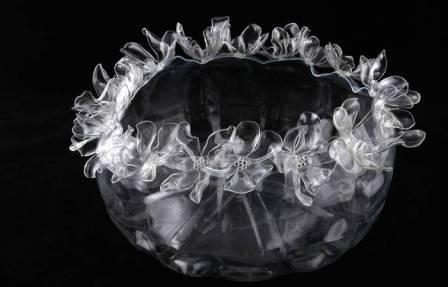
Vase painted by a balloon
![]()
Necessary materials:

Step-by-step instruction:
Step 1: Preparation of bottles
- Make sure the bottles are clean.
- Cut the top of the bottle.
- Purley the cropped edge of the tape so that when using a vase, upper region did not cut flowers. Make sure it holds hard on the bottle.

Step 2: Primer
Prepare a bottle to paint, pre-apply a layer of primer. So the paint will be better to stay and last longer.
Step 3: Painting
Spray the paint from the spray and leave to complete drying. Do this procedure on the street, or check the floor with newspapers in order not to blur.

Tip: If you want to do not vase using multiple colors of paint (for example, gold and black, as in the photo), first apply one of the colors, leave completely dry, and then stir up the insolent to the area where you want to add a second color, and spray Also leave until complete drying, remove the isolent.

Be sure to wait until the first paint dries, otherwise the sticker power will ruin it, and then they will remove together.
![]()
Here are such wonderful vases!
ATTENTION: If you use bottles of thicker plastic (from under yoghurt, for example), then the upper edge can be acclaimed by anything. Cut the top carefully, and if there will be a barrier, just drink it a little.
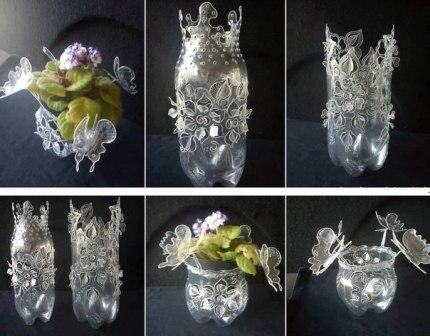
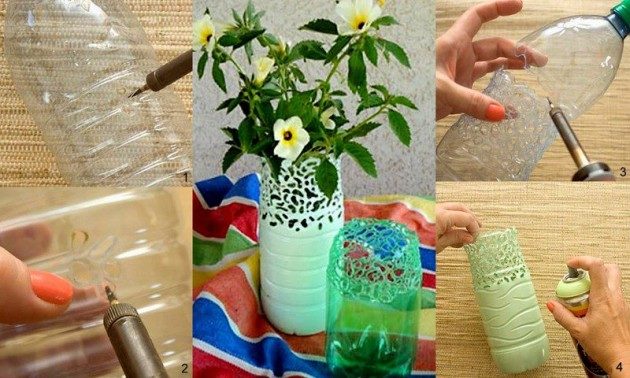
Decoupage vase
Another way to decorate a plastic bottle - use napkins for decoupage. They make it possible to apply a huge spectrum of drawings. Also, as an option, we propose to make this vase suspended.
Necessary materials:
- napkins for decoupage
- materials for fastening napkins (brush, glue)
- scissors
- decorative Tape with Pomponchiki
- hole puncher
- adhesive gun.
Step-by-step instruction:
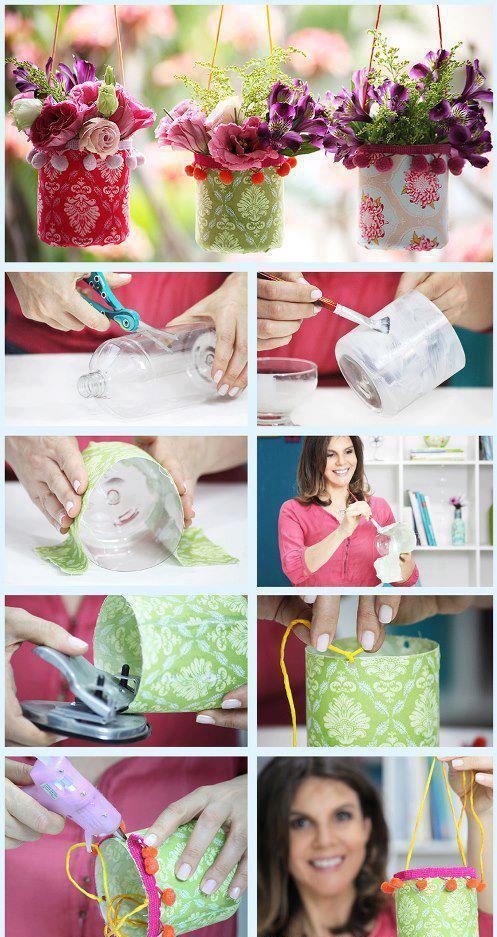
Step 1: Pruning
- Cut and throw the top of the bottle, leaving only low part.
- Using materials for decoupage, attach the napkin you choose to the bottom of the bottle.
Step 2: Fresh Rope
In order for the vase to hang, you need to attach the rope.
- First, make a hole for two holes near the top edge, they must be arranged diametrically oppositely opposite each other.
- Take the rope of the desired length and tie to both holes.
Step 3: Tape with Pomponchiki
It remains only to make the final decorative element. With the help of a gun with hot glue, attach a spacing with pomponchiks to the upper edge of the vase.
All is ready! Hang in the apartment or garden, place the flowers inside and enjoy!
Bottle Vase and Threads
This method is suitable for the manufacture of VAZ for dried flowers, pots for pots or just a basket. It turns out quite unusual, and it is not at all clear that a plastic bottle was used here.
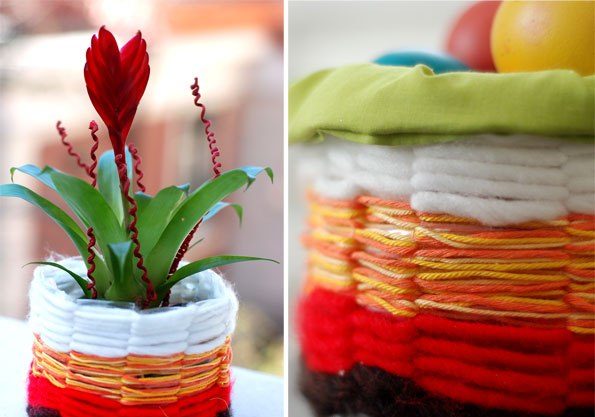
Necessary materials:
- wide plastic bottle
- knitting
Step-by-step instruction:
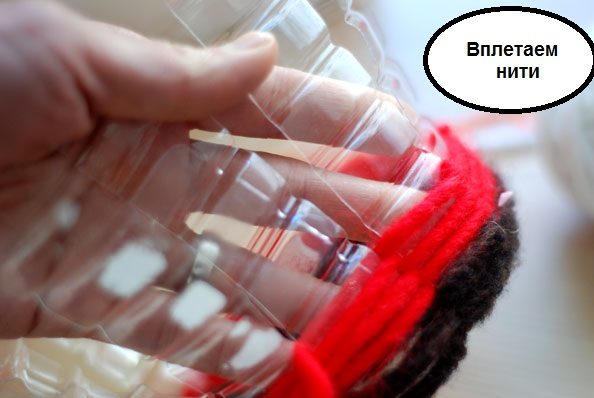
Step 1: Pruning
Cut the bottle in half, leave only the bottom. Relieve the side sides of the lower half to the even number of the same bands. On them we will push the layers of yarn.

Step 2: Weaving
It is better to use a thick yarn, and looks more beautiful, and woves faster. Put the strips through one: the first front, the next back, and so on. Continue until you reach the top. You can use one color, melange threads, or alternating several different colors.
Step 3: Treatment of the upper edge
From above, you need to attach a strip of fabric (or braid) so that the edge does not quive, and the threads did not disintegrate. To do this, first wrap the end of the thread into the middle of the vase under the layer of shilled threads, and then on the edge of the vase with large stitches, our tissue strip. Now Vaz is ready to decorate your home interior!

Set of Vaz
From small square plastic bottles, you can make a whole set of VAZ. And here they do not even have to cut anything.
![]()
Necessary materials:
- 6 identical small plastic bottles of square shape
- Scotch
- Multicolored ribbons
Step-by-step instruction:
Step 1: Collect the bottles together
Take six identical clean bottles, put them next to two rows of three pieces. Now wrap them all together with scotch, to firmly fix each other.
- Wake up the design of bottles with multi-colored ribbons, in several levels above each other.
- Insert a small number of colors in each bottle so that one big bouquet is ultimately turned out.

Suspended vase in the garden
In plastic bottles, you can not only insert cut flowers, and grow live plants. We offer to make a small suspended pot that can be attached on a tree in the garden, a fence or a veranda.
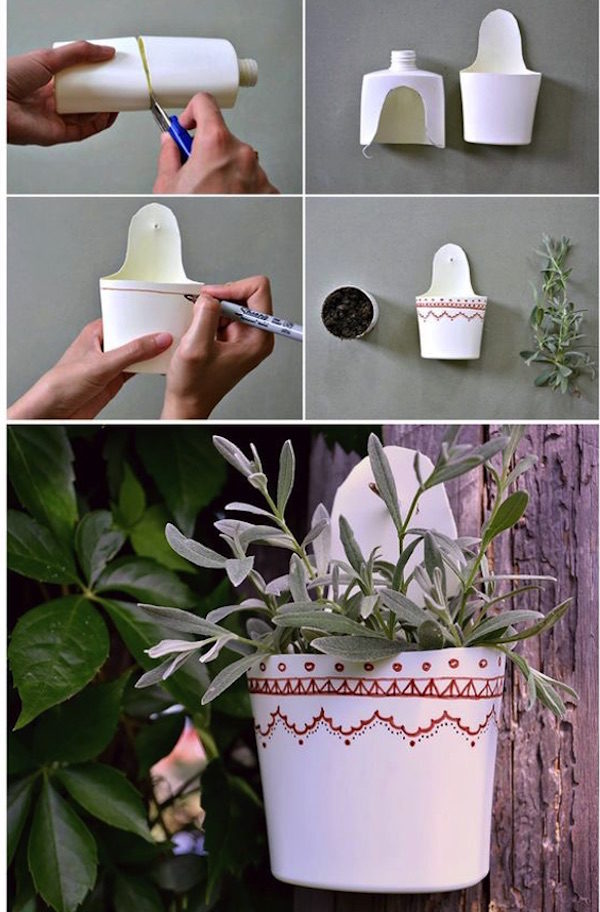
Necessary materials:
- Plastic bottle with thick material (for example, from shampoo, detergent)
- Stationery knife or scissors
- Marker
- Hole punch or shily
- Soil and plant
Step-by-step instruction:
Step 1: Pruning
You need to trim the bottle, as depicted in the photo, and not just horizontally. Thus, we leave a place for fastening.
Step 2: Hole to hang
- Punch or seer Make a hole over the protruding side of the bottle.
- Apply a marker (better immentable, so that the drawing does not deteriorate after the first rain) patterns on the top edge of the bottle (or draw completely, your taste).
Step 3: Plant Plant
It remains only to plant a plant in the just made pot and attach to the carnations in the selected place.
Another variant
We also offer another option that is done similarly.
There were two-liter bottles from the sprite. Since plastic thinner than in a bottle of shampoo, make two holes for hanging (one may simply not withstand the weight of the Vason with the Earth). You can use both vases for wildflowers.
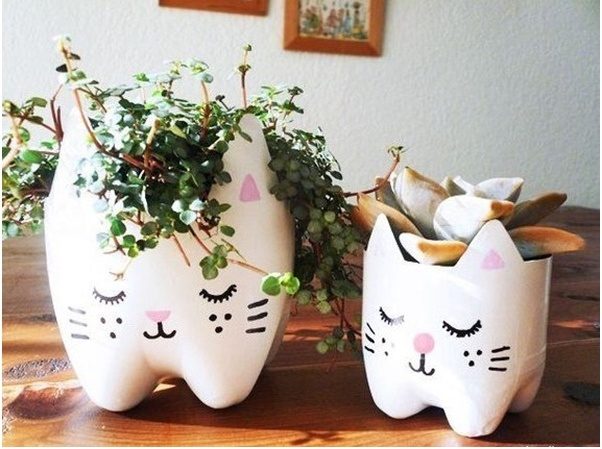
Flower vase
All love quotes (or at least the majority). Decorate your apartment with this cute vouaker, and she will be a smile on your face.
Necessary materials:
- Large plastic bottle (2 liters)
- Stationery knife
- White paint spray
- Markers (Black and Light Pink)
- Flowers
Step-by-step instruction:
Step 1: bottle cleaning
Remove the label from the plastic bottle, wash it well (so that there are no traces of sweet water in the middle, neither glue from the label outside).
Step 2: We celebrate the place of the drawing
Note what height should be your vase, and spend the horizontal line around the entire bottle. She should not be too high so that the cat turned out pretty.
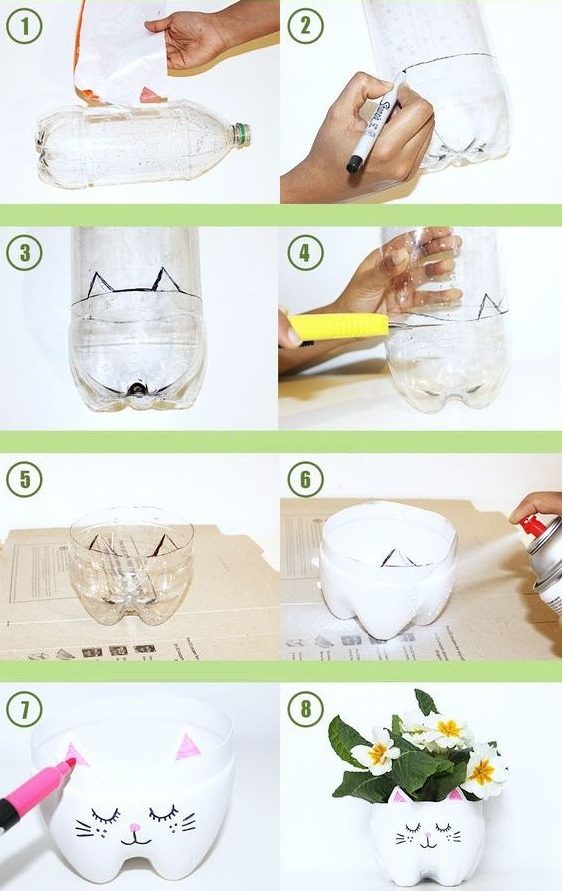
Step 3: Draw a cat
On the one side of the bottle over the horizontal line you just spend two ears, as shown in the photo.
Step 4: Cut
Now cut the bottom of the plastic bottle according to the outlined circuit. Be especially neat with ears so that they come with even and the same.
Step 5: Coloring for coloring
- Shipping the floor with newspapers or boxes so as not to blur during the color.
- Before painting, you can apply a layer of primer so that the paint is better to hold.
Step 6: Painting
Apply on the bottle white paint from the canister. See the layer to be uniform, and there are no transparent places.
Step 7: Draw a cat
Now the most pleasant part: draw a cat. You can copy with a photo or come up with your own.
It remains only to put flowers in a vase, it is low, so a small bouquet is suitable for briefly cropped colors. You can also pour the soil and plant a home plant.
See how beautiful it turns out, I am delighted with this vase!
Vase with face
A funny vase or a pot with a face will add to the homely atmosphere of funny notch.
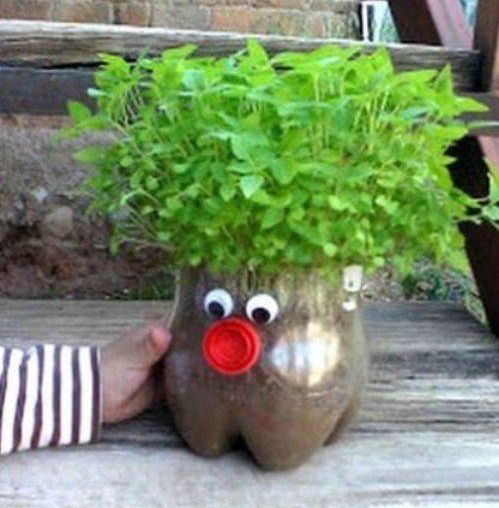
Necessary materials:
- Plastic bottle (2 l)
- Stationery knife or scissors
- Decorative eyes
- Flat caps from under bottles (in double-liter bottles they are highly high, it is better to take from yogurt)
- Super Challenges (or Adhesive Pistol)
- Flowers or soil with a plant
Step-by-step instruction:
Step 1: Pruning
- Cut the bottle (not highly high) and leave only the bottom.
- Enclose decorative eyes and sprinkle. Cork can be mounted and up and down the bottom, at your discretion.
Step 2: We put flowers or plant plants
If you are used as a vase - just put flowers in it, if as a pot - pour the soil and plant a plant.
This is what should happen in the end:
Tip: Plastic vases are lungs, so not very persistent. It is possible to increase stability, putting inside the bottom of several pebbles, the vase will become harder, and will not turn over and fall.

 How to return the love of her husband to his wife - Tips of the psychologist
 Why you can not give icons