Production and installation of a metal canopy. Shed canopy made of metal profile. Materials and dimensions of canopy structures
Each owner of his own land plot, country house or giving is faced with the need to create a carport. The advantage of this design is its versatility. After all, it can be used not only to accommodate a vehicle, but also to store garden tools, small equipment, as well as for outdoor dining.
The canopy can be used not only for placing a car, but also for storing garden tools
It is very important that the metal canopy, which you can easily create with your own hands, is different high quality, durability, reliability and harmoniously combined with the buildings already present on the site.

Preparatory work
Before the beginning construction works it is necessary to draw a plan for the future canopy. In case the choice is made in favor of a small structure, four supports will suffice. If several cars must fit under the canopy, their number should be increased.

Before the main work, it is necessary to outline a plan for the future design
Preparation of building materials.

The area where the canopy is planned to be built must be cleared, leveled and tamped
An excellent solution for creating support pillars will be pipes with a diameter of 80 mm. Their length should be no more than 3 m. Otherwise, the structure will not be sufficiently stable. You will also need crossbeams and rafters. For the latter, even an aluminum corner is suitable.
Site preparation.
After preparing the consumables, you should clear, level and tamp the area where the canopy is planned to be installed. If desired, it can be concreted or covered with paving slabs.
Installation of supports
The installation of support pillars takes place in several stages. This will require:
- dig holes, about a meter deep;
- install selected pipes;
- fill in fine gravel (layer - 15 cm);
- fill the pits cement mortar.

Particular attention should be paid to the installation of support pillars
Further work can be carried out only after a few days. This is due to the fact that the solution must dry well.
Creating a canopy
To make the design really reliable, it is best to weld the crossbars to the supports using a welding machine. Depending on what material the rafters are made of, they will also need to be fixed using welding or self-tapping screws.
To create a roof of a metal canopy, corrugated board is perfect. Its cost is quite acceptable, and the material itself is durable.
Self-tapping screws are required for the installation of corrugated board. The sheets can be painted in various colors, which allows you to create not only a practical, but also an attractive canopy.

For the installation of corrugated board you will need screws and a screwdriver
Alternatives
In the process of building a carport, the most various materials. Metal is great option because it is reliable and easy to maintain. In addition, it is impossible not to appreciate the relative ease of installation of such a design.
True, there are many people who prefer canopies made of wood, polycarbonate, brick.

To create a canopy, you can use metal, polycarbonate, brick or wood
Canopy price
the total cost finished construction largely depends on the consumables used. Most Owners country houses can easily find old pipes and put them in order. Thus, it remains to buy exclusively required amount decking and fasteners.
The cost of cement mortar, which is needed in any case, is from 1000 rubles / m³. You can also buy a ready-made mixture, but it will cost 3 times more.
A beam that is suitable for creating a canopy costs at least 5,500 rubles / m³, and corrugated board - 150 rubles / m³.
The polycarbonate construction will be quite expensive. Choosing the most available materials, in this case, you will need to spend at least 20,000 rubles.
Message
sent.
Does your car still freeze in the dog cold, rust and become covered with a crust of ice when frost sets in? Then we go to you! Now we will look at how to make a metal canopy for your car and protect it from the effects of precipitation, ultraviolet light, branches and anything else that can fall from the sky.
Is it expensive? The materials will take only a couple of thousand rubles, but as a result you get a neat canopy on a metal frame that will last for decades and, if necessary, can be easily dismantled and moved around the yard. We bring to your attention step-by-step instructions, using which you can independently build a canopy quickly and quite successfully, even if you do not have special building skills.
Preparatory work for the installation of a shed metal canopy
We could also consider gable structures, but the purpose of this particular article is to make an extremely practical, simple and cheap canopy with a metal frame, so we chose a single-slope structure. Make it 2 times faster, since there is no need for bent trusses, joining the roofing material in the center and materials will go 30% less. Consider the entire instruction step by step and start with preparatory work.
STEP 1 : choose a place for a shed canopy. You can build wherever there is space, but it is better to choose a small hill in the yard and a place with shallow clay so that water after rain does not accumulate under a canopy, and you can spend a minimum of money on installing concrete under the supports. Fans of Feng Shui are not welcome here, since the main thing here is practicality.
STEP 2 : choice of materials. We have already chosen it. Our supports will be made of a metal square 40x40 mm, we selected it taking into account the load of the structure and the possible wind load of 4%, we also did not forget the precipitation for severe climate zone. The supports are designed for a metal canopy with a slope of 15-20% and dimensions of 4x4 meters. The roof can be made of polycarbonate, but we still preferred metal corrugated board, as it is inexpensive and easy to work with. 
STEP 3: clearing the area
.
We will use a concrete floor for the car, so the area must be planned and about 10 cm of earth removed to add slag and install a screed at least 5 cm thick. This is a lot, quite enough for a heavy SUV (within reason, up to 2500 kg). If you want to buy a hummer or a tractor in the future, then your screed depth will be at least 12 centimeters. 
STEP 4: we count communications
.
Yes, you heard right, there will be more communications around the canopy. What for? It's simple. Firstly, water will not wash it away, it will not flow under a canopy, and secondly, it just looks cool and is inexpensive. These will be ebbs in the ground and drainage systems. In addition, it is necessary to supply electricity to the shed just in case of a fire (suddenly there will be nowhere to fry a barbecue or you need to warm up the car) and make wire conclusions from under the screed or along the supports in the future. 
Metal carports can be of different sizes, you can make it just for a car, or you can create a parking lot for 3-4 places (suddenly the mother-in-law will come to visit or former classmates), it is better to think it over in advance, since the expansion will be problematic. At the very least, you need to pour the foundation and supports immediately to the size of the canopy you have chosen and start manufacturing after the calculations. Look like that's it. Now we have prepared the site, morally gathered and accepted for courage - you can go to build.
We install metal poles for a canopy and crate
Making the frame is the hardest part, because installing the roof and decorating is already a breeze and even a child can handle it. But the frame must be carefully done, do not be lazy to use the level and more often check the correctness of the work. If you install the supports or the screed unevenly, then it will be possible to fix it, of course, but it will take a lot of time and effort, because this is almost completely redoing everything. Consider how to concoct a metal canopy with your own hands according to GOST in detailed instructions.
STEP 1: install supports
.
There are about a dozen different methods installation of supports, but we will not bother bottom straps, just make a hole in the ground by 40-50 centimeters with a drill or a shovel, put a metal profile in the center and fill it with concrete - the support is ready. Here it is important to install the supports exactly vertically, measure everything with a level so that they are in the same plane. concrete mortar 1:3 we do. 
STEP 2: top binding.
But at the top it is necessary to tie the supports, since their height will be 270 centimeters above the ground and 240 cm, respectively, on the other side, where the slope will be (we chose just such a height), they may deviate slightly. Therefore, at the top along the perimeter, it is necessary to weld a metal profiled pipe, the length of which will be equal to the length of one side (we took the dimensions of the canopy 4x4 meters as a template). 
STEP 3: crate.
Since metal canopies with pitched roof do not require bent elements and joints in the middle, making the crate as easy as shelling pears. It is necessary to weld a metal pipe every 60 centimeters between the sides of the canopy with a height of 270 and 240 cm to form a slope. We will get about 20% slope, even a little less - this is quite enough to metal carcass the canopy successfully coped with any amount of precipitation. 
Now it remains only to screw the roofing material. The frame will cost only 3,500 rubles, you can still save money by installing jumpers every 80 centimeters, instead of 60 cm as we did, but it’s better to have a margin of safety, you can make the construction easier only if the carport is located in a cozy place in the yard and not exposed to strong winds.
We select and fix the roof on a metal carport
As we said earlier, it is possible to lighten the structure and attach polycarbonate to the roof, but this will not be very rational from the point of view of efficiency. It is best to make a shed metal canopy from corrugated board. In addition, it does not need to be bent, leveled, put tricky washers and it’s not scary to pull a little. Installing it is easier than a steamed turnip, consider the step-by-step instructions:
STEP 1: drilling holes
.
Need to raise a metal sheet and make holes in it at the level metal beam, which connects the sides of the canopy. This can be done simply: put the sheet on the beam, mark the bottom with a marker where you need to make holes, remove and drill them. Holes every 35 centimeters. 
STEP 2: drilling a metal canopy for a car
.
Holes can be made both in advance in the marked places, and when the sheet is already applied to the frame and a jumper is drilled through the hole on the corrugated board. It is necessary to use special screws with sealing caps so that the screwing points do not rust. You can use plastic washers to work, it's convenient and cheap. 
STEP 3: processing with protective materials.
It is better to use deep impregnations for metal and varnishes so that our work will stand long years. When using varnish, metal canopies for summer cottages last at least 2 times longer, since even high acidity of precipitation does not cause corrosive processes. 
We looked at how to make a metal canopy without the help of a specialized team, but we also suggest watching a video on how to properly screw the corrugated board to the metal frame in order to avoid mistakes:
Canopies on metal supports and with a corrugated roof are perhaps the most reliable and practical. Their use is so widespread that they are found not only on summer cottages and in private homes, but also mainly in industry. Such canopies have special characteristics, have clear advantages. We will talk about this in the article, and also tell you how to assemble a metal canopy with your own hands.
Characteristics of the metal canopy
Metal canopies include canopies, the supports of which and the frame are made of metal, while the roof can be made of any roofing material. And here is the canopy metal roofing, but wooden supports should not be called metal.
For the manufacture of the canopy structure, different metals are used:
- iron;
- aluminum;
- stainless steel.
Profiles, corners, pipes are made from these metals different sizes and different diameter, forged elements are made of iron. The most expensive are stainless steel supports. They don't need to be processed. appearance perfectly combined with glass, polycarbonate, fabric, they are not subject to corrosion and are durable. At the same time, making a stainless steel canopy with your own hands is not easy, almost impossible if you do not know how to work with special welding.
And will cost a lot. Therefore, most often, an iron profile is used for the construction of canopies, it is not so expensive, light and easy to install. A corner is suitable for the connecting elements of the canopy structure. Both bolts and welding are used as fasteners. 
Designs from aluminum parts very easy to assemble by hand. Usually these are awnings. small sizes, collapsible type.
Round pipes are used less often, as they are more difficult to join and create right angles. In this case, only welding is suitable. The profile pipe may have different shape, metal thickness and dimensions. The picture shows a variety profile pipe.
List of advantages and disadvantages
Metal frames of canopies are most often covered with polycarbonate sheets. Such a design has its advantages.
- First, at correct installation and compliance with technology, the canopy will last a dozen years.
- Secondly, such a construction is economically beneficial, since a one-time investment of funds will pay off over decades of operation.
- Thirdly, metal canopies are resistant to temperature changes, they are not afraid of physical exertion, chemical exposure.
Important! If a metal canopy is erected over a barbecue or barbecue, then the metal parts near the fire will quickly heat up, remember this.
- Fourthly, metal allows you to make beautiful forged canopies that emphasize the majesty of the building.
The disadvantage of a metal canopy is that it is susceptible to corrosion and can rust, so it must be treated with anti-corrosion impregnations and paint. Unless, of course, this is a canopy made of stainless steel tubes.
Types of canopies: by purpose, device, form
Canopies are very different and may differ in shape, purpose, device of metal structures. If we talk about the purpose of the canopy and the purposes of its construction, then you can list a lot, let's name the most common:
- carport for one or more cars;
- canopy over the pool;
- canopies for sheltering people at bus stops;

- visors over the porch or gate;
- canopy over the barbecue;
- canopy over the woodpile;

- canopy over the swing;
- canopy over the gazebo;
- industrial sheds (hangars, granaries, warehouses, etc.)

According to the complexity and size of the metal structure, all canopies can be divided into three groups:
- Small canopies, which include visors, barbecues with a roof, portable gazebos, awnings over swings, etc.
- Free-standing sheds that act as independent buildings.
- Combined or adjoining sheds - a shed near a house or a bathhouse, an extension to a garage, terraces, outbuildings.
Note! The listed types of canopies can be open and closed, that is, sheathed on several sides with some kind of material (wood, fabric, grating, corrugated board, etc.)
For the roofing of metal structures, polycarbonate, corrugated board, metal tiles, awning fabrics are used. The choice of material will depend on the purpose of the canopy, its shape and size. Awning fabrics, for example, are most often used for shelters from the sun and rain, equipping recreation areas. Sheds made of metal tiles often become a continuation of the roof of a house or garage, they look like a single composition. A canopy made of metal tiles is a durable structure that is not afraid of any weather conditions.

The nuances of developing a drawing and design calculations

When developing a drawing, you need to accurately determine the type of canopy and its purpose. Creating a drawing of a simple metal structure is not so difficult. First you need to make a sketch of the future structure, on which indicate the measurements of the area allocated for the canopy. Then calculate the load on the canopy, in accordance with which to select the desired section of the professional pipe. Based on calculations and a sketch, create a drawing in which you indicate the amount of required material and fasteners.
Note that the drawing must contain both a solid structure and its individual elements, namely supports and trusses or metal strapping with a run. Supports of metal structures must be located at a distance of 2-3 meters from each other. For a canopy erected next to the wall of a house, garage or bath, you need to make supports not only on one side, but next to the wall. Otherwise, you will have to fix the cross beam along the wall of the house with your own hands, which must be reliable and durable. Anchor bolts must be used for fastening.
The frame of the canopy, as well as the supports, is under heavy loads from snow and wind, so the calculation of the truss structure must be carried out carefully. It is also necessary to take into account the slope of the roof and the size of the entire metal structure. For most household sheds, you can use ready-made truss drawings, for example, as in the figure below.

In order for a metal canopy to be reliable and safe for human life, one must not forget about the norms and standards when working with this material.
- It is impossible to use for construction a profile that has defects and cracks.
- The cut of the support rib should be rough and have a factor of 12.5 µm.
- When welding the metal parts of the canopy, carbon sulfur or carbon with argon should be used, as well as PP-AN-8 wire.
- Bolts for fastening supports and rafters must be class 5.8.
Note! The listed requirements are taken from the state standards during construction, do not be too lazy to study them when erecting sheds from metal tiles.
We prepare materials and tools
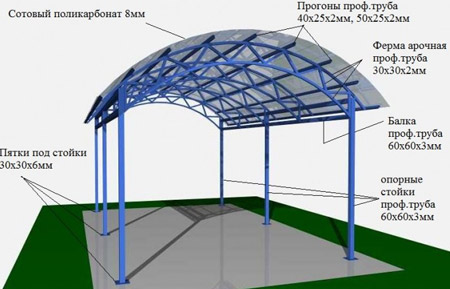
We will consider the stages of building a canopy made of metal with our own hands using an example gable design with polycarbonate roof, size 6x3m. His device is one of the simplest.

To make such a canopy, you will need the following materials and details:
- corrugated pipe measuring 80x80 mm with a section thickness of 3 mm and a length of 3.5 m - 6 pieces;
- corrugated pipes for a run with a size of 50x25 mm with a section thickness of 2 mm and a length of 6 m - 7 pieces and 2 pieces with a size of 50x40 mm and a length of 6 m;
- finished gable trusses with an angle of inclination of 20 0 and a length of 3.5 m - 5 pieces;
- sheets cellular polycarbonate size 2.1x6 m - 4 pieces.
- hardware for fixing polycarbonate;
- straight joint profile - 10 pieces of 2 m each and corner 3 jokes of 2 m each;
- end polycarbonate profile- 21 m;
- crushed stone and a mixture of concrete.
You can not do without a tool, such as: hole drill, screwdriver, welding machine, drill, measuring tool, building level, marker, grinder with special nozzle for cutting polycarbonate sheets.
We fill the foundation and build the frame
The construction of a canopy begins with clearing the area under it. The selected area is cleared of debris and topsoil. Along the perimeter of the 6x3 meter site, wooden stakes are dug in, between which a rope is pulled to align the boundaries of the site. After it is ready, we proceed to laying the foundation. To do this, you need to dig 6 holes to the depth of soil freezing, approximately 1-1.2 m. The pits are dug in two rows of 3 pits, the distance between all the pits is 3 m.
Important! For swampy areas, use the piling method of installing supports, rather than concreting.
 A layer of crushed stone and sand about 10 cm is compacted at the bottom of the pit. Then a layer of concrete is poured, this is another 10 cm and a professional pipe 80x80 mm is installed. After the pipe is level, you can fill it with concrete to the ground and put props so that it does not tilt. The supports are not removed until the concrete is strong, which is about a week.
The next stage is the welding of the stiffeners of the metal structure. For this, a 50x40 mm professional pipe is laid on three supports and joined by welding. You need to work with at least two people, since it is very difficult to lift heavy elements alone. Next, trusses are welded to the stiffeners, the distance between which will be 1.5 m.
After that, a run is welded to the tops of the trusses. In parallel with the welded run, the remaining 50x25 mm professional pipes are welded with a distance between them of 60-62 cm, on both sides of the roof. This will complete the assembly of the metal structure.
Do not forget that all metal pipes need to be cleaned sandpaper, progruvat mixture from corrosion, and then paint.
We mount the roof with our own hands
Completes the process of building a canopy - polycarbonate fasteners. First, each polycarbonate sheet is cut into 3 parts 2 m long. An allowance of 10-15 cm must be left along the edge of the roof. The sheet is screwed to the metal structure using hardware (a self-tapping screw with a rubber seal and a washer). A hole is pre-drilled with a diameter larger than the self-tapping screw by 2 mm. The self-tapping screw is screwed in strictly perpendicular, tightly, but not excessively, so as not to damage the material.

Between themselves, polycarbonate sheets are fastened with a special profile. Such a connection is tight and reliable. The polycarbonate joint at the top of the truss must be made using an angled profile. Thus, 6 polycarbonate sheets will be fixed on each side of the canopy. The ends of the polycarbonate are closed with an end profile, which will prevent the ingress of water and dust.

On this, the construction of a gable metal canopy with their own hands is completed. To do such work is within the power of a novice master. The main thing is to follow the instructions and technical requirements. Good luck!
A canopy is an almost integral part of any country house, allowing you to shelter gazebos, playgrounds and other areas from rain. In the last decade, sheds made of metal profiles have become very popular, which is explained by the low cost of construction, as well as reasonable cost. What types of such canopies are, as well as their advantages, we will consider further.
An example of a canopy from a metal profile for parking
The main function that a metal profile canopy performs is protective. It is equipped in those places where there is a need to create a roof that protects against precipitation.
The metal profile has become so widespread for a number of reasons:
This list can serve as the basis for choosing a metal profile as a roofing material for a canopy, since it has excellent technological characteristics, which are ideally combined with affordability.
Varieties of canopies from a metal profile
When it is necessary to focus on their shape and spatial position.
 Canopy from a semicircular profile
 In accordance with these criteria, the following main types of canopies are distinguished: single-slope, gable, arched.
Shed canopy
This type of canopy is very convenient, because it has the shape of an inclined plane located at an angle. This design provides maximum protection of the territory, and also has a natural. Water and other atmospheric precipitation are not able to linger on an inclined plane, thus protecting roofing materials from premature deterioration.
If you want to make a shed canopy from a metal profile with your own hands, you need to take into account several features. First of all, key point is to determine the angle of inclination. If it is too steep, then there is a risk of unwanted moisture getting under the canopy, and there is also a high probability of damage to the metal under the influence of strong gusts of wind.
 Shed canopy for car park
 Secondly, it is necessary to think over the organization drainage system, since the constantly rolling liquid will turn into a water stream that can erode soils.
Thirdly, the choice of slope direction should be based entirely on statistical data on the prevalence of air masses, or rather, their direction.
To obtain such data, you can use the services of meteorologists, or independently mark the direction of the wind for six months.
And, fourthly, one should not neglect the additional strengthening of the canopy, especially in regions that are characterized by frequent gusts of wind. A shed canopy from a metal profile will perfectly protect not only from precipitation, but also from excessive sun, which is extremely convenient for all seasons. Most often it is not used as a separate structure but as an extension.
 Detailed scheme with the dimensions of a shed canopy
 gable canopy
In those regions where it is difficult to establish the prevailing direction of the winds, a gable canopy from a profile is more often in demand. It differs from a shed with an additional plane, this design looks like a regular house roof, but has a slightly different structure. 
Such a canopy has much more advantages, since its area allows you to cover a lot of the pain of the territory than in the first case. To achieve the maximum effect, as well as to make the structure reliable, it is necessary to use a more serious system of fastenings, which involve additional profile supports.
Multi-slope canopies
Exhibition centers, playgrounds and car parks are most conveniently equipped with multi-slope canopies, which look like a cascade of gable canopies.  The multi-level arrangement allows you to maximize the area covered, however, the installation process will take much longer.
This is due to several needs:
- measurements and drawings (in order for the multi-pitched canopy to be durable and fully fulfill its functions, accurate measurements and design skills are indispensable);
- selection of suitable material;
- obligatory arrangement of the drainage system and storm water.
You can often find a multi-pitched canopy in a private house, which plays the role of a continuation of the garage, serving as an excellent option for protecting vehicles from precipitation.
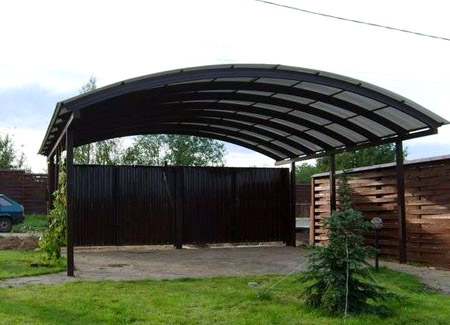
Arched canopies
For those for whom a canopy is not only a means of shelter and protection, but also an element of decor, an arched canopy is ideal.
 Device variant arched canopy from profile
 It has an attractive and neater appearance, which does not affect its appearance in any way. quality characteristics giving any home or area a personality.
The main disadvantage of such canopies will be their higher cost. This is explained by the fact that it is almost impossible to make a canopy from an arc-shaped profile with your own hands. This will require special tools, as well as knowledge and skills in working with metal.
Absolutely any owner of a cottage or a country house is faced with the need to equip a canopy for his iron friend. This circumstance is primarily due to the versatility of the design, since it can be used not only for a car, but also for storage garden supplies and small technical devices. In addition to this, this building becomes more relevant when it is necessary to park vehicle for a small amount of time. In the article we will tell you how to make a metal carport with your own hands for a car, we will provide step by step instructions, photo and video materials.
Before performing construction work, you should determine the future location of the canopy, its style, determine the purpose and type of the structure being built. In addition, it is worth making a choice between a stationary and mobile view.
The advantages of a stationary building are practicality and durability, and a mobile building is mobility. However, a movable canopy requires the manufacture of a strong frame, so it is built in rare cases when it is necessary to temporarily protect the car from precipitation, direct sun rays and dust.
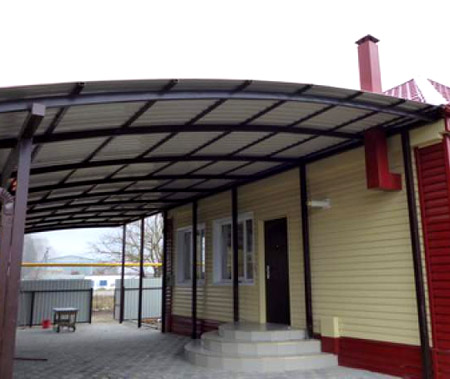
According to the type of placement, canopies are free-standing and made as an extension. Attached structures form a single structure with a nearby building and are often united by a common roof.

The roof of a free-standing canopy can be domed, arc, arched, single-pitched and gable.
Ordinary metal or profile pipes, brick and wood can be used as support pillars. At the same time, roofing materials also abound in variety: corrugated board, natural tiles, polycarbonate, metal tile, etc.
The type of canopy and material determine the complexity and duration of the installation of the structure. As a rule, for a simpler and more economical assembly, a metal profile and corrugated board are used. The thickness of the pillars and ceilings is selected depending on the size of the structure and the expected load.

To successfully complete the task, it is necessary to draw up an approximate sketch of the future canopy, prepare a tool, purchase consumables and accessories. Required tools:
- building level and tape measure;
- grinder or saw for cutting metal;
- drill with a puncher and a set of drills and bits;
- riveter;
- metal screws or rivets.
A complete and objective assessment of the quantity depends on the clear drawing up of the drawing. consumable, as well as the required volume of fasteners, therefore, the preparation of the named document should be treated with special attention. In addition, do not forget about safety precautions when working with metal products.

Before starting work, it is worth preparing the site for the structure. To do this, according to the sketch drawn up, we level and tamp the ground at the site of the proposed construction. Then, along the perimeter, we dig holes for support pillars with a depth of 50 to 100 cm. The recesses are equipped in such a way that a rectangle is obtained, as a rule, in two rows of 2–3 holes.

The metal profile should be cut according to the number of support pillars, their length should be 3 m. Depending on the type of construction you choose, the method of attaching the racks is determined. During the construction of a stationary canopy, the supports are installed according to the level and concreted, and when erecting its mobile counterpart, additional cutting is required metal pipes with a diameter somewhat larger than that of the support pipe, and a length equal to the depth of the foundation. Prepared metal pieces are mounted in pits and filled with cement mortar. Then a profile is inserted into each of the pipe cuts. Holes are drilled in the pipe and the profile and the entire support is tightened with bolts.

To stiffen and prevent premature failure, you can use the described protective "casings" and when arranging fixed structure. The only difference from mobile canopies will be that the profile must be welded to a metal pipe.

Roofs are solid and collapsible. Their primary difference lies in the method of fastening the elements to each other: in the first case, the components are welded, and in the second, they are bolted together. In addition, the designs are single-sided and double-sided.

On the example of a non-separable gable roof consider the technology of its installation. To support pillars you need to weld the pieces metal profile, so that a regular rectangular frame is obtained. Then, we start welding the rafters. On the ground, to the beam on one side and on the other, we weld pieces of a metal profile in increments of 1 m at an angle of no more than 30º. It is important to consider that the resulting structure should protrude somewhat beyond the welded upper frame. Next, we place the welded elements on the reference rectangle, and weld at the joints.

To simplify the procedure for constructing a frame for the roof, it is necessary to strengthen the metal rectangular base located on the supports, cross beams in the center of each side. Then, to the central safety beam, we weld 20–30 cm pieces of a profile pipe, which will act as a support for the future ridge. Next, we fasten the extended segments with pipes from the profile to each other and to a rectangular base.

Having finished with the installation of the frame, we proceed to the sheathing with corrugated board. The sheets are fastened directly to the prepared frame on the rafters overlapping each other by means of rivets, self-tapping screws or bolts.
At self-manufacturing carport it is important to follow the instructions and observe the dimensions constituent elements reflected in the prepared drawings based on accurate calculations. All these conditions, combined with the right approach and due diligence, will allow you to build a quality metal canopy.
Video
This video tells more about the intricacies of manufacturing a metal canopy:
A photo
In the photographs you can see various options arrangement of a metal canopy:


Scheme
If you decide to make a metal canopy, then the diagrams provided can help you in making a design suitable for you:


 Blood thinning products: recommendations and prohibitions
 Tank legend, fighters and equipment for the Arctic: what will be shown at the Victory Parade How is the Victory Parade
 Helba yellow tea: properties and reviews