Polymer floors: do-it-yourself self-leveling coatings, screed technology, pouring PUR floors, how to make a liquid polymer. Do-it-yourself self-leveling polymeric floors Self-levelling polymer floors
AT recent times polymer floors are relevant and in demand. Today, construction is the most important branch of the national economy. A special place in the industry was occupied by the creation of floor covering in one space or another. Today, to create a floor, you can use a variety of building materials - wooden boards, plywood, linoleum, concrete screed.
Advantages of a polymer self-leveling floor
In recent years, the so-called liquid floor has become increasingly relevant. It is also called bulk in another way. Unlike traditional building materials, it has some advantages. Floor polymeric filling floors represent a covering from synthetic material. They are most often used in large shopping malls, garage premises, exhibition halls, etc.
Often, polymeric fill coatings are used in production due to their reliability and long service life.
Creating such coatings with your own hands is quite simple. It is necessary to consider in more detail how polymer coatings are poured, the main stages of repair, positive and negative sides bulk floor. Polymer fillings have a number of advantages, due to which the floors are in demand among the consumer.

The advantage of a polymer floor is that it is beautiful and practical.
The advantages are as follows:
- Polymer coatings are various kinds(epoxy, polyurethane, methyl ethacrylate), depending on this, they can withstand the highest temperature conditions and are also moisture resistant.
- Despite the fact that a polymer is used, they are clean, safe, and environmentally friendly.
- The floors are very easy to clean, they are easy to wash and treat with a cleaning agent.
- Resistant polymer coating different kind abrasive substances.
- Self-leveling coatings can be with a glossy or matte surface, so you can choose a design that suits your taste, which will match the style direction.
- Liquid coatings contain a liquid substance that rapidly hardens. Thanks to this, the floor dries quickly and adheres to any surface, whether it is wood or concrete screed. Unlike wood and concrete bases, this coating is created quickly and without much effort.
Thanks to all the above advantages, more and more people prefer to fill the coating, equipping the floors of apartments, private houses, offices, parking lots, etc. In addition, 3D coatings have been developed. They differ from the standard coating by the presence of complex images, which not any home master can do on their own.
Preparatory work for bulk coatings
The complexity of creating flooded coatings is that they need a perfectly even base. In the event that the base is made of tiles, you will need to perform some roughness. This can be done using sandpaper or sandpaper.
Often problems can arise when leveling the base if it is made of wood. To do this, it is paramount to remove all uneven places, carefully patching them up.
The unevenness of the base of the floor surface can manifest itself well when the logs are disassembled and the old coating is removed. However, a height difference is allowed, and it is 4 mm. If possible, it is better to concrete screed. If it is not done, then uneven places and defects can be removed using a special grinding machine or a grindstone.

You can install the polymer floor both independently and with the help of qualified specialists.
In order to determine the evenness of the surface, experts advise applying:
- water level;
- Building level;
- Another measuring device.
It will also be useful to carry out a thorough priming of the surface. The primer increases the moisture resistance of the surface and increases the adhesion of the filler floor to the base. After the base is well prepared, along the perimeter room you need to nail special slats like a plinth. This is necessary so that the liquid filling polymer does not spread into the voids between the floor surface and the walls. Reiki is attached to self-tapping screws, nails (if the wall is wood) or dowels (if the wall is made of concrete).
Polymer self-leveling floors: mixture preparation technology
In order to make your own PUR floor, you should carefully prepare the working liquid composition. You can buy a polymer mixture at any specialized store. After that, it must be diluted, as provided by the instructions and technology.
This is one of the most important steps of the entire repair, since the result largely depends on the quality of the liquid composition. repair work.
You need to prepare the mixture only according to the instructions that are attached to the purchased product. The mixing process plays an important role. This must be done slowly, carefully so that not a single lump remains. In addition, absolutely all air bubbles must be removed from the solution. Mixing can be done with a special construction mixer or another suitable remedy. Next important step- pouring the composition. The liquid mixture should be applied to floor base from the section of the room farthest from the doors and carefully move towards the doors. The correct thickness of the floor layer should be approximately 4 mm.

Before proceeding with the installation of the polymer floor, it is necessary to correctly select and prepare a special mixture for pouring
If the layer is thinner, then it will turn out:
- Not durable;
- Unreliable;
- Not durable.
A very thin layer can only be poured onto a finished base as a supplement. It is best to pour the composition together. One home master holds a bucket of polymer composition and carefully pours it onto the floor, while the second smoothes the surface. For alignment, you can use a wood lath. After the polymer filler floor dries qualitatively, you can begin to apply varnish. Lacquer is necessary in order to finished coating it was aesthetic, shiny, more secure. In addition, the varnish increases the wear resistance of the material, and makes it the smoothest. The time for the polymer to dry is approximately 30 minutes. But it is better to do everything in accordance with the instructions on the packaging of the material. The varnish is applied only on the already hardened surface. Laying the coating should be in 3 or even 4 layers. Walking on only a flooded filler floor is not immediately possible. So that there are no traces and defects, it is better to step on the finished floor after a day.
Do-it-yourself tools and materials for a polymer floor
In order to make a PUR floor based on a polymer composition, you should have a whole arsenal of tools and building materials available. The set should consist of certain items and materials.

Should be prepared in advance necessary materials and tools so as not to be distracted in the process of work
Namely:
- Water or building level;
- Rail for leveling the polymer solution when it is poured;
- Brush;
- Putty knife;
- Primer;
- The solution, if a concrete screed will be arranged;
- Container for polymer composition;
- Mixer.
In addition, it is necessary to prepare wooden slats for fencing the room around the perimeter for 3D flooding. In this case, the most important detail will be a film with a pattern or coloring composition. In order to give the flooring aesthetics, you will need to varnish the surface.
Types of polymer floors (video)
As a result, one thing can be noted that the flooded polymer floor is an innovative design solution for repair work in a cottage or apartment building. This technology has found wide application in production.
In modern industrial and civil construction, they are widely used. According to their characteristics, they have proven themselves as environmentally friendly, dust-free, impact-resistant and soundproof coatings.
According to the composition of the components included in the bulk antistatic polymer floors, they are divided into polyurethane and epoxy. The former are based on polyurethane and methyl metaacryl. The curing of the coating occurs under the influence of air.
The second ones include a two-component epoxy resin in the base. The polymerization of such a coating occurs when a hardener is added to the mixture.
Since these coatings were developed for industrial use and are resistant to high loads, then when they are used in an apartment and a private house, the difference between them is practically not noticeable.
The difference is not significant, but there is. Epoxy self-leveling floors are more resistant to abrasion and impact (when a tool falls). But polyurethane coatings dampen vibration well and reduce noise (during machine operation).

Based on this, it is possible to offer polymer floors in an apartment or house according to the following principle:
- entrance hall - polymer epoxy floors (there is an increased content of sand from shoes);
- kitchen - epoxy floors (high probability of falling heavy objects);
- bathroom and toilet - epoxy floors;
- bedrooms and living rooms - polyurethane floors (increased sound insulation of the premises).
The technology of laying self-leveling polymer floors is quite simple. Even a schoolboy can master it. Therefore, for home master laying a self-leveling polymer floor with your own hands is not difficult.
When performing work, he will need a maximum of one assistant. However, it is important to remember that no matter how simple the operation of installing a self-leveling floor, they must be approached responsibly. Especially if you are planning the installation of self-leveling 3D floors.
Self-leveling 3D floors are the same epoxy or polyurethane floors, on the surface of which a three-dimensional drawing, a finished photograph or a reproduction of a painting is applied. From above, such a floor is covered with a protective transparent layer (lacquer).
Let's consider in detail how to properly fill the self-leveling floor. More precisely, instructions will be given below on what and how to do it.

Where does the repair in an apartment or house begin? Of course, with planning, calculation of materials and your budget. When you have decided which floors you will use, you can begin to calculate.
Choosing an (epoxy or polyurethane) self-leveling floor, how to calculate the amount of material for its installation is not difficult. They are sold in sets. The self-leveling floor may include various fillers (quartz dust, marble chips, dyes, etc.)
The choice of color and filler is up to you. Instructions are attached to the kit, which indicate which layer and for what area it is spent. On average, 1 liter of the mixture goes to 1 sq.m of the floor base with a layer thickness of 1mm.
How to calculate the material for self-leveling floor
The specific gravity of 1 liter of the substance is approximately 1.3 kg. For a room of 16 square meters, you will need 16 x 1.3 = 20.8 kg of the mixture. For polyurethane floors specific gravity 1.25-1.33kg/l. For epoxy floors 1.4-1.5 kg/l.
Sets of self-leveling polymer floors from different manufacturers may differ in weight. On average, 1 set weighs —— and its consumption is 20 square meters with a layer thickness of 3mm.

Damper tape to compensate for the expansion of the floor when it is heated. It is laid around the entire perimeter, where the floor is in contact with the walls.
You can do without it, but for this you need to arrange a special expansion joint. It will be described below.
Instruments
Tool for polymer floors:
- electric drill with low speed and mixing nozzle;
- container for mixing components (plastic bucket);
- household scales (for weighing fillers);
- angle grinder (grinder);
- vacuum cleaner;
- wide spatula (can be serrated);
- cloth roller;
- needle roller (squeegee for);
- paint shoes (have needle soles and are worn on shoes).
After you have prepared everything you need, you can get to work. Important! Before laying the self-leveling floor, the instructions attached to the kit of materials should be carefully studied by you.
How to fill the self-leveling floor
Laying of polymer floors is carried out only on a previously leveled and prepared surface of the floor base. If the screed has cracks and chips, they must be repaired cement mortar or waterproofing mastic.
You can also use mastic to process the junctions of the floor and walls around the perimeter. If the base of the floor has critical differences, then it must be leveled. Self-leveling floors are ideal for this.

If the surface of the original cement-sand screed is even, then it must be processed with an angle grinder (grinder). This will remove fragile elements and roughen (sand) the surface for strong adhesion of the self-leveling floor and the base (screed). If you don't want to use damper tape, then along the perimeter of the room (at the junction of the floor to the walls), the grinder makes an incision parallel to the floor and up to 5 mm deep and equal to the height of the layer being poured.
This gap compensates for the thermal expansion of the floor and prevents cracks from appearing. Otherwise, lay a damper tape around the perimeter. After pouring the floor, it can be cut with a knife, and the joint can be closed with a plinth.
After cleaning, it is necessary to remove all debris from the surface and thoroughly vacuum the subfloor. Dust is the main enemy of self-leveling floors. If there are grease or oil stains, they must be degreased with a solvent.
A primer is applied to the prepared surface. Manufacturers of self-leveling polymer floors produce polyurethane-based primers. They can be supplied as a set of self-leveling floors.
In their absence, the solution can be prepared by yourself. The primer will be a mixture of 20-30% of the base material of the self-leveling floor and a solvent (acetone, solvent, xylene, etc.).
The primer is mixed in a container with a drill with a nozzle at low speeds. This will prevent bubbles from forming. Mix for 3-4min. After that, the primer is poured onto the floor and stretched evenly over the surface with a flat spatula.
The applied primer layer is rolled with a needle roller to remove their mixture of air bubbles. Paint shoes must be worn on the feet. Apply a second layer if necessary.
After applying the primer, it should dry well. Remember! It is impossible to make large technological gaps between priming and applying the base layer.
As a rule, the drying time of the composition is indicated on the container with the primer. For epoxy floors, the complete drying time is 12-18 hours. For polyurethane: 6-12 hours.
When priming, the room must be well ventilated. The use of open fire is prohibited.
After the primer has dried, a base coat can be applied. The preparation of the mixture requires careful preliminary study of the instructions.
Open container with base layer(liquid A) and, using a drill with a nozzle at low speed, mix the liquid for 3-5 minutes. Add the hardener (liquid B) to the center of the liquid A container. Using the drill again, stir for 3-5 minutes.
Avoid air bubbles. While mixing, add fillers (quartz sand, dyes). When the mixture is ready, it is ready for laying.
Work begins from the far wall. From the container, the mixture is poured along the wall in parallel strips and, using a spatula (notched trowel), it is evenly leveled over the surface. Then pour the next portion of the mixture.
When the mixture is spread over the floor, it must be rolled with a spiked roller. It will remove air bubbles from the base coat. If this is not done, the floor will be weakened and may crack.
After the last procedure, the floor is ready and requires time for drying and curing.
After 24 hours, the floor can be carefully walked on. Full polymerization will come in 7 days and the laying of the self-leveling floor is completed.
To increase the wear resistance of the polymer floor, a protective varnish can be applied to its surface. If before that a decorative three-dimensional drawing or photograph is applied to it, then wonderful, exclusive 3d floors will turn out.
Step 3 describes the sequence for an epoxy floor. However, it differs from the sequence of laying the polyurethane floor only in the preparation of the solution.
There, the role of the hardener is played by the solvent supplied in the kit. The term for performing work on pouring a polyurethane floor after mixing with a solvent is limited to 30 minutes.
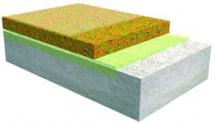
Bulk polymer floors are a very popular and practical coating that has a lot of advantages. They are a liquid polymer mass, which is poured onto the base, and after hardening becomes even and durable. The presented material can be used at home, as well as at industrial facilities.

Among the advantages of self-leveling floors are the following:
- The absence of joints and seams, which reduce the decorative properties of the coating.
- High degree of environmental cleanliness.
- Tightness.
- Resistance to moisture, biological factors, corrosion.
- High level of durability.
- Choice of different shades and textures.
- Hygiene, so you can pour the mixture even in children's rooms and hospital rooms.
- Easy to clean, and the floor can be cleaned using a variety of detergents(even chemical ones).
- Antistatic.
- Resistance to temperature difference. The presented coating is able to withstand fairly high temperatures.
- The possibility of pouring the mixture with your own hands.
Visually about the advantages of coverage will tell the video:
As for the disadvantages, there are only a few of them: a rather high cost of the material, as well as an unusually difficult dismantling of the polymer layer.
Classification of polymer coatings
Before you start pouring the mixture with your own hands, you need to decide what they are:
According to the material used
- . They are characterized by low cost, good hardness and strength. However, under strong mechanical stress, they are capable of cracking, as they are considered quite brittle;
- . They are resistant to temperature changes, can withstand heavy loads and do not crack even after a strong impact. However, their cost is quite high;
- Methyl methacrylate. Such floors are quite difficult to fill with your own hands, while they harden extremely quickly (in 25 hours). Due to this property, the period of repair of the floor is significantly reduced. However, they also have some disadvantages: weak resistance to negative influence chemical substances.

depending on layer thickness
- Thin-layer. Most often they are used to equip garages, parking lots, storage rooms. The layer thickness in this case is only 0.25-0.4 mm. Such a coating practically does not exfoliate during a point impact, and is also able to withstand traffic;
- Medium thickness - 1.5-2.5 mm. Used in industrial premises and commercial buildings. They are quickly assembled and hardened. Such mixtures have a rich range of shades;
- Thick-layer. The layer thickness is 5-8 mm.

Depending on properties
- Cement-polyurethane. The thickness of the coating in this case is 5-8 mm. They are used in areas where very strict requirements are imposed on cleanliness, for example: in the kitchen, in workshops Food Industry, medical laboratories. Such a coating performs its functions well in a fairly wide temperature range: from -40 to +1200 °C;
- Antistatic. These floors are ideal for photo studios, electronics manufacturing shops, research labs;
- Frost-resistant. They have a small thickness, and can be used in those rooms where there is high humidity and low temperature;
- Highly filled. They have a maximum thickness of 5-10 mm. The mixture contains quartz sand, which allows the coating to withstand heavy loads;
- Deactivated. Most often they are used in buildings where work is carried out with nuclear reactors.
Pouring technology
Necessary tools and materials for installation
In order to mount, it is necessary to assemble such devices and materials:

Preparatory work
You can pour the mixture with your own hands, but the surface of the base should be well prepared before that. In most cases, polymer blends can even out significant height differences, but it is better not to have them. If there are any defects, chips, protrusions in the base, then it is advisable to remove them.
We have a very detailed video here about all the nuances of preparing the base for pouring the self-leveling floor:
In order for the fill to "take" well, the base must be processed with sandpaper. In addition, the floor should be covered with a primer solution. Subsequently, the filled layer cannot be dismantled independently without special equipment, so it must be poured very carefully and carefully.
Pouring a draft and finishing layer
To fill the polymer floor with your own hands, you need to perform several steps:

When pouring the second layer of the mixture, it is necessary to leave a technological gap around the perimeter of the room. It will subsequently be filled with a special sealant designed for polymer coatings.
Learn more about technology self-assembly in the video:
As you can see, installing such a floor covering with your own hands is quite simple, even if the master has no experience working with such a mixture. However, all work should be done carefully and carefully.
Most homeowners who are planning to renovate or renovate flooring tend to focus on modern technology and the most popular design solutions. Often, in the process of choosing a floor covering, one has to face a number of difficulties, since modern material for finishing the floor must meet many characteristics and be appropriate even in rooms where the floor covering will be exposed to a whole “set” of harmful influences - from chemical to abrasive, without losing its decorative and hygienic characteristics. All these requirements are met by a polymer floor covering, which is very popular in modern construction sites and featuring high performance. Polymer floors, also called liquid linoleum, are a seamless finishing polymer floor coating applied to a concrete base, cement-sand screed, ceramic tile or wooden floor. Polymer floors, being a high-tech modern floor covering, have all the characteristics that are not characteristic of either concrete, or linoleum, or ceramic tiles and are relevant at the present stage of design development. Despite the fact that earlier polymer floors were considered only in the context of industrial premises, today, thanks to the use in the process of their production modern technologies, they have become relevant in residential areas. In connection with the relevance of polymer flooring, this article will consider its main varieties, their a brief description of, as well as advantages and disadvantages.
Varieties of self-leveling floors: a brief description
Mineral poured coatings
The demand for self-leveling floor is partly due to the wide choice of its varieties presented on the construction market. Modern manufacturers offer two main types of bulk coating: mineral and polymer. The mineral coating is cement mixture, supplemented by a number of fillers that largely determine its performance characteristics. The mineral self-leveling floor is a leveling compound that is used to prepare the surface immediately before laying. ceramic tiles, linoleum, laminate and other floor coverings.

There are three types of mineral mixtures:
- Base mix designed for the initial leveling of concrete and cement surfaces with slopes up to 80 mm. Leveling the surface with the base mixture is not final, since it is necessary to make additional adjustments with the help of mixtures for the middle layer;
- The average mixture is used as the main composition for leveling surfaces characterized by slopes of not more than 30 mm;
- The finishing mixture is intended for the final leveling of the bases on which the flooring is laid.

Polymeric coatings
No less popular is another type of self-leveling floors - polymer coatings. They are characterized by predominant use in rooms where increased requirements are placed on the floor covering, such as resistance to mechanical and chemical influences, lack of tendency to abrasion and environmental Safety. There are several actual classifications of polymer coatings that group the types of polymer coatings in accordance with a certain feature. Most often, polymer coatings are classified taking into account:
- The binder component used in the composition of the mixture;
- Degrees of filling and material thickness.

Consider the main types of polymer coatings for concrete floors.
In accordance with the binder used, the following types of polymer coating are distinguished:
- Epoxy resin coating for the floor is characterized by moisture resistance, high strength and resistance to mechanical and chemical effects of acids, alkalis and oils, which not every floor covering can boast of. The use of epoxy coating is relevant only in enclosed spaces in which certain sanitary and hygienic requirements are established. It is in them that conditions are created for the intensive impact of mechanical loads and aggressive liquids;
- Epoxy urethane blends, the use of which is justified only in areas characterized by heavy traffic, such as platforms and parking lots. Being high-strength compounds resistant to abrasion, they retain their elasticity throughout the entire period of operation;
- Polyurethane poured coating characterized by high wear resistance, resistance to high temperatures and chemicals, which leads to long term coverage up to 20 years. Distinctive feature polyurethane floors - smoothness and lack of seams, thanks to which they will never turn into a dust collector. This is the main principle of their high aesthetics. Taking into account these features, it should be noted that the polyurethane self-leveling floor is perfect choice for rooms characterized by constant vibration load and mobility of the floor, as well as frequent abrasive effects on the floor covering;
- Methyl methacrylate coating characterized by the least popularity, due to the difficulties that arise in the process of its installation. Despite the fact that the methyl methacrylate coating is characterized by minimal resistance to mechanical stress, it still remains unrivaled for unheated premises.

In view of the above, we can conclude that there is a wide variety of polymeric materials for flooring. Despite the fact that the binder component of the polymer composition largely determines its performance, it is not the only factor that is guided by when choosing a self-leveling coating.
Important! Another important parameter characterizing the bulk coating is the thickness. During operation, a polymer layer of a certain thickness is erased annually from the surface of the polymer coating, which is determined by the composition of the polymer, as well as the intensity of the load and varies within 10-30 microns.

In accordance with the thickness and degree of filling of the coating, the following categories of polymer coatings are distinguished:
- Thin-layer polymer coatings(thickness usually does not exceed 0.5 mm), also called painting by the method of application, are characterized by a minimum operational period and predominant use in rooms with minimal traffic, and, consequently, mechanical stress;
- Bulk, also called self-levelling, being the most popular type of floor covering, are characterized by a thickness of 4-5 mm, a degree of filling up to 50% and universal performance;
- Highly filled coatings(average thicknesses are 4-8 mm, but can reach 20 mm) are characterized by a degree of filling up to 90%, which determines their long-term resistance to high mechanical loads.

Polymer flooring: advantages and disadvantages
Despite the unpretentiousness of the polymer coating, it still remains one of the most aesthetic options for arranging the floor in any room. From the name it follows that the composition of the flooring includes polymaterials included in it in the form of a liquid and undergoing polymerization during its technological processing. Thanks to this feature, the surface is perfectly flat and uniform.
Important! Due to the fast polymerization of the composition, the operation of the floors can be carried out within a short period of time from the moment of laying the floor covering.

Advantages of polymer coating:
- High elasticity, which makes the flooring resistant to intense shock loads;
- Resistant to constant exposure low temperatures, thanks to which polymer compositions can be used for arranging flooring at open trading floors, for laying flooring on the territory of commercial organizations for various purposes, as well as in freezers;
- High wear resistance, which determines the ability to withstand long-term mechanical loads without loss of original performance;
- Resistant to high humidity and chemicals;
- Long service life, which can exceed 40 years;
- Unpretentiousness in leaving - cleaning of a floor covering can be carried out by means of ordinary water, without use of special cleaners;
- Non-toxicity and fire safety;
- High aesthetic characteristics, lack of seams and absolute smoothness of the coating. The polymer coating acquires additional surface decorativeness and a unique special effect due to 3D varnish. Furthermore, modern manufacturers offer a polymer coating with a textured surface and an original pattern.

Disadvantages of polymer coating:
- In the process of surface preparation, which takes enough long time, you may encounter difficulties;
- The polymer coating is characterized by a long service life, during which it can become morally obsolete or annoy the owner;
- Difficulties encountered in the process of removing the floor covering;
- Vapor resistance of polymer flooring;
- Polymer flooring belongs to a fairly high price category, due to the high cost of the component materials that make up the polymer coating;
- Despite the relevance of the previous paragraph, there are also cheaper varieties of polymer coating on the market, however, they are prone to rapid yellowing due to ultraviolet radiation;
- Compared with traditional flooring, resin material design is not large enough;
- In the process of repairing a polymer flooring, difficulties may arise, as it is subject to increased aesthetic requirements. Thus, if you are faced with the need for local repairs, it will be difficult to select the required color scheme.

Important! Polymer floors intended for laying on a concrete base and characterized by the absence of active waterproofing will soon begin to peel off due to evaporation ground water that rise through the natural capillaries of concrete slabs.
The device of polymer floor coverings: a step-by-step guide
In order to avoid the repair of the polymer floor covering, ensuring it a long service life, in the process of arranging the self-leveling floor, it is necessary to strictly follow the recommendations of specialists. If you follow all the technological steps of the flooring installation, this process seems pretty easy to you.

Materials and tools for arranging a self-leveling floor
To equip a self-leveling floor, you will need:
- Several plastic buckets with a volume of 30 liters;
- A drill equipped with a stirrer and characterized by a small number of revolutions (no more than 300);

- Notched roller and spatula;
- Special needle roller designed to remove air bubbles. Required amount tools is determined by the area of \u200b\u200bthe room - an average of 40 square meters. m of the room will require one roller;
- Squeegee with an adjustable gap, which will be required to evenly distribute the mixture on the surface;
- Paint shoes, which will be required to move on a freshly poured floor;
- A solvent with which you will clean all tools after work.

Foundation preparation is a crucial stage in the arrangement of the self-leveling floor
It is important to carefully consider this stage of flooring, because otherwise, if there are uneven bases, this will cause deformations of the floor covering and its subsequent damage. Technology preparatory work from the initial state of the base and the material from which it is made.
Training concrete base
- Carry out a moisture test of the base, which should not exceed 4%;
- If you have laid a new foundation, at least 28 days must pass before laying the self-leveling floor;
- If you are dealing with an old concrete base, remove the old flooring, clean the surface of dirt, removing the remnants of mastic, paint, glue and oil stains;
- Clean the concrete base from dust and repair all existing bumps, cracks and potholes with mortar with the addition of resin. Upon detection small cracks and breaks are recommended to use adhesive solution. To mask and remove the smallest defects, use a grinder;
- Using a horizontal stick-level, check the levelness of the surface.

Training wooden base
- Check the humidity of the wooden base - it should not exceed 10%;
- Remove the skirting boards, as new ones will be installed during the installation of the flooring;
- Clean the surface of varnish, paint and glue with a spatula, wire brush or grinder;
- Open cracks and clean the floor with sandpaper, which will increase the adhesion of the surface;
- Using an industrial vacuum cleaner, remove the remaining dust and degrease the surface with a cleaning powder;
- Level the wood floor cement screed or patch cracks with mortar.

- The air temperature in the room where the floor will be poured should be from +5 to +25 degrees, and the humidity should not exceed 60%.
- Any mixture for pouring polymer flooring in a garage or any other room is a two-component one, and therefore, they must be mixed in a clean bucket using an electric drill.
- Application polymer mixture it is necessary to carry out only after the final drying of the primer, which will take about a day. It is recommended to start pouring the mixture from the highest point of the surface. To do this, the prepared polymer mixture is poured onto a primed base and spread over the entire surface of the base using a toothed roller. If bubbles form, remove them using a spiked roller.
- The thickness of the coating on average should not exceed 1.5 mm, but in some cases it can be increased to 5 mm.
- To move across the floor, you will need paint shoes. After waiting for the final drying of the first layer, proceed to applying the second, after which, after 12 hours, apply a layer of varnish.

Technology of pouring polymer flooring
- Pour the prepared solution onto the floor surface and spread it over the entire area. To make the distribution more uniform, each subsequent portion of the mixture is distributed near the previous one with a wide spatula. To adjust the thickness of the applied mixture, use a squeegee;
- To remove air bubbles that have fallen into the solution, use a spiked roller by passing it over the floor surface;
- Pour the next portion of the solution and smooth it, thus filling the coating over the entire floor area;

- When finished, cover the floor surface plastic wrap, which will prevent dust from entering the floor that has not yet hardened, and will also make drying more uniform;
- To enhance the decorative characteristics of the polymer coating, apply polyurethane varnish to its surface.

Features of arranging a 3D floor
A decorative option for a polymer floor covering is a 3D floor, which is a three-layer structure that includes three layers:
- base layer;
- Picture;
- The final one is the protective layer.

- The installation of a 3D coating is generally no different from the installation of a traditional polymer floor covering. The first stage of installation also consists in preparing the base and is carried out in accordance with the above recommendations for self-leveling floors;
- For the arrangement of the base layer, it is recommended to use a polymer coating or floor screed. It is important to determine the features of the future decor. Depending on whether it will be small or large, the color scheme of the polymer coating is selected. If the decor is characterized by the presence of a small pattern, the polymer coating will act as a background surface, which necessitates a responsible attitude to the selection of a color palette;
- One of the most important stages is drawing an image. If you plan to paste the selected picture, select the image in such a way that its dimensions slightly exceed the floor area;
- Sticking the picture is carried out only on an ideal flat surface. At the same time, make sure that not a single bubble forms during the gluing process;

Important! To apply a complex artistic drawing, use the services of professional artists.
- To fix the resulting image, apply a thin layer of varnish.
- The thickness of the final protective layer should not exceed 0.5 mm. For its application, as in the case of a traditional self-leveling floor, a toothed roller is used, and a needle roller is used to smooth the resulting air bubbles. The operation of the polymer 3D floor can be carried out in a week.

Important! One of the biggest challenges you may face when decorating a 3D floor is blistering. Their appearance may be due to factors such as increased humidity of the coating, poor-quality mixing of components and improper preparation of the mixture. To avoid this, it is recommended to use an electric drill equipped with a mixer attachment to mix the components of the mixture. To make sure the humidity concrete surface is at the optimum level, use plastic wrap, laying it on concrete and gluing it with tape. If after three days the film remains dry, you can start pouring the mixture.

Precautions in the process of arranging a self-leveling floor
- Use protective goggles and gloves during work;
- Avoid getting the mixture on open areas skin, as this may cause irritation;
- Take care of effective ventilation in the room where the filling will take place, as the mixture has a sharp specific smell;
- If you want to give the floor a shine, use special chemicals;
- Normal cleaning of dust and dirt can be done with running water.
Self-leveling polymer floors have now become a promising and fashionable type of flooring and are increasingly being arranged in apartments (houses). Because they very well combine many requirements for flooring. Their qualities such as durability, hygiene, resistance to mechanical and chemical damage, the ability to decorate, as well as their electrophysical properties put polymer floors in the first positions. In addition, this floor can have any color, thus giving a flight of fancy for design.
Self-leveling polymer floors
And what is important for a home master, you can make such a floor yourself. You just need to have no more experience in carrying out repairs in your apartment, a set of tools and fixtures. And before starting the installation of the floor, carefully study the instructions that are attached to the set of materials for self-leveling floor. Carefully observe the proportions when mixing the components, observe the time ranges, strictly observe the temperature and humidity recommended in the instructions so as not to disrupt the technological cycle and not let all the work go to waste. If you are not afraid of such conditions, then you can get to work.
The process of installing polymer floors is carried out in stages:
- preparation of the necessary materials, tools, devices, workwear and protective equipment;
- preparation of the subfloor;
- treatment of the base of the floor with a primer;
- application of the main layer of the polymer floor;
- application of the top (finish) layer.
If this is your first time doing this work, then it is best to start with a polymer floor with a bathtub. Because there is usually small area floor and, in case of some flaws, they will not be so noticeable, but after gaining experience, you can continue in other rooms of your apartment.
Preparation of materials and tools.
Hitting the market building materials you will see a fairly large selection of materials for the device self-leveling polymer floor. They differ in their characteristics and properties. Consult with the seller to choose the right one specifically for your case, depending on the quality of the base of your future floor, its evenness and humidity.
 Self-leveling floor tools
 Of the tools you will need: an electric drill with a mixing nozzle, it’s good to have a surface grinder, a vacuum cleaner, an ordinary paint roller, a needle roller, regular and notched spatulas, special needle-shaped paint mortars for moving on a wet polymer floor, and of course tools personal protection. Provide good illumination of the floor surface during work.
Subfloor preparation.
If you arrange a polymer floor in the bathroom without dismantling the old floor tiles you still need to prepare the floor. Jointing, grinding, cleaning of all seams and cracks, check its horizontalness. If a deviation of the floor from the horizon is detected, a screed will have to be made to level it. After finishing the preparation of the base, it is necessary to remove all the dust in the room with a vacuum cleaner and cover the cracks with putty.
Processing the base of the self-leveling floor with a primer.
The primer is simple, but very important detail and it must be carried out with great responsibility. The primer is made with an ordinary paint roller in two layers with drying of each layer for at least a day. To ensure better adhesion of the polymer floor to the base, the freshly laid primer is sprinkled with clean quartz sand. The quality of the completed primer is determined visually after its final drying by the gloss and saturation of the surface where it is applied.
Application of the base layer of polymer self-leveling floor.
Polymer self-leveling floors are divided into several systems and in each there are differences in the technology of applying the main floor layer. The main ones are: painting, self-levelling and high filling.
 Painting polymer floors
 The easiest system to manufacture is the paint system.. It is a thin layer system about one millimeter thick and can be applied to both new concrete, and on the old existing floor covering. Polyurethane paint systems are most commonly used, and it is recommended to apply up to 150 g/m2 on each layer of the floor. The floor arranged according to this system is relatively inexpensive, but due to its small thickness it is not durable and requires good training grounds.
 Self leveling system
 Self leveling system and is the so-called self-leveling floor, their thickness reaches 5 mm. There are many varieties of self-levelling coatings. Such formulations are prepared from two components right before use and poured onto a prepared base.

Then it is evenly distributed over the surface of the future floor with a notched trowel. The solidification of the polymer mixture begins after 15 minutes, so you need to hurry to have time to level the material and roll it with a spiked roller in different directions to remove
air bubbles and its uniform distribution over the floor surface. In this case, it is not necessary to remove the roller from liquid material until the end of the run.
If you want to move on a freshly poured floor, then special krasko stupa with needle sole.
Highly filled systems, their thickness is about 10 mm, the most complex in terms of technology and labor intensity of work, and therefore require highly qualified performers. They hide all the defects of the subfloor.
 Highly filled systems
 Application of the top (finish) layer.
On the final stage polymer self-leveling floor devices on top of the main layer are applied the so-called finishing layer to make the floor surface more resistant to various influences and improve appearance. As such a layer, various varnishes are used, which are applied with a roller. After completion of work, access to the room is terminated until the floor is completely dry.
Video instructions for installing a polymer self-leveling floor.
 Blood thinning products: recommendations and prohibitions
 Tank legend, fighters and equipment for the Arctic: what will be shown at the Victory Parade How is the Victory Parade
 Helba yellow tea: properties and reviews