Make a shopping pavilion with your own hands. Rent a land under the shopping pavilion. Top types
For the construction of the pavilion, it is necessary to rent a land plot from the city. The main steps will be the choice of place, pavilion and submission of an application to the appropriate state or municipal authority.
1. First step to construction or installationpavilion - Choosing a place. Trade will flourish only in "bobby" places, so it is necessary to approach the choice. After you approximately look at the land plot under the pavilion, you will need to decide which pavilion you want to build. It will already depend on what and when you trade, the choice of pavilions is huge. For temporary, summer trading, pavilions made of light designs that do not belong to real estate, as they do not have durable communication with the Earth. For other types of commerce, a pavilion with a foundation is suitable, in which it will not be cold. Such a pavilion is real estate. According to the law, the real estate law is subject to state registration in the Rosreestra bodies.
2. In order to rent a land plot for constructionpavilionYou will need to submit to the authorized state or municipal authority land plot and preliminary coordination of the place of placement of the object -pavilion . The authorized body conducts everything required procedures on the choice of the plot and inform the interested parties about the upcoming construction of yourpavilion. The decision on the preliminary coordination of the placement location is made.pavilion, Cadastral works are carried out, the site is put on cadastral records. After that, the authority decides on the provision of a plot for construction, the lease agreement is concluded, which must be registered in the Rosreestra bodies.
3. The next step is to obtain a construction permitpavilion . However, it is only necessary if the pavilion can be considered an object of capital construction. The city-planning code gives a pretty vague definition of such objects (the object of capital construction is a building, structure, structure with the exception of temporary buildings, kiosks, canopies and the like). However, most pavilions can still be attributed to the objects of capital construction. To obtain a construction permission, it is necessary to submit an appropriate application to the authorized body by attaching to it:
1. The right-font documents on the land plot - the lease agreement, etc.
2. Project documentation on the pavilion.
3. The city planning plan of the land plot on which the pavilion is located.
4. Conclusion of the state examination of project documentation on the pavilion.
IN different cases Other documents may be needed.
Only on passing all these steps it will be possible to start directly construction pavilion.
In order to save place and time at the apiary, simplify the preparation for winter, increase the yield and generally simplify the content of the honeymills, the pavilion for bees is useful to each beekeeper. In such a design, a dozen bee families, separated wooden sheets One of the other. Many beekeepers are wondering how to make such a pavilion with their own hands? About this further in the article.
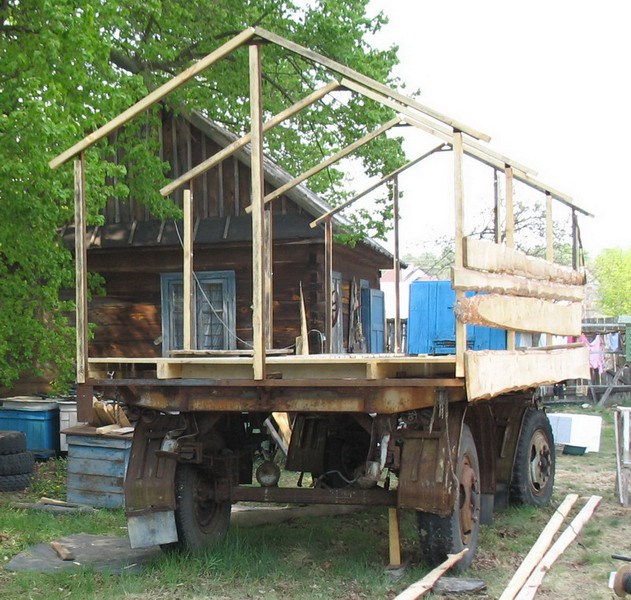
Mobile bee-packAllion is a mobile room for bees, which can be different in size and design. For example, to pollinate sophisticated conditions Movement or on small squares best option There will be an arrangement of small uniaxial mobile hives by 12-17 beekeepers. For pollination on large squares, on the contrary, it is more expedient to have a building that can accommodate 30 bees and more families. Mobile pavilion can be built, taking into account transportation on the clans or wheels (see photo).
With this mode, the apiary becomes mobile - you can carry it throughout the season a large number of time. It is done in order to more fully use medical vegetation and fully free from work on unloading and loading the hives. The mobile pavilion is more comfortable for small labor mode, and also facilitates the security of the apiary. In such facilities, the hives can be kept year-round, so the need to build winterings disappears.
Care of bees in such a mobile design is not particularly different from the usual content in single hives. However, it is necessary to get used to working with limited space and reduce the number of work to a minimum. During the season, it is necessary to produce:
- sanitary and hygienic processing, spring inspection, safety checking;
- staging the stores or the statement of the second corps;
- form a gauge and select breakdown;
- select honey and pick up a variety for wintering.
Video "Beekeeping in pavilions" shows in detail, as contains bees in mobile ule.
To start building a mobile pavilion with your own hands is necessary with the preparation of a competently developed drawing (for example, as in the photo below), which will be suitable for the main conditions:
- the desired sizes for the trailer or van;
- equipment with household and working compartments;
- the presence and necessity of folding platforms and ladies;
- availability of ventilation;
- the possibility of heating a mobile pavilion;
- lighting the working pass between the household and hives;
- the presence of a luggage compartment where you can store the necessary inventory.

By number of sections, you need to navigate the size of the mobile design. However, experienced beekeepers are not recommended to do more than 20 sections, in view of the fact that bees will interfere with each other.
The pavilion for bees is not easy for bees, because for this you need to be able to use equipment for cutting metal, crepe and tightening tools. What will take:
- tools for welding;
- jack;
- levels;
- project drawing;
- cargo trailer, preferably not heavy (preferably ZIL, IF);
- bruks of wood;
- metal for a bee carcass;
- sheets of fiberboard;
- boards (can also be replaced by disassembled pallets);
- ruberoid;
- nails, self-tapping screws, paints, door and window loops.
- Making a sketch of the drawing of the future trailer. The pavilion must be built in such a way that the roof does not touch the head of the beekeeper, not higher. The width should be at least 80 cm. This is done so that the standard 4-frame honeycon is freely entered between the hives. The length of the bee-packAllion depends on the location of the hives and their quantity.
- Align the trailer with the help of the level and jack, since after the end of the construction it may turn out that the pavilion came out curves.
- We remove the floor if it is wooden, and the side.
- We lower the floor in the pass between the hives if the trailer design allows to reduce the height of the pavilion (see photo).


Video "Beehive for mobile apiary"
Looking at this video, you will see how easy it is possible to make a hive for your mobile apiary.
Beekeeping in pavilions: all the subtleties of the process
Natural and comfortable house for bees - Beehive deck
We make beefares for apiary
Need advice?
The problem is not how to make a pavilion for bees. The problem is in the design of documents on the pavilion, I mean mobile. There is so much an obstacle at the design that they do not want and honey. Well, the last barrier is native traffic police. What is interesting, all apply strictly by law.
I would advise to make a pavilion based on modern technologies. With the use of three-layer sandwich panels. Outside, such a panel represents metal-turn from 0.5 mm of steel sheet, then the filler from polystyrene foam or polyurethane. The inner layer of a flat steel sheet or the same metal profile with an 8 mm ridge height. If someone confuses the metal from the inside of the pavilion you can apply or cellular polycarbonate or plastic panel or Osbpanel (this is a little harder). With such a design, you do not need any struts, heavy steel or wooden beams For frame.
Having a truck platform such a design from finished panels can be collected for 1 day. If you collect and glue from semi-finished products, time will need a little more. But the design will turn out, rigid, durable and easy.
- Costs and incomes for nursing hens
- Meat Ragge
- Diet of productive geese
- The diet of tribal turkeys
- Cesar diet
- Ration quail
- Diet phase on meat
- Enth of selling eggs
- Okrol rabbit
- Support sower
- Okam Sheep
- Cow hotels
- Figures mare
- Okhot of the goat

Instruction
For one tent you will need two sellers working shifting. We usually do not prevent sellers for tents for tents, because it is not necessary to be able to sell, attract customers. Therefore, you can stay on sellers without experience that do not require high (in Moscow - up to 15,000 rubles).
Sources:
- rent a tent
Today, a fairly popular kind of small business is the opening of trading kiosks and pavilions. But in order to open the kiosk, there is a fairly long procedure for concluding a land lease agreement. This may take a fairly long period of time, up to several months.

You will need
- - application for the provision of the site;
- - cadastral passport on the plot;
- - Protocol assessment of the site.
Instruction
Contact the Committee of the State Property Committee, which is located in the area in which you want to get a plot. Write a statement about the provision of land not for construction purposes. Be sure to specify the location of the site and its required area.
A month later, come to the Committee again and get the answer.
After receiving permission from the Committee of the State Property, temporarily disadvantages the site and put it on cadastral records. After that, get the cadastral passport to the site.
Perform an independent assessment of the area provided.
Present a cadastral passport and a protocol for assessing a plot to the State Property Committee. In turn, he will publish notifications in newspapers. If none of the citizens will express discontent within a month, the lease will be concluded.
Enclose the lease agreement and pay the amount to which the site was evaluated as a result of the evaluation procedure. Depending on the cost, the annual rent for the use of the site will be installed.
note
All of the above actions are needed only if you want to rent a plot without a construction goal, that is, to install the kiosk, metal garage, shopping pavilion and everything you can easily disassemble and remove from the site. If land rental for construction is needed, the procedure looks quite different and costs much more expensive.
IN lately The policy of the state is aimed at reducing the number of temporary buildings worsening exterior appearance Cities streets. Therefore, the Committee of State Property Committee provides a refusal to provide a plot for rent under the kiosk. Optimal option Will get this plot for construction and build a small store on it. In this case, you will be completely legal to occupy land, and in time you will be able to acquire it in the property.
Despite growing competition in trade, entrepreneurs often pay special attention to this area of \u200b\u200bbusiness. The trading tent requires less investments and attention than a large store, faster pays off, more mobile and also has a lot of other advantages.

You will need
- - trade tent;
- - plot;
- - Foundation or blocks for installation.
Instruction
To become the happy owner of the trading tent, you need to receive registration documents in the tax authority. As a rule, there is enough registration for trading as an individual entrepreneur, but if you wish or necessity, you can open entity. The most suitable for trading system of taxation is the so-called "shift". When paying the tax on the imputed income tax is made by equal payments depending on the retail space, so you do not need to install the cash register and keep in the state of the accountant.
Find a plot to install a trading tent. Pick up a place where your product will enjoy the greatest demand. Best post tent. In the center of the city on the street, a convenient approach and entrance should be provided to it. The site can be purchased or renting and an individual, organization or administration of the city.
If your trading tent has the ability to move from place to place, and it is not provided for installing it on the foundation, then take care that it stood at some distance from the ground. Perfectly suitable for this concrete blocks. For a small pavilion there will be enough two or three pieces. The tent must be installed in terms of level. If it stands on the blocks uneven, it is necessary to put on one of them any dense construction material.
Connect electricity to the tent. Do not forget to receive a special permission from the installation of the counter.
Near the showcase of the tent should always be dry and purely. So make a ditch for wastewater And set the urn for garbage.
Helpful advice
In some cities, the installation of the city authorities is required to install shopping tents. Information on this issue you can get in the local administration.
Sources:
- what documents are needed on the kiosk
Small retail The street does not promise the owner of the Golden Mountains, but it is quite capable of feeding the one who has already received some experience of doing this kind of business and recognized his little secrets. Opening your kiosk Once, create new outlets of your network you will already be without any problems.

You will need
- - permission from the local administration and fire inspection authority;
- - certificate of registration of an individual entrepreneur;
- - "Box" of the shopping kiosk;
- - set of commercial equipment (including cash register);
- - One or two replaceable implementers.
Instruction
Choose a place where it will be located kioskHolding in the mind of major circumstances conducive to street trade. First, you need high permeability, secondly - the ability to connect to electricity and other communications (if necessary), and thirdly - the lack of tough competition in the selected territory. The latter is important both from a purely economic point of view, and for considerations of your safety - to learn about the established traditions and underwater flows in this area of \u200b\u200bactivity you need in advance.
Get permission to install the outlet in the selected location, apply to the architecture department and the local administration trade department. Having received "Welcome", register individual entrepreneurship in the tax inspection body. Enjoy the consent of the fire inspection staff, which will then arrive once again on the already equipped point to check the health of the fire extinguisher, which it will be equipped.
Purchase kioskBy studying all the existing ads for the sale of used shopping "boxes" - for major city This is enough chassis. Ordered delivery and installation kioskand at your chosen point - all the work will take you from the strength for several days, although it will require the involvement of third-party workforce and technology. Connect to electricity by concluding an agreement with electricity supplier.
Buy a standard set of shopping equipment for kioska - Wooden trays, metal racks, refrigerator and scales. You also purchase a cash register to be registered in the tax authority. This set of commercial equipment for your goals will be quite enough.
Find multiple sellers that will work in your kioske, replacing each other. Many shopping points prefer to work in a stall on their own, only forced to leaving workplace For the procurement of goods. Hoping that the hired seller will trade efficiently only if its wage It will be folded from the salary and the percentage of profits received for replacing.
Sources:
- Business plan for the opening of the kiosk
Space under the kiosk or pavilion - The case is very troublesome and long. But if you firmly decided to become the owner of the trading place - be patient and proceed to design a land lease agreement for your pavilion.

Instruction
Register in the tax authorities as individual entrepreneur Or place a limited liability company.
Get constituent documents. After that, look for a place under the pavilion. Please note: that in each region there are regulations and requirements for installing trade pavilions. For example, a ban on establishing them along the main roads. Be sure to check the requirements in the land and property relationship.
Write an application to the head of the district (or settlement) And apply it to the administration. Specify the place where you intend to install the pavilion. Apply to the application required documents: Scheme of placement of the trading point, copies of all constituent documents and the Charter, a certificate from the tax inspection on the lack of arrears in taxes and fees, copies of the OKVED codes.
Sign up for the Special Commission on Short-term leases. If your question is solved positively, a petition will be sent to the mayor. Where to consider the Office of Architecture, the Land Committee for the City Hall and the Department of the Consumer Market.
After that, you will receive a direction on topographic shooting. Based on which you order later architectural project Your outlet.
Consider ready project With trade departments, improvement, architecture, land and property relations, as well as with the district (urban) administrative technical inspection.
Do not forget to get the conclusion of environmentalists, SES, traffic police, firefighters, departments engineering communications and vodokanal. And also coordinate the project with the Deputy and Chairman of the Commission on Short-term lease.
After passing all the procedures, having received all the necessary approvals, the administration will sign a lease agreement with you. Having received its copy, you can start up the construction of a trading pavilion.
Helpful advice
It is much easier to buy a place under the pavilion on one of the microseanks of your city. In this case, all coordination will be held market owners. You just conclude a lease agreement with them.
Sources:
- Trading pavilions
- rental of land under trade Pavilion
In order to save place and time at the apiary, simplify the preparation for winter, increase the yield and generally simplify the content of the honeymills, the pavilion for bees is useful to each beekeeper. In such a design, a dozen bee families separated by wooden sheets can be accommodated at the same time. Many beekeepers are wondering how to make such a pavilion with their own hands? About this further in the article.
Pavilion features
Mobile bee-packAllion is a mobile room for bees, which can be different in size and design. For example, for pollination in difficult conditions of movement or in small areas, the best option will be the arrangement of small uniaxial mobile hives by 12-17 beekeys. For pollination on large squares, on the contrary, it is more expedient to have a building that can accommodate 30 bees and more families. Mobile pavilion can be built, taking into account transportation on the clans or wheels (see photo).
With this mode, the apiary becomes the movable - throughout the season it can be transported by a large number of times. It is done in order to more fully use medical vegetation and fully free from work on unloading and loading the hives. The mobile pavilion is more comfortable for small labor mode, and also facilitates the security of the apiary. In such facilities, the hives can be kept year-round, so the need to build winterings disappears.
Care of bees in such a mobile design is not particularly different from the usual content in single hives. However, it is necessary to get used to working with limited space and reduce the number of work to a minimum. During the season, it is necessary to produce:
- sanitary and hygienic processing, spring inspection, safety checking;
- staging the stores or the statement of the second corps;
- form a gauge and select breakdown;
- select honey and pick up a variety for wintering.
Video "Beekeeping in pavilions" shows in detail, as contains bees in mobile ule.
How to make yourself?
To start building a mobile pavilion with your own hands is necessary with the preparation of a competently developed drawing (for example, as in the photo below), which will be suitable for the main conditions:
- the desired sizes for the trailer or van;
- equipment with household and working compartments;
- the presence and necessity of folding platforms and ladies;
- availability of ventilation;
- the possibility of heating a mobile pavilion;
- lighting the working pass between the household and hives;
- the presence of a luggage compartment where you can store the necessary inventory.

By number of sections, you need to navigate the size of the mobile design. However, experienced beekeepers are not recommended to do more than 20 sections, in view of the fact that bees will interfere with each other.
Tools and materials
The pavilion for bees is not easy for bees, because for this you need to be able to use equipment for cutting metal, crepe and tightening tools. What will take:
- tools for welding;
- jack;
- levels;
- project drawing;
- cargo trailer, preferably not heavy (preferably ZIL, IF);
- bruks of wood;
- metal for a bee carcass;
- sheets of fiberboard;
- boards (can also be replaced by disassembled pallets);
- ruberoid;
- nails, self-tapping screws, paints, door and window loops.

Step-by-step instruction
- Making a sketch of the drawing of the future trailer. The pavilion must be built in such a way that the roof does not touch the head of the beekeeper, not higher. The width should be at least 80 cm. This is done so that the standard 4-frame honeycon is freely entered between the hives. The length of the bee-packAllion depends on the location of the hives and their quantity.
- Align the trailer with the help of the level and jack, since after the end of the construction it may turn out that the pavilion came out curves.
- We remove the floor if it is wooden, and the side.
- We lower the floor in the pass between the hives if the trailer design allows to reduce the height of the pavilion (see photo).

Then you need to weld the frame of metal. To do this, first cut the corners whose length should be the same, and weld the doorway (see picture of the frame).
We screw to the frame of the bars, and they pierce the boards. Cheaper and the easiest way to nail the unwanted boards: they are tight enough to fix next to each other on the bars.
- We are wearing a solid sheets of DVP pavilion over the boards.
- We put on the roof of the ruboreoid.
- Making doors and hatches.
- There remains a gap throughout the perimeter of the floor for the insertion verand. We put the hive tightly to the frame.
- You feed the bars of the same width as the frame elements, which protrude inside the design, from above the left slot. Then move close hiles to these bars.
- We make hatches in the ceiling under the size of a nomadic mesh from sixteenth bends.
- We weld the steps to the drawing of the trailer for convenience.
Photo Gallery
Little mobile beeperopavilion
Inside the beelepavillon

12-frame trailer with retractable nearby

Video " Mobile apiary hive»
Looking at this video, you will see how easy it is possible to make a hive for your mobile apiary.
What is a shopping pavilion? The design set separately in the most advantageous place for trade, and this is its main difference from shops that have settled in administrative or residential buildings. Trading pavilions are convenient, economical, beautiful and are a quick-scale design. How to build a shopping pavilion?
From the mobility of the pavilion depends on the choice of its foundation, due to the need to connect certain communications. Can serve as the basis ribbon foundation, road plates or even asphalt.
How to build a modular shopping pavilion
Pavilion construction technologies are different: modular design, polystic or use of sandwich panels. Pavilions modular type consist of metal carcass, Shield finished structures (containers) and external sandwich panels, thanks to which they become strong and reliable (www.perof.ru). For installation, it is not necessary to fill the foundation, it is enough to align the pad, pour and put lags under the point of the support. Containers are mounted among themselves end and facelights, and are also installed until the height of the 3rd floors. Thanks to the use of partitions and removing some wall elements, layouts may be different. The pavilion is not difficult to dismantle and transport.
How to build a shopping pavilion using a polystum mounting
Political installation of pavilions is the installation of metal frame, enclosing structures with the installation of a galvanized external professional leaf, waterproofing from two sides, insulation and an internal professional leaf, which can be replaced by GCL, clapboard or other material. Often use galvanized tone metal with color polymer coatingThis provides greater security for buyers (http://www.perof.ru). Fencing structures are fasten with self-drawing bolts.
How to build a shopping pavilion from sandwich panels
Sandwich panels - layered panel having an inner insulator layer and double-sided outdoor coating sheet materials in different versions. Such panels are produced on the factories and are attached to the metal rings of the metal scab with self-draws. The junctions between the panels are easily closed with a decorative nickname. Doors and windows are installed on the selection of plastic, aluminum or steel profile, one or two-chamber windows.
The term of assembling the pavilion depends on its size and constructive complexity.
Such a pavilion can be equipped necessary equipment, for example, electrical displacement and heating, establish sanitary equipment, connect communications.
 How to return the love of her husband to his wife - Tips of the psychologist
 Why you can not give icons