How to sew a padding polyester. How to stuff a pillow: do it yourself at home. Guide to the choice of material. Variety of forms of decorative cushions
We will send the material to you by e-mail
Sometimes it happens that the interior seems familiar, monotonous, and you want to update it with something. Or vice versa, new design the room seems imperfect and something is missing. Do-it-yourself decorative pillows can be called a wonderful original addition for decorating a room, and at the same time your own comfort .. We have prepared tips on how to create a beautiful pillow yourself in different styles and for various purposes.
If the product includes different types fabrics, you will need needles of different thicknesses and suitable types of thread
At first glance, it may seem scary to a beginner in sewing - to take and sew a decorative pillow. But in fact, the technology for making a pillow is not such a difficult thing. How simpler form products, the easier it will be to work.
What tools are used to work
Whatever pillow you want to sew, for the process of creating a miracle you will need needles, threads according to the color of the fabric, scissors, a crayon (or a simple pencil), paper to build a pattern. In the case when the product has a special design, you need to have at hand all the components for the design of the product.

What forms can a decorative pillow on a sofa take?
In many photos of the do-it-yourself sofa pillow, there is a square standard shape. In addition to the usual square or rectangle, many people stop at a round shape.


Pillow Decorating Techniques
The favorite style that creates an atmosphere of comfort in the house is considered to be patchwork - patchwork. Not the easiest option for a beginner, but the result will be worth all the effort and perseverance.


The colors of the products can match the tone of the furniture or make a contrast. It all depends on whether you need to emphasize the room, or it is worth emphasizing the unity of style.


Another common way to decorate a pillow is to sew a cover from an unnecessary sweater onto it, or knit or crochet it. These covers make the atmosphere warm at home, and in winter time you look at such a thing and you warm up.


It turned out that annoying jeans look great in the form of pillows. In addition, they can be used without any problems for their intended purpose without fear of damaging the decorative finish.


How do you feel about buffs? Just imagine a sliding satin in your hands, a thin needle ... and a few hours of painstaking work. But as a result, exquisite beauty will settle on the sofa. What are puffs? These are waves of fabric, fixed in a certain pattern.


You can list all sorts of decor types until morning, but it's worth taking the time to create pillow beauty as well.
How to choose fabric for a cover, accessories and cushion padding
Finding a decor idea is only half the battle. You also need to pick up fabric, padding and accessories, if required. Usually, buttons, rivets or zippers are used for such products. It is better to sew the latter in the most inconspicuous way, so that neither the geometry of the product, nor its appearance... Respected pillow fabrics: satin, burlap, cotton, linen, upholstery fabrics, fur, jeans.
And how to stuff the pillow with your own hands? Of course, not with cotton wool and not with a feather. We dwell on a synthetic winterizer in any of its form or firetech. These are hypoallergenic and non-caking materials even after washing.
How to make a pillow with your own hands - step by step instructions
How to sew a pillow on a sofa with your own hands? We get an idea or take our own, select tools, fabric, printing and get down to business!
How to sew an original bizarre pillow with your own hands
If the form is not simple, then it will take more time to create a good thing.


Why not? We bring to your attention a detailed master class.
| Illustration | Description of action |
|---|---|
 | Such patterns are needed for work. |
 | We prepare a set of patterns according to the templates. There should be 6 circles of each diameter. |
 | The core will require such details. The edges of the stripes are rounded. |
 | We make a petal from two fabrics, sew the edge with an oblique inlay, but at the end we leave a hole for stuffing. |
 | We put a synthetic winterizer inside, sew the edge with a blind seam and form a petal with a thread and a needle. |
 | Sew on the base one by one all the petals. |
 | The last one we sew into the middle is a long petal, twisted around ourselves. |
How to create a decorative pillow with applique
Let's remember childhood, when we created masterpieces from the remains of colored paper. Here is the same with the applique on the pillow: we take scraps of any fabrics suitable for the idea, scotch tape for appliqués on fabrics, fabric on a pillowcase for a pillow and tailor's tools.

The operating instructions are simple:
- First, the composition is arranged and, when the idea takes on its final form, the patches are glued to the base using a hot iron.
- Then the workpieces of the required shape are cut with scissors. Let's try to cut out the leaves and the trunk of the tree.
- Remove the paper base of the tape and place the blanks on one side of the future pillowcase.
- The application is fixed with a heated iron. Now all the elements need to be sewn with a sewing machine, retreating from the edge by 2-3 mm, with any seam.
We sew a pillowcase from the back and front side, and then put the product on the pillow.
How to make a shabby chic throw pillow
The shabby chic style (literally - "shabby chic") is associated with romantic feelings, retro-memories. For a full immersion in the image, linen, cotton, silk are used.

As a print, you should take flowers, pastoral, angels, birds, butterflies. The shabby chic pillow is decorated with lace, ruffles, voluminous fabric flowers, ribbons, and embroidery.


For work, you will need filler, fabric and a tailor's kit. According to the pattern, the shape of the future pillow is cut out of the fabric and separately strips with a processed edge for the shuttlecock. First, the shuttlecock is sewn to the front side, and then the back and front sides are sewn from the wrong side. Once the filler is inside, the edges of the product are sewn together.
How to knit a decorative pillow
If you definitely want to work with knitting needles, then here's an idea for you.

And here's a diagram.

Such a product serves as a cover rather than a base for a pillow.
How to sew a roller pillow
The head bolster is very comfortable. And how to sew a pillow roller with your own hands? Patterns will help!

We sew the rectangle into a ring, not forgetting about the drawstring along the edge, if the pillow is in the shape of a candy. Then we insert the cord into the drawstring.


Advice! These pillows can be decorated with lace.
How to sew a decorative baby pillow
The children's room will look funnier if there are toy pillows in it. These irregularly shaped products, sewn with caring hands, will simply become true friends of the child.
Children's pillow made by hand in the form of a toy
To inspire you to create a miracle for a child, we suggest looking at a small gallery of pillow toys.


Fur, an old sweater, felt, flannel, plush can be used.

As a pattern, you can draw your own sketch, or take a ready-made one from the master class. Fleece and felt for the face are suitable as fabrics:
- The templates of all parts are transferred to the fabric and cut taking into account the seam allowance. The body is made up of a rectangle, and the front and back are made up of circles.
- Details are sewn on the seamy side, starting from the cat's ears.
- The ears are sewn in and all the seams are sewn on a typewriter. A hole is left at the bottom for stuffing.
- The muzzle can be drawn acrylic paint, waterproof felt-tip pens or sew on felt parts.
Important! With any decor, especially when it comes to small details, the work must be stitched reliably and firmly. All details must be sewn on, not glued.
Article
Home is the place where you need to return with pleasure. To do this, we equip it according to our taste, create our own small world... Decor is an integral part of a comfortable home and the decorations created by with my own hands... Today we will look at.
It's about a simple square cushion. In addition to the pillow itself filled with holofiber, we will show in detail how sew a pillowcase onto a pillow.
For the inside of the pillow, we need:
- rectangle of fabric 45x70 cm;
- holofiber packing - 0.5 kg.
For the pillowcase, let's prepare:
- leatherette - 47x47 cm;
- upholstery fabric for sofas, red - 47x47 cm;
- plastic snake, more than 50 cm long.

To be honest, this pillow was assembled from materials that were in the "what's left" basket. Those. I did not collect fabric on purpose, but sewed from what was already there and what I wanted to realize at least into something, so in the process of sewing I ran into some difficulties that I had to solve on the go.
How to sew a pillow
So, the inside of the pillow. We take a rectangle of fabric 45x70 cm and fold it in half, thereby allowing ourselves not to sew one side. From one edge, we sew two halves, stepping back from the fold 1/3 of the length. We sew to this very fold. Then, stepping back from the fold 2/3, we sew the entire pillow along the contour. This leaves us with a filling hole. I like it when my fist freely passes through the opening of the bag with the expectation that the filler will be clamped in it. Pushing the padding through a small hole is a dubious pleasure.

As for the stuffing - I've tried different variants... The most common, which, unfortunately, most people use is padding with padding polyester. I don't like it for two reasons:
- synthetic winterizer steam (although this is not critical for a sofa cushion);
- it is caked. Those. after a while, the pillow will lose its elastic appearance and will look more like a bedding. Even stuffing with a "pyramid" does not help (folding layers of synthetic winterizer of different sizes on top of each other from large to small to the center and from smaller to larger to the top)
Therefore, I prefer the holofiber. It looks like pellets of approximately the same size, does not crumble, even if thrown at them, which shows a good connection between the inner fibers. At the same time, each spool can be easily separated from its neighbor, which allows you to adjust the amount of stuffing. You can buy from us by weight any required amount or order on a specialized website.
The fabric for the inner pillow I came across is frankly bad, it poured heavily around the edges. I had to sew it in three stages:
- straight stitch along the contour;

- zigzag over straight stitch;

- overlock the edge.

There were attempts to overlock the edges of the fabric separately, but they fell together with the overlock threads. Everything held up perfectly on two layers of fabric. Therefore, it turns out that the edges of the fabric in the place of the hole are not overlocked. Work with them more carefully.

After we have a bag on our hands, we turn it out and start stuffing it, having first straightened the corners from the inside.
After you have reached the required density in the packing, we sew the hole manually.
The inner pillow is ready.

How to sew a pillowcase
We will sew the pillowcase from two squares and a snake. The red fabric is overlocked at the edges, the leatherette square is not.

The snake can be of any length, the main thing is longer than the side of the square. I had one meter long snake with two dogs, which I divided into two.

We sew the snake to one square, putting them face to face. Sew the snake using a one-sided foot. Take care of your fingers!

Then, in the same way, we sew the second square, we get a snake between the two edges of the pillowcase.

We begin to sew up the contours of the pillowcase. I started from one corner and went to the snake. Having separated the two sides of the snake as in the photo, we wrap it as if inside. If you don't open the snake, you will get the dog outside and you will have to rip it open, there are no other options.

Sew slowly and carefully. Wear construction or other safety goggles, especially if you have a metal snake. A piece of a needle flying off in the face is a dangerous business.
We repeat the same on the other side. We also fold the snake.
Sewing up the bottom of the pillowcase.

We turn it out, measure the already finished and stuffed pillow. She shouldn't walk in a pillowcase. The cushion is usually hard, there is no room for empty corners. If the pillowcase turned out to be larger, turn it out, measure how much you need to sew, mark it with chalk. Remove the pillowcase from the pillow and sew it on, evenly on each side
We measure again by first straightening the corners. The best way to stretch the corners is to use a large, stiff needle.
Our pillow is ready.
Search the internet for design ideas sofa cushions... They don't have to be all the same, even on the same couch.
This is how our pillow looks from the leatherette side:

Sewing and photography: M.Y. CODe. Groups in
It often turns out that the purchased pillow for sleeping does not suit with something: the lightning will quickly fail, the quality of the fabric leaves much to be desired, then the filler falls off and becomes a hard stone. Therefore, I propose to sew a pillow for sleeping with your own hands, and do everything to your taste.
On my website you can not only see different decorative pillows, but also watch a video on their sewing. For example: that can be easily sewn in 20 - 30 minutes, or and I'm sure that you have never seen one like this. There is also an orthopedic pillow-bone with a funny name. I do not change my tradition and show a video on sewing a pillow for sleeping:
The choice of fabric.
In my opinion, the best fabric for a pillow cover is, of course, teak. And if you decide to use feathers or down as a filler, then you only need to take teak. For artificial fillers, coarse calico, flax, polycotton or flannel are well suited - at will. Natural fabrics are preferred. For the pillow cover, I do not recommend chintz, as it has a loose structure, the threads are not tightly intertwined with each other, and the filler will seep through the fabric.
In order for the pillow to have a beautiful shape, you can insert a piping for the pillows into the seams and a zipper on one side. If necessary, you can replace the filler and wash the cover.
Expendable materials.
Two pieces of fabric in the size of the desired pillow. I will sew a pillow measuring 50x70 cm.To do this, I take two pieces of teak measuring 51 cm x 71 cm. finished form the pillow should turn out to be slightly smaller than the desired size - 48 cm x 68 cm. Everything else will go to the seam allowances (1 cm each). This is so that the standard 50x70 cm pillowcase on my pillow is loose.
Ready-made cushion edge - 2.40 m (50 + 50 + 70 + 70 cm).
One-sided (preferably left-sided, which has no left half) foot on sewing machine for edging. The entire pillow is sewn with a one-sided foot.
Zipper closure 20-25 cm long.
Sewing pillows.
Sew a piping along the perimeter on one of the halves future pillow for sleep. At the corners, make cuts along the edge, not reaching the stitching line.
Sew one half of the zipper on one side in the center. Place the zippers directly on the piping.
Stitch the sides from the top and bottom of the zipper on the cushion cover. Do the fasteners immediately behind the zipper piece.
On the front side, make a bartack along the second half of the zipper, covering it with a cloth.
Stitch the pillow cover on all remaining sides.
Unscrew to the right side and fill with pillow filler.
? - you will read the answer to this question in my article.
And if you want to sew bed linen with your own hands, but do not know, then on my website you will learn how to make calculations for any size of sets.
That's all! As you can see, it was not difficult at all. The sleeping pillow is ready! Sweets dreams!
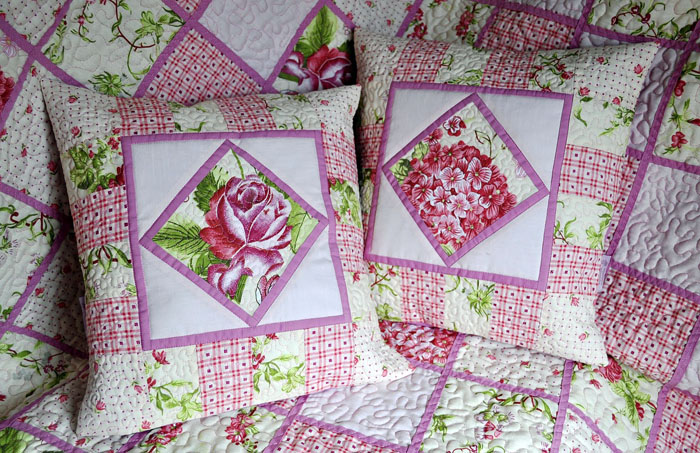
Do-it-yourself decorative pillows, patterns, photos, schemes for the manufacture of which you can find in this article will help to refresh the interior without significant investments and give the room more comfort and warmth. There is nothing better than beautiful pillows that the hostess of the house worked on. They can be an excellent decoration for a room and a real pride.
There can be a lot of options on how to sew a decorative pillow for the home, it all depends on the imagination of the performer and on what materials are planned to be used in the work. In the manufacture of decorative pillows, various accessories are often used, so they turn out to be unusual and very beautiful.
Decorative pillows will help to refresh the interior without significant investments and give the room more comfort and warmth.
The decorative pillow itself can be made ordinary with your own hands and used as a filler synthetic winterizer or holofiber.
These materials are much better suited for decorative pillows, as they do not roll and hold their shape perfectly, unlike fluff or cotton wool. Moreover, such products are lightweight and comfortable. The main element of the decorative pillow is the pillowcase. Much depends on how interesting it will be made. Sometimes it is the pillows that make up an important part of the interior and give it originality.

The decorative pillow itself can be made ordinary with your own hands and used as a filler synthetic winterizer or holofiber
For example, in scandinavian style where restraint in the setting and colors is welcomed, the atmosphere can be diluted with bright decorative pillows. But decorative pillows will be relevant not only in restrained minimalist styles. With their help, you can achieve a more interesting effect in other areas of room decoration.
The shape should also be noted. The pillows that will be used to decorate the room, and not for sleeping, can be absolutely anything. It is not at all necessary to make simple squares or rectangles. Both oval and round pillows, as well as products in the form of animals and letters. The latter option can be a good addition when decorating a children's room.

Sometimes it is the pillows that make up an important part of the interior and give it originality.
If the master came up with the idea to decorate the interior of his room with decorative pillows, you first need to define the style. Only after the direction has been chosen, you can think about the shape, color and material. Decorative pillows do it yourself, photos of which can be found in this article, will be relevant for many styles. They perfectly emphasize the French country (Provence, retro style, romantic shabby chic with its excessive sophistication), and are also an excellent addition to the nursery.

The most popular are natural materials, from which you can make decorative pillows for children, Provence-style bedrooms
After the master has decided on the direction, you can move on to the material. For each style, the color and type of fabric should be special. The most popular are natural materials, from which you can make decorative pillows for children, Provence style bedrooms and Scandinavian style. Shabby chic or classics require more interesting solutions... Here silk, satin, etc. may be relevant.
Advice! If pillows will decorate a country-style room, you can choose simple fabrics in natural colors and rough textures.

Fittings are welcome in romanticism and French rustic style
As for the fittings, they are welcomed in romanticism and French rustic style. When decorating a room with pillows in the Scandinavian direction, you should not use buttons, stripes and various additions, since minimalism is welcomed here. The product can be bright, but without unnecessary details.
Hi-tech and minimalism do not welcome pillows at all. If the master nevertheless wants to decorate such an interior with soft decorations, he must be very careful in choosing colors and shapes. It is better to make an ordinary square decorative pillow with your own hands from artificial smooth fabric, for example, from leatherette.

It is better to make an ordinary square decorative pillow with your own hands from artificial smooth fabric, for example, from leatherette
It is a pleasure for a creative person to work with a children's room. Here you can let your imagination run wild and come up with something original that will delight your baby every day. One of the fairly new trends is decorating the interior of a children's room with letter pillows. From them you can collect a word, for example, the name of the baby. This is both useful and interesting and very original. But not only letters and numbers will be suitable for a child's room. Decorative pillows in the form of animals or fruits look good. They are very easy to make using the patterns that can be found at the end of the article.

It is a pleasure for a creative person to work with a children's room.
In order to sew a decorative pillow with your own hands, you must follow certain rules.
First of all, they relate to the choice of material. It should be natural, not electrified or cause allergies. Use the fittings very carefully. If the pillow is in the form of an animal, you should not make eyes out of buttons or glue false doll eyes. This can be very dangerous, as small parts come off easily and the child can swallow them or choke on them. It is best to limit yourself to embroidery. It is both beautiful and safe.

If the craftswoman has enough free time, it is worth surprising loved ones with new bright and stylish accessories for home
How to make a pattern for a pillow?
If the question arose of how to sew a decorative pillow, then first you need to make a pattern. Firstly, it is convenient, and also allows you to avoid mistakes, and secondly, you can make several exact copies of the pillows, which will perfectly match in size. This is important, since the irregularities are sometimes very striking and can ruin the whole effect of the presence of pillows.

It is best to make a pattern of a decorative pillow with your own hands and immediately draw up a drawing for a pillowcase
It is best to make a decorative pillow pattern with your own hands and immediately draw up a drawing for the pillowcase. This will make it more convenient to work and make calculations, because the pillowcase should be several centimeters larger than the pillow itself.

Overlock is used to make a decorative pillow with your own hands.
As for how to sew a decorative pillow with your own hands, it is worth noting that this does not require any special education, no complicated equipment. Of course, it is much easier to work when you have at home. sewing machine and overlock, but in their absence, all the work can be done manually, although it will take much longer in time.

DIY sewing machine for making decorative pillows
When drawing up a pattern, you need to determine the desired size of the pillow, make a square or rectangle on paper, and then add 1.5 cm to it for a seam. The pattern for a decorative pillow is transferred to a double fabric, everything is sewn up to a certain point, and then turned inside out. It is important not to forget that the product will need to be filled with padding polyester. To do this, you will need to leave a small opening. Through it, the blank for the pillow will be turned inside out, and then filled with synthetic filler. This opening is then sewn neatly on the front side.
Then you can start making the pillowcase. For her, you also need to make your own pattern based on the first one, but plus 2-3 cm. It is also unnecessary to forget that the pillowcase must have a special hole. If zippers or buttons are not used here, you need to leave a longer strip of fabric on one side, it will later need to be folded inward so that it holds the pillow and does not let it fall out of the pillowcase.

On a note! Professional seamstresses use in the manufacture bed linen, including pillowcases, special seams.
They make products more durable, but this is not necessary for a decorative pillow. If possible, you can overlock the seams or simply sew them by hand.
Pillow shape
It is not at all necessary to do decorative item correct shape... The most popular are rectangles and squares, but the pillow can be oval, round, or in the form of a letter and an animal.

The most popular are rectangles and squares, but the pillow can be oval, round, or in the form of a letter and an animal.
For each type, you must first take care of drawing up a pattern. For complex shapes you can find options in special editions, and simple ordinary decorative pillows with your own hands are easy to make according to your own drawings.
It is important to immediately think over not only the shape, but also the option for decorating the pillow. This is of great importance, otherwise the product will not look harmonious. The size of the pillow also needs to be selected carefully. For the living room, do not use large pillows so that they do not clutter up the room. But for the nursery, you can sew a large flat pillow on which it will be convenient for the baby to play, and the parents will not worry that their child will freeze.
How to decorate a decorative pillow?
Decorating a pillowcase must be approached responsibly. Even in cases where it is undesirable to use small accessories, you can decorate a decorative pillow with your own hands in a very original way so that it becomes a real highlight of the room. To do this, you can use traditional satin stitch or cross stitch, as well as decoration with ribbons and yarn. Needlewomen use lace, sequins, appliques, folds, puffs and much more to work on decorative pillows. The most patient can create whole embroidered pictures and use even small beads to create them.

Decorating a pillowcase must be approached responsibly
One of the most interesting and low-cost versions is creating a pillowcase from puffs. This is the sewing of the surface of the fabric in a certain order, which gives the product a certain volume. The work is carried out in a strictly defined form and in a clear order. This makes for a very interesting drawing.
Pillows made of puffs look very original, but you need to take into account that such a pillowcase will take much longer than the standard version. This must be remembered when distributing the fabric. The puff technique allows you to create various patterns. These pillows look best in classic interior or when decorating a room in a shabby chic style.

Embroidered paintings will make a decorative pillow not just a home decoration, but a work of art that will not leave guests indifferent
Ribbon embroidery will be no less interesting. Needlewomen know how to create from this simple material real masterpieces. Embroidered paintings will make a decorative pillow not just a home decoration, but a work of art that will not leave guests indifferent. Working with ribbons is straightforward. Therefore, this option is well suited even for novice craftswomen. It is better to work according to a previously prepared scheme. Suitable option can be downloaded from the world wide web.
Advice! Another simple one, but interesting option embellishments are appliques for decorative pillows.
They are well suited both for the living room and for the children's room, the main thing is to choose the right motive. The easiest option would be applications in the form of emoticons or circles. Stripes in the form of letters and animals also look interesting. V classic style flowers and fanciful patterns will look best.

An interesting decoration option is the applique for decorative pillows.
If the master is familiar with several design techniques, you can combine them. This will create the most interesting options.
Shabby chic
This style needs to be given special attention, since this is where decorative pillows will be most relevant. For shabby chic, puffs are ideal in all possible options... Embroidery and lace are also welcome here. Lace pillowcases are easy to sew and look great when combined with other options.

For shabby chic, puffs are ideal in all possible options
The sizes of pillows for shabby chic style can be different. You can make a few small items, and a couple of large ones, and it is unnecessary to forget about cushion covers for stools, which perfectly complement the exquisite design. Buttons, braid and light colors are integral parts of decorative pillows in a romantic style.
Products for the nursery
In the baby room, pillows can be toys at the same time. It is very easy to make them if you choose the right materials and a pattern. Animals and birds are best suited for decorating a children's room. Owls, cats and dogs are very popular with needlewomen. But it is quite possible that the child will give preference to other animals.

In the baby room, pillows can be toys at the same time.
Learning toddler with early age reading and math will be helped by pillows in the form of numbers and letters. They are comfortable and beautiful to look at. The main rule is to respect the proportion and work according to a pre-drawn scheme.

DIY decorative pillows will be an excellent option for decorating a room and adding originality to it, but without spending a lot of money.
DIY decorative pillows will be an excellent option for decorating a room and adding originality to it, but without spending a lot of money. If the craftswoman has enough free time, she should surprise her loved ones with new bright and stylish home accessories.

Pillows in the form of numbers and letters will help the child to teach reading and mathematics from an early age.
I like
Kirill Sysoev
Callous hands do not know boredom!
Content
Such pleasant little things as cushions for a sofa can give a special coziness to a home environment, decorate a room, arrange correctly bright accents and become a great decor. The design of the products allows you to place them anywhere: on a sofa, armchairs, even on the floor. You can choose custom-made cushions for a sofa, but it is much more pleasant and cheaper to try to sew them yourself.
DIY cushions
Sofa cushions will make any home look inviting. This decorative element can not only decorate the home, but also please loved ones with stylish and an original gift... It is not so difficult to create such a surprise with your own hands. All that is needed, except for materials and tools, is a little perseverance, imagination, a desire to make beautiful thing... A master class on sewing cushions for a sofa will help you do it right, neatly.
The size
A set of pillows in several sizes will look stylish: small, medium and large. All these options fit perfectly into the interior of one room. Products are considered small if the side size or diameter is 30-40 cm, the average size is 40-70 cm, and the large one is 70 or more centimeters.
The form
Sofa cushions are different. One of the most popular types is “dumka”. This regular pillow is square, round and rectangular shape, has small dimensions: edges from twenty to forty centimeters. It can be used as a padded chair seat or back. A modern dummy can be of absolutely any kind - from the classical to the form of fairy-tale characters, animals, bottles, transport.
The classic shape of the dummy is square, round, rectangular. But there are other, unusual and interesting options:
- Sectional - parts are connected using side inserts of different rigidity, used on wicker furniture.
- Turkish - with oriental ornaments, folds in the corners, rounded shape.
- Quilted - the model is decorated with decorative stitching on one or two sides.
- Oxford - decorated with a border, tassels.
- Dumka-roller is the most common type.
- Custom shapes - flowers, letters, animal shapes, etc.

Filler
The cushion should be soft and pleasant to the touch. Filler is of no small importance. In addition to comfort, you need to take into account its hypoallergenic properties. When choosing the filling of an accessory, you should immediately exclude old fabric items or cotton wool. These materials knock over time, form hard lumps. Optimal options: synthetic winterizer, fibertek, foam rubber, holofiber, fluff. Foam or synthetic pillow filler is characterized by the absence of allergic properties, softness.
Textile
The first step in sewing a dummy is the choice of fabric. The material must be durable. Beginners are advised to choose simpler fabrics, for example, chintz, cotton. In the manufacture of pillows, fabrics such as silk, linen, felt, denim, calico, bikinis, and upholstery are often used. Sometimes an old knitted sweater and a voluminous pullover are used to create knitted pillows. The most important thing is that the colors of the material are durable, the surface is dense and does not allow the filler to fall out.
Each type of fabric used has its own pros and cons:
- Linen - does not cause irritation, persistent, "breathes". Minus: easily wrinkled, a little harsh, sits down quickly.
- Silk is durable, pleasant, wear-resistant (can withstand washing at 110 degrees), and is breathable. Cons: expensive, wrinkles quickly.
- Chintz is breathable, easy to clean. Disadvantages: short-lived, afraid of high temperatures, wrinkles and shrinks easily.
Denser fabrics have their own characteristics. These include Firth, Jeans, Bike.
- Felt - wide color palette, easy to work with, no front or back side, composition: 90-100% wool. Minus: afraid of high temperatures, may lose shape if washed incorrectly, pellets appear.
- Denim fabric (denim) - durable, breathable, eco-friendly, fashionable. Disadvantages: shrinks after washing, hardens, fades.
- The bike is hypoallergenic, low cost, practical, pleasant to the touch. Minus: inelasticity, difficulty in sewing (crumbles).
When sewing decorative pillows, you can combine fabrics: for example, one part is made of silk, the other is made of felt, resulting in a winter-summer version. Inserts from several types of fabric look beautiful. If the material has fallen into disrepair, there is no need to rush to throw out the dummy - the sewn-on colored flap will not spoil the appearance. Give the furniture a zest different sizes made of colored upholstery fabric.
Pillow decor
To decorate ready-made furniture pillows, you can choose any decorations you like. Various accessories, applique, embroidery will look great. A patchwork style dummy made of knitted items looks interesting. The finished dummy is decorated with soft decorative elements: braid, flap, ribbon, less often zippers, beads, buttons are used.
The design of the product is carried out in any way. The most common decoration options:
- Application and printing. Photo printing is available today, the image is durable and of high quality. Printed patches can be part of the appliqué.
- The key element is the center of the decoration: a simple button, one or framed with fabric, tassels, pom-poms, etc.
- Knitting, embroidery, lace can give an interesting and very expensive look.
- Embossed decor - bows, flowers, fringe, puffs.

How to sew a pillow on a sofa with your own hands
If an experienced needlewoman is able to sew a pillow without much difficulty, then beginners need to know the principles and sequence of work. The first thing to do is to prepare everything you need to work. Beautiful pillows on the sofa are made in two stages:
- Sewing the thought itself, working with the selected filler.
- Making a pillowcase or a cover for it.
First you need to prepare a set necessary tools and materials:
- sewing machine;
- dense fabric for a napernik - satin, coarse calico;
- stuffing;
- tailor's tape, pencil or chalk to mark the fabric;
- scissors, needle, pins, thread.
- cardboard, paper for patterns, diagrams, ruler,
- materials for decoration;
- hoops, special threads or knitting needles if you plan to make embroidery or knitted items.
When all the materials and tools are collected, the idea of a pillow for the sofa is ready, you need to move on to the sewing process.
- You need to decide on the size, shape. Suppose that the dummy is square, 45x45 cm.
- Draw 2 identical squares on the seamy side of the fabric. Along the perimeter, add 2 cm for the seams.
- Fold the squares right side inward, pierce the lines with pins so that the fabric does not slip. Cut out every detail.
- Sew on three sides, 2 cm apart from the edge of each. You can sew on pins, this will not interfere with the machine needle, but will prevent the fabric from slipping.
- Fold the seam allowances to one side and press them in, turn the pillowcase with its “face” outward.
- Fill the resulting bag with filler, sew up the hole by hand, bending the seams inward.
How to sew a cushion pillowcase
To sew pillowcases for sofa cushions from the fabric that will be on the outside, you need to cut square details a little bigger size... The base was 45x45 cm, which means that the removable cover was 46x46 centimeters. A case that is too small will not fit on a bag full of filler, or will make it hard. It is best to cut out the main details (the sides of the cushions for the sofa) from different fabrics: the pattern, texture on one side will make it the front, the simpler material on the other - the wrong side. Do not forget to leave seam allowances of 1-1.5 cm.
The sequence of making a pillowcase is similar to the process of working on a pillowcase:
- Fold the cut out parts facing inward.
- Pin it with pins (photo).
- Sew with machine stitch around the perimeter on three sides. For strength, it is recommended to make 2-3 lines.
- All seams are ironed.
- Excess fabric is cut at a distance of at least 3 mm from the seam.
After the product is turned onto the front side, corners are additionally formed. This is done with a needle: the fabric is carefully stretched to the desired sharpness of the angle:
- The edges of the 4th side are folded inward by 1-1.5 cm, ironed on.
- A dummy is inserted into the cover, everything is aligned, adjusted in the corners.
- The hole is sewn up manually with a blind seam.

At the stage of sewing a pillowcase, it can be decorated with braid, scallops, a combined cover, borders, buttons, etc. When deciding on the decor, the first thing you need to pay attention to is the quality, the color of the threads. They should be ideal not only for colors, but also in terms of density, thickness. For example, denim, raincoat fabric involves the use of threads No. 40 (for finishing seams, dense fabrics), coarse calico, flannel, bike - No. 60 (for linen and lightweight materials), silk, cambric, chintz - No. 80 (for fine fabrics) ...
The decorative tape is sewn to the pillowcase from the front side until the 4th side is sewn and the cover is put on the pillowcase. This is done manually:
- Sewn to each side decorative ribbons any width along the edges of the dummy.
- All decorative elements are attached to the bases (squares) from the front side with a simple seam.
- The pillow is stitched, while the seams, fastening tapes are tucked inward.
- If the braid will be located not along the edge, but on one of the bases, you can attach it before the sides of the pillow are sewn.
For trimming with borders, squares are cut out with a large margin. The stock width is equal to the width of the curbs plus 2 cm for seam allowances:
- First, borders are sewn along the edge on three sides.
- Then the cover is turned over.
- The line is made according to the size of the dummy also on three sides.
- The finished pillow case is inserted into the hole.
- To close it, a line is stitched along the fourth side, slightly retreating from the edge of the dummy inserted inside.
- The last part of the border is processed: the edges are folded inward, ironed with an iron.
- They are sewn manually with a blind seam.
A scalloped pillow is made according to a different principle. Feston is decorative element, an ornamental stripe with a downward-facing pattern in the form of leaves, flowers, stepped teeth, waves. First, all the details are made, then they are put together. Fabric festoons are jagged, rectangular, rounded. Monochrome or contrasting fabrics are used. You will need a material for finishing (scallops), a base (squares for covers), a zipper, a pair of compasses or a glass to draw the edges, a regular sewing kit.
The work begins with the marking of the parts:
- Make a pattern. Leave 1-1.5 cm on the seams. Retreat enough from the edges of the fabric so that after cutting the squares 10-11 cm remain in stock.
- Cut out the resulting squares. The remaining square hole fabric will be used to mark and cut the scallops.
- Scribble on the paper for the scallops. Smooth and equal edges will help to make a glass or compasses. Cut everything.
- Pin the resulting template with pins along the perimeter to the edges of the fabric left over from cutting out the squares. Cut to pattern.
After that, he proceeds to processing and grinding the edges of the scallops:
- Fold the cut-out parts together facing inward.
- Sew with a typewriter along the wavy lines (edges of the scallops).
- Trim the drawing, from the seams at least 3 mm. Turn outwards.
- To align the edges, sew on all sides of the scallops. You need to do this with outside, but very neat and even.
- The resulting finish is sewn to the main part: the edges of the square are folded inward, superimposed on the scallop.
Each square is sewn on the front side from 3 sides. Further, the process is usual: a pillow is inserted inside. The fabric is leveled, the corners are straightened. The fourth side can be stitched with a machine immediately on top. But it is better to insert a zipper into it first. The fastener can be sewn not necessarily along the perimeter, sometimes it is sewn directly into the square.
 Forbidden Ancient Magic and Ancestral Spells
 The meaning of the name Adam Adam's family relationship
 How to dry a man's love on an apple