How to properly install the mixer in the bathroom. Installing the mixer in the bathroom: Device and Step-by-Step Mounting Guide
Installing the mixer in the bathroom - the task is not complicated, but very responsible. And during its execution, a whole string of various difficult situations may arise. In order for you to understand what you can encounter, as an example, I will introduce you to those problems that I happened to solve me.
Problem number 1: Choosing a new device
Before installing a mixer in the bathroom, you need to buy it. It seems to be nothing complicated, but when I came to the plumbing shop, I changed my mind about this. You will try to slightly facilitate the task and I will describe the basic criteria to pay attention to:

Material
In general, steel, glass, fiberglass, ceramics, plastic and even granite can serve as material for the crane. But the most popular are the following two options:
- Brass. The brass device has a decent weight and relatively considerable cost, but it has high strength properties and excellent resistance to in different kind Chemical influences. Having made such a purchase, you can not fear that the thread will crack in the process of tightening nuts, and the hussak is blown away as a result of careless handling of it;
- Silumin. This is a very cheap aluminum and silicon alloy. The models made from it are light and fragile. It is impossible to call such a choice to be called, making it, you can eventually save, but, on the contrary, get into the even more costs;

Externally brass and silte models can be very similar. To distinguish them, just take into hand and try on weight. A heavy product is a brass, slightly silumin.
Control
It also has to make a choice in accordance with your financial capabilities and preferred functionality:
- Two valves. More recently, this system of water mixing in the crane did not have competition at all. In it, for each water pressure, its crane-box is provided, with which its intensity is adjusted. The replacement of such details in case of their failure is easily feasible with your own hands. Also, the pros will also include lower cost and compliance. classic style. The minus is the complexity of the control, eliminating the possibility of adjusting the weak flow of the desired temperature and requiring the use of two hands;

- One lever. Here, the connection of different water flows occurs with the help of a special cartridge, which is easily controlled by one hand movement. It is these models that are currently the most popular at the expense of the optimal balance between ease of operation and price. By the way, I also stopped at this option;
If you wish to use water economically, I recommend buying a two-step model. In it until a certain moment, while the water pressure is not too strong, the lever moves easily, for the same to open the tap completely, you will need to attach tangible efforts.
- Thermostatic governance. One handle is responsible for the strength of the pressure, the other is at its temperature. Such a system, though it is not no one else, but completely eliminates the possibility of obtaining burns, which has an important meaning in the event of a stay in the house of children;

- Contactless control. In this case, it is enough to turn on the device only to bring hands to him, after which everything you need will do infrared sensors. But it should be remembered about the high cost of such equipment and the need to regularly replace the batteries.
Geometrical dimensions
The height can be adjusted during installation, if you, of course, perform it from scratch. If a replacement occurs, then focus at the location of the old instrument. But on the length of the gland, please note that the resulting out of it water did not fight on the side of the bathroom, and at the same time so that he himself did not interfere with your stay in it.
Problem number 2: availability of the necessary inventory
For me, this, in fact, was not a problem, as I try to always keep my workshop in the most complete configuration. But I advise everyone else before installing with your own hands any plumbing device, and not just a mixer, check the following tools and materials under hand:
Problem number 3: Preparation of installation site
Now before putting the mixer in the bathroom, it is necessary to prepare a place properly. Here are two different situations, Together with the associated difficulties. Me B. different time I happened to face both, so let's wonder everything in order:
The presence of an old mixer
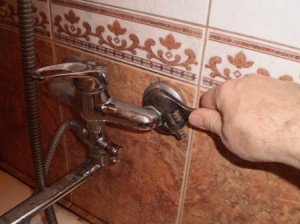
How to remove the previous device? I did it very simple:
- Blocked the flow of cold and hot water in the apartment;
- Carefully unscrew the prescribed key knit nuts. At this stage it is very important to act very much carefully, so as not to damage the fittings, otherwise the volume repair work significantly increase in the amount;
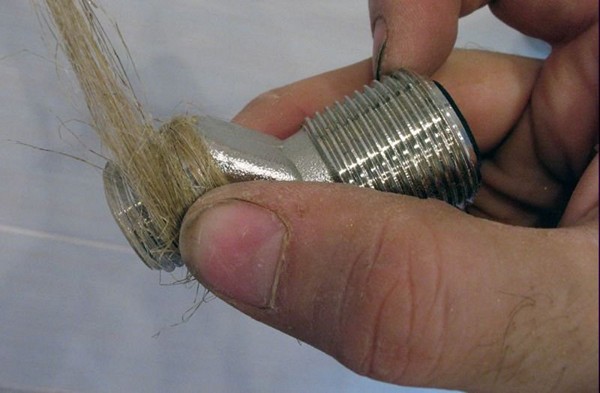
- Cleaned from the remnants of the old winding and paint thread and the inner part of the connecting elements protruding from the wall.
Lack of pipes
But here you will first need to install pipes for the mixer:
- From the point of entry in cold and hot water pipes punched the shoes in the wallusing the grinder and perforator;
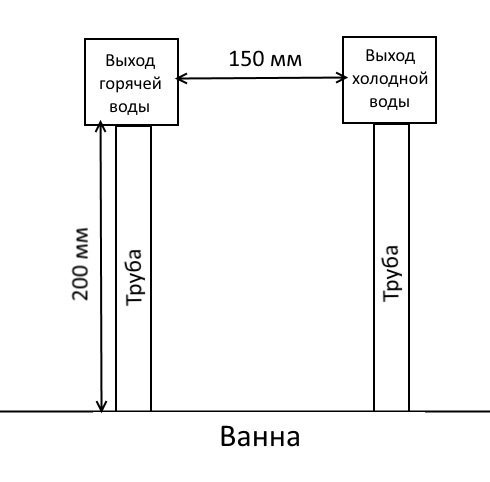
- Spent on them plastic pipes , Connecting the desired segments using couplings by soldering. In order to find out at what height to remove them, it was climbed to read the slopes, and it turned out that this is 200 mm above the border of the bath. So I did;
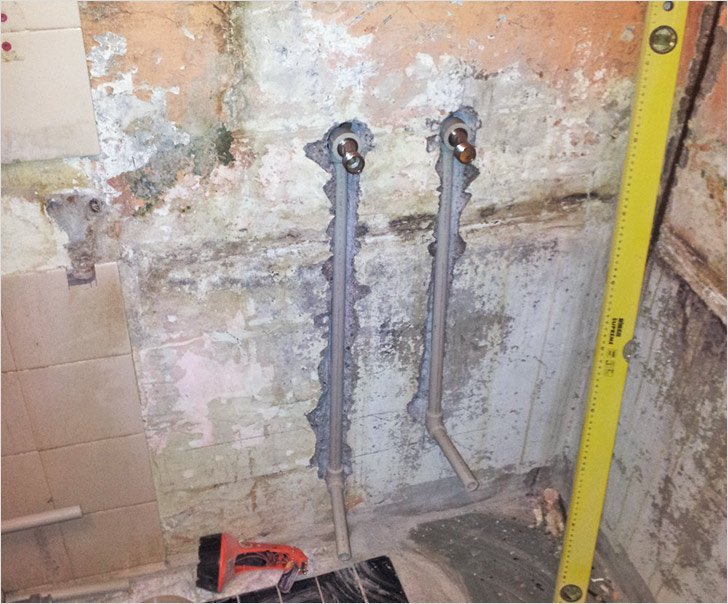
In my case, the creation of a stroke occurred in empty roomif you have all the rest of the plumbing equipment already installed, and you do not plan it, then be sure to cover polyethylene film or cloth to protect from building garbage. In particular, it is important to do on acrylic bath In order to avoid the appearance on its surface scratches.
- Also checked both at what distance the output points from each other should be 150 mm;
- Before fixing the fittings, I'm accurate out of their horizontal with Waterpas. In case of omission this moment The mixer as a result can be set crookedly;
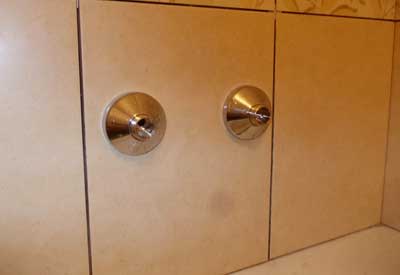
- Since later planned wall cladding tiles, then i brought the edges of the couplings from the stroke for 20 mmSo that they will eventually come up with trim. You also definitely take into account the thickness of your finishing material.
Problem number 4: Disassembled mixer
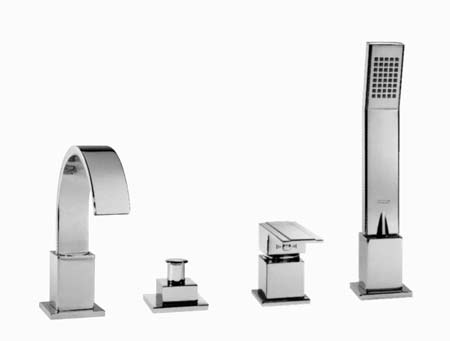
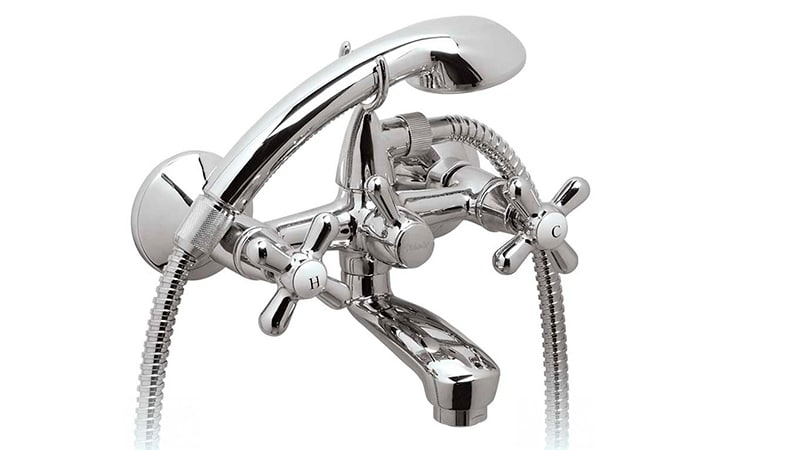
The mixer for the bathroom is sold in a disassembled form, and is installed in the assembled. It consists of the following items:
| Element | Purpose |
| Watering can | This is the soul component, it is with its help a single water stream will be transformed into a pleasant rain from a variety of thin jets |
| Spill | He is a hussak or spout, directs mixed liquid in the bath |
| Hose | Another component of the shower delivering water to the watering can |
| Chief block | It is here that mixing the hot liquid with cold in the right proportions and the pressure is set. |
| Decorative Plafones | Close and decorate the point of connecting the device to the pipes |
| Rubber strips | Responsible for the tightness of the compounds |
| Eccentrices | Allow you to align the position of the mixer if fittings are installed with errors |

I collected all the ingredients together, except for the eccentrics, as they are set at the time of fittings. And here, by the way, you should not use FUM tape or other means, rubber gaskets are quite enough.
Problem number 5: Installation
After execution finishing work, I finally got to the most important problem: how to install a mixer in the bathroom into the wall? And now after overcoming all of the above obstacles, it took and for its decision:
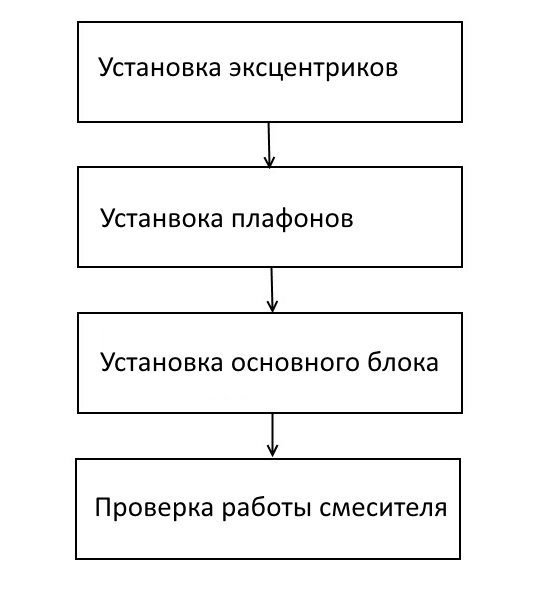
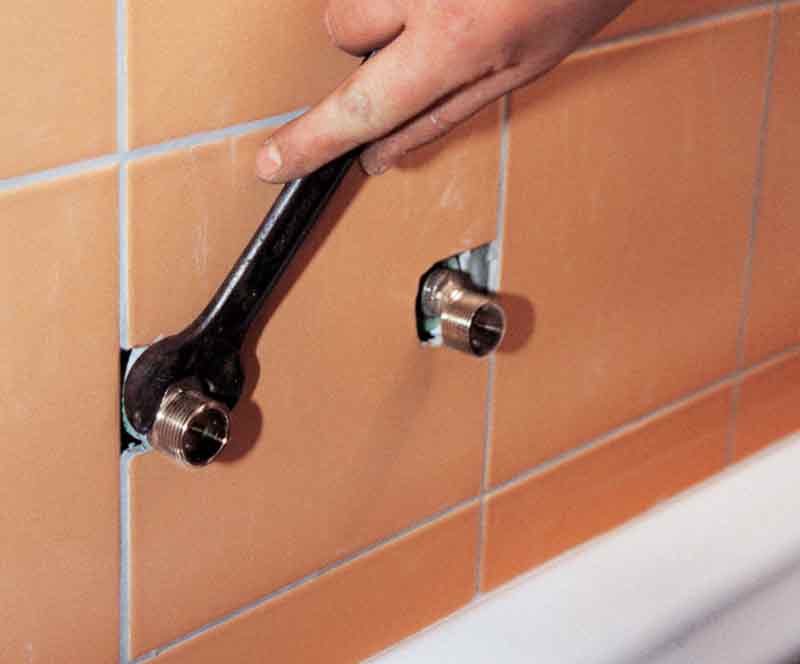
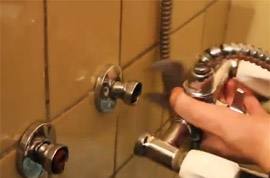
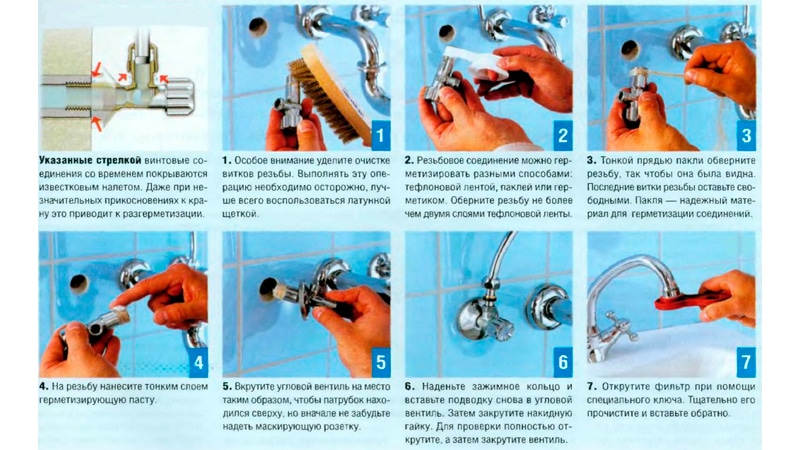
- Wrapped the eccentric fum-ribbon and screwed them into protruding fittings. A package also comes to seal the connection. Adjusted the distance between the outlet holes, which, as I noted above, should be 150 mm, and also put them with a horizontal using building level. Do not forget to measure the position of the mounted items at each step, if you do not want to obtain the rating crane as a result;
- Now screwed the entire block. Both nuts easily went on the thread, so I removed the device back and installed decorative plafones. If you have difficulties, the fixing elements will go tightly, then return to the adjustment of the eccentrics, otherwise you can damage the threaded connection;
- Before connecting the unit finally, it made a fum-tape on the thread, after which it is already to the end performed its installation, reliably tightening the clamping nuts with a wrench to a characteristic screen. It is not necessary to drag much, because at the same time you can break the nuts, contact the tool carefully, especially if we are talking about the silhumine product;
- Turned on water and checked the operation of the device. If water mixing occurs normally, there are no leaks, then you can count on polypropylene pipes The mixer has been successfully completed.
How to install a mortise mixer? In this case, you will also need a drill with a special milling nozzle in the form of a crown:
- Choose the most appropriate place For the crane on the side of the bath and apply the corresponding markup there, which takes into account the size of the purchased plumbing device;
- Insert the crown in the drill and drill hole according to the markers applied;
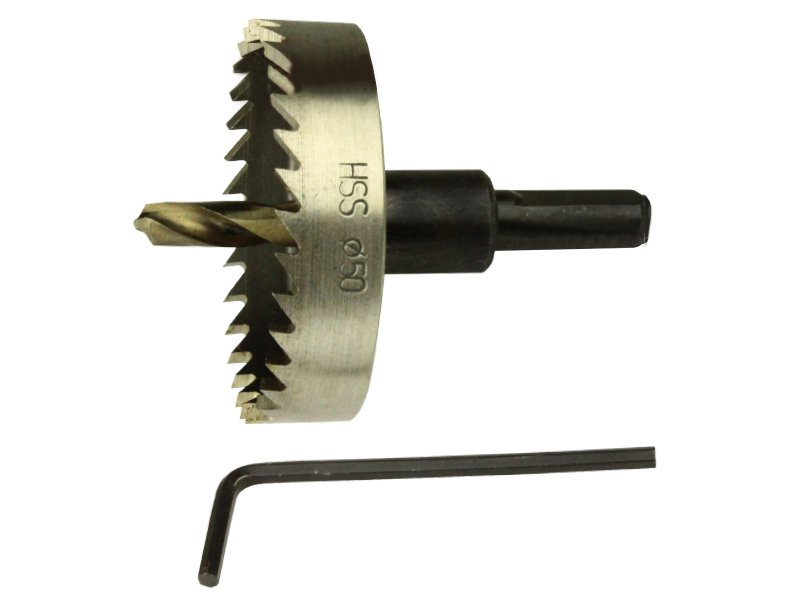
- Under the mixer insert a special gasketexisting with it in the kit;
- Install the mixer In the created hole and fasten it from below the fastener nut, which then you should tighten with the filter key. In some models, the fixation function is performed;
- Connect flexible hoses connecting the device with plumbing pipes;

- Turn on the water and check the system.
Mounting the mortise model resembles the installation of the mixer on the sink, only requires the drills of the bathing of the bath.
Conclusion
All problems arising when installing the mixer in the bathroom are easily solved with the right approach. Selected the appropriate device, prepared the tools, paved pipes or removed the old crane, gathered a new and connected to fittings or side of the bath. Everything can safely use the benefits of modern civilization.

Video in this article will allow you to familiarize yourself with some number for more informationconcerning the topic outlined. If you have any questions about the read material, then ask them in the comments.
August 16, 2016.If you want to express your gratitude, add clarification or objection to ask the author - add a comment or tell me thanks!
In this article, we will look at two options for installing the mixer. One of them is the replacement of an old mixer to a new one, and the second is the installation of the mixer in the bathroom during repair. Options are very similar to one another, but everyone has its advantages and disadvantages.
Replacing the old mixer
Selecting the mixer
Old mixer that needs to be changed
In order to replace the old mixer, we definitely need to purchase a new one. We will not specifically call the best manufacturers of plumbers, but just try to figure out, which parameters should be estimated for a bathroom faucet:
- Weight. The quality of the mixer can often be determined by weight. A good device can not be easy, as the thickness of the metal largely determines the long-term ministry. Of course, in a heavy mixer there may be disadvantages, but the weight is the pledge of metal thickness.
- Metal. Mixers can be made of silumin and from brass. Silicon is much cheaper and easier than brass fellows. But the silumin (aluminum alloy with silicon) is rather not durable metal. The mixers from this material are often chopped by knobs or blast furnace nuts. They are short-lived and their only advantage lies in the low price of products. Brass (multicomponent copper alloy) is much more expensive than the silicon, they prevail in the mass and have an increased viscosity of the alloy. A viscous alloy does not allow a pipe or pressure nut to burst with a minor deformation that cannot be avoided when installing and using a crane. Brass taps are not as susceptible to corrosion and have a more impressive look.
- Parameters. Since you have decided, in addition to all its qualities, you need to pay attention to the technical parameters. Even the most expensive and high-quality device may be unsuitable if its parameters do not correspond to the installation site. You should decide whether you need a faucet with a crane or without it, and if with a crane, then the length should be this element.
Dismantling
Dismantling of an old mixer
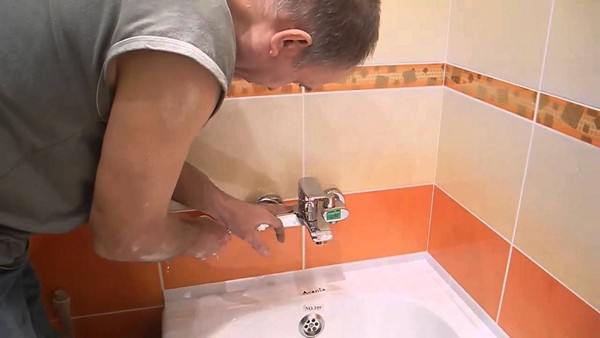
Disassemble the old mixer is easy, but before dismantling it is necessary to overlap water. And it is necessary to overlap not only the main highway, but also hot watersupplied from an electrical or gas column. We will produce a replacement in the bathroom already under the tile. Replacement allowance can be found on the video located on this site page.
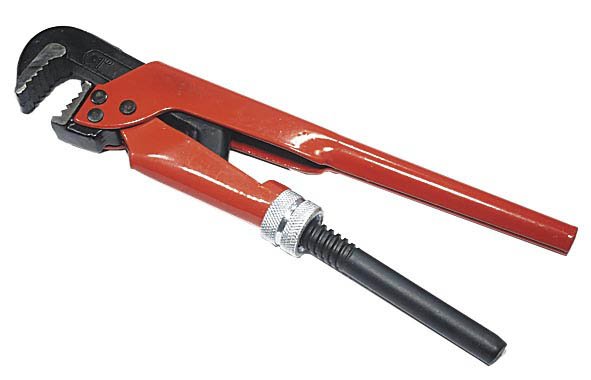
To dismantle, as well as for mounting a new mixer, we will need two keys - gas and adjustable. It is possible that the passage will be useful, but it is not necessary.
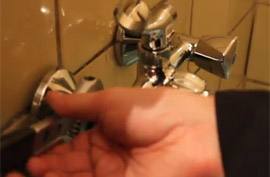
Having lowered the water from the crane, unscrew it from the wall. We do it carefully, so as not to damage the thread on the fitting in the wall. Otherwise, we are not just the replacement of the crane, but a full repair, as you have to break the wall to replace fittings.
After dismantling, carefully cleaned the fitting remaining in the wall with internal thread From pieces of an old winding and, possibly, paints.
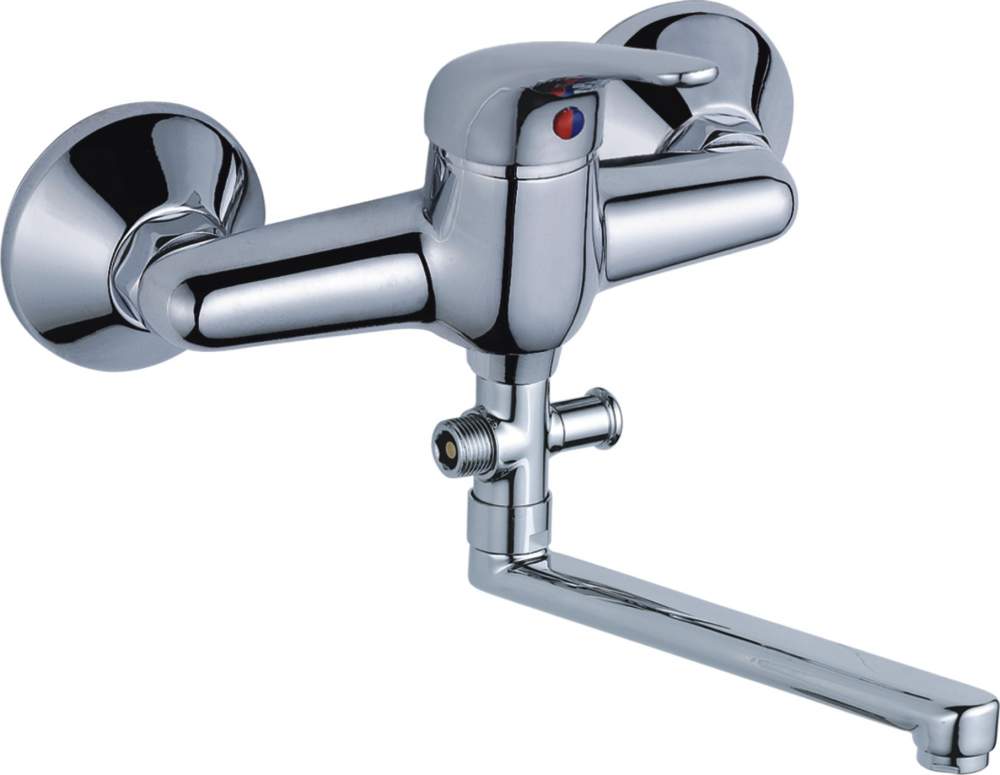
Mixer
New mixer
The installation of the mixer for the bathroom also implies the latter assembly. They are sold in a disassembled form and, buying such a crane, it is necessary to carefully check for all components:
- main unit;
- gander;
- shower canoe;
- shower hose;
- eccentrics;
- decorative plaffones;
- gaskets.
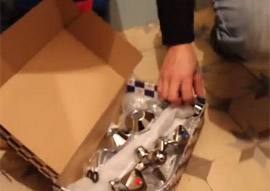
Such an assortment of components should expect you in a packaging box. Moreover, all this should be packaged into tissue and cellophane bags. Check the mounting nuts and eccentrics on the integrity of the thread.
Installation
We will collect a mixer, that is, to connect to it a hussak and a shower hose with a watering can before it is installed or after it is not important. Everyone comes in different ways, and each master has the highest arguments in favor of this or that option.
But, this is not interested. We will not even be distracted by the assembly, since this task is to do with even a child collecting a constructor, especially since the assembly you can see on the video clip attached to this page. We only mention that with proper assembly, you can do without keys at all or when we use it, tighten the nuts with minimal effort.
Be careful if you have to step on an acrylic bath. With a certain effort when mounting the mixer, you can damage it.
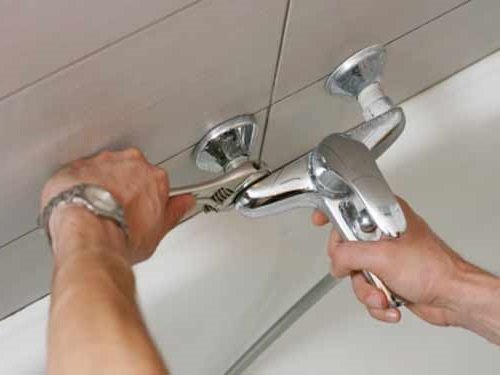
Installation of a new mixer
Let's start the installation. When installing we will use the fum-ribbon. But you can and the winding packles, with the addition of the "Unipac" paste, as it can be seen in the video clip. Complete the eccentrics and screw them into fittings that are in the wall. Eccentrics serve to displace the distance between the centers. The distance on the mixer between the two inputs is 150 mm. If, when installing fittings, this distance was broken, or there was a mixture vertically, then exit to the necessary 150 mm helps the eccentrics. But, nevertheless, twisting the eccentrics - use the level.
After installing the eccentrics, try on them the main unit. Try to screw it. If both sides of the block are hugging without problems, then the eccentrics are installed correctly. We remove the unit and screw the decorative plafones on the eccentrics. Plafones should fit tightly to the tile. This is also one of the indicators of the correct installation.
Then screw the block itself. At the same time, one should not resort to any additional winding material. For a dense shrinkage of the mixer, there are enough of those gaskets that are inside the clamping nuts. Nuts slightly tighten the key. With a normal tightening, the key as it struck. It is felt by hand and, in some cases, ear.
If you have not collected a mixer before installing it - do it now. Do not forget that the use of the key in this case is an exception, and not an extreme necessity. Open the main crane and hot water. Check the mixer for performance.
Installing the mixer to a new wall
How to replace the old mixer, I hope, understandable to all. But how to be if we have to change Plumbing Pipes and facing the wall tile? The essence of the installation will still remain the same, just how to start this setting, we will look at below.
In order to output the fittings for the installation of the mixer, you must calculate several parameters:
- First, the distance between the fittings centers should be 150 mm, and at the same time they should be strictly parallel to each other;
- Secondly, extreme point Fitting, after laying ceramic tile, there must be flush with the wall plane;
- Thirdly, they should be on the same level and at an acceptable height mixer, you can navigate on board the bath.
Repair work in the bathroom can not do without replacing the mixer. And sometimes he and one requires attention. An enterprising and practical hosts know that the installation of the mixer in the bathroom with their own hands is a rather exciting and interesting lesson, especially for those who have previously been unfamiliar to the technology of the process. An embodiment of this task depends on the main purpose: it is necessary to simply replace the old device to a new sample, or the first installation, from zero.
Before changing the mixer in the bathroom or install a new one, it must be chosen and purchased. A good sample should approach all the parameters, including style and design.
Weight. The mixer should not be too easy, which speaks of material savings and decrease service life. But it's not too hard that it will provoke unwanted problems in the installation.
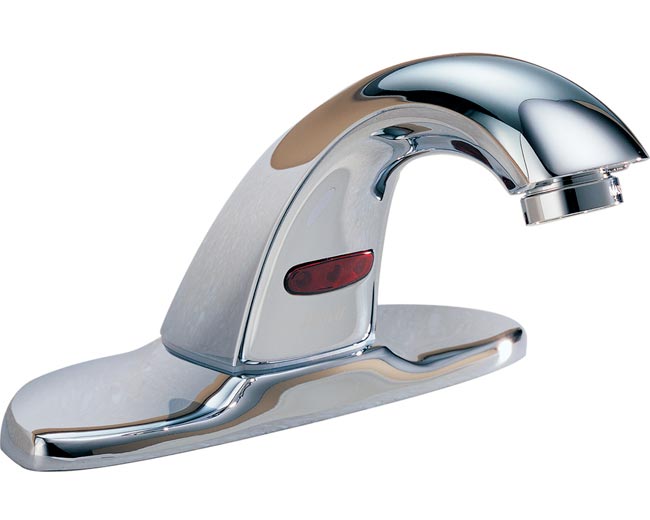
Thermostatic mixer in the bathroom
Material. The most common and most often used materials are simulin and brass. And, although silhum, which represents a fusion of silicon and aluminum, has a lower cost and lightweight, brass is more preferable and reliable. At least because copies from Simulin with enviable regularity pens are laid out, presser nuts disappear. But the pleasant price provides them with decent demand. Brass - more massive alloy, with greater reliability, practicality. This material is quite resistant to deformations during installation and operation.
Dimensions. Most thoroughly decide on the dimensions, measure all the parameters, including the distance from the edge of the bath to the selected location of the mixer. The success of the entire event depends on this. First, what method of fastening will be on a side or on the wall? Secondly, the length of the nose, the scene of the shower hose and the type of watering. Special attention to the method of water supply. There are three types of modern designs, each of which is successfully used:
- Lever.
The simplest option in the device and convenient to operate. One single element controls the water temperature and its pressure. Negative quality - When breakdown in one component, it is necessary to change the entire design.

Installing a lever mixer in the bathroom
- Valves.
With two, respectively, the valves for feeding hot and cold water. More diverse in terms external view and style decisions, But the water parameters are maintained by means of such equipment.
Installation of the valve mixer in the bathroom on the wall
- Thermostatic.
Optimal, albeit more expensive option. Such a mixer can be configured to a certain amount of water supplied and the desired temperature. Design variability allows you to choose what soul you want.
Also worth paying close attention to the design individual elements Mixer (hussak, hose, shower holder with fastening).
Samples of mixers are different and selected depending on the location: wall or securing to the bath.

Thermostatic mixer with mounting to the wall
Important: An option adapted for fastening on the bathroom is not suitable for cutting into the wall.
In many bathrooms, the wash sink is located close to the bathroom itself, so it is very convenient to install a mixer with rotating nose in such cases. But the hydromassage and individual shower cabins always equip themselves with an independent device.
The process of dismantling the old mixer
Deciding with a specific model, picking up and buying the desired sample, you can start. Installation of the mixer is performed after it is thoroughly assembling, and not vice versa. But before proceeding to the process, you must first dismantle the old device if it is available.
The replacement of the mixer in the bathroom begins with overlapping water supply. Then slowly and gradually perform the following actions:
- descend the remaining water using a filter key;
- caution, trying not to damage the carving of the stationary connecting part (fitting), which is joined with the plumbing, twisted the mixer from the wall;
- from the remnants of the winding clean the thread.
- main block;
- shower hose;
- lakes;
- hussak;
- pads;
- eccentrics;
- decorative plafones.
Important: Each item must be packaged in a separate container (package, bag, box). It is always worth checking the integrity of the thread on the elements.
Then the immediate installation begins, the instructions for which are attached to products.
- The mixer is fastened with the help of eccentric. First, the winding is performed, which can be used as a special fum ribbon (fluoroplastic sealing material) or the usual passage (preferably with paste).
- Scotched eccentrics screw to fittings water pipeswhich are in the wall. In order to be necessary for a particular mixer, the distance could be adjusted, and eccentrics are used. They are shifted. Especially this quality becomes important when the distance between the inputs is not standard 150 mm.
- To check the location of the eccentrics and streamline their horizontal level, use construction tools.

Installing the mixer in the bathroom on the wall
- Then neatly try the main unit: if the initial installation is made correctly, both sides are screwed easily.
- After catching the main unit, it is removed and decorative plaffers screw. With correct manipulations, they will be removed to the finishing coating.
- The queue for the unit itself: an additional winding is not required for it, it will quite be enough gaskets that are equipped with nuts.
- Nuts preferably tighten a little key.
- Include water supply to basic highways to test performance. If droplets appeared on the junctions or more, there was a flow, the nuts are lightly twisted, and check the system again.
IMPORTANT: Application in the process of installation of a fitting mixer and spanic keys Rather exception, rather than the rule. If you still need to resort to the help of these tools, then it is worth it carefully and carefully, without applying special efforts.
Installing a new mixer
The process of replacing the old device is easy, while installing the mixer in the bathroom on the wall, as they say, from scratch - the task is more complicated.
First you need to ensure full-fledged workplace: withdraw the pipes of the water pipe to the place where it is supposed to put a new mixer. For this purpose, pipes are used optimally made of plastic or metalplastic. They are docked with water supply, fed to the location point of the mixer and fix on the wall with special clamps (grabs). It is very desirable to provide the entire system with a ball valve so that if necessary, it is easy and quick to overlap water.
Step-by-step manual installation of the mixer on the wall
Typically, the distance from the bathroom to the point of placement of the mixer is 30 cm or a little more. Based on this value, the end of the pipe ends is determined. Fittings are attached to them, to then combine them with the mixer. In order for the process to go unmistakably and successfully, it is recommended to comply with some important parameters:
- the distance between the middle of the connecting parts should be 150 mm;
- fittings must be placed on one horizontal and exactly relative to each other;
- the end of the connecting element after the end of the arrangement and the trim should be in the surface of the wall;
- when looking at fittings from above, they must be parallel;
- the distance between the bathroom and the mixer must be at least 30 cm.
The most important thing in the process of performing work is non-density and consistent combination of parts.
There are two options for solving the installation of the mixer in the bathroom - you can pay some money and cause have a good specialist Or attend happiness and do everything yourself. In the latter case, you will have to get acquainted with some theoretical knowledge that we will provide you in this article from the site site. Of it, you will learn not only how the installation of the mixer in the bathroom is performed correctly, but also learn this job competently, taking into account all the subtleties and nuances.
How to install the mixer in the bathroom with your own hands
Installing the mixer in the bathroom: work sequence
We will not climb into the debris of complex plumbing devices for mixing water - independently install such a product as an embedded mixer is quite difficult. Our goal is to teach you to install a simple and familiar wall. To easily perceive this inefficient information, we present the entire process of installing the mixer in the form of a small instruction.

Installation of the mixer for the bathroom with your own hands photo
That's basically it. This is how the instructions for installing the mixer in the bathroom looks like. It remains only to deal with some subtleties, without the knowledge of which these works will turn into a daytime nightmare.
To imagine clearly, how to install the mixer in the bathroom, see the video.
How to install a mixer in the bathroom: subtlety and nuances of mounting
What else needs to be known in order to quickly and reliably perform independent installation mixer in the bathroom?
- You need to be able to properly use the packs. Wreaty Len, you need to stick to some rules. First, it is necessary to wind through the tightening of the thread, secondly, tight, and, thirdly, the cone, the foundation of which is directed from the front edge of the thread. It is also necessary to ensure that the package does not wind up a twisted harness - it should be flushed and go to bed only in the grooves of the thread.
- If the installation of the mixer is performed simultaneously with the replacement of plumbing, then you need to know the height of the installation of the mixer in the bathroom - as a rule, it is 150-200mm over upper edge.
Subtlety installation of the mixer in the bathroom
Now you know how the mixer is installed in the bathroom. Finally, I just want to give a couple of tips relating to the selection of this Santhpribor. First, pay attention to the case material - a high-quality mixer can be determined by weight (it is heavy). Secondly, it will not be superfluous to determine the material of the eccentrics - if they are silicon, then it is better not to put them, because such eccentrics rot. And, thirdly, do not forget about the reputation of the manufacturer - really durable and reliable mixers produce not so many companies.
 How to return the love of her husband to his wife - Tips of the psychologist
 Why you can not give icons