How to independently dismantle a stretch ceiling with your own hands. How to remove a stretch ceiling with your own hands and dismantling video. The main reasons for the dismantling of structures
Despite the beauty and durability of the tension coating, there are situations when it is required to dismantle it. This is necessary not only in the case of replacing the coating with a new product, but also when restoring it after flooding or damage. Before taking off stretch ceiling, you need to figure out what type of coverage you have installed. The method of dismantling and the possibility of reinstalling the product depend on this.
Ways to dismantle the stretch ceiling
Methods for removing the tension panel directly depend on the type of coating and the mounting profiles used. There are two types of coatings:
- Film products made of polyvinyl chloride. They are well stretched and installed by heating to high temperatures. A heat gun is used to heat the cloth. Installation and dismantling of a PVC stretch ceiling starts from the corners of the room and moves towards the center of the room. Once removed, this type of coating can be reinstalled.
- Fabric seamless ceiling products mounted without preheating. They stretch worse and are cut with a supply of material around the perimeter. This margin is trimmed after installation. Installation and dismantling starts from the central part of the walls and moves towards the corners. After removal, it will not be possible to put the woven fabric back due to the lack of necessary allowances around the perimeter, which were cut off after the first installation.

Each type of panel has its own mounting profiles. The possibility of safe removal with subsequent installation depends on their type:
- baguette with harpoon locking mechanism used only for PVC installations panels (it allows you to dismantle and re-mount the coating);
- wedge or bead fixing system more often used when installing fabric panels, but also suitable for PVC products (it will not be possible to dismantle without damage and re-install the coating);
- clip-on profiles are used for mounting fabric panels (they allow you to remove the coating, but you cannot reinstall it).
Reasons for dismantling
Full or partial removal of the stretch ceiling is necessary for the following reasons:
- The need to replace with a new product due to its pollution, damage, flooding, or if you want to change the interior of the room.
- Partial dismantling carried out in case of flooding to drain water from the ceiling, dry the ceiling space and stretch the sagging coating.
- Complete dismantling of the film ceiling carried out for the purpose of cleansing. Such procedures can only be carried out with PVC sheets. After cleaning, fabric ceilings cannot be reinstalled, because there are no allowances necessary for tension along the perimeter of the coating. But it is possible to stretch a fabric product in a smaller room.
- Partial or complete removal carried out when repairing the coating or for the purpose of installing new lighting fixtures.

Tools and materials for ceiling removal
Before you remove the stretch ceiling with your own hands, prepare the following materials and tools:
- narrow plaster spatula with rounded corners;
- scaffold or ladder;
- pliers with long jaws;
- fitter's knife;
- screwdriver with a curved end;
- soft cotton gloves for hands;
- electric or gas heat gun;
- clothespins for hanging a stretch PVC panel.
Step-by-step instruction
Do-it-yourself dismantling of stretch ceilings begins with the preparation of the room. First of all, remove all the furniture from the walls so that you can get to the fixing baguettes. Remove all sharp interior items that could accidentally damage the coating. If the panel will be re-installed with heating, then take out the cages with animals and flowers. Now we will describe step by step the sequence of dismantling canvases of different types.
Methods for removing PVC ceiling
To begin with, with the help of a heat gun, the room is heated. The subsequent dismantling work depends on the fastening profile used.
Harpoon mount
Work starts from the corners of the room. First, remove the decorative insert that closes the mounting slot against the wall. Next, using pliers with elongated jaws, grab the harpoon of the cloth and pull it out of the slot. It is important that there are no burrs and sharp edges on the pliers, otherwise you risk damaging the coating. Therefore, the tool should be polished in advance.

Attention! Be careful. If you grab not a harpoon, but a cloth, then you will simply tear the thin film.
After removing the first section of the panel, further work is easier and faster. In this case, you can not use pliers, but remove the coating from the mounting profile with your hands. To prevent fingerprints from being left on the heated PVC film, wear protective gloves. In the course of work, move from the corners of the room to its center.
Bead fastening
First, we warm up the room and remove the decorative insert. Next, with the help of hands, gently bend aluminum profile. After that, the glazing bead is easily released from the baguette. Using a screwdriver with a bent end, pull the glazing bead out of the mounting profile. Try not to damage the panel and not deform the wall profile.
wedge fastening
After removing the decorative plug with our hands, we bend a part of the profile for easy release of the wedge and tension panel. We take out the coating first in the corners of the room, and then we gradually move towards its central part.
Partial dismantling of the ceiling and installation back
Partial dismantling is often carried out to drain water from the ceiling or minor repairs. The dismantling process proceeds in the same way as described above, only not all of the coating is released, but only that part of it that is located near the problem area.

After that, the canvas is installed back. The ease of performing these works depends on the baguette used. it is simply inserted into the profile groove with a spatula with rounded edges. The ease of installation of the coating in other types of fastening baguettes depends on how large a supply of film around the perimeter has been preserved. It’s good if there is an allowance of a couple of centimeters to stretch and bring the canvas into the grooves of the profile.
Ways to remove fabric
Preheating the room in this case is not required. Cloths that are installed in wedge or bead baguettes are dismantled in the same way as film products. The only difference is that the work starts from the center of the room and moves towards the corners.
Cam mount
In the case of using a cam (clip) fixing mechanism, it will not be possible to partially dismantle the coating, you will have to completely remove the panel. This is due to the fact that the reliability of fixation in this type of baguettes is small and, with partial dismantling, the rest of the panel will still pop out of the mounting profile.
Do-it-yourself dismantling of a stretch ceiling, video instructions:
Dismantling cost
Prices for the dismantling of tension coating in different regions are different. If you need professional dismantling of a stretch ceiling, the price per m2 starts from $1.2. In any case, when ordering a stretch ceiling dismantling service, the price depends on the type of tension panel and the fasteners used.
Although such ceilings look extremely attractive, most people do not dare to “hang” them at home, that is, install them, worrying about how much does it cost to remove a stretch ceiling, if the need arises.
Indeed, in the event of, say, a flood, or a desire to change the fixtures, call the craftsmen, wait for them and pay for partial or complete dismantling, few people want to. These moments scare away very, very many from this ceiling design option.
But, in fact, there is nothing difficult in to remove the stretch ceiling with your own hands, or - part of it, remove or replace the "light", or carry out any other manipulations.
In what cases it is necessary to remove the stretch ceiling
Is it really so often that there is a need for dismantling procedures? Removing the ceiling material is not necessary as often as it seems, but to carry out its hauling, even complete, you just need to know how exactly it is arranged this design, that is, the baguette itself, and imagine the properties of those materials that are used to create.
The most common reasons for the complete removal or partial adjustment of the structure are:
- deformation of the appearance, various sags and more;
- damage to the canvas - flooding, mechanical damage, stains, etc.;
- bacteriological causes - the appearance of black or gray mold, "mossy" growth spots;
- desire to change appearance, "refresh" your ceiling;
- cosmetic "refreshing" repair;
- the need to replace electrics or add new wires;
- the desire to install, or vice versa, remove point or diffuse lighting devices.
In the event that it is necessary to carry out any manipulations behind the canvas, but its appearance and condition are ideal, it can always be removed and then returned to its place, regardless of what was on top - film or woven material.

Dismantling the ceiling (process)
Before, how to dismantle stretch ceiling, it is necessary to prepare workplace", that is, remove:
- all furniture, all items that make up the decor of the furnishings or interior that may interfere or be damaged by the action of a heat gun, if its use is planned;
- be sure to take out all aquariums, even closed ones;
- ensure the isolation of the dismantling site from all pets;
- close something stationary flooring or remove the “floor”, in cases where this is possible, the carpet, for example, needs to be taken out, and the parquet should be carefully “hidden” under a protective layer.
The work preceding the dismantling of the canvas itself, that is, already carried out "at the top", is:
- removal, decor or - removal of masking tapes;
- removal of external (not "internal") lighting fixtures.
AT without fail, before you start working, you should check if everything you need is at hand. A canvas from the ceiling, these are not wallpaper rolls, you won’t be able to leave behind forgotten pliers or a knife.

For work you will need:
- maximum comfortable staircase;
- for those who have a ceiling covering made of vinyl - a heat gun;
- "crocodiles", that is, clamps used to hold the canvas in limbo;
- spatulas, spatulas and hooks;
- construction and breadboard knives;
- pliers and wire cutters;
- screwdriver, screwdriver and fasteners;
- adhesive tape for construction and installation.
In addition to having everything you need and preparing the room, you should brush up on the way the ceiling was fixed. This is spelled out in the contract, if it, of course, was concluded.
The canvas can be fixed by one of the following methods:
- harpoon;
- glazing bead or - wedge-shaped;
- clip-on.
The order of its removal directly depends on how exactly the canvas was once fixed.
The most used, and, accordingly, the most common of the stretching methods is harpoon. The order of removal will be as follows:
- warm up the canvas completely, starting from the center and moving towards its borders - for film products, the fabric does not need to be heated;
- choose a place where the harpoon is available and there are no joints on the canvas;
- squeeze and pick up the harpoon, smoothly remove it from the groove of the baguette;
- fix the position and do the same in the other part of the wall;
- stretch the canvas, for convenience, or, if necessary, placing it on weight with the help of "crocodiles";
- remove the harpoon itself that held the material.
After the termination of all necessary actions, the ceiling can be returned to its place, there are no problems with this if the material has not been damaged or stretched.

The canvas, fixed with bead wedges, is removed in the same way. Dismantling starts from the corner. The difference from the harpoon system is that when removing, the wedge itself is first pulled out, at the same time you need to very carefully support or immediately hang the material.
Fastening with clips is, in essence, a plastic profile, very similar to an ordinary clip. The difference with others when removing clip-on ceilings is that:
- you need to start working from the center fragment of the wall and move to the sides;
- with no “reserve” of material left, it will be quite difficult to put the canvas back without damaging it.
In general, the process of removing and replacing ceiling (both film and fabric) paintings does not require the call of specialists, with the exception of complex multi-level structures with internal functionality (usually this is light), it is not very difficult to manage “home” ceilings on your own.
How to remove a spotlight from a stretch ceiling
Faced with how to remove stretch ceiling, sometimes resort to hiring craftsmen solely because they do not know how to remove spotlight from a stretch ceiling. Indeed, looking at the scattering of light points, the process of their removal seems complicated.

But, everything is not as it seems, dismantling spotlights from stretch, both woven and film, structures is even easier than from “solid” ceilings. The dismantling itself is to:
- squeeze the “wheel” holding the light device as carefully as possible;
- carefully and very smoothly pull out the device, so that there is access to the latch, that is, to the latch;
- press the clips of the “latches” of the latches and pull out the case.
The “light” will be removed, and its “nest” will remain behind the material, into which you can insert another device, simply decorate it, or, if the “points” are removed to change the canvas, after all the work, return the device removed with your own hand.
How to remove a plinth from a stretch ceiling
Faced with the need to remove the canvas from, most people are looking for information immediately about the dismantling process itself, although it would be more correct to start not with how to remove the front canvas, but with , as exactly remove the plinth from the stretch ceiling.

There are no particular difficulties in this either. What kind of tool will be needed and how (technically) the removal will take place, depends only on what kind of skirting board is available and how it is directly fixed. Usually, the skirting board is attached with:
- glue;
- adhesive types of putties;
- carnations.
For dismantling the skirting board, you will need:
- a hammer;
- mallet;
- nail puller;
- chisel;
- spatula, necessarily bending;
- wedges, absolutely any;
- knife - construction, mock-up or clerical type.
Correctly removed skirting boards always remain ready for use, intact, do not lose their decorative effect and it is quite possible to “stretch” them onto the base again.
The simplest thing is to dismantle the decor fixed with carnations, they just need to be pulled out. When attached to glue or any of the adhesive mixtures, the procedure will be more difficult:
- carefully insert a knife blade between the wall and the baseboard itself;
- cut the gap with the adhesive mass in the literal sense, around the entire perimeter;
- the process can be started both from the middle and from the corners;
- if the material of the canvas and decor is heat-resistant - the plinth needs to be heated with a heat gun, as an option, you can take a good powerful hair dryer with the narrowest nozzle, directing the jet not at the body of the plinth, but into the seam - the glue layer softens from heat and it becomes cut at times easier.
The only type of decor that is almost impossible to remove is gypsum. You can try to dismantle the stucco molding, but, as a rule, real (professional) finishers do not undertake such work.

How much does it cost to remove a stretch ceiling
If in that is it possible to remove the stretch ceiling who needs it, on their own, there are serious doubts, you can always resort to the services of specialists. Usually it is enough to contact the company whose workers were engaged in stretching the canvas.
If for some reason this is not possible, then you can always invite "third-party" specialists. However, when using the services of those who "set", as the builders themselves say, the ceiling, there are a number of advantages, the most important of which is that they know exactly how the ceiling is mounted.
The cost of labor of "mercenaries" depends on many factors, including whether it will be necessary to mount the canvas back. In general, the prices for such work, its main demanded stages, are within:
- removal of the canvas - from 240 to 650 rubles per meter (linear);
- cleaning chemical material - from 170 to 360 rubles per square meter;
- drying the material - from 225 to 980 rubles per square meter;
- draining standing water and subsequent work on site - from 430 to 2900 rubles, regardless of the footage.

From these basic points, offered by almost any firm or private brigade of finishers, it is clear that masters can be invited to perform any one stage that causes difficulties during self-removal.
For example, full-fledged dry cleaning is very popular among homeowners, especially for woven fabrics or their combinations.
With a slight flooding, a complex of cleaning and drying the canvas will help. Choice professional services large enough and, if desired, among them you can always find what is necessary for a particular case, or you can do everything yourself, besides, the dismantling process does not cause any special difficulties.
How to remove the side of the stretch ceiling with your own hands, without damaging the frame and PVC film, will be described in this article. French or PVC ceilings are a fairly strong and durable structure, designed to last 15-20 years. Mounting features make them not susceptible to building settlement and sagging carrier plate.
But, life makes its own adjustments to human plans. Moreover, these adjustments are not always pleasant, and, as a rule, at the wrong time. Often it may be necessary to remove the tension web. There can be quite a few reasons for this: the neighbors flooded, the electrical wiring failed, or a planned replacement of the pipes of the heating system is underway.
If the PVC sheet is in good condition and suits the owners, then it can be removed and, after necessary work or drying room, install back.
What information is needed to get the job done?
Before you remove the stretch ceiling, you must have certain data on the type of fastening of the web and a brief knowledge of the structure of the coatings.
Ways of fastening the canvas
As a rule, on tension structures a warranty card is issued from PVC film, in which, in addition to the service life, the main specifications. One of these characteristics is the method of fastening the canvas in a baguette. The method of work will depend on this method. If there is no documentation for the product, then the necessary information can be obtained independently by studying the design features.
When installing stretch fabrics the following types of their fastening in the profile are used:
- Harpoon. A fairly common type of fastener. Cloths with such edges are made to order and are the easiest to work with. A rigid edge in the form of a harpoon is welded along the edges of the film. Entering the profile, this edge unfolds and holds the film in the profile.
- Clip-on (cam) type. In this case, the fixation of the film is carried out due to the pressure of the elastic plates plastic baguette. With this mounting option, plugs and decorative trims are not used. Installation can be carried out without preheating.
- Shtapik type. This type of fastener involves pressing the film to inner walls profile with a special longitudinal product - glazing bead.
- wedge type. Easy to assemble and disassemble system, available for independent work.
In the second and third cases, it should be borne in mind that the canvas was in direct contact with the surface of the baguette and may be damaged.
Features of fixing French ceilings

The main part of the French ceilings is PVC film. It is a durable, environmentally friendly and elastic material. One of its features is an increased reaction to an increase in air temperature. At temperatures above +60º C, PVC film becomes soft and stretches well. As it cools, it shrinks and becomes hard.
Therefore, a special tool is used to install PVC sheets - a heat gun. Before you remove the stretch ceiling, you should take care of its acquisition. For a one-time action, it makes no sense to buy it, but renting it is quite reasonable and affordable. A heat gun will be needed both for dismantling the canvas and for installing it in place.
Attention: Please note that PVC film, having incredible tear strength, reacts very poorly to sharp objects. It is easy to pierce or cut. And this is fraught with the replacement of the entire ceiling.
Web removal technique
Demolition work can, in some cases, be more difficult than the construction itself. Question: how to carefully remove the stretch type ceiling on your own, is relevant for many owners of such structures. It is quite possible to carry out such an operation, provided that quality tools, manifestations of patience and consistency in the implementation of all actions.
Tools and equipment

To work with PVC film, rather specific equipment is required, which can not always be found in a home pantry.
So, you need the following property:
- With a steel width of 8-10 cm. Before removing the stretch ceiling yourself, it is necessary to round off the corners of the spatula and grind off all sharp edges. If this is not done, then you can cut the film.
- Sturdy pliers with long, curved jaws.
- Construction knife.
- Sturdy screwdriver with a bent end.
- Special clothespins for fixing the canvas on baguettes during installation.
- Table, ladder or goats.
- Heat gun. It is recommended to use a gas-powered machine. The electrical appliance has a large capacity and can damage household electrical wiring.
When the equipment for work is prepared, you can proceed to the next stage - preparing the workplace.
Workplace preparation

Before you remove the side of the canvas or its entire surface, you need to carry out certain preparatory work.
They include:
- dismantling of ceiling lamps;
- removal of cages with birds, aquariums and flowers from the room;
- protection against overheating of interior items that may be affected by high temperatures (TVs, plastic windows, Digital Watch).
After the room and tools are prepared, you can begin to remove the canvas with your own hands.
film removal process

Significant assistance in carrying out the work will be provided by a video on the removal of the canvas of the French ceiling. It will reveal some of the nuances and answer the question of whether it is possible to shoot the canvas yourself.
The technology for removing the web directly depends on the type of installation of the web in the profile. Based on this, the disassembly of the structure is carried out.
Important detail: Answers to the question of how to dismantle the entire surface or how to remove the side of the stretch ceiling must be considered separately, in relation to each installation method.
Harpoon mount

Facing with this option of adhesion to the walls is easier to disassemble than others. Why? The reason is simple: this type of fixation allows for easy assembly and the possibility of repeated disassembly of the structure. The separation of the canvas should begin with a part of the wall in the area of \u200b\u200bthe corner.
Removal of the canvas is carried out in the following order:
- Detachable decorative strip around the perimeter or only on one side.
- With a heat gun, the room is heated up to + 70º C. This is necessary for the canvas to increase in size and relieve pressure on the harpoon mount.
- With a blunt spatula, the harpoon is hooked and lifted.
- The released harpoon hook is captured with pliers and removed from the profile.
- Further extraction is carried out manually without much effort.
Installing the canvas in place is carried out in the reverse order.
Cam mount
Removing the film with this fixation option is the simplest and least expensive, since in this case there is no need to warm up the room. But, extra care must be taken because the spatula will be in direct contact with the film.
To detach the film, you can proceed in two ways:
- In the corner of the room and at a distance of 50-60 cm from it, insert 2 screwdrivers between the cams. The pressure of the cams on the segment between them will weaken, which will make it possible to freely remove the film from the clamp. Repeat the operation until the desired amount of material is removed.
- Insert a spatula between the cams and squeeze out the movable one. The material will come out of the clamps due to the web tension. The rest of the material is extracted manually.
It should be remembered that serifs from the clamps may remain on the material. When installing, they can be a kind of guide.
Bead variant

In this case, you will need a screwdriver, a spatula and a heat gun.
The sequence of work is as follows:
- The room is warming up.
- The decorative cap is removed.
- In the corner, the outer wall of the baguette is pressed with a spatula, and the glazing bead is hooked with a screwdriver and removed.
- The glazing bead is intercepted by hands and pulled out of the baguette.
If there is a sufficient supply of material, it may well be inserted back.
wedge method

The easiest way to remove film.
The sequence of actions is as follows:
- A decorative insert is detached, which plays the role of a wedge, which causes a release of pressure on the plug.
- The plug clings to the edge with a screwdriver and is removed from the baguette.
The cloth freely gets from a groove.
Thus, it is quite feasible with our own hands, subject to certain technology.
Related videos
Stretch ceilings (and they are also called French) are not only durable, but also durable - with proper care, the life of the canvas can be 15-20 years. Due to the installation features, such ceilings are practically immune to the displacement of the carrier plate or shrinkage of the house. However, life is an unpredictable thing, so sometimes it becomes necessary to dismantle the stretch fabric. There can be a lot of reasons - from failed electrical wiring to banal flooding by neighbors from above.
Stretch ceiling - a popular option for finishing the ceiling surface
If the ceiling is made of PVC and its condition is still quite tolerable, then the owners can remove it to, for example, dry it, and then install it back. But in order to dismantle correctly, without damaging the film or frame, you need to know about the basic nuances of the process.

Where to begin?
The dismantling technology largely depends on how the canvas is attached to the baguette. To find out, you need to study the warranty card (it is issued for all PVC structures), which should indicate not only the operational period, but also the method of attachment. From this we will build on. In the absence of such documentation, you can study yourself design features ceiling.

A special fastening profile is one of the main elements of a stretch ceiling
There are 4 ways to fix the stretch film in a baguette, let's get acquainted with them.

- Harpoon mount. The easiest to use, and therefore the most popular option. In this case, a hard edge is welded along the edges of the canvas (in the form of a harpoon, hence the name), which, after entering the baguette, unbends and thus holds the canvas.
- Cam(another name is clip-on). The film is fixed here by means of elastic plastics. plastic profile that put pressure on her. None decorative ribbons and plugs with this method of installation are not used, and preheating is not required.
- Glazing bead. This method fastening provides for pressing the canvas to the inner walls of the baguette by means of a longitudinal glazing bead.

Note! In the last two methods, it is necessary to pay attention to the fact that the film is in direct contact with the surface of the profile, which means that it can be damaged if handled carelessly.
Stretch ceiling prices
stretch ceiling
Features of working with their PVC film
Most modern stretch ceilings are made of PVC film (there are also fabric options, but about them a little later). This material is not only elastic and durable, but also environmentally friendly. Its other feature is the reaction to changes in air temperature. So, if the temperature rises to + 60 ° C, then polyvinyl chloride becomes more elastic and pliable, and when cooled, it hardens and decreases. For this reason, a special device is used for installation and dismantling - a heat gun. It can be purchased or rented.

Note! PVC film has a very high tensile strength, but it can be easily damaged by some sharp object, which, accordingly, will require complete replacement canvases.

Dismantling the film stretch ceiling
The process consists of several main stages, but in order to do everything right, you need to be patient, acquire good tools and act in accordance with the instructions.
Stage number 1. We prepare everything you need
To remove the PVC film, specific devices and tools are needed, which are not found in every home.

So, first we prepare:
- clothespins for fixing the canvas;
- heat gun(preference should be given to gas device, because the electric one is very powerful, which means it can damage the wiring);
- a spatula intended for stretch fabrics (small, up to 10 cm wide) with pre-rounded corners and sharpened edges; if the tool is not processed in advance, then you can cut the PVC film;
- stepladder (in the absence of one, you can use the table);
- high-quality screwdriver with a curved end;
- pliers (their lips should also be curved);
- construction knife.


When everything is ready necessary equipment, boldly begin the second stage - the preparation of the premises.
Stage number 2. We prepare the room
Before removing the tension fabric or one of its sides, we carry out appropriate preparatory measures, including:
- removal of ceiling lighting fixtures;
Stretch ceiling kit prices
stretch ceiling kit

- removal of plants, animals and birds from the premises (if any);
- protection of furniture and appliances that can be damaged by high temperatures due to the operation of the heat gun ( metal-plastic windows, computer, electronic clock, etc.).

Now that both the room and the tools are properly prepared, you can begin to remove the canvas.
Stage number 3. Filming
The dismantling technology directly depends on which of the listed types of fastening was used during installation. Based on this, we will disassemble the entire structure.
Note! The issues of removing the entire tension fabric and only one side of the surface should be considered separately, and with respect to each of the installation methods.
Harpoon mount
This option for attaching the film is easiest to dismantle. The reason is extremely simple: harpoon fixation in itself implies easy assembly and the possibility of multiple disassembly. ceiling structure. In this case, we will start removing the canvas from the section of the wall located next to the corner.

The algorithm of actions is given below, for the convenience of visitors, the information is given in the form of a table.
Table. Dismantling of PVC stretch ceiling (option with harpoon fastening).
| Steps, illustrations | Brief description of actions |
|---|---|
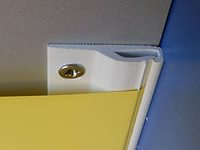
| First, remove the masking tape (decorative insert) on one side or around the entire perimeter. This will open access to the places of fixing the canvas. |
| We determine the places of fixation of the slotted inserts fixed between the canvas and the walls of the room. We remove these inserts. |
| We warm the room with a heat gun to a temperature of + 70 ° C (this action must be performed without fail). As a result of heating, the dimensions of the web will increase, and the pressure exerted on the harpoon mount will weaken. |
| We proceed directly to the removal of the film. To do this, we warm up the area from which we will begin the process (for curved ceilings, this can be any point of the structure, for even ones, one of the corners of the room). We climb onto the stepladder, hook it with a blunt spatula and raise the harpoon. We take pliers, grab the extracted harpoon hook with them and take it out of the profile. |
| We pull the film towards ourselves. |
| Further actions will not require much effort. Carefully remove the film from a special mounting profile (we are not in a hurry, otherwise we can damage the material), if necessary, heating new areas with a heat gun. |


Fabric stretch ceilings are dismantled using a slightly different technology, because special glazing beads are used here to fix the material. We will consider this process in more detail later.
Video - How to dismantle a stretch ceiling yourself
Cam mount
If the stretch ceiling is installed using a cam-type mount, then its (ceiling) dismantling will be the simplest and easiest to perform. The fact is that in this case, even heating the room is not required. But special care is required, since the spatula will be in direct contact with PVC.

So, you can unhook the film in one of two possible ways.
Method number 1. We take two screwdrivers, insert one between the cams in the corner of the room, and the second - about 55-60 cm. Because of this, the pressure of the cams in this area will noticeably weaken, which will make it easy to remove the PVC from the fasteners. We carry out the procedure until we extract the required amount of canvas.
Method number 2. We take a spatula, insert it between the cams and wring out the one that is movable. Due to the tension, the material will freely leave the clamps. The remaining film is removed manually.

Note! On the surface of the PVC film, characteristic serifs may remain after clamping. These serifs can be guided during re-installation.
Bead type fastening
Here you will need to work:
- spatula (such as described above);
- screwdriver;
- heat gun.
The algorithm of actions is given below.

Dismantling the glazing bead: remove the plinth, bend the profile, remove the glazing bead, remove the canvas
First, we warm up the room in the same way as in the previous versions.
We remove the masking tape (plug).
We take a spatula and wring out the outer wall of the baguette in one of the corners of the room. After that, pry off the bead with a screwdriver and remove it.
We intercept the glazing bead with our hands, remove it. We remove the canvas.
If, when installing the ceiling, a supply of material was left, then the canvas, if necessary, can be completely inserted back.
Prices for stretch ceiling "Galaxy"
Stretch ceiling "Galaxy"

Video - How to remove the stretch ceiling
Features of dismantling seamless fabrics
When removing the fabric ceiling, such strong heating is not required. If a we are talking about wedge or bead type fasteners, the dismantling process is no different from a similar action with PVC film. The only difference is that you should start from the center of the wall, gradually moving towards the corner. The installation is the same. The success of the event largely depends on the slowness and accuracy of the actions performed.


As for the re-installation of the fabric web, everything here depends mainly on the conscientiousness of the previous installers. If they cut the material "back to back", then we are unlikely to get the perfect tension when reinstalling. After all, polyester fabric is not as elastic as polyvinyl chloride. But if the installation was done by professionals, then in any case they left a few “extra” centimeters of the canvas. If so, then there shouldn't be much of a problem.

Note! Particular attention should be paid to fabric canvases installed using clip-on baguettes. Partial removal of such ceilings is impossible - if anything, you need to remove everything at once, otherwise the canvas may well pop out of the clamps due to the unreliability of this kind of fastening.
During removal and further installation, the ceiling must be heated regularly, albeit not as much as PVC. If after installation there are minor irregularities, do not worry - heat them with a heat gun and they will quickly level out. Try not to lift the heat gun too close to the canvas, because it is also, in fact, plastic, so it can deform.
In order for the dismantling work to be carried out as quickly and efficiently as possible, we recommend that you adhere to the following important requirements.
- It is advisable to find one or two assistants for work. In this case, the removal of the blade will be carried out carefully and, more importantly, safely.
- When installing a stretch ceiling, give preference to exclusively high-quality materials.
- Do not use tools that have sharp edges. With such tools, you can easily damage the ceiling or finishing materials.

As you can see, the process of dismantling the stretch ceiling is nothing complicated. It is quite possible to cope with the work with your own hands, if you know about all the nuances of the process and follow a certain technology.
Video - Stretch ceiling repair (wedge fastening)
The need to dismantle the stretch ceiling may arise due to different reasons. For example, this is necessary when it is necessary to replace the communications laid under it, or if certain sections of the coverage are damaged. Let's see how you can remove such a ceiling without inviting specialists. Such a task is not an easy one. But, believe me, it is doable.
Can any ceiling be dismantled?
There are several types of stretch ceilings. Some of them are simply impossible to dismantle. Others are filming on your own without major difficulty. The specific type of structures that you install in the premises of your home should be checked with specialists at the stage of their installation. The type of ceiling, in addition, is always indicated in the instructions for its operation. If there is none at hand, you will have to determine the type of tension product visually, based on the information presented below.
First of all, you need to know that the coatings of interest to us are divided into:
- 1. Polyvinyl chloride (PVC).
- 2. Fabric.
The first is quite difficult to mount and dismantle. This is due to the fact that these works are carried out in preheated rooms. Such an operation can be performed by a heat gun - a special device, without which the installation and removal of stretch PVC coatings becomes impossible. Dismantling of PVC structures should start from the corners of the room, approaching the middle of the walls. The fabric ceiling, called seamless, is installed (removed) easier due to the lack of the need to warm up the room. You need to dismantle it from the center of the wall to the corners of the room.
Installation of fabric and PVC sheets is carried out on different mounts. It is very important. Let's briefly review each type. The first - harpoon, makes it possible to install only PVC ceiling sheets. For fabric ceilings it is not used. Harpoon structures can be dismantled. But the process of removing them is quite complicated.
The second type of fastening involves the use of special fixing clips made of plastic. With their help, you can install seamless products and quite easily, if necessary, remove them. There are also wedge and bead options for attaching the ceiling canvas to the baguette. These methods are suitable for both PVC and fabric materials. Such mounts are formally non-separable. But with a strong desire, the glazing bead or wedge can still be knocked out, and then put in place. The main thing here is not to tear the tension fabric during its dismantling and installation.
What tools are needed to remove tensile structures?
So, we found out that it is quite possible to remove fabric or PVC. To perform such a procedure, we need to immediately stock up on all necessary devices and tools. These include:
- Electric or gas heat gun (if you plan to dismantle PVC sheets).
- Thin spatula for plastering works. This tool needs to be further prepared for use. We take emery or an electric grinder. We grind sharp corners on a spatula. Then we wrap its canvas with reinforced special tape. Such a "protected" tool will eliminate the risk of damage to the blade when it is removed.
- A fitter's knife, a screwdriver bent at the end.
- Special clothespins of the big size. They are sold in hardware stores. Clothespins are needed to fix the material (its weight is not small, it is unrealistic to hold the canvas in the process of removing and installing the ceiling).
- Pliers. We purchase a tool with long jaws. Regular pliers won't work. In addition, even the smallest burrs should be ground on the tool.

Also, do not forget to get a ladder in advance. Without it, reaching the ceiling will be problematic. If there is no ladder, we use any table as a stand for working at height. The main thing is that it be as stable as possible.
We work with PVC coatings - accuracy comes first
Before dismantling the canvas, we free the room from unnecessary items and things, providing free access to the venue of the planned event. Be sure to cover the plastic windows (if any) with a thick cloth to protect them from melting under the influence of high temperature. Turn on the heat gun. We heat up the room. 
We work with harpoon mounts according to the following algorithm (we start the operation strictly from the corners):
- 1. Remove the decorative insert (it may not be, it is not provided in all ceiling structures).
- 2. With the help of pliers, carefully pull out the PVC coating by the harpoon. Important! We need to capture not the PVC film itself, but the mounting harpoon. If the pliers catch on the canvas, the latter is guaranteed to break.
- 3. After releasing a small part of the decorative film, put the pliers aside and carefully pull out the main part of the coating from the baguette with your hands. It is recommended to perform the procedure with gloves. Then there will be no permanent fingerprints left on the PVC product that has been heated.
- 4. We fix the canvas with large clothespins, perform the necessary work.
We dismantle bead and wedge structures a little differently. In the first case, in order to pull out the canvas, we need to bend the aluminum profile. And then carefully release the bead and pull it out of the baguette. The easiest way to do this is with a curved and blunt-ended screwdriver. We act with the utmost care. One wrong move with a screwdriver, and the baguette or canvas will be damaged. The wedge is much easier to pull out. The profile can be bent by hand.
You don't need to remove the entire canvas. Part of the ceiling was exposed, the required work was carried out (repair of material, replacement of pipes), the canvas was installed in place. Installation of the coating is carried out in the reverse order. If, during the initial installation, the masters thought of leaving a 2–3 cm allowance, stretching the canvas will not cause problems. In other situations reverse mounting coverage can cause serious problems.
Fabric canvases - everything is much simpler
To dismantle seamless ceiling coverings, it is not necessary to heat the room with a gun. This greatly facilitates and speeds up the planned work.

We remove wedge and glazing bead fabric structures according to the principle described above. There is only one difference - we start dismantling not from the corners, but from the middle of the room.
If the specialists who built the ceiling did not leave a supply of material (3-4 cm), we most likely will not be able to install the dismantled coating. The fabric cannot be stretched in the same way as a heated plastic film.
One more moment. Seamless canvases, fixed with clips, are removed quickly and without problems (we just disconnect the fasteners from the baguette). But in such situations, partial dismantling of the ceiling is not possible. You have to remove all the cover. This is due to the fact that clip baguettes do not provide reliable fixation of the structure. If you dismantle only part of it, the remaining piece of the canvas may well fall off during the work.
That's all the features of self-dismantling stretch fabrics. Good luck!
 Blood thinning products: recommendations and prohibitions
 Tank legend, fighters and equipment for the Arctic: what will be shown at the Victory Parade How is the Victory Parade
 Helba yellow tea: properties and reviews