Independently insert a plastic window. How to install plastic windows correctly. Correct stamps of plastic window
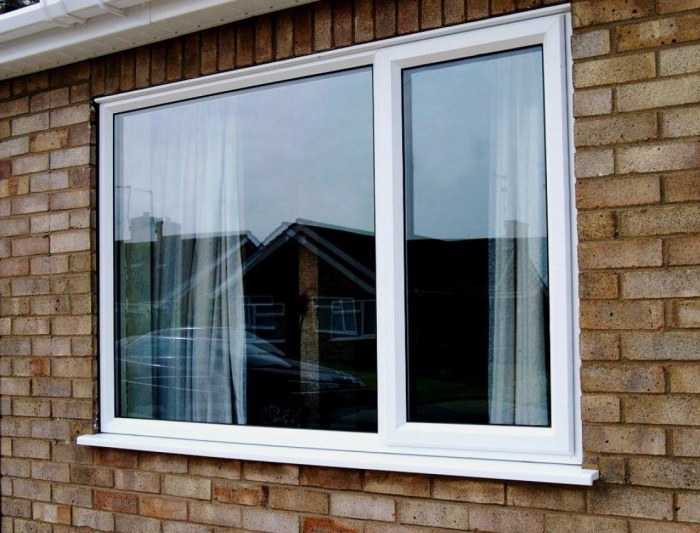
Currently, more and more people give their choice in favor of metal-plastic windows. Such glass packages also equip both ordinary apartments, and summer houses, and gorgeous country mansions. And quite often, people set new windows with their own hands. Depending on the selected method of installation and installation skills, the installation process of one window will take from one and a half hours to half a day. Technology installation of windows is extremely simple and understandable. It does not require the use of any complex tools. The main thing is to adhere to the order of installation and comply with all the requirements that dictates the installation technology.
Necessary measurements before ordering plastic windows
The correct installation of new windows requires the execution of accurate metering of the window opening. In addition, it is important to know the features of the installation of windows in openings with a quarter. Such window openings are usually found in foam concrete buildings. They help significantly reduce heat loss. The main difference - in the opening of a quarter, is set to a window with a length of 50 mm less than the length of the opening. From the measured width, it is necessary to take 30 mm. By contour of the opening, leave the gaps of 15 mm on the march. In accordance with the current gtales, it is necessary to leave 20 mm around the perimeter. Below additionally leave 35 mm under the windowsill.
In the event that the installation of windows from PVC will be performed in the window opening with a quarter, measure the most narrow place. When ordering a window width, add 30 mm. You do not need to change the length.

As a rule, the window is not installed in the center of the opening, but at a distance of about 1/3 deep into the outer plane. If the installation of PVC windows is performed with their own hands, then the owner can shift the design into any convenient side for it. Treat offset in advance and take into account this parameter when ordering low tide and windowsill.
To certain in accordance with the location of the window and the windows and the windowsill, add 50 mm. When calculating the width of the windowsill, take into account the addition of such an indicator as the location of the battery.
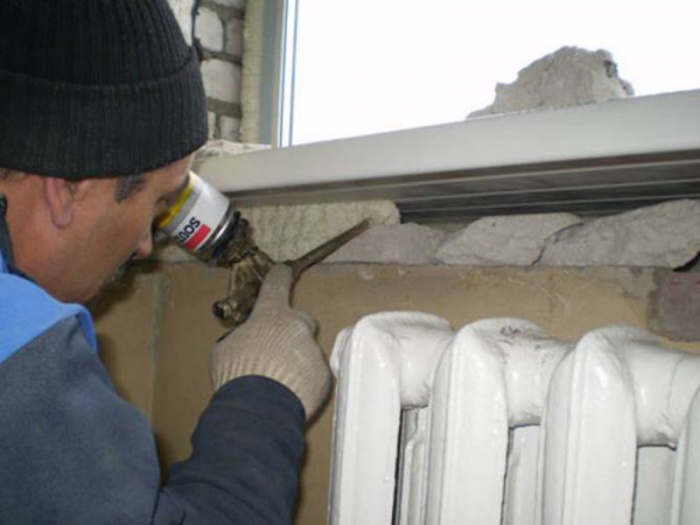
The windowsill must close the radiator half. Add 20 mm for the product of the product under the base of PVC windows. The stock in length should be at least 80 mm. But it is better not to save and add 150 mm so that in the future there is no problem to cut the windowsill. Together with the sump and the windowsill you will be offered the side plastic plugs. No need to refuse them.
Back to the category
What is the method of fastening the frame to choose?
The installation of windows from PVC does not depend on the chamber of the glass package, or on the number of internal cameras in the profile. The procedure for installing the product may vary only with the material of the design of the walls and the size of the window. A suitable mount and method of mounting PVC windows is selected in accordance with the above parameters. To secure the window design, you can use:
- Dowel or anchor, cut into walls by means of existing or previously prepared through holes.
- Protective plates. They are pressed into profile. Mascuses are attached to the wall and are fixed with the help of screws.

Practice shows that the most reliable is the first option. It is most often used when installing heavy and large windows. In the case of end-to-end mount, the window will normally withstand multiple shock loads, inevitably occurring when turning and folding the window sash. In addition, with the help of anchors, the installer gets the possibility of the most accurate adjustment of the horizontal and the vertical of the product being installed.
Those who install windows with deaf glazing, i.e. Without swivel and folding flaps, it will be more interested in installation using anchor plates. These products are hiding under the slopes, so that they will not spoil the appearance. If the walls of the house are made of brick or concrete, then for plates it is recommended to pre-prepare small recesses. They will get rid of the need to apply an alignment layer in front of the devil.
Sometimes both methods are applied in the complex. Through the bottom profile and side parts of the frame in the walls, anchor is plunged, and plates are used for fixing the design. In case the windows are installed in the structure of the tree, the use of plates is better to refuse, because They are overwhelmed after a short time. In this case, galvanized screws are more preferred.
Back to the category
What do you need to know the owner of a wooden house?
The process of installing PVC windows is very dependent on the material manufacturing material. In the case of brick designs and foam concrete, the differences are reduced only to the magnitude of the anchors perch. With the openings from the bar and the cut, everything is a little more difficult.

If the walls of the house are made of wood, you need to remember a number of important rules. First, it is recommended to start installing PVC windows in a wooden house no earlier than a year, and even better 2 years after completing the construction of the house. This requirement is dictated by the fact that during this time the material gives shrinkage. The smallest value and the shrinkage period is characterized by glued bar. Secondly, the windows are not installed directly in the opening. The product can be mounted exclusively in a wooden box. It will protect the PVC window from the deformation. The block should not have any defects, traces of the defeat insects and rot, etc. Before starting any work, wood must be processed by an antiseptic.
After 1-2 years, the shrinkage does not stop completely, but is no longer so strong. After installing PVC windows and finishing, it will also happen. That is why at the top between the box and the opening you need to leave the gap of 30-70 mm. The size of this gap is selected taking into account the type and humidity of building materials. After completing the installation, this gap must fill in the jute and close with platbands.
Construction standards do not establish any clear recommendations for materials for the windowsills and swells. As a rule, standard flows are used, complete with PVC window. The windowsill can be made wooden or polymer. The bottom profile can be described directly to the windowsill of a tree, i.e. This product can if you want to install before mounting the window. Or you can not get rid of the old window sill, if it is normal.

Experienced builders give a very useful recommendation, which is not in regulatory documents, but it will be useful to any person who has decided to perform an independent installation of PVC windows. Wood misses evaporation. If you do not take any action on this, evaporation data will gradually worsen the properties of the mounting foam. And in order to prevent foam moisturizing, the polyethylene foil ribbon should be pasted along the line of its application.
Back to the category
Preparation of the opening and installation windows
Before you begin further work, prepare tools for mounting PVC windows. You will need the following:
- Screwdriver.
- Pistol for applying foam and directly foam.
- Level.
- Electrolzik.
- Perforator.
- Set of hexagon keys.
- Pencil.
- Yardstick.
- Stationery knife.
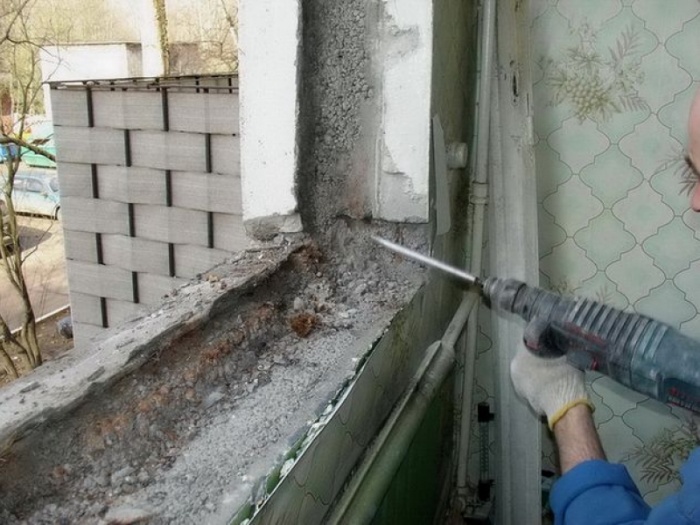
After you dismantle the old window, clean the opening from the paint and garbage. In case the walls of your home are made of wood, you will have to additionally comprite the top layer if the new window is mounted in the box already served. Such preliminary processing provides a stronger foam clutch with a top layer.

Builders recommend applying to fill the foam gap only if the slot between the opening and the frame does not exceed 40 mm in size. In the case, if the gaps have a larger size, it is better to partially fill them with foam, drywall and other affordable materials. For example, in the house from the bar you can use the segments of the same timber.
First you need to remove the sash frame. To do this, pull the pin from the top loop. You can carefully pick it up with screwdriver or pliers. After that, remove the leaf from the bottom loop. If the window is deaf, it needs to take out the glass. First get longitudinal staps, after them - transverse. The strokes are easily removed using a spatula or a wide knife. It is enough to insert auxiliary tool into the gap and start it gradually shift. Be careful, do everything so as not to damage the glass.
If a small window, you can insert it using mounting plates without the need to pre-remove glass accommodation or sash. If there is a possibility not to disturb the integrity of the factory structure, then it is better not to do. Take the sash or glass and lean the product to the wall at a low angle, putting on a flat horizontal surface, pre-covered with a dense cardboard or some soft material.

In no case, do not put the double-glazed windows and sash plafhmy. It is also prohibited to put them with disk. Even because of the smallest pebble, a crack may appear under the foundation in the product. Remove the protective film from the outer side of the frame. It is better to do it immediately, because In the future, this process will require much greater effort.
Make places to install fasteners. Builders recommend installing fasteners in a step of 40 cm. In accordance with the current gtales, the step should not exceed 70 cm. Standard indents from the impost and angles are equal to 15 cm. If you install the PVC window using the plates, attach them in advance to the frame in advance. For this, self-tapping screws are used. Prepare holes for long screws or anchor bolts. Use for this drill on metal. Drill from the outdoor side of the frame.
Most instructions indicate that before starting the installation, you need to fix with the help of a protective psyl. However, the practice shows that it is quite uncomfortable before installing it. Therefore, you can do it after the completion of the installation, nothing terrible will not happen.
Today, the PVC windows have become very common, and with them are wide popularity and those firms that install them are widely popular.
However, the installation of PVC windows does not represent any special difficulties, so it should not be afraid of such a job.
Stepped window installation instructions

The whole process consists in several actions that require a sequence of execution:
- Dismantling of old windows.
- Preparatory activities for installing a new window.
- Installation of a stacker profile.
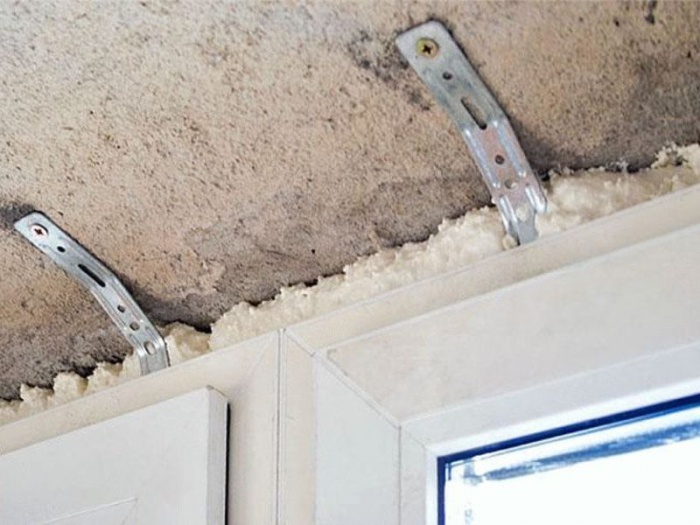
- Fastening the fixing reinforcement to the frame of the new window.
- Creating special recesses under these fastening elements in the wall.
- Direct window mounting and alignment.
- Fixing PVC.
- Filling all seams by mounting foam.
- Installation of the window sill and its alignment.
- Mounting slopes.
- Adjusting windows accessories.
- Mounting
It must be said that many of these stages are preparatory, so the whole process can be divided into the following types of work:
- Preliminary measurements of all parameters.
- Preparation for installation of the opening.
- Preparation of PVC windows with their own hands.
- Direct installation.
Back to the category
Measures and calculations

Before buying a product, you should carefully measure its necessary parameters. In this case, one should consider one characteristic of the opening:
- has a quarter;
- does not have a quarter.
A quarter is a special piece of block, concrete or other structure that serves to reduce heat loss.
If there is no quarter, then the window is made by 5 cm in short along the length and 3 cm shorter in width. This explains that in this case it is necessary to leave the gaps - 1.5 cm on each side, and below 3.5 cm for the windowsill.
It is necessary to say that in various documentation (standards) are 2 cm, and not 1.5 cm.
As for the opening, which has a quarter, then the PVC windows are ordered, which in the width of the width of the outlook itself by 3 cm. But the length in this case should remain the same.

In order for all the measurements to be faithful and the window later approached, they need to be carried out by the narrowest place.
There are subtleties and when choosing the size of the low tide and the windowsill. In most cases, the windows are installed by removing them by a third of the opening of the opening, that is, not in the center. However, the installation of windows allows you to make a choice in this regard. Accordingly, the windowsill is chosen on the basis of the resulting result.
It is only necessary to say that both sides, and the windowsill should have 5 cm more than it turned out as a result of measurements.
As for the width of the window sill, it must open the window on each side by 2 cm. When calculating the minimum reserve can be considered 8 cm, but it is better to make 15 cm that then these cuts can be removed in case of an unsuccessful first attempt.
Back to the category
Production of window opening

So, when all the calculations are completed and the dimensions of all components are known, you can proceed to the preparation of the place where the product is installed.
At first you need to proceed to remove the old window. Make it in various ways. If you deal with the old wooden window, then it is better to do this:
- First remove all the glasses, for what you need to remove the strokes or cloves, their holding.
- Then remove all nails or strokes that hold the frame itself.
- Remove frame.
Why do you need to remove glass? The fact is that the old windows are very often simply nailed to the windowsill through the frame. In the process of dismantling the fixed windows, the glass could simply crack and fall out from their places, which is unsafe. After the old window frame is dismantled, the whole niche needs to be cleaned of dirt, dust and paint residues.
It should be noted: the foam is best covered with fresh wood, so the old layer must be removed, which can be made with a planer, sandpaper or grinding with grinding circle.
Of course, it is necessary to do only in a tree niches.
Back to the category
The process of preparing a new window

Immediately I must say that some professional workers who have already established no one-tent of the PVC windows do their own hands, do this without disassembling them. As for independent work, it is better to adhere to the following recommendations.
It is necessary to free the frame from the sash. To do this, the pin is extracted, which is located in the upper loop. It can be removed by pliers and a screwdriver, carefully picing and pushing. After removing the pins, the sash is easily removed from the bottom loop. If the window does not have flaps, then it is necessary to remove the glass that can be done, deleting all the strokes. To do this, you can use a knife or spatula. It is inserted into the gap between it and the frame and the smooth movement are shifted to the side.
It must be said that such procedures must be performed only in the case of large products. If it is possible not to disturb the integrity of the new window, then it is better not to do.
From the outside of the frame, it is necessary to remove the protective film so that then there is no difficulty with this.
Then you need to put markup, that is, designate the place of attachment of the product to niche, regardless of which method is selected (they will be discussed a little further). It is recommended to hold a step in 0.4 m. The minimum distance from the place of attachment to the angle should be at least 15 cm.
Back to the category
PVC windows installation methods

Immediately I must say that the choice of the method should not be based on such parameters of the product as the number of sash and cameras in the double-glazing. The installation method must be selected based on the size of the product and depend only on the material from which the walls are made.
So, the installation of PVC windows can be carried out according to one of two ways:
- on anchor bolts or dowels;
- with special fixing fittings.
Anchors and dowels fasten the frame to the wall. At the same time, in the case of the anchor bolts, the holes of the corresponding sizes are drilled with dowels.
Installation using these fasteners is good when it comes to concrete, block or brick walls.

As for the fastener reinforcement, it is usually used in the case of wooden walls. But it should be noted that this is an optional rule.
The essence lies in the fact that the plates are pressed into the profile and are installed in space to the wall. These plates themselves are attached with the help of ordinary self-tales.
If there is a desire to install plates on brick or concrete walls, then it is best to pre-cut the corresponding dimensions in them. This will help avoid unnecessary work related to the subsequent alignment of slopes.
Very often, builders in the process of installing windows use both methods at once, which is also permissible.
Back to the category
Installation technology

Installation of the window begins with the fact that the prepared frame is inserted into the niche or the entire window is inserted. Before that, it is necessary to put bar or plastic corners around the perimeter. They will help provide the necessary minimum clearance.
The frame is aligned vertically and horizontally, as well as relative to the center of the niche. Make it easily by moving these steamards.
Placement wedges or corners are best spaced under the fastening points.
This will give her extra rigidity and keeps out of the deformation at the time of attachment.
Since the installation of PVC windows may differ from the fasteners used, the installation technology will be their own. And the differences begin with precisely from the next step:
- If the opening is made of wood, then further installation involves screwing the self-pressing through the drilled in advance in the frame. Self-tapping screws not to the end, but only so that it is slightly "out."
- On concrete or brick walls through the same holes, marks are set. Further Rama is removed, and at the place of the marks, holes for anchor bolts or dowels are dried. The frame is then installed on its original place and enshrines anchors, but not completely.
- In the case when the mount is carried out with the help of anchor plates, they need to be simply anticipated so that they touch both the opening, and the frames in the right place.

After prior installation, it is necessary to check the verticality and horizontal frame of the installed frame. This can be done with the help of an ordinary building hydraulic level or a plumb.
After checking the frame is fully fixed. In this case, the anchors are not very tightened. The final tightening time is determined by the moment when the anchor hat is leveled with the frame plane. Some builders recommend even leaving 1 mm.
Then join all the details of the window dismantled at the preparatory stage, that is, glass or sash. After installation, they should be adjusted.
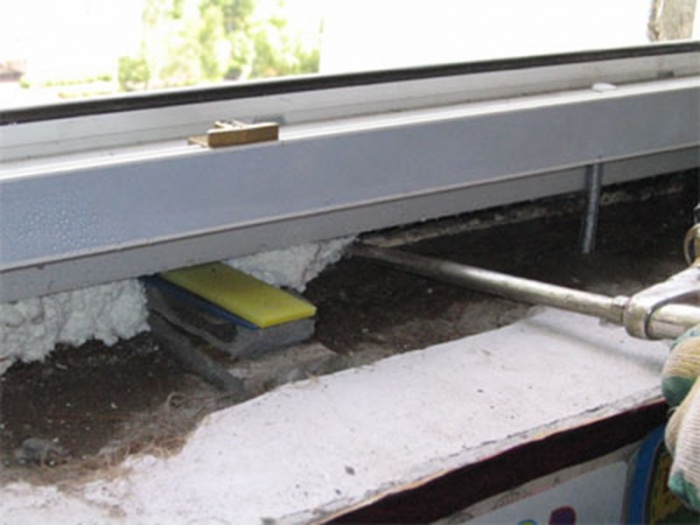
All gaps between the window and the opening are filled with foam. It often arises such a situation that the window is less than the opening so much that the gap remains greater than necessary. If this clearance does not exceed 4 cm, it is allowed to completely fill in with the mounting foam. If the gap is from 4 to 7 cm, it is recommended to fill it with a foam, consolidating the mounting foam.
When the gap is more than 7 cm (except for the case below), it is required to fill it with boards, bricks or other similar materials. Cement mortar is suitable.
The tump is installed on the foam. Additionally fastened with self-draws to this profile, if it was used, or to wooden bars.
Single is installed with a slope from the window.
After the foam dries, you can start the installation of the window sill. He will start under the "Donnik" for 2 cm. I must say that the window sills do not install strictly horizontally. This is done with the goal so that the moisture that the moisture does not accumulate on their surface. In order to create a slope of the window sill, it is also carried out on the installation foam.
After all installation actions are completed, the window should not be touched by another 16-20 hours. It is necessary, in order not to disturb the integrity of all the gaps, that is, do not shift the product relative to its initial position.
When planning to change the old windows to the new, many are wondering how difficult it is to put them on their own. The answer is the work of medium difficulty. By time, the replacement of the medium-sized window with the dismantling of the old takes about 3.5-4.5 hours. This is for a person without experience. Employees of companies engaged in this constantly spend on it less than an hour. But the installation of plastic windows with their own hand is the host of the room, does not matter any comparison with the hasty work of "professionals." They simplify the process to be inadvertising, arguing the fact that the rates were not raised for 6 years and spend time on the little things. If you are lucky to find really masters, you can trust them. If not - it is better to spend the output and install yourself.
Design of plastic windows
In order to normally understand the installation process, it is necessary to have an idea of \u200b\u200bthe design of the windows. Let's start with the materials and titles. Plastic windows are made of polyvinyl chloride, which is abbreviated called PVC. Hence the second name - PVC windows.
The main element of any window is the frame. For plastic windows, the frame is made from a special multi-chamber profile. It is divided by partitions on a certain number of cells - cameras. The more these cells, the warmer will be the window. When they talk about how many cameras will be in a plastic window, have the number of cells in the profile.
In the middle of the design, in the largest chamber, the insertion of blue is visible. This is a reinforcing element of increased rigidity. It gives the profile the required strength. In plastic windows, this insertion of plastic, in metal plastic - from metal (generally - from aluminum). That's the difference between them.

There is still separation of profiles for classes: economy, standard and premium. The optimal choice, if you need normal windows, class standard. In the class of the economy, too thin partitions and they are laughing almost since the installation. Premium has a high price due to options that are essentially not needed.
If you want to have the best profile for plastic windows, take the class standard of any factory. There is no particular difference between products of different firms. They have long been standardized and all stories of managers about benefits are fairy tales. If they are made on factory equipment, there is no difference between them: all factory profiles have long been standardized.
Profiles for windows in the standard version have white, but can be brown - under the color of any tree, and even pink - under the order. The windows of the color profile are more expensive than similar white.
Window structure
To understand what we are talking about in the description of the installation process, you need to know what is called each component of the structure.

It consists of:
- Frames. This is the basis of the window.
- If the window consists of several parts, the frame is divided into part of the impost - the vertical component. If a window of two parts, an impost one, if from three - two, etc.
- The opening part of the window is called a sash, a fixed - a depth. Double-glazed windows are inserted into them - two, three or more glasses, hermetically bonded among themselves. Between the glasses, a foil ribbon is laid, providing tightness. There are double-glazed windows with special properties: with reinforced glass, tinted and energy efficient, which, according to manufacturers, reduces heat loss through windows. There are still double-glazed windows, between the glasses of which inert gas is injected. It also reduces heat loss.
- Double-glazed windows are pressed against the frame with a slim plastic plate. The tightness of the compound is provided by the rubber seal (it is usually black).
- On the sash sets shut-off accessories. This is a specific set of mechanisms that provide opening and locking. They can be different, as they provide different functionality: opening, opening with ventilation, opening + ventilation + micro.
- To ensure tightness on all parts - frame, impost and sash - rubber seals are installed.
Below on the outdoor side of the frame (the one that is facing the street) is drainage holes that are closed with special caps. The condensation is excreted through them, formed inside due to the temperature difference on the street and indoors.

Another window has a drop - the board is outside, reducing the precipitation and the windowsill inside. Side and upper parts from the street and premises. They can also be made of plastic or do on another technology.
How to make a measure plastic window
When ordering windows, you will need six sizes: the height and width of the window, the length and width of the windowsill and the slope. In order to measure everything correctly, you need to determine, with a quarter you have a window opening or without.

Watch out the opening. If the outer part of the window is already, opening with a quarter. In this case, measurements are made according to the narrow place: the openings rarely have an ideal geometry, therefore it will have to measure at several points. Find the smallest value, add 3 cm to it. Pass as it is.
If the open is smooth, the calculation is different. Measure the width and height. From the measured width, we take 3 cm, from the height - 5 cm. It will be the height and width of your window. In the width we remove 3 cm, since the clearance is required at least 1.5 cm on both sides under the mounting foam. In height, we take 5 cm in height, since all the same 1.5 cm are needed on top, and the bottom - 3.5 cm will go to the installation of the windowsill.
The length of the windowsill and the low tide is taken with a margin - by 5-10 cm more width of the window opening. When installing and tump and the windowsill "take off" a little in the adjacent walls, there will go there. In the width of the fetters are standard, so you choose the nearest greater. On the windowsill, the situation is different. Its width is chosen arbitrarily - at the request of the owner. Someone likes wide - so that you can put something, someone prefers her in the wall. So there is no rules.
When ordering, you will need to specify how many and what parts will be in your window: there is or not there is a deaf, where it is located, how many sashers, with what parties they should open. You will need to specify the type of accessories (ventilation, micro-taking).
Preparation
If the windows change, the installation of plastic windows begins with the demonstration of the old one. Problems usually do not occur: to break down do not build. After dismantling it is necessary to conduct an audit of the opening: remove everything that can fall off. If there are some protruding parts, they must be removed - with the help of a hammer, bolt or power tools. When the plane is aligned, it is necessary to remove the entire construction trash. Ideally, it's all, right up to dust, otherwise when installing foam badly "grab" with a wall.

If there are too large potholes or cavities, it is better to smell with cement mortar. The greater the opening, the easier it will take place. With loose wall material, they can be treated with binding compositions: penetrating bonding primers.
How to install: Choosing installation method
There are two different techniques: with unpacking (disassembling) windows and without it. When unpacking in the frame, the holes are drilled through the holes, they are driven into the wall of anchor. This method is more difficult, but fastening is more reliable.

This is an installation on an anchor bolt. They put three pieces on each side
When installing without unpacking, metal plates are fixed to the frame outside, and then they are to the walls. It is natural, faster, but the fastening is very unreliable: with significant wind loads, the frame will switch or it will resist.

If the window does not really want to disassemble, you can mount on the plate, but it is not narrow and thin, but thick and wide, which are still used when installing the rafter system.
In principle, small windows mounted on the mounting plates, subject to the absence of significant wind loads, can stand normally. If you live in a region with strong winds, and they blow mostly to you in the window, if the apartment is located in a high-rise building on a high floor - in these cases it is necessary to install with unpacking.
Below, see the emotional and intelligible video, in which it is described why it is better to use anchor.
Installing plastic windows with your own hands: Step by step instructions
We describe both methods: suddenly you will need a way with mounting on the plate. It is used in foam block buildings, the carrying ability of which is small and there is a load from the windows to distribute to a large surface. Another method of installing plastic windows is necessary if the building is built on the "layered" technology. For example, in front and rear concrete, and between them a layer of insulation. If the window should stand in a soft layer, it will be fixed to the plates. Installation of PVC windows in a brick, slag block, panel, etc. The house is desirable to anchor.
Installation with unpacking
Installing plastic windows with your own hands begins with measurements. Measure the frame and window opening, make sure they are compatible. After you can proceed to work. The process begins with disassembly (unpacking) PVC windows. Here are actions for steps:
- Remove the window sash:
- Close the window (the handle is turned down).
- Remove plastic lining on both hinges. They are approaching a screwdriver.
- On the top loop there is a pin that provides a moving connection. It is in the center and performs a little. It is pressed on it until it is drowned (you can take a metal plate, rubbing it into the pin and slightly knock on the plate). Bottom pin will be promoted. Now it can be captured by rake or pliers and pulling down, pull out.
- Holding the sash at the top, open the lock. For this handle put in a horizontal position. By rejecting the upper part of a little on yourself, raise the sash, removing it from the bottom pin.
All the sash is removed. That was clearer watching the video. It describes how it is described in detail how to remove and put the leaf on the plastic window.
- On Glukhar shoot the glass. He keeps at the expense of the headquarters. They need to be removed, then the glazing itself will be removed without problems. Shot so:
- In the slot between the stroke and the frame inserted something narrow and durable. If there is no special tool, it is best to use a small spatula. Disassembly start with one of the long sides.
- The spatula of the corner is neatly driven into the gap and gradually move the strap to the side of the frame.
- Without taking out the tool, moved a little along, again moving towards the stroke.
- So pass along the entire length. As a result, the stroke is almost separated, it is simply taken out.
- With a short side, everything is easier: the liberated edge and turning the spatula is removed from the groove. Take a hand for the liberated edge and pull up.
Now you can try to remove the glass. Just carefully: he is heavy. If it does not work, remove another one from the strokes. Just follow the window stood obliquely and the glass package is not falling out. Now, if necessary, you can independently replace the glass. Watch the video on how to remove the headquarters with PVC windows.
- Remove the window sash:
- The liberated frame on the outer perimeter is covered with a special self-adhesive ribbon. Its installation is recommended by GOST. With it the window does not like it.

- Remove the protective tape with the campaign logo. If you leave it, it is under the influence of the sun too much to spill with the frame and remove it will be problematic.
- The prepared frame is inserted into the window opening. For its placement, assembly wedges are used. They are necessarily installed in the corners and under the impos. The rest are placed as needed. Lining their window is set strictly by level in three planes. Pre-fix the position of the window. For this you can use mounting plates.

- Take a drill and drill, which coincides in size with the diameter of the anchors. Make holes under fasteners. 150-180 mm retreat from the upper edge. This is the first hole. The bottom is approximately at the same distance from the lower angle. Another anchor is installed in the standard window: the maximum distance between the two mounts should not be more than 700 mm.
- Having done a hole, whether the frame will not be shifted (the level in all three planes), then clog the anchor and delay it. Thinking it is impossible: the profile should not be fed. Repeat this operation required number of times.

- Set fighters outside. To do this, first the outer part of the frame passes vapor-permeable waterproofing (it is self-adhesive). On the sides of the window opening, there are small shoes in which the edges of the sings will be created.

- On the part of the window opening outside, where the tump will be relying on the wall, apply a layer of foam. Sometimes, if the height difference is large, there are installed a lining profile. And then they are fixed by Olive. The sizes are cut into the frame of the frame and are fixed to the frame with self-draws.

- At the bottom edge, the tump is also married.

- Next, gate the opening. When plastic windows are installed in summer, the gap between the frame and the window opening is sprayed with water from the spray. This is necessary for better polymerization of foam.
- According to the contour, the frame is glued with a vapor-permeable heat insulating band - it is also recommended by GOST.
- Take a cylinder with foam and fill out the available gaps on 2/3 volumes. If the size of the gap is large - more than 2-3 cm - is applied foam into several stages. Between two layers, the time interval is required at 10-15 minutes. When the first layer partially dries it, they are also sprayed with water and apply the second. So repeat before filling the volume by 2/3.

Fatings of PVC windows when installing with their own hands can be carried out in several stages - depends on the size of the gap
- Without waiting for the full polymerization, the free edge of the heat insulating tape is glued to the window of the window. Just note that when using the tape, the slopes will need to make plastic: the plaster and the solution will not be "shaking".
- Collect all parts of the window. Only finishing work remained, and they are not a hindrance.
- The windowsill at the bottom is also installed a vapor barrier tape (also the recommendations of the GOST). The windowsill on the support pads from solid varieties treated by impregnation of wood is relieved. The distance between them is 40-50 cm. They are made in such a way that the window sill was slightly inclined toward the room (about 5 °).

On how to put the windowsill when installing the plastic window, see the video. There are a lot of secrets.
The latter are set or closed. On this occasion, another video.
Installation without unpacking
The main subtleties are described above, so this chapter is small. The installation begins on this option from the installation of mounting plates. They are two species: P-shaped and linear. It is important to choose the most reliable of thick metal.

They are installed at the same distance as an anchor: 150-250 mm from the edge and no more than 700 mm between average. Screw them simply screws to the profile.

Then the installation of plastic windows with their own hands with mounting plates is identical to the above described above, starting from the date of the window to the level in the opening. Only they are fixed not to frame, but plates and not on an anchor, but on a dowel-nail. The hole is drilled, rebuilt the plate, the dowel is inserted, putting the plate to the place twist the dowel. Next, all actions are identical.
Now it is clear why installers prefer them: a decent piece of work with disassembly, anchoring, etc.: Screw the screws much easier. True, if you take powerful plates, they will hold firmly. No worse than anchor. For example, such as in the video.
Plastic windows are increasingly installed by the owners of country houses, as they have many advantages compared to wooden products. They also differ in acceptable cost. But before installing installation, you need to carefully prepare for such work. To fulfill everything yourself, you need to know the features of the execution of all operations.
All plastic products are equipped with details for installation, so with due preparation, you can install the window without assistance. It is worth performing all actions very carefully not to damage the design. In order to fix the windows in the opening more accurately, it is worth working with an assistant. In some cases, it is necessary to increase the opening before working.

Materials required for work
Before starting the installation, you need to prepare the following materials:
- wedges inserted for the correct location of windows;
- mounting foam;
- sealant;
- hydroral insulating material required to protect the joints against moisture;
- anchor bolts.
Wedges are used in the installation process for a more accurate plastic profile installation. Without these materials, it is much more complicated to monitor. The mounting foam is an insulating material that fills the space between the wall and the frame. During the choice of foam, it must be borne in mind that it should correspond to the temperature at which work will be performed. If you purchase a material intended for use in the summer, its use in winter can lead to the creation of a poor-quality insulating layer.

Also during work, a self-insulating sealing tape will be required. This material is glued along the perimeter of the window from the outside, after which its extension occurs. The sealant is used to fill the space between the slopes and the windowsill.
How to determine the correct position of the plastic window
Before performing installation work, it is important to correctly determine the position of the frame relative to the wall thickness. The plastic window must be about a third to enter inside from the street side. This rule is not mandatory, but when the window shift, in any direction relative to the specified distance, it should be borne in mind that the length of the sumps and windowsill must comply with the project.
It is important to take into account the size of the radiator and its position. The windowsill should not overlap it more than ½ width. If you completely overlap the heating battery, it may adversely affect the temperature in the room in winter, as well as in the window status. With incorrect installation, plastic windows are usually started to fog.
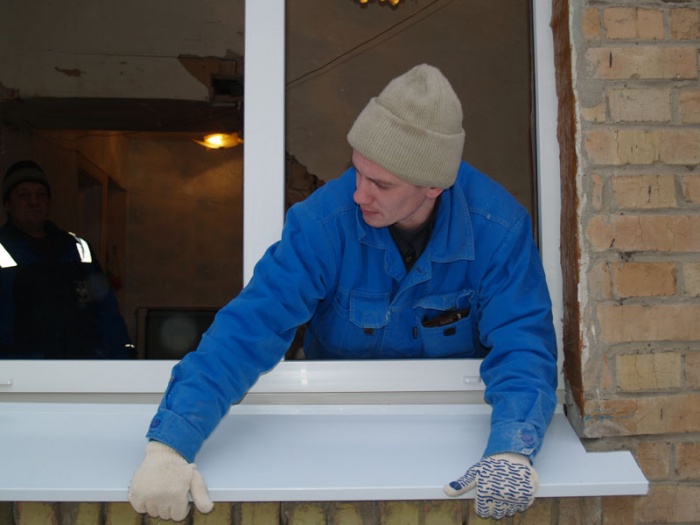
The length of the windowsill should be more window opening by about 15 cm. Due to this, you can process the edges of the windowsill during the decoration of the slopes. Included with the window sill go side plugs, which should also be fixed after installing the window.
Methods for fixing plastic windows
The choice of a certain method of fixing depends on parameters such as the size of the window opening and the material of the walls. This should be taken into account when choosing fasteners for plastic design.
Fixing plastic windows can be made in several ways:
- With the help of dowels or anchor bolts. They are fixed in the holes designed in the wall.
- Plates with cloths that are located outside the window profile. They are installed on space and secure with self-tapping screws.
The first described method is considered more reliable. That is why with the help of dowels, plastic structures are fixed, which have large sizes. The mount passing through the window block is more reliable and able to resist shocks.
If you decide to install a plastic window that has small sizes, they can be fixed when using anchor plates. These fasteners can be hidden by slopes and finishing materials. But before carrying out work, you should prepare small recesses for them. This will avoid problems with plane leveling.
It is worth noting that when installing plastic windows, professionals combine these methods. In this case, the anchor bolts are used to secure the profile base and its vertical parts. The upper part is fixed with the plates.
Basic rules for installing plastic windows
To correctly install the windows, several basic rules should be followed:
- The installation of plastic glass pumps should be made when using a mounting foam. This material allows you to give the design additional rigidity. He also acts as a retainer and thermal insulator.
- To protect the space between the window and the wall, it is necessary to fasten the waterproofing material outside, and from the inside - a vapor polyplator.
- You can install windows at any time of the year. Many professionals are recommended to carry out work in winter, as this will allow you to immediately see if errors were allowed.
- Before purchasing foam, it is necessary to carefully examine the features of the composition. Such materials differ in several parameters. One of them is the temperature of solidification. The instructions on the cylinder indicate the most favorable conditions for the use of foam. If they ignore them, the material can begin to collapse during the operation of the structure.
- During the margin of gaps between plastic windows and walls, it is necessary to fill in small portions. This allows you to spend less foam.
- If the opening crumble, it is necessary to clean the surface from old materials and produce its strengthening.
Observing the described rules can be installed by windows with your own hands without making mistakes that people do not have any experience of such work. The technology of installing plastic windows in a brick house is quite simple, but it is important to carefully perform each action so as not to make an error.
How is the preparation of the opening
Before making work on the installation of windows, it is necessary to carefully clean the opening from pollution and dust. It is important to remove all residues of paint and building materials. Before installation, it is also important to compare the dimensions of the opening and plastic frame. If the gap will be more than 4 cm, it is necessary to use not only foam. This is due to the fact that when using it will not be able to create a smooth and high-quality seam. In addition, the foam will leave quite a lot.
Before installing, you must remove the sash with the frame. To do this, it is enough to pull the pin from the loops. If you need to get a glass outflower from the frame, the strokes that hold the glass are removed. Perform these actions must be very careful not to scratch the glass.
After removing the sash and double-glazed windows, you should put on a soft litter and lean to the wall so that they are in a steady position. Double-glazed windows do not fit on the plane, as this can lead to the appearance on the surface of glass scratches.
After that, the protective film is removed and the markup of the places where the mounts will be located. The distance between them should be about 40 cm. It is important to take into account that indents from the corners must be more than 15 cm.
Installation process
After the described actions should be inserted into the window opening in the brick wall strut, to create the necessary gap. The alignment of the frame should be made using a construction level. It is also important to control the side clearances.
In the openings of brick houses, it is necessary to mark the installation sites of the anchors. After that, the creation of holes in the walls occurs. If the fixing is performed using anchor plates, it is necessary to bend them in such a way that they are well layered on the wall.
At the next stage, the frame is set. It is important to check the horizontality and verticality of the design before. How it will be finally fixed. After that, the bolts are finally twisted until the hat appears above the surface is no more than 1 mm.
After all the works described, the installation of sash and double-glazed windows is made, as well as checking the functionality of the entire structure. If you installed products with your own hands for the first time, you should carefully examine the opening and make sure that there were no errors during work.
Installation of slopes
Before installing external slopes, it is necessary to measure the width and the length of the opening. Cutting plastic slopes is performed using a disk saw.
Important! Fasten the slopes only on clean and aligned surfaces.
At the first stage, the upper horizontal part is fixed. It should be drunk as much as possible, and the space is filled with mounting foam. It is worth remembering. That it can not be released too much, since when solidified, the material can change the shape of plastic products.
After that, the installation of vertical slopes occurs. During these works, it is important to check the verticality of the elements. The installation of lower slopes occurs in the same way. It is important to ensure that all elements are properly docked, and there were no gaps between them. Corners between plastic slopes are closed by a special detail.
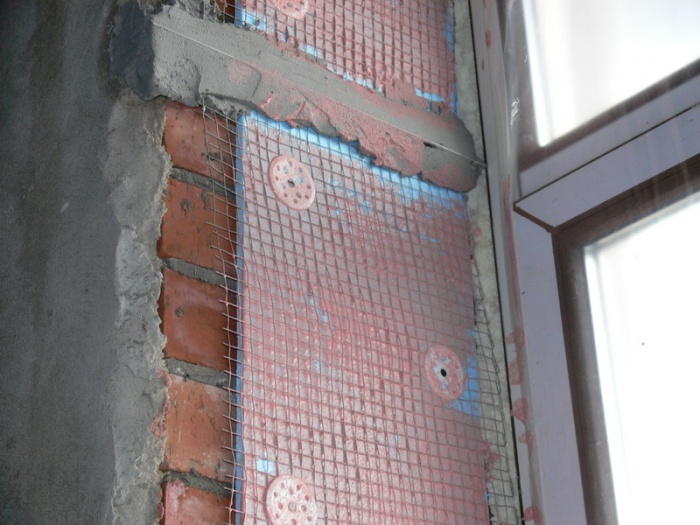
The installation of internal slopes should be made only after careful surface preparation. If the opening cries, it is better to clean it to the main wall and only after that carry out further work. After that, the opening is aligned and filled with insulation. If necessary, an increase in window opening is carried out.
The new-fashioned Euro-mounted boom today covered most of our planet's inhabitants. You can have a long time to argue about the advantages and minuses of plastic windows, but if you have purchased them, you will have to do their installation. It is possible to engage in installing or trusting professionals - to solve you. Before you choose your choice, we suggest familiarizing yourself with the material, how to properly insert plastic windows so that they provide for a long time to provide your family reliable heat protection.
To begin with, we will study the stages of the preparatory work that you can easily fulfill themselves:
- thunder window openings;
- dismantle worn window structures;
If you are not too confident in your abilities, directly installing PVC windows is still better to entrust specialists.
Measures
Reference to the process of removal of measurements should be responsible. Be sure to consider the windings of windows are 2 types: with a quarter and without.
In the first variant It is necessary to measure the width of the opening in the most narrow place between the quarters and to the obtained value of adding 30-40 mm - so you get measurements of the width of the window structure. Next, make sure that the design width of the window block exceeds the maximum distance between the vertical quarters. To decide on the height of the window, you need to measure the distance from the horizontal upper quarter to the bottom quarter of the window opening. The sizes of the window block obtained should be greater than the outdoor opening window so that the slots between the edge edges and the window box are not formed.
For the second optionTo obtain the overall values \u200b\u200bof the window block follows from the value of the vertical size of the opening of 50 mm, and from the horizontal - 30mm. At the same time, it is necessary to determine the size of the window window sill and low tide, taking into account the following moments:
- The hoist width is calculated taking into account the intended method of insulation of the opening or the objective of the enclosing structures (usually the tump protrudes from 50-100 mm from the wall plane).
- The width of the windowsill is determined, based on its functional destination (whether it is decorated with floral pots or not, etc.). Often, the protruding part of the window sill slightly covers heating radiators.
- The length of the window sill should be approximately 100 mm more width of the window opening (the edges of the window sill are taken to the slope cavity by about 50 mm).
Order window block

After the measurements carried out, the next stage is the order of the new PVC window, while in addition to the determination of the overall dimensions of the structure, it is important to take into account the following indicators:
- type of glass package (one, two, three-chamber);
- type of window profile (three, five-chamber);
- the presence and quality of fastening elements and other concomitant accessories for the window design.
Dismantling window

Steps to dismantle the replaceable window block:
- From the disassembly of the window, you should push all the existing obstacles, whether it is furniture or household items.
- The window block must be released from opening steers and sash.
- Next, in the window structure, glass and holding their strokes are removed.
- With the help of a hacksaw or in the household of the Bulgarian on concrete (with a cutting circle), rods are made in horizontal and vertical frame bars.
- Using the existing house of the girlfriend (hammer, scrap, monting), the old frame is extracted from the window opening. In addition to the window frame, dismantling the windowsill and low tide.
- Window opening is cleaned and levels.
- Then indoors are cleaning from the resulting garbage.
If you wish, you can dismantle the window frame without its destruction, with preservation of integrity, but it requires from the contractor in addition to knowledge, more experience and significant time costs. Making all the extraction operations of the old window block should be very careful, so as not to be injured, while eliminating the possibility of accidental falling out the outside.
Mounting process

This process consists of a number of steps:
- Acquired plastic windows should be released from attachments of attachments, as well as in the deaf flaps to dismantle the glass windas.
- Next is the pre-markup and departing the holes for fasteners.
- Then, the window frame is installed in the opening and leveled around the perimeter (horizontally and vertical).
- With the help of anchor bolts, the frame should be securely fixed in the opening. Each side of the frame should be attached to 70 cm increments.
- Next, it is necessary to establish outdoor salts. They are adjusted for the required dimensions, and then mounted on the place intended for them.
- After the new PVC window is installed and securely fixed, and also mounted, the special installation of the mounting seams should be sealed by special mounting foam. That is, the foam is filled with all the space formed between the walls of the opening and the window frame.
- Next, the mounting of the windowsill is performed. With the help of a grinder, saws with a small tooth or an electrolovka sizes of the window sill are adjusted to the required. After that, it is set on the level on the prepared wooden backups and are marked with mounting foam. But before the start of the marking, to eliminate the possibility of deformation of the window sill (when expanding the foam), at three points of its surface, it is necessary to establish any cargo weighing about five kilograms.
- After a day, protruding remnants of foam are cut off. This can be done by the stationery knife.
- Speaks of the internal opening can be sewed with plasterboard, sharpen, and can be arranged with plastic panels. The junctions between the panels are closed with special corners and then close in liquid plastic.
- At the final step, the installation of double-glazed windows and installation of sash in the frame is made. Handles are attached to hinged flaps, accessories are adjusted, and the window loops are closed with special decorative caps.
Now you can remove the accumulated construction garbage and organize a presentation of the family of a personally installed plastic window.
Video
Below you can see the most detailed instructions for installing plastic windows:
Photo


 Why you can not postpone the pregnancy
 Effect from regular use of home recipes
 Features of the structure of the neck