Wooden shelves in a niche. Wooden shelves - photos of examples of exclusive design solutions. What are wooden shelves made of?
Shelves are quite often used not only to complement and decorate the overall interior of a room, but also for a clearer and more efficient organization of space. Thanks to their use, the owner of the apartment gets the opportunity to conveniently arrange a huge number of small things that will simply get lost in the closets.
Today there are a lot of different models which are made of different materials... They also differ in design.

You can choose not only products with classic design but also cutting edge designs.

But more and more people prefer to make such interior details on their own. Asking the question of how to make a shelf with their own hands, they re-read a lot of literature and look through many catalogs.

However, this does not mean that self-production the shelf is complex and it is beyond the power of a person who does not have special skills. No, this is not at all true.

Familiarization with the literature in this case is necessary in order to create a product with beautiful design that will fit into general interior... Let's consider in more detail what kind of shelves there are.
Varieties of shelves
Any specialist will tell you that before starting to create a product, you need to decide for yourself what kind of design you want to get and whether it will be combined with the interior. And only after that you can start creating the product.

Indeed, for a home decorated in a classically consistent style, it is completely unacceptable to use ultra-fashionable and modern shelves. They will look extremely ridiculous.


The most popular and widely known shelf type is the classic shelf. This is due to the fact that it is quite simple to install, and the appearance, due to its simplicity, seems refined and sophisticated.
Open, closed shelves are also used with success. Closed products are used most often for decoration and installation in rooms decorated in more modern styles... For their construction, glass and sometimes plastic are used.

Open structures can be used both in modernly decorated houses and in apartments with a classic design. Over the past few years, it is this type of shelf that has gained immense popularity and therefore is gradually replacing the classic options.

V small spaces quite often you can see corner shelves, which have a special way of fastening. They are mounted on adjacent walls that are adjacent to each other. They are most commonly used in bathrooms, kitchens and utility rooms.

In addition to the above types of shelves that are mounted on the wall, there are suspended and floor structures. Hanging shelves are mounted in an unusual way.

They are installed using cables and vertical posts, and is attached directly to the ceiling. This mount looks quite unusual and original.

Floor structures are most often used in hallways. After all, it is floor shelves for shoes, made with your own hands, not only look beautiful, but also help you organize the space of a small hallway. At the same time, making them is quite simple.
How to make a simple shelf?
To create the claimed product, you should purchase or prepare some tools and materials in advance. You can use whichever suits you best as connecting elements. But the most popular are ordinary self-tapping screws, brackets and dowels.
Note!


For example, let's take a photo of the shelves with our own hands, which is presented below. It shows a product with the following parameters: width 250 mm, height 300 mm, length 1100 mm. For convenience, the manufacturing process will be divided into stages.
Stages of work
In the first step, you need to do the markup. To do this, you should lay the boards on a table or any other flat surface and transfer measurements from drawings. The side walls must be exactly 268 mm high.

This marking is optimal because the side walls will be located between the two parts.

At the second stage, it is required to cut the boards. To get even and neat cuts, you need to use a jigsaw. After cutting, you will have 2 fairly long blanks and 2 shorter ones.

At the third stage, you can start processing the resulting blanks. The resulting segments should be covered with a special protective varnish or stain, after having polished them.

Note!

In the event that you only plan to paint the shelf, you can get by with a conventional antiseptic primer. So you will not only increase the service life, but also achieve a more even distribution of paint.

At the fourth stage of making a wooden shelf with your own hands, you proceed to its direct assembly. Place the bottom board on a flat surface. Retreat 8 mm from the ends of the workpiece and draw two lines parallel to the cuts.
On them, 2 points should be marked with a distance of 5 cm from the edge. At the marked points, it is necessary to drill holes for self-tapping screws. The same manipulations must be done with the second workpiece.

After that, you should install the side blanks on the lower section of the board and secure them. Once you're done attaching the side panels, proceed with the installation top panel and its consolidation.

At the fifth stage, you should fix the brackets at the ends of the side panels, and make several holes in the wall for the dowels. Then screw in the self-tapping screws so that they protrude by 5 mm. And now your shelf is ready.

You can make acoustic shelves in the same way, but you need to take into account the dimensions of the equipment itself. Measurements should be done carefully, because if you are wrong, the work will have to start over.
Note!


Photos of shelves with your own hands


Necessary
- Roulette and pencil
- Marking square
- Fine grained abrasive paper
- Hacksaw
- Electric saw (if required)
- Cigar level
- Normal spirit level
- Electric drill with twist drill
- Drill for brickwork(If you want to)
- Measuring slats
- Malka
- Screwdriver
Materials (edit)
- Shelves
- Slats 38 x 25 mm made of soft wood
- Wood screws
- Traffic jams
The cladding strips on the front edges of these shelves hide the ends of the side strips nailed to the walls.
Many homes have niches, often along the sides of a fireplace or other similar structure. These niches are perfect place for built-in shelves and shelving, as the niche walls provide the required support, especially for heavy loads.
The simplest method of hanging shelves is to attach strips to the side walls - supports for the shelf itself. For wide niches, add a third plank along the back wall to prevent the shelf from sagging. If the plaster on the niche walls is uneven, adjust each shelf separately. The shelves can be made of wood, plywood, veneered chipboard, stained or painted.
If you are going to attach a strip along the back wall of the niche, be especially careful if there is a lamp in the niche - there may be hidden wiring... Electricians always run the wiring vertically or horizontally, but the hobbyist might run the wire diagonally. Best used for searching hidden wiring special finder (see Helpful Hints).

1. First, decide where the shelves will be located (see the next page for using the finder to locate racks, wires, and pipes). For the rack, determine the distance between the shelves. Then mark the positions of the shelves on the side wall of the niche.

2. Reward saw out as many planks as needed to support the shelves and sand the ends well. If you will be making shelves with front trim strips (see item 7), subtract the width of the strip from the width of the shelf to determine the length of the side support strips. Otherwise, the length of the side strips must match the width of the shelves.

3. Drill holes in each side strip approximately 25 mm from the ends. Place the bar against the mark and set it horizontally along the level. Use an awl to mark the position of the rear screw. Drill a hole, insert a plug if necessary and screw in the screw. Fasten the bar in the same way with a second screw.

4. After fixing all the planks on one wall, draw the lines along the back wall to mark the position of the planks on the opposite wall. Attach the strips to the opposite wall as instructed in step 3. If using wide shelves, install the support strips on the rear wall of the niche as well.

5. Using the measuring sticks — two sticks held together with a rubber band (they are more accurate than a tape measure) —determine the length of the back side for each shelf. Determine the exact angular measure of each corner with a small tool.

6. Cut the shelves to the required size and shape. Paint or stain the shelves and / or varnish and dry. Carefully place the shelves on the support strips to avoid damaging the wall. If you want to hide the ends of the planks, follow the instructions in section 7.

7. Cut the trim strips to fit under the front end of each shelf. Use a clamp to attach the rail to the shelf, protecting the surface with a plank. Attach the rail with screws long enough to fit into the shelf by no more than two-thirds of its thickness. Fill the gaps. After the putty has dried, paint over these areas.
In a new review, the author has collected examples of shelving and shelves that you can cook with your own hands. You need to use them, of course, for their intended purpose. Having looked at the photographs collected here, you can easily make sure that there is nothing fundamentally complicated in the proposed option.
1. In the shape of a circle

The original round shelf, the edging of which is made of thin fiberboard, and the shelves themselves are made of ordinary board painted in White color... Of course, such a structure will not be suitable for storing the entire home library, but it will be able to accommodate several educational books, small indoor plant and a couple of framed shots.
2. Hanging shelf

A charming hanging shelf that can be made from several unnecessary books or notebooks of the same size. Such a shelf is not only suitable for storing cosmetic accessories and small items decor, but in itself will be a wonderful decoration for any wall.
3. Arrow

Stylish bookshelf in the form of an illuminated arrow made from the remains of metal water pipes, will fit perfectly into the interior of a teenage boy's room or a bachelor's apartment.
4. Practical and unusual

An original and practical shelf that can be made from a small tray from an old cart and a few wooden blocks. Such a shelf is reliable and spacious and is suitable for storing a variety of things.
5. Charming bookcase

Stylish and original shelving made of a slightly modified and white painted door. Filled with your favorite books, candles, family photos and small decorative elements, this rack will be a real highlight of any space.
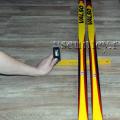
6. Narrow slats

Old skis that have been gathering dust in the pantry for many years can be used to create unusual shelves... Such shelves will perfectly fit into the interior of the nursery and are suitable for storing toys and books.
7. Stylish copper

Massive shelves made of wood, covered with a stylish copper film, are perfect for placing indoor plants.
8. Old pallet

old wooden pallet just turn it into original shelf for storing magazines and family photos.
9. Industrial style

Stylish storage system up to date industrial style which can be made from wood or MDF boards painted in grey colour and interconnected by a structure of metal water pipes.
10. Bright honeycomb

Original shelves made of bright hexagonal gift boxes attached to mirrors of the same shape. Of course, such a design is unsuitable for storing large, heavy objects, but it is suitable for storing lovely little things and decor items, and will also become a unique wall decoration.
11. Stylish transformation

Drawers an old table prepared for discard can be used to create original shelves. Drawers, neatly painted and modified to your liking, can be fixed to the wall, both vertically and horizontally, and used for storing a variety of things.
12. Rough design

Rough shelves made of untreated wood, opened with varnish or paint, will perfectly fit into the interior of a room decorated in a rustic or country style.
13. The abundance of cells

Huge wall-to-wall shelving made from a variety of wooden boxes painted in bright colours, can be a stylish and budget alternative to a massive store-bought wardrobe.
14. Wicker basket
MDF shelves.
Compact MDF shelves with fruit slices painted under them will become a bright and functional decoration of the kitchen wall.
17. Rustic style

A dense piece of bark or untreated wood can be turned into a fantastic hanging shelf, which will become an original alternative to the standard bedside table.
How in small apartment be able to place a large number of things and keep you feeling uncluttered? How to create original interior? What to do with the multitude of souvenirs presented by friends and brought back from vacations? There is only one answer - pay attention to the shelves and walls. The best solution there will be many shelves that can be placed in different ways.

Storage shelves can be placed:
- on the wall;
- in the wall;
- between the walls, dividing the space.
The easiest way to place shelves is on the walls. It is easy to hang them - you just need to drive dowels into the walls and hang the shelves. The placement of the shelves in this case depends on personal taste.


The shelves located in a niche in the back of the wall look more interesting and original. Wherein modern design suggests niches of the most different forms and sizes. This solution gives the room individuality and originality.
The role of shelves in a niche:
- a niche allows you to increase the storage space;
- a niche in the wall allows you to increase useful area- if a niche with a depth of 20 cm is pierced in a wall 25 cm thick, then an extra 20 cm is gained, which can be used with benefit;
- a niche decorates the room and makes it original.
Where niches can be made

A niche in an apartment is appropriate in almost any room. In the bedroom, niches can be used to store things and place lamps; in the living room, a niche can be used for placing books and interior items, in the bathroom - for placing towels; in the nursery - for children's toys.
Important: To create a special atmosphere, niches can be equipped with lighting that will illuminate the shelves. At the same time, this backlight will play the role of additional lighting.
Niches are:
- natural - that is, the openings formed as a result of the layout of the apartment under the window, in the area ventilation duct etc;
- specially made during construction: storage niches;
- artificially made by the tenants themselves during the renovation.
Niches without shelves are completely meaningless. It is the shelves that make the niches a separate storage system. It is not difficult to equip niches with shelves yourself. It is important here to precisely align where the shelves are placed in the walls. It is important that no electrical wiring or pipe decoupling passes through this place.
In a natural niche can be located Appliances or shelves. Shelves are a good solution for natural beggars. In this case, the dead space can be used to the maximum. The niche under the windows may well be transformed for organizing the storage of small things - for this, it is enough to place 1-2 shelves under the windowsill.
In specially designed pantries, the arrangement of the shelves is more than natural. Storerooms can be reorganized into dressing rooms or shelving.


Specially made niches become the most interesting and original ones. They can have a non-standard shape. The shelves in such niches can also have an unusual shape. These niches look good in bedrooms and living rooms. They give the interior an unusual sound.
Features of the design of shelves:
- In the kitchen, shelves should be made of moisture-resistant material - moisture-resistant drywall or wood treated with impregnations and varnish to impart moisture resistance.
- When designing, it is necessary to take into account the purpose of the shelves and their estimated carrying capacity - if the shelves are intended for interior things, then a simple fastening is enough. If it is assumed that heavy objects will be installed on the shelves, for example, a TV and other equipment, then the structure of the shelves should be reinforced with a metal profile.
- According to the design concept, the shelves can have curly shapes. In this case, it is better to use drywall.
Examples of a niche in the wall in the kitchen (photo)


 |  |  |  |
What you need to work
In order to make built-in shelves in a niche in the wall, you will need tools and materials.
The tools you need
- screwdriver;
- jigsaw or electric jigsaw;
- grinder with discs;
- roulette;
- square;
- electric screwdriver.
Materials (edit)
- screws or nails;
- joiner's glue;
- shelf stops;
- wedges.
Stages of work

So what you have to do:
- Determine the location of the shelves. Using a level, mark the location of the shelves and racks for the shelves.
- Make a mark.
- Cut out the shelves according to the size of the niche. The length of the shelf should match the width of the niche. Finish and sand the edges of the shelf.
- Drill rows of holes into which to insert the shelf stops. Wedges or corners can serve as stops. These fixtures will serve as supports for installing the shelves.
- Place the shelves in the niche on the stops.
The shelves in the niche can be varnished, painted or pasted over with wallpaper or self-adhesive film. The decoration method depends on general concept premises.
How to make niches in the wall with shelves (video)
Conclusion
Wall shelves are able to create an original and extraordinary design concept. You can save a lot of money by making the shelves in the apartment yourself. It is important here to accurately observe the dimensions and carry out all the work carefully. Then niches with shelves will look aesthetically pleasing.
Niche in the kitchen in the wall (photo)


Your home may not have a piano or floor lamp, rocking chair, loft bed, or other items. There may not even be a table or a regular stool. And there are probably wooden shelves.
And this is great, because it is the shelves that help to use the surface of the walls, further optimizing the space of your apartment or house.

What are wooden shelves
Surely you have never thought about the fact that wooden shelves are different. The most common type is the most common, straight shelves.

In fact, this is a board (or a strip of a certain plate - chipboard, MDF or plywood), attached in a certain way to the wall). In addition, shelves are suspended (as the name implies, they themselves are not attached to the wall, but suspended from it or the ceiling).
Also, wooden shelves are corner ones - these are attached to two walls at once and allow you to effectively use the corners of rooms, which, as a rule, are not used in any way.
And there are also various shelves unusual shape, but we'll talk about them some other time.

What are wooden shelves made of?
Obviously made of wood. The most expensive shelves are from solid wood. Not only their price is great, but also their weight. These are good for souvenirs or something else light.
Home craftsmen often use boards (often lining) to make shelves. This is what is called the path of least resistance.

After careful processing (grinding), the board is attached to brackets (many of these are sold in hardware stores and hypermarkets). Depending on the width of the board, these shelves can be used in different ways.
Most of the shelves are made from sheet material- thick plywood, MDF and chipboard. MDF shelves look the nicest, they are often sold ready-made in stores.

How to fix a wooden shelf
Depending on the wall material, the type of shelf and the expected load, as well as taking into account the aesthetic preferences of the owners, wooden shelves can be attached in different ways.
The most common mounting method is overhead brackets on which the shelf rests from above. At the same time, the shelf supports are visible and complement the interior. They can be either also made of wood or made of another material - metal or plastic. Forged items are often used.

Often, shelves are hinged - metal strips with holes like keyholes. This method is quite reliable and aesthetic - the mount is hidden from view, and the whole structure gains some airiness.
In addition to the types of fasteners mentioned, a variety of pins are often used, screwed into the wall with one side, and with the other into special grooves in the back of the shelf.

It is believed that it is better not to overload such shelves - especially if they are made of cheap chipboard sheets.

Speaking about the methods of fastening wooden shelves, one cannot fail to mention another, more rare, but very characteristic, method. It is about fixing the shelves to the floor supports.


Usually, it comes not about one shelf, but about a certain composition of them, while the supports can either be attached to the floor or not. In the latter case, the structure is supported by its own weight.

There are also shelves that are held on rails fixed both to the floor and to the ceiling. This option, however, is inherently closer to stationary storage systems than to the organization of shelves.

Our experts know everything about wooden shelves - we will be happy to help you choose shelves in accordance with your needs and aesthetic preferences, as well as taking into account the current financial capabilities of your family.

We interact both with serial Russian and foreign manufacturers of shelves, and with workshops that develop them to order.

Photos of wooden shelves in the interior


 How to install ski bindings
 Daria Domracheva and Ole Einar Bjoerndalen got married
 Ski Pole Walking: Dangerous or Beneficial?