Plywood kayak: types, purpose and self-production. Making a kayak with your own hands Do-it-yourself kayak from a sheet of plywood
My desire to build a Wood duck 10 kayak (hereinafter referred to as the Duckling) is starting to materialize. But first of all I would like to thank Andrey Konstantinov for the detailed photographs of the original version and Andrey Ivanov for their computer processing. All materials are located at .
Alexander (Barakuda) believes that you need to write right away. Agree. Firstly, someone will need it, and secondly, they will help themselves. Well, the moderator did not mind, since he is silent. The only negative is that the work goes on only on weekends, which means it will drag on for two months.
Why Duckling. Somehow he, firstly, laid down on my idea of what I need and my design requirements. Secondly, I have a two-seater kayak, and I did most of the exits alone, and it is inconvenient to lift it on the trunk alone. Well, my hands must be itching too. In general, there are drawings, there is one sheet of decent plywood 2440x1220 - started.
What else is good about the hybrid version of the Duckling? One sheet of plywood goes to the hull itself, I will find some piece for the bulkhead, the deck is slatted - we will saw it, and the technological frames are made of all kinds of plywood debris.
The sheet was cut in half lengthwise. I fasten the halves of a sheet of plywood with bolts in free places, then joint sawing and gouging of edges (crimping).
I decided to do the plywood joining into the lock, it seems to me that it fixes better from the mutual angular rotation of the parts, but I have no stock. The lock template is made of thick cardboard. We apply a template, prick the center, outline the contour, drill holes D20, then manual jigsaw, file, sandpaper. We put the plywood sheets on top of each other according to the pattern, draw the outline, insert the template between the sheets, then in the same way.
Drilling is necessary by pressing the plywood tightly against the lining to avoid chipping of the veneer at the exit. We connect the sheets with filing. We overlay the pattern of the sheet and refine the contour, cut it off. The sheets are ready for gluing with epoxy, there is nothing tricky in it.
On the benefits of a home library: there is always something to squeeze. The workpieces are brought in heat under gluing. Epoxy adhesive EDP with wood flour. It takes agonizingly long time to get up.
These preparatory operations took two days off, four hours each. Continued next weekend.
A few words about rats, but about the most common ones. A friend of the old Soviet school tells me that he fights with them in the garage with epoxy resin, they say they can't stand the smell. I'm in shock, why are you pouring tar, do you have a barrel? Well, no, just a canister and now I confiscated it, not full, but it pulls 6-7 kg. So we lived, that in production, then at home.
A little about the glue. This one was bought at the suggestion of Oleg Alexandrovich. I did a test gluing, soaked it for a day, I was satisfied with the result, although it was 2D in terms of water resistance, and not 4, as I would like. Yacht glossy polyurethane varnish is waiting for its turn.
During gluing, the first joint arose - the EDP glue did not stand up during the 10: 1 kneading, re-glued 5: 1, it seems normal. In general, glue and resin are different things.
Well, Saturday has come, it's time to continue. The workpieces are returned to the garage, leveled and drilled.
The assembly took almost the entire day. Docked in my opinion pretty well.
Brace pads for alignment
Ready to proceed with gluing
First trip to warm lands
There she is. Battery central heating... The main part of the work will take place here.
Sizing will go slowly and tediously, but this is in my service, you can study in the evenings.
He glued all the joints to remove the wire before applying the "flour" epoxy.
I did it in turn, tilting it to the side so that the liquid resin did not flow out of the joint.
In principle, everything is prepared for the main gluing.
Beginning of gluing joints with glass tape.
Pasting from the inside: started. The office is very convenient.
The middle of the process. Impregnation comes with heating with a hair dryer.
Finish for today. The entire seamy side is pasted over. Masking tape is laid along the sides. On it, the fiberglass will be cut off and there will be clean plywood for gluing the deck.
Today is the fourth day off. I was engaged in the material and technological preparation for the deck. The son recently brought reiki from the dacha. To bring them, I had to cut them.
I made a device for cutting the rails. Two pieces of chipboard from old furniture, in one cut under a sander, fastened with self-tapping screws. A bar at any angle. Removing the stop, it is convenient to grind the ends on the table. I tried it, order. You can even not fix the machine, just support it with your left hand.
First I put a cutter for metal on the machine, so that the cut was cleaner. I didn't like it, a lot of effort and burns, I went and bought a 140x2.2 disc. Sawed almost all the slats. Pine and mahogany.
This week I will be installing templates for the deck.
In principle, I can already report on the budget.
Plywood "good" - 800 r, plywood 6 mm simple -320 r, joiner glue and varnish - 240 r, fiberglass 10 m - 250 r. Total - 1610 rubles.
From the stocks of friends and friends: epoxy resin - 4 kg, pine and mahogany lath, 3 m of fiberglass.
The deck is pasted over from the inside, the hatch is cut out.
Here, the deck is pulled together with the hull before gluing.
I wanted to outwit myself and sand the deck, but I filled the entire tape with glue. I stitched it a little with a plane, and with a scraper. He began to glue the coamings.
Let the resin stand still, well, and skin it.
And now like this. There are, of course, kosyachki. Still, the work is not in the workshop, then one did not capture, then he hurried, but, in general, tolerant. I think about impregnation, something like a walnut.
I will answer your questions.
This is how the deck is pulled to the hull. How skates were screwed to felt boots.
Inside gluing. Dark color because mahogany wood flour. Nose view. I screwed a brush and a spatula to a meter stick and screwed it up.
I got tired of skinning, I began to remove the necessary, all the same, the layers in the plywood are thin. The advantage of the lath is in the finish. He stopped and pasted over the deck. The hull was wet, it turned out, as expected, a sandy camouflage. Actually, oak stain, water.
The duckling is in place.
Here in the photo the coaming and the hatch have not yet been pasted over, but everything has already been done.
There is varnishing left as protection from ultraviolet radiation. Partially I'll be in time before departure.
This concludes the report and stay in touch on the network until the end of April. There will be production of seat, backrest and hatch seal. Then the test, drinking champagne and other amusements. This is in a different story.
Today I bought a modem and a small SIM card, maybe he will take it at the dacha. According to their map, the reception is uncertain. If it works out I'll be in touch.
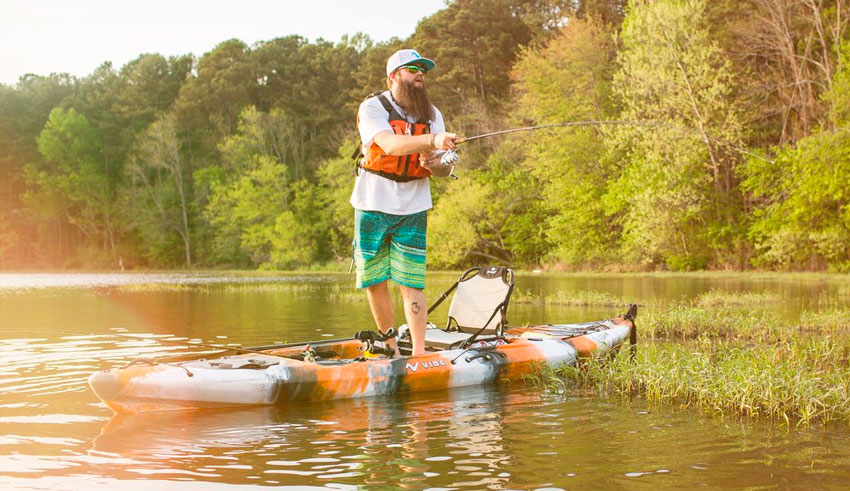
A kayak is a type of boat. It is perfect for fishing conditions and not only. It can be really used for hiking trips and simply for walking along rivers or lakes. This is due to the fact that in comparison with other analogs, this boat has a number of advantages.
A kayak is not that difficult to make with your own hands, so there is no need to purchase one, although this option can also be considered. The information in this article is aimed at somehow helping those who decided to make a kayak with their own hands.
Boats are needed by fishermen to navigate water bodies in search of promising places, as well as to fish from these boats. The presence of a boat makes the fishing process more dynamic and efficient. This is due to the fact that the fishing area is expanding and the most inaccessible parts of the reservoir become accessible. Kayaks are much more popular among anglers, in comparison with other types of similar watercraft, due to their better technical characteristics.
This is due to a number of advantages that it makes sense to talk about. For example:
They are easy to use, which is associated with the safety of both being in the boat and when moving inside it.
The stability of the boat plays a very important role, especially when you need to pull a large specimen out of the water or leave the boat by moving into the water. You can just as easily climb into the boat from the water at any time.
There is no need to scoop water out of it, as it will flow out of the boat by itself through the holes that are located above the bottom level.
A properly made structure will never sink, even if it overturns for some reason, thanks to the presence of special partitions.
The kayak is easy to transport over any distance, since it does not affect the aerodynamic properties of the car.
This craft does not require special storage conditions. It is enough to hang it as high as possible in a garage or other room.
Which is better: buy a kayak or do it yourself?
If funds allow, then it is better to buy it. Unfortunately, not all anglers are capable of this due to lack of funds. Many of them start making their own purely out of interest. In addition to the fact that the boat will cost less, it is amusing, and there is a feeling of pride in what you do. And although it will take a lot of money and time, it is still a very real and feasible task. Self-production is always associated with a number of advantages. In addition to the fact that it is very interesting and instructive, you can always count on getting quality product that meets the requirements that are stated. The task is greatly simplified by the fact that it is not difficult to find the desired scheme, required material, as well as acquire the necessary tools.
DIY fishing kayak
What do you need to have?
First of all, you should decide on the availability of tools and materials. For such work, you need to have the following tools and materials:
Some wooden sticks similar to those used for ice cream.
Cargo.
Masking tape.
Working drawings that are required for the construction of the boat. They can be found on the Internet and downloaded, and then redrawn at a 1: 1 scale, which greatly simplifies the construction process. It will be enough to transfer the drawing to plywood and cut out the blanks with an electric jigsaw.
Procurement of materials
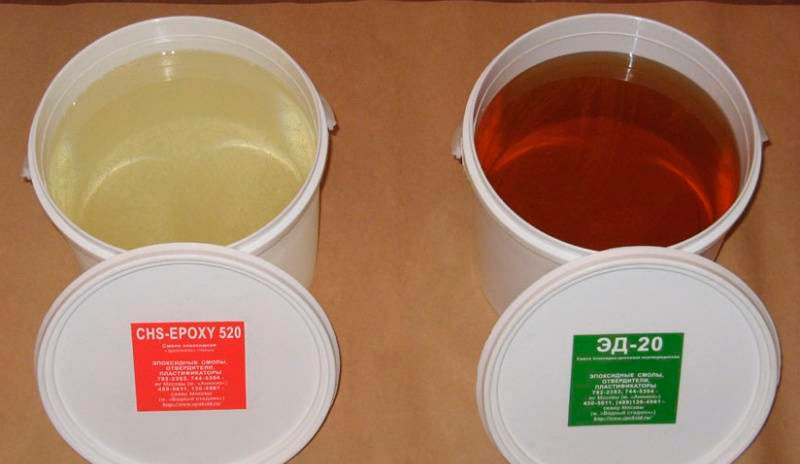
The main materials are plywood, epoxy resin and fiberglass. When purchasing, you should pay attention to their quality. The features of these materials are indicated below in the text.
Plywood
To make a kayak, you need plywood, which differs in appropriate dimensions (2240x1120mm) and which is not sold in our stores. Therefore, you will have to turn to the Internet for help and place an order through it, although this does not give any guarantees.
Even through the Internet, such lists are difficult to acquire, since not all organizations carry out such a trade. This is due to the fact that plywood of this size is not in great demand due to transportation problems.
Despite this, there are companies that sell these types of goods over the Internet.
An example is Penrus. 2 types of plywood are suitable for making a kayak. For example:
"LauroVermello", which is produced in Brazil. It is considered very quality material, on which you will practically not find defects or knots. Plywood is particularly durable, and its thickness is almost the same over the entire plane.
"Amesklao", which is an analogue of the Chinese manufacturer. The price of plywood is somewhat lower, but the quality is also somewhat worse.
At the same time, it does not matter what color the plywood has, since this will not affect the construction process. After completion of construction, the kayak can be painted in any, the most attractive color. For making a boat color will suit"Jotoba".
Fiberglass
The quality of this material also plays a significant role in the process of independent manufacture of such a craft. When choosing a material, the main criteria are:
The manufacturing process requires the use of fiberglass with a specific weight of about 130 grams per square meter.
Much more common is material with a specific gravity of 100 or 200 grams per square meter... In this case, you should opt for a material with a specific gravity of 200 grams per square meter. As a result, you can really get a high-quality and durable product.
To obtain a high-quality final result, you should take those pieces of fabric that do not have bends, as they will interfere with obtaining flat surface... Fabric with transverse bending marks will cause a lot of problems in the process of opening it with epoxy.
As stated above, about 10 kg of epoxy will be required, although many instructions indicate less material consumption. In this case, it is better to rely on the results obtained in a practical way, and they indicate that the consumption will be of the order of 10 kilograms. If it remains, then not so much, and if not enough, then this can affect the quality of the product, since the epoxy hardens quickly enough. It is better if the entire surface of the boat is covered in one pass, without stopping the process of applying the epoxy resin.
For work will do epoxy "Etal-370", for which the hardener "Etal-47F5" is suitable. If we evaluate the ratio of price to quality and its basic technical data, then this is the most suitable technical product.
Construction stages
To begin with, you should start preparing the workplace, materials and tools. Given the size of the boat, for her construction is suitable car garage. In any case, there should be enough space, and work with epoxy requires special conditions.
The construction of such a floating craft consists of the following technological stages:
Based on the available drawings, they are engaged in the manufacture of all component parts... For this it is used electric jigsaw and other tools.
The assembly of individual parts of the parts is carried out, for which they use masking tape.
First of all, they collect decks and lower part future kayak.
After both parts of the product are ready, they are put together and it is judged how much they fit together.
A layer of epoxy is applied to the inner surfaces of both parts.
At the bottom of the boat, an unsinkable compartment is formed, which consists of several partitions. They should also be treated with epoxy.
After that, the deck and the lower part of the structure are adjusted again. As a result, they should fit perfectly together.
If everything is fine, then both parts are glued together and the joints are treated with epoxy. After that, the entire surface of the boat is exposed with a layer of epoxy resin.
At this stage, hatches are formed.
The final stage is the gluing of fiberglass to the entire surface of the craft. In this case, you need to monitor the quality of gluing fiberglass. After the epoxy resin hardens, it is advisable to grind the building, and then paint it in any color.
Testing
As a result of the construction, a relatively light watercraft should be obtained, which can be easily transported to the reservoir using passenger car... Here, on the reservoir, you need to start sea trials of a unique boat built by your own hands.
As far as is known ready product should easily carry a load of 120 kilograms, without compromising fit and handling. The main thing is that the boat does not let water through anywhere. As practice shows, products created using this technology are easily repaired and have high durability, despite their lightness.
Going to the pond, many take watercraft with them in order to turn their vacation into a more exciting event. However, not always an avid fisherman finds compelling arguments to convince his wife to buy an expensive rubber boat for such outings. Therefore, it is reasonable that persistent fishermen think about building a kayak for fishing on their own. It's fun, useful, and not that expensive.
Anglers who are not experienced in navigation do not often know exactly what is the difference between a canoe and a kayak or kayak. All three representatives of small river vessels are very similar and are distinguished by their extraordinary lightness and buoyancy. It is for these advantages that they are so appreciated by fishermen.
The main difference between a kayak and a kayak is their size.... If the kayak is made for only 1-2 people, then the kayaks can accommodate up to six people. The canoe can be even more impressive in size. There are nautical canoe options with accommodations on board.
Another difference between canoes and kayaks and kayaks is the lack of seats and closed storage compartments. There are such places in kayaks and kayaks.
A distinction is made between canoe one-way oars and two-way kayak. The bottom of kayaks and kayaks is usually flat, while the bottom of canoes is oval.
Otherwise, all three types of ships are very similar. They are lightweight, very easy to operate and quite durable and reliable, unlike their rubber counterparts.
Preparation for construction
Having decided to build a canoe for fishing, any craftsman tries to prepare for the process and foresee all possible difficulties and problems. Here is a short list of the main points to prepare:
Having prepared everything you need, they start building the kayak with their own hands.
Drawings and construction diagram
Getting started is usually the hardest part. It is necessary to decide on the construction of a canoe or other vessel, so many hesitate at this stage. However, it is worth remembering that the earlier construction starts, the faster it will end. In order to make a canoe with your own hands, they follow a pattern proven over the years:
First of all I want to express special thanks to Alexander (Barakuda) and Andrey Kalachinsky... Alexander for giving a powerful impetus to the production of a kayak, and Andrey for moral and remote technical support of the process.
Since the article is technical, I will try without lyrics, like “I don’t like seal-type rest on mass beaches, etc.” I’ll say simply - I wanted a kayak. I turned around a lot of information, typing combinations of words in Yandex: How to make a kayak, Homemade kayak, Do-it-yourself kayak, etc. .com). But it seemed unreal to me, and I threw my thoughts away from myself until I came across an article by Alexander (Barakuda) "Sea kayak made of plywood." I looked at the photos, read, counted and realized that all this is REAL, and not so difficult as it might seem at first glance.
TTD Wood Duck:
1. Length - 3.65m
2. Width - 0.76m
3. I don’t know for sure, but probably no more than 20 kg
Tool:
1. Electric jigsaw
2. Belt sander
3. Drill or screwdriver.
4. Fan (or hair dryer, I don't know how to do it correctly)
5. Scissors
7. Pliers
8. Nippers
Materials:
1.4 sheets of plywood (4mm)
2.20 sq.m. fiberglass t-23
3. Epoxy somewhere 4-5 kg (I can't say for sure)
4. Knitting wire
You also needed:
1. Disposable glasses
2. Brushes (it took me 5 pieces)
3. Sticks (possible from ice cream)
4. Rubber gloves
5. Solvent (650)
6. Rubber spatula(most of all they had to work with epoxy)
7. Paper tape.
I think that the manufacturing process, as well as in the article "Sea kayak made of plywood", and there is no need to describe it in detail. The difference is only in a few details:
1. Alexander (Barakuda) has a fender, the Wooden Duckling does not have one, but frames are used.
2. Alexander glued only the seams with fiberglass, and the Duckling was glued both inside and outside.
We started doing it with our son on April 26th. The first launch on June 6, although it has not been completed yet. It doesn't take so much time, it's just that the epoxy dries for a long time. I cut off the plywood "on a mustache" in 15 minutes, glue it for 5 minutes and dries for a DAY. Etc. But it is convenient that you can do it in the evenings. You can always "carve out" a couple of hours.
When connecting the halves in the bow and stern, you need to connect them as accurately as possible in order to avoid the "propeller". This is then reflected in swimming. Because of this, my kayak was constantly drifting to the right.
I applied fiberglass with epoxy. I was so impatient to roll it in in the morning, and I decided to quickly apply a second coat. Epoxy hasn't forgiven me for that. By the way, if I would do it again, then before gluing the plywood with fiberglass, I would first prime it with the same epoxy. Why? Because plywood absorbs well, and there are areas under the fabric where it is dry - all the resin is in the plywood!
I didn't have fiberglass tapes, so I cut out the strips and glued them on. In such cases, the "fringe" can not be avoided. All right, aesthetics, some are pricked.
The photo shows the result of an error that was made at the very beginning of the assembly. The keel was a "propeller". I had to dilute the epoxy with plywood flour (which is formed during the grinding process) and putty. Covered on top with a piece of fiberglass. Well, more or less corrected. The right has stopped pulling. Overall, I liked it. My family went for a Saturday walk, everyone is happy.
Alexander for giving a powerful impetus to the production of a kayak, and Andrey for moral and remote technical support of the process.
Since the article is technical, I will try without lyrics, like “I don’t like seal-type rest on mass beaches, etc.” I’ll say simply - I wanted a kayak. I turned around a lot of information, typing combinations of words in Yandex: How to make a kayak, Homemade kayak, Do-it-yourself kayak, etc. .com). But it seemed unreal to me, and I threw my thoughts away from myself until I came across an article by Alexander (Barakuda) "Sea kayak made of plywood." I looked at the photos, read, counted and realized that all this is REAL, and not so difficult as it might seem at first glance.
TTD Wood Duck:
1. Length - 3.65m
2. Width - 0.76m
3. I don’t know for sure, but probably no more than 20 kg
Tool:
1. Electric jigsaw
2. Belt sander
3. Drill or screwdriver.
4. Fan (or hair dryer, I don't know how to do it correctly)
5. Scissors
7. Pliers
8. Nippers
Materials:
1.4 sheets of plywood (4mm)
2.20 sq.m. fiberglass t-23
3. Epoxy somewhere 4-5 kg (I can't say for sure)
4. Knitting wire
You also needed:
1. Disposable glasses
2. Brushes (it took me 5 pieces)
3. Sticks (possible from ice cream)
4. Rubber gloves
5. Solvent (650)
6. Rubber spatula (most of all they had to work with epoxy)
7. Paper tape.
I think that the manufacturing process, as well as in the article "Sea kayak made of plywood", and there is no need to describe it in detail. The difference is only in a few details:
1. Alexander (Barakuda) has a fender, the Wooden Duckling does not have one, but frames are used.
2. Alexander glued only the seams with fiberglass, and the Duckling was glued both inside and outside.
We started doing it with our son on April 26th. The first launch on June 6, although it has not been completed yet. It doesn't take so much time, it's just that the epoxy dries for a long time. I cut off the plywood "on a mustache" in 15 minutes, glue it for 5 minutes and dries for a DAY. Etc. But it is convenient that you can do it in the evenings. You can always "carve out" a couple of hours.
When connecting the halves in the bow and stern, you need to connect them as accurately as possible in order to avoid the "propeller". This is then reflected in swimming. Because of this, my kayak was constantly drifting to the right.
I applied fiberglass with epoxy. I was so impatient to roll it in in the morning, and I decided to quickly apply a second coat. Epoxy hasn't forgiven me for that. By the way, if I would do it again, then before gluing the plywood with fiberglass, I would first prime it with the same epoxy. Why? Because plywood absorbs well, and there are areas under the fabric where it is dry - all the resin is in the plywood!
I didn't have fiberglass tapes, so I cut out the strips and glued them on. In such cases, the "fringe" can not be avoided. All right, aesthetics, some are pricked.
The photo shows the result of an error that was made at the very beginning of the assembly. The keel was a "propeller". I had to dilute the epoxy with plywood flour (which is formed during the grinding process) and putty. Covered on top with a piece of fiberglass. Well, more or less corrected. The right has stopped pulling. Overall, I liked it. My family went for a Saturday walk, everyone is happy.
P.S. This one has not finished yet, but already "hands are itching" something else to make a thread ...
Did not find an answer to your question? Look at here


 The main difference between a kayak and a kayak is their size.... If the kayak is made for only 1-2 people, then the kayaks can accommodate up to six people. The canoe can be even more impressive in size. There are nautical canoe options with accommodations on board.


 What is the dream of an office based on a dream book Office based on a dream book of the sorceress Medea
 Characteristics of the Capricorn man by zodiac sign - an avid pragmatist
 Strong biofield in humans, signs